YAMAHA RHINO 700 2013 Owners Manual
RHINO 700 2013
YAMAHA
YAMAHA
https://www.carmanualsonline.info/img/51/51183/w960_51183-0.png
YAMAHA RHINO 700 2013 Owners Manual
Trending: brake, tire pressure, light, low beam, coolant capacity, fuse box, ground clearance
Page 151 of 188
8-38
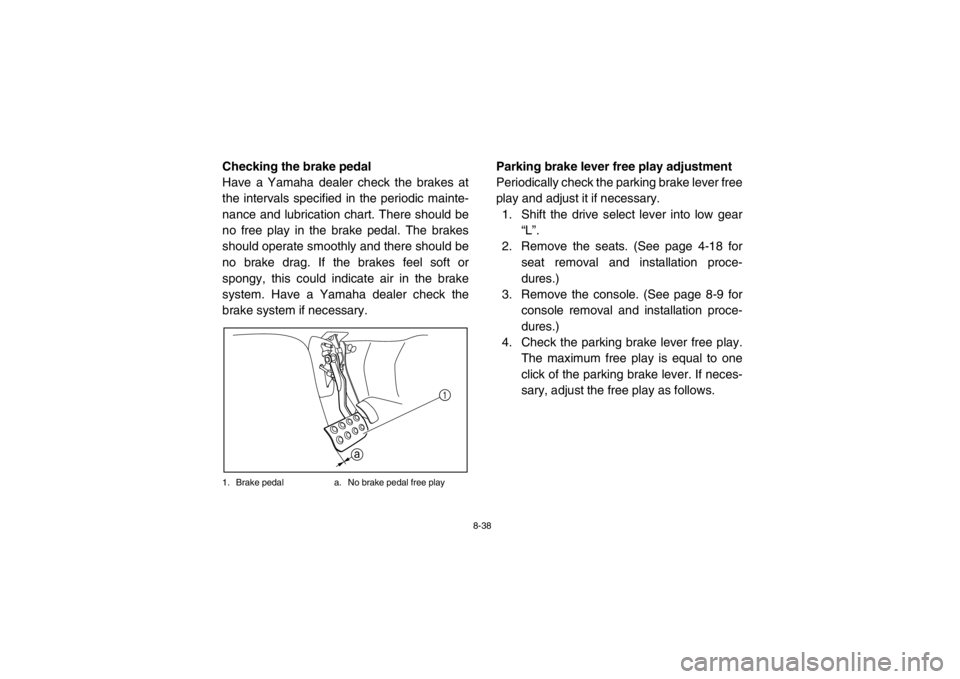
EVU01220Checking the brake pedal
Have a Yamaha dealer check the brakes at
the intervals specified in the periodic mainte-
nance and lubrication chart. There should be
no free play in the brake pedal. The brakes
should operate smoothly and there should be
no brake drag. If the brakes feel soft or
spongy, this could indicate air in the brake
system. Have a Yamaha dealer check the
brake system if necessary.1. Brake pedala. No brake pedal free play
EVU00870Parking brake lever free play adjustment
Periodically check the parking brake lever free
play and adjust it if necessary.
1. Shift the drive select lever into low gear “L”.
2. Remove the seats. (See page 4-18 for
seat removal and installation proce-
dures.)
3. Remove the console. (See page 8-9 for
console removal and installation proce-
dures.)
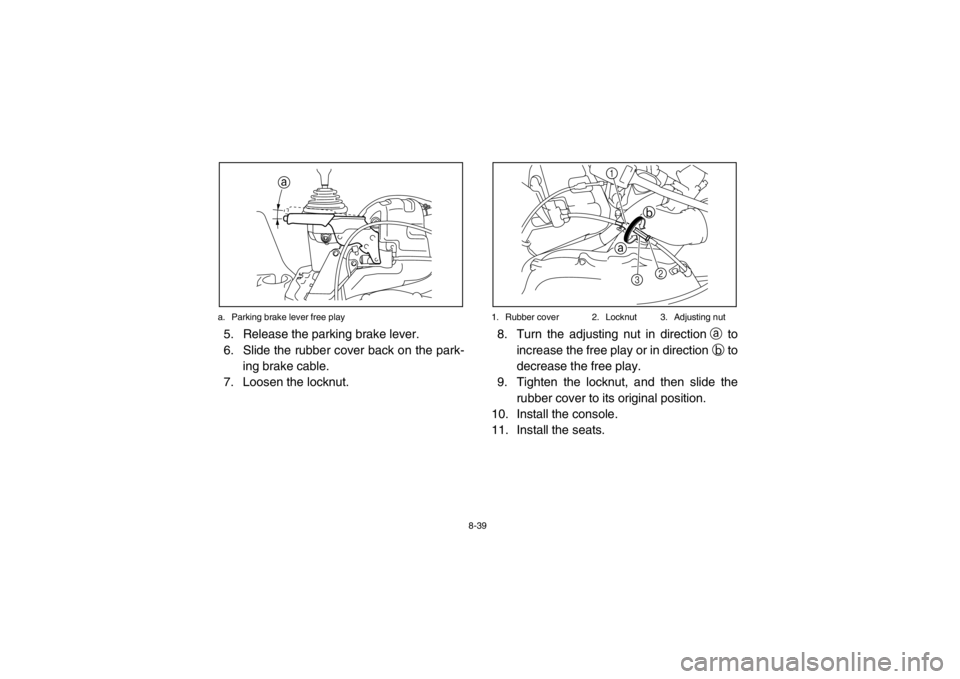
4. Check the parking brake lever free play.
The maximum free play is equal to one
click of the parking brake lever. If neces-
sary, adjust the free play as follows.
1
a
1RB7A_EE.book Page 38 Tuesday, April 24, 2012 9:07 AM
Page 152 of 188
8-39
a. Parking brake lever free play
5. Release the parking brake lever.
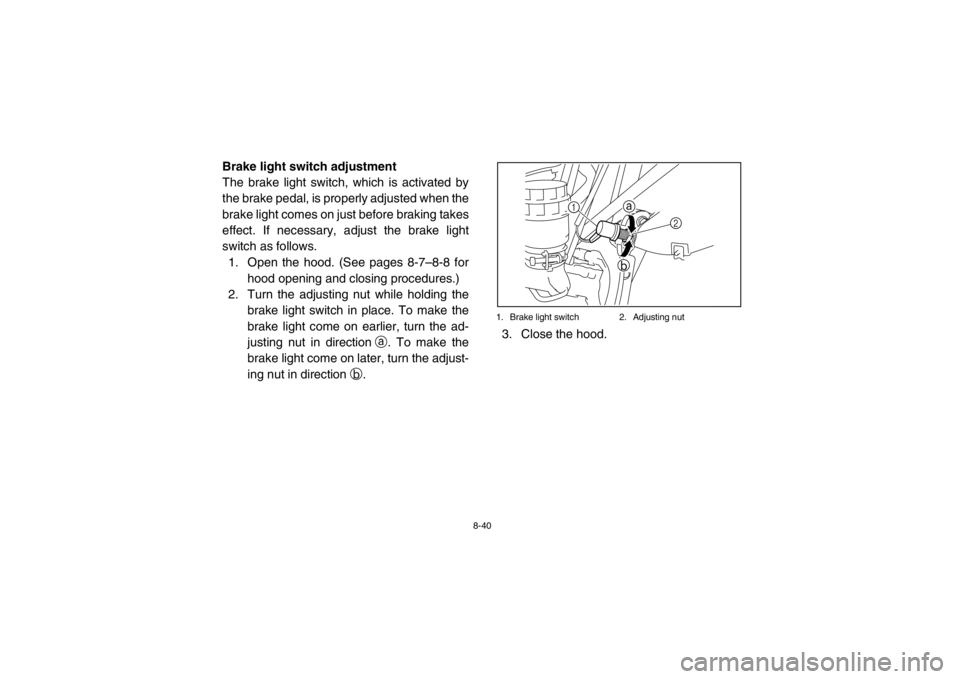
6. Slide the rubber cover back on the park-
ing brake cable.
7. Loosen the locknut.
1. Rubber cover 2. Locknut 3. Adjusting nut8. Turn the adjusting nut in direction a to
increase the free play or in direction b to
decrease the free play.
9. Tighten the locknut, and then slide the rubber cover to its original position.
10. Install the console.
11. Install the seats.
a
a b
2
1
3
1RB7A_EE.book Page 39 Tuesday, April 24, 2012 9:07 AM
Page 153 of 188
8-40
EVU00880Brake light switch adjustment
The brake light switch, which is activated by
the brake pedal, is properly adjusted when the
brake light comes on just before braking takes
effect. If necessary, adjust the brake light
switch as follows.1. Open the hood. (See pages 8-7–8-8 for hood opening and closing procedures.)
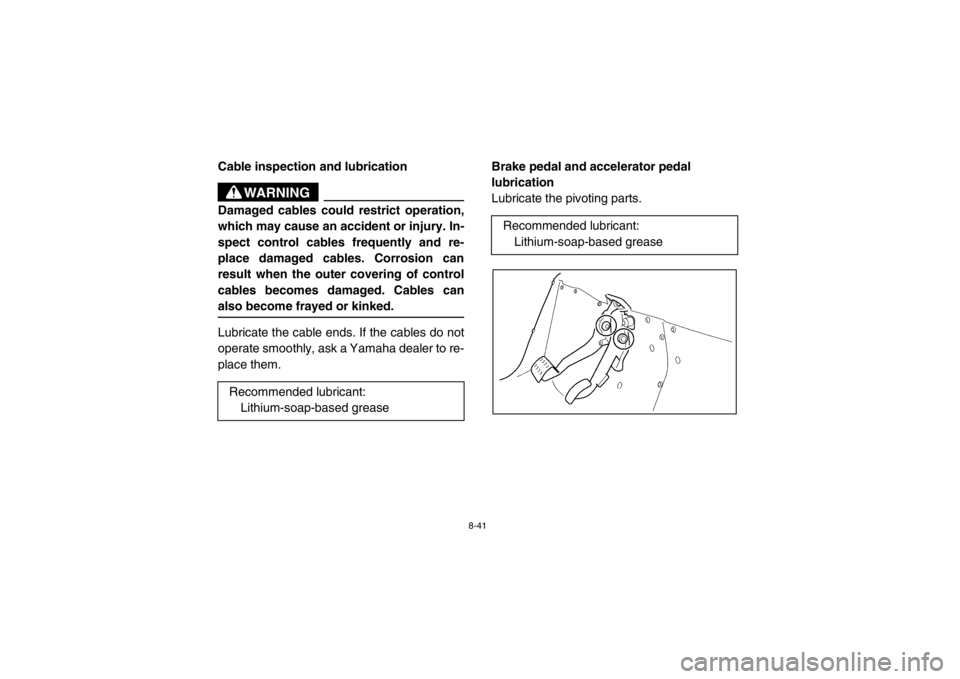
2. Turn the adjusting nut while holding the
brake light switch in place. To make the
brake light come on earlier, turn the ad-
justing nut in direction a. To make the
brake light come on later, turn the adjust-
ing nut in direction b.
1. Brake light switch 2. Adjusting nut3. Close the hood.
1
a
b
2
1RB7A_EE.book Page 40 Tuesday, April 24, 2012 9:07 AM
Page 154 of 188
8-41
EVU00890Cable inspection and lubrication
WARNING
Damaged cables could restrict operation,
which may cause an accident or injury. In-
spect control cables frequently and re-
place damaged cables. Corrosion can
result when the outer covering of control
cables becomes damaged. Cables can
also become frayed or kinked.Lubricate the cable ends. If the cables do not
operate smoothly, ask a Yamaha dealer to re-
place them.
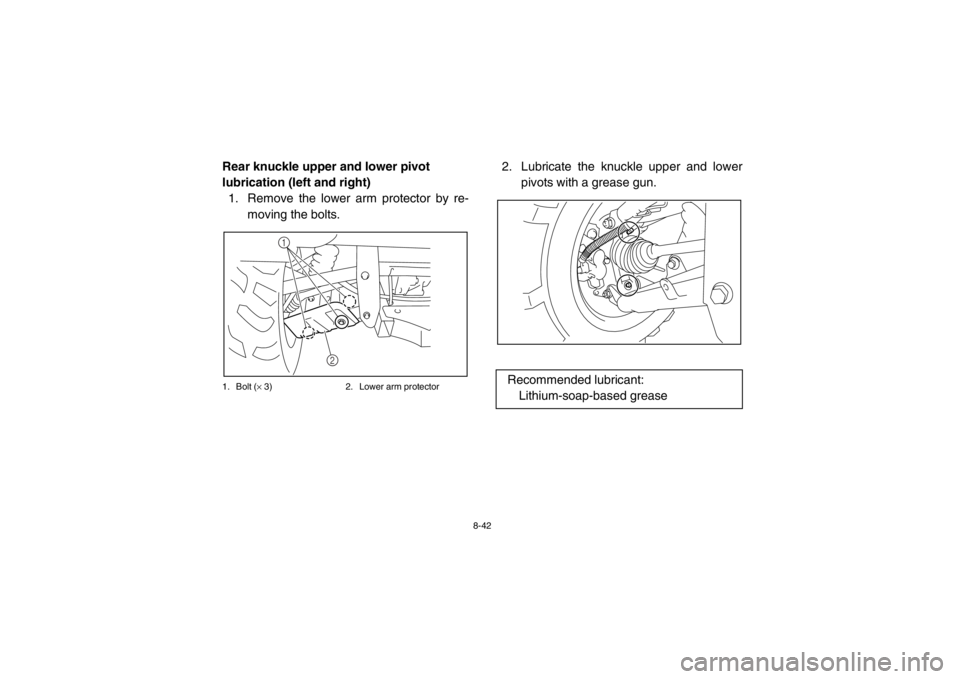
EVU00900Brake pedal and accelerator pedal
lubrication
Lubricate the pivoting parts.
Recommended lubricant: Lithium-soap-based grease
Recommended lubricant:
Lithium-soap-based grease
1RB7A_EE.book Page 41 Tuesday, April 24, 2012 9:07 AM
Page 155 of 188
8-42
5B410021Rear knuckle upper and lower pivot
lubrication (left and right)1. Remove the lower arm protector by re-
moving the bolts.1. Bolt ( × 3) 2. Lower arm protector
2. Lubricate the knuckle upper and lower
pivots with a grease gun.
1
2
Recommended lubricant:Lithium-soap-based grease
1RB7A_EE.book Page 42 Tuesday, April 24, 2012 9:07 AM
Page 156 of 188
8-43
3. Install the lower arm protector by install-ing the bolts and tightening them to the
specified torque.
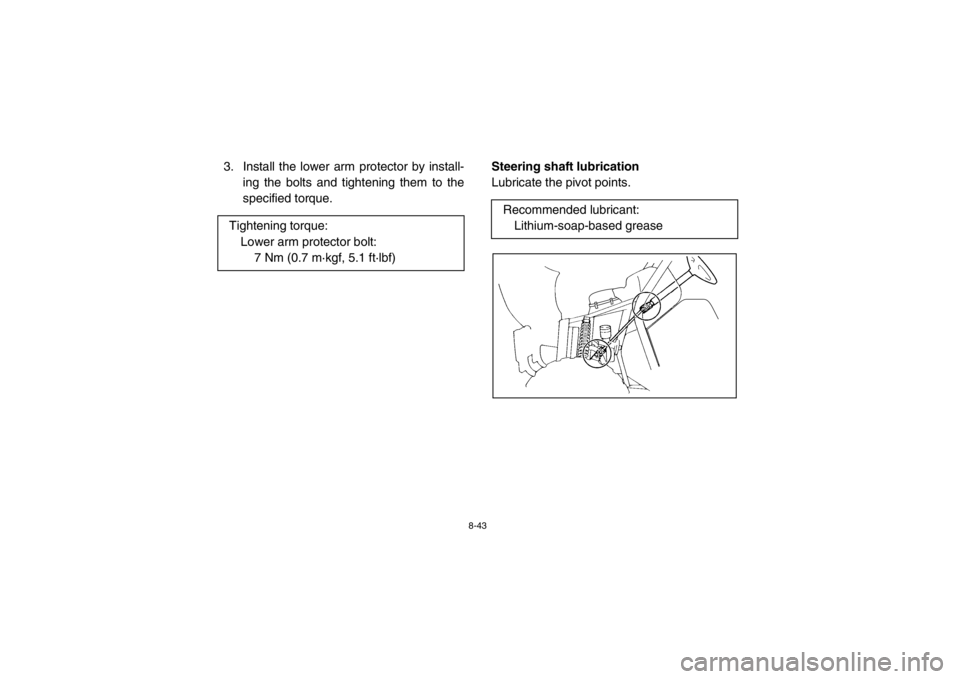
EVU00920Steering shaft lubrication
Lubricate the pivot points.
Tightening torque: Lower arm protector bolt: 7 Nm (0.7 m·kgf, 5.1 ft·lbf)
Recommended lubricant:Lithium-soap-based grease
1RB7A_EE.book Page 43 Tuesday, April 24, 2012 9:07 AM
Page 157 of 188
8-44
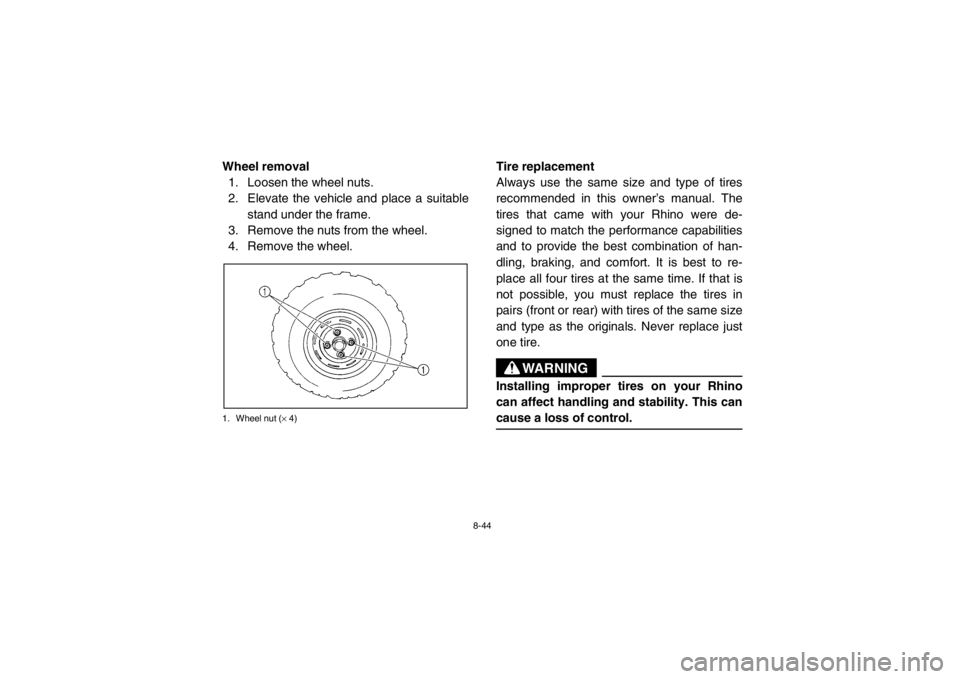
EVU00930Wheel removal1. Loosen the wheel nuts.
2. Elevate the vehicle and place a suitable stand under the frame.
3. Remove the nuts from the wheel.
4. Remove the wheel.1. Wheel nut ( × 4)
Tire replacement
Always use the same size and type of tires
recommended in this owner’s manual. The
tires that came with your Rhino were de-
signed to match the performance capabilities
and to provide the best combination of han-
dling, braking, and comfort. It is best to re-
place all four tires at the same time. If that is
not possible, you must replace the tires in
pairs (front or rear) with tires of the same size
and type as the originals. Never replace just
one tire.
WARNING
Installing improper tires on your Rhino
can affect handling and stability. This can
cause a loss of control.
1RB7A_EE.book Page 44 Tuesday, April 24, 2012 9:07 AM
Page 158 of 188
8-45
The tires listed below have been approved by
Yamaha Motor Manufacturing Corporation of America for this model.
EVU00940Wheel installation
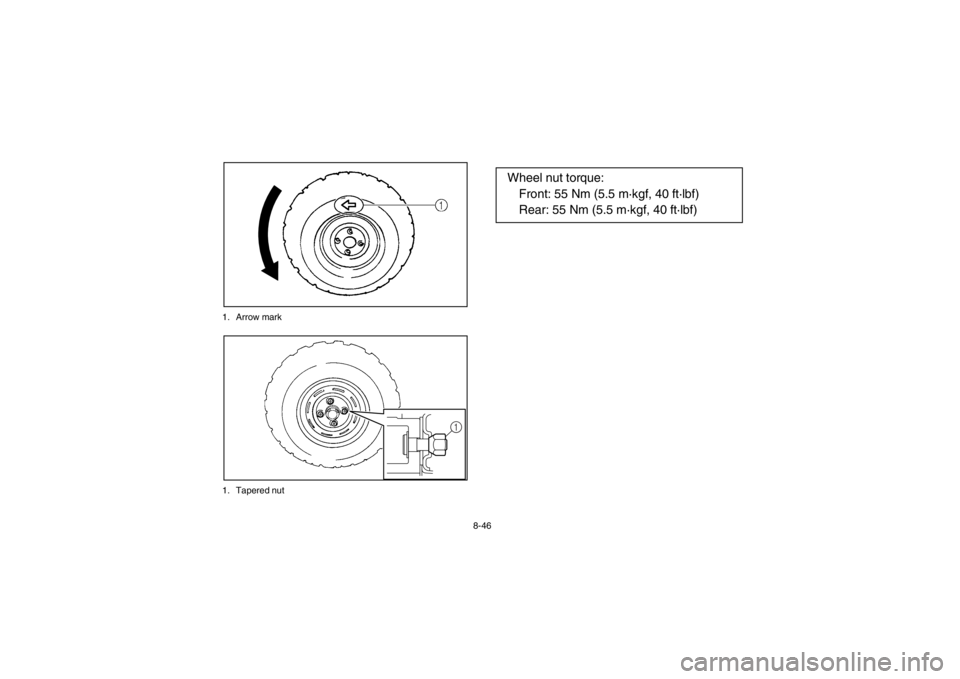
1. Install the wheel and the nuts.
●
The arrow mark on the tire must
point toward the rotating direction of
the wheel.
●
Tapered nuts are used for both the
front and rear wheels. Install the nuts
with their tapered side towards the
wheel.
2. Lower the vehicle so that the wheel is on the ground.
3. Tighten the wheel nuts in crisscross pat-
tern to the specified torque.
WARNING
Do not reverse the rims on the Rhino to
widen the track width. Installing wheels
improperly increases the risk of wheel fail-
ure and accidents.
Manufacturer SizeType
Front MAXXIS 25 × 8-12NHS M951Y
Rear MAXXIS 25 × 10-12NHS M952Y
1RB7A_EE.book Page 45 Tuesday, April 24, 2012 9:07 AM
Page 159 of 188
8-46
1. Arrow mark
1. Tapered nut
1
Wheel nut torque:
Front: 55 Nm (5.5 m·kgf, 40 ft·lbf)
Rear: 55 Nm (5.5 m·kgf, 40 ft·lbf)
1RB7A_EE.book Page 46 Tuesday, April 24, 2012 9:07 AM
Page 160 of 188
8-47
EVU00950Battery
The battery is located under the hood. (See
pages 8-7–8-8 for hood opening and closing
procedures.)
This model is equipped with a VRLA (Valve
Regulated Lead Acid) battery. There is no
need to check the electrolyte or to add distilled
water. However, the battery lead connections
need to be checked and, if necessary, tight-
ened.
WARNING
Avoid battery contact with skin, eyes, or
clothing. Shield eyes when working near
batteries. Keep out of reach of children.
You could be poisoned or severely burned
by the sulfuric acid in battery electrolyte.
In case of accidental contact with battery
electrolyte:
EXTERNAL: Flush with water.
INTERNAL: Drink large quantities of water
or milk. Follow with milk of magnesia,
beaten egg, or vegetable oil. Get prompt
medical attention.
EYES: Flush with water for 15 minutes and
get prompt medical attention.
WARNING
Batteries may produce explosive gases.
Ventilate when charging or using in a
closed space. Keep batteries away from
sparks, flames, cigarettes, or other sourc-
es of ignition.
1RB7A_EE.book Page 47 Tuesday, April 24, 2012 9:07 AM
Trending: oil additives, automatic transmission, battery, run flat, engine oil, brake fluid, checking oil

