YAMAHA RHINO 700 2013 Owners Manual
Manufacturer: YAMAHA, Model Year: 2013, Model line: RHINO 700, Model: YAMAHA RHINO 700 2013Pages: 188, PDF Size: 4.9 MB
Page 111 of 188

7-23
Rough terrain
Operation over rough terrain should be done
with caution.●
Look for and avoid obstacles that could
cause damage to the vehicle or could lead
to a rollover or accident.
●
Do not drive in a way that will get the Rhino
airborne, as injury, loss of control, and
damage to the vehicle could occur.
Pavement
This vehicle is designed for off-road use only.
Avoid paved surfaces. Turn gradually and go
slowly if you must drive on pavement. Water
If you must cross shallow, slow-moving water
up to the depth of the vehicle’s floorboards,
choose your path carefully to avoid sharp
drop-offs, large rocks, or slippery surfaces
that could cause the vehicle to overturn. Nev-
er operate through water deeper than 33 cm
(13 in) or fast-flowing water. Choose a path
where both your entrance into and exit point
from the water is a gradual incline. Determine
the water depth and currents before crossing.
Operating this vehicle through deep or fast-
flowing water can lead to loss of control or
overturn. To reduce your risk of drowning or
other injuries, use care when crossing
through water.
Wet brakes may have reduced effectiveness.
After leaving the water, test your brakes. If
necessary, apply the brakes several times to
let friction dry out the linings.
1RB7A_EE.book Page 23 Tuesday, April 24, 2012 9:07 AM
Page 112 of 188

7-24
NOTICEAfter driving your vehicle in water, be sure
to drain the trapped water by removing the
check hoses at the bottom of the air filter
case and air duct, the V-belt cooling duct
check hose, the drive select lever box
check hose and the V-belt case drain plug.
Wash the vehicle in fresh water if it has
been operated in salt water or muddy con-
ditions.
Loose terrain/slippery terrain
When driving on slippery terrain, including
wet, muddy, or icy conditions, as well as loose
gravel, be aware that you could begin skid-
ding or sliding. To avoid loss of control, slow
down and put the Rhino in four-wheel drive
before driving on a slippery surface and plan
your path to avoid making abrupt maneuvers.
If you feel the Rhino begin to slide sideways or
the back wheels slide during a turn, steer into
the direction of the slide if possible, to regain
directional control. For example, if you feel the
back of the vehicle start to slide to your right,
steer to the right.
1RB7A_EE.book Page 24 Tuesday, April 24, 2012 9:07 AM
Page 113 of 188

7-25
Brush or wooded areas
When operating in areas with brush or trees,
watch carefully on both sides and above the
vehicle for obstacles such as branches that
the vehicle might hit, causing an accident.
Watch for brush that might enter the vehicle
as you pass and strike you or the passenger.
Never hold onto the cage/frame. The passen-
ger should always hold onto the handholds
with both hands.
The muffler and other engine parts become
extremely hot during operation and remain
hot after the engine has stopped. To reduce
the risk of fire during operation or after leaving
the vehicle, do not let brush, grass and other
materials collect under the vehicle, near the
muffler or exhaust pipe, or next to other hot
parts. Check under the vehicle after operating
in areas where combustible materials may
have collected. Do not idle or park the vehicle
in long dry grass or other dry ground cover. Encountering obstacles
If you cannot go around an obstacle, such as
a fallen tree or a ditch, stop the vehicle where
it is safe to do so. Set the parking brake and
get out to inspect the area thoroughly. Look
from both your approach side and exit side. If
you believe you can continue safely, choose
the path that will allow you to get over the ob-
stacle and at as close to a right angle as pos-
sible to minimize vehicle tipping. Go only fast
enough to maintain your momentum but still
give yourself plenty of time to react to chang-
es in conditions.
If there is any question about your ability to
maneuver safely over the obstacle, you
should turn around if the ground is flat and you
have the room or back up until you find a less
difficult path.1RB7A_EE.book Page 25 Tuesday, April 24, 2012 9:07 AM
Page 114 of 188
8-1
EVU006501-PERIODIC MAINTENANCE AND ADJUSTMENTPeriodic inspection, adjustment, and lubrica-
tion will keep your vehicle in the safest and
most efficient condition possible.
Safety is an obligation of the vehicle owner/
operator. The most important points of vehicle
inspection, adjustment, and lubrication are ex-
plained on the following pages.
WARNING
Failure to properly maintain the vehicle or
performing maintenance activities incor-
rectly may increase your risk of injury or
death during service or while using the ve-
hicle. If you are not familiar with vehicle
service, have a Yamaha dealer perform
service.
WARNING
Turn off the engine when performing main-
tenance unless otherwise specified.●
A running engine has moving parts
that can catch on body parts or cloth-
ing and electrical parts that can cause
shocks or fires.
●
Running the engine while servicing
can lead to eye injury, burns, fire, or
carbon monoxide poisoning – possi-
bly leading to death. See page 2-7 for
more information about carbon mon-
oxide.WARNING
Brake discs, calipers, drums, and linings
can become very hot during use. To avoid
possible burns, let brake components cool
before touching them.
1RB7A_EE.book Page 1 Tuesday, April 24, 2012 9:07 AM
Page 115 of 188
8-2
1
2
3
4
5
6
78
9
10
11
12
13
14
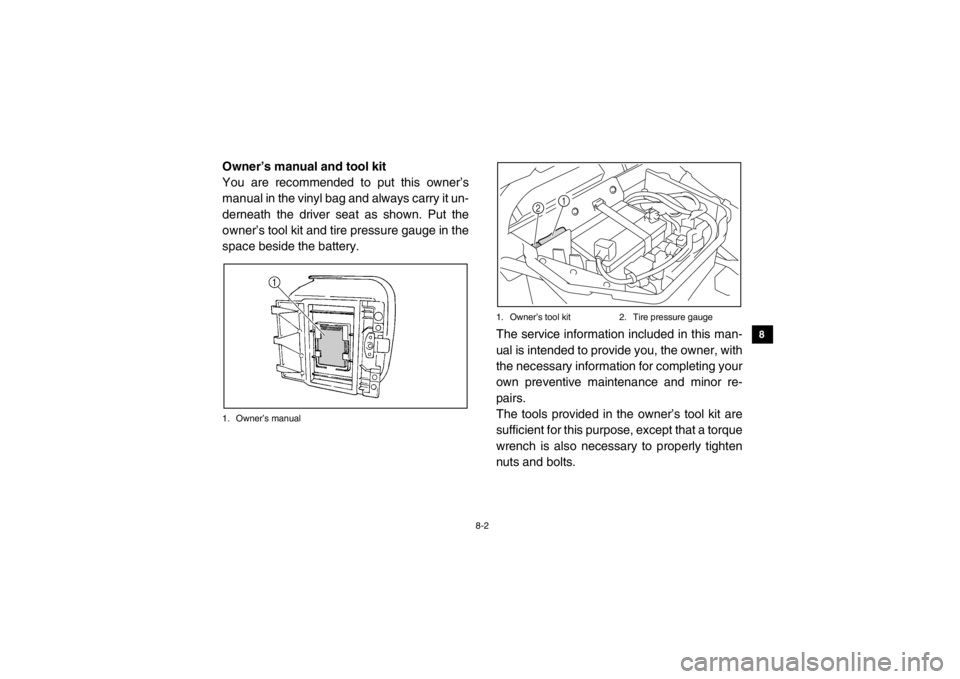
EVU00660Owner’s manual and tool kit
You are recommended to put this owner’s
manual in the vinyl bag and always carry it un-
derneath the driver seat as shown. Put the
owner’s tool kit and tire pressure gauge in the
space beside the battery.1. Owner’s manual1. Owner’s tool kit 2. Tire pressure gauge
The service information included in this man-
ual is intended to provide you, the owner, with
the necessary information for completing your
own preventive maintenance and minor re-
pairs.
The tools provided in the owner’s tool kit are
sufficient for this purpose, except that a torque
wrench is also necessary to properly tighten
nuts and bolts.
2
1
1RB7A_EE.book Page 2 Tuesday, April 24, 2012 9:07 AM
Page 116 of 188

8-3
If you do not have a torque wrench available
during a service operation requiring one, take
your vehicle to a Yamaha dealer to check the
torque settings and adjust them as necessary.1RB7A_EE.book Page 3 Tuesday, April 24, 2012 9:07 AM
Page 117 of 188

8-4
EVU01640Periodic maintenance chart for the emission control system●
For vehicles not equipped with an odometer or hour meter, follow the month maintenance in-
tervals.
●
For vehicles equipped with an odometer or an hour meter, follow the km (mi) or hours mainte-
nance intervals. However, keep in mind that if the vehicle isn’t used for a long period of time,
the month maintenance intervals should be followed.
●
Items marked with an asterisk should be performed by a Yamaha dealer as they require spe-
cial tools, data and technical skills.
ITEMROUTINEWhichever
comes first INITIAL
EVERY
month136612 km
(mi) 320
(200) 1200
(750) 2400
(1500) 2400
(1500) 4800
(3000)
hours 20 75 150 150 300
Fuel line* Check fuel hose for cracks or damage.
Replace if necessary.
Valves*
Check valve clearance.
Adjust if necessary.Spark plug Check condition.
Adjust gap and clean.
Replace if necessary.Crankcase breather
system* Check breather hose for cracks or damage.
Replace if necessary.Exhaust system*
Check for leakage.
Tighten if necessary.
Replace gasket(s) if necessary.Spark arrester
Clean.
1RB7A_EE.book Page 4 Tuesday, April 24, 2012 9:07 AM
Page 118 of 188
8-5
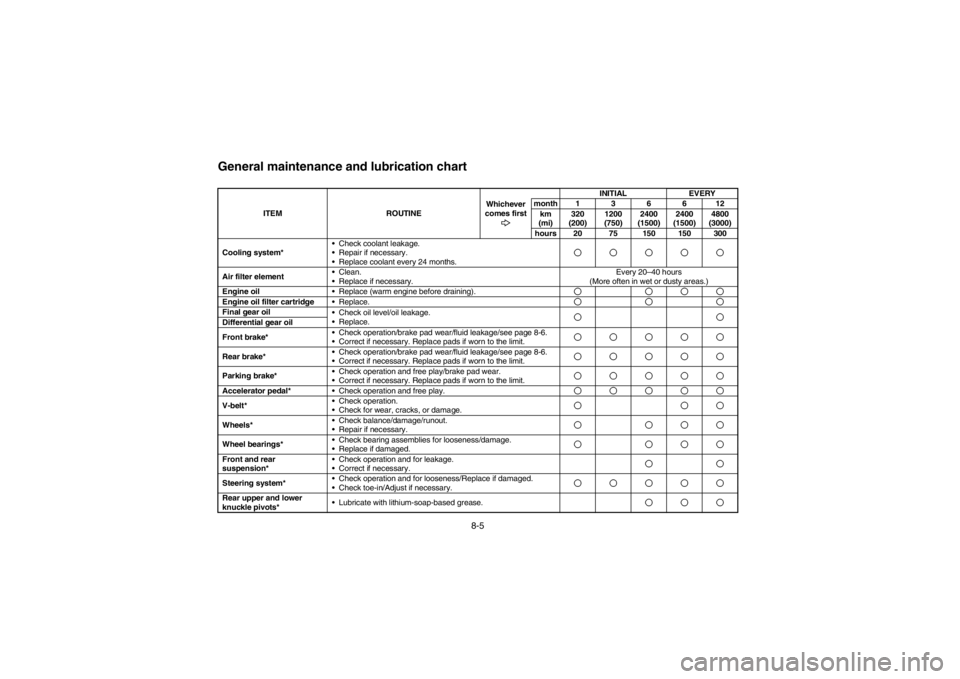
EVU01650General maintenance and lubrication chart
ITEMROUTINEWhichever
comes first INITIAL
EVERY
month136612 km
(mi) 320
(200) 1200
(750) 2400
(1500) 2400
(1500) 4800
(3000)
hours 20 75 150 150 300
Cooling system* Check coolant leakage.
Repair if necessary.
Replace coolant every 24 months.
Air filter element
Clean.
Replace if necessary. Every 20–40 hours
(More often in wet or dusty areas.)
Engine oil Replace (warm engine before draining).Engine oil filter cartridge Replace.Final gear oil
Check oil level/oil leakage.
Replace.Differential gear oil
Front brake* Check operation/brake pad wear/fluid leakage/see page 8-6.
Correct if necessary. Replace pads if worn to the limit.Rear brake* Check operation/brake pad wear/fluid leakage/see page 8-6.
Correct if necessary. Replace pads if worn to the limit.Parking brake*
Check operation and free play/brake pad wear.
Correct if necessary. Replace pads if worn to the limit.Accelerator pedal*
Check operation and free play.V-belt* Check operation.
Check for wear, cracks, or damage.Wheels* Check balance/damage/runout.
Repair if necessary.Wheel bearings*
Check bearing assemblies for looseness/damage.
Replace if damaged.Front and rear
suspension* Check operation and for leakage.
Correct if necessary.Steering system*
Check operation and for looseness/Replace if damaged.
Check toe-in/Adjust if necessary.Rear upper and lower
knuckle pivots* Lubricate with lithium-soap-based grease.1RB7A_EE.book Page 5 Tuesday, April 24, 2012 9:07 AM
Page 119 of 188
8-6
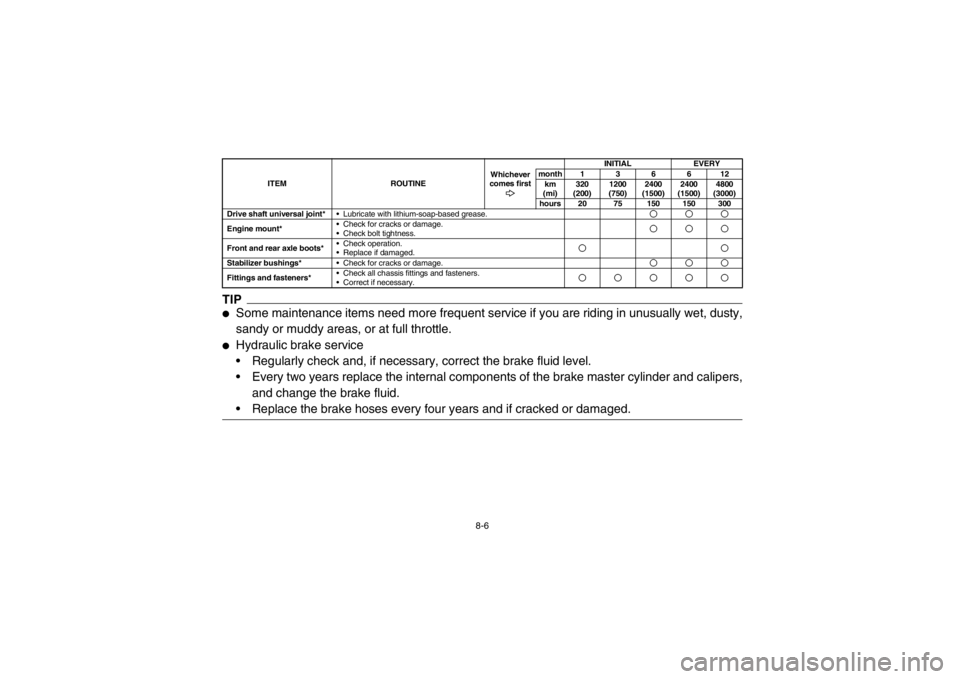
TIP●
Some maintenance items need more frequent service if you are riding in unusually wet, dusty,
sandy or muddy areas, or at full throttle.
●
Hydraulic brake service
Regularly check and, if necessary, correct the brake fluid level.
Every two years replace the internal components of the brake master cylinder and calipers,
and change the brake fluid.
Replace the brake hoses every four years and if cracked or damaged.Drive shaft universal joint* Lubricate with lithium-soap-based grease.Engine mount* Check for cracks or damage.
Check bolt tightness.Front and rear axle boots* Check operation.
Replace if damaged.Stabilizer bushings*
Check for cracks or damage.Fittings and fasteners* Check all chassis fittings and fasteners.
Correct if necessary.
ITEM
ROUTINEWhichever
comes first INITIAL
EVERY
month136612 km
(mi) 320
(200) 1200
(750) 2400
(1500) 2400
(1500) 4800
(3000)
hours 20 75 150 150 300
1RB7A_EE.book Page 6 Tuesday, April 24, 2012 9:07 AM
Page 120 of 188
8-7
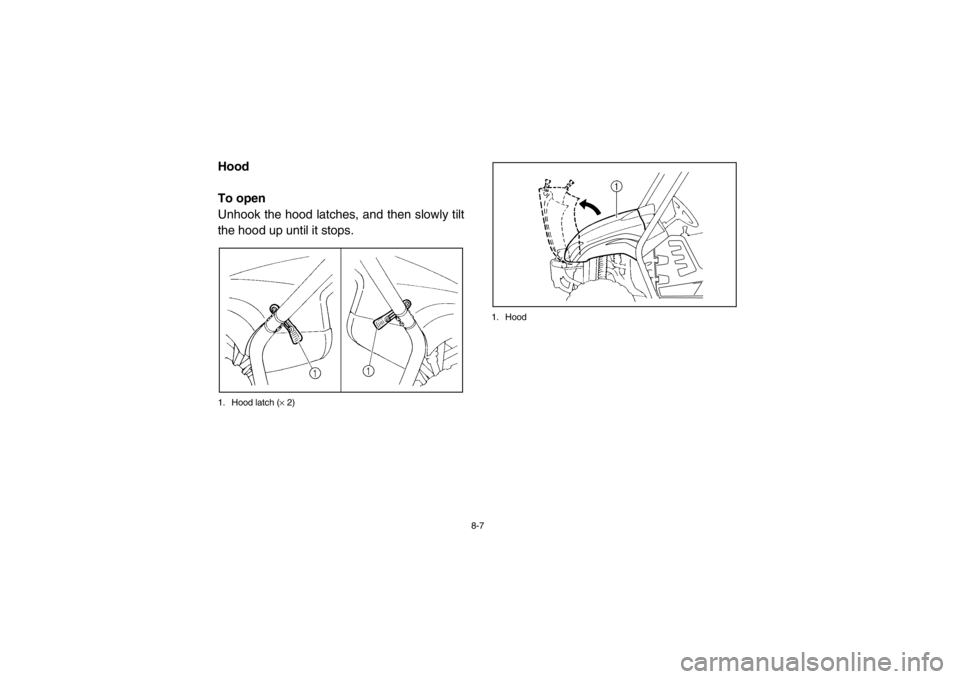
EVU00680Hood
To open
Unhook the hood latches, and then slowly tilt
the hood up until it stops.1. Hood latch (× 2) 1. Hood1RB7A_EE.book Page 7 Tuesday, April 24, 2012 9:07 AM