YAMAHA WR 250F 2004 Manuale duso (in Italian)
Manufacturer: YAMAHA, Model Year: 2004, Model line: WR 250F, Model: YAMAHA WR 250F 2004Pages: 864, PDF Dimensioni: 22.07 MB
Page 701 of 864
5 - 120
CHAS
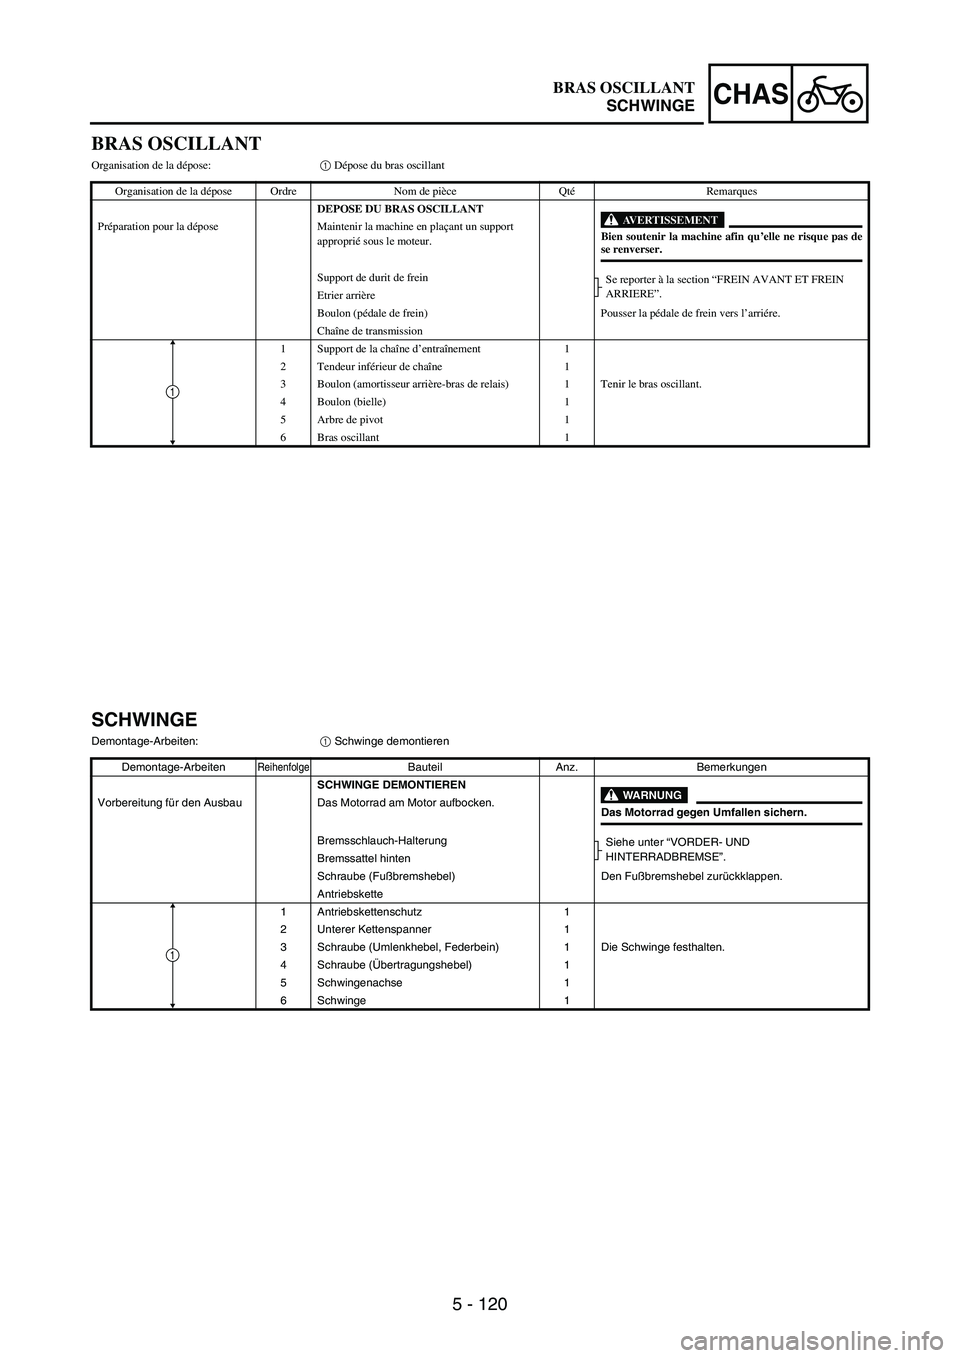
BRAS OSCILLANT
Organisation de la dépose:1 Dépose du bras oscillant
Organisation de la dépose Ordre Nom de pièce QtéRemarques
DEPOSE DU BRAS OSCILLANT
AVERTISSEMENTBien soutenir la machine afin qu’elle ne risque pas dese renverser. Préparation pour la dépose Maintenir la machine en plaçant un support
approprié sous le moteur.
Support de durit de frein
Se reporter à la section “FREIN AVANT ET FREIN
ARRIERE”.
Etrier arrière
Boulon (pédale de frein) Pousser la pédale de frein vers l’arriére.
Chaîne de transmission
1 Support de la chaîne d’entraînement 1
2 Tendeur inférieur de chaîne 1
3 Boulon (amortisseur arrière-bras de relais) 1 Tenir le bras oscillant.
4 Boulon (bielle) 1
5 Arbre de pivot 1
6 Bras oscillant 1
1
SCHWINGE
Demontage-Arbeiten:
1 Schwinge demontieren
Demontage-Arbeiten
ReihenfolgeBauteil Anz. Bemerkungen
SCHWINGE DEMONTIEREN
WARNUNG
Das Motorrad gegen Umfallen sichern. Vorbereitung für den Ausbau Das Motorrad am Motor aufbocken.
Bremsschlauch-Halterung
Siehe unter “VORDER- UND
HINTERRADBREMSE”.
Bremssattel hinten
Schraube (Fußbremshebel) Den Fußbremshebel zurückklappen.
Antriebskette
1 Antriebskettenschutz 1
2 Unterer Kettenspanner 1
3 Schraube (Umlenkhebel, Federbein) 1 Die Schwinge festhalten.
4 Schraube (Übertragungshebel) 1
5 Schwingenachse 1
6 Schwinge 1
1
BRAS OSCILLANT
SCHWINGE
Page 702 of 864
5 - 121
CHAS
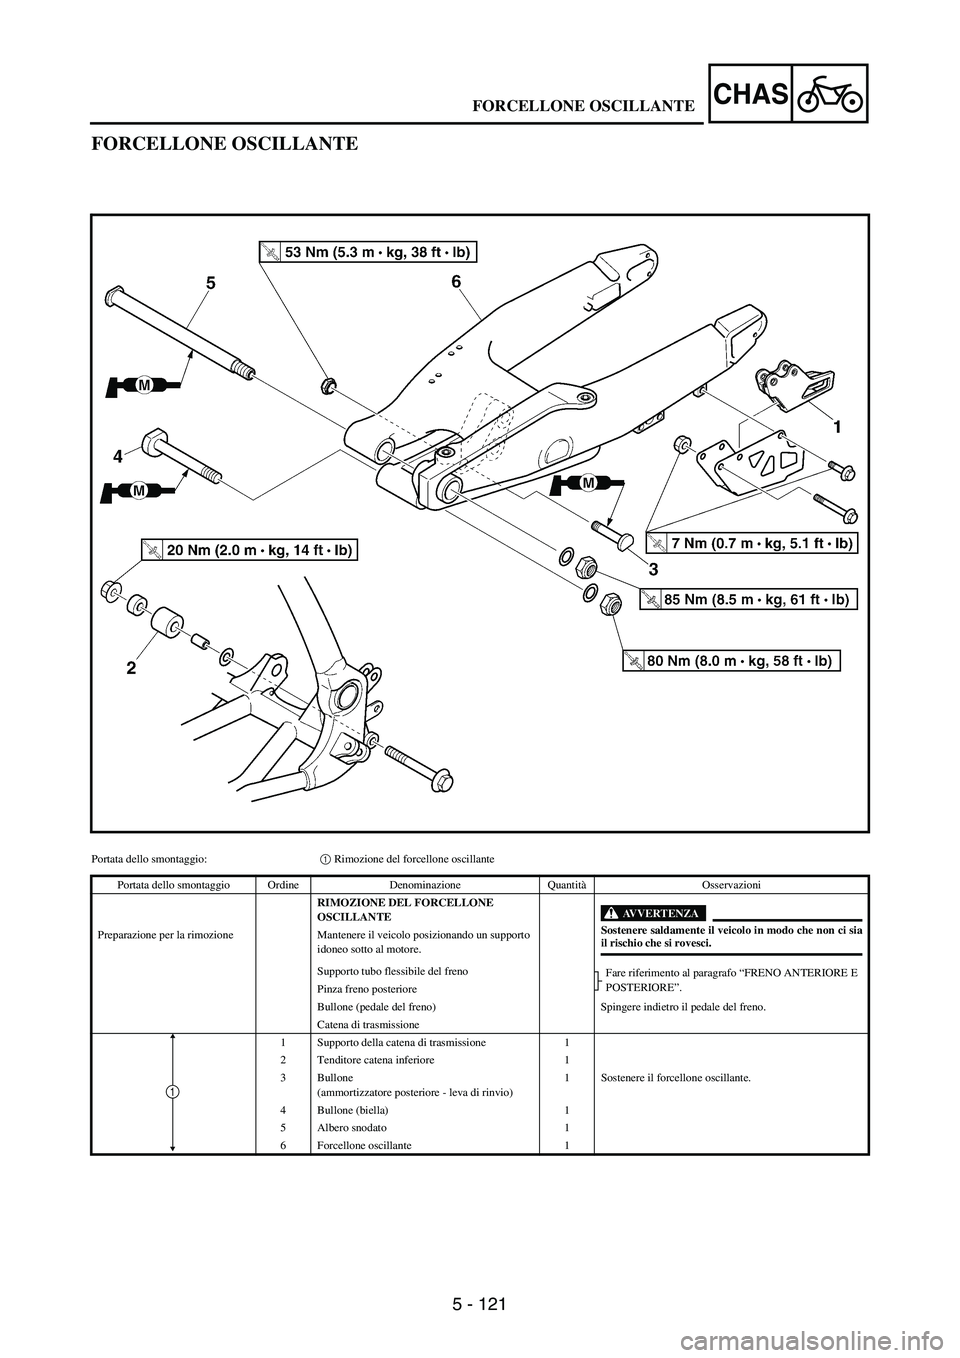
FORCELLONE OSCILLANTE
Portata dello smontaggio:1 Rimozione del forcellone oscillante
Portata dello smontaggio Ordine Denominazione QuantitàOsservazioni
RIMOZIONE DEL FORCELLONE
OSCILLANTE
AVVERTENZA
Sostenere saldamente il veicolo in modo che non ci siail rischio che si rovesci. Preparazione per la rimozione Mantenere il veicolo posizionando un supporto
idoneo sotto al motore.
Supporto tubo flessibile del freno
Fare riferimento al paragrafo “FRENO ANTERIORE E
POSTERIORE”.
Pinza freno posteriore
Bullone (pedale del freno) Spingere indietro il pedale del freno.
Catena di trasmissione
1 Supporto della catena di trasmissione 1
2 Tenditore catena inferiore 1
3 Bullone
(ammortizzatore posteriore - leva di rinvio)1 Sostenere il forcellone oscillante.
4 Bullone (biella) 1
5 Albero snodato 1
6 Forcellone oscillante 1
1
FORCELLONE OSCILLANTE
Page 703 of 864
5 - 122
CHAS
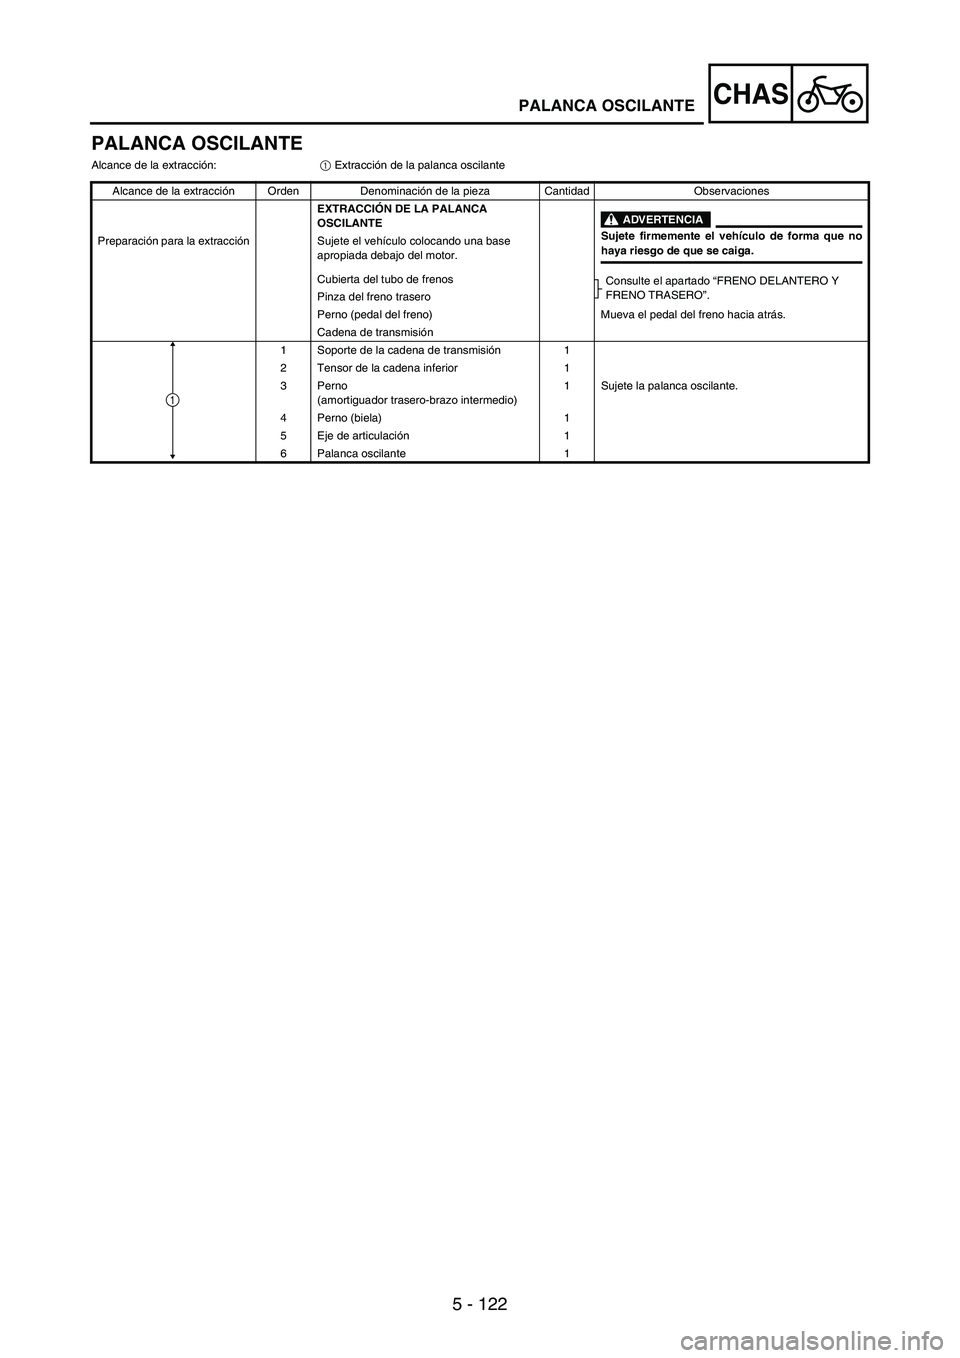
PALANCA OSCILANTE
Alcance de la extracción:
1 Extracción de la palanca oscilante
Alcance de la extracción Orden Denominación de la pieza Cantidad Observaciones
EXTRACCIÓN DE LA PALANCA
OSCILANTE
ADVERTENCIA
Sujete firmemente el vehículo de forma que nohaya riesgo de que se caiga. Preparación para la extracción Sujete el vehículo colocando una base
apropiada debajo del motor.
Cubierta del tubo de frenos
Consulte el apartado “FRENO DELANTERO Y
FRENO TRASERO”.
Pinza del freno trasero
Perno (pedal del freno) Mueva el pedal del freno hacia atrás.
Cadena de transmisión
1 Soporte de la cadena de transmisión1
2 Tensor de la cadena inferior 1
3 Perno
(amortiguador trasero-brazo intermedio)1 Sujete la palanca oscilante.
4 Perno (biela) 1
5 Eje de articulación1
6 Palanca oscilante 1
1
PALANCA OSCILANTE
Page 704 of 864
5 - 123
CHASSWINGARM
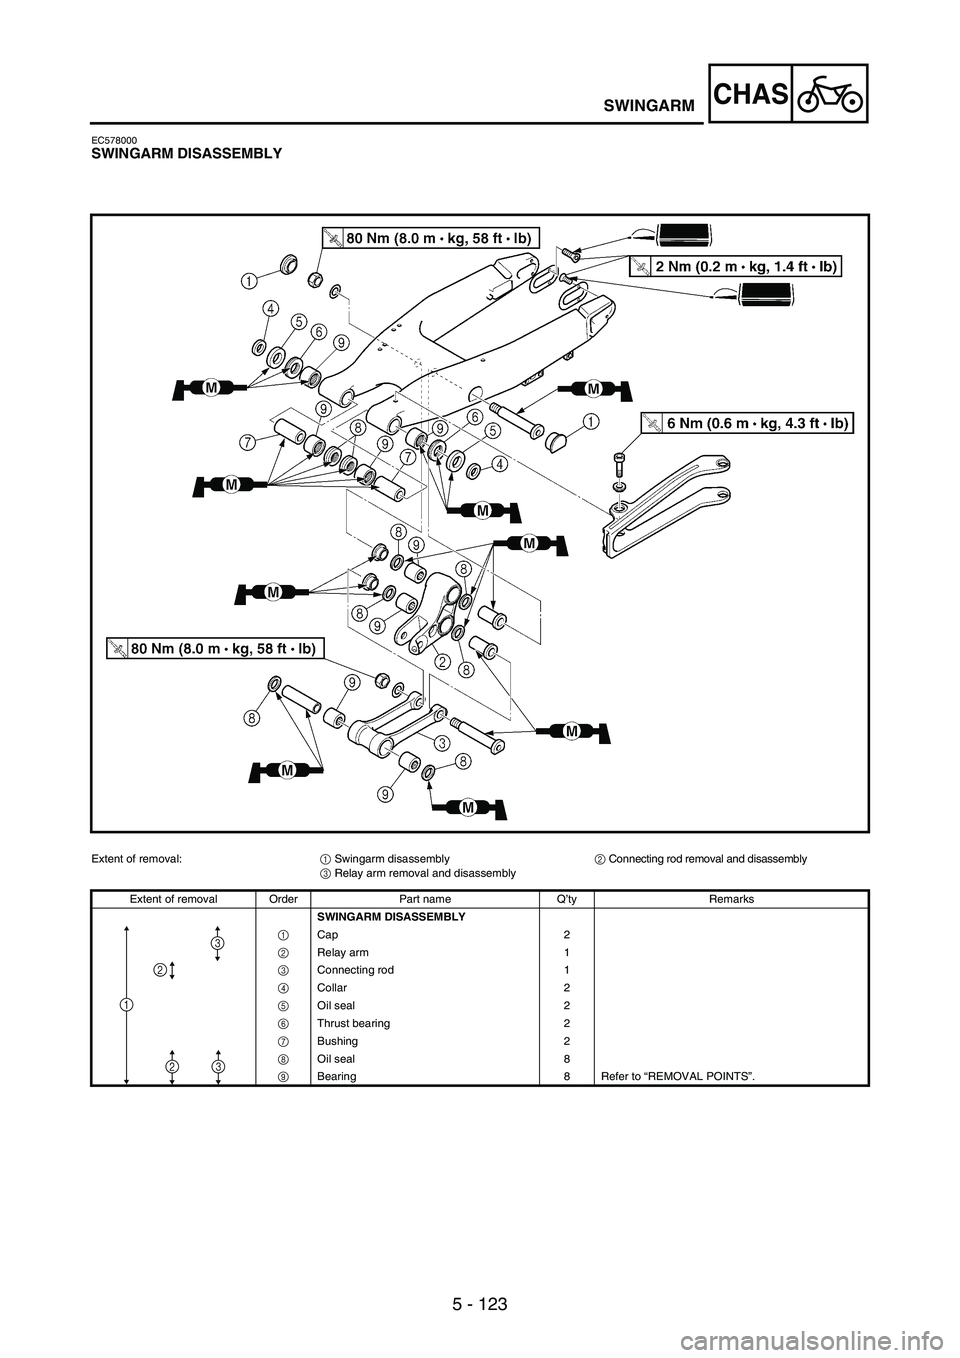
EC578000SWINGARM DISASSEMBLY
Extent of removal:
1 Swingarm disassembly
2 Connecting rod removal and disassembly
3 Relay arm removal and disassembly
Extent of removal Order Part name Q’ty Remarks
SWINGARM DISASSEMBLY
1 Cap 2
2 Relay arm 1
3 Connecting rod 1
4 Collar 2
5 Oil seal 2
6 Thrust bearing 2
7 Bushing 2
8 Oil seal 8
9 Bearing 8 Refer to “REMOVAL POINTS”.
1
2
3
23
Page 705 of 864
5 - 124
CHAS
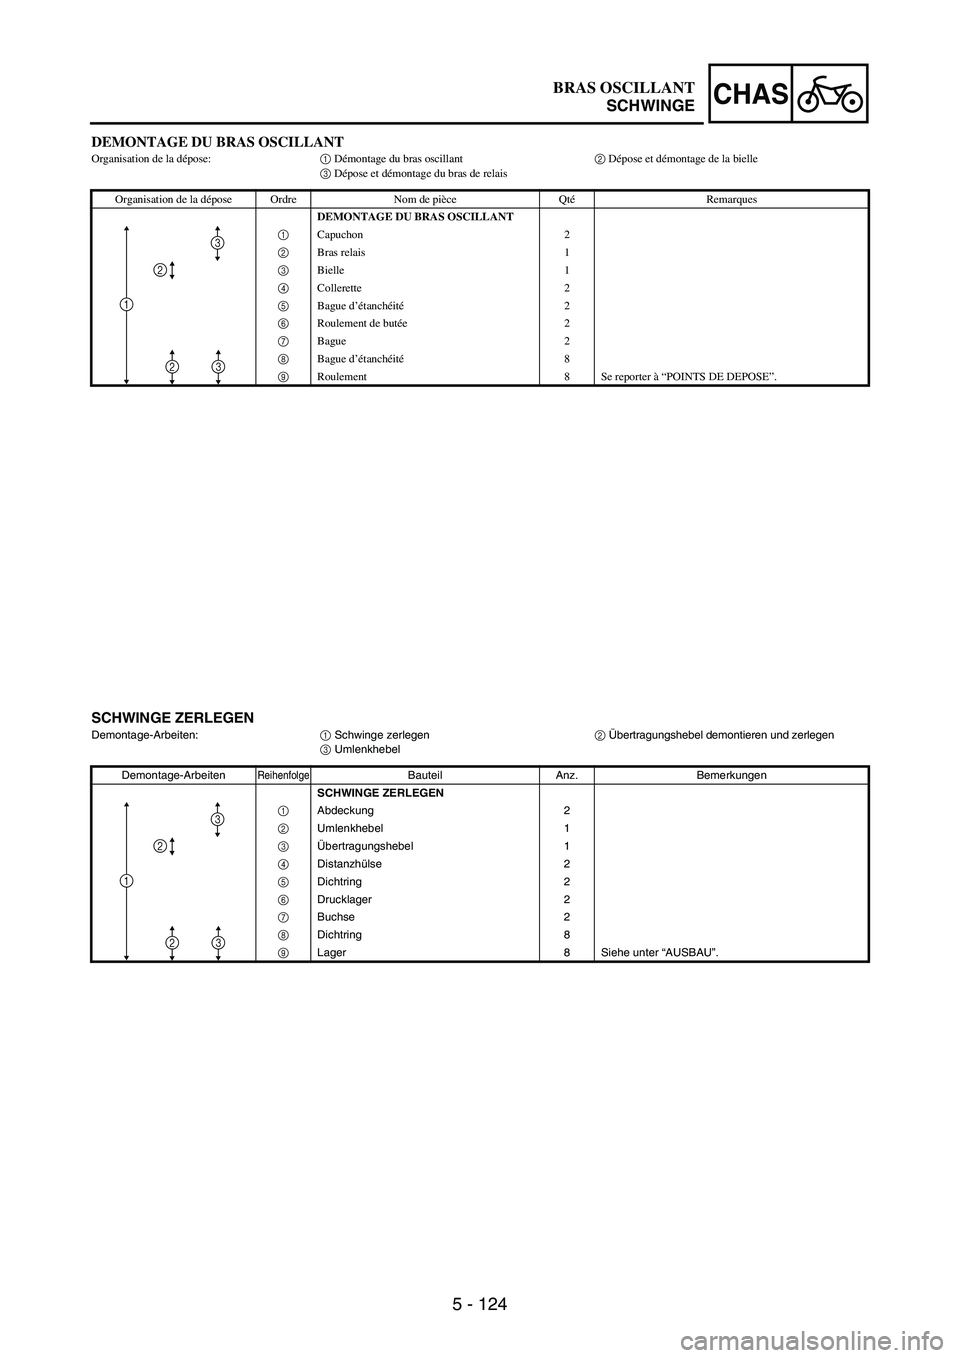
DEMONTAGE DU BRAS OSCILLANTOrganisation de la dépose:1 Démontage du bras oscillant2 Dépose et démontage de la bielle
3 Dépose et démontage du bras de relais
Organisation de la dépose Ordre Nom de pièce QtéRemarques
DEMONTAGE DU BRAS OSCILLANT
1 Capuchon 2
2 Bras relais 1
3 Bielle 1
4 Collerette 2
5 Bague d’étanchéité2
6 Roulement de butée2
7 Bague 2
8 Bague d’étanchéité8
9 Roulement 8 Se reporter à “POINTS DE DEPOSE”.
1
2
3
23
SCHWINGE ZERLEGEN
Demontage-Arbeiten:
1 Schwinge zerlegen
2 Übertragungshebel demontieren und zerlegen
3 Umlenkhebel
Demontage-Arbeiten
ReihenfolgeBauteil Anz. Bemerkungen
SCHWINGE ZERLEGEN
1 Abdeckung 2
2 Umlenkhebel 1
3 Übertragungshebel 1
4 Distanzhülse 2
5 Dichtring 2
6 Drucklager 2
7 Buchse 2
8 Dichtring 8
9 Lager 8 Siehe unter “AUSBAU”.
1
2
3
23
BRAS OSCILLANT
SCHWINGE
Page 706 of 864
5 - 125
CHAS
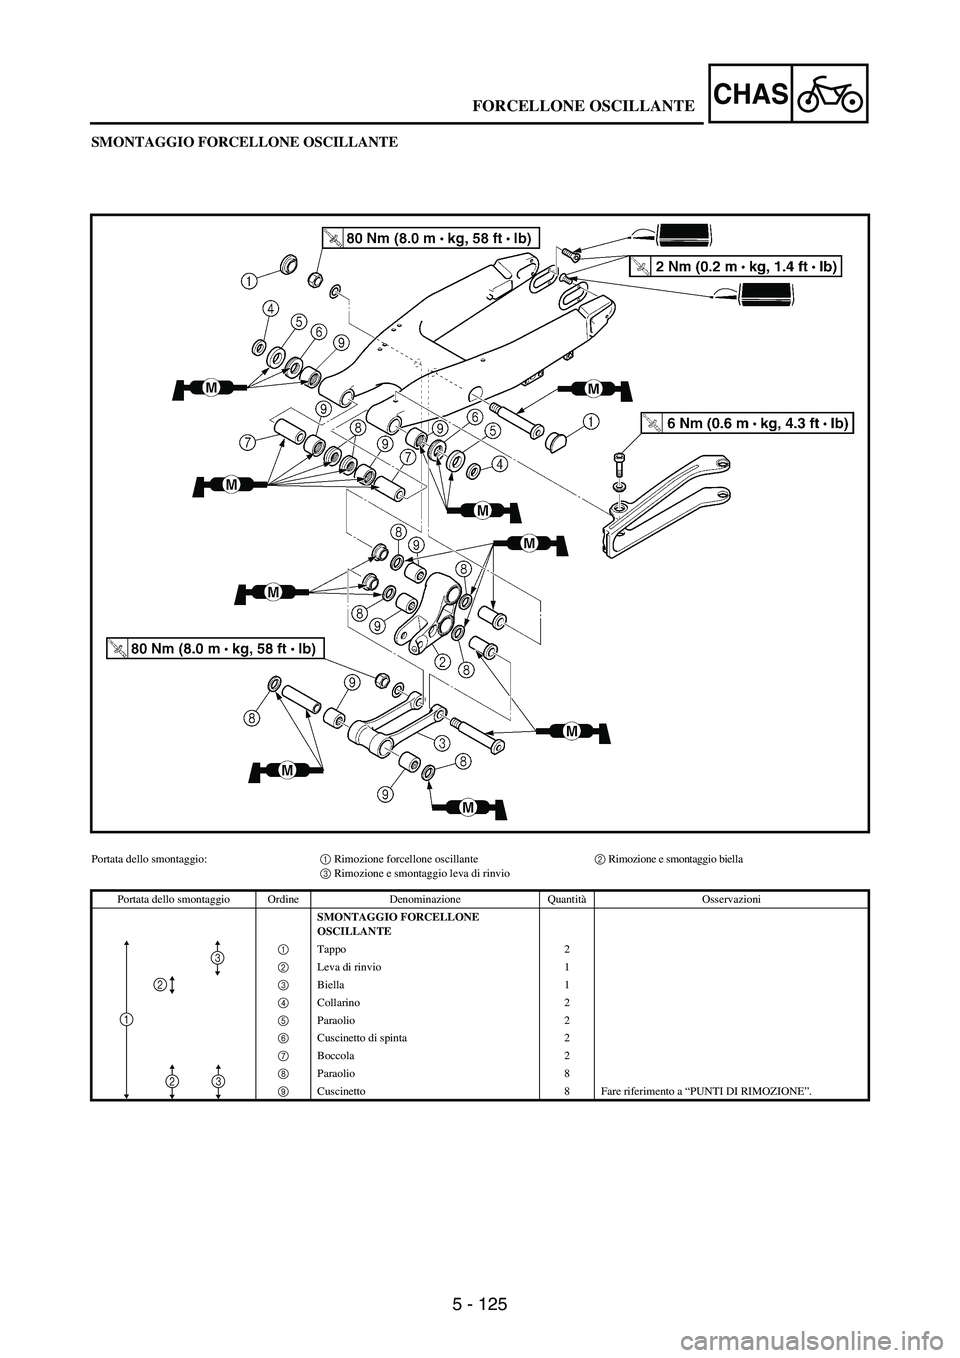
SMONTAGGIO FORCELLONE OSCILLANTE
Portata dello smontaggio:1 Rimozione forcellone oscillante2 Rimozione e smontaggio biella
3 Rimozione e smontaggio leva di rinvio
Portata dello smontaggio Ordine Denominazione QuantitàOsservazioni
SMONTAGGIO FORCELLONE
OSCILLANTE
1 Tappo 2
2 Leva di rinvio 1
3 Biella 1
4 Collarino 2
5 Paraolio 2
6 Cuscinetto di spinta 2
7 Boccola 2
8 Paraolio 8
9 Cuscinetto 8 Fare riferimento a “PUNTI DI RIMOZIONE”.
1
2
3
23
FORCELLONE OSCILLANTE
Page 707 of 864
5 - 126
CHAS
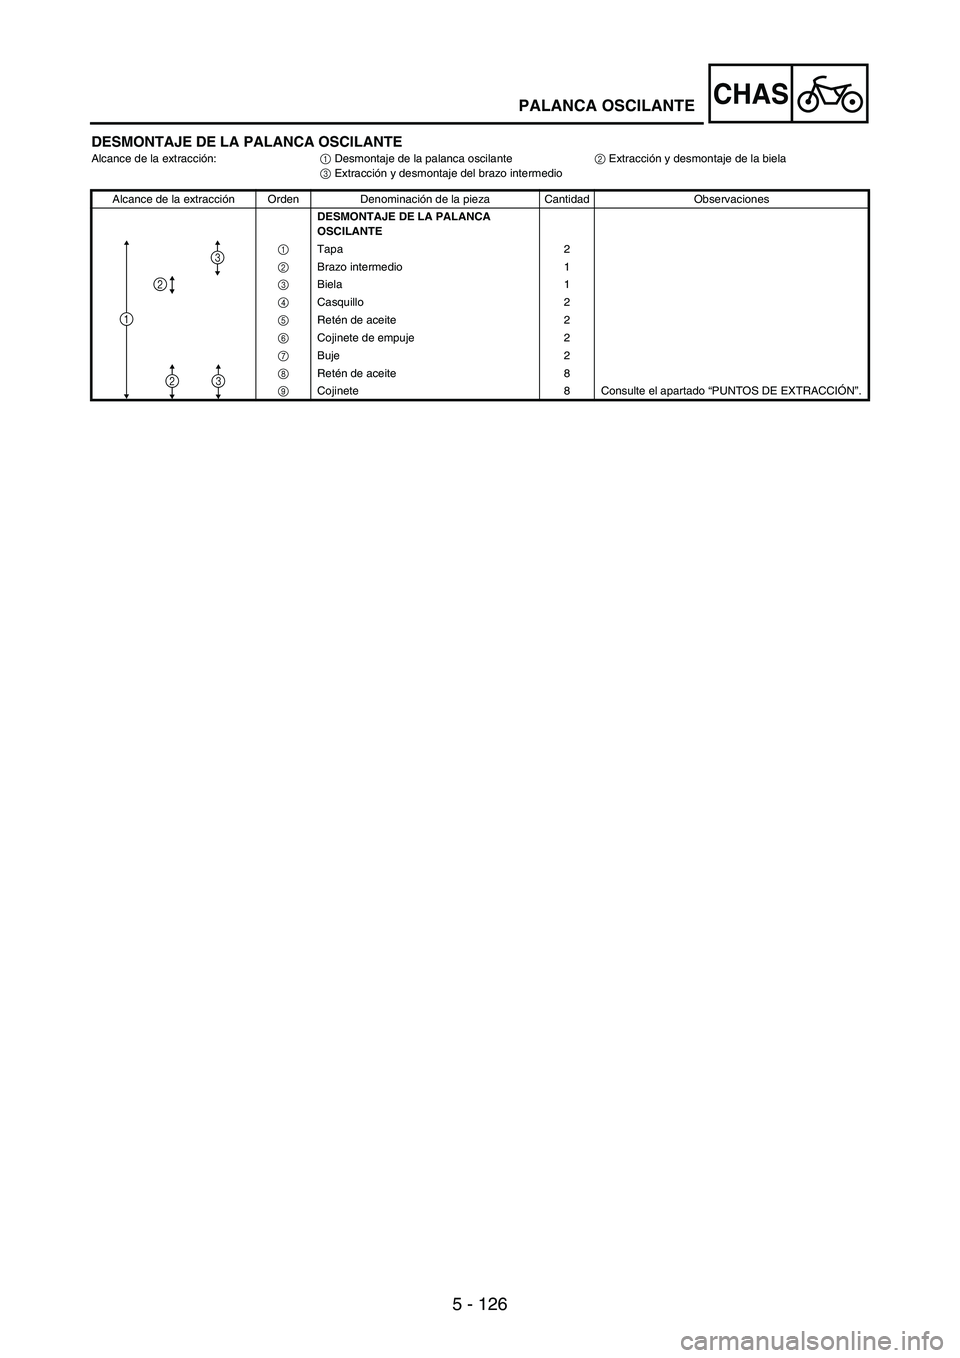
DESMONTAJE DE LA PALANCA OSCILANTEAlcance de la extracción:
1 Desmontaje de la palanca oscilante
2 Extracción y desmontaje de la biela
3 Extracción y desmontaje del brazo intermedio
Alcance de la extracción Orden Denominación de la pieza Cantidad Observaciones
DESMONTAJE DE LA PALANCA
OSCILANTE
1 Tapa 2
2 Brazo intermedio 1
3 Biela 1
4 Casquillo 2
5 Retén de aceite 2
6 Cojinete de empuje 2
7 Buje 2
8 Retén de aceite 8
9 Cojinete 8 Consulte el apartado “PUNTOS DE EXTRACCIÓN”.
1
2
3
23
PALANCA OSCILANTE
Page 708 of 864
5 - 127
CHASSWINGARM
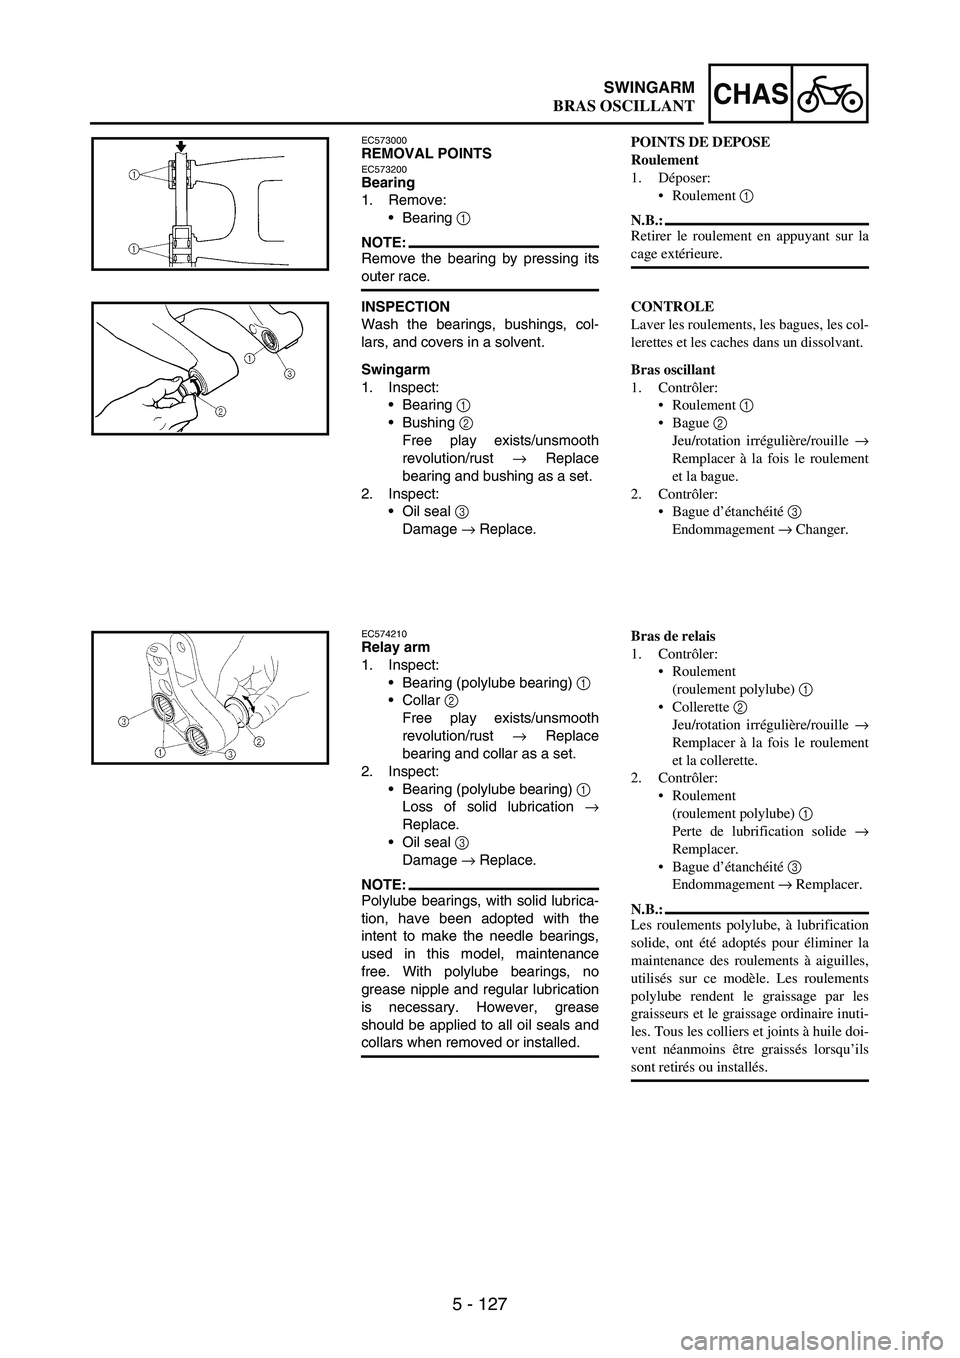
EC573000REMOVAL POINTSEC573200Bearing
1. Remove:
Bearing
1
NOTE:Remove the bearing by pressing its
outer race.
INSPECTION
Wash the bearings, bushings, col-
lars, and covers in a solvent.
Swingarm
1. Inspect:
Bearing
1
Bushing
2
Free play exists/unsmooth
revolution/rust
→ Replace
bearing and bushing as a set.
2. Inspect:
Oil seal
3
Damage
→ Replace.
EC574210Relay arm
1. Inspect:
Bearing (polylube bearing)
1
Collar
2
Free play exists/unsmooth
revolution/rust
→ Replace
bearing and collar as a set.
2. Inspect:
Bearing (polylube bearing)
1
Loss of solid lubrication
→
Replace.
Oil seal
3
Damage
→ Replace.
NOTE:Polylube bearings, with solid lubrica-
tion, have been adopted with the
intent to make the needle bearings,
used in this model, maintenance
free. With polylube bearings, no
grease nipple and regular lubrication
is necessary. However, grease
should be applied to all oil seals and
collars when removed or installed.
POINTS DE DEPOSE
Roulement
1. Déposer:
Roulement 1
N.B.:
Retirer le roulement en appuyant sur la
cage extérieure.
CONTROLE
Laver les roulements, les bagues, les col-
lerettes et les caches dans un dissolvant.
Bras oscillant
1. Contrôler:
Roulement 1
Bague 2
Jeu/rotation irrégulière/rouille →
Remplacer à la fois le roulement
et la bague.
2. Contrôler:
Bague d’étanchéité 3
Endommagement → Changer.
Bras de relais
1. Contrôler:
Roulement
(roulement polylube) 1
Collerette 2
Jeu/rotation irrégulière/rouille →
Remplacer à la fois le roulement
et la collerette.
2. Contrôler:
Roulement
(roulement polylube) 1
Perte de lubrification solide →
Remplacer.
Bague d’étanchéité 3
Endommagement → Remplacer.
N.B.:
Les roulements polylube, à lubrification
solide, ont été adoptés pour éliminer la
maintenance des roulements à aiguilles,
utilisés sur ce modèle. Les roulements
polylube rendent le graissage par les
graisseurs et le graissage ordinaire inuti-
les. Tous les colliers et joints à huile doi-
vent néanmoins être graissés lorsqu’ils
sont retirés ou installés.
BRAS OSCILLANT
Page 709 of 864
5 - 128
CHAS
AUSBAU
Lager
1. Demontieren:
Lager
1
HINWEIS:
Das Lager am äußeren Laufring ein-
pressen.
KONTROLLE
Die Lager, Buchsen, Hülsen und
Anlaufscheiben in Lösungsmittel
waschen.
Schwinge
1. Kontrollieren:
Lager
1
Buchse
2
Spiel/Schwergängigkeit/Rost
→ Lager und Buchse im Satz
erneuern.
2. Kontrollieren:
Dichtring
3
Beschädigung
→ Erneuern.
Umlenkhebel
1. Kontrollieren:
Lager (Polylube-Lager)
1
Distanzhülse
2
Spiel/Schwergängigkeit/Rost
→ Lager und Hülse im Satz
erneuern.
2. Kontrollieren:
Lager (Polylube-Lager)
1
Verlust der Trockenschmie-
rung
→ Erneuern.
Dichtring
3
Beschädigung
→ Erneuern.
HINWEIS:
Polylube-Lager mit Trockenschmie-
rung werden eingesetzt, um die in
diesem Modell verwendeten Nadella-
ger wartungsfrei zu machen. Bei
Polylube-Lagern gibt es keine
Schmiernippel, und regelmäßige
Schmierung ist nicht erforderlich. Es
sollte aber beim Ausbau oder Einbau
Fett auf alle Ölabdichtungen und
Distanzhülsen aufgetragen werden.PUNTI DI RIMOZIONE
Cuscinetto
1. Rimuovere:
Cuscinetto 1
NOTA:
Rimuovere il cuscinetto premendo
sull’anello esterno.
ISPEZIONE
Lavare i cuscinetti, le boccole, i collarini
e i coperchi con un solvente.
Forcellone oscillante
1. Ispezionare:
Cuscinetto 1
Boccola 2
Gioco/movimento non agevole/
ruggine → Sostituire in blocco il
cuscinetto e la boccola.
2. Ispezionare:
Paraolio 3
Danni → Sostituire.
Leva di rinvio
1. Ispezionare:
Cuscinetto
(cuscinetto polylube) 1
Collarino 2
Gioco/movimento non agevole/
ruggine → Sostituire in blocco il
cuscinetto e il collarino.
2. Ispezionare:
Cuscinetto
(cuscinetto polylube) 1
Perdita di lubrificazione solida →
Sostituire.
Paraolio 3
Danni → Sostituire.
NOTA:
I cuscinetti polylube, con lubrificazione
solida, sono stati adottati in modo che i
cuscinetti a spillo usati in questo
modello non necessitino di manuten-
zione. Con cuscinetti polylube, non è
necessario un ingrassatore o una lubrifi-
cazione periodica. Tuttavia, si deve
applicare grasso a tutti i paraolio e colla-
rini quando vengono rimossi o installati.PUNTOS DE EXTRACCIÓN
Cojinete
1. Extraer:
Cojinete
1
NOTA:
Extraiga el cojinete empujando su
pista externa.
INSPECCIÓN
Lave los cojinetes, los manguitos,
casquillos y las cubiertas con un
disolvente.
Palanca oscilante
1. Inspeccionar:
Cojinete
1
Buje
2
Existe juego libre/vueltas brus-
cas/óxido
→ Reemplazar el
cojinete y el buje como un
juego.
2. Inspeccionar:
Retén de aceite
3
Daños
→ Reemplazar.
Brazo intermedio
1. Inspeccionar:
Cojinete
(cojinete de polilube)
1
Casquillo
2
Existe juego libre/vueltas brus-
cas/óxido
→ Reemplazar el
cojinete y el casquillo como un
juego.
2. Inspeccionar:
Cojinete
(cojinete de polilube)
1
Pérdida de lubricación sólida
→ Reemplazar.
Retén de aceite
3
Daños
→ Reemplazar.
NOTA:
Se ha optado por los cojinetes de
polilube, con lubricación sólida, para
que no sea necesario hacer manteni-
miento a los cojinetes de aguja, utili-
zados en este modelo. Con los
cojinetes de polilube, no son necesa-
rios los engrasadores ni lubricar
regularmente. Sin embargo, deberá
aplicarse grasa a todos los retenes
de aceite y casquillos cuando se
desmonten o instalen.
SCHWINGE
FORCELLONE OSCILLANTE
PALANCA OSCILANTE
Page 710 of 864
5 - 129
CHASSWINGARM
EC574310Connecting rod
1. Inspect:
Bearing (polylube bearing)
1
Collar
2
Free play exists/unsmooth
revolution/rust
→ Replace
bearing and collar as a set.
2. Inspect:
Bearing (polylube bearing)
1
Loss of solid lubrication
→
Replace.
Oil seal
3
Damage
→ Replace.
NOTE:Polylube bearings, with solid lubrica-
tion, have been adopted with the
intent to make the needle bearings,
used in this model, maintenance
free. With polylube bearings, no
grease nipple and regular lubrication
is necessary. However, grease
should be applied to all oil seals and
collars when removed or installed.
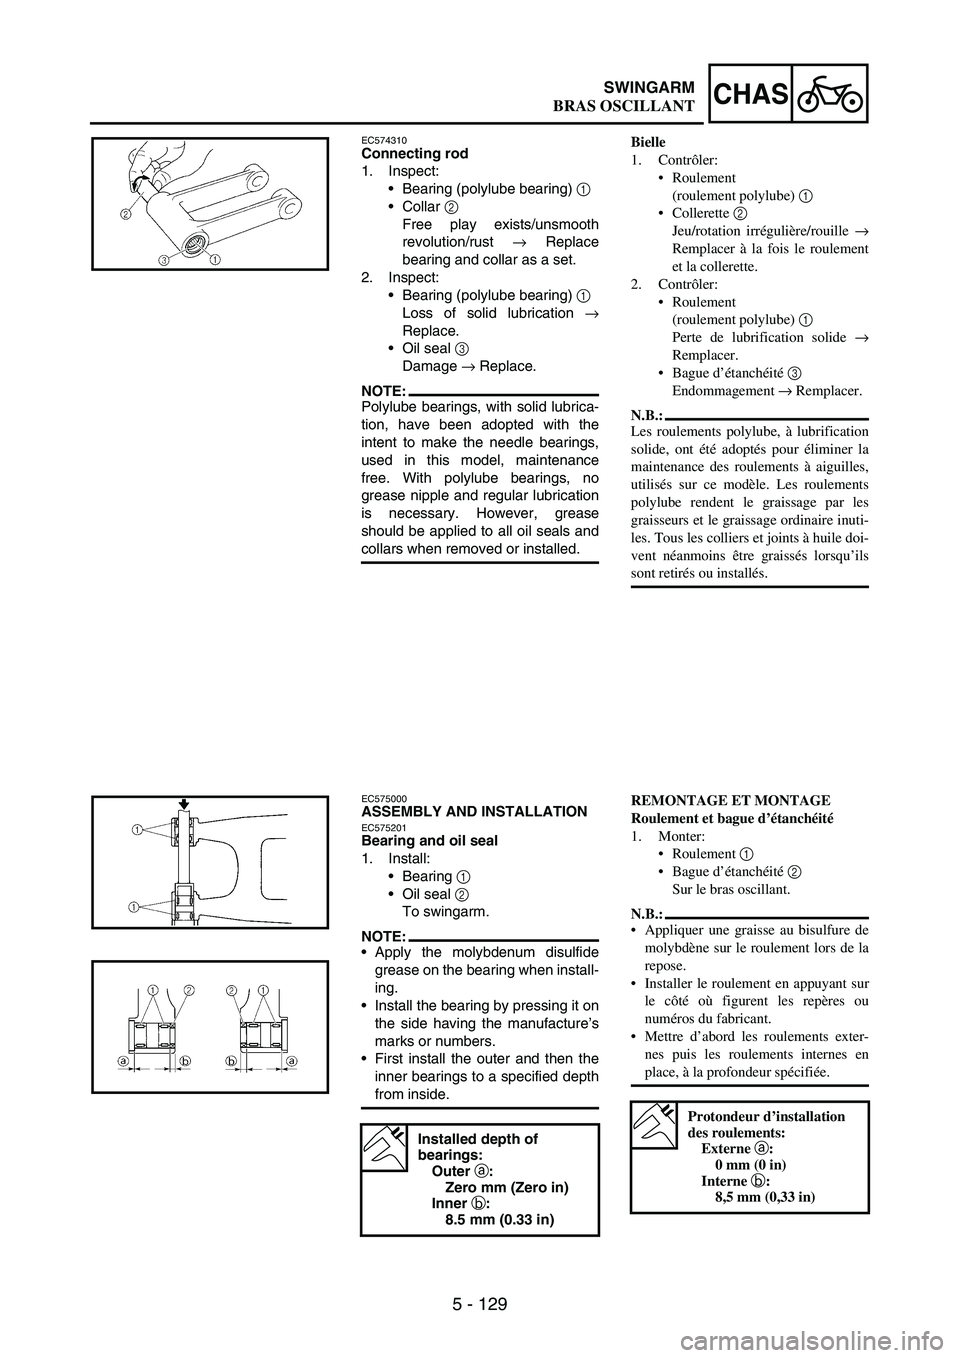
EC575000ASSEMBLY AND INSTALLATIONEC575201Bearing and oil seal
1. Install:
Bearing
1
Oil seal
2
To swingarm.
NOTE:Apply the molybdenum disulfide
grease on the bearing when install-
ing.
Install the bearing by pressing it on
the side having the manufacture’s
marks or numbers.
First install the outer and then the
inner bearings to a specified depth
from inside.
Installed depth of
bearings:
Outer a
:
Zero mm (Zero in)
Inner b
:
8.5 mm (0.33 in)
Bielle
1. Contrôler:
Roulement
(roulement polylube) 1
Collerette 2
Jeu/rotation irrégulière/rouille →
Remplacer à la fois le roulement
et la collerette.
2. Contrôler:
Roulement
(roulement polylube) 1
Perte de lubrification solide →
Remplacer.
Bague d’étanchéité 3
Endommagement → Remplacer.
N.B.:
Les roulements polylube, à lubrification
solide, ont été adoptés pour éliminer la
maintenance des roulements à aiguilles,
utilisés sur ce modèle. Les roulements
polylube rendent le graissage par les
graisseurs et le graissage ordinaire inuti-
les. Tous les colliers et joints à huile doi-
vent néanmoins être graissés lorsqu’ils
sont retirés ou installés.
REMONTAGE ET MONTAGE
Roulement et bague d’étanchéité
1. Monter:
Roulement 1
Bague d’étanchéité 2
Sur le bras oscillant.
N.B.:
Appliquer une graisse au bisulfure de
molybdène sur le roulement lors de la
repose.
Installer le roulement en appuyant sur
le côté où figurent les repères ou
numéros du fabricant.
Mettre d’abord les roulements exter-
nes puis les roulements internes en
place, à la profondeur spécifiée.
Protondeur d’installation
des roulements:
Externe a:
0 mm (0 in)
Interne b:
8,5 mm (0,33 in)
BRAS OSCILLANT