oil change YAMAHA XSR 900 2022 Owners Manual
[x] Cancel search | Manufacturer: YAMAHA, Model Year: 2022, Model line: XSR 900, Model: YAMAHA XSR 900 2022Pages: 114, PDF Size: 4.36 MB
Page 28 of 114
Instrument and control functions
4-5
1
2
34
5
6
7
8
9
10
11
12
13 on “TCS-MODE”.
See page 3-3 for more informationon “D-MODE”.
EAU91374
Wheel switch “ ”
When the wheel switch is operated, a
cursor will appear around the previous-
ly selected item on the display.
The wheel switch controls:
Vehicle information displays
Settings MENU
Grip warmer function (Option)
Operate the wheel switch as follows:
Rotate up - rotate the wheel upward to
scroll up or increase a setting value.
Rotate down - rotate the wheel down-
ward to scroll down or decrease a set-
ting value.
Press inward - press the wheel switch
in towards the handlebar to select items
indicated by the cursor and confirm set-
tings changes. Press and hold the
switch inward to reset selected items.
TIP
If the wheel switch is not operated
for a certain period of time, the cur-
sor will disappear.
For items that can be reset, leave
the cursor over the item, press and
hold the switch to reset.
See page 4-9 for more information
on the main screen and its func-
tions.
See page 4-15 for more informa-
tion on the MENU screen and howto make settings changes.
EAU4939U
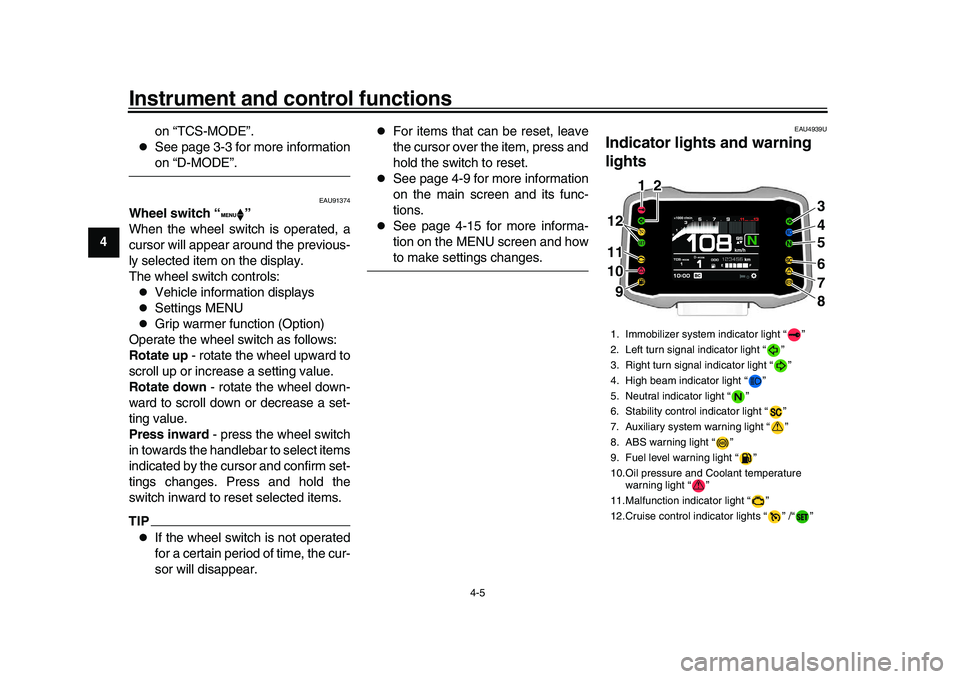
Indicator lights and warning
lights1. Immobilizer system indicator light “ ”
2. Left turn signal indicator light “ ”
3. Right turn signal indicator light “ ”
4. High beam indicator light “ ”
5. Neutral indicator light “ ”
6. Stability control indicator light “ ”
7. Auxiliary system warning light “ ”
8. ABS warning light “ ”
9. Fuel level warning light “ ”
10.Oil pressure and Coolant temperature warning light “ ”
11.Malfunction indicator light “ ”
12.Cruise control indicator lights “ ” /“ ”
ABS
3
4
56
7
8
11 11
10 10 9
11 1 12
2 2
1012 12 12 9 9
BEA-28199-E0.book 5 ページ 2021年12月1日 水曜日 午後7時8分
Page 32 of 114
Instrument and control functions
4-9
1
2
34
5
6
7
8
9
10
11
12
13
EAU96241
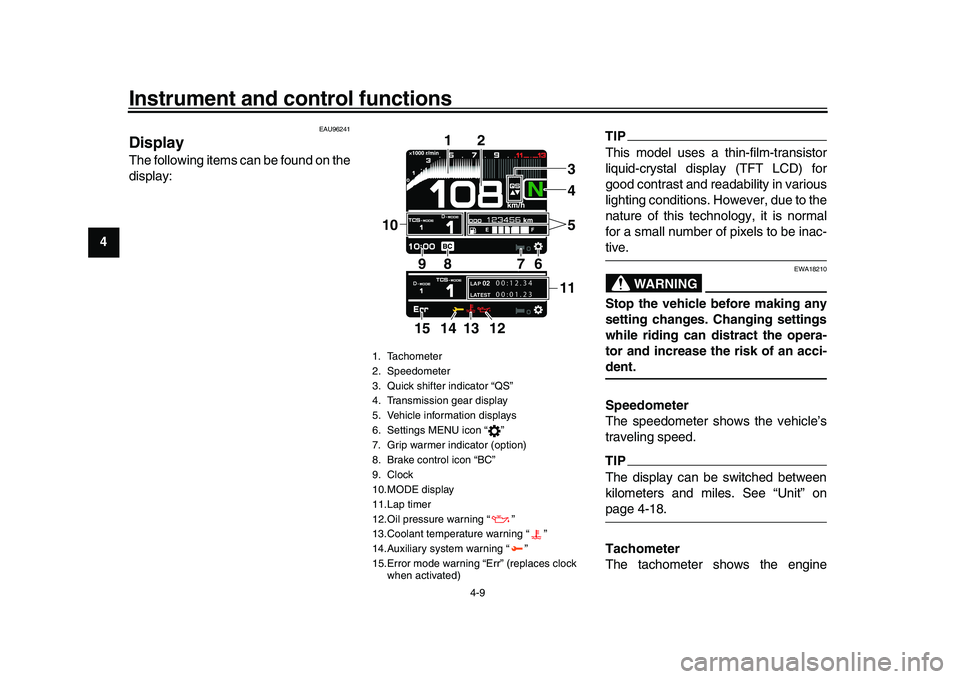
DisplayThe following items can be found on the
display:
TIPThis model uses a thin-film-transistor
liquid-crystal display (TFT LCD) for
good contrast and readability in various
lighting conditions. However, due to the
nature of this technology, it is normal
for a small number of pixels to be inac-tive.
WARNING
EWA18210
Stop the vehicle before making any
setting changes. Changing settings
while riding can distract the opera-
tor and increase the risk of an acci-dent.
Speedometer
The speedometer shows the vehicle’s
traveling speed.TIPThe display can be switched between
kilometers and miles. See “Unit” onpage 4-18.
Tachometer
The tachometer shows the engine
1. Tachometer
2. Speedometer
3. Quick shifter indicator “QS”
4. Transmission gear display
5. Vehicle information displays
6. Settings MENU icon “ ”
7. Grip warmer indicator (option)
8. Brake control icon “BC”
9. Clock
10.MODE display
11.Lap timer
12.Oil pressure warning “ ”
13.Coolant temperature warning “ ”
14.Auxiliary system warning “ ”
15.Error mode warning “Err” (replaces clock when activated)
LAP 02LATEST
00:12.34
00:01.23
4
1
2
7
6
9
10
8
1135
14 13
12
15
BEA-28199-E0.book 9 ページ 2021年12月1日 水曜日 午後7時8分
Page 37 of 114
Instrument and control functions
4-14
1
2
345
6
7
8
9
10
11
12
13
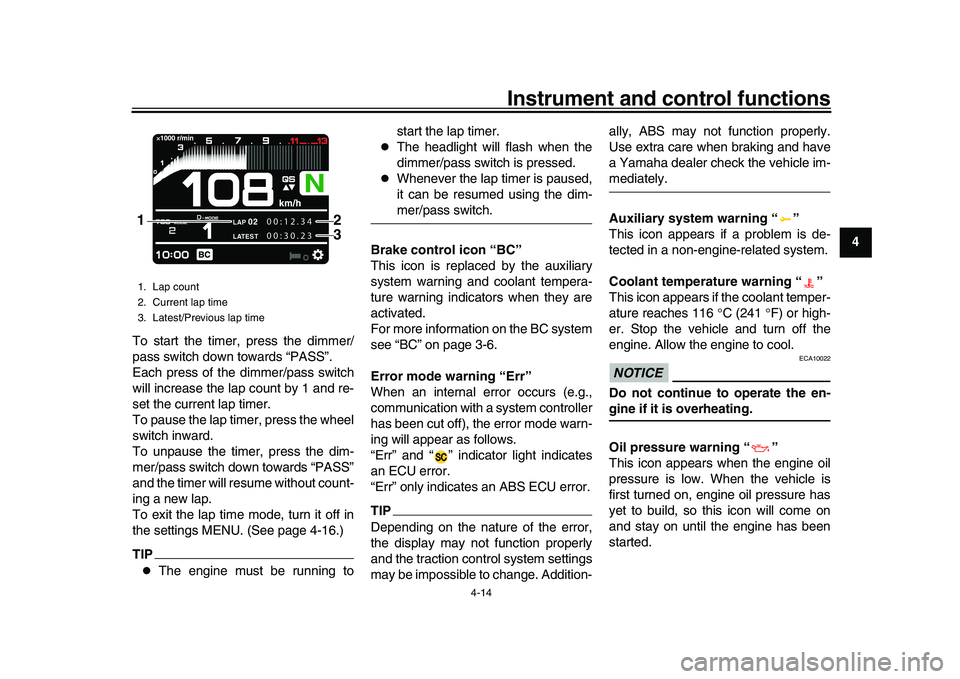
To start the timer, press the dimmer/
pass switch down towards “PASS”.
Each press of the dimmer/pass switch
will increase the lap count by 1 and re-
set the current lap timer.
To pause the lap timer, press the wheel
switch inward.
To unpause the timer, press the dim-
mer/pass switch down towards “PASS”
and the timer will resume without count-
ing a new lap.
To exit the lap time mode, turn it off in
the settings MENU. (See page 4-16.)
TIP
The engine must be running to start the lap timer.
The headlight will flash when the
dimmer/pass switch is pressed.
Whenever the lap timer is paused,
it can be resumed using the dim-mer/pass switch.
Brake control icon “BC”
This icon is replaced by the auxiliary
system warning and coolant tempera-
ture warning indicators when they are
activated.
For more information on the BC system
see “BC” on page 3-6.
Error mode warning “Err”
When an internal error occurs (e.g.,
communication with a system controller
has been cut off), the error mode warn-
ing will appear as follows.
“Err” and “ ” indicator light indicates
an ECU error.
“Err” only indicates an ABS ECU error.
TIPDepending on the nature of the error,
the display may not function properly
and the traction control system settings
may be impossible to change. Addition- ally, ABS may not function properly.
Use extra care when braking and have
a Yamaha dealer check the vehicle im-
mediately.
Auxiliary system warning “ ”
This icon appears if a problem is de-
tected in a non-engine-related system.
Coolant temperature warning “ ”
This icon appears if the coolant temper-
ature reaches 116
C (241 F) or high-
er. Stop the vehicle and turn off the
engine. Allow the engine to cool.NOTICE
ECA10022
Do not continue to operate the en-gine if it is overheating.
Oil pressure warning “ ”
This icon appears when the engine oil
pressure is low. When the vehicle is
first turned on, engine oil pressure has
yet to build, so this icon will come on
and stay on until the engine has been
started.
1. Lap count
2. Current lap time
3. Latest/Previous lap time
LAP
02
LATEST
00:12.34
00:30.23
2
1
3
BEA-28199-E0.book 14 ページ 2021年12月1日 水曜日 午後7時8分
Page 38 of 114
Instrument and control functions
4-15
1
2
34
5
6
7
8
9
10
11
12
13
TIPIf a malfunction is detected, the oil pres-sure warning icon will flash repeatedly.NOTICE
ECA26410
Do not continue to operate the en-gine if the oil pressure is low.
EAU9145B
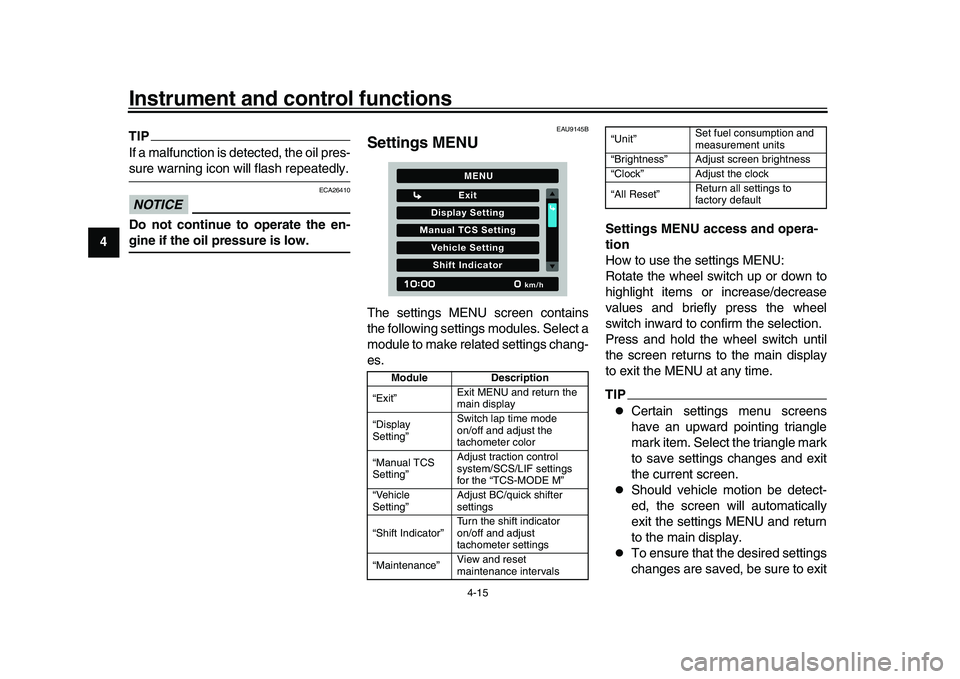
Settings MENUThe settings MENU screen contains
the following settings modules. Select a
module to make related settings chang-
es. Settings MENU access and opera-
tion
How to use the settings MENU:
Rotate the wheel switch up or down to
highlight items or increase/decrease
values and briefly press the wheel
switch inward to confirm the selection.
Press and hold the wheel switch until
the screen returns to the main display
to exit the MENU at any time.
TIP
Certain settings menu screens
have an upward pointing triangle
mark item. Select the triangle mark
to save settings changes and exit
the current screen.
Should vehicle motion be detect-
ed, the screen will automatically
exit the settings MENU and return
to the main display.
To ensure that the desired settings
changes are saved, be sure to exit
Module
Description
“Exit” Exit MENU and return the
main display
“Display
Setting” Switch lap time mode
on/off and adjust the
tachometer color
“Manual TCS
Setting” Adjust traction control
system/SCS/LIF settings
for the “TCS-MODE M”
“Vehicle
Setting” Adjust BC/quick shifter
settings
“Shift Indicator” Turn the shift indicator
on/off and adjust
tachometer settings
“Maintenance” View and reset
maintenance intervals
Display Setting
Exit
Manual TCS SettingVehicle SettingShift Indicator
km/h
MENU
“Unit”Set fuel consumption and
measurement units
“Brightness” Adjust screen brightness
“Clock” Adjust the clock
“All Reset” Return all settings to
factory default
BEA-28199-E0.book 15 ページ 2021年12月1日 水曜日 午後7時8分
Page 41 of 114
Instrument and control functions
4-18
1
2
345
6
7
8
9
10
11
12
13
“IND Start” - the r/min at which the indi-
cator starts flashing can be chosen.
Once selected, rotate the wheel switch
up/down to increase or decrease the
r/min value by increments of 200 r/min.
“IND Start” is settable between 6000 -
12800 r/min.
“IND Stop” - the r/min at which the indi-
cator stops flashing can be chosen.
Once selected, rotate the wheel switch
up/down to increase or decrease the
r/min value by increments of 200 r/min.
“IND Stop” is settable between 6200 -
13000 r/min.
“Maintenance”
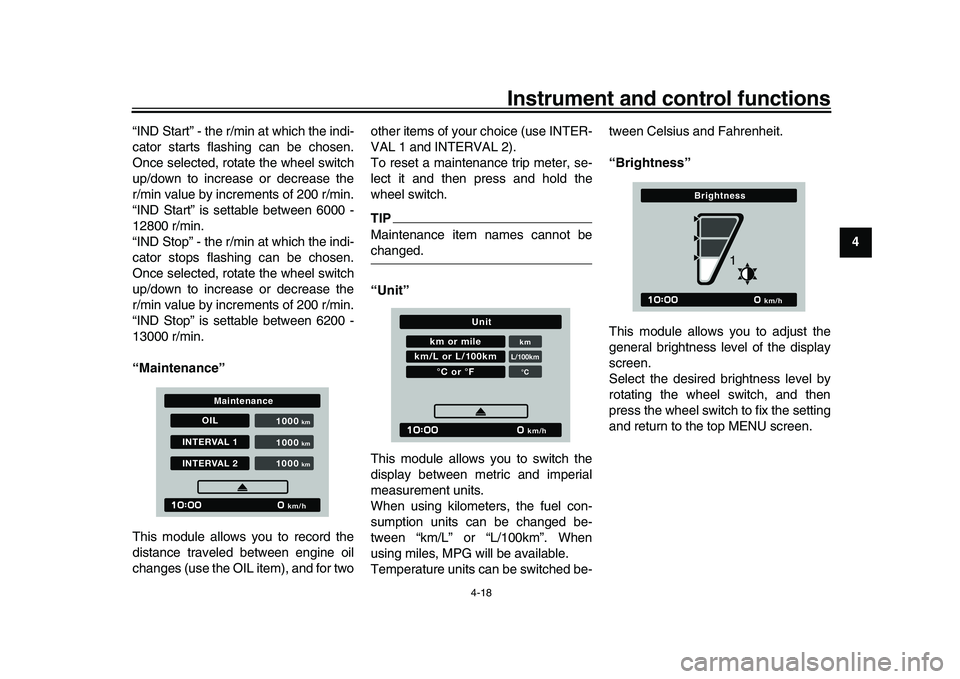
This module allows you to record the
distance traveled between engine oil
changes (use the OIL item), and for two other items of your choice (use INTER-
VAL 1 and INTERVAL 2).
To reset a maintenance trip meter, se-
lect it and then press and hold the
wheel switch.
TIPMaintenance item names cannot bechanged.
“Unit”
This module allows you to switch the
display between metric and imperial
measurement units.
When using kilometers, the fuel con-
sumption units can be changed be-
tween “km/L” or “L/100km”. When
using miles, MPG will be available.
Temperature units can be switched be-tween Celsius and Fahrenheit.
“Brightness”
This module allows you to adjust the
general brightness level of the display
screen.
Select the desired brightness level by
rotating the wheel switch, and then
press the wheel switch to fix the setting
and return to the top MENU screen.
OIL
INTERVAL 1INTERVAL 2 1000
km/h
km
1000
km
1000
km
Maintenance
km or mile
kmL/100km°C
km/L or L/100km
°C or °F
km/h
Unit
km/h
Brightness
1
BEA-28199-E0.book 18 ページ 2021年12月1日 水曜日 午後7時8分
Page 59 of 114
6-1
1
2
3
4
567
8
9
10
11
12
13
Operation and important riding points
EAU15952
Read the Owner’s Manual carefully to
become familiar with all controls. If
there is a control or function you do not
understand, ask your Yamaha dealer.
WARNING
EWA10272
Failure to familiarize yourself with
the controls can lead to loss of con-
trol, which could cause an accidentor injury.
EAU16842
Engine break-inThere is never a more important period
in the life of your engine than the period
between 0 and 1600 km (1000 mi). For
this reason, you should read the follow-
ing material carefully.
Since the engine is brand new, do not
put an excessive load on it for the first
1600 km (1000 mi). The various parts in
the engine wear and polish themselves
to the correct operating clearances.
During this period, prolonged full-throt-
tle operation or any condition that might
result in engine overheating must be
avoided.
EAU17094
0–1000 km (0–600 mi)
Avoid prolonged operation above 5300
r/min. NOTICE: After 1000 km (600
mi) of operation, the engine oil must
be changed and the oil filter car-
tridge or element replaced.
[ECA10303]
1000–1600 km (600–1000 mi)
Avoid prolonged operation above 6300 r/min.
1600 km (1000 mi) and beyond
The vehicle can now be operated nor-
mally.
NOTICE
ECA10311
Keep the engine speed out of
the tachometer red zone.
If any engine trouble should oc-
cur during the engine break-in
period, immediately have a
Yamaha dealer check the vehi-cle.
BEA-28199-E0.book 1 ページ 2021年12月1日 水曜日 午後7時8分
Page 69 of 114
Periodic maintenance and adjustment
7-6
1
2
3
4
5
678
9
10
11
12
13
23 *Rear suspension
relay arm and
connecting arm
pivoting points Check operation.
24 *Engine oil Change (warm engine before
draining).
Check oil level and vehicle for oil leakage.
25 *Engine oil filter
cartridge Replace.
26 *Cooling system Check coolant level and vehicle
for coolant leakage.
Change. Every 3 years
27 *Front and rear brake
switches Check operation.
28 *Moving parts and
cables Lubricate.
29 *Throttle grip Check operation.
Lubricate throttle grip housing
tube guides.
30 *Lights, signals and
switches Check operation.
Adjust headlight beam.
NO. ITEM CHECK OR MAINTENANCE JOB
ODOMETER READING
ANNUAL
CHECK
1000 km
(600 mi) 10000 km
(6000 mi) 20000 km
(12000 mi) 30000 km
(18000 mi) 40000 km
(24000 mi)
BEA-28199-E0.book 6 ページ 2021年12月1日 水曜日 午後7時8分
Page 70 of 114
Periodic maintenance and adjustment
7-7
1
2
3
4
5
67
8
9
10
11
12
13
EAU72800
TIP
Air filter
This model’s air filter is equipped wi th a disposable oil-coated paper elemen t, which must not be cleaned with com-
pressed air to avoid damaging it.
The air filter element needs to be replaced more fr equently when riding in unusually wet or dusty areas.
Hydraulic brake service
Regularly check and, if necessary, correct the brake fluid level.
Every two years replace the internal components of t he brake master cylinders and calipers, and change the brake
fluid. Replace the brake hoses every four years and if cracked or damaged.
BEA-28199-E0.book 7 ページ 2021年12月1日 水曜日 午後7時8分
Page 75 of 114
Periodic maintenance and adjustment7-12
1
2
3
4
5
678
9
10
11
12
13
EAU36113
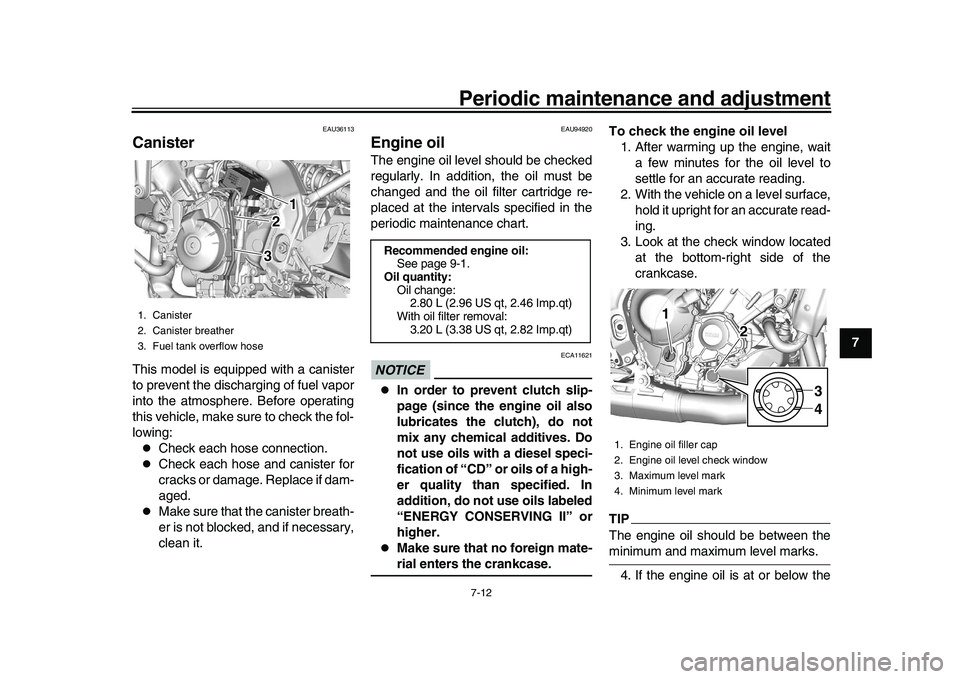
CanisterThis model is equipped with a canister
to prevent the discharging of fuel vapor
into the atmosphere. Before operating
this vehicle, make sure to check the fol-
lowing:
Check each hose connection.
Check each hose and canister for
cracks or damage. Replace if dam-
aged.
Make sure that the canister breath-
er is not blocked, and if necessary,
clean it.
EAU94920
Engine oilThe engine oil level should be checked
regularly. In addition, the oil must be
changed and the oil filter cartridge re-
placed at the intervals specified in the
periodic maintenance chart.NOTICE
ECA11621
In order to prevent clutch slip-
page (since the engine oil also
lubricates the clutch), do not
mix any chemical additives. Do
not use oils with a diesel speci-
fication of “CD” or oils of a high-
er quality than specified. In
addition, do not use oils labeled
“ENERGY CONSERVING II” or
higher.
Make sure that no foreign mate-rial enters the crankcase. To check the engine oil level
1. After warming up the engine, wait a few minutes for the oil level to
settle for an accurate reading.
2. With the vehicle on a level surface, hold it upright for an accurate read-
ing.
3. Look at the check window located at the bottom-right side of the
crankcase.
TIPThe engine oil should be between theminimum and maximum level marks.
4. If the engine oil is at or below the
1. Canister
2. Canister breather
3. Fuel tank overflow hose
1 1 1
2 2
3 3
Recommended engine oil: See page 9-1.
Oil quantity: Oil change:2.80 L (2.96 US qt, 2.46 Imp.qt)
With oil filter removal: 3.20 L (3.38 US qt, 2.82 Imp.qt)
1. Engine oil filler cap
2. Engine oil level check window
3. Maximum level mark
4. Minimum level mark
11
21
2
34
BEA-28199-E0.book 12 ページ 2021年12月1日 水曜日 午後7時8分
Page 76 of 114
Periodic maintenance and adjustment
7-13
1
2
3
4
5
67
8
9
10
11
12
13 minimum level mark, remove the
oil filler cap and add oil.
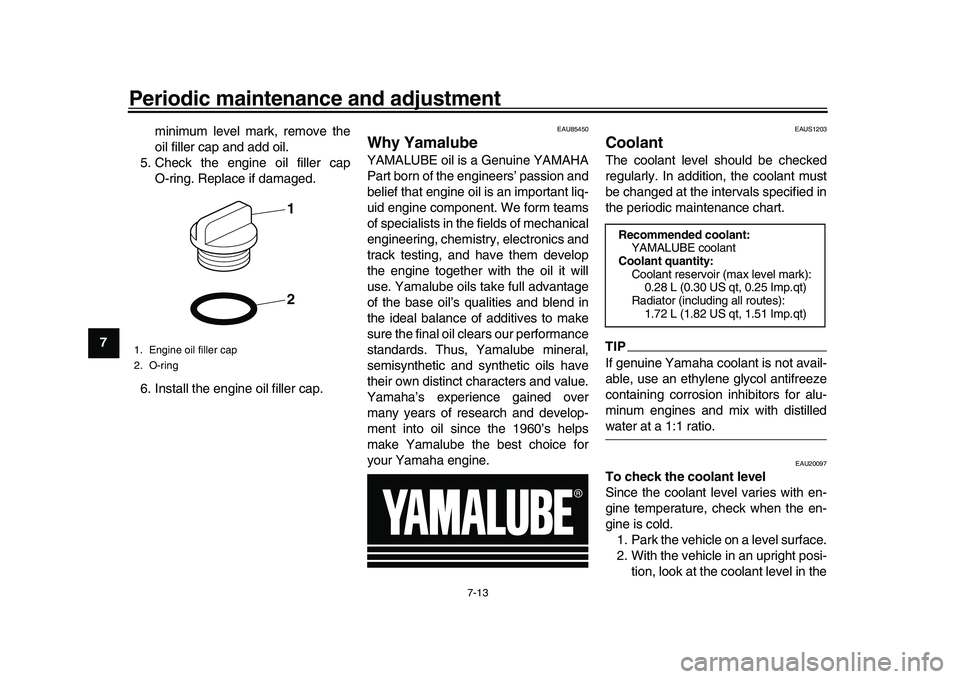
5. Check the engine oil filler cap O-ring. Replace if damaged.
6. Install the engine oil filler cap.
EAU85450
Why YamalubeYAMALUBE oil is a Genuine YAMAHA
Part born of the engineers’ passion and
belief that engine oil is an important liq-
uid engine component. We form teams
of specialists in the fields of mechanical
engineering, chemistry, electronics and
track testing, and have them develop
the engine together with the oil it will
use. Yamalube oils take full advantage
of the base oil’s qualities and blend in
the ideal balance of additives to make
sure the final oil clears our performance
standards. Thus, Yamalube mineral,
semisynthetic and synthetic oils have
their own distinct characters and value.
Yamaha’s experience gained over
many years of research and develop-
ment into oil since the 1960’s helps
make Yamalube the best choice for
your Yamaha engine.
EAUS1203
CoolantThe coolant level should be checked
regularly. In addition, the coolant must
be changed at the intervals specified in
the periodic maintenance chart.TIPIf genuine Yamaha coolant is not avail-
able, use an ethylene glycol antifreeze
containing corrosion inhibitors for alu-
minum engines and mix with distilledwater at a 1:1 ratio.
EAU20097
To check the coolant level
Since the coolant level varies with en-
gine temperature, check when the en-
gine is cold. 1. Park the vehicle on a level surface.
2. With the vehicle in an upright posi- tion, look at the coolant level in the
1. Engine oil filler cap
2. O-ring
21
Recommended coolant:YAMALUBE coolant
Coolant quantity: Coolant reservoir (max level mark):0.28 L (0.30 US qt, 0.25 Imp.qt)
Radiator (including all routes): 1.72 L (1.82 US qt, 1.51 Imp.qt)
BEA-28199-E0.book 13 ページ 2021年12月1日 水曜日 午後7時8分