ACURA NSX 1991 Service Repair Manual
Manufacturer: ACURA, Model Year: 1991, Model line: NSX, Model: ACURA NSX 1991Pages: 1640, PDF Size: 60.48 MB
Page 1141 of 1640
Positive Crankcase Ventilation (PCV) System
Description
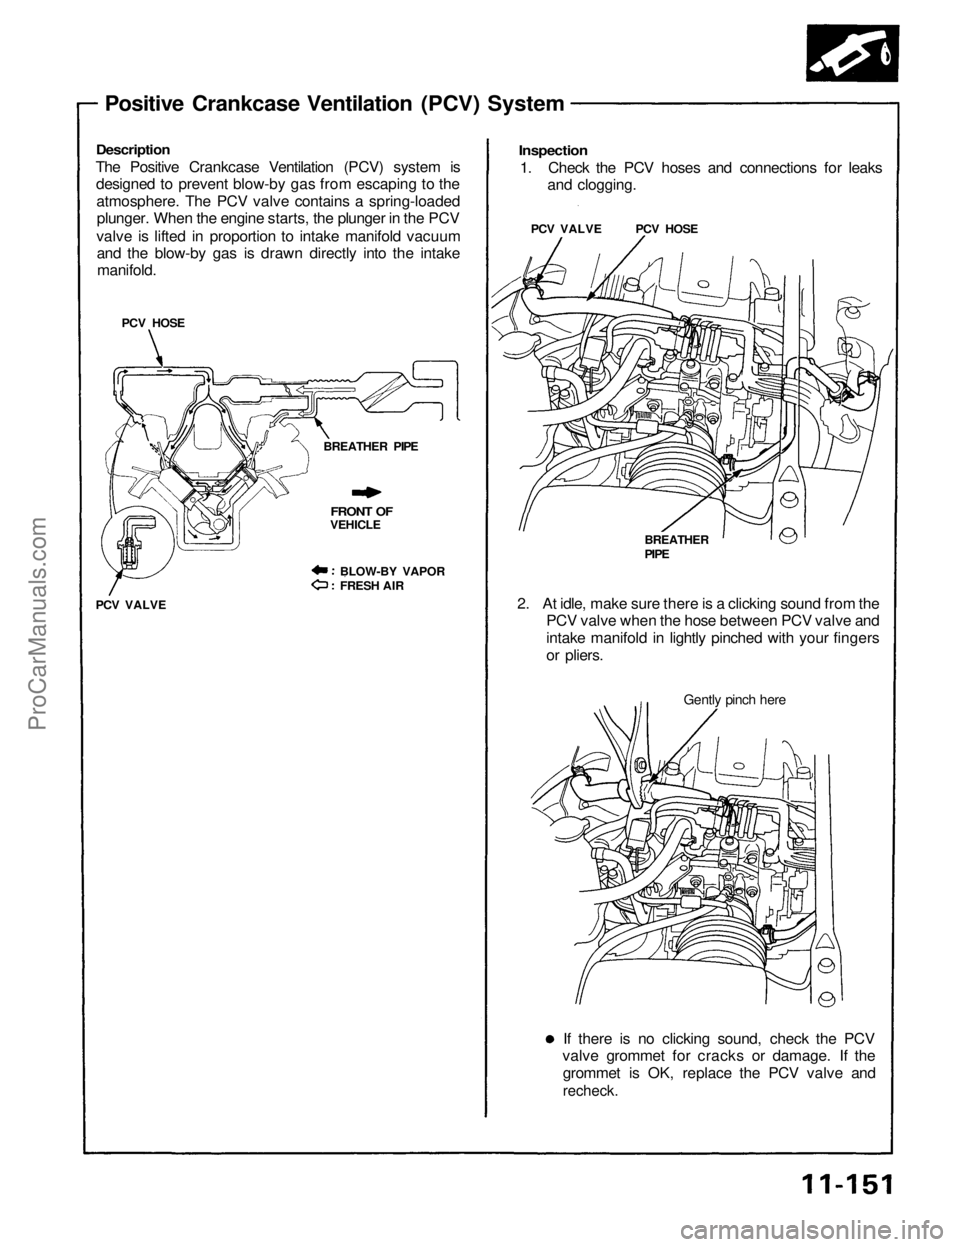
The Positive Crankcase Ventilation (PCV) system is
designed to prevent blow-by gas from escaping to the
atmosphere. The PCV valve contains a spring-loaded
plunger. When the engine starts, the plunger in the PCV
valve is lifted in proportion to intake manifold vacuum
and the blow-by gas is drawn directly into the intake
manifold.
PCV HOSE
BREATHER PIPE
FRONT OF
VEHICLE
BLOW-BY VAPOR
FRESH AIR
PCV VALVE
If there is no clicking sound, check the PCV
valve grommet for cracks or damage. If the
grommet is OK, replace the PCV valve and
recheck.
Gently pinch here
2. At idle, make sure there is a clicking sound from the
PCV valve when the hose between PCV valve and
intake manifold in lightly pinched with your fingers
or pliers.
BREATHER
PIPE
PCV VALVE PCV HOSE
Inspection
1. Check the PCV hoses and connections for leaks
and clogging.ProCarManuals.com
Page 1142 of 1640
Emission Control System
Description
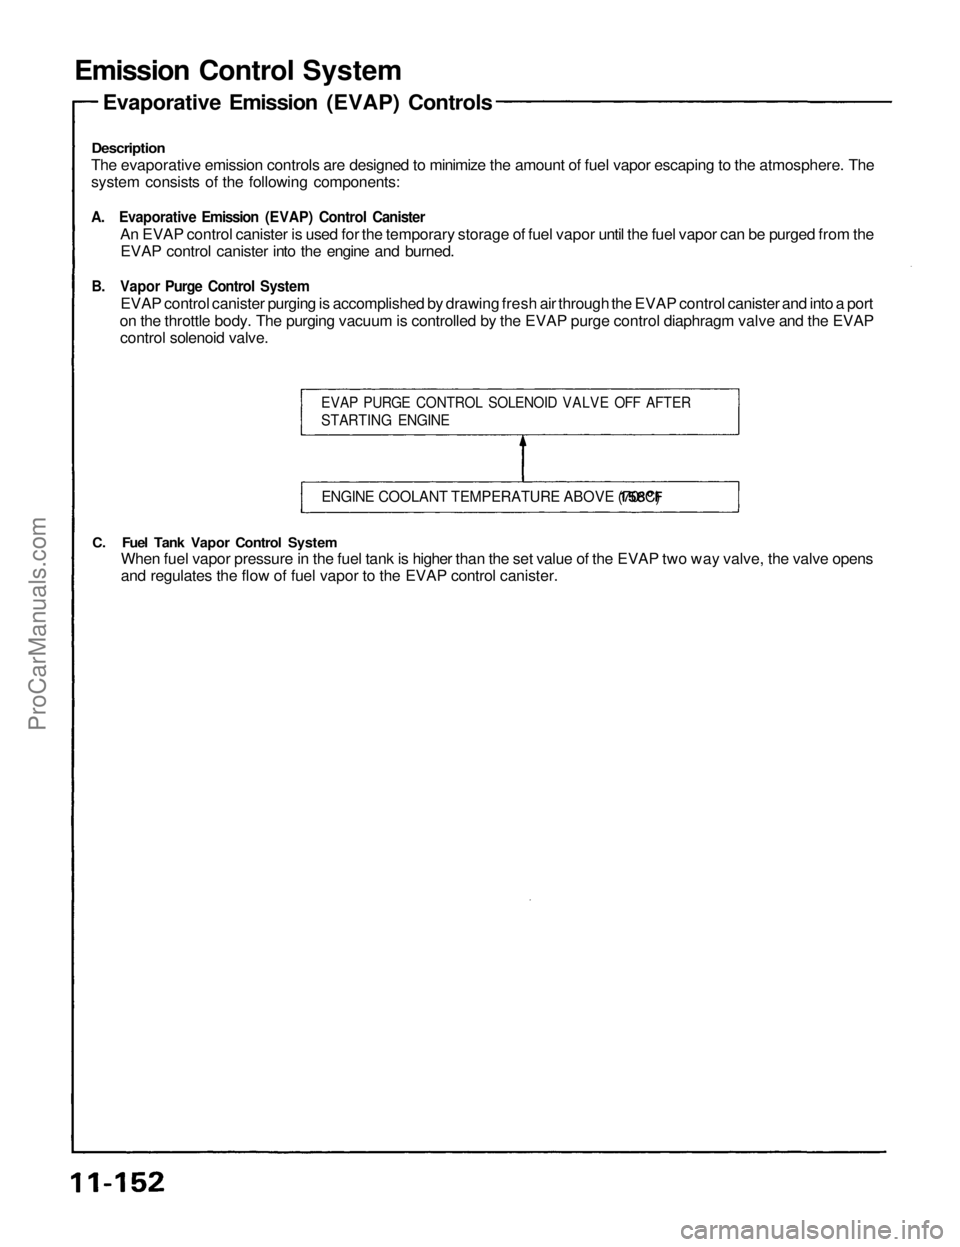
The evaporative emission controls are designed to minimize the amount of fuel vapor escaping to the atmosphere. The
system consists of the following components:
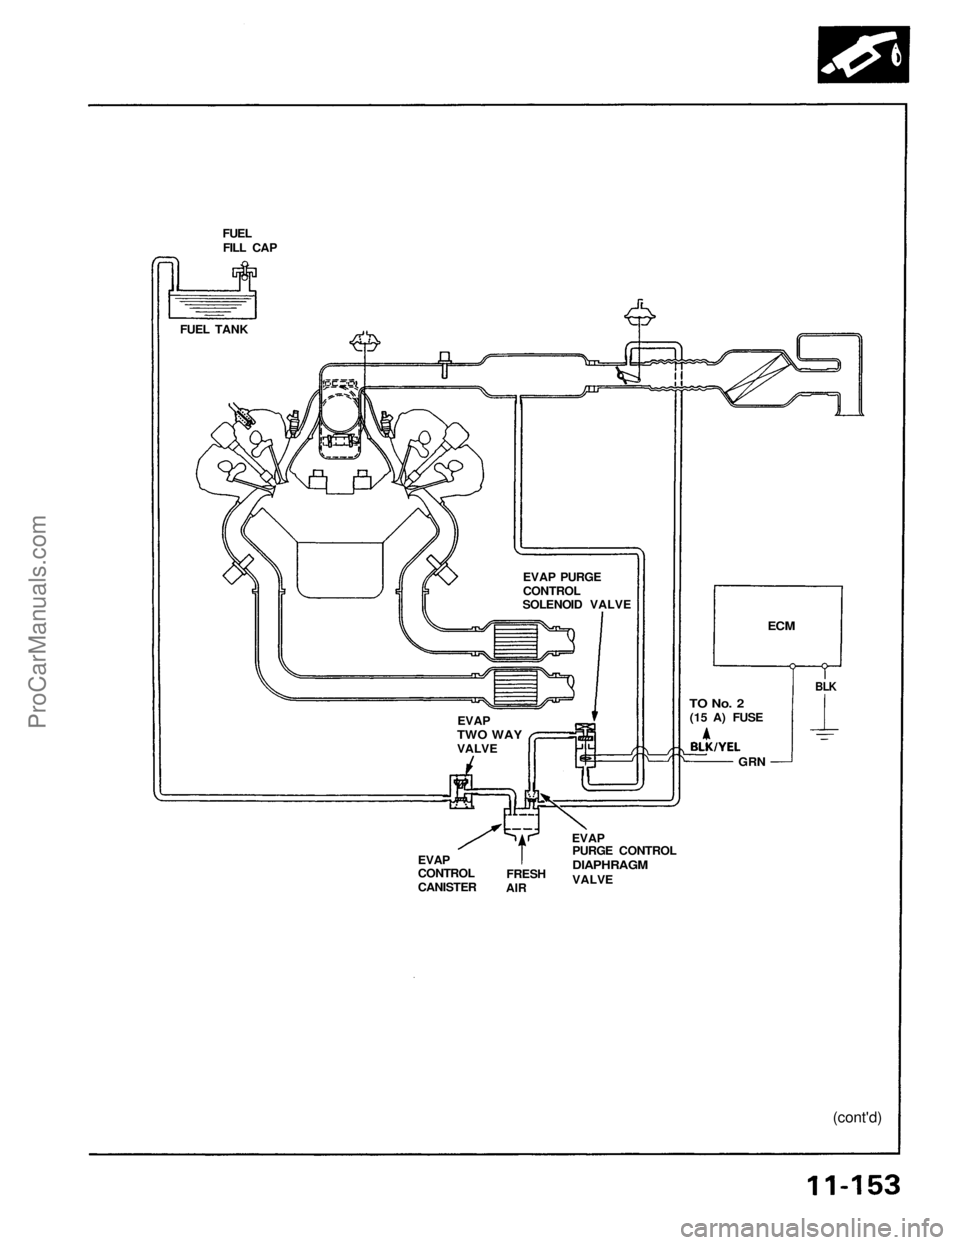
A. Evaporative Emission (EVAP) Control Canister
An EVAP control canister is used for the temporary storage of fuel vapor until the fuel vapor can be purged from the
EVAP control canister into the engine and burned.
B. Vapor Purge Control System
EVAP control canister purging is accomplished by drawing fresh air through the EVAP control canister and into a port
on the throttle body. The purging vacuum is controlled by the EVAP purge control diaphragm valve and the EVAP
control solenoid valve.
C. Fuel Tank Vapor Control System
When fuel vapor pressure in the fuel tank is higher than the set value of the EVAP two way valve, the valve opens
and regulates the flow of fuel vapor to the EVAP control canister.
EVAP PURGE CONTROL SOLENOID VALVE OFF AFTER
STARTING ENGINE
ENGINE COOLANT TEMPERATURE ABOVE
158°F
(70°C)
Evaporative Emission (EVAP) ControlsProCarManuals.com
Page 1143 of 1640
FUEL
FILL CAP
FUEL TANK
EVAP
CONTROL
CANISTER
FRESH
AIR
EVAP
PURGE CONTROL
DIAPHRAGM
VALVE
(cont'd)
BLK
ECM
TO No. 2
(15 A) FUSE
GRN
EVAP PURGE
CONTROL
SOLENOID VALVE
EVAP
TWO WAY
VALVEProCarManuals.com
Page 1144 of 1640
Emission Contro l Syste m
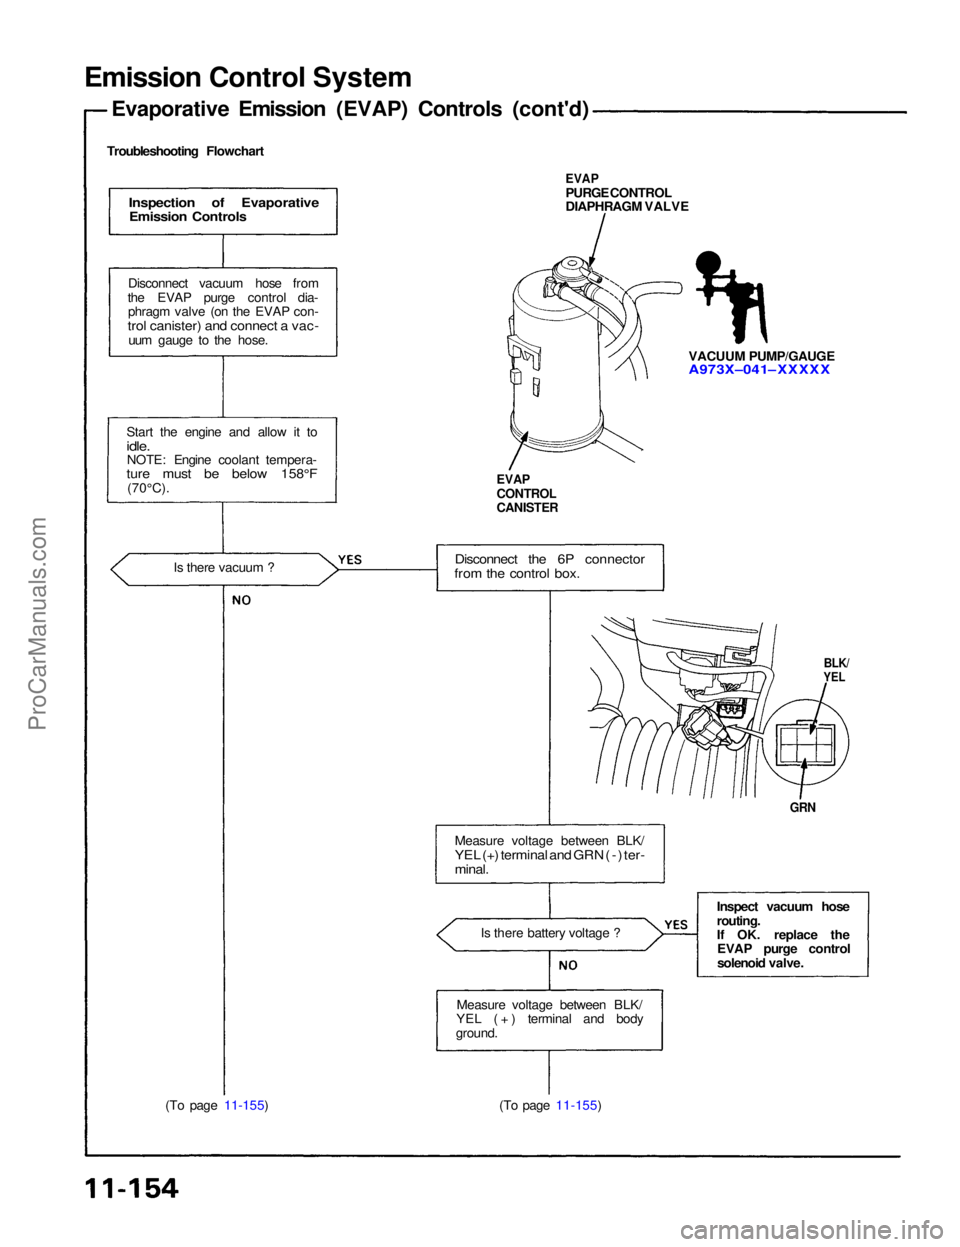
Troubleshootin g Flowchar t
Evaporativ e Emissio n (EVAP ) Control s (cont'd )
(To pag e 11-155 ) (To pag e 11-155 )
GRN
BLK /YEL
VACUU M PUMP/GAUG EA973X–041–XXXXX
EVAPCONTRO LCANISTE R
EVAPPURG E CONTRO L
DIAPHRAG M VALV EInspectio n o f Evaporativ eEmission Control s
Disconnec t vacuu m hos e fro m
th e EVA P purg e contro l dia -
phrag m valv e (o n th e EVA P con -
trol canister ) an d connec t a vac -uum gaug e t o th e hose .
Star t th e engin e an d allo w i t t o
idle .NOTE : Engin e coolan t tempera -ture mus t b e belo w 158° F(70°C).
Is ther e vacuu m ?
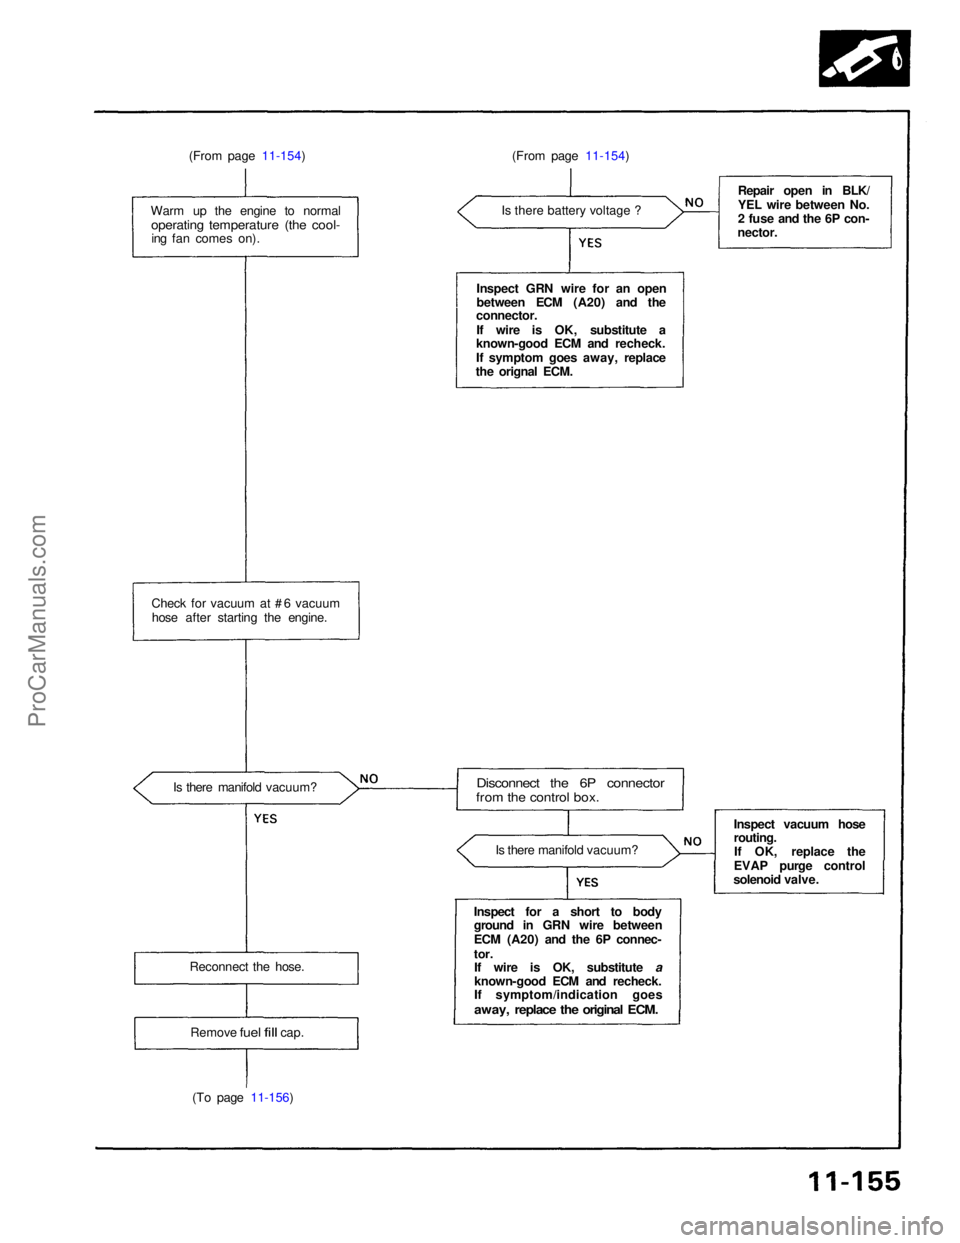
Disconnec t th e 6 P connecto rfrom th e contro l box .
Measur e voltag e betwee n BLK /YEL (+ ) termina l an d GR N ( - ) ter-minal .
Is ther e batter y voltag e ?
Measur e voltag e betwee n BLK /
YE L ( + ) termina l an d bod y
ground . Inspec
t vacuu m hos e
routing .
I f OK . replac e th e
EVA P purg e contro l
solenoi d valve .
ProCarManuals.com
Page 1145 of 1640
Page 1146 of 1640
Emission Contro l Syste m
Evaporativ e Emissio n (EVAP ) Control s (cont'd )
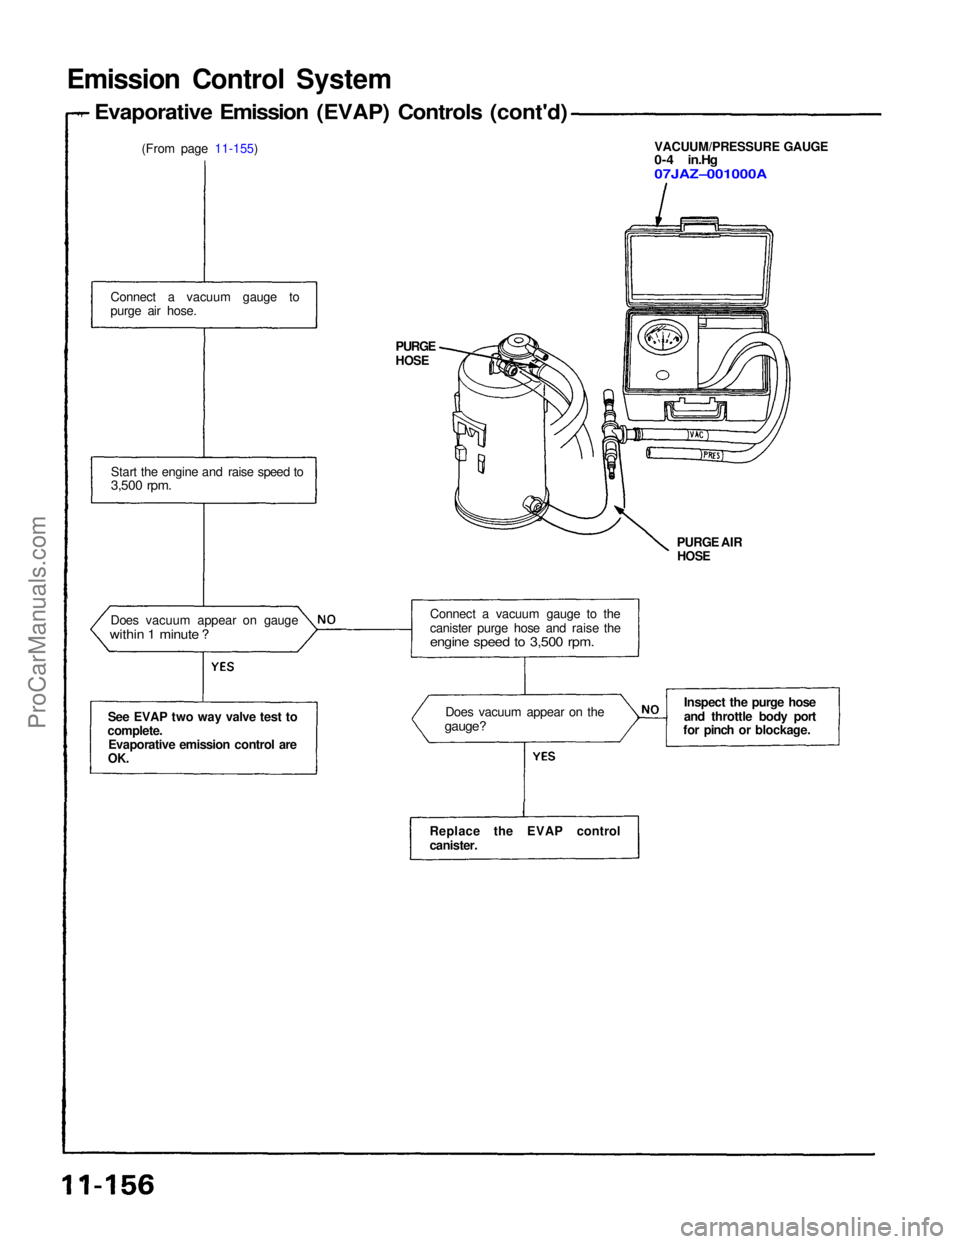
(From pag e 11-155 ) VACUUM/PRESSUR
E GAUG E0-4 in.H g07JAZ–001000A
PURG E AI RHOS E
PURG EHOSE
Connec t a vacuu m gaug e t o
purg e ai r hose .
Star t th e engin e an d rais e spee d to
3,50 0 rpm .
Does vacuu m appea r o n gaug ewithin 1 minut e ?
Se e EVA P tw o wa y valv e tes t t o
complete .
Evaporativ e emissio n contro l ar e
OK .
Connec t a vacuu m gaug e t o th e
caniste r purg e hos e an d rais e th e
engin e spee d to 3,50 0 rpm .
Does vacuu m appea r o n th egauge ?
Replac e th e EVA P contro l
canister . Inspec
t th e purg e hos e
an d throttl e bod y por t
fo r pinc h o r blockage .
ProCarManuals.com
Page 1147 of 1640
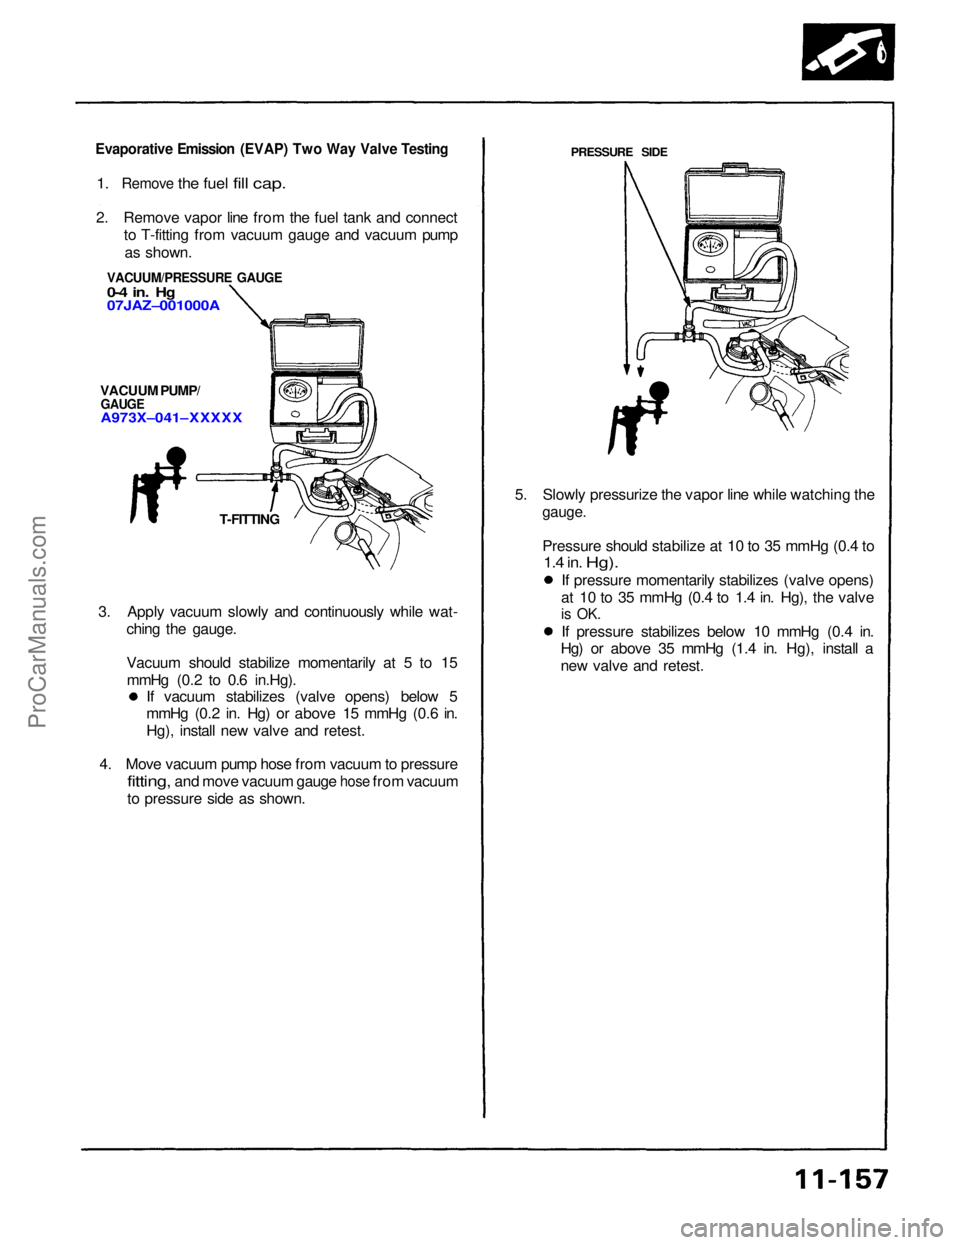
Evaporative Emissio n (EVAP ) Tw o Wa y Valv e Testin g
1. Remov e the fue l fill cap .
2. Remov e vapo r lin e fro m th e fue l tan k an d connec t
t o T-fittin g fro m vacuu m gaug e an d vacuu m pum p
a s shown .
PRESSUR E SID E
3. Appl y vacuu m slowl y an d continuousl y whil e wat -
chin g th e gauge .
Vacuu m shoul d stabiliz e momentaril y a t 5 to 1 5
mmH g (0. 2 t o 0. 6 in.Hg) . 5
. Slowl y pressuriz e th e vapo r lin e whil e watchin g th e
gauge .
Pressur e shoul d stabiliz e a t 1 0 to 3 5 mmH g (0. 4 to
1. 4 in . Hg) .
VACUUM/PRESSUR E GAUG E0-4 in . Hg07JAZ–001000A
VACUU M PUMP /GAUG EA973X–041–XXXXX
T-FITTIN G
If vacuu m stabilize s (valv e opens ) belo w 5
mmH g (0. 2 in . Hg ) o r abov e 1 5 mmH g (0. 6 in .
Hg) , instal l ne w valv e an d retest .
4 . Mov e vacuu m pum p hos e fro m vacuu m to pressur e
fitting, and mov e vacuu m gaug e hose from vacuu m
t o pressur e sid e a s shown . I
f pressur e momentaril y stabilize s (valv e opens )
a t 1 0 to 3 5 mmH g (0. 4 to 1. 4 in . Hg) , th e valv e
is OK .
If pressur e stabilize s belo w 1 0 mmH g (0. 4 in .
Hg ) o r abov e 3 5 mmH g (1. 4 in . Hg) , instal l a
ne w valv e an d retest .
ProCarManuals.com
Page 1148 of 1640
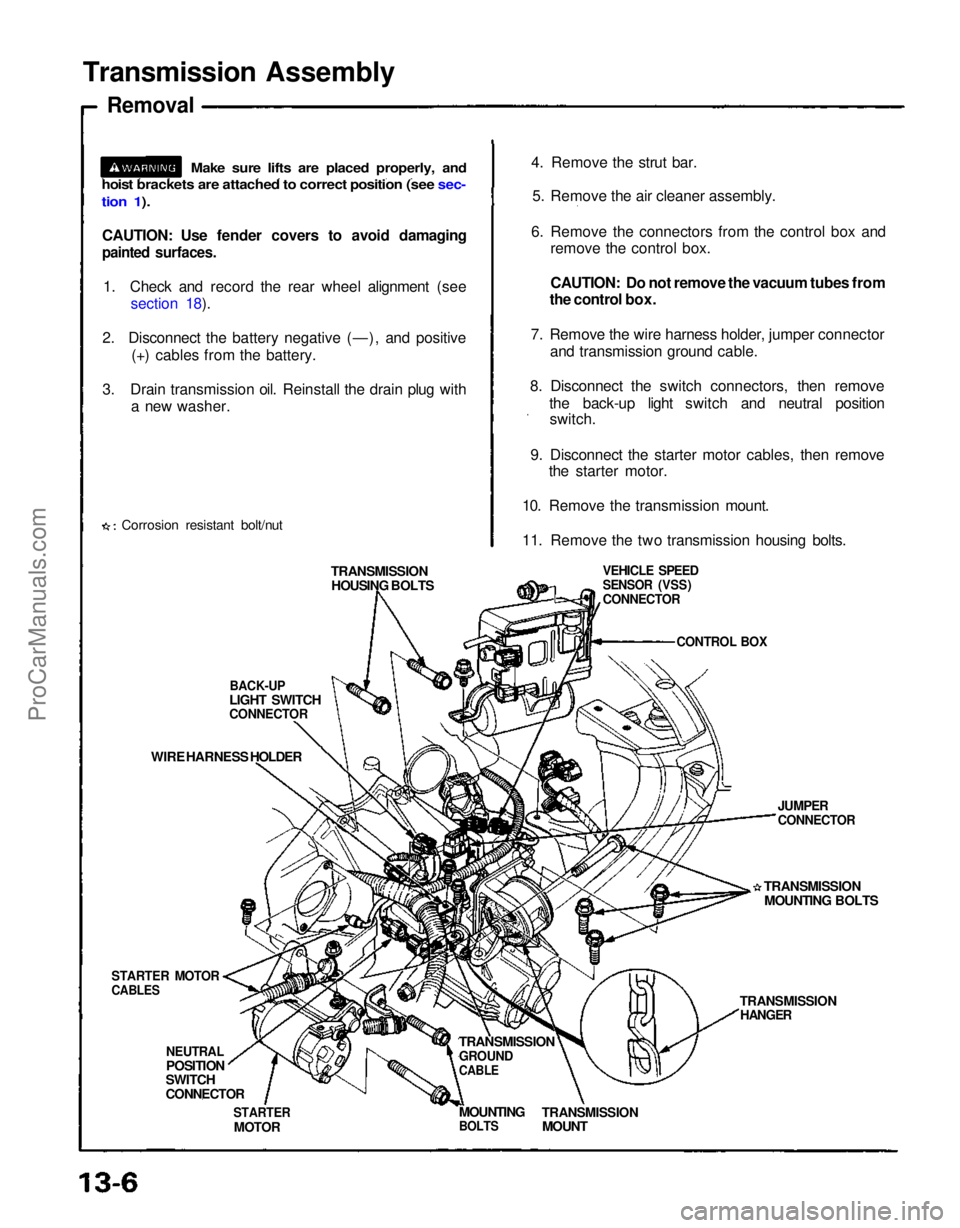
Transmission Assembly
Removal
CAUTION: Use fender covers to avoid damaging
painted surfaces.
1. Check and record the rear wheel alignment (see section 18).
2. Disconnect the battery negative (—), and positive (+) cables from the battery.
3. Drain transmission oil. Reinstall the drain plug with a new washer.
Corrosion resistant bolt/nut 4. Remove the strut bar.
5. Remove the air cleaner assembly.
6. Remove the connectors from the control box and remove the control box.
CAUTION: Do not remove the vacuum tubes from
the control box.
7. Remove the wire harness holder, jumper connector and transmission ground cable.
8. Disconnect the switch connectors, then remove the back-up light switch and neutral positionswitch.
9. Disconnect the starter motor cables, then remove the starter motor.
10. Remove the transmission mount.
11. Remove the two transmission housing bolts.
TRANSMISSION HOUSING BOLTS
BACK-UP
LIGHT SWITCH
CONNECTOR
WIRE HARNESS HOLDER
STARTER MOTOR
CABLES
NEUTRAL
POSITION
SWITCH
CONNECTOR
STARTER
MOTOR
TRANSMISSION
GROUND
CABLE
TRANSMISSION
MOUNT
MOUNTING
BOLTS
TRANSMISSION
HANGER
TRANSMISSION
MOUNTING BOLTS
JUMPER
CONNECTOR
VEHICLE SPEED
SENSOR (VSS)
CONNECTOR
CONTROL BOX
Make sure lifts are placed properly, and
hoist brackets are attached to correct position (see sec-
tion 1).ProCarManuals.com
Page 1149 of 1640
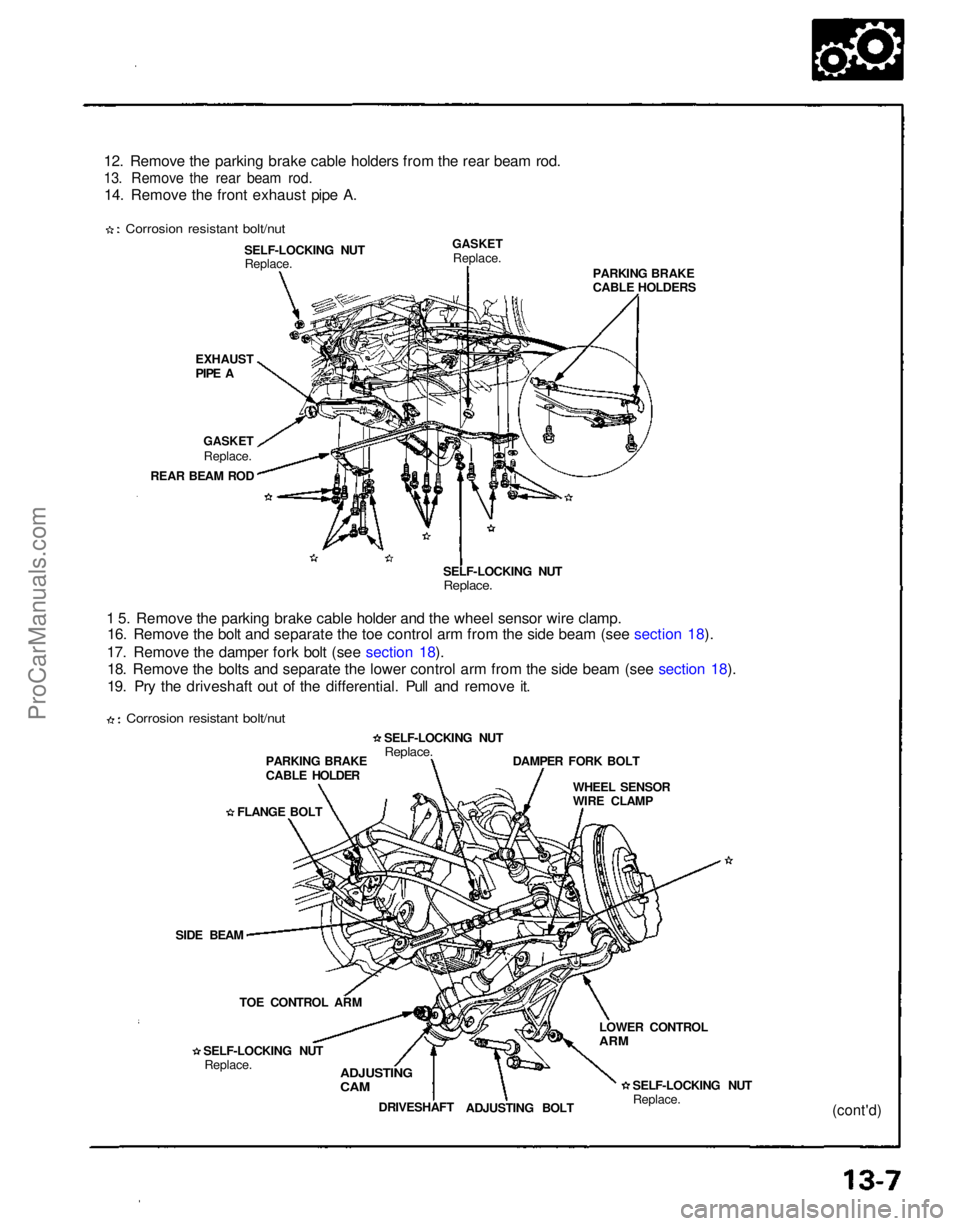
12. Remove the parking brake cable holders from the rear beam rod.
13. Remove the rear beam rod.
14. Remove the front exhaust pipe A.
Corrosion resistant bolt/nut
EXHAUST
PIPE ASELF-LOCKING NUT
Replace.
GASKET
Replace.
GASKET
Replace.
REAR BEAM ROD
1 5. Remove the parking brake cable holder and the wheel sensor wire clamp. 16. Remove the bolt and separate the toe control arm from the side beam (see section 18).
17. Remove the damper fork bolt (see section 18). 18. Remove the bolts and separate the lower control arm from the side beam (see section 18).
19. Pry the driveshaft out of the differential. Pull and remove it. SELF-LOCKING NUT
Replace.
PARKING BRAKE
CABLE HOLDERS
PARKING BRAKE
CABLE HOLDER
FLANGE BOLT
SIDE BEAM TOE CONTROL ARM
SELF-LOCKING NUT Replace. SELF-LOCKING NUT
Replace.
WHEEL SENSOR
WIRE CLAMP
DAMPER FORK BOLT
ADJUSTING
CAM
DRIVESHAFT
ADJUSTING BOLT SELF-LOCKING NUT
Replace.
LOWER CONTROL
ARM
(cont'd)
Corrosion resistant bolt/nutProCarManuals.com
Page 1150 of 1640
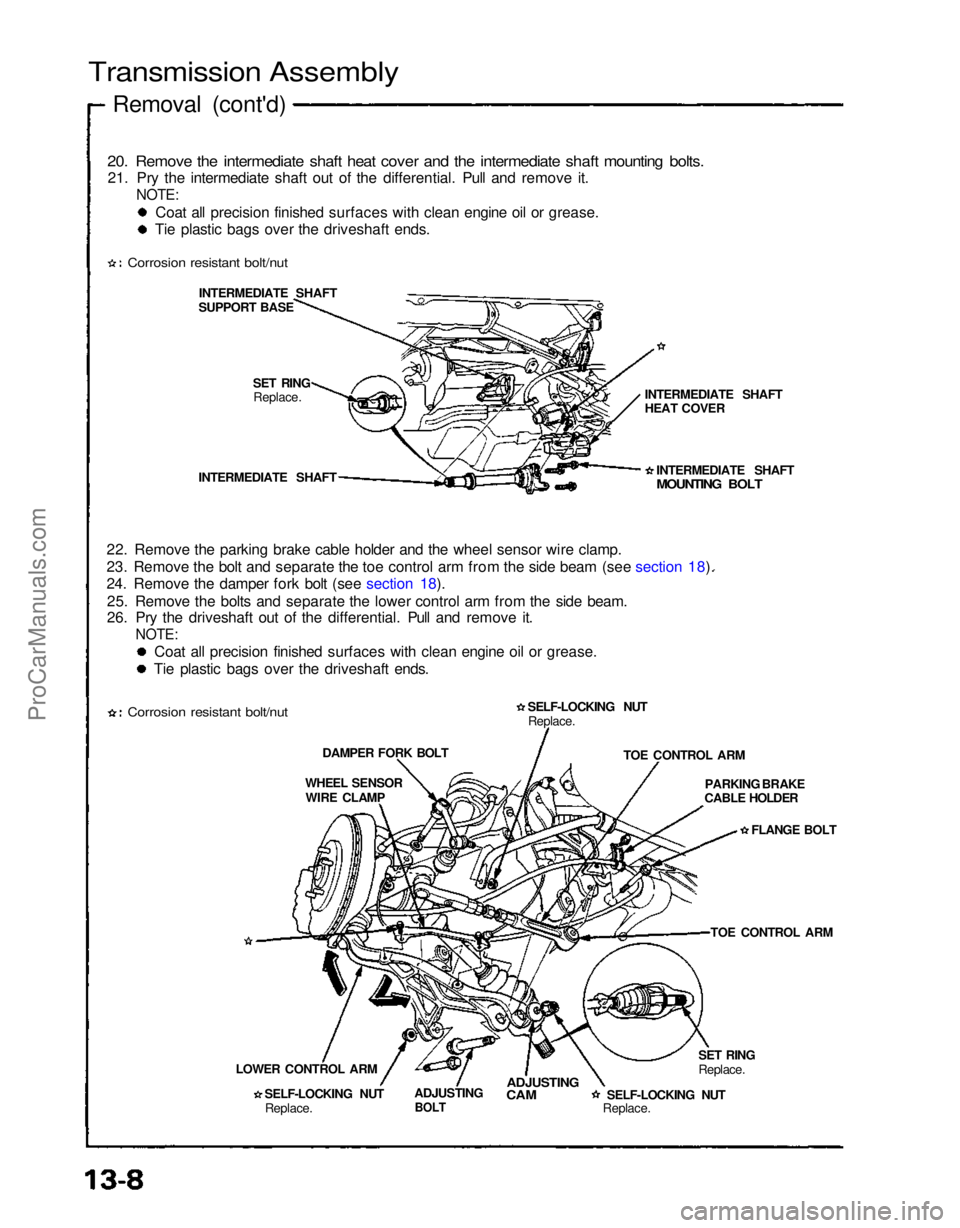
Transmission Assembly
Removal (cont'd)
20. Remove the intermediate shaft heat cover and the intermediate shaft mounting bolts.
21. Pry the intermediate shaft out of the differential. Pull and remove it.
NOTE:
Coat all precision finished surfaces with clean engine oil or grease.
Tie plastic bags over the driveshaft ends.
Corrosion resistant bolt/nut
INTERMEDIATE SHAFT
SUPPORT BASE
SET RINGReplace.
INTERMEDIATE SHAFT
22. Remove the parking brake cable holder and the wheel sensor wire clamp.
23. Remove the bolt and separate the toe control arm from the side beam (see section 18).
24. Remove the damper fork bolt (see section 18). 25. Remove the bolts and separate the lower control arm from the side beam.
26. Pry the driveshaft out of the differential. Pull and remove it.
NOTE:
Coat all precision finished surfaces with clean engine oil or grease.
Tie plastic bags over the driveshaft ends.
Corrosion resistant bolt/nut
DAMPER FORK BOLT
WHEEL SENSOR WIRE CLAMP
LOWER CONTROL ARM SELF-LOCKING NUTReplace. ADJUSTING
BOLT
ADJUSTING
CAM
SELF-LOCKING NUT
Replace.SET RING
Replace.TOE CONTROL ARM
PARKING BRAKE
CABLE HOLDER
FLANGE BOLT
TOE CONTROL ARM
SELF-LOCKING NUT
Replace. INTERMEDIATE SHAFT
MOUNTING BOLT
INTERMEDIATE SHAFT
HEAT COVERProCarManuals.com