ACURA NSX 1991 Service Repair Manual
Manufacturer: ACURA, Model Year: 1991, Model line: NSX, Model: ACURA NSX 1991Pages: 1640, PDF Size: 60.48 MB
Page 601 of 1640
Seat Belts
Replacement (cont'd)
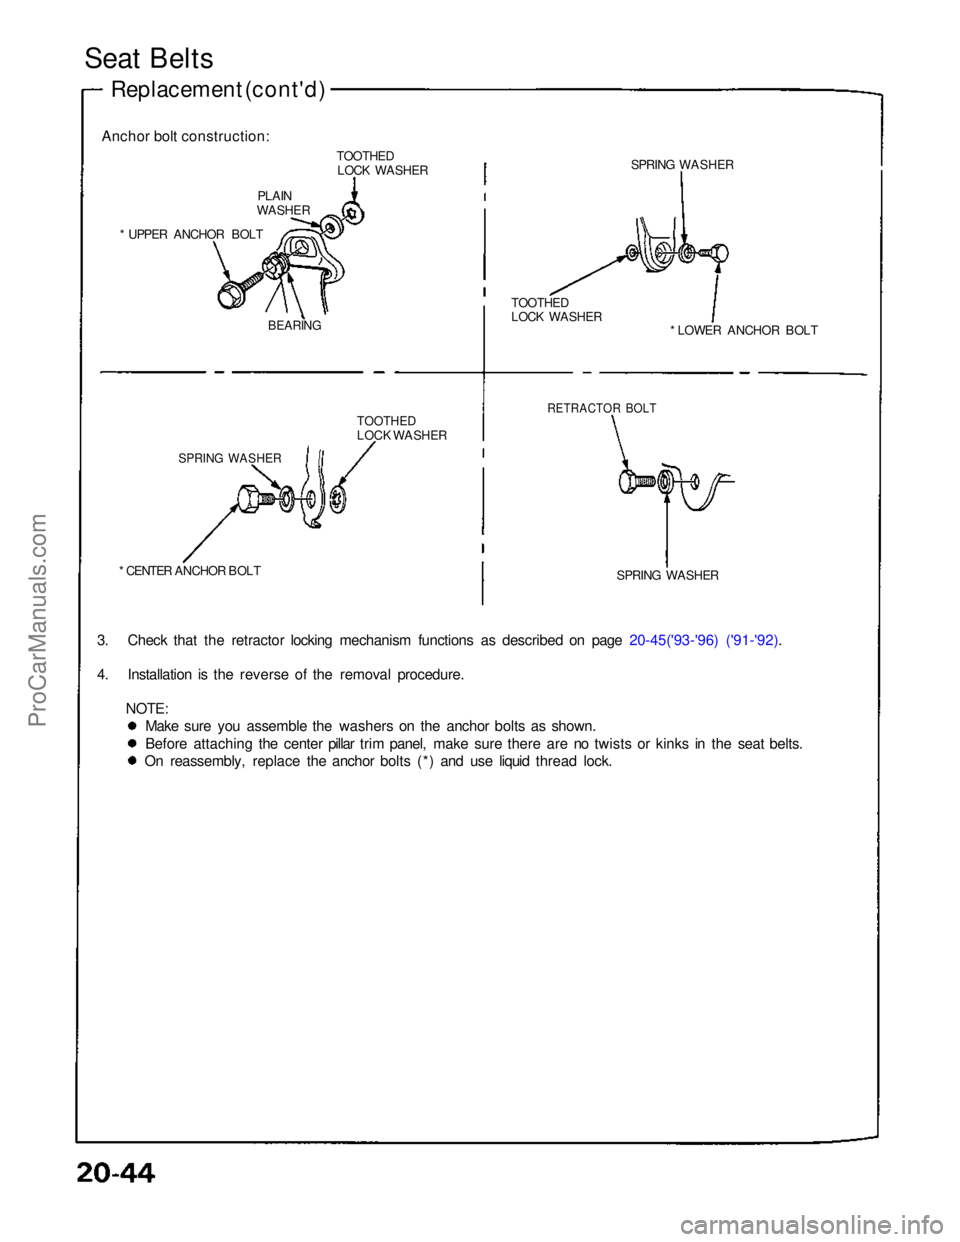
Anchor bolt construction: TOOTHEDLOCK WASHER
PLAIN
WASHER
* UPPER ANCHOR BOLT
BEARING
TOOTHED
LOCK WASHER
SPRING WASHER
* CENTER ANCHOR BOLT
3. Check that the retractor locking mechanism functions as described on page 20-45('93-'96) ('91-'92).
4. Installation is the reverse of the removal procedure. NOTE:Make sure you assemble the washers on the anchor bolts as shown.
Before attaching the center pillar trim panel, make sure there are no twists or kinks in the seat belts.
On reassembly, replace the anchor bolts (*) and use liquid thread lock. SPRING WASHER
RETRACTOR BOLT
* LOWER ANCHOR BOLT
TOOTHED
LOCK WASHER SPRING WASHERProCarManuals.com
Page 602 of 1640
Inspection
SRS wir e harnesse s ar e route d nea r th e retractor .
Al l SR S wir e harnesse s an d connec -
tor s ar e colore d yellow . D o no t us e electrica l tes t
equipmen t o n thes e circuits .
CAUTION :
• B e carefu l no t t o damag e th e SR S wir e har -
nesse s whe n servicin g th e retractor .
• Remov e th e shor t connecto r (RED ) fro m th e it s
holde r an d disconnec t th e SR S wir e harnes s
connector , the n connec t th e shor t connecto r
(RED ) t o th e tensione r connector .
NOTE : T o kee p ou t dust , wra p th e SR S wir e har -
ness connecto r with a protectiv e cover .
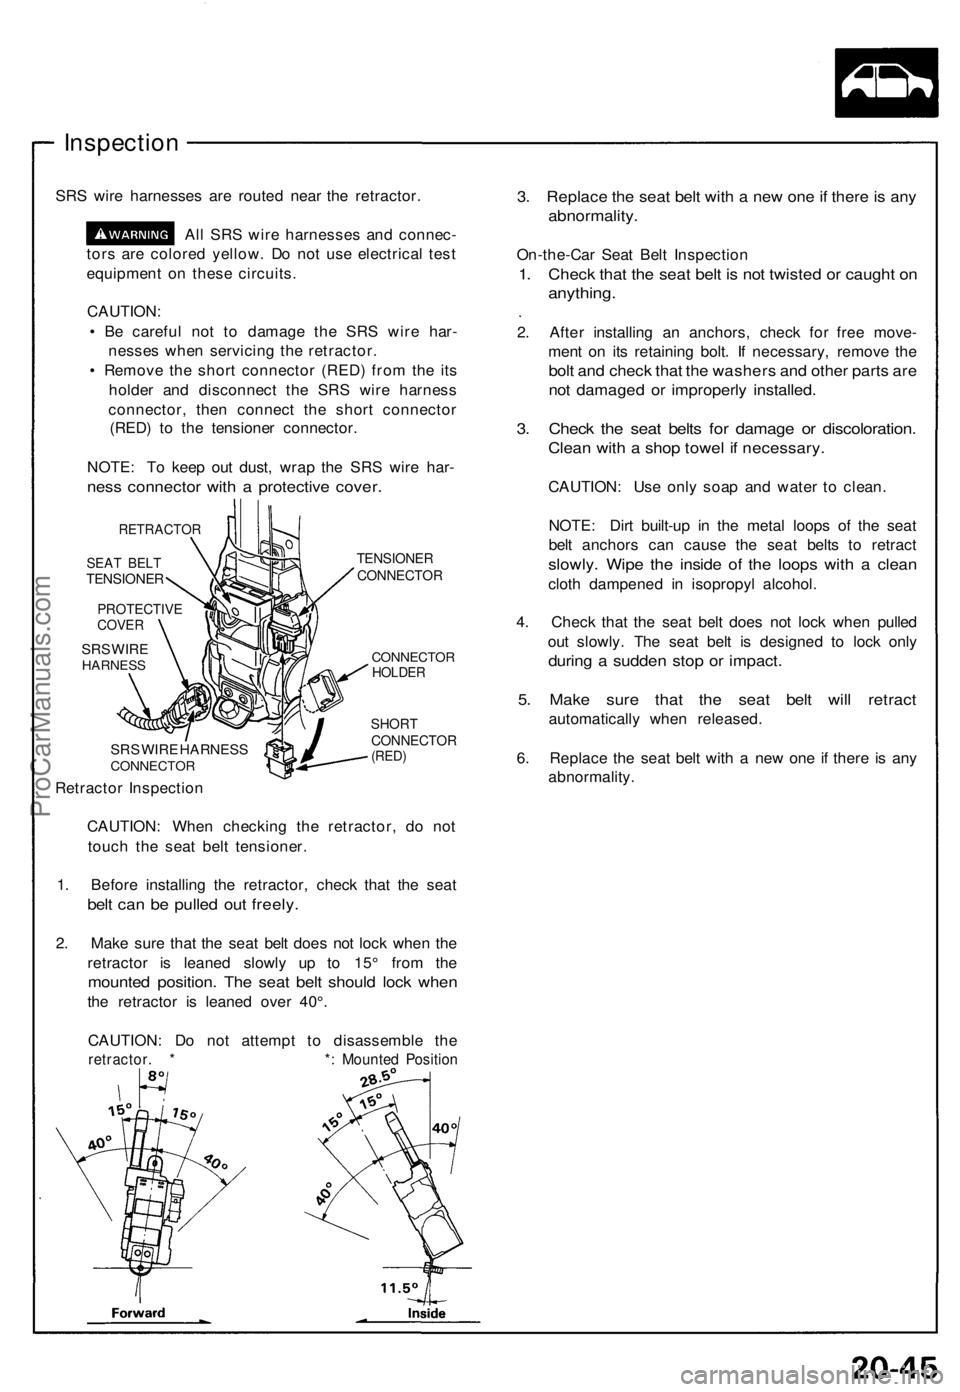
RETRACTO R
SEAT BEL TTENSIONE R
PROTECTIV ECOVER
SRS WIR EHARNES S
SRS WIR E HARNES SCONNECTO R
Retractor Inspectio n
TENSIONE RCONNECTO R
CONNECTORHOLDER
SHORTCONNECTO R(RED)
CAUTION : Whe n checkin g th e retractor , d o no t
touc h th e sea t bel t tensioner .
1 . Befor e installin g th e retractor , chec k tha t th e sea t
belt ca n b e pulle d ou t freely .
2. Mak e sur e tha t th e sea t bel t doe s no t loc k whe n th e
retracto r i s leane d slowl y u p t o 15 ° fro m th e
mounte d position . Th e seat belt shoul d loc k whe n
the retracto r i s leane d ove r 40° .
CAUTION : D o no t attemp t t o disassembl e th e
retractor . * * : Mounte d Positio n
3. Replac e th e sea t bel t wit h a ne w on e if ther e is an y
abnormality .
On-the-Car Sea t Bel t Inspectio n
1. Chec k tha t th e sea t bel t i s no t twiste d o r caugh t o n
anything .
2. Afte r installin g a n anchors , chec k fo r fre e move -
men t o n it s retainin g bolt . I f necessary , remov e th e
bol t an d chec k tha t th e washer s an d othe r part s ar e
not damage d o r improperl y installed .
3. Chec k th e sea t belt s fo r damag e o r discoloration .
Clean wit h a sho p towe l i f necessary .
CAUTION: Us e onl y soa p an d wate r t o clean .
NOTE : Dir t built-u p i n th e meta l loop s o f th e sea t
bel t anchor s ca n caus e th e sea t belt s t o retrac t
slowly. Wip e th e insid e of the loop s wit h a clea n
cloth dampene d i n isopropy l alcohol .
4 . Chec k tha t th e seat belt doe s no t loc k whe n pulle d
ou t slowly . Th e sea t bel t i s designe d t o loc k onl y
durin g a sudde n sto p o r impact .
5. Mak e sur e tha t th e sea t bel t wil l retrac t
automaticall y whe n released .
6 . Replac e th e sea t bel t wit h a ne w on e i f ther e i s an y
abnormality .
ProCarManuals.com
Page 603 of 1640
Seat Belt s
Child Sea t Ancho r Plat e
An attachmen t poin t i s provide d fo r a chil d restrain t
syste m whic h use s a to p tether . Th e tethe r bracke t an d
bol t ar e availabl e a t you r Acur a dealer . Th e tethe r at -
tachmen t poin t i s locate d o n th e pane l behin d th e
passenger' s seat-back .
1 . Adjus t th e passenge r sea t full y forwar d t o mak e
roo m behin d th e seat-back .
2 . Usin g th e dimension s shown , measur e an d mar k
th e locatio n o f th e attachmen t poin t o n th e interio r
panel .
3 . Us e a razo r blad e o r shar p knif e t o carefull y cu t a 1
inc h diamete r circl e a t th e poin t yo u marked . Cu t
throug h on e laye r a t a time . Yo u wil l nee d t o
remov e tw o layer s t o reac h th e tethe r attachment .
4. Instal l th e tethe r bracke t an d bol t an d tighte n to :
16 Ib-f t (2 2 N-m )
Make sur e t o rout e th e tethe r throug h th e spac e be -
twee n th e headres t an d seat .
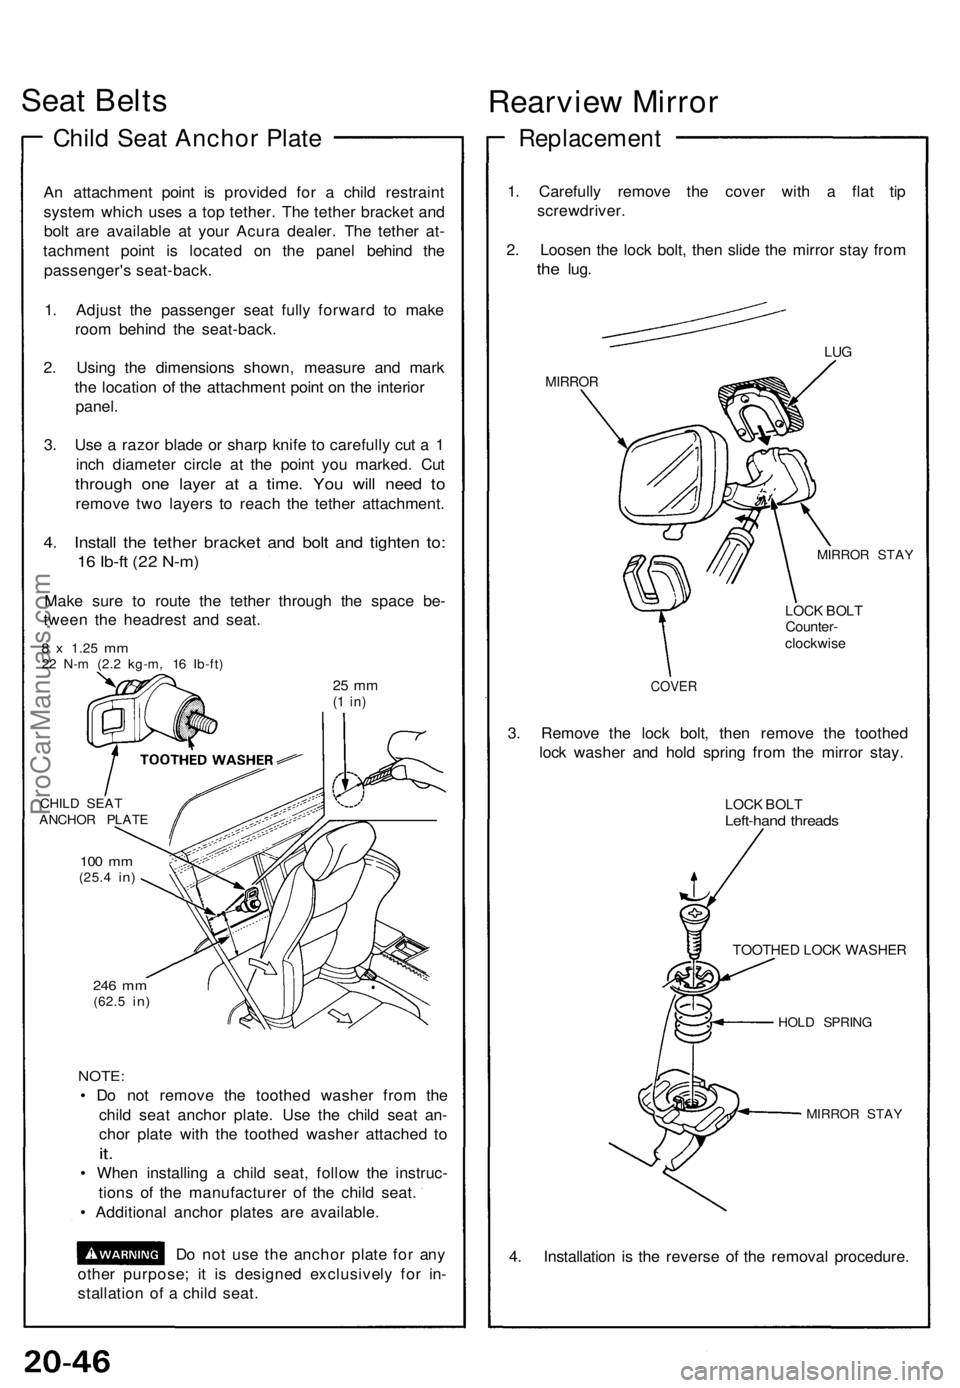
8 x 1.2 5 mm22 N- m (2. 2 kg-m , 1 6 Ib-ft )
25 m m(1 in )
CHIL D SEA T
ANCHO R PLAT E
100 m m(25. 4 in)
246 m m(62. 5 in)
NOTE :
• D o no t remov e th e toothe d washe r fro m th e
chil d sea t ancho r plate . Us e th e chil d sea t an -
cho r plat e wit h th e toothe d washe r attache d t o
it.
• Whe n installin g a chil d seat , follo w th e instruc -
tion s o f th e manufacture r o f th e chil d seat .
• Additiona l ancho r plate s ar e available .
D o no t us e th e ancho r plat e fo r an y
othe r purpose ; i t i s designe d exclusivel y fo r in -
stallatio n o f a chil d seat .
Rearvie w Mirro r
Replacemen t
1. Carefull y remov e th e cove r wit h a fla t ti p
screwdriver .
2 . Loose n th e loc k bolt , the n slid e th e mirro r sta y fro m
the lug .
MIRRO R
LUG
MIRRO R STA Y
LOCK BOL TCounter -
clockwis e
COVER
3. Remov e th e loc k bolt , the n remov e th e toothe d
loc k washe r an d hol d sprin g fro m th e mirro r stay .
LOCK BOL TLeft-han d thread s
TOOTHE D LOC K WASHE R
HOLD SPRIN G
MIRRO R STA Y
4. Installatio n i s th e revers e o f th e remova l procedure .
ProCarManuals.com
Page 604 of 1640
Carpet
Replacement
SRS components are located in this area. Review the SRS component locations, precautions, and procedures in the SRS
section (24) before performing repairs or service.
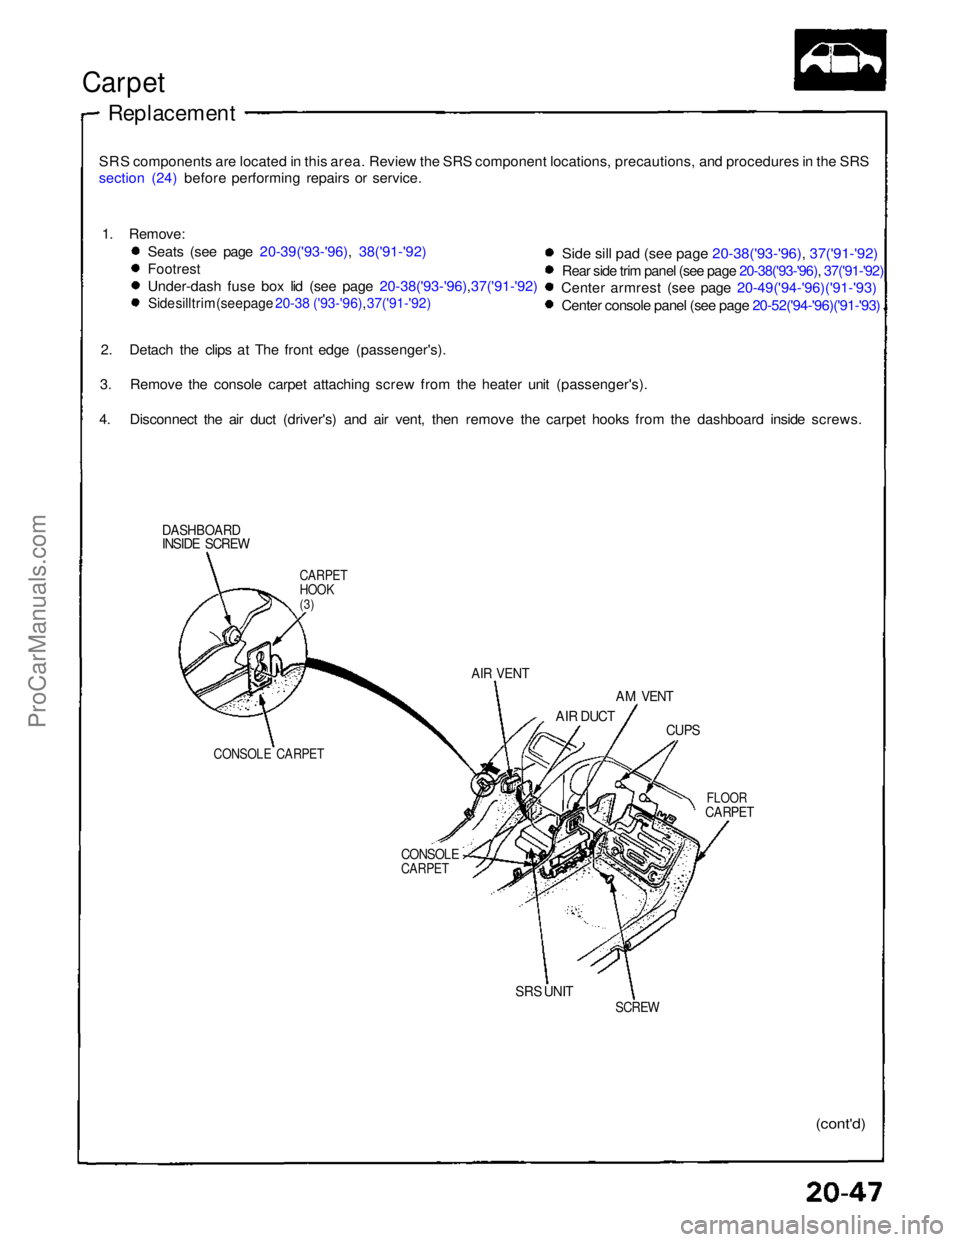
DASHBOARD
INSIDE SCREW
CARPET
HOOK
(3)
AIR VENT
AM VENT
AIR DUCT
CUPS
FLOOR
CARPET
CONSOLE
CARPET
CONSOLE CARPET
SRS UNIT
SCREW
(cont'd)
1. Remove:
Seats (see page 20-39('93-'96), 38('91-'92)
Footrest
Under-dash fuse box lid (see page 20-38('93-'96),37('91-'92)
Side sill trim (see page 20-38 ('93-'96), 37('91-'92)
Side sill pad (see page 20-38('93-'96), 37('91-'92)
Rear side trim panel (see page 20-38('93-'96), 37('91-'92)
Center armrest (see page 20-49('94-'96)('91-'93)
Center console panel (see page 20-52('94-'96)('91-'93)
2. Detach the clips at The front edge (passenger's).
3. Remove the console carpet attaching screw from the heater unit (passenger's).
4. Disconnect the air duct (driver's) and air vent, then remove the carpet hooks from the dashboard inside screws.ProCarManuals.com
Page 605 of 1640
Carpet
Replacemen t (cont'd )
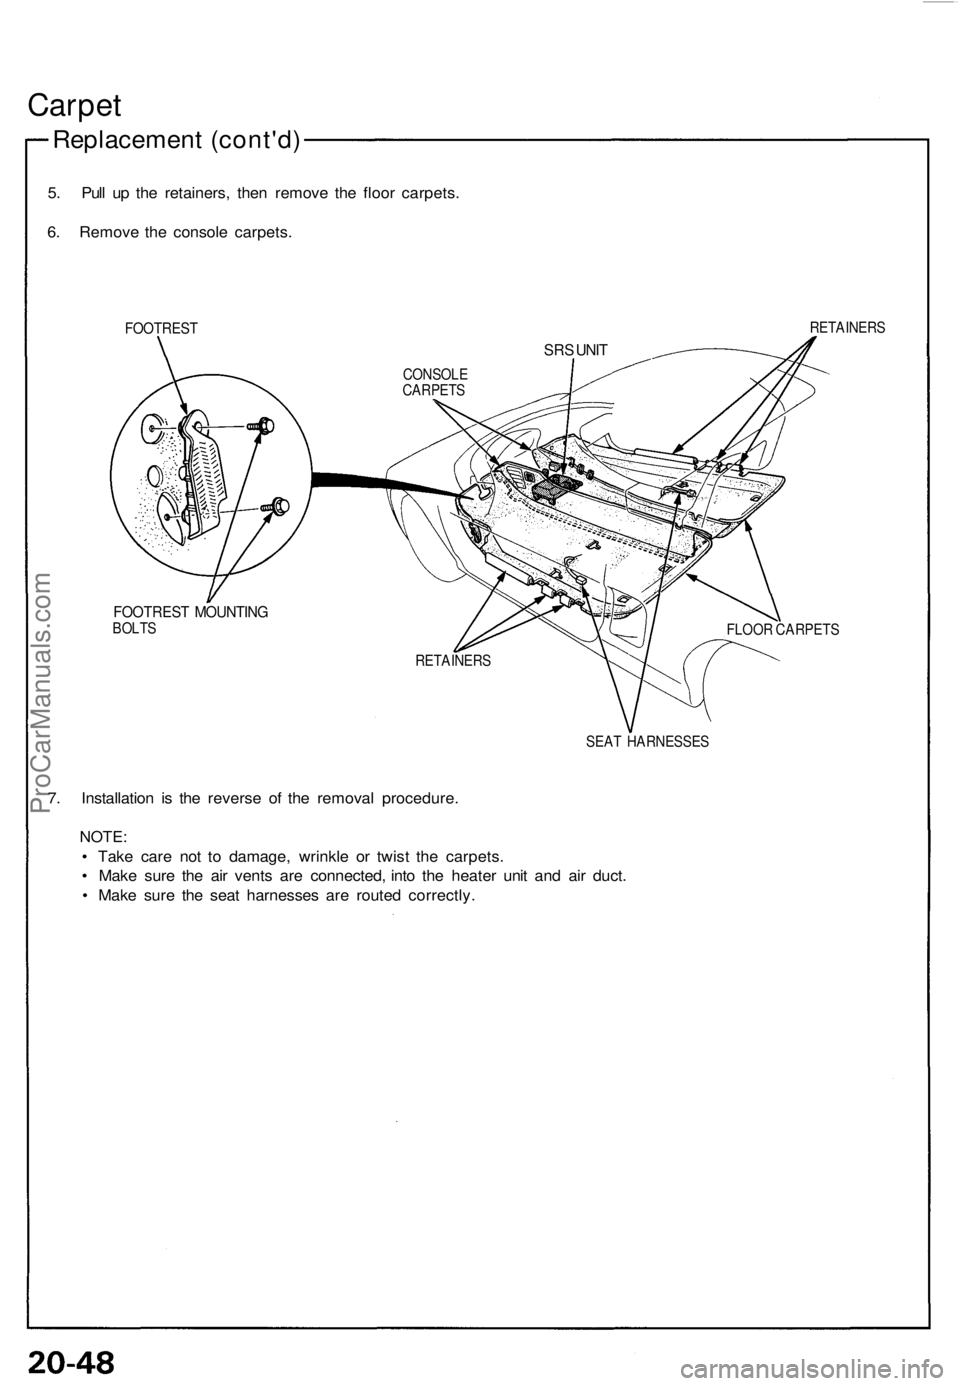
5. Pul l u p th e retainers , the n remov e th e floo r carpets .
6 . Remov e th e consol e carpets .
FOOTRES TRETAINER S
FOOTREST MOUNTIN GBOLTS
FLOOR CARPET S
SEA T HARNESSE S
7. Installatio n i s th e revers e o f th e remova l procedure .
NOTE:
• Tak e car e no t t o damage , wrinkl e o r twis t th e carpets .
• Mak e sur e th e ai r vent s ar e connected , int o th e heate r uni t an d ai r duct .
• Mak e sur e th e sea t harnesse s ar e route d correctly .
CONSOLECARPETS
SRS UNI T
RETAINER S
ProCarManuals.com
Page 606 of 1640
Center Armres t
Replacemen t
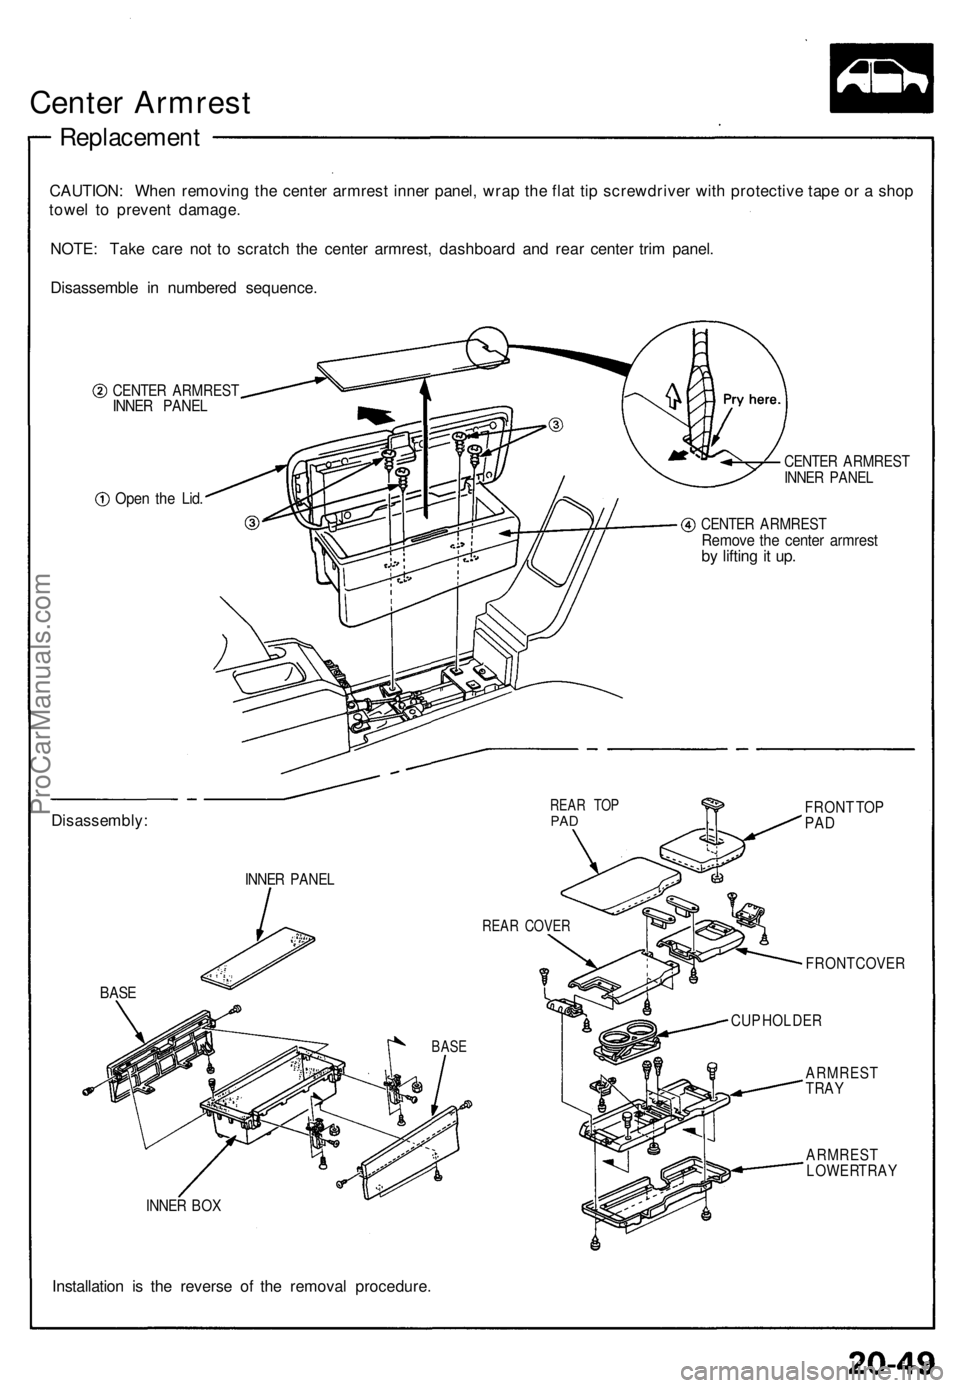
CAUTION: Whe n removin g th e cente r armres t inne r panel , wra p th e fla t ti p screwdrive r wit h protectiv e tap e o r a sho p
towe l t o preven t damage .
NOTE : Tak e car e no t t o scratc h th e cente r armrest , dashboar d an d rea r cente r tri m panel .
Disassembl e i n numbere d sequence .
CENTER ARMRES TINNER PANE L
Open th e Lid .
INNE R BO X
Installatio n i s th e revers e o f th e remova l procedure .
CENTER ARMRES TINNER PANE L
CENTE R ARMRES TRemove th e cente r armres tby liftin g it up .
FRON T TO PPAD
FRON T COVE R
CUP HOLDE R
ARMRES TTRAY
ARMRES TLOWER TRA Y
Disassembly :
INNER PANE L
REAR TO PPAD
REA R COVE R
BASE
BAS E
ProCarManuals.com
Page 607 of 1640
Dashboard
Component Removal/Installation
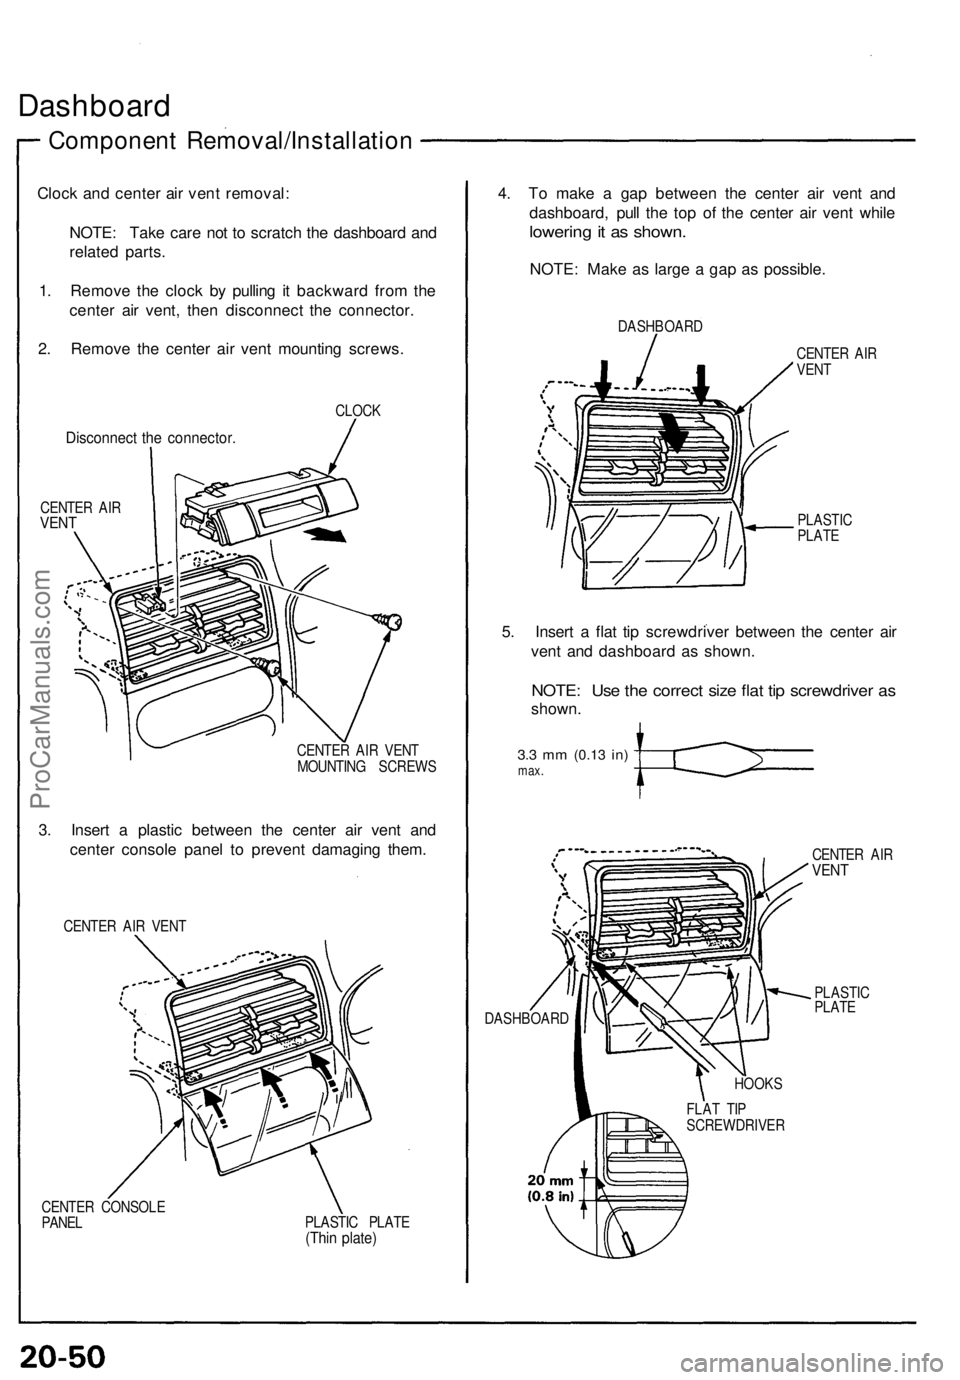
Clock and center air vent removal:
NOTE: Take care not to scratch the dashboard and
related parts.
1. Remove the clock by pulling it backward from the
center air vent, then disconnect the connector.
2. Remove the center air vent mounting screws.
4. To make a gap between the center air vent and
dashboard, pull the top of the center air vent while
lowering it as shown.
CLOCK
Disconnect the connector.
CENTER AIR
VENT
CENTER AIR VENT
MOUNTING SCREWS
3. Insert a plastic between the center air vent and
center console panel to prevent damaging them.
CENTER AIR VENT
CENTER CONSOLE
PANEL
PLASTIC PLATE
(Thin plate)
NOTE: Make as large a gap as possible.
DASHBOARD
CENTER AIR
VENT
PLASTIC
PLATE
5. Insert a flat tip screwdriver between the center air
vent and dashboard as shown.
NOTE: Use the correct size flat tip screwdriver as
shown.
3.3 mm
(0.13
in)
max.
CENTER AIR
VENT
DASHBOARD
PLASTIC
PLATE
HOOKS
FLAT TIP
SCREWDRIVERProCarManuals.com
Page 608 of 1640
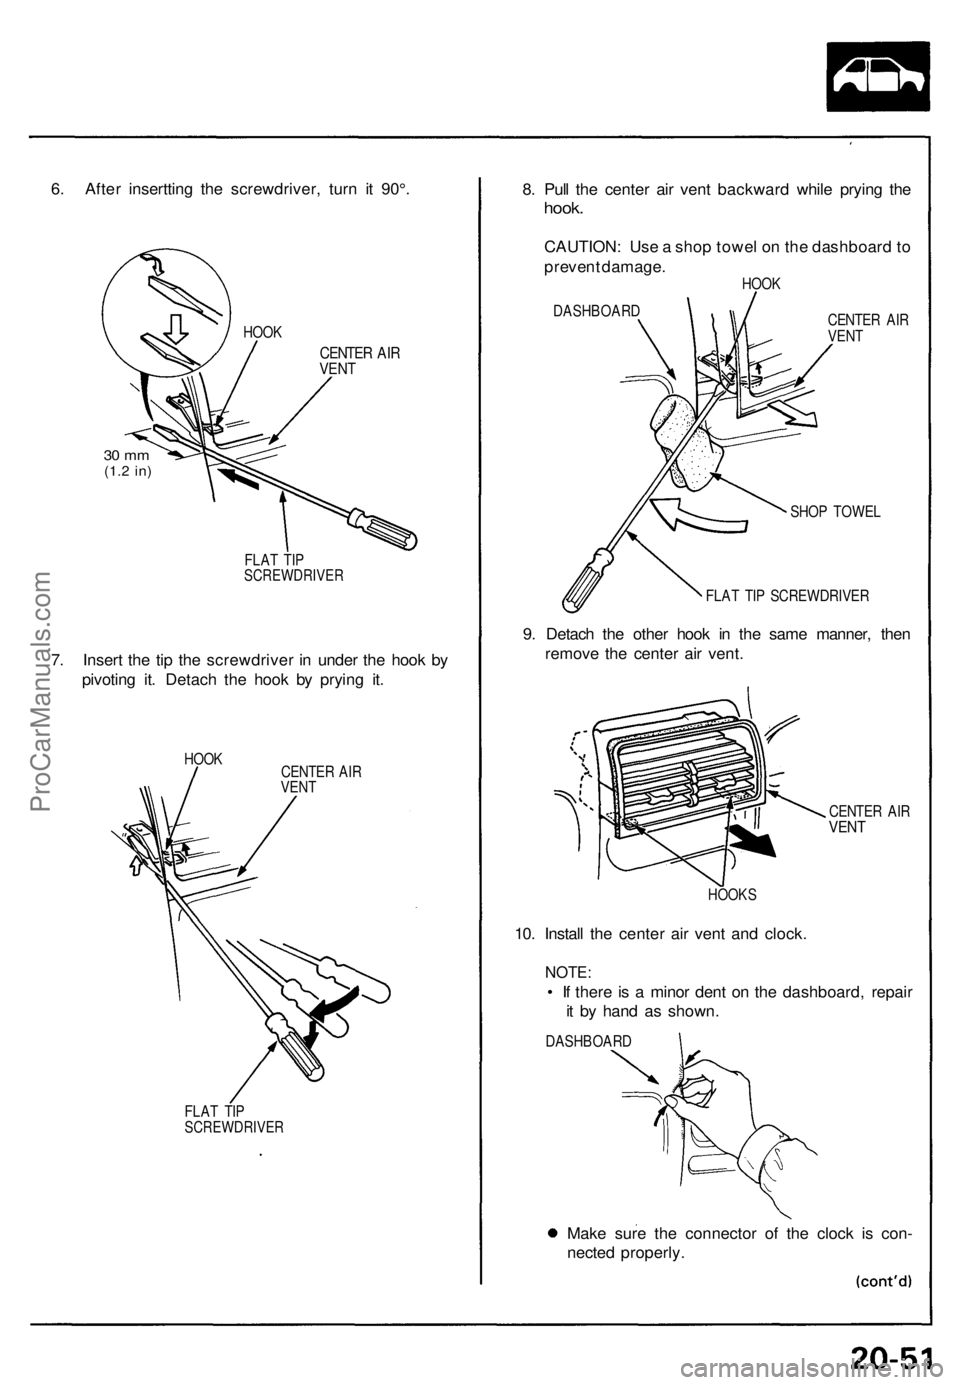
6. After insertting the screwdriver, turn it 90°.
CENTER AIR
VENT
30 mm
(1.2
in)
FLAT TIP
SCREWDRIVER
7. Insert the tip the screwdriver in under the hook by
pivoting it. Detach the hook by prying it.
HOOK
CENTER AIR
VENT
FLAT TIP
SCREWDRIVER
8. Pull the center air vent backward while prying the
hook.
CAUTION: Use a shop towel on the dashboard to
prevent damage.
HOOK
DASHBOARD
CENTER AIR
VENT
SHOP TOWEL
FLAT TIP SCREWDRIVER
9. Detach the other hook in the same manner, then
remove the center air vent.
CENTER AIR
VENT
HOOKS
10. Install the center air vent and clock.
NOTE:
• If there is a minor dent on the dashboard, repair
it by hand as shown.
DASHBOARD
Make sure the connector of the clock is con-
nected properly.
HOOKProCarManuals.com
Page 609 of 1640
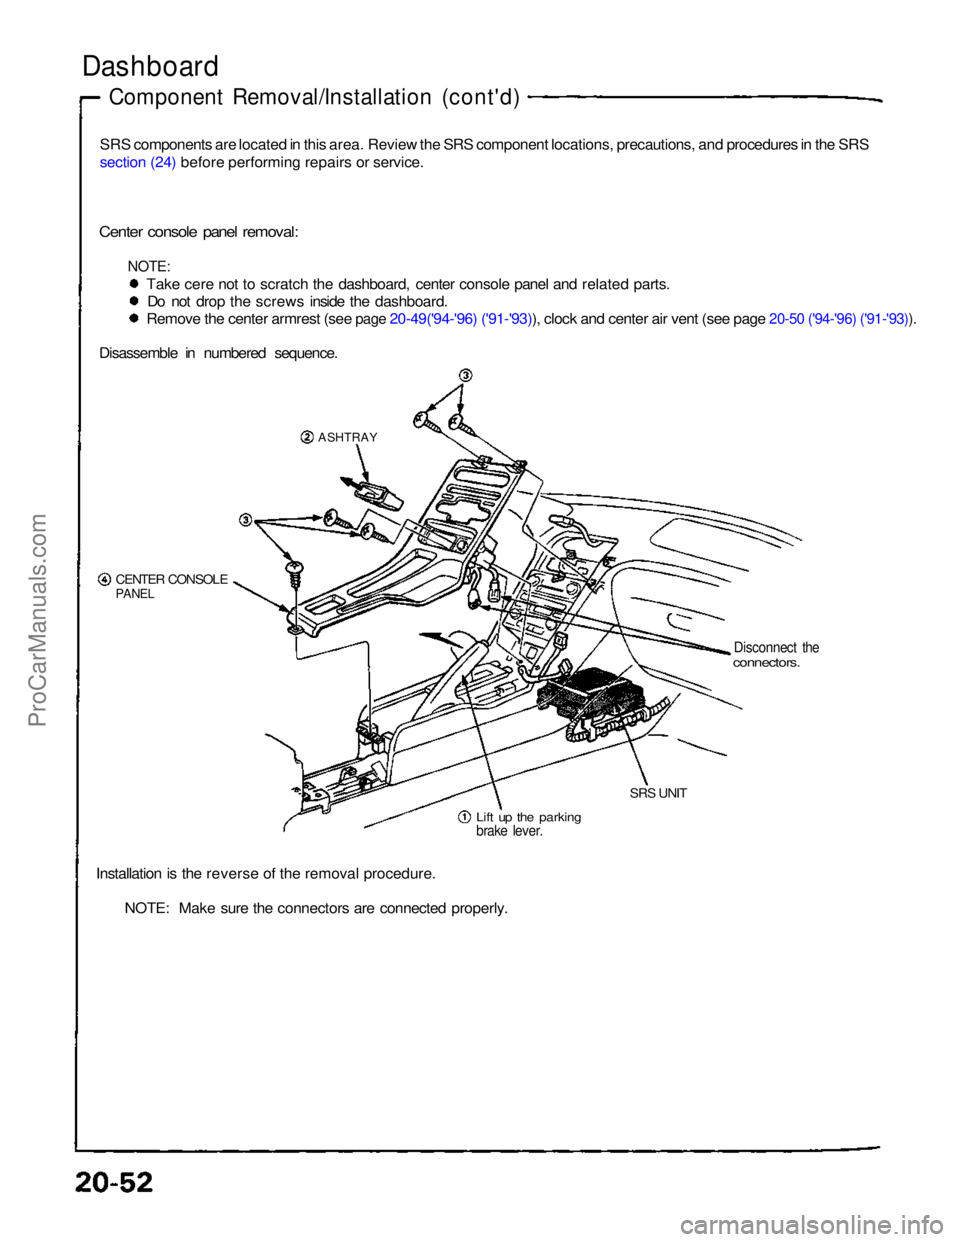
Dashboard
Component Removal/Installation (cont'd)
SRS components are located in this area. Review the SRS component locations, precautions, and procedures in the SRS
section (24) before performing repairs or service.
Center console panel removal:
NOTE:
Take cere not to scratch the dashboard, center console panel and related parts.Do not drop the screws inside the dashboard.
Remove the center armrest (see page 20-49('94-'96) ('91-'93)), clock and center air vent (see page 20-50 ('94-'96) ('91-'93)).
Disassemble in numbered sequence.
ASHTRAY
CENTER CONSOLE
PANEL
Disconnect the
connectors.
Lift up the parking
brake lever.
SRS UNIT
Installation is the reverse of the removal procedure. NOTE: Make sure the connectors are connected properly.ProCarManuals.com
Page 610 of 1640
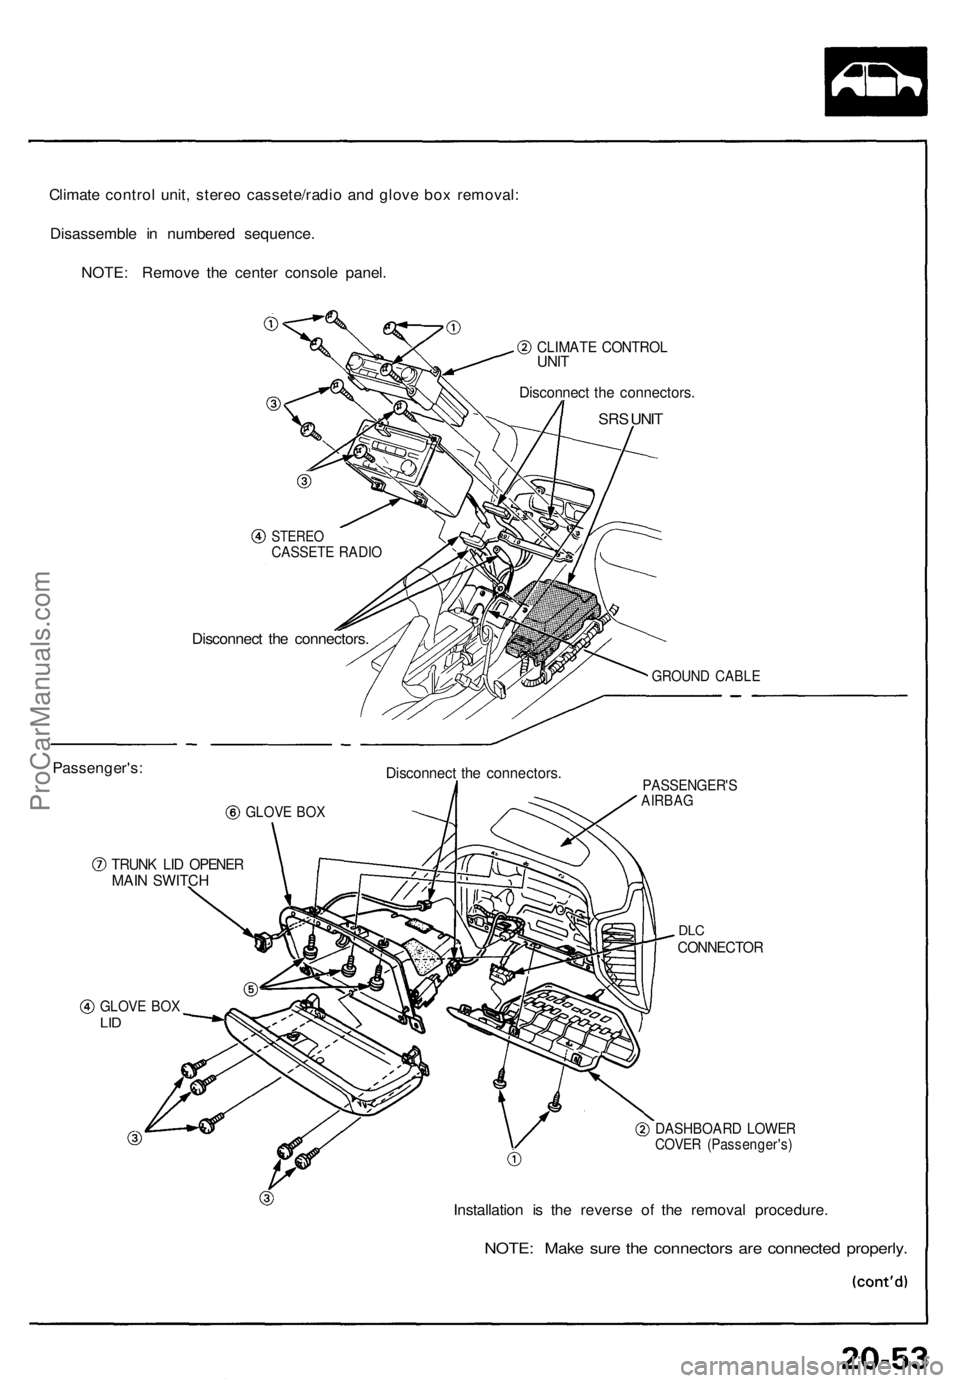
Climate control unit, stereo cassete/radio and glove box removal:
Disassemble in numbered sequence.
NOTE: Remove the center console panel.
CLIMATE CONTROL
UNIT
Disconnect the connectors.
SRS UNIT
Passenger's:
STEREO
CASSETE RADIO
Disconnect the connectors.
GROUND CABLE
GLOVE BOX
Disconnect the connectors.
TRUNK LID OPENER
MAIN SWITCH
PASSENGER'S
AIRBAG
DLC
CONNECTOR
GLOVE BOX
LID
DASHBOARD LOWER
COVER (Passenger's)
Installation is the reverse of the removal procedure.
NOTE: Make sure the connectors are connected properly.ProCarManuals.com