ACURA NSX 1991 Service Repair Manual
Manufacturer: ACURA, Model Year: 1991, Model line: NSX, Model: ACURA NSX 1991Pages: 1640, PDF Size: 60.48 MB
Page 591 of 1640
Rear Windo w
Installatio n
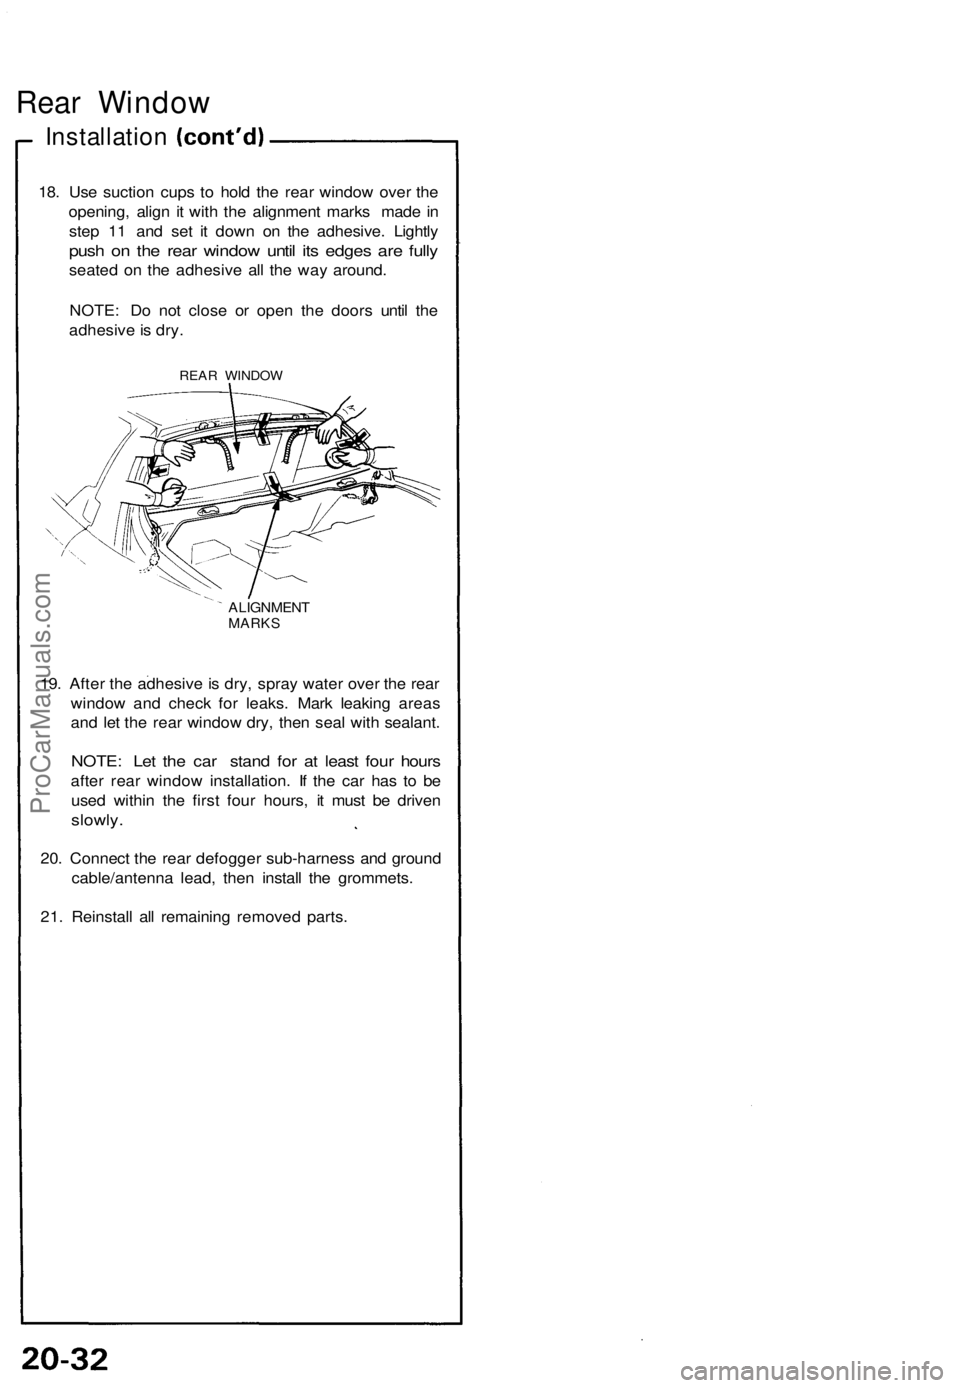
18. Us e suctio n cup s t o hol d th e rea r windo w ove r th e
opening , alig n i t wit h th e alignmen t mark s mad e in
ste p 1 1 an d se t i t dow n o n th e adhesive . Lightl y
push o n th e rea r windo w unti l it s edge s ar e full y
seate d o n th e adhesiv e al l th e wa y around .
NOTE : D o no t clos e o r ope n th e door s unti l th e
adhesiv e is dry .
REA R WINDO W
ALIGNMEN TMARKS
19. Afte r th e adhesiv e is dry , spra y wate r ove r th e rea r
windo w an d chec k fo r leaks . Mar k leakin g area s
an d le t th e rea r windo w dry , the n sea l with sealant .
NOTE: Le t th e ca r stan d fo r a t leas t fou r hour s
after rea r windo w installation . I f th e ca r ha s t o b e
use d withi n th e firs t fou r hours , i t mus t b e drive n
slowly .
20. Connec t th e rea r defogge r sub-harnes s an d groun d
cable/antenn a lead , the n instal l th e grommets .
21 . Reinstal l al l remainin g remove d parts .
ProCarManuals.com
Page 592 of 1640
Rear Hatc h Glas s
Remova l
CAUTION :
• Us e cover s t o avoi d damagin g th e body .
• Wea r glove s t o remov e an d instal l th e glass .
• D o no t damag e th e defroste r gri d lines .
• Tak e car e no t scratc h o r scor e th e molding .
1 . Remov e th e rea r hatc h assembl y fro m th e bod y
(se e pag e 20-64).
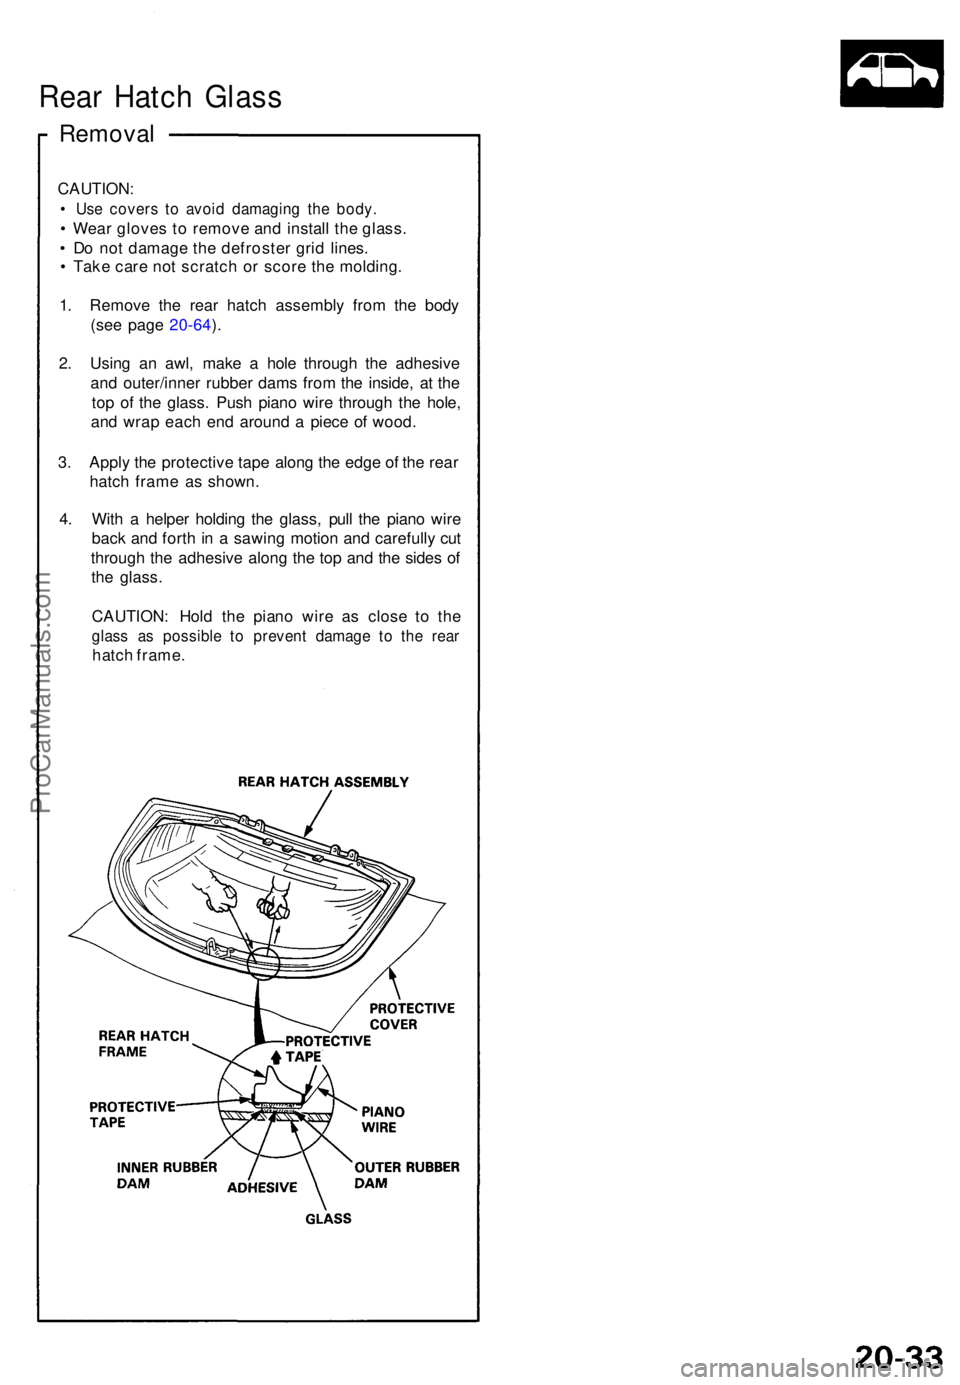
2 . Usin g a n awl , mak e a hol e throug h th e adhesiv e
an d outer/inne r rubber dams fro m th e inside , a t th e
to p of the glass . Pus h pian o wir e throug h th e hole ,
an d wra p eac h en d aroun d a piec e o f wood .
3 . Appl y th e protectiv e tap e alon g th e edg e of the rea r
hatc h fram e a s shown .
4 . Wit h a helpe r holdin g th e glass , pul l th e pian o wir e
bac k an d fort h in a sawin g motio n an d carefull y cu t
throug h th e adhesiv e alon g th e to p an d th e side s o f
th e glass .
CAUTION : Hol d th e pian o wir e a s clos e t o th e
glas s a s possibl e t o preven t damag e t o th e rea r
hatch frame .
ProCarManuals.com
Page 593 of 1640
Rear Hatc h Glas s Moldin g
Replacemen t
CAUTION:
• Wea r glove s t o replac e th e molding .
• D o no t damag e th e glas s an d defroste r gri d lines .
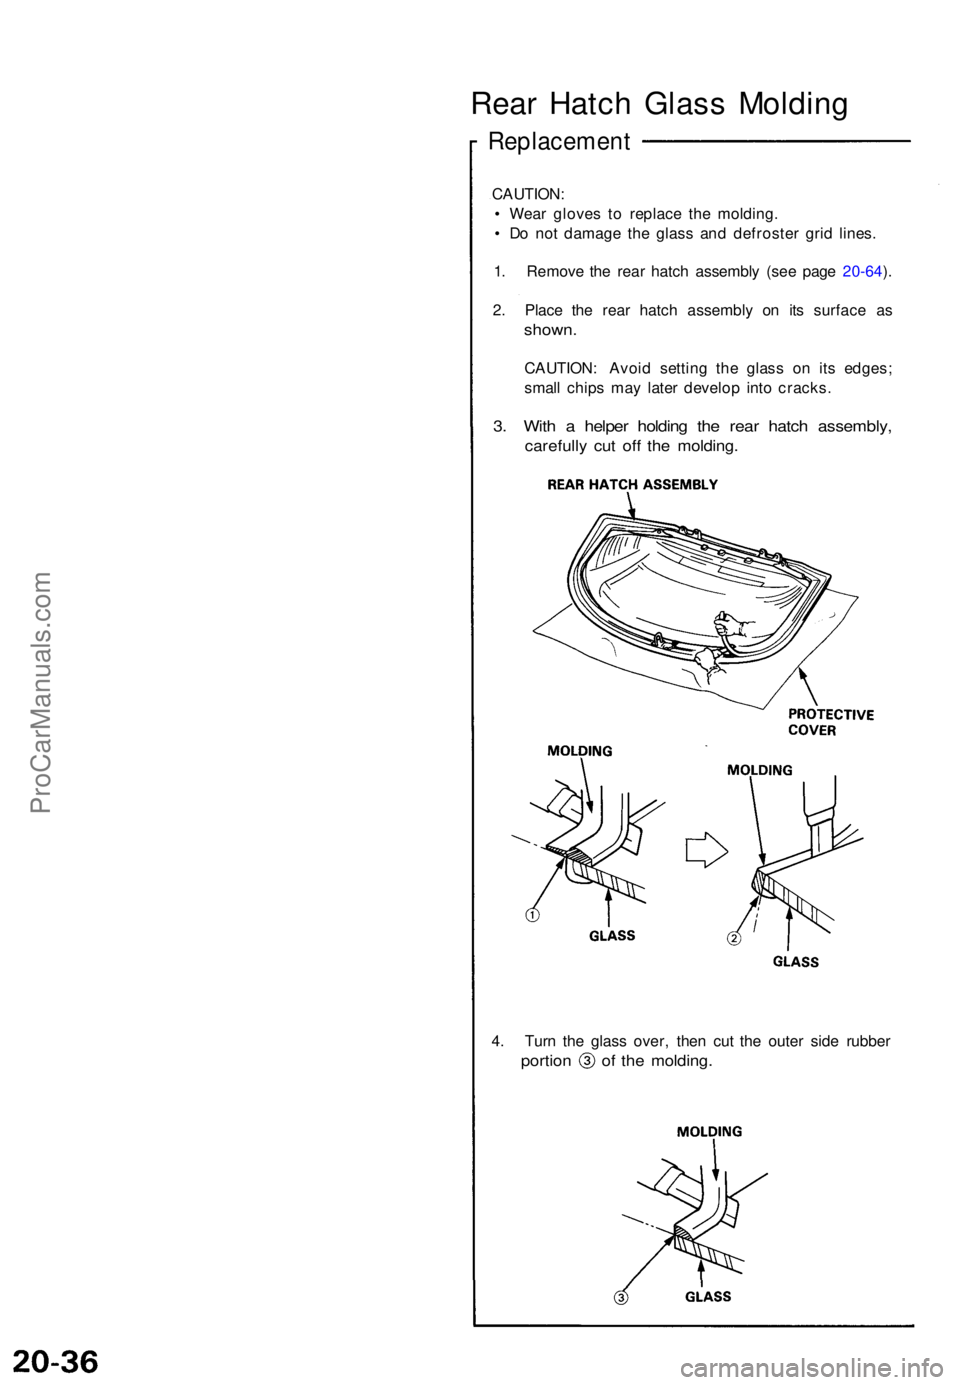
2 . Plac e th e rea r hatc h assembl y o n it s surfac e a s
shown .
CAUTION : Avoi d settin g th e glas s o n it s edges ;
smal l chip s ma y late r develo p int o cracks .
3. Wit h a helpe r holdin g th e rea r hatc h assembly ,
carefully cu t of f th e molding .
4. Tur n th e glas s over , the n cu t th e oute r sid e rubbe r
portion o f th e molding .
1. Remove the rear hatch assembly (see page 20-64).
ProCarManuals.com
Page 594 of 1640
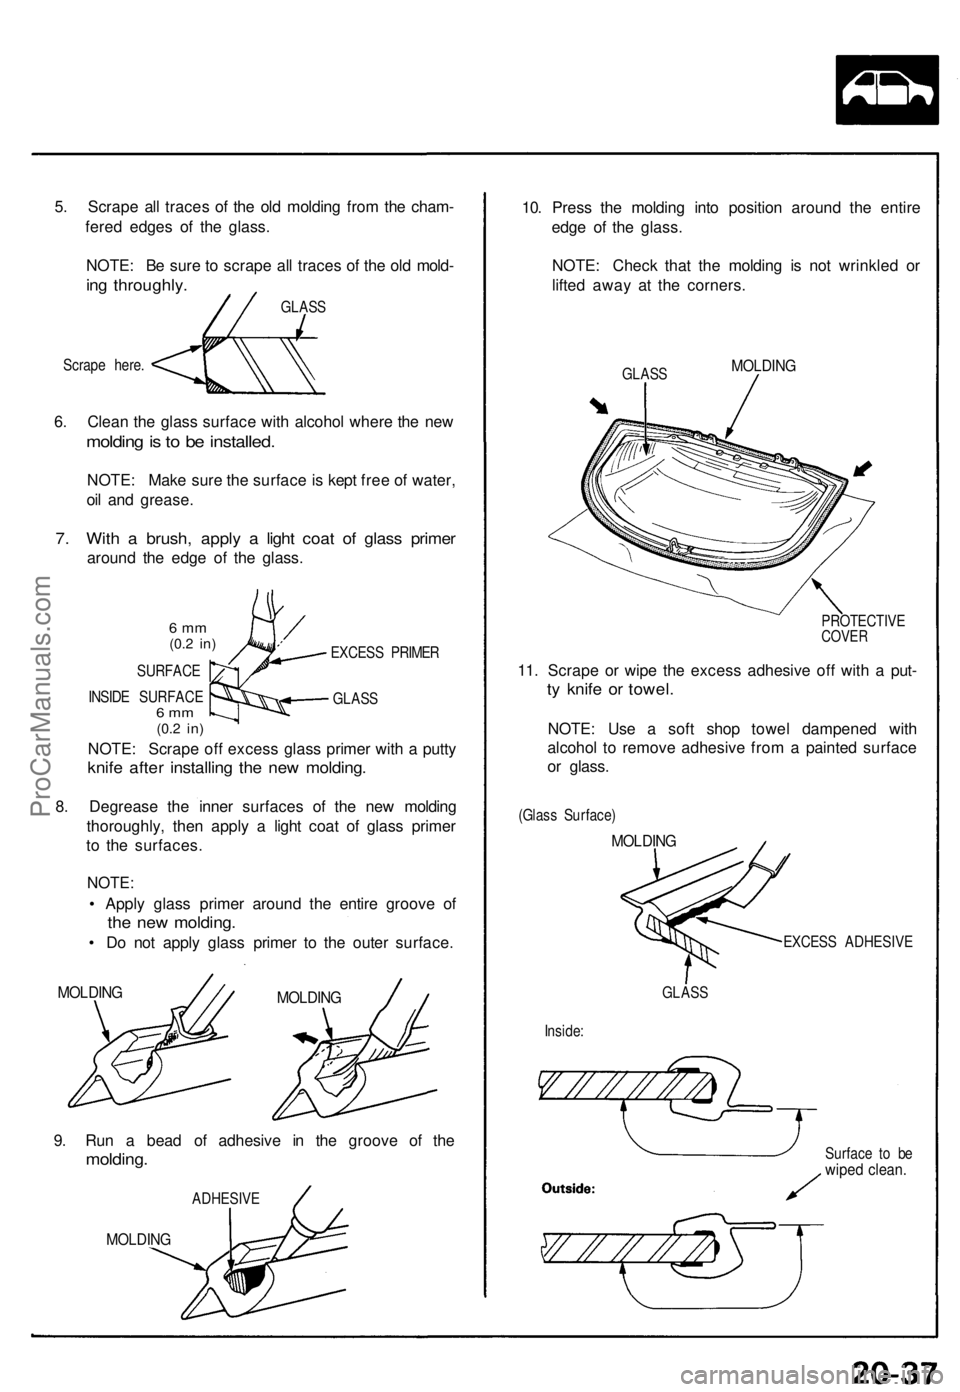
6. Clea n th e glas s surfac e wit h alcoho l wher e th e ne w
moldin g is t o b e installed .
NOTE: Mak e sur e th e surfac e is kep t fre e o f water ,
oi l an d grease .
7. Wit h a brush , appl y a ligh t coa t o f glas s prime r
around th e edg e of the glass .
EXCES S PRIME R
GLAS S
6 m m(0.2 in )
SURFAC E
INSID E SURFAC E
6 m m(0. 2 in )
NOTE : Scrap e of f exces s glas s prime r wit h a putt y
knife afte r installin g th e ne w molding .
8. Degreas e th e inne r surface s o f th e ne w moldin g
thoroughly , the n appl y a ligh t coa t o f glas s prime r
t o th e surfaces .
NOTE:
• Appl y glas s prime r aroun d th e entir e groov e of
th e ne w molding .
• D o no t appl y glas s prime r t o th e oute r surface .
MOLDINGMOLDING
9. Ru n a bea d o f adhesiv e i n th e groov e o f th e
molding .
ADHESIV E
MOLDING
10. Pres s th e moldin g int o positio n aroun d th e entir e
edg e of the glass .
NOTE : Chec k tha t th e moldin g i s no t wrinkle d o r
lifte d awa y a t th e corners .
GLASSMOLDIN G
PROTECTIV ECOVER
11. Scrap e o r wip e th e exces s adhesiv e of f wit h a put -
ty knif e o r towel .
NOTE: Us e a sof t sho p towe l dampene d wit h
alcoho l t o remov e adhesiv e fro m a painte d surfac e
o r glass .
(Glass Surface )
MOLDING
EXCESS ADHESIV E
GLAS S
Inside :
Surface t o b e
wipe d clean .
5. Scrap e al l trace s o f th e ol d moldin g fro m th e cham -
fere d edge s o f th e glass .
NOTE : B e sur e t o scrap e al l trace s o f th e ol d mold -
ing throughly .
Scrape here . GLAS
S
ProCarManuals.com
Page 595 of 1640
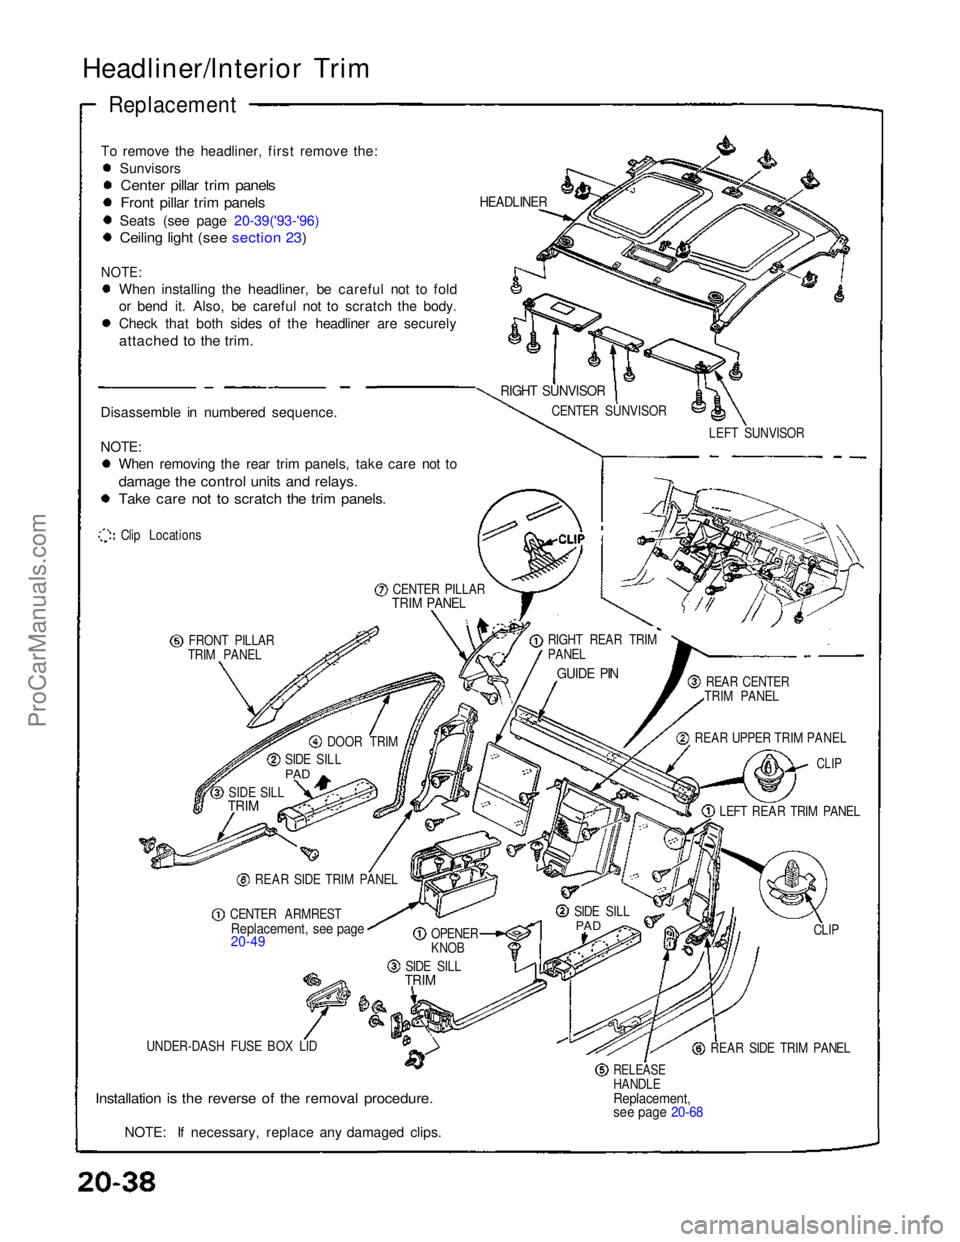
Headliner/lnterior Trim
Replacement
To remove the headliner, first remove the: Sunvisors
Center pillar trim panels
Front pillar trim panels
Seats (see page 20-39('93-'96)
Ceiling light (see section 23)
NOTE:
When installing the headliner, be careful not to fold
or bend it. Also, be careful not to scratch the body.
Check that both sides of the headliner are securely
attached to the trim.
Disassemble in numbered sequence.
NOTE: When removing the rear trim panels, take care not to
damage the control units and relays.
Take care not to scratch the trim panels.
Clip Locations
CENTER PILLAR
TRIM PANEL
FRONT PILLAR
TRIM PANEL
DOOR TRIM
SIDE SILL
PAD
SIDE SILL
TRIM
REAR SIDE TRIM PANEL
CENTER ARMREST
Replacement, see page
20-49
OPENER
KNOB
SIDE SILL
TRIM
UNDER-DASH FUSE BOX LID
Installation is the reverse of the removal procedure.
NOTE: If necessary, replace any damaged clips.
RELEASE
HANDLE
Replacement,
see page 20-68
REAR SIDE TRIM PANEL CLIP
SIDE SILL
PAD
LEFT REAR TRIM PANEL
CLIP
REAR UPPER TRIM PANEL REAR CENTER
TRIM PANEL
GUIDE PIN
RIGHT REAR TRIM
PANEL LEFT SUNVISOR
CENTER SUNVISOR
RIGHT SUNVISOR
HEADLINERProCarManuals.com
Page 596 of 1640
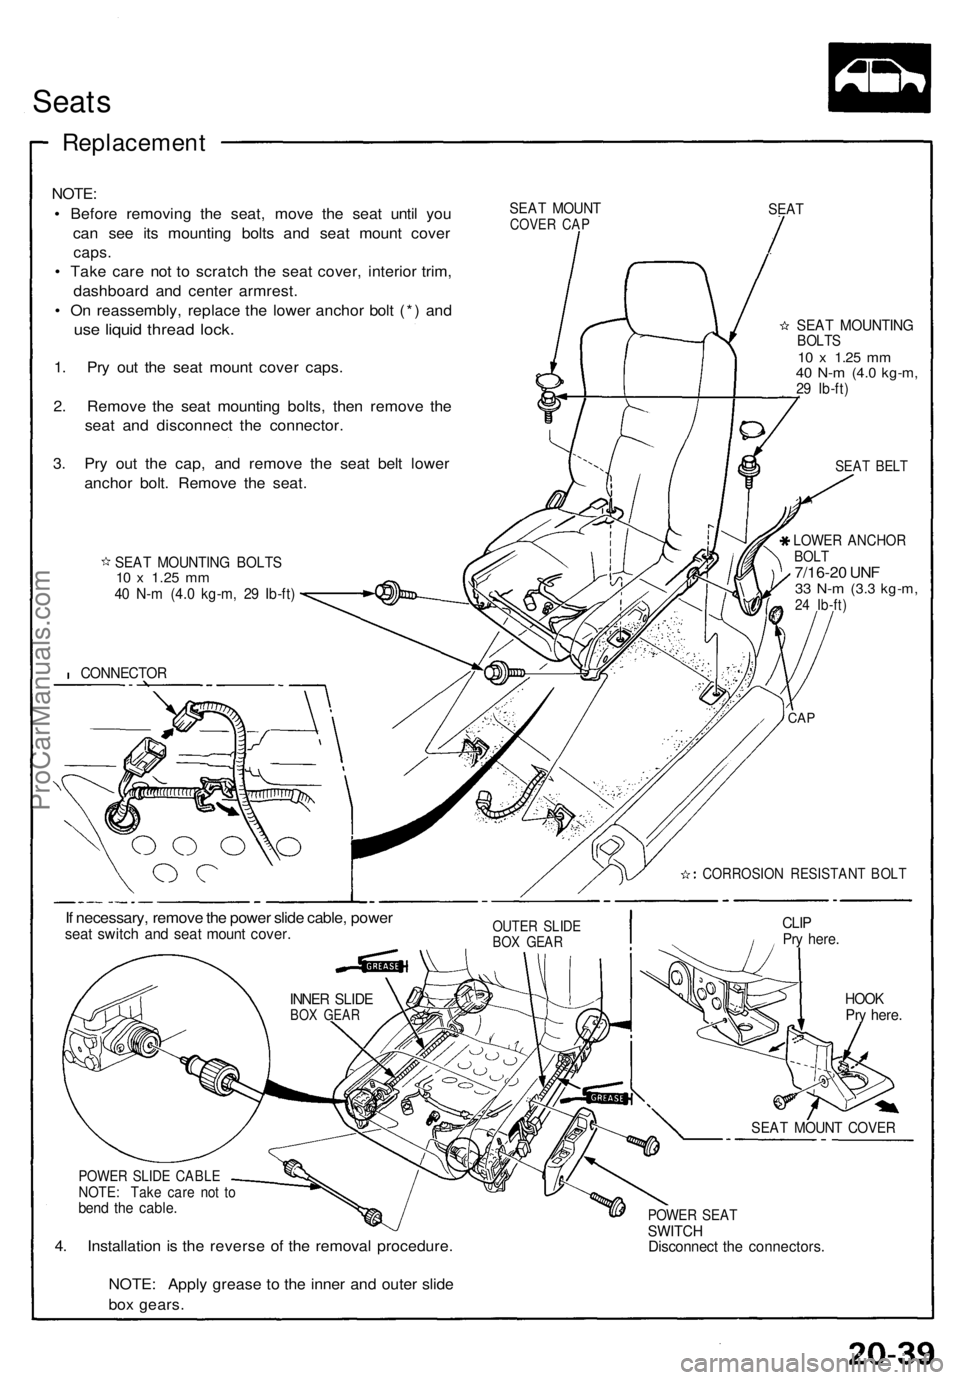
Seats
Replacemen t
NOTE:
• Befor e removin g th e seat , mov e th e sea t unti l yo u
ca n se e it s mountin g bolt s an d sea t moun t cove r
caps.
• Tak e car e no t t o scratc h th e sea t cover , interio r trim ,
dashboar d an d cente r armrest .
• O n reassembly , replac e th e lowe r ancho r bol t (* ) an d
use liqui d threa d lock .
1. Pr y ou t th e seat moun t cove r caps .
2 . Remov e th e seat mountin g bolts , the n remov e th e
sea t an d disconnec t th e connector .
3 . Pr y ou t th e cap , an d remov e th e sea t bel t lowe r
ancho r bolt . Remov e th e seat .
SEAT MOUNTIN G BOLT S10 x 1.2 5 mm40 N- m (4. 0 kg-m , 2 9 Ib-ft )
CONNECTO R
SEAT MOUN TCOVER CA PSEA T
SEA T MOUNTIN GBOLTS10 x 1.2 5 mm40 N- m (4. 0 kg-m ,29 Ib-ft )
SEAT BEL T
LOWE R ANCHO RBOLT7/16-2 0 UN F33 N- m (3. 3 kg-m ,24 Ib-ft )
If necessary , remov e th e powe r slid e cable , powe rseat switc h an d sea t moun t cover .OUTER SLID EBOX GEA R
CLIPPry here .
HOOKPry here .
POWE R SLID E CABL ENOTE: Tak e car e no t t oben d th e cable .
4. Installatio n i s th e revers e o f th e remova l procedure .
POWER SEA TSWITC HDisconnec t th e connectors .
NOTE: Appl y greas e t o th e inne r an d oute r slid e
bo x gears .
INNER SLID EBOX GEA R
SEAT MOUN T COVE R
CORROSIO N RESISTAN T BOL T
CAP
ProCarManuals.com
Page 597 of 1640
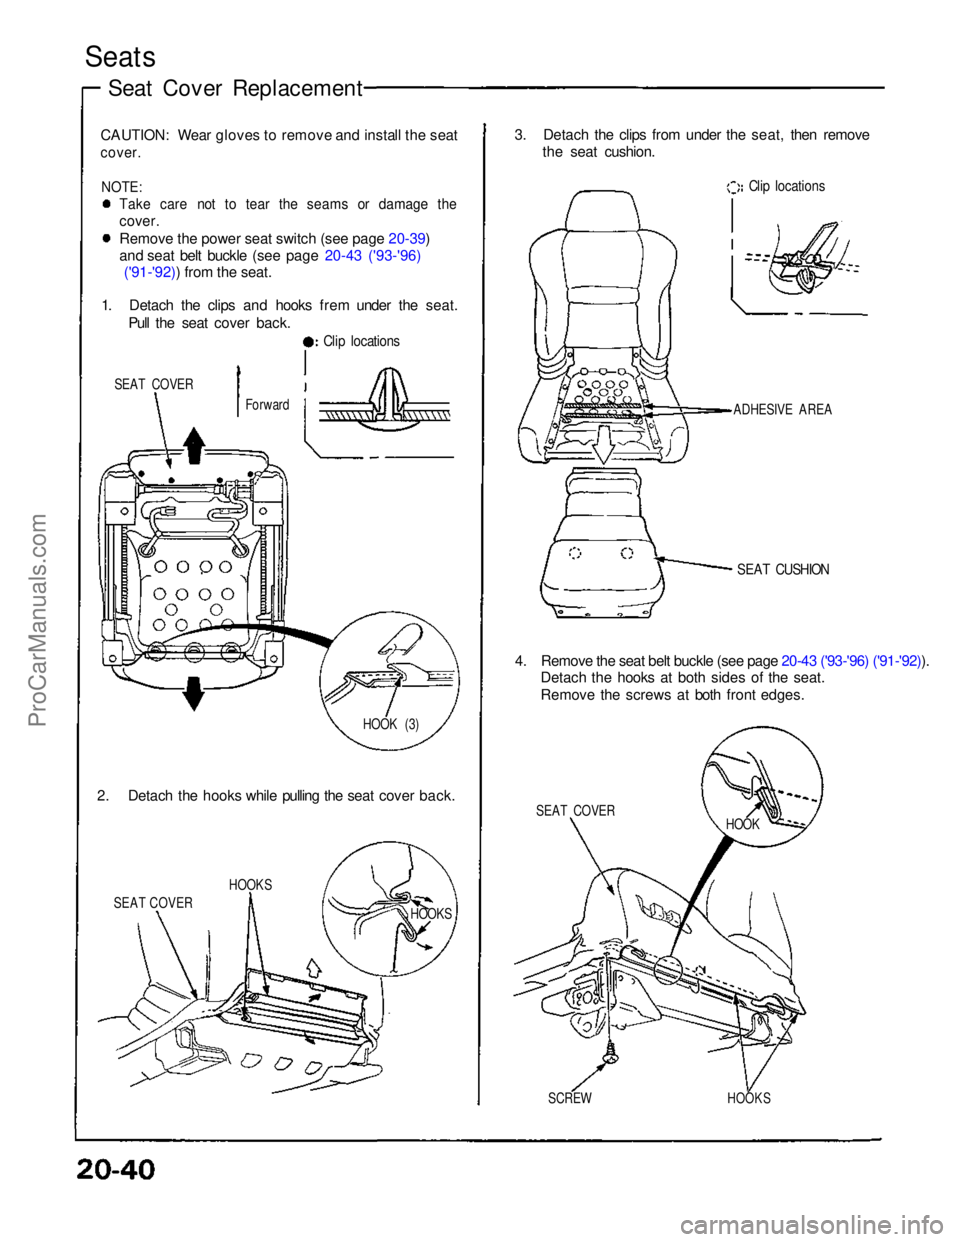
Seats
Seat Cover Replacement
CAUTION: Wear gloves to remove and install the seat
cover.
NOTE:
Take care not to tear the seams or damage the
cover.
Remove the power seat switch (see page 20-39)
and seat belt buckle (see page 20-43 ('93-'96) ('91-'92)) from the seat.
1. Detach the clips and hooks frem under the seat.
Pull the seat cover back.
Clip locations
SEAT COVER Forward
HOOK (3)
2. Detach the hooks while pulling the seat cover back.
SEAT COVER HOOKS
HOOKS
SCREW
HOOKS
SEAT COVER
HOOK
4. Remove the seat belt buckle (see page 20-43 ('93-'96) ('91-'92)).
Detach the hooks at both sides of the seat.
Remove the screws at both front edges.
SEAT CUSHION
ADHESIVE AREA
Clip locations
3. Detach the clips from under the seat, then remove
the seat cushion.ProCarManuals.com
Page 598 of 1640
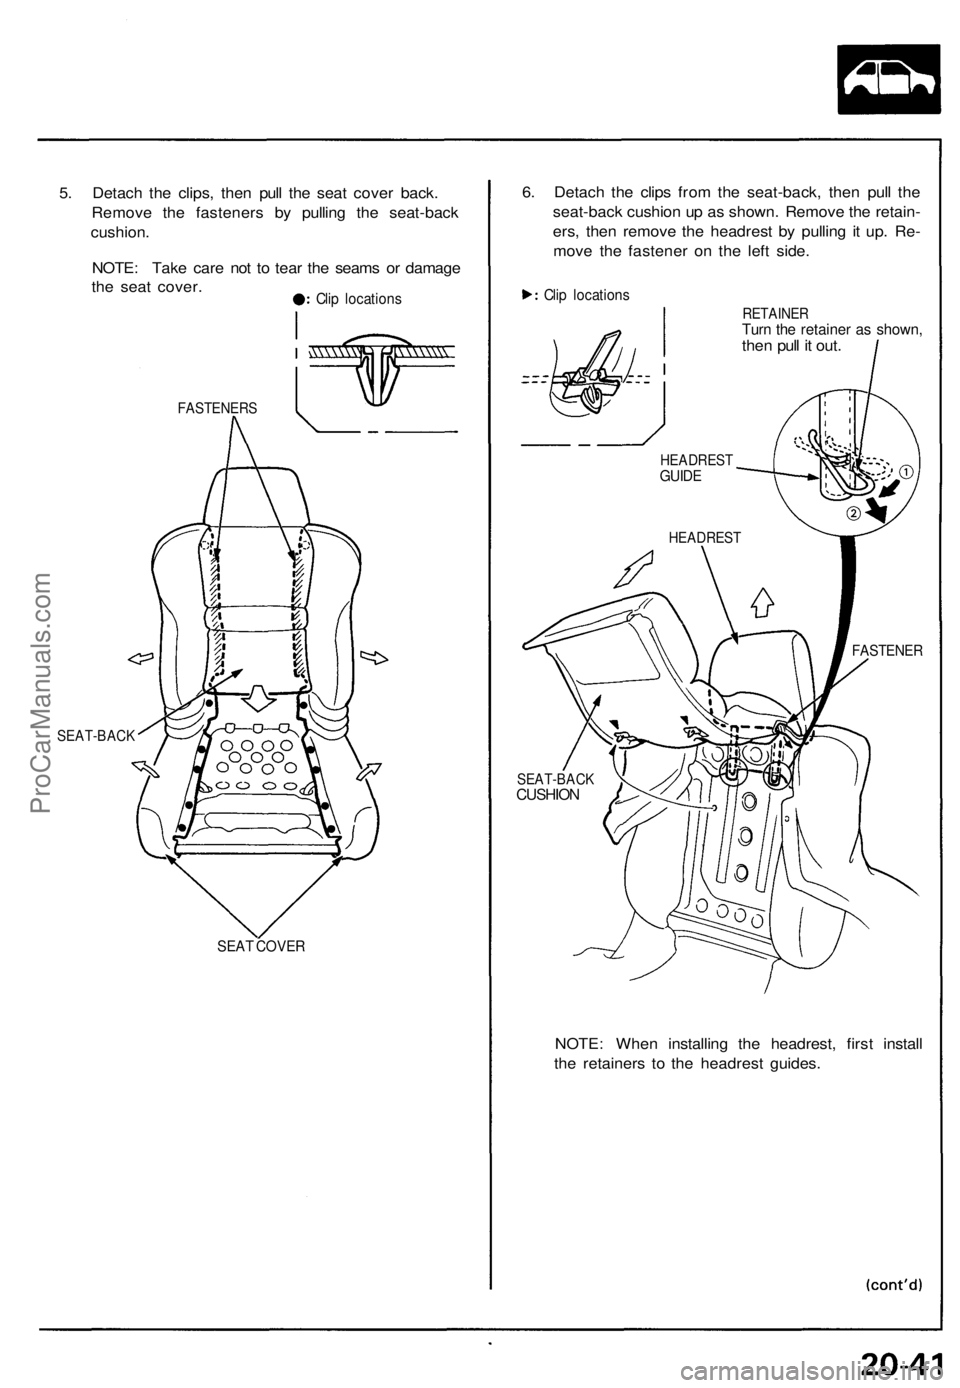
5. Detach the clips, then pull the seat cover back.
Remove the fasteners by pulling the seat-back
cushion.
NOTE: Take care not to tear the seams or damage
the seat cover.
Clip locations
FASTENERS
SEAT-BACK
SEAT COVER
6. Detach the clips from the seat-back, then pull the
seat-back cushion up as shown. Remove the retain-
ers, then remove the headrest by pulling it up. Re-
move the fastener on the left side.
Clip locations
RETAINER
Turn the retainer as shown,
then pull it out.
NOTE: When installing the headrest, first install
the retainers to the headrest guides.
HEADREST
GUIDE
HEADREST
FASTENER
SEAT-BACK
CUSHIONProCarManuals.com
Page 599 of 1640
Seats
Seat Cove r Replacemen t
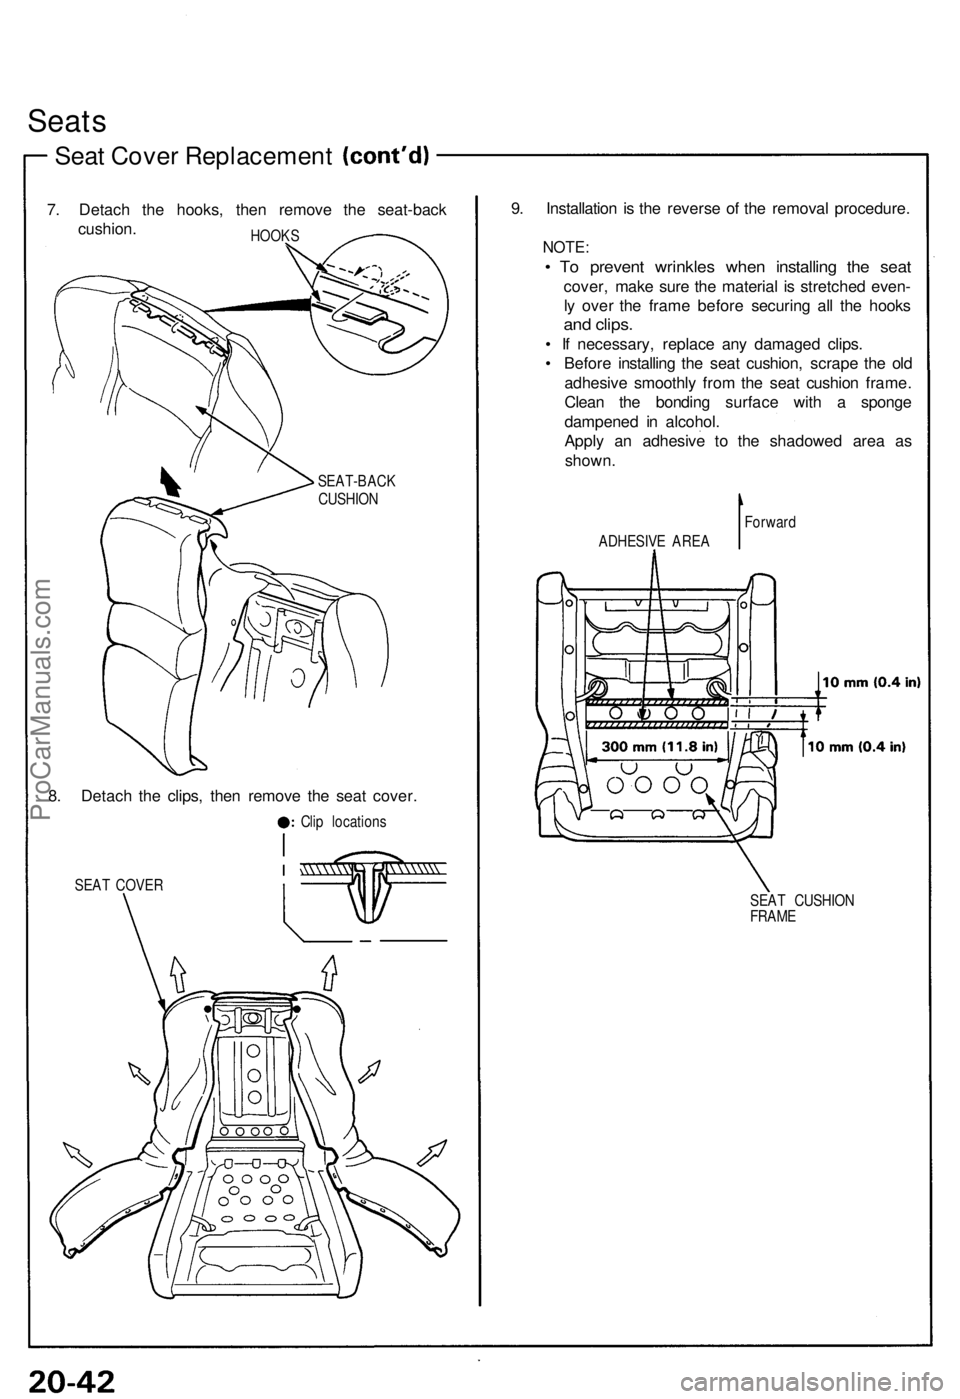
7. Detac h th e hooks , the n remov e th e seat-back
cushion .
HOOKS
8. Detac h th e clips , the n remov e th e sea t cover .
Clip location s
SEA T COVE R
9. Installatio n i s th e revers e o f th e remova l procedure .
NOTE:
• T o preven t wrinkle s whe n installin g th e sea t
cover , mak e sur e th e materia l i s stretche d even -
l y ove r th e fram e befor e securin g al l th e hook s
and clips .
• I f necessary , replac e an y damage d clips .
• Befor e installin g th e sea t cushion , scrap e th e ol d
adhesiv e smoothl y fro m th e sea t cushio n frame .
Clea n th e bondin g surfac e wit h a spong e
dampene d i n alcohol .
Appl y a n adhesiv e t o th e shadowe d are a a s
shown .
Forwar d
SEA T CUSHIO N
FRAM E
ADHESIV
E ARE A
SEAT-BAC K
CUSHION
ProCarManuals.com
Page 600 of 1640
Seat Belts
Replacement
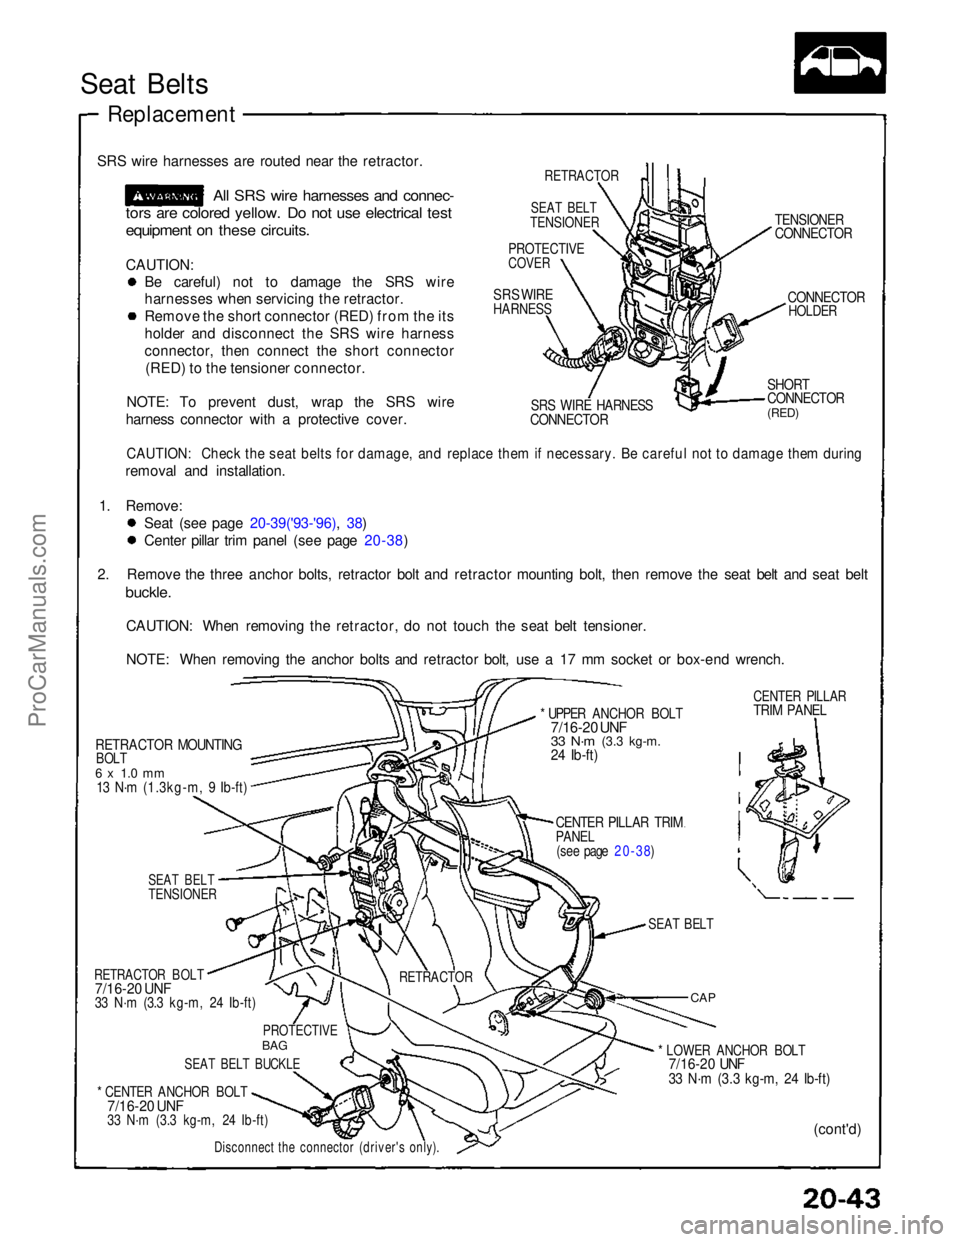
SRS wire harnesses are routed near the retractor.
All SRS wire harnesses and connec-
tors are colored yellow. Do not use electrical test
equipment on these circuits.
CAUTION: Be careful) not to damage the SRS wire
harnesses when servicing the retractor.
Remove the short connector (RED) from the its
holder and disconnect the SRS wire harness
connector, then connect the short connector
(RED) to the tensioner connector.
NOTE: To prevent dust, wrap the SRS wire
harness connector with a protective cover.
RETRACTOR
SEAT BELT
TENSIONER
PROTECTIVE
COVER
SRS WIRE
HARNESS
SRS WIRE HARNESS
CONNECTOR
TENSIONER
CONNECTOR
CONNECTOR
HOLDER
SHORT
CONNECTOR
(RED)
CAUTION: Check the seat belts for damage, and replace them if necessary. Be careful not to damage them during
removal and installation.
1. Remove: Seat (see page 20-39('93-'96), 38)
Center pillar trim panel (see page 20-38)
2. Remove the three anchor bolts, retractor bolt and retractor mounting bolt, then remove the seat belt and seat belt
buckle.
CAUTION: When removing the retractor, do not touch the seat belt tensioner.
NOTE: When removing the anchor bolts and retractor bolt, use a 17 mm socket or box-end wrench.
RETRACTOR MOUNTING
BOLT
6 x 1.0 mm
13 N·m (1.3kg-m, 9 Ib-ft)
* UPPER ANCHOR BOLT
7/16-20 UNF
33 N·m
(3.3 kg-m.
24 Ib-ft)
CENTER PILLAR TRIM
PANEL
(see page 20-38)
SEAT BELT
TENSIONER
RETRACTOR BOLT
7/16-20 UNF
33 N·m (3.3 kg-m, 24 Ib-ft)
* CENTER ANCHOR BOLT
7/16-20 UNF
33 N·m (3.3 kg-m, 24 Ib-ft)
CENTER PILLAR
TRIM PANEL
PROTECTIVE
BAG
SEAT BELT BUCKLE
SEAT BELT
CAP
* LOWER ANCHOR BOLT
7/16-20 UNF
33 N·m (3.3 kg-m, 24 Ib-ft)
(cont'd)
Disconnect the connector (driver's only).
RETRACTORProCarManuals.com