ACURA NSX 1991 Service Repair Manual
Manufacturer: ACURA, Model Year: 1991, Model line: NSX, Model: ACURA NSX 1991Pages: 1640, PDF Size: 60.48 MB
Page 751 of 1640
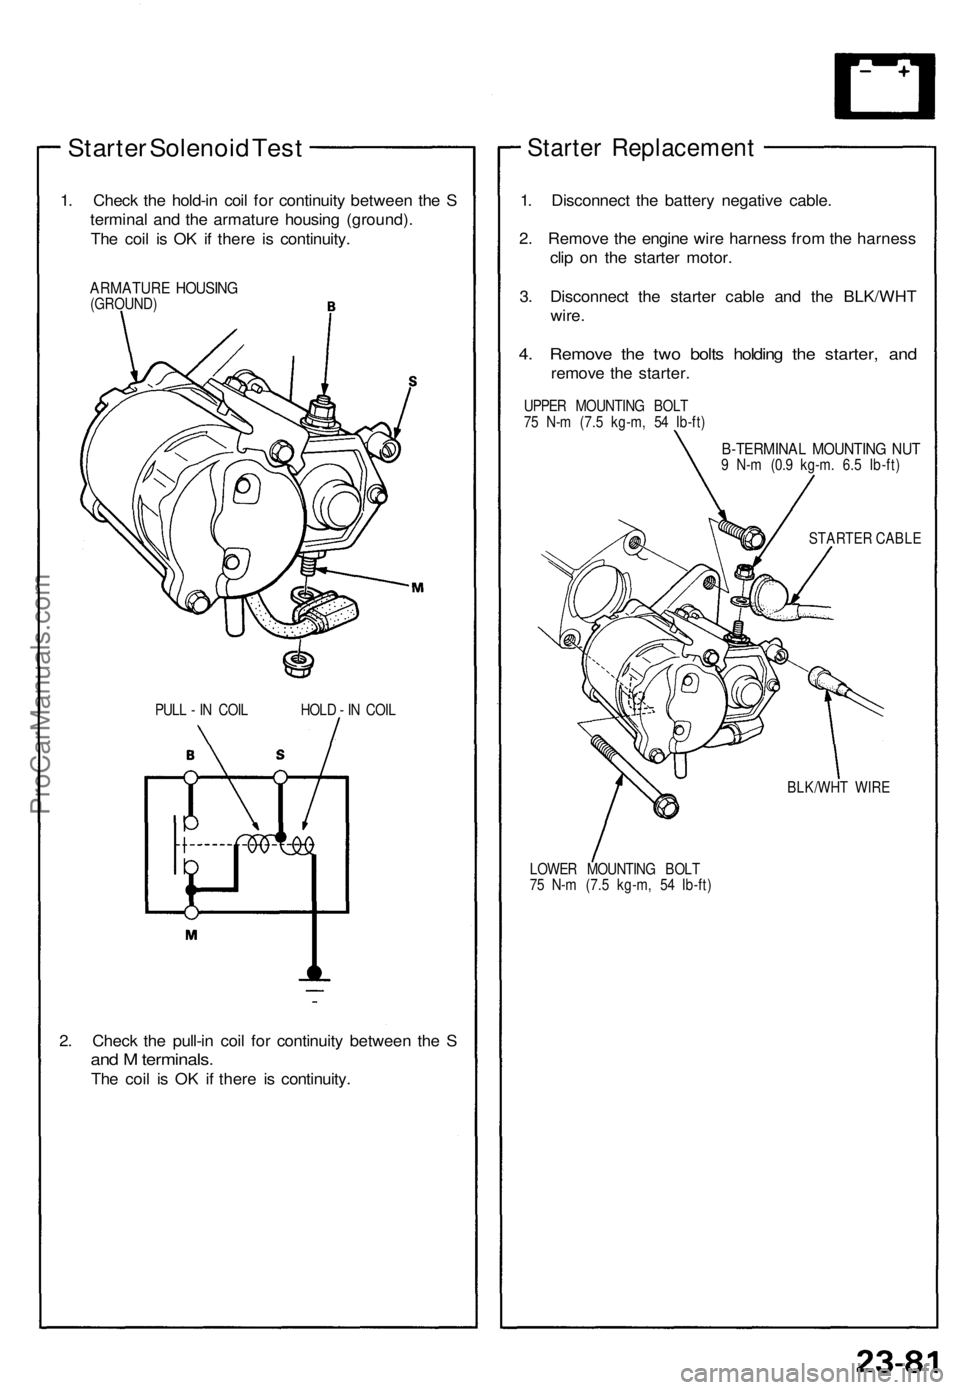
Starter Solenoid Test
1. Check the hold-in coil for continuity between the S
terminal and the armature housing (ground).
The coil is OK if there is continuity.
ARMATURE HOUSING
(GROUND)
PULL - IN COIL HOLD - IN COIL
2. Check the pull-in coil for continuity between the S
and M terminals.
The coil is OK if there is continuity.
Starter Replacement
1. Disconnect the battery negative cable.
2. Remove the engine wire harness from the harness
clip on the starter motor.
3. Disconnect the starter cable and the BLK/WHT
wire.
4. Remove the two bolts holding the starter, and
remove the starter.
UPPER MOUNTING BOLT
75 N-m (7.5 kg-m, 54 Ib-ft)
B-TERMINAL MOUNTING NUT
9 N-m (0.9 kg-m. 6.5 Ib-ft)
STARTER CABLE
LOWER MOUNTING BOLT
75 N-m (7.5 kg-m, 54 Ib-ft)
BLK/WHT WIREProCarManuals.com
Page 752 of 1640
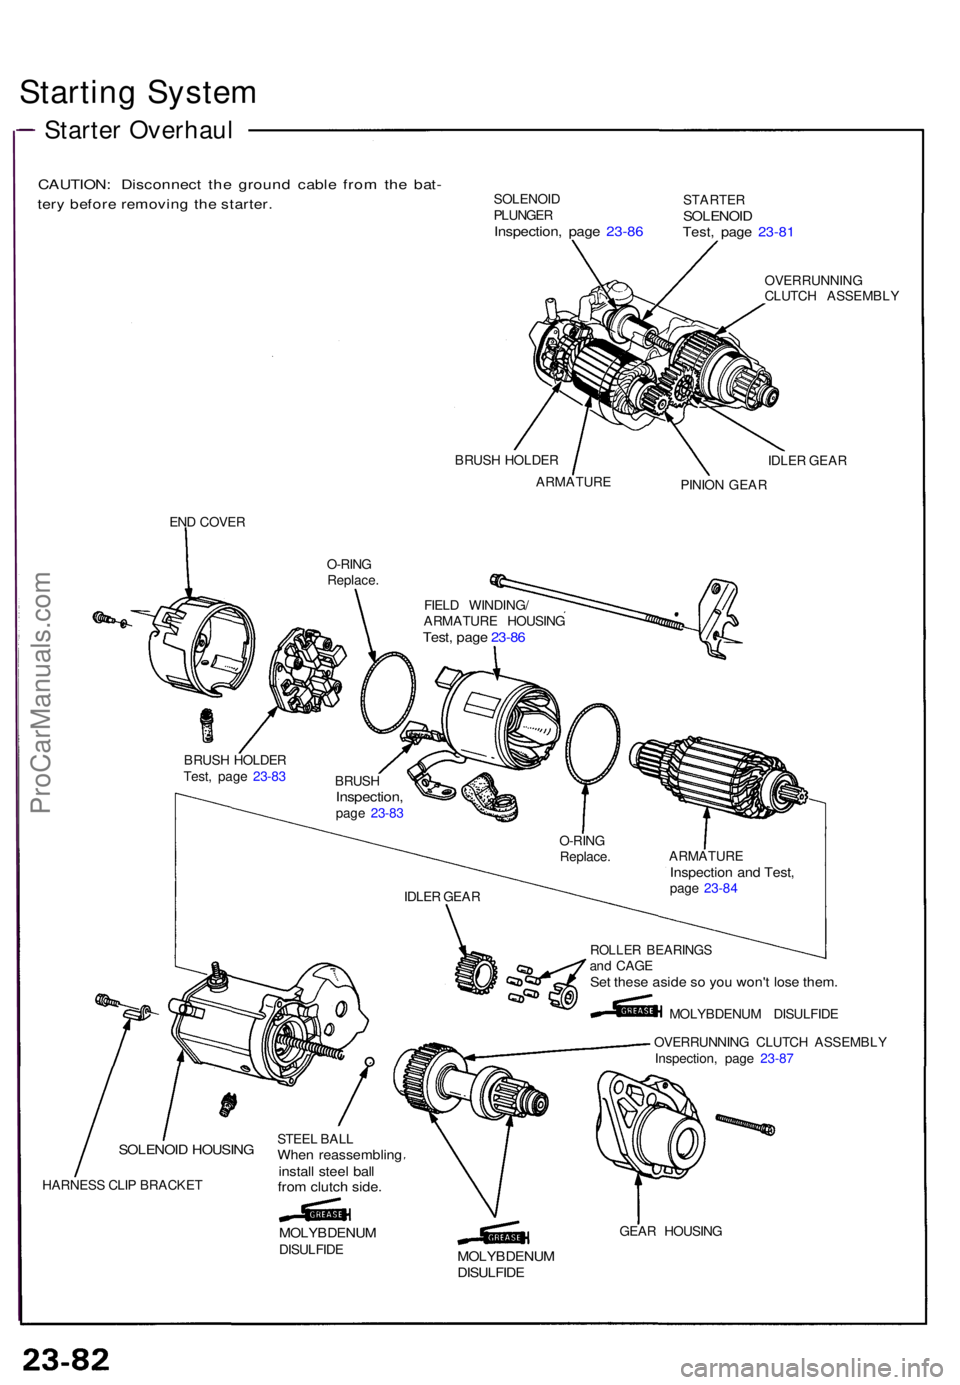
Starting Syste m
CAUTION : Disconnec t th e groun d cabl e fro m th e bat -
tery befor e removin g th e starter .SOLENOI D
PLUNGE R
Inspection , pag e 23-8 6
STARTE RSOLENOI DTest, pag e 23-8 1
OVERRUNNIN G
CLUTC H ASSEMBL Y
BRUS H HOLDE R
ARMATUR E IDLE
R GEA R
PINIO N GEA R
EN D COVE R
O-RING
Replace .
FIELD WINDING /
ARMATUR E HOUSIN G
Test, pag e 23-8 6
IDLE R GEA R
SOLENOI D HOUSIN G
HARNES S CLI P BRACKE T STEE
L BAL L
When reassemblin ginstall stee l bal lfrom clutc h side .
MOLYBDENU MDISULFIDE
ROLLER BEARING Sand CAG ESet thes e asid e s o yo u won' t los e them .
MOLYBDENU M DISULFID E
OVERRUNNIN G CLUTC H ASSEMBL Y
Inspection , pag e 23-8 7
GEA R HOUSIN G
MOLYBDENU MDISULFIDE
Starter Overhau l
BRUSH HOLDE R
Test , pag e 23-8 3
BRUSH
Inspection ,page 23-8 3
ARMATURE
Inspection an d Test ,page 23-8 4
O-RIN
G
Replace .
ProCarManuals.com
Page 753 of 1640
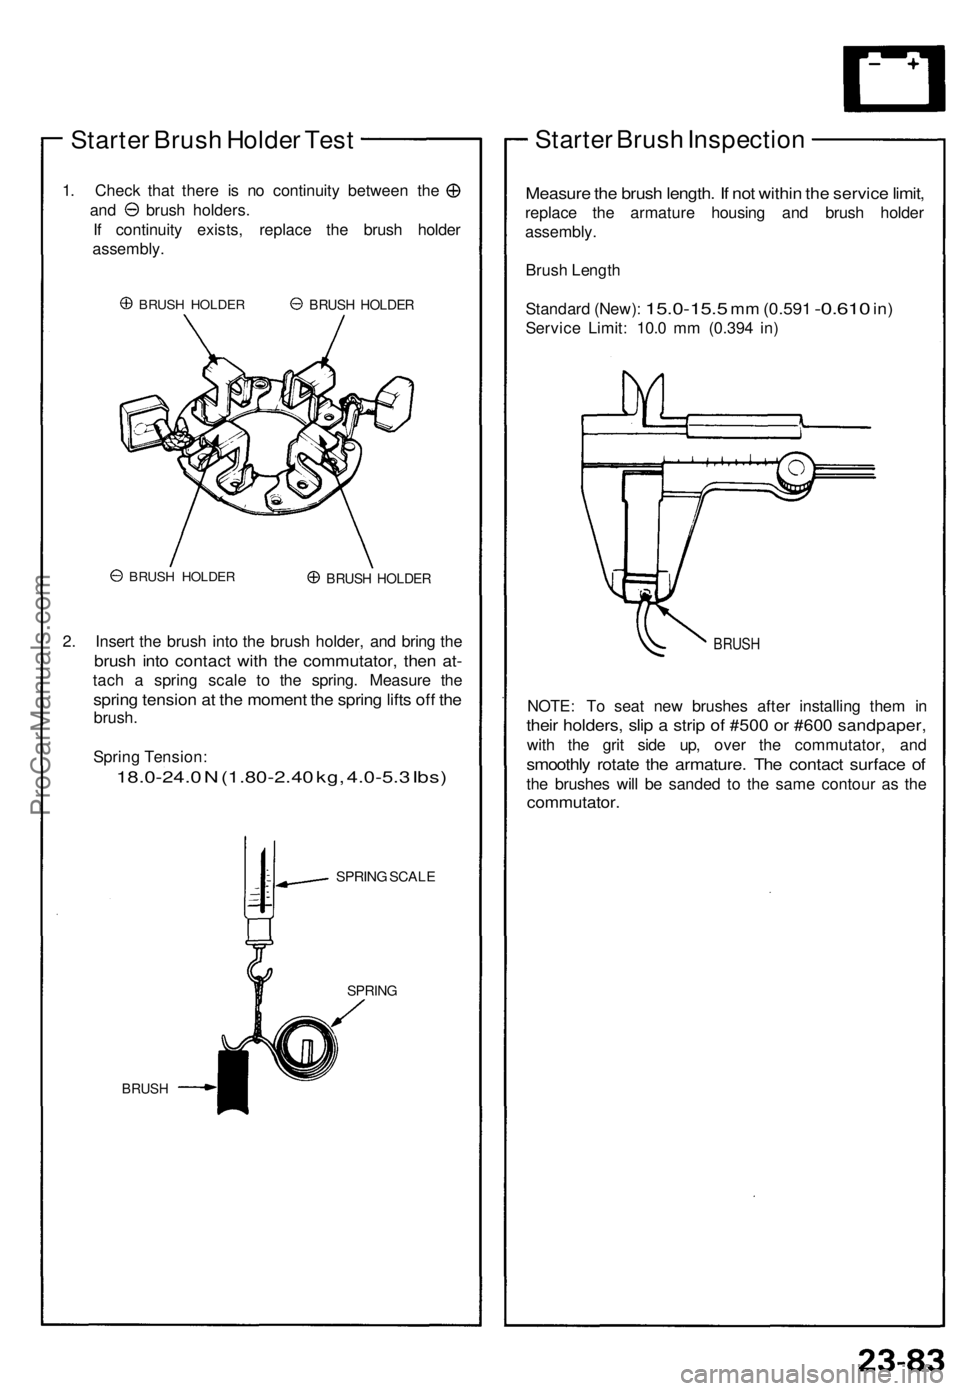
Starter Brush Holder Test
1. Check that there is no continuity between the
and brush holders.
If continuity exists, replace the brush holder
assembly.
BRUSH HOLDER
BRUSH HOLDER
BRUSH HOLDER
2. Insert the brush into the brush holder, and bring the
brush into contact with the commutator, then at-
tach a spring scale to the spring. Measure the
spring tension at the moment the spring lifts off the
brush.
Spring Tension:
18.0-24.0 N (1.80-2.40 kg, 4.0-5.3 Ibs)
SPRING SCALE
BRUSH
SPRING
Starter Brush Inspection
Measure the brush length. If not within the service limit,
replace the armature housing and brush holder
assembly.
Brush Length
Standard (New):
15.0-15.5
mm
(0.591
-0.610
in)
Service Limit: 10.0 mm (0.394 in)
BRUSH
NOTE: To seat new brushes after installing them in
their holders, slip a strip of #500 or #600 sandpaper,
with the grit side up, over the commutator, and
smoothly rotate the armature. The contact surface of
the brushes will be sanded to the same contour as the
commutator.
BRUSH HOLDERProCarManuals.com
Page 754 of 1640
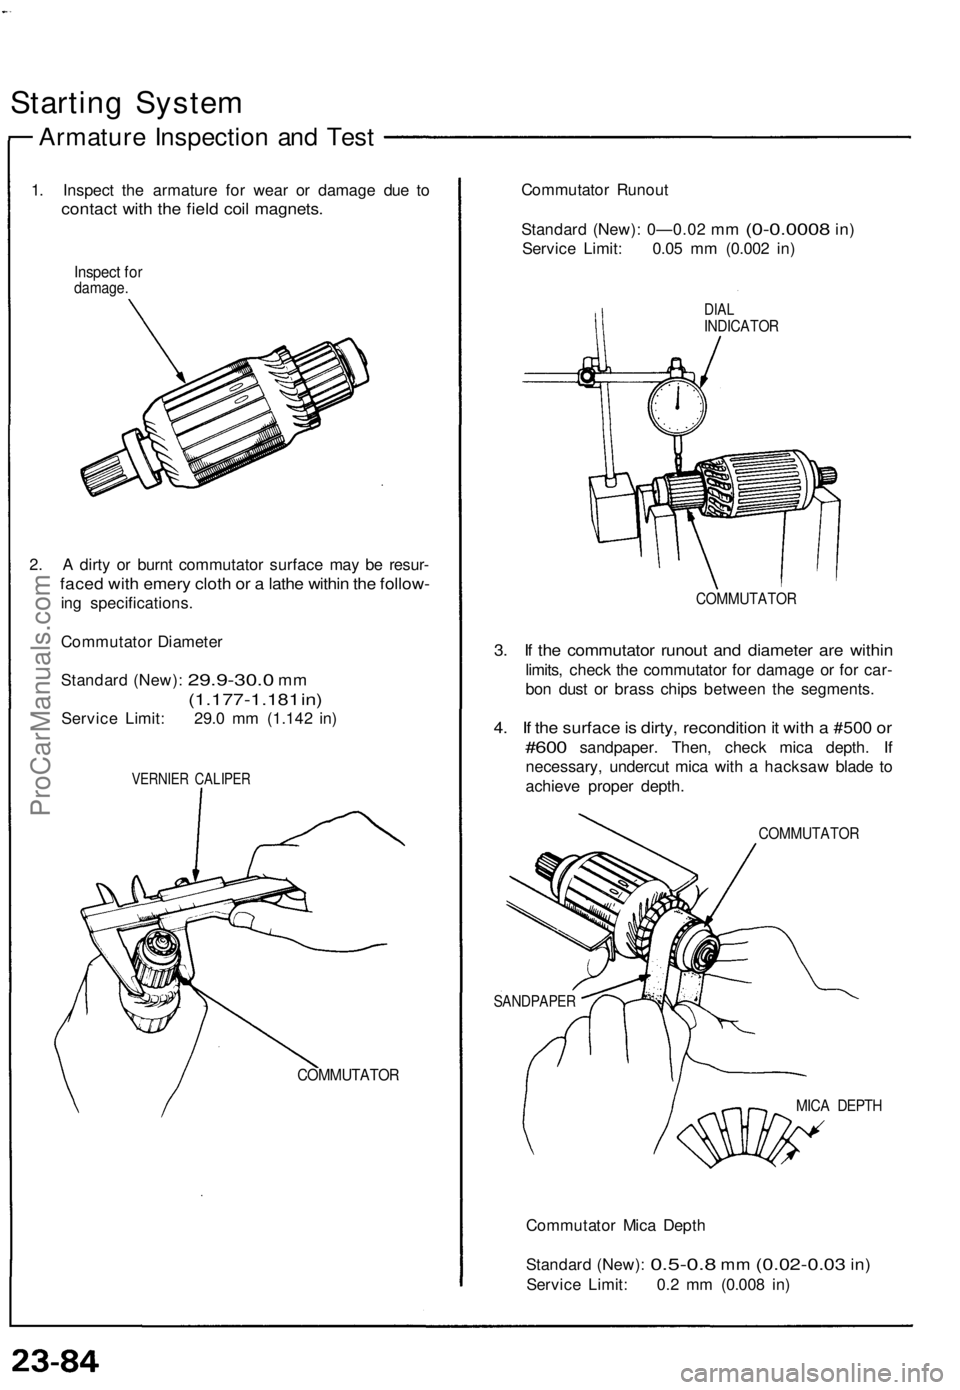
Starting System
Armature Inspection and Test
1. Inspect the armature for wear or damage due to
contact with the field coil magnets.
Inspect for
damage.
2. A dirty or burnt commutator surface may be resur-
faced with emery cloth or a lathe within the follow-
ing specifications.
Commutator Diameter
Standard (New):
29.9-30.0
mm
(1.177-1.181 in)
Service Limit: 29.0 mm (1.142 in)
VERNIER CALIPER
COMMUTATOR
Commutator Runout
Standard (New): 0—0.02
mm
(0-0.0008
in)
Service Limit: 0.05 mm (0.002 in)
DIAL
INDICATOR
COMMUTATOR
3. If the commutator runout and diameter are within
limits, check the commutator for damage or for car-
bon dust or brass chips between the segments.
4. If the surface is dirty, recondition it with a #500 or
#600
sandpaper. Then, check mica depth.
If
necessary, undercut mica with a hacksaw blade to
achieve proper depth.
COMMUTATOR
SANDPAPER
MICA DEPTH
Commutator Mica Depth
Standard (New):
0.5-0.8
mm
(0.02-0.03
in)
Service Limit: 0.2 mm (0.008 in)ProCarManuals.com
Page 755 of 1640
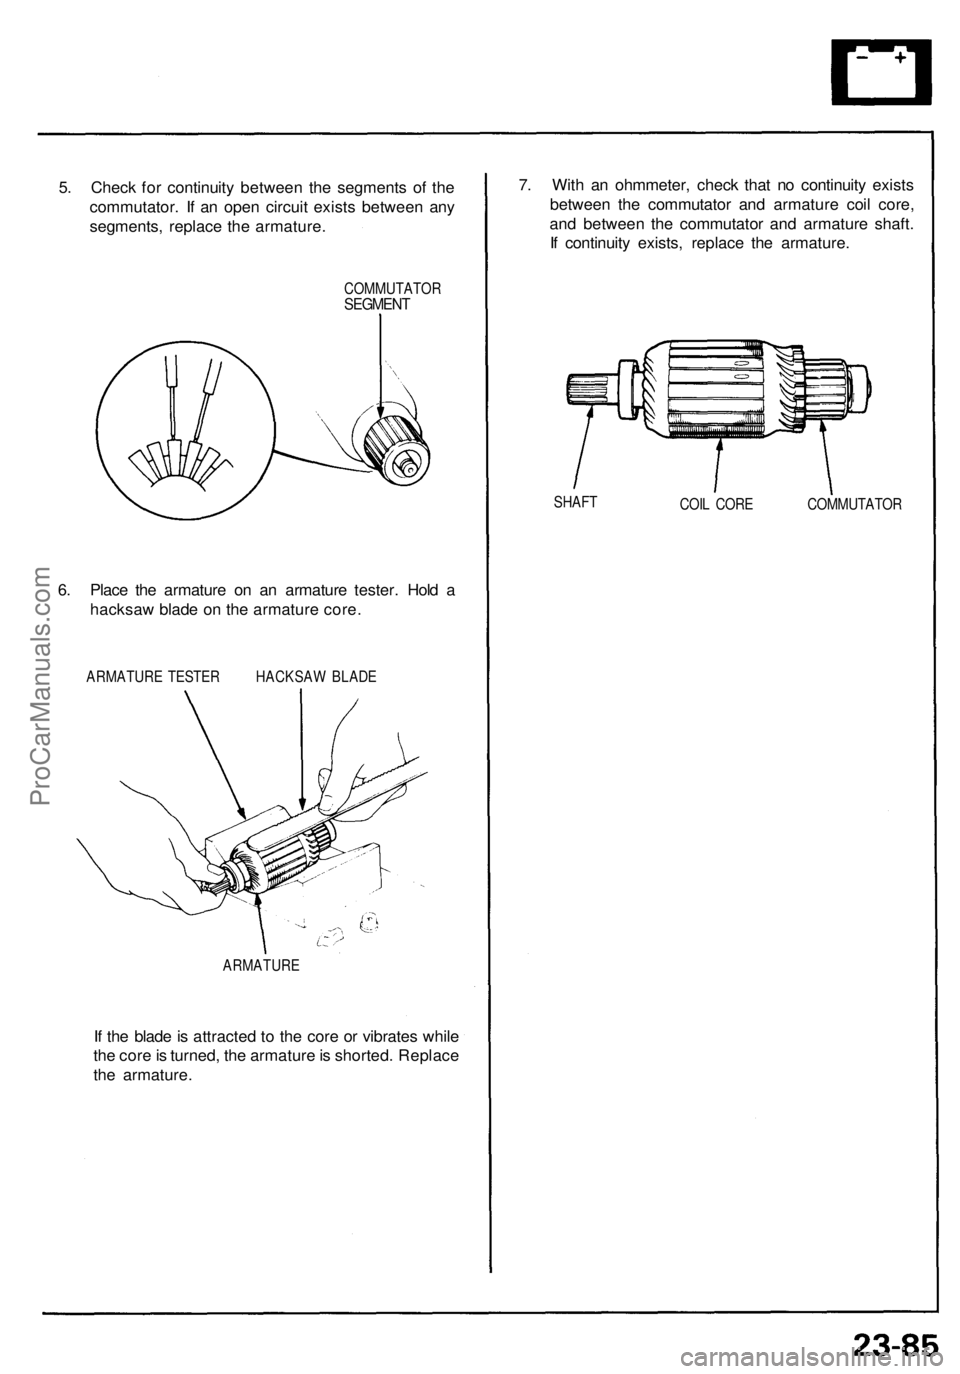
5. Check for continuity between the segments of the
commutator. If an open circuit exists between any
segments, replace the armature.
COMMUTATOR
SEGMENT
6. Place the armature on an armature tester. Hold a
hacksaw blade on the armature core.
ARMATURE TESTER
HACKSAW BLADE
ARMATURE
If the blade is attracted to the core or vibrates while
the core is turned, the armature is shorted. Replace
the armature.
7. With an ohmmeter, check that no continuity exists
between the commutator and armature coil core,
and between the commutator and armature shaft.
If continuity exists, replace the armature.
SHAFT
COIL CORE COMMUTATORProCarManuals.com
Page 756 of 1640
Starting System
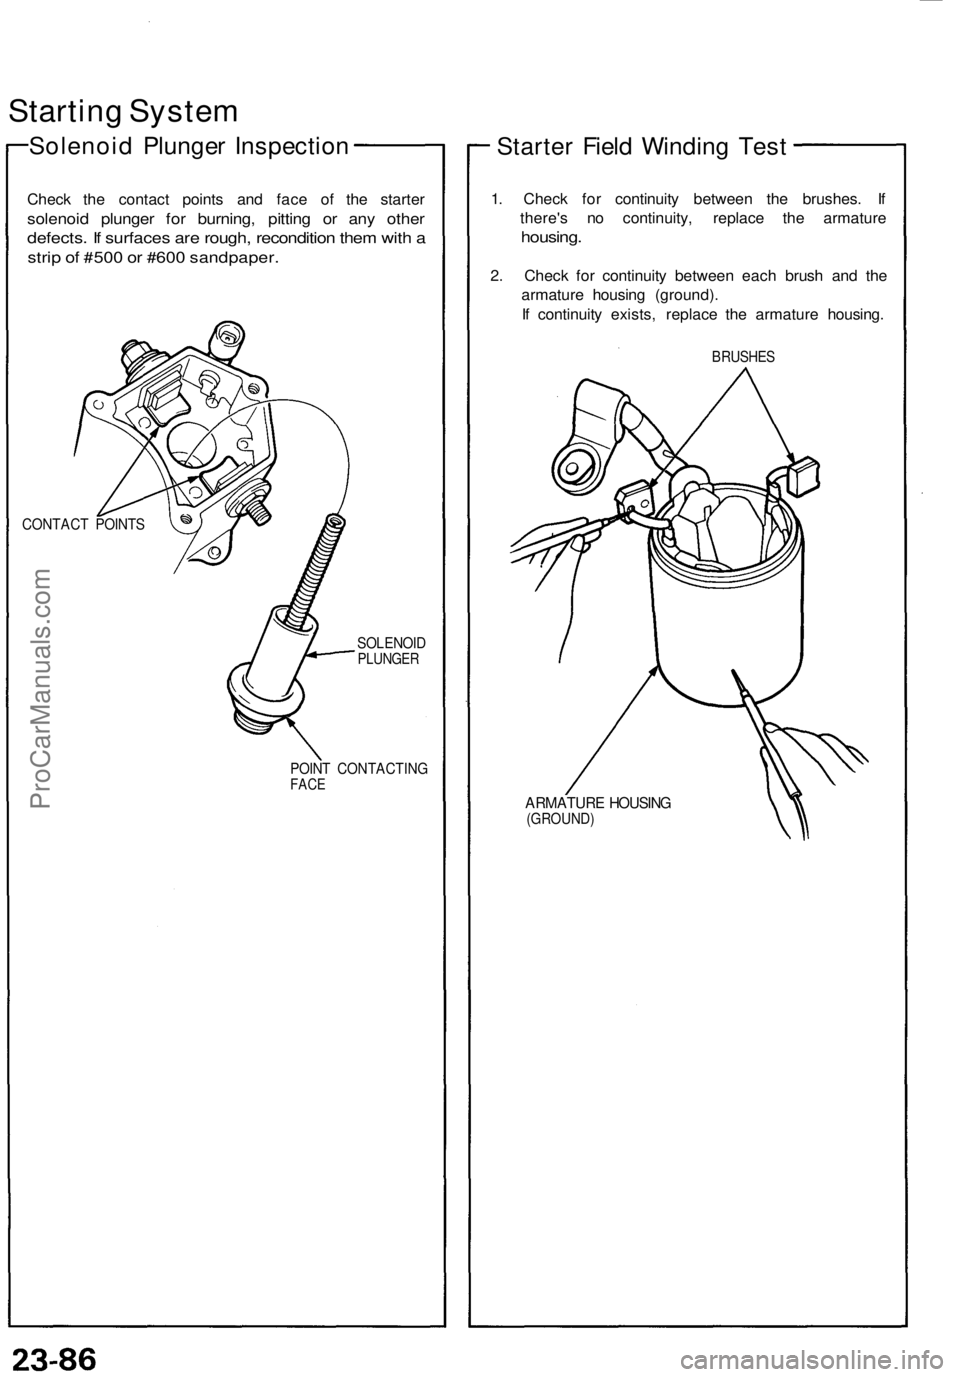
Solenoid Plunger Inspection
Check the contact points and face of the starter
solenoid plunger for burning, pitting or any other
defects. If surfaces are rough, recondition them with a
strip of #500 or #600 sandpaper.
CONTACT POINTS
SOLENOID
PLUNGER
POINT CONTACTING
FACE
Starter Field Winding Test
1. Check for continuity between the brushes. If
there's no continuity, replace the armature
housing.
2. Check for continuity between each brush and the
armature housing (ground).
If continuity exists, replace the armature housing.
BRUSHES
ARMATURE HOUSING
(GROUND)ProCarManuals.com
Page 757 of 1640
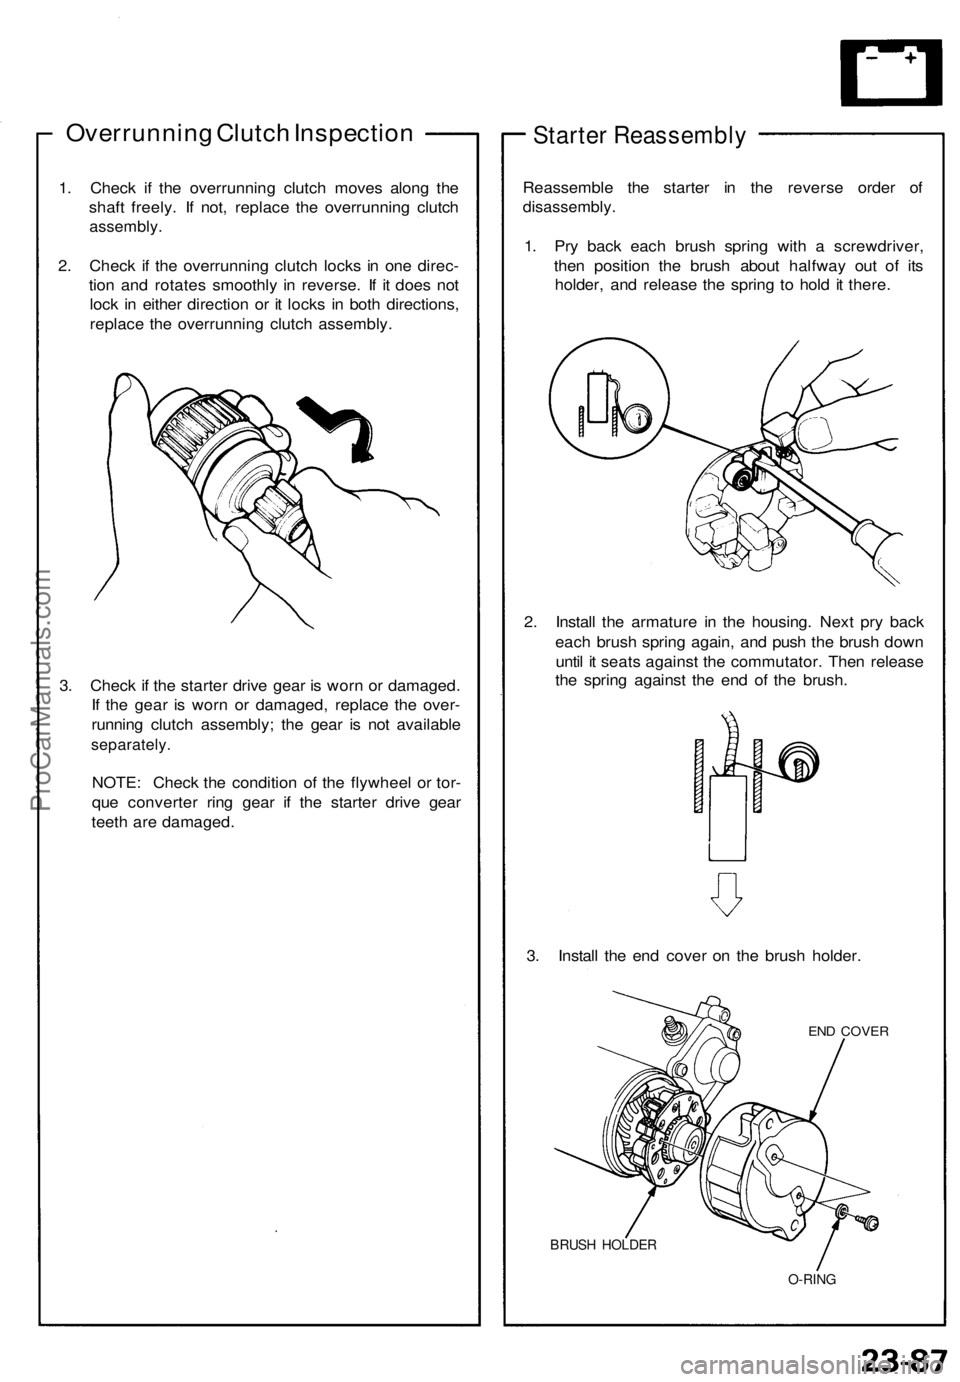
Overrunning Clutc h Inspectio n
1. Chec k i f th e overrunnin g clutc h move s alon g th e
shaf t freely . I f not , replac e th e overrunnin g clutc h
assembly .
2. Chec k i f th e overrunnin g clutc h lock s i n on e direc -
tio n an d rotate s smoothl y i n reverse . I f i t doe s no t
loc k i n eithe r directio n o r i t lock s i n bot h directions ,
replac e th e overrunnin g clutc h assembly .
3 . Chec k i f th e starte r driv e gea r i s wor n o r damaged .
I f th e gea r i s wor n o r damaged , replac e th e over -
runnin g clutc h assembly ; th e gea r i s no t availabl e
separately .
NOTE: Chec k th e conditio n o f th e flywhee l o r tor -
qu e converte r rin g gea r i f th e starter drive gea r
teet h ar e damaged .
Starter Reassembl y
Reassembl e th e starter in th e revers e orde r o f
disassembly .
1. Pr y bac k eac h brus h sprin g wit h a screwdriver ,
the n positio n th e brus h abou t halfwa y ou t o f it s
holder , an d releas e th e sprin g t o hol d i t there .
2 . Instal l th e armatur e i n th e housing . Nex t pr y bac k
eac h brus h sprin g again , an d pus h th e brus h dow n
unti l i t seat s agains t th e commutator . The n releas e
th e sprin g agains t th e en d o f th e brush .
3 . Instal l th e en d cove r o n th e brus h holder .
END COVE R
BRUSH HOLDE R
O-RING
ProCarManuals.com
Page 758 of 1640
Ignition System
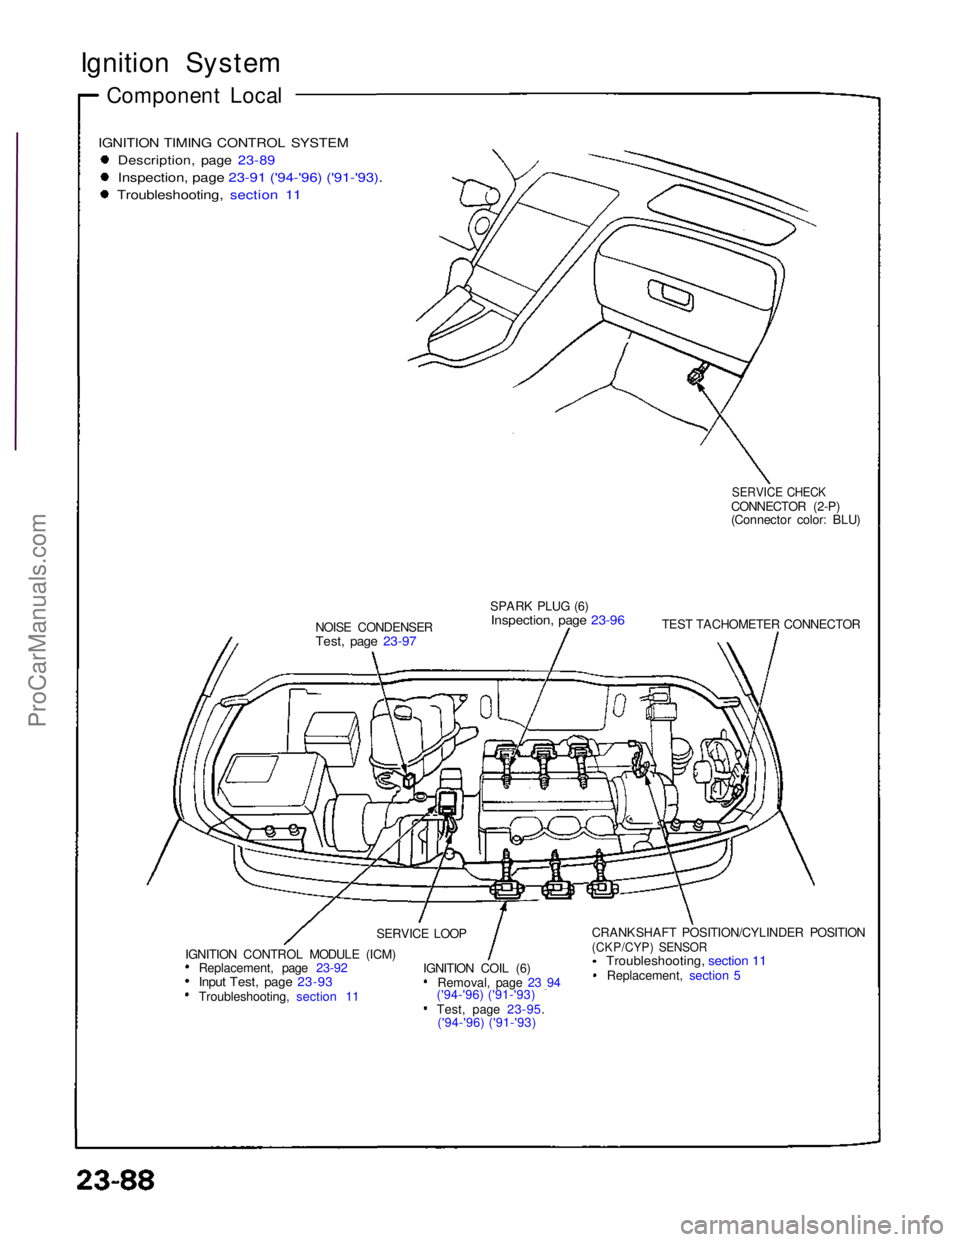
Component Local
IGNITION TIMING CONTROL SYSTEM
Description, page 23-89
Inspection, page 23-91 ('94-'96) ('91-'93).
Troubleshooting, section 11
NOISE CONDENSER
Test, page 23-97
SPARK PLUG (6)
Inspection, page 23-96
TEST TACHOMETER CONNECTOR
SERVICE CHECK
CONNECTOR (2-P)
(Connector color: BLU)
CRANKSHAFT POSITION/CYLINDER POSITION
(CKP/CYP) SENSOR
Troubleshooting, section 11
Replacement, section 5
IGNITION COIL (6)
Removal, page 23 94
('94-'96) ('91-'93) Test, page 23-95.
('94-'96) ('91-'93)
IGNITION CONTROL MODULE (ICM)
Replacement, page 23-92
Input Test, page 23-93
Troubleshooting, section 11
SERVICE LOOP
ProCarManuals.com
Page 759 of 1640
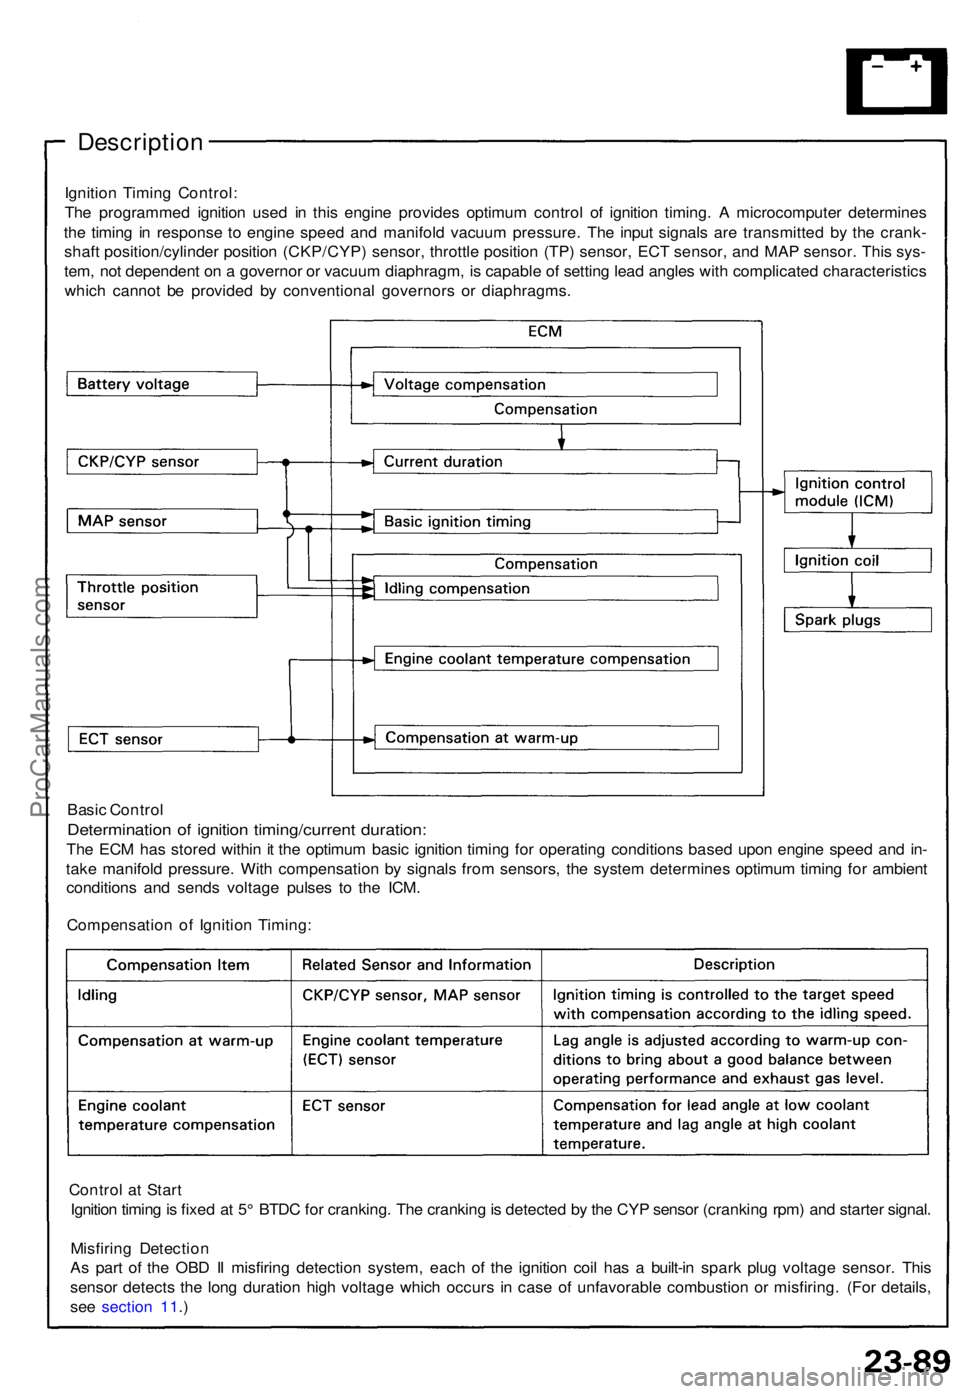
Control a t Star t
Ignitio n timin g is fixe d a t 5 ° BTD C fo r cranking . Th e crankin g is detecte d b y th e CY P senso r (crankin g rpm ) an d starte r signal .
Misfirin g Detectio n
A s par t o f th e OB D II misfirin g detectio n system , eac h o f th e ignitio n coi l ha s a built-i n spar k plu g voltag e sensor . Thi s
senso r detect s th e lon g duratio n hig h voltag e whic h occur s i n cas e o f unfavorabl e combustio n o r misfiring . (Fo r details ,
se e sectio n 11 .)
Compensatio
n o f Ignitio n Timing :
Basi
c Contro l
Determinatio n o f ignitio n timing/curren t duration :
The EC M ha s store d withi n it th e optimu m basi c ignitio n timin g fo r operatin g condition s base d upo n engin e spee d an d in -
tak e manifol d pressure . Wit h compensatio n b y signal s fro m sensors , th e syste m determine s optimu m timin g fo r ambien t
condition s an d send s voltag e pulse s t o th e ICM .
Ignitio
n Timin g Control :
Th e programme d ignitio n use d i n thi s engin e provide s optimu m contro l o f ignitio n timing . A microcompute r determine s
th e timin g i n respons e t o engin e spee d an d manifol d vacuu m pressure . Th e inpu t signal s ar e transmitte d b y th e crank -
shaf t position/cylinde r positio n (CKP/CYP ) sensor , throttl e positio n (TP ) sensor , EC T sensor , an d MA P sensor . Thi s sys -
tem , no t dependen t o n a governo r o r vacuu m diaphragm , i s capabl e o f settin g lea d angle s wit h complicate d characteristic s
whic h canno t b e provide d b y conventiona l governor s o r diaphragms .
Description
ProCarManuals.com
Page 760 of 1640
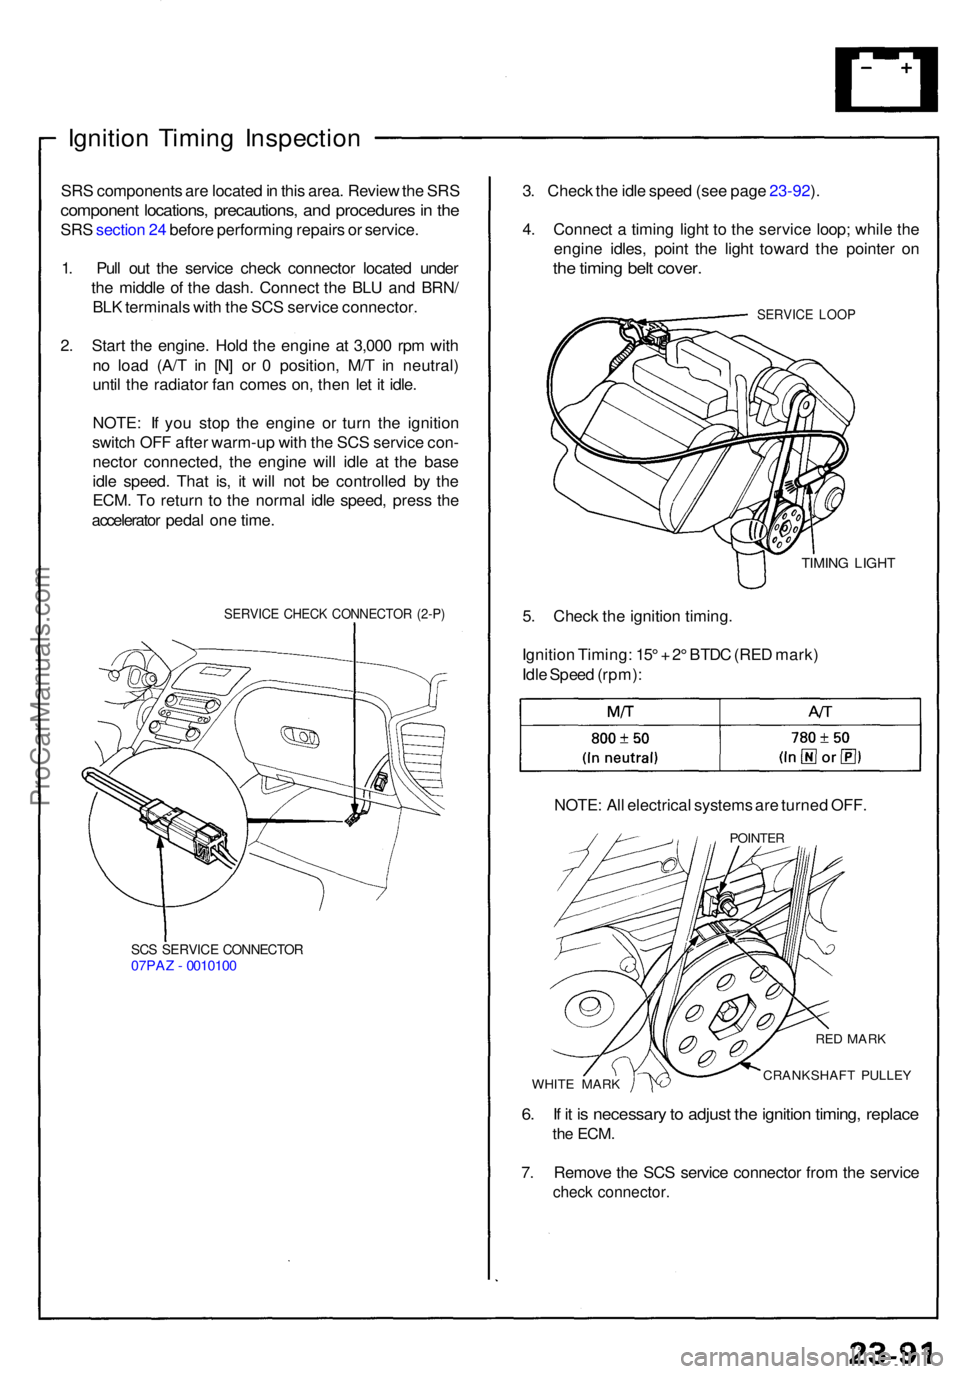
Ignition Timin g Inspectio n
SRS component s ar e locate d in thi s area . Revie w th e SR S
componen t locations , precautions , an d procedure s in th e
SR S sectio n 24 befor e performin g repair s o r service .
1 . Pul l ou t th e servic e chec k connecto r locate d unde r
th e middl e o f th e dash . Connec t th e BL U an d BRN /
BL K terminal s wit h th e SC S servic e connector .
2 . Star t th e engine . Hol d th e engin e a t 3,00 0 rp m wit h
n o loa d (A/ T i n [N ] o r 0 position , M/ T i n neutral )
unti l th e radiato r fa n come s on , the n le t i t idle .
NOTE : I f yo u sto p th e engin e o r tur n th e ignitio n
switc h OF F afte r warm-u p wit h th e SC S servic e con -
necto r connected , th e engin e wil l idl e a t th e bas e
idl e speed . Tha t is , i t wil l no t b e controlle d b y th e
ECM . T o retur n t o th e norma l idl e speed , pres s th e
accelerato r peda l on e time .
SERVIC E CHEC K CONNECTO R (2-P )
SCS SERVIC E CONNECTO R07PAZ - 001010 0
3. Chec k th e idl e spee d (se e pag e 23-92 ).
4 . Connec t a timin g ligh t t o th e servic e loop ; whil e th e
engin e idles , poin t th e ligh t towar d th e pointe r o n
the timin g bel t cover .
SERVIC E LOO P
TIMIN G LIGH T
5. Chec k th e ignitio n timing .
Ignitio n Timing : 15 ° + 2° BTD C (RE D mark )
Idl e Spee d (rpm) :
NOTE : Al l electrica l system s ar e turne d OFF .
POINTE R
WHITE MAR K
RED MAR K
CRANKSHAF T PULLE Y
6. I f i t i s necessar y to adjus t th e ignitio n timing , replac e
the ECM .
7. Remov e th e SC S servic e connecto r fro m th e servic e
check connector .
ProCarManuals.com