ACURA NSX 1991 Service Repair Manual
Manufacturer: ACURA, Model Year: 1991, Model line: NSX, Model: ACURA NSX 1991Pages: 1640, PDF Size: 60.48 MB
Page 791 of 1640
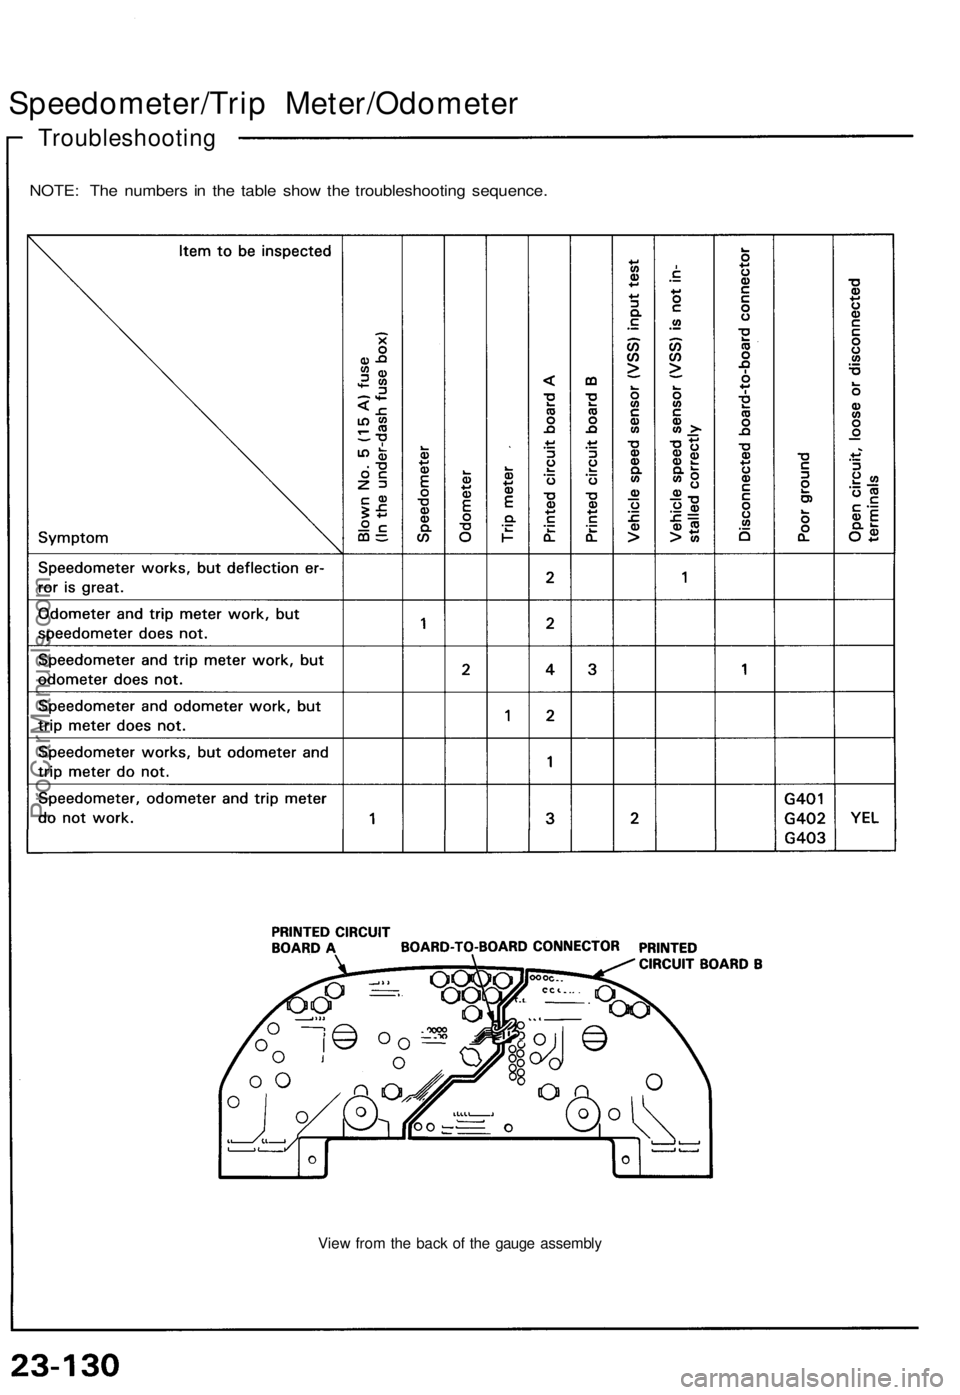
Speedometer/Trip Meter/Odometer
Troubleshooting
NOTE: The numbers in the table show the troubleshooting sequence.
View from the back of the gauge assemblyProCarManuals.com
Page 792 of 1640
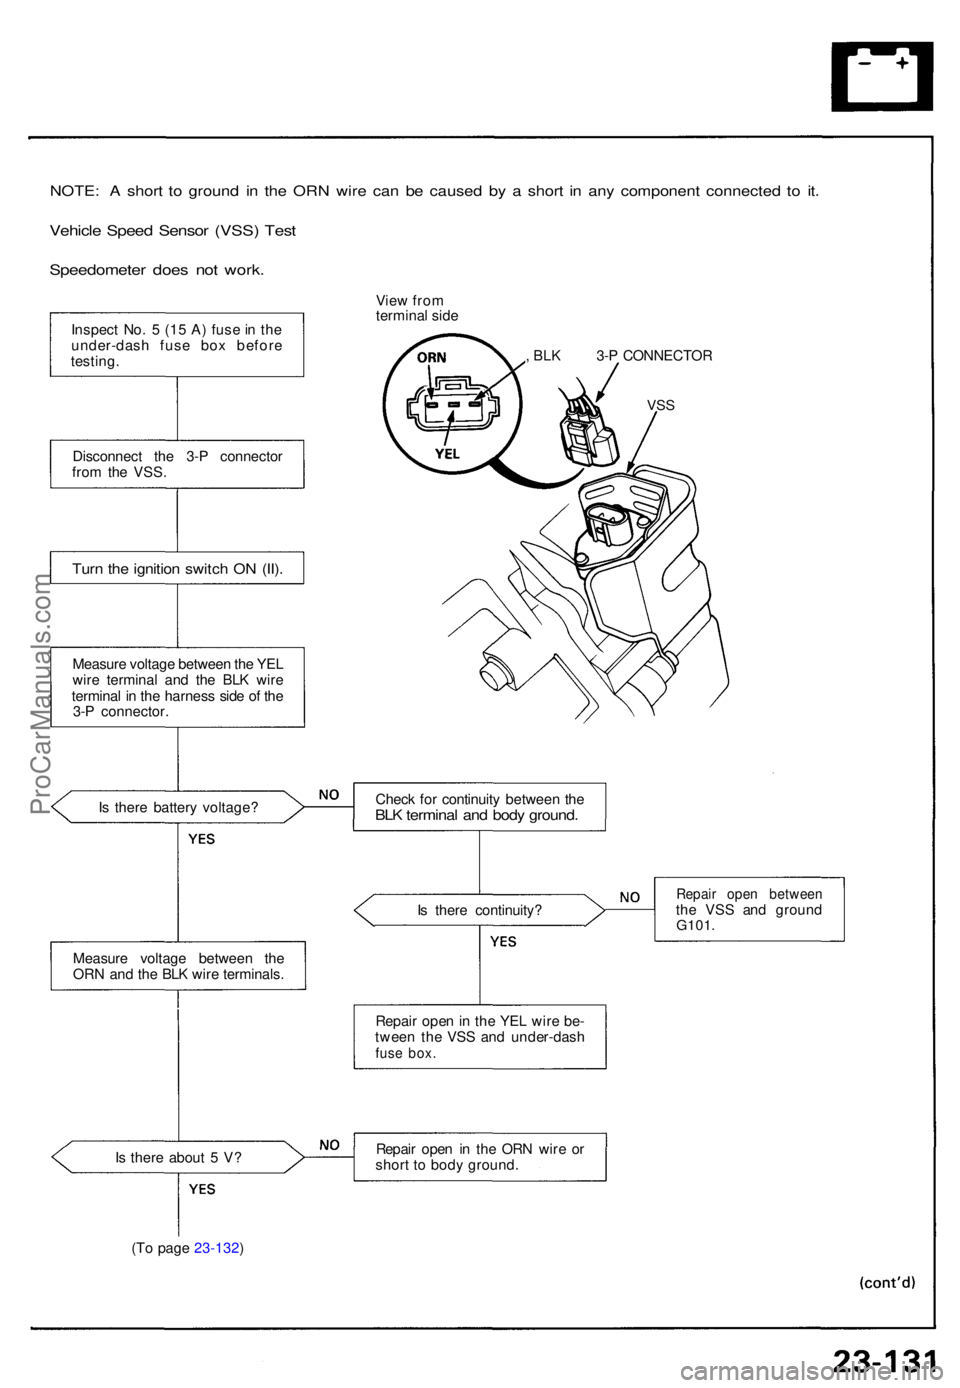
NOTE: A shor t t o groun d i n th e OR N wir e ca n b e cause d b y a shor t i n an y componen t connecte d t o it .
Vehicl e Spee d Senso r (VSS ) Tes t
Speedomete r doe s no t work.
Inspec t No . 5 (1 5 A ) fus e in th e
under-das h fus e bo x befor e
testing .
Disconnec t th e 3- P connecto r
fro m th e VSS .
Turn th e ignitio n switc h O N (II) .
Measur e voltag e betwee n th e YE L
wir e termina l an d th e BL K wir e
termina l i n th e harnes s sid e o f th e
3- P connector .
I s ther e batter y voltage ?
Measur e voltag e betwee n th e
OR N an d th e BL K wir e terminals .
I s ther e abou t 5 V ?
(T o page 23-132 ) Vie
w fro m
termina l sid e
, BL K 3- P CONNECTO R
VSS
Is ther e continuity ?
Repai r ope n in th e OR N wir e o r
shor t t o bod y ground .Repair ope n betwee nthe VS S an d groun dG101.
Repai r ope n in th e YE L wir e be -
twee n th e VS S an d under-das h
fuse box .
Chec k fo r continuit y betwee n th eBLK termina l an d bod y ground .
ProCarManuals.com
Page 793 of 1640
Speedometer/Trip Meter/Odomete r
Troubleshooting
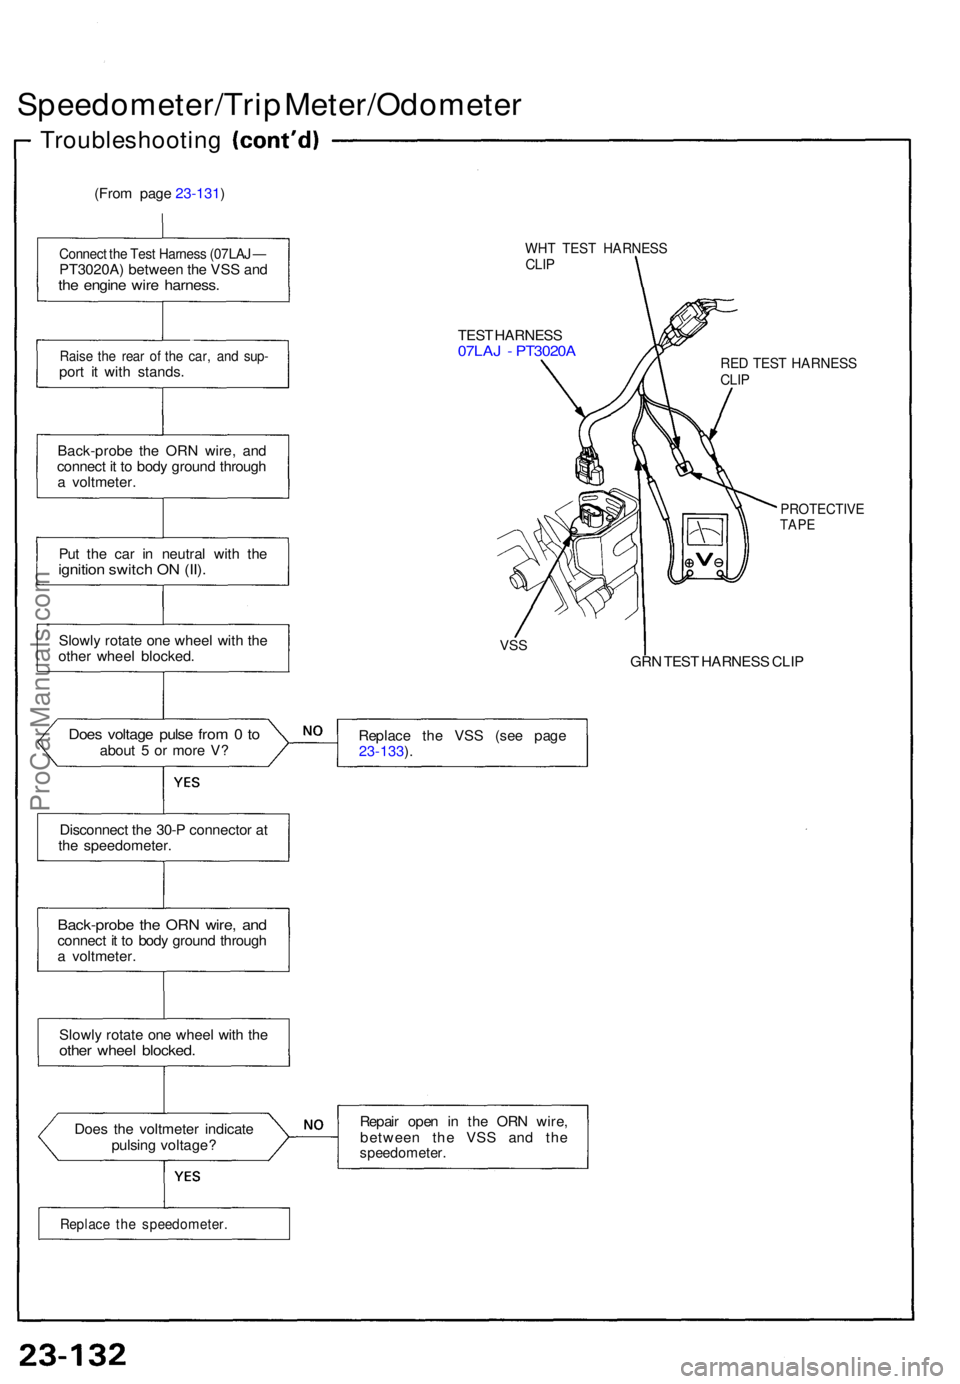
(From page 23-131 )
Connec t th e Tes t Harnes s (07LA J —PT3020A ) betwee n th e VS S an dthe engin e wir e harness .
Raise th e rea r o f th e car , an d sup -port i t wit h stands .
Back-prob e th e OR N wire , an d
connec t i t t o bod y groun d throug h
a voltmeter .
Pu t th e ca r i n neutra l wit h th e
ignitio n switc h O N (II) .
Slowl y rotat e on e whee l wit h th e
othe r whee l blocked .
Does voltag e puls e fro m 0 toabou t 5 or mor e V ?
Disconnec t th e 30- P connecto r a t
th e speedometer .
Back-probe th e OR N wire , an dconnec t i t t o bod y groun d throug h
a voltmeter .
Slowl y rotat e on e whee l wit h th e
othe r whee l blocked .
Does th e voltmete r indicat e
pulsin g voltage ?
WHT TES T HARNES SCLIP
TES T HARNES S07LAJ - PT3020 ARED TES T HARNES SCLIP
PROTECTIV ETAPE
VSSGR N TES T HARNES S CLI P
Replac e th e VS S (se e pag e
23-133 ).
Repai r ope n i n th e OR N wire ,
betwee n th e VS S an d th e
speedometer .
Replace th e speedometer .
ProCarManuals.com
Page 794 of 1640
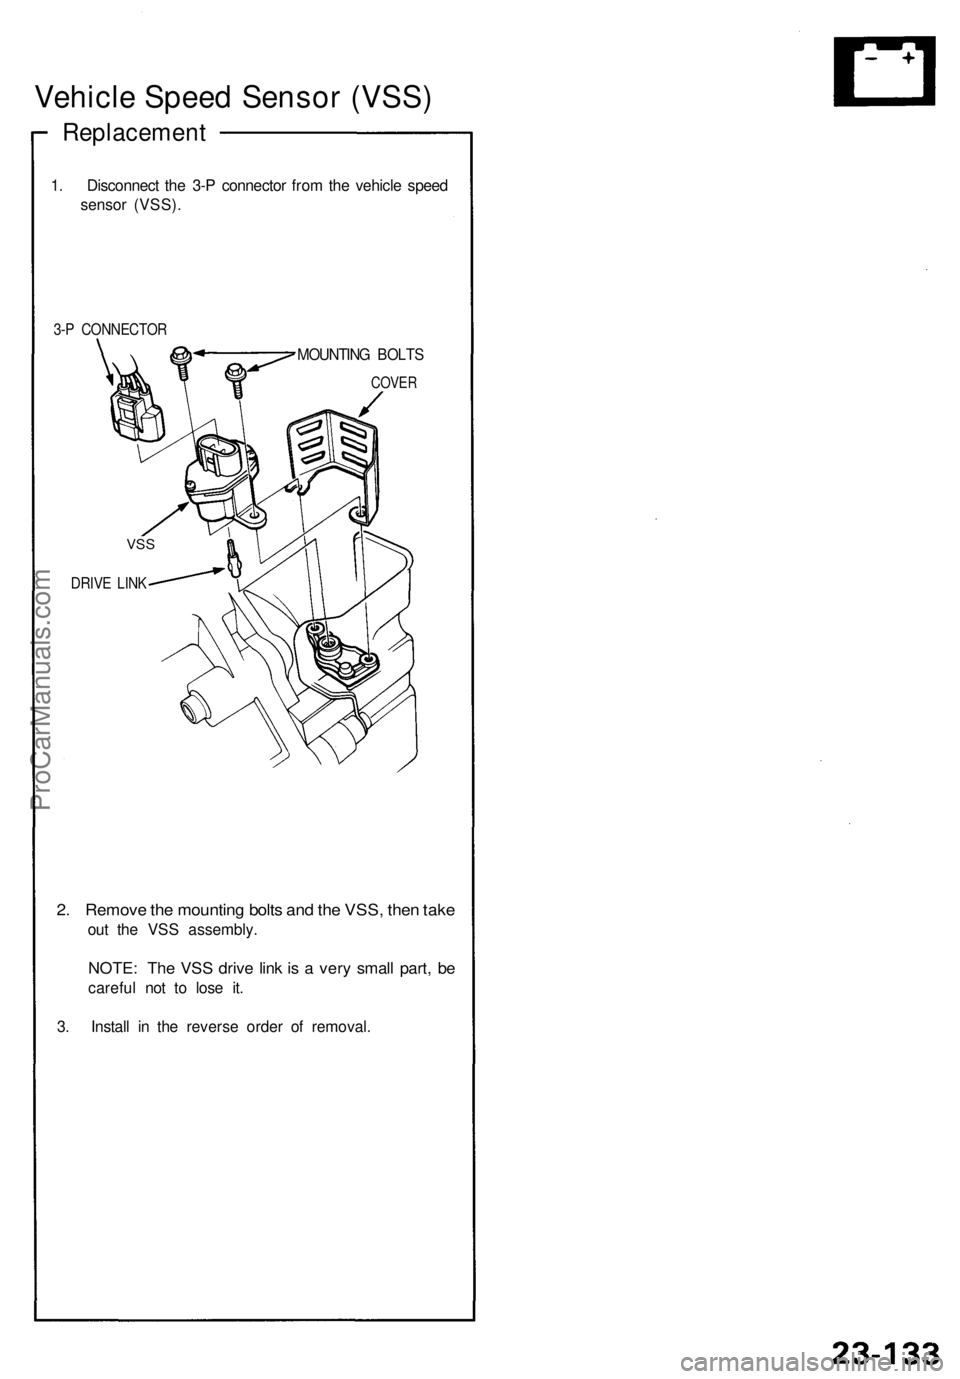
Vehicle Speed Sensor (VSS)
Replacement
1. Disconnect the 3-P connector from the vehicle speed
sensor (VSS).
3-P CONNECTOR
MOUNTING BOLTS
2. Remove the mounting bolts and the VSS, then take
out the VSS assembly.
NOTE: The VSS drive link is a very small part, be
careful not to lose it.
3. Install in the reverse order of removal.
COVER
VSS
DRIVE LINKProCarManuals.com
Page 795 of 1640
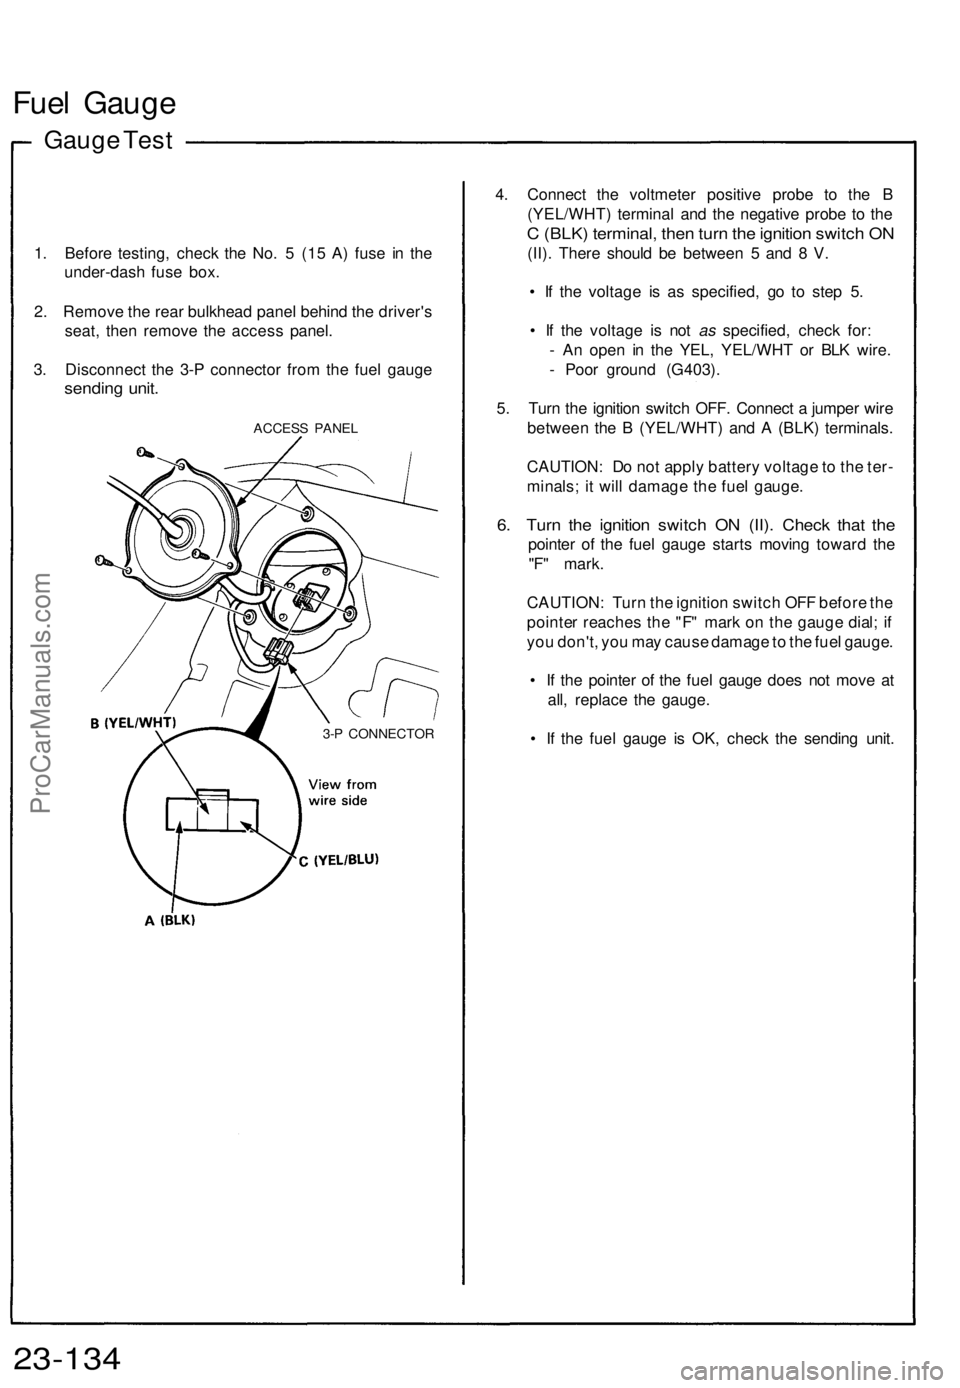
Fuel Gaug e
Gauge Tes t
1. Befor e testing , chec k th e No . 5 (1 5 A ) fus e i n th e
under-das h fus e box .
2 . Remov e th e rea r bulkhea d pane l behin d th e driver' s
seat , the n remov e th e acces s panel .
3 . Disconnec t th e 3- P connecto r fro m th e fue l gaug e
sendin g unit .
ACCES S PANE L
4. Connec t th e voltmete r positiv e prob e t o th e B
(YEL/WHT ) termina l an d th e negativ e prob e t o th e
C (BLK ) terminal , the n tur n th e ignitio n switc h O N
(II) . Ther e shoul d b e betwee n 5 an d 8 V .
• I f th e voltag e i s a s specified , g o t o ste p 5 .
• I f th e voltag e i s no t as specified , chec k for :
- A n ope n i n th e YEL , YEL/WH T o r BL K wire .
- Poo r groun d (G403) .
5 . Tur n th e ignitio n switc h OFF . Connec t a jumpe r wir e
betwee n th e B (YEL/WHT ) an d A (BLK ) terminals .
CAUTION : D o no t appl y batter y voltag e to th e ter -
minals ; i t wil l damag e th e fue l gauge .
6. Tur n th e ignitio n switc h O N (II) . Chec k tha t th e
pointe r o f th e fue l gaug e start s movin g towar d th e
"F " mark .
CAUTION : Tur n th e ignitio n switc h OF F befor e th e
pointe r reache s th e "F " mar k o n th e gaug e dial ; i f
yo u don't , yo u ma y caus e damag e to th e fue l gauge .
• I f th e pointe r o f th e fue l gaug e doe s no t mov e a t
all , replac e th e gauge .
• I f th e fue l gaug e i s OK , chec k th e sendin g unit .
23-13 4
3-P CONNECTO R
ProCarManuals.com
Page 796 of 1640
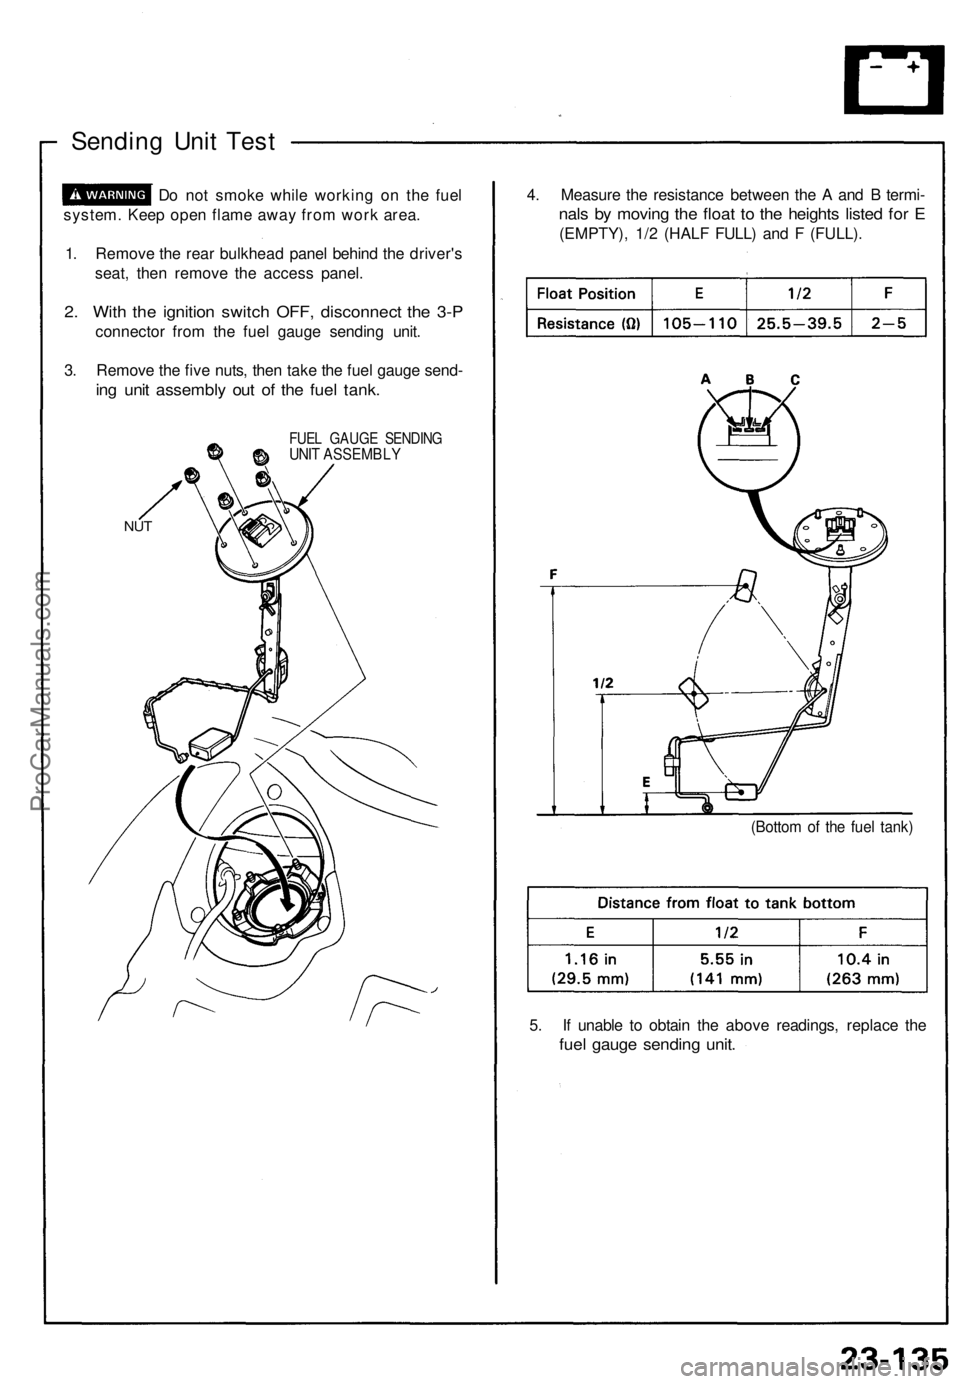
Sending Unit Test
Do not smoke while working on the fuel
system. Keep open flame away from work area.
1. Remove the rear bulkhead panel behind the driver's
seat, then remove the access panel.
2. With the ignition switch OFF, disconnect the 3-P
connector from the fuel gauge sending unit.
3. Remove the five nuts, then take the fuel gauge send-
ing unit assembly out of the fuel tank.
FUEL GAUGE SENDING
UNIT ASSEMBLY
NUT
4. Measure the resistance between the A and B termi-
nals by moving the float to the heights listed for E
(EMPTY), 1/2 (HALF FULL) and F (FULL).
(Bottom of the fuel tank)
5. If unable to obtain the above readings, replace the
fuel gauge sending unit.ProCarManuals.com
Page 797 of 1640
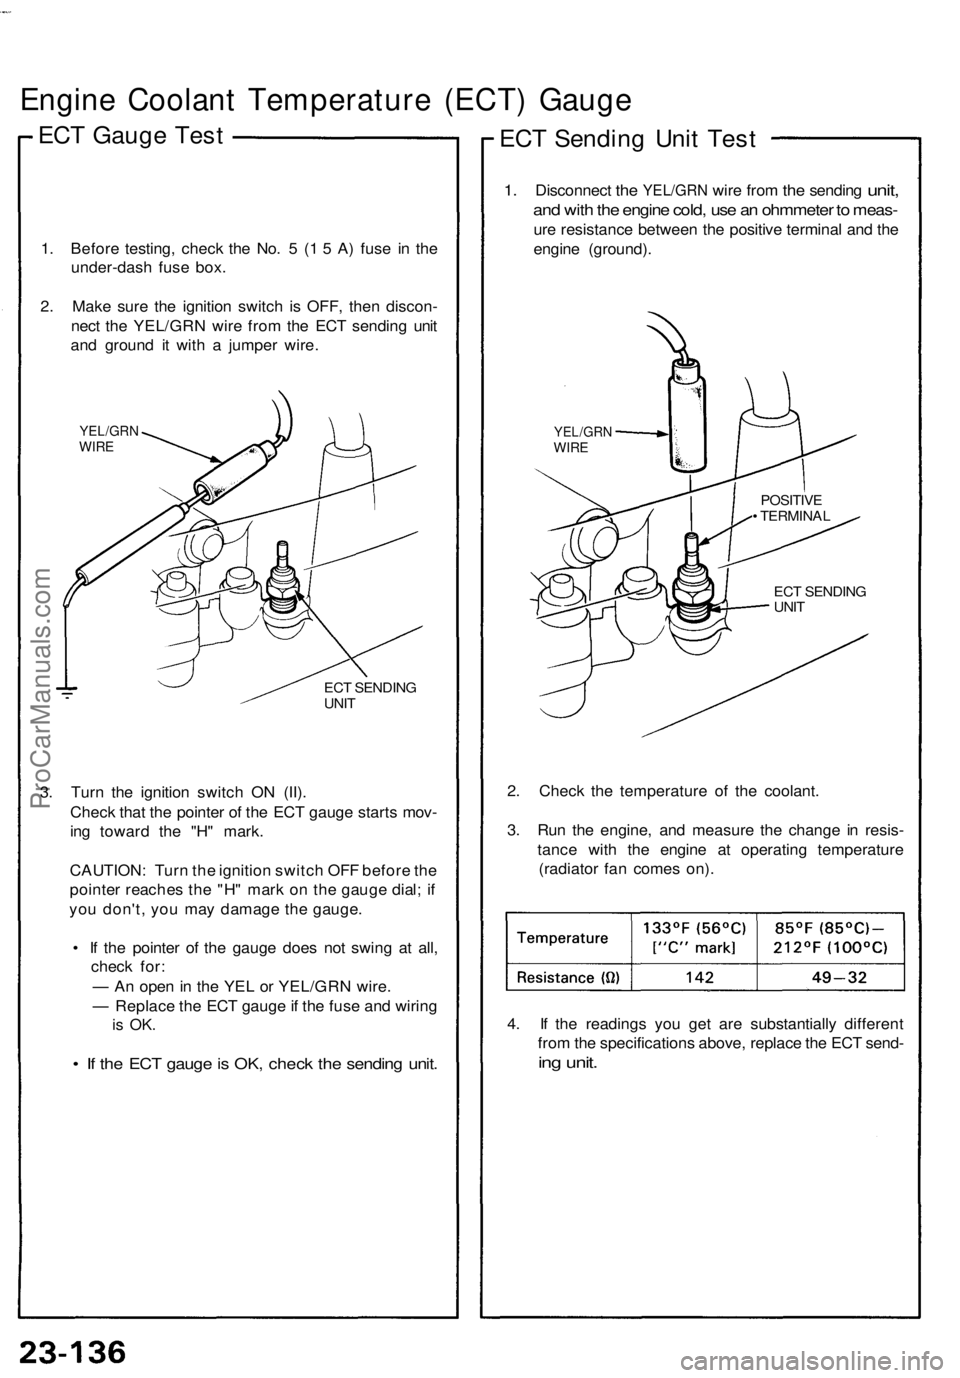
Engine Coolan t Temperatur e (ECT ) Gaug e
ECT Gaug e Tes t
1. Befor e testing , chec k th e No . 5 (1 5 A ) fus e i n th e
under-das h fus e box .
2 . Mak e sur e th e ignitio n switc h i s OFF , the n discon -
nec t th e YEL/GR N wir e fro m th e EC T sendin g uni t
an d groun d i t wit h a jumpe r wire .
YEL/GR NWIRE
ECT SENDIN G
UNI T
3. Tur n th e ignitio n switc h O N (II) .
Chec k tha t th e pointe r o f th e EC T gaug e start s mov -
in g towar d th e "H " mark .
CAUTION : Tur n th e ignitio n switc h OF F befor e th e
pointe r reache s th e "H " mar k o n th e gaug e dial ; i f
yo u don't , yo u ma y damag e th e gauge .
• I f th e pointe r o f th e gaug e doe s no t swin g a t all ,
chec k for :
— A n ope n in th e YE L o r YEL/GR N wire .
— Replac e th e EC T gaug e if th e fus e an d wirin g
is OK .
• I f th e EC T gaug e is OK , chec k th e sendin g unit .
ECT Sendin g Uni t Tes t
1. Disconnec t the YEL/GR N wire fro m the sendin g unit,
and wit h th e engin e cold , us e a n ohmmete r t o meas -
ure resistanc e betwee n th e positiv e termina l an d th e
engin e (ground) .
2 . Chec k th e temperatur e o f th e coolant .
3 . Ru n th e engine , an d measur e th e chang e i n resis -
tanc e wit h th e engin e a t operatin g temperatur e
(radiato r fa n come s on) .
4 . I f th e reading s yo u ge t ar e substantiall y differen t
fro m th e specification s above , replac e th e EC T send -
ing unit .
YEL/GR NWIRE
POSITIV E
• TERMINA L
EC T SENDIN G
UNI T
ProCarManuals.com
Page 798 of 1640
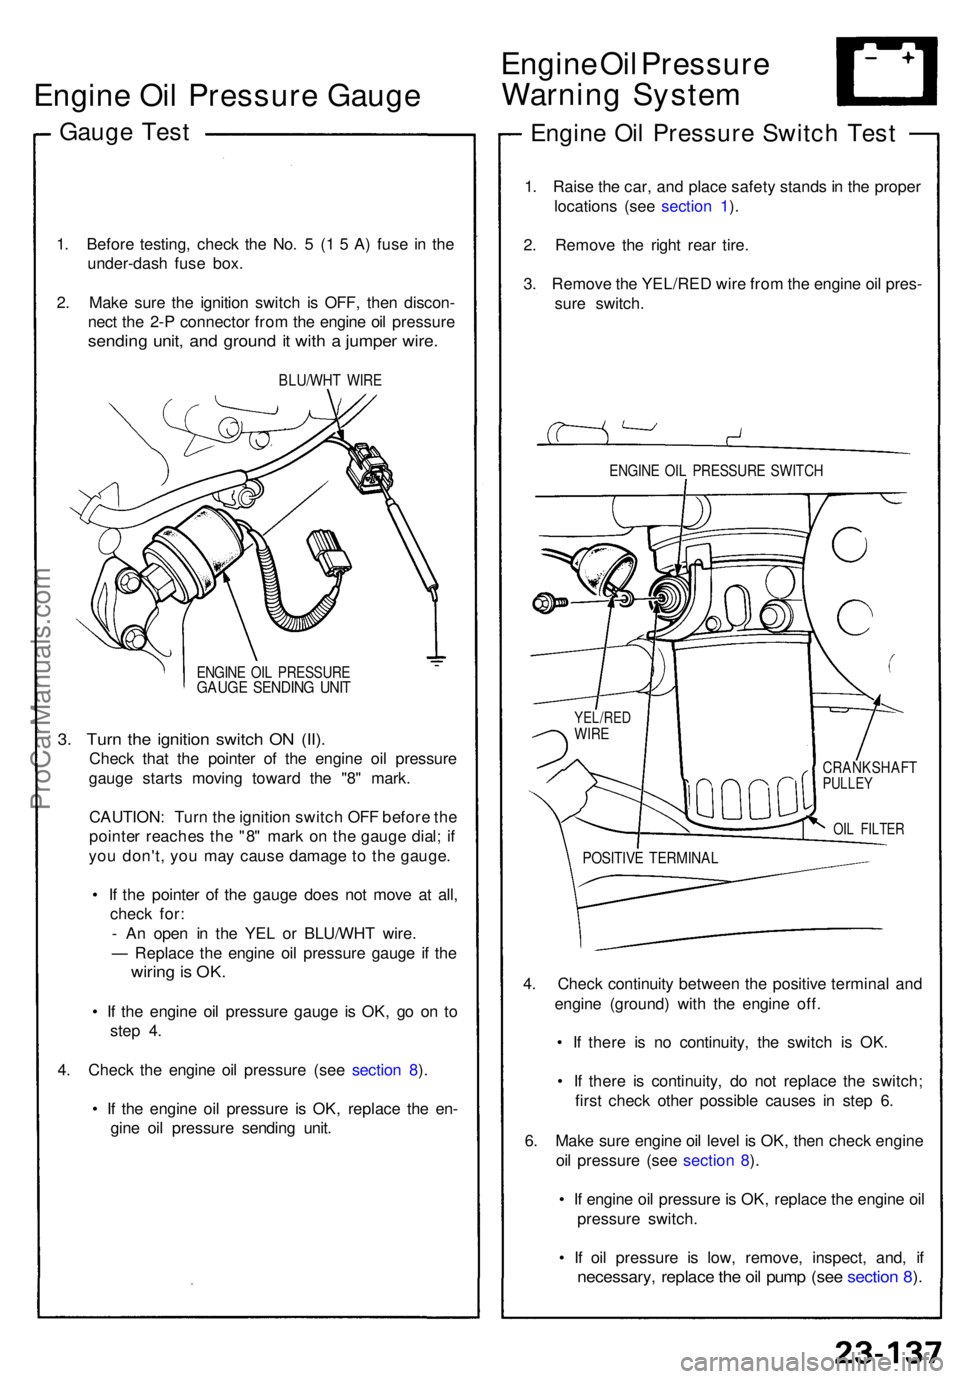
Engine Oi l Pressur e Gaug e
Gauge Tes t
1. Befor e testing , chec k th e No . 5 (1 5 A ) fus e i n th e
under-das h fus e box .
2 . Mak e sur e th e ignitio n switc h i s OFF , the n discon -
nec t th e 2- P connecto r fro m th e engin e oi l pressur e
sending unit , an d groun d it wit h a jumpe r wire .
BLU/WH T WIR E
ENGIN E OI L PRESSUR EGAUGE SENDIN G UNI T
3. Tur n th e ignitio n switc h O N (II) .
Chec k tha t th e pointe r o f th e engin e oi l pressur e
gaug e start s movin g towar d th e "8 " mark .
CAUTION : Tur n th e ignitio n switc h OF F befor e th e
pointe r reache s th e "8 " mar k o n th e gaug e dial ; i f
yo u don't , yo u ma y caus e damag e t o th e gauge .
• I f th e pointe r o f th e gaug e doe s no t mov e a t all ,
chec k for :
- A n ope n i n th e YE L o r BLU/WH T wire .
— Replac e th e engin e oi l pressur e gaug e i f th e
wirin g is OK .
• I f th e engin e oi l pressur e gaug e i s OK , g o o n t o
ste p 4 .
4 . Chec k th e engin e oi l pressur e (se e sectio n 8 ).
• I f th e engin e oi l pressur e i s OK , replac e th e en -
gin e oi l pressur e sendin g unit .
Engin e Oi l Pressur e
Warnin g Syste m
Engine Oi l Pressur e Switc h Tes t
1. Rais e th e car , an d plac e safet y stand s in th e prope r
location s (se e sectio n 1 ).
2 . Remov e th e righ t rea r tire .
3 . Remov e th e YEL/RE D wir e fro m th e engin e oi l pres -
sur e switch .
ENGINE OI L PRESSUR E SWITC H
CRANKSHAF TPULLEY
4. Chec k continuit y betwee n th e positiv e termina l an d
engin e (ground ) wit h th e engin e off .
• I f ther e i s n o continuity , th e switc h i s OK .
• I f ther e i s continuity , d o no t replac e th e switch ;
firs t chec k othe r possibl e cause s i n ste p 6 .
6 . Mak e sur e engin e oi l leve l i s OK , the n chec k engine
oi l pressur e (se e sectio n 8 ).
• I f engin e oi l pressur e is OK , replac e th e engin e oi l
pressur e switch .
• I f oi l pressur e i s low , remove , inspect , and , i f
necessary , replac e th e oi l pum p (se e sectio n 8 ).
YEL/RE DWIRE
POSITIV E TERMINA L
OIL FILTE R
ProCarManuals.com
Page 799 of 1640
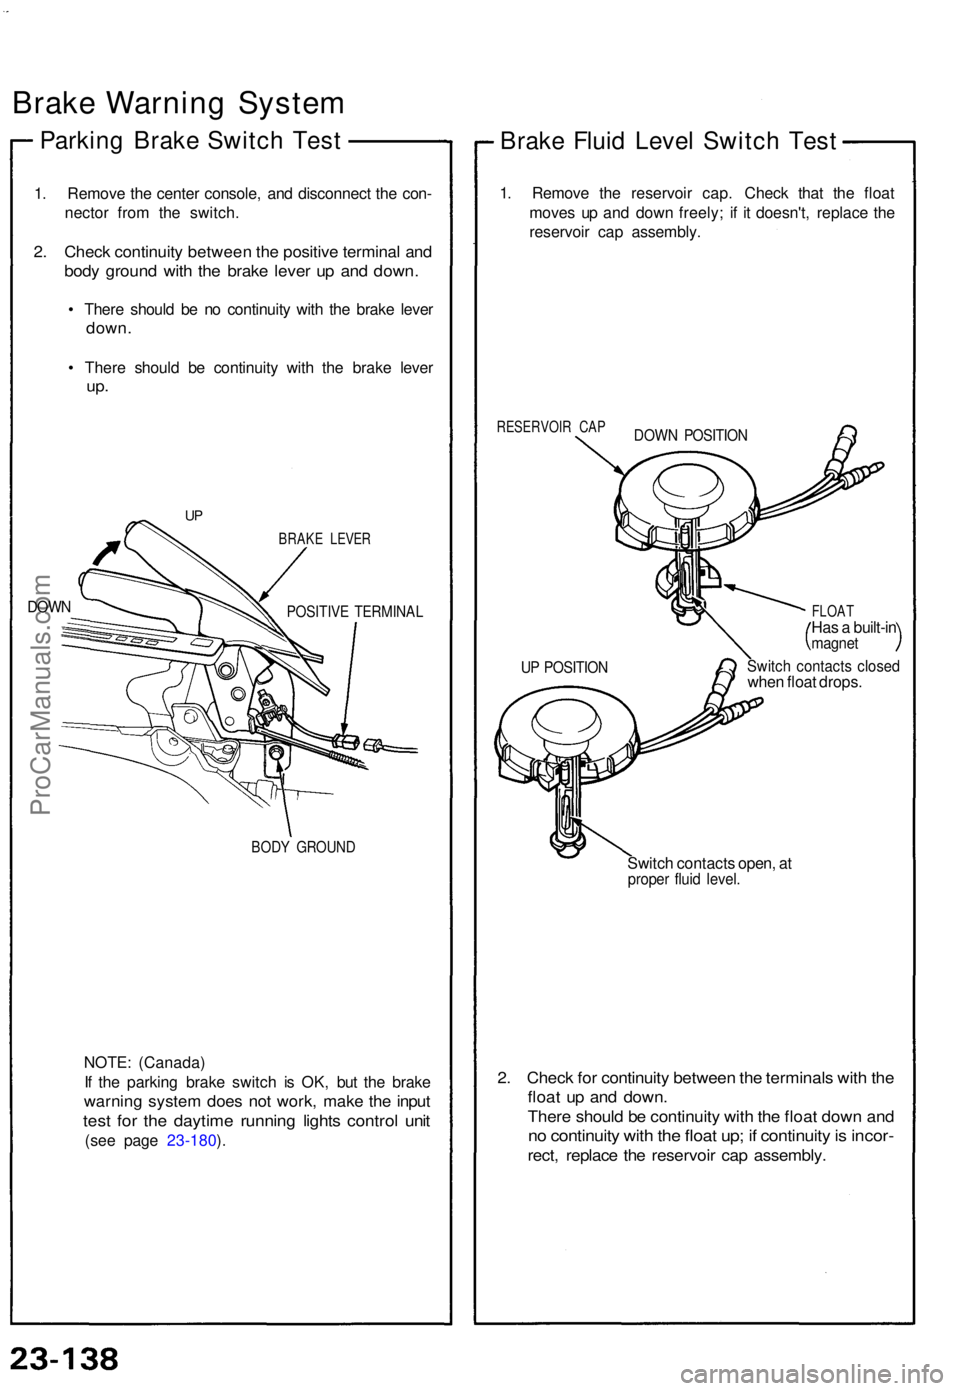
Brake Warnin g Syste m
Parking Brak e Switc h Tes t
1. Remov e th e cente r console , an d disconnec t th e con -
necto r fro m th e switch .
2. Chec k continuit y betwee n th e positiv e termina l an d
bod y groun d wit h th e brak e leve r u p an d down .
• Ther e shoul d b e n o continuit y wit h th e brak e leve r
down .
• Ther e shoul d b e continuit y wit h th e brak e leve r
up.
DOW N
BRAK E LEVE R
POSITIV E TERMINA L
BODY GROUN D
NOTE: (Canada )
I f th e parkin g brak e switc h i s OK , bu t th e brak e
warnin g syste m doe s no t work , mak e th e inpu t
test fo r th e daytim e runnin g light s contro l uni t
(see pag e 23-180 ).
Brak e Flui d Leve l Switc h Tes t
1. Remov e th e reservoi r cap . Chec k tha t th e floa t
move s u p an d dow n freely ; i f i t doesn't , replac e th e
reservoi r ca p assembly .
RESERVOI R CA P
FLOAT
Has a built-i nmagne t
Switch contact s close dwhen floa t drops .
Switc h contact s open , a t
prope r flui d level .
2. Chec k fo r continuit y betwee n th e terminal s wit h th e
floa t u p an d down .
There shoul d b e continuit y wit h th e floa t dow n an d
no continuit y wit h th e floa t up ; i f continuit y is incor -
rect, replac e th e reservoi r ca p assembly .
UP POSITIO N
DOWN POSITIO N
UP
ProCarManuals.com
Page 800 of 1640
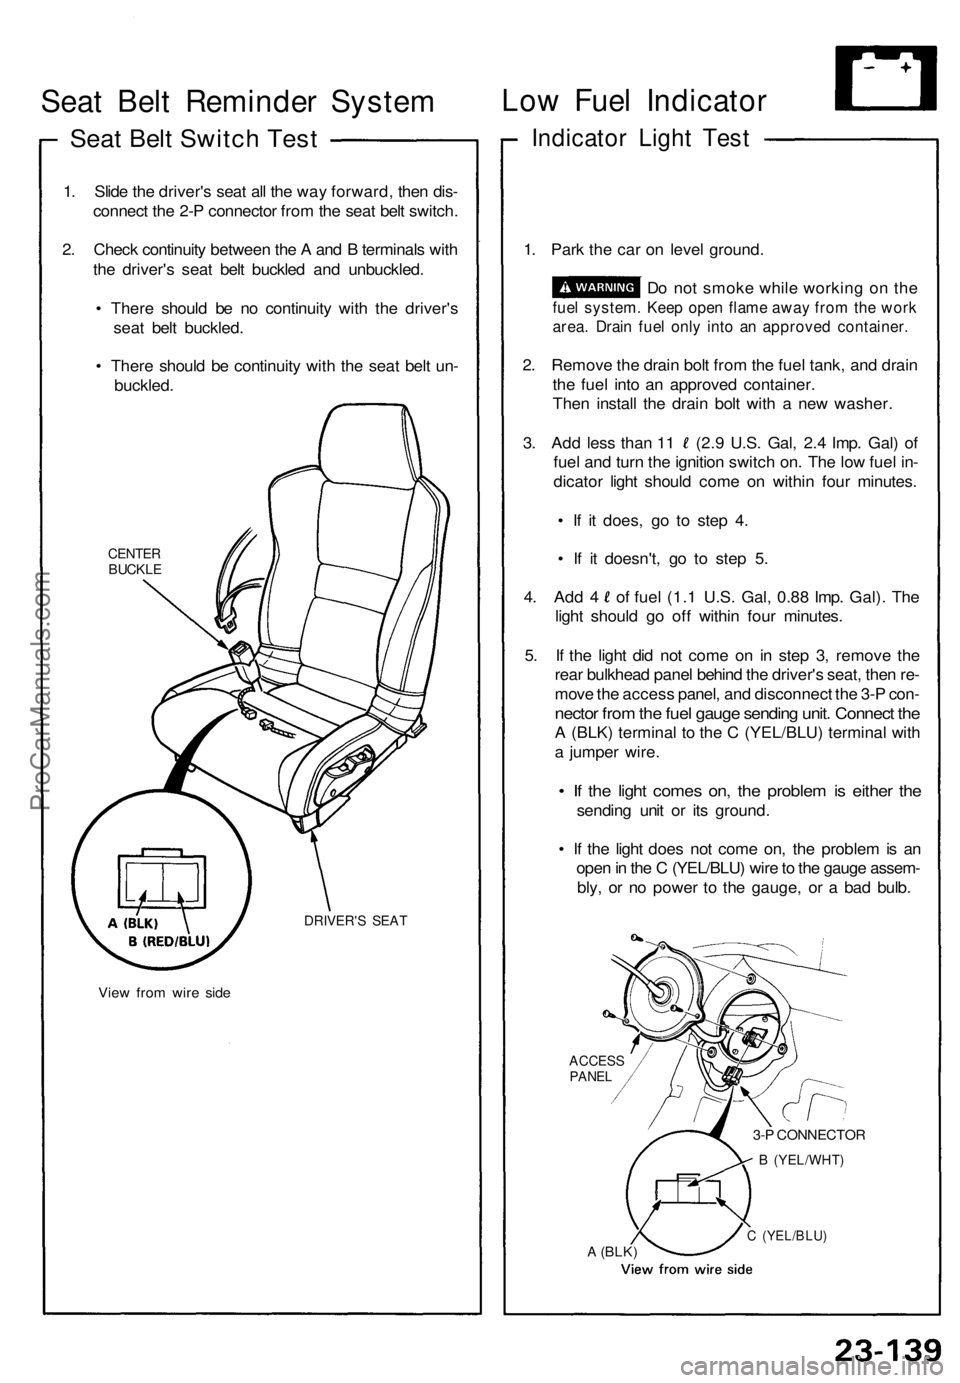
Seat Bel t Reminde r Syste m
Seat Bel t Switc h Tes t
1. Slid e th e driver' s sea t al l th e wa y forward , the n dis -
connec t th e 2- P connecto r fro m th e sea t bel t switch .
2 . Chec k continuit y betwee n th e A an d B terminal s wit h
th e driver' s sea t bel t buckle d an d unbuckled .
• Ther e shoul d b e n o continuit y wit h th e driver' s
sea t bel t buckled .
• Ther e shoul d b e continuit y wit h th e sea t bel t un -
buckled .
CENTERBUCKL E
DRIVER' S SEA T
View fro m wir e sid e
Low Fue l Indicato r
Indicator Ligh t Tes t
1. Par k th e ca r o n leve l ground .
D o no t smok e whil e workin g o n th e
fue l system . Kee p ope n flam e awa y fro m th e wor k
area. Drai n fue l onl y int o a n approve d container .
2. Remov e th e drai n bol t fro m th e fue l tank , an d drai n
th e fue l int o a n approve d container .
The n instal l th e drai n bol t wit h a ne w washer .
3. Ad d les s tha n 1 1 (2. 9 U.S . Gal , 2. 4 Imp . Gal ) o f
fue l an d tur n th e ignitio n switc h on . Th e lo w fue l in -
dicato r ligh t shoul d com e o n withi n fou r minutes .
• I f i t does , g o t o ste p 4 .
• I f i t doesn't , g o t o ste p 5 .
4. Ad d 4 o f fue l (1. 1 U.S . Gal , 0.8 8 Imp . Gal) . Th e
ligh t shoul d g o of f withi n fou r minutes .
5 . I f th e ligh t di d no t com e o n i n ste p 3 , remov e th e
rea r bulkhea d pane l behin d th e driver' s seat , the n re -
mov e th e acces s panel , an d disconnec t th e 3- P con -
necto r fro m th e fue l gaug e sendin g unit . Connec t th e
A (BLK ) termina l t o th e C (YEL/BLU ) termina l wit h
a jumpe r wire .
• I f th e ligh t come s on , th e proble m is eithe r th e
sendin g uni t o r it s ground .
• I f th e ligh t doe s no t com e on , th e proble m is a n
ope n in th e C (YEL/BLU ) wir e to th e gaug e assem -
bly , o r n o powe r t o th e gauge , o r a ba d bulb .
ACCES SPANEL
3-P CONNECTO R
B (YEL/WHT )
A (BLK)C (YEL/BLU )
ProCarManuals.com