ACURA NSX 1991 Service Repair Manual
Manufacturer: ACURA, Model Year: 1991,
Model line: NSX,
Model: ACURA NSX 1991
Pages: 1640, PDF Size: 60.48 MB
ACURA NSX 1991 Service Repair Manual
NSX 1991
ACURA
ACURA
https://www.carmanualsonline.info/img/32/56988/w960_56988-0.png
ACURA NSX 1991 Service Repair Manual
Trending: seat adjustment, dashboard warning lights, height, set clock, trunk release, oil capacity, fuse box location
Page 871 of 1640
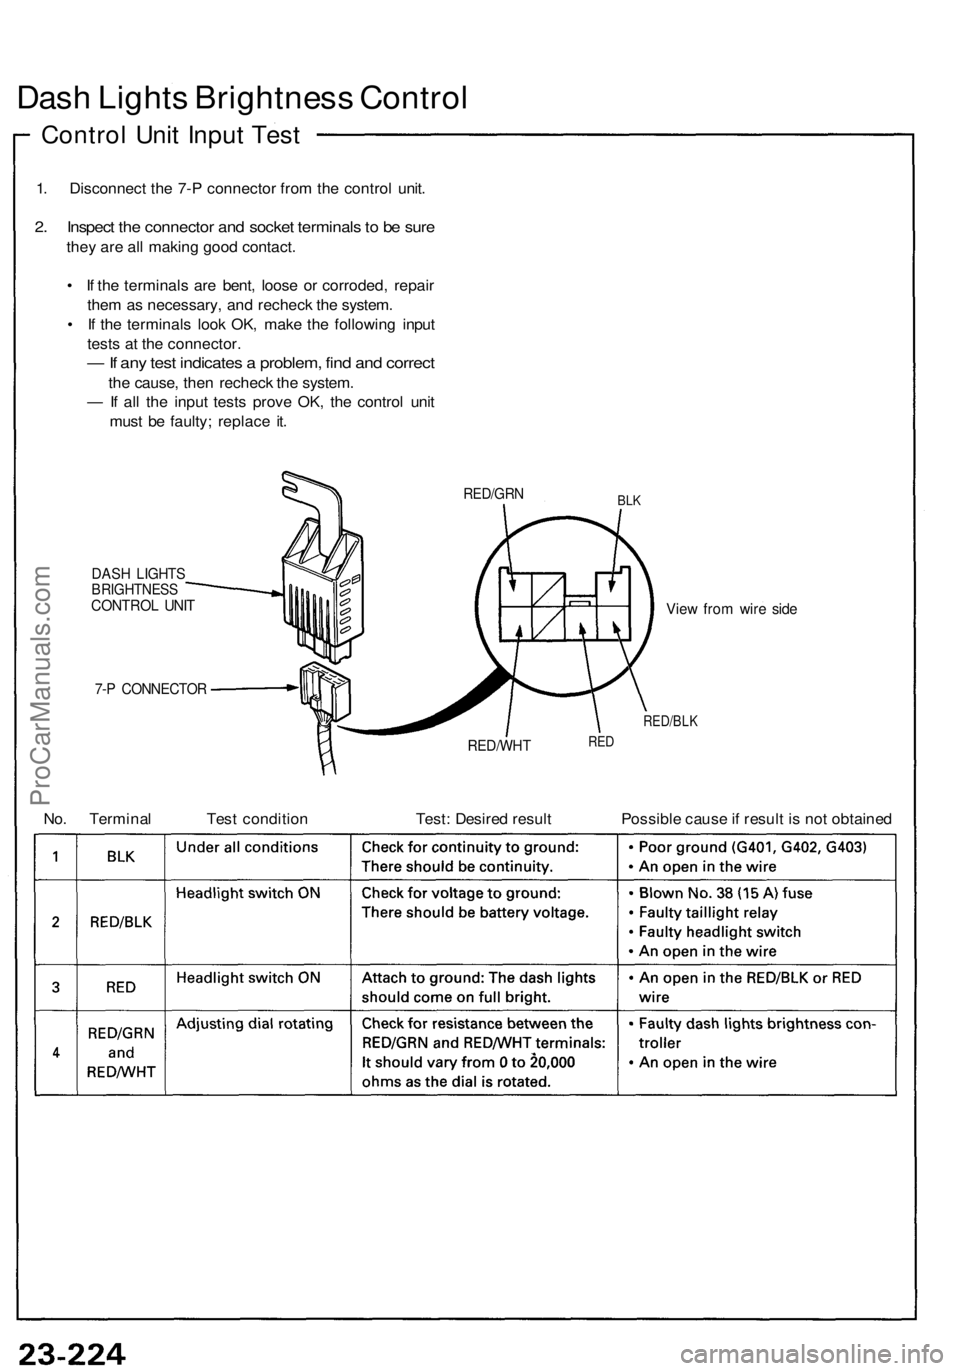
Dash Lights Brightness Control
Control Unit Input Test
1. Disconnect the 7-P connector from the control unit.
2. Inspect the connector and socket terminals to be sure
they are all making good contact.
• If the terminals are bent, loose or corroded, repair
them as necessary, and recheck the system.
• If the terminals look OK, make the following input
tests at the connector.
— If any test indicates a problem, find and correct
the cause, then recheck the system.
— If all the input tests prove OK, the control unit
must be faulty; replace it.
RED/GRN
BLK
DASH LIGHTS
BRIGHTNESS
CONTROL UNIT
7-P CONNECTOR
View from wire side
RED/BLK
No. Terminal
Test condition
RED/WHT
Test: Desired result
RED
Possible cause if result is not obtainedProCarManuals.com
Page 872 of 1640
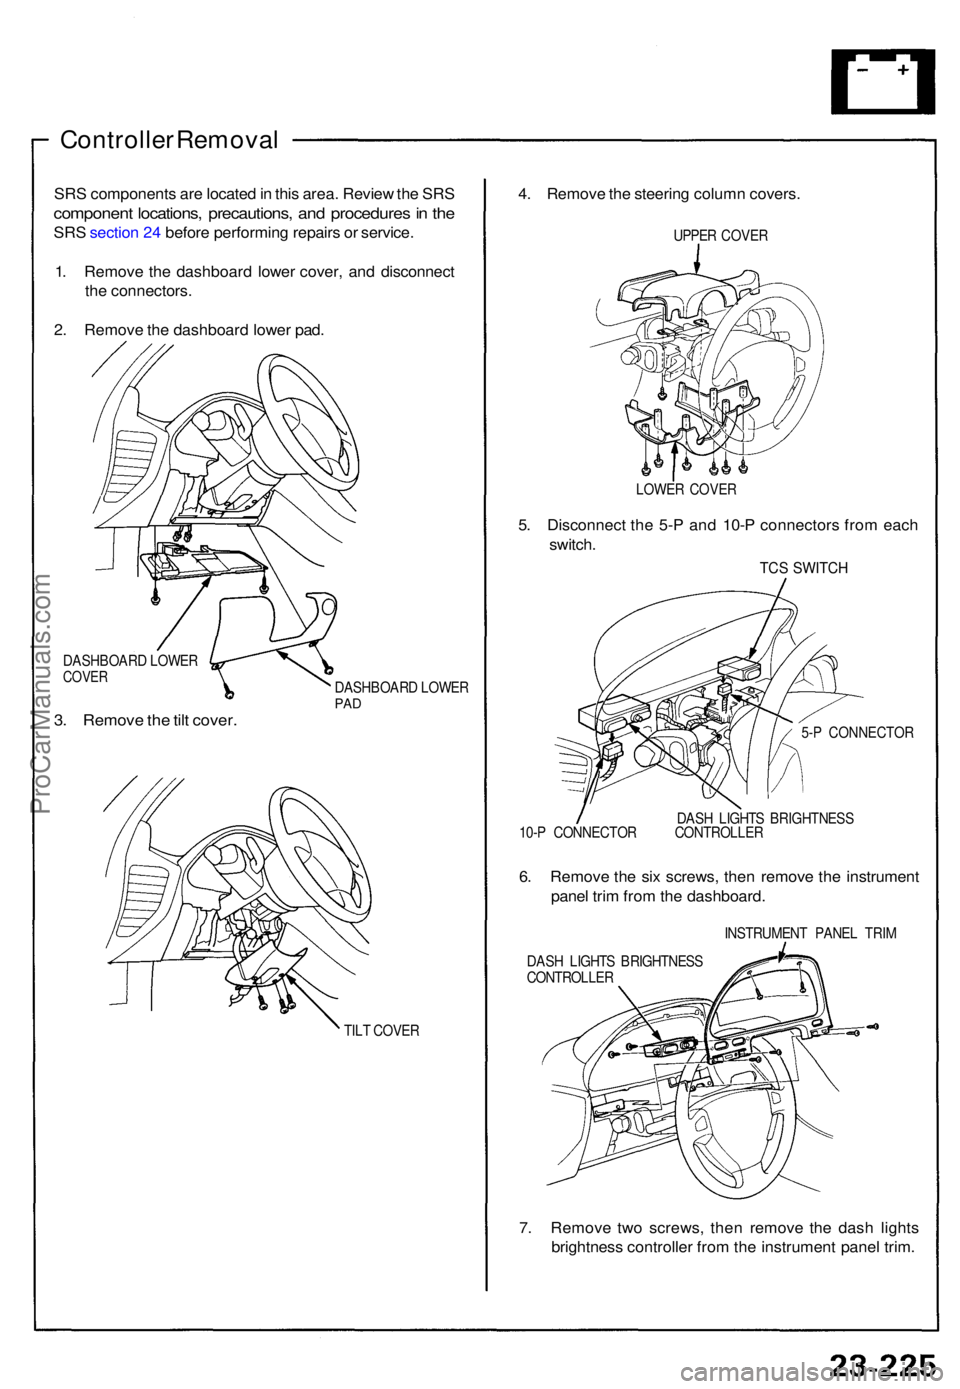
Controller Remova l
SRS component s ar e locate d in thi s area . Revie w th e SR S
componen t locations , precautions , an d procedure s in th e
SR S sectio n 24 befor e performin g repair s o r service .
1 . Remov e th e dashboar d lowe r cover , an d disconnec t
th e connectors .
2 . Remov e th e dashboar d lowe r pad .
DASHBOAR D LOWE RCOVER
3. Remov e th e til t cover .
DASHBOAR D LOWE RPAD
TIL T COVE R
4. Remov e th e steerin g colum n covers .
UPPER COVE R
LOWE R COVE R
5. Disconnec t th e 5- P an d 10- P connector s fro m eac h
switch .
TCS SWITC H
5-P CONNECTO R
DAS H LIGHT S BRIGHTNES S
10- P CONNECTO R CONTROLLE R
6. Remov e th e si x screws , the n remov e th e instrumen t
pane l tri m fro m th e dashboard .
INSTRUMEN T PANE L TRI M
DAS H LIGHT S BRIGHTNES S
CONTROLLE R
7. Remov e tw o screws , the n remov e th e das h light s
brightnes s controlle r fro m th e instrumen t pane l trim .
ProCarManuals.com
Page 873 of 1640
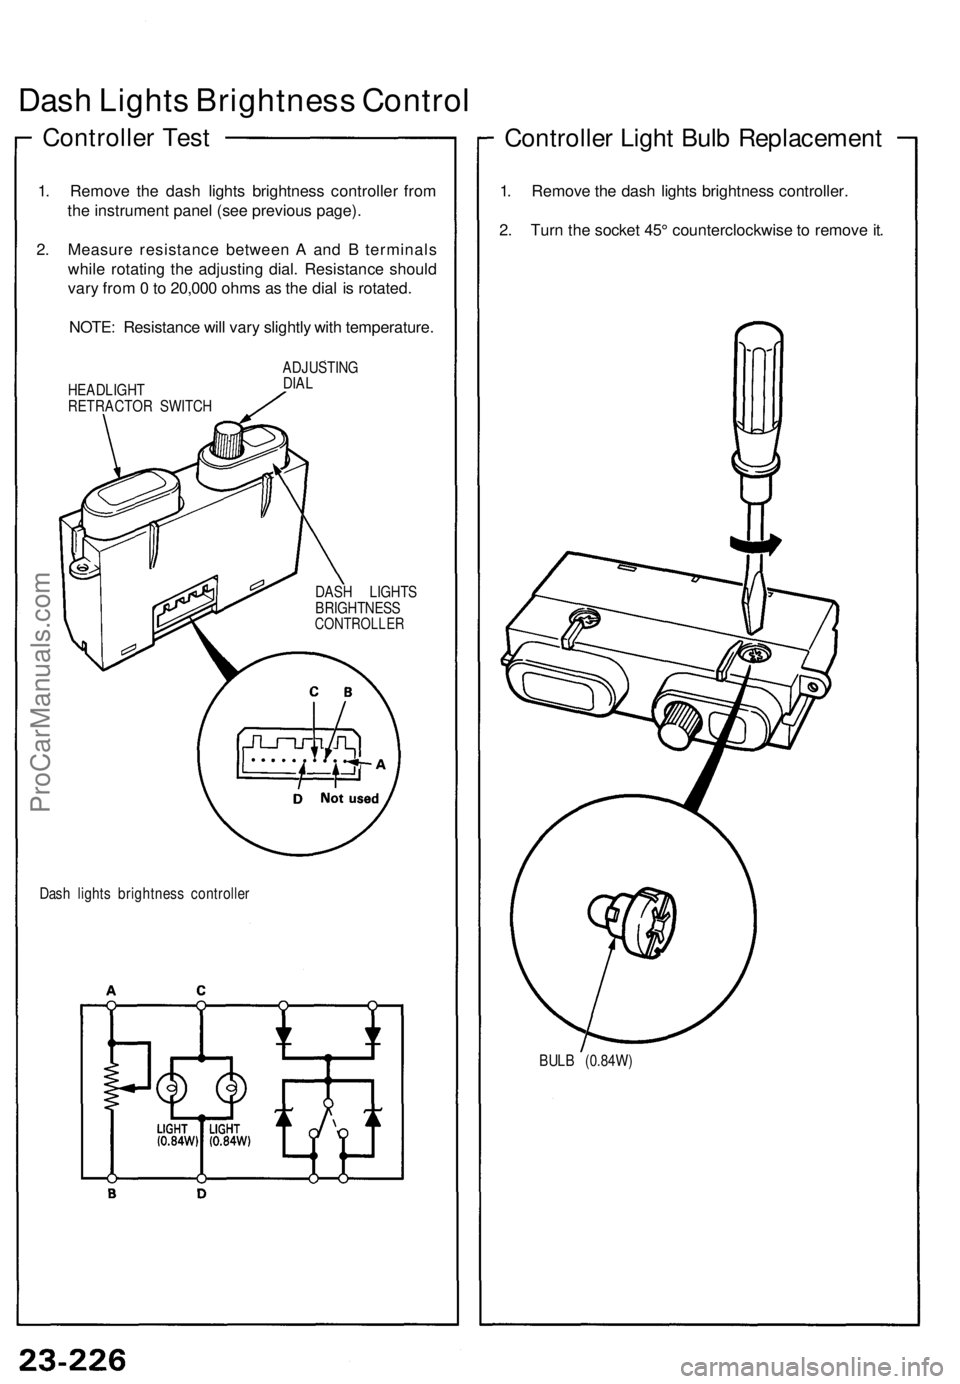
Dash Lights Brightness Control
Controller Test
1. Remove the dash lights brightness controller from
the instrument panel (see previous page).
2. Measure resistance between A and B terminals
while rotating the adjusting dial. Resistance should
vary from 0 to 20,000 ohms as the dial is rotated.
NOTE: Resistance will vary slightly with temperature.
HEADLIGHT
RETRACTOR SWITCH
ADJUSTING
DIAL
DASH LIGHTS
BRIGHTNESS
CONTROLLER
Dash lights brightness controller
Controller Light Bulb Replacement
1. Remove the dash lights brightness controller.
2. Turn the socket 45° counterclockwise to remove it.
BULB (0.84W)ProCarManuals.com
Page 874 of 1640
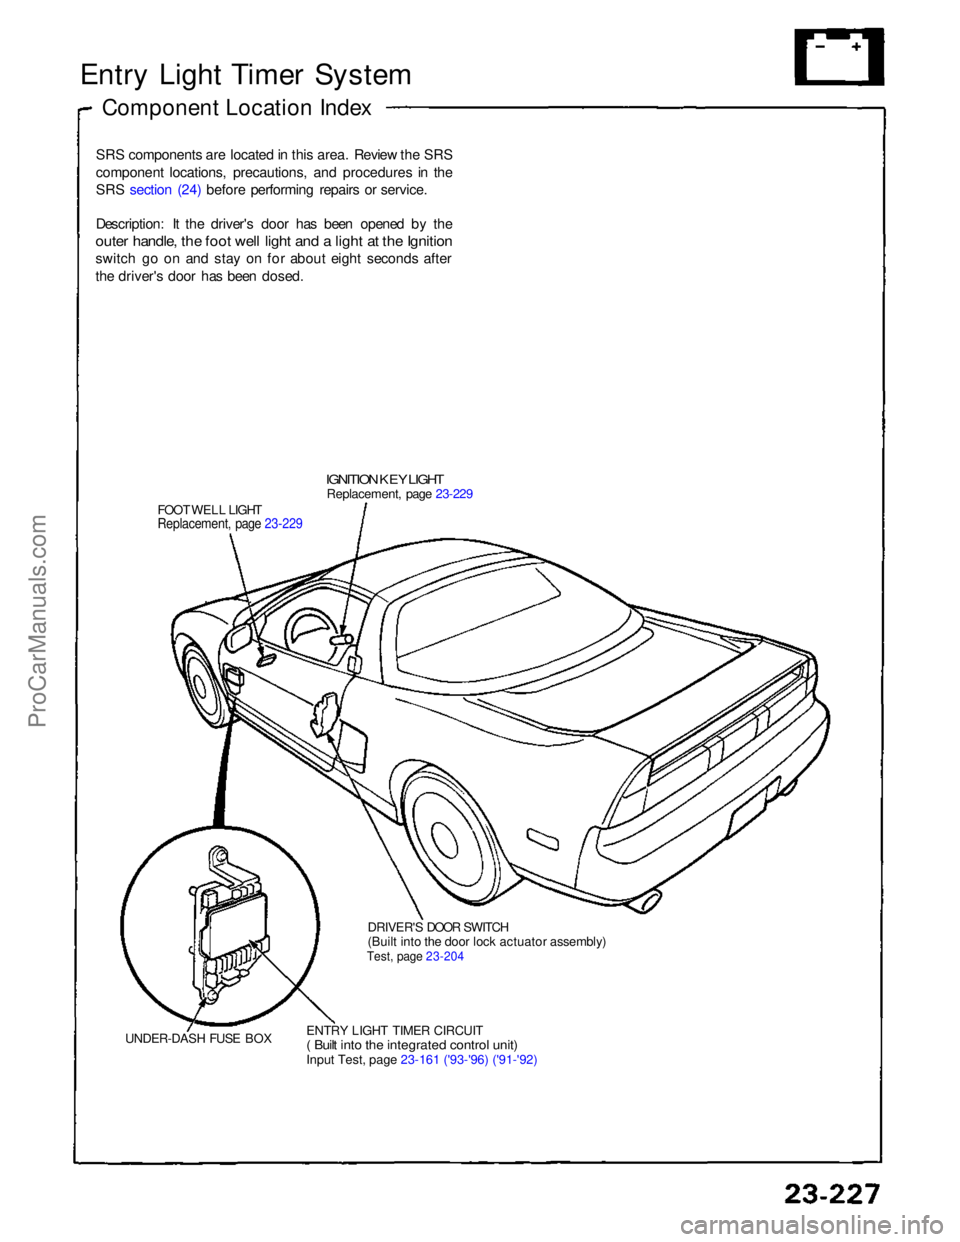
Entry Light Timer System
Component Location Index
SRS components are located in this area. Review the SRS
component locations, precautions, and procedures in the
SRS section (24) before performing repairs or service.
Description: It the driver's door has been opened by the
outer handle, the foot well light and a light at the Ignition
switch go on and stay on for about eight seconds after
the driver's door has been dosed.
IGNITION KEY LIGHT
Replacement, page 23-229
FOOT WELL LIGHT
Replacement, page 23-229
DRIVER'S DOOR SWITCH
(Built into the door lock actuator assembly)
Test, page 23-204
UNDER-DASH FUSE BOX ENTRY LIGHT TIMER CIRCUIT
( Built into the integrated control unit)
Input Test, page 23-161 ('93-'96) ('91-'92)
ProCarManuals.com
Page 875 of 1640
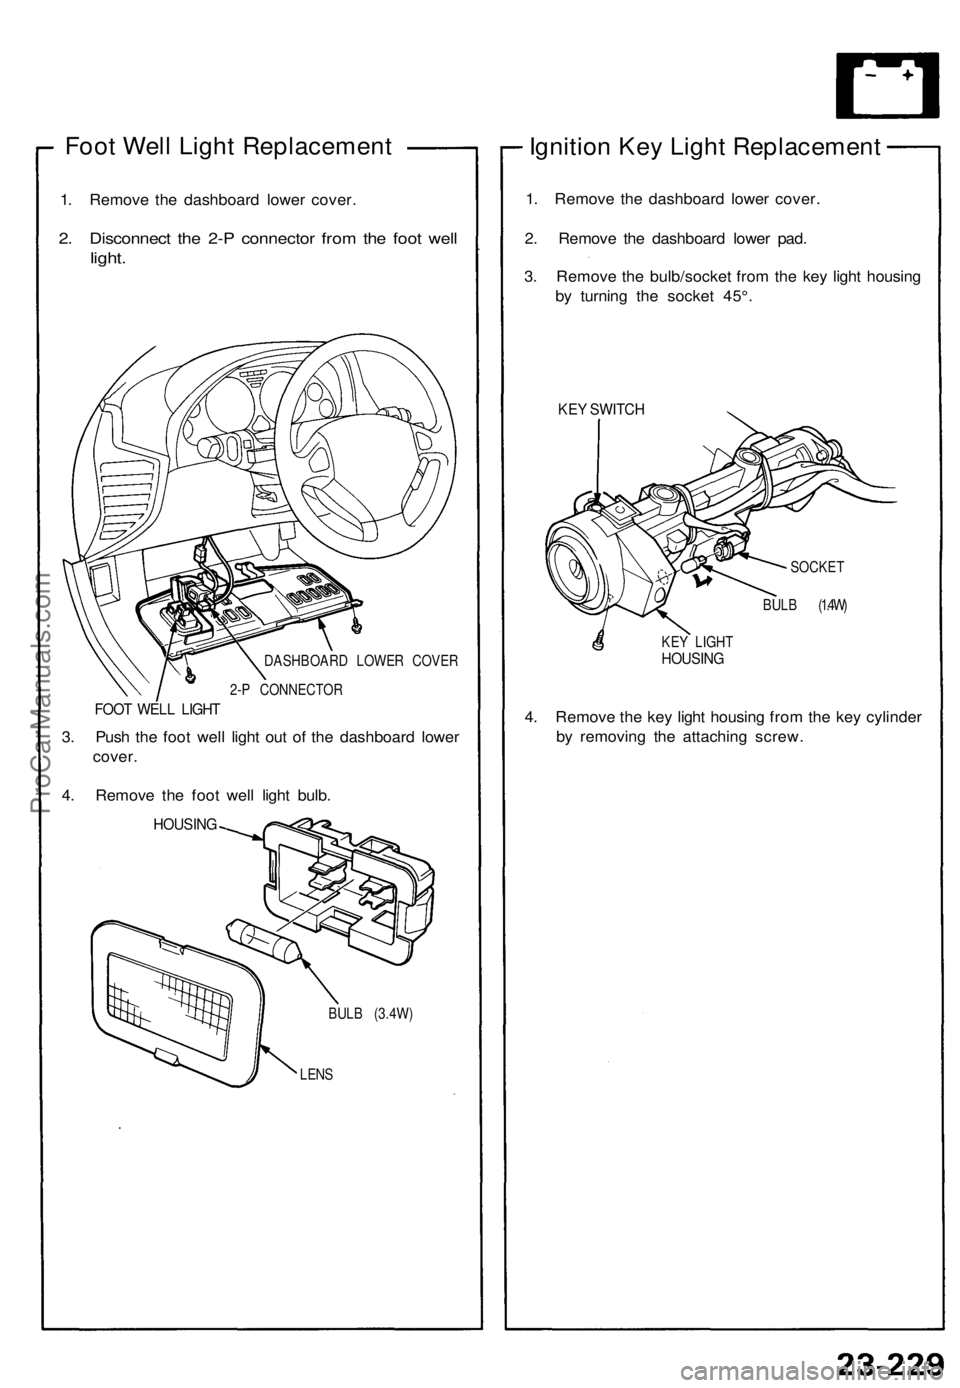
Foot Well Light Replacement
1. Remove the dashboard lower cover.
2. Disconnect the 2-P connector from the foot well
light.
DASHBOARD LOWER COVER
2-P CONNECTOR
FOOT WELL LIGHT
3. Push the foot well light out of the dashboard lower
cover.
4. Remove the foot well light bulb.
HOUSING
BULB (3.4W)
LENS
Ignition Key Light Replacement
1. Remove the dashboard lower cover.
2. Remove the dashboard lower pad.
3. Remove the bulb/socket from the key light housing
by turning the socket 45°.
KEY SWITCH
SOCKET
BULB (1.4W)
KEY LIGHT
HOUSING
4. Remove the key light housing from the key cylinder
by removing the attaching screw.ProCarManuals.com
Page 876 of 1640
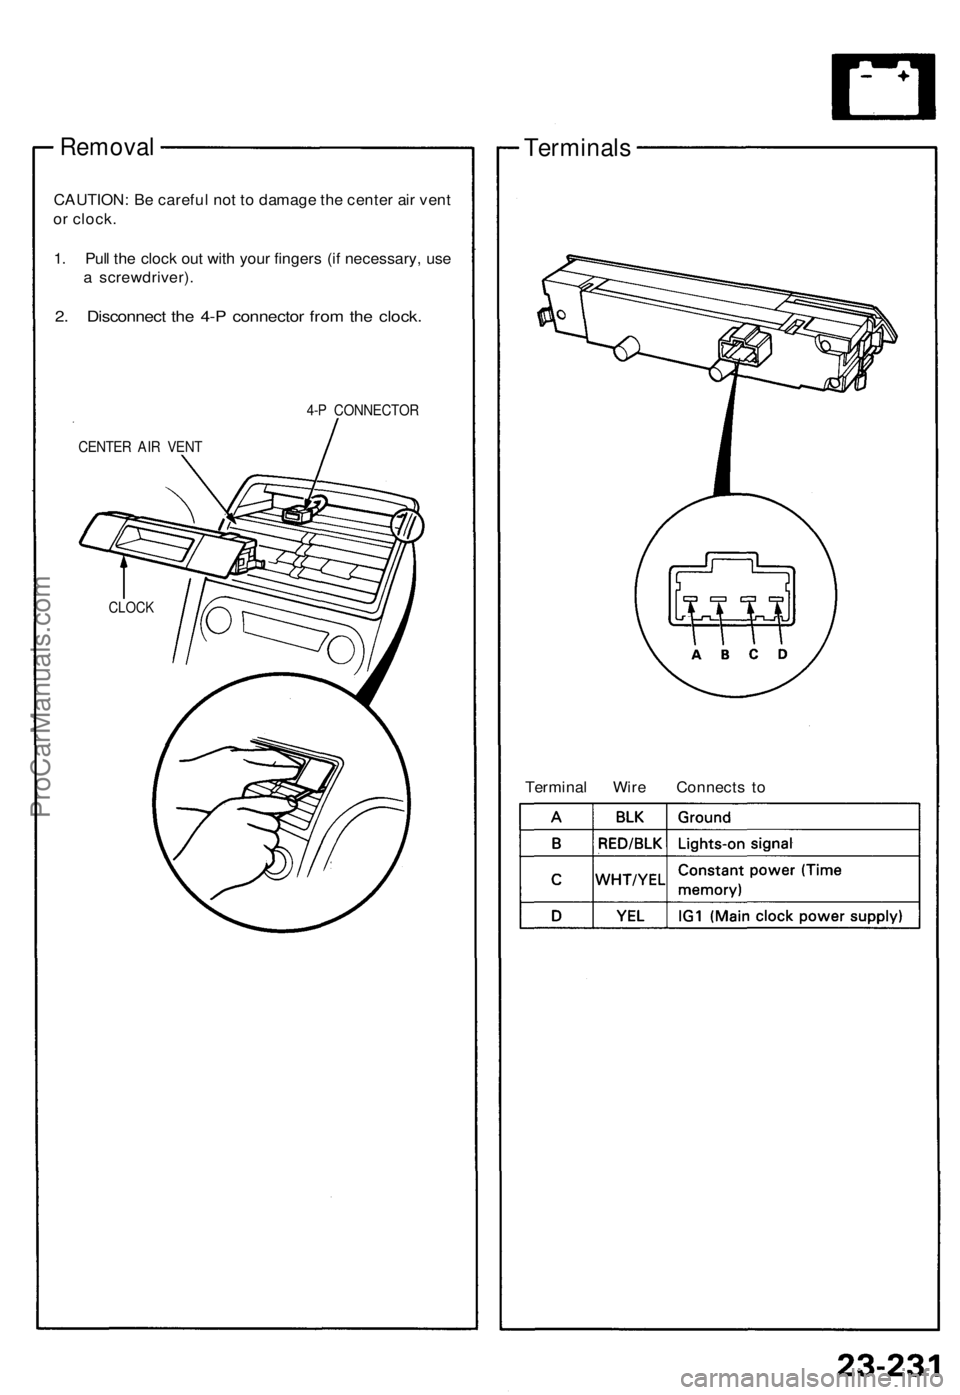
Removal
CAUTION: Be careful not to damage the center air vent
or clock.
1. Pull the clock out with your fingers (if necessary, use
a screwdriver).
2. Disconnect the 4-P connector from the clock.
4-P CONNECTOR
CENTER AIR VENT
Terminals
Terminal Wire Connects to
CLOCKProCarManuals.com
Page 877 of 1640
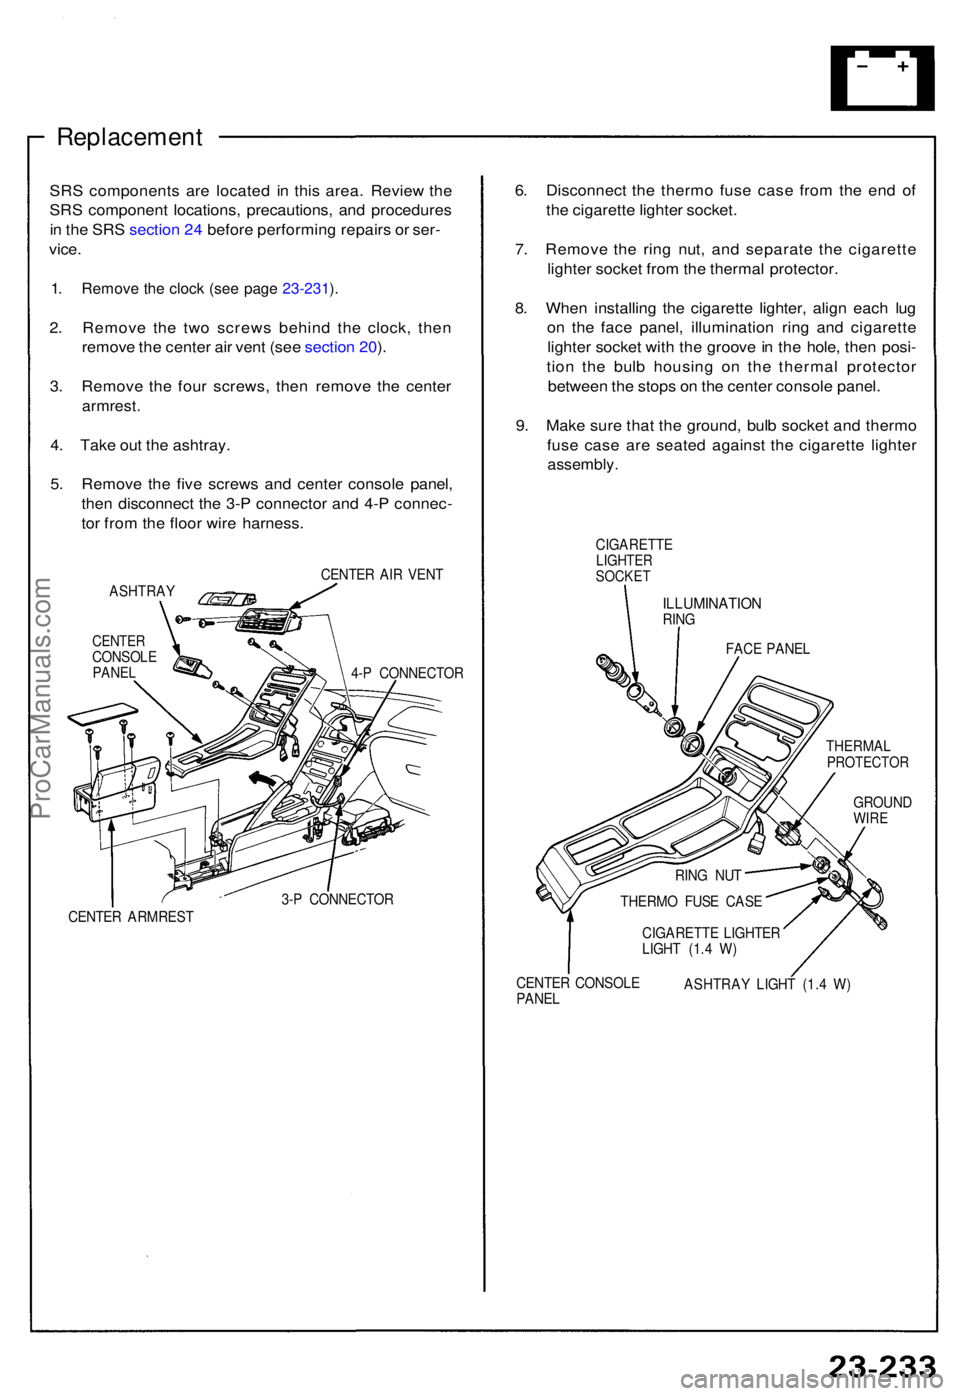
Replacement
SRS component s ar e locate d i n thi s area . Revie w th e
SR S componen t locations , precautions , an d procedure s
i n th e SR S sectio n 24 befor e performin g repair s o r ser -
vice .
1. Remov e th e cloc k (se e pag e 23-231 ).
2 . Remov e th e tw o screw s behin d th e clock , the n
remov e th e cente r ai r ven t (se e sectio n 20 ).
3 . Remov e th e fou r screws , the n remov e th e cente r
armrest .
4. Tak e ou t th e ashtray .
5 . Remov e th e fiv e screw s an d cente r consol e panel ,
the n disconnec t th e 3- P connecto r an d 4- P connec -
to r fro m th e floo r wir e harness .
ASHTRA Y
CENTERCONSOL EPANEL
CENTE R AI R VEN T
4- P CONNECTO R
3- P CONNECTO R
CENTE R ARMRES T
6. Disconnec t th e therm o fus e cas e fro m th e en d of
th e cigarett e lighte r socket .
7 . Remov e th e rin g nut , an d separat e th e cigarett e
lighte r socke t fro m th e therma l protector .
8 . Whe n installin g th e cigarett e lighter , alig n eac h lu g
o n th e fac e panel , illuminatio n rin g an d cigarett e
lighte r socke t wit h th e groov e in th e hole , the n posi -
tio n th e bul b housin g o n th e therma l protecto r
betwee n th e stop s o n th e cente r consol e panel .
9 . Mak e sur e tha t th e ground , bul b socke t an d therm o
fus e cas e ar e seate d agains t th e cigarett e lighte r
assembly .
CIGARETT ELIGHTERSOCKE T
ILLUMINATIO NRING
FACE PANE L
THERMA L
PROTECTO R
GROUNDWIRE
CENTE R CONSOL EPANELASHTRA Y LIGH T (1. 4 W )
RIN
G NU T
THERM O FUS E CAS E
CIGARETT E LIGHTE R
LIGH T (1. 4 W )
ProCarManuals.com
Page 878 of 1640
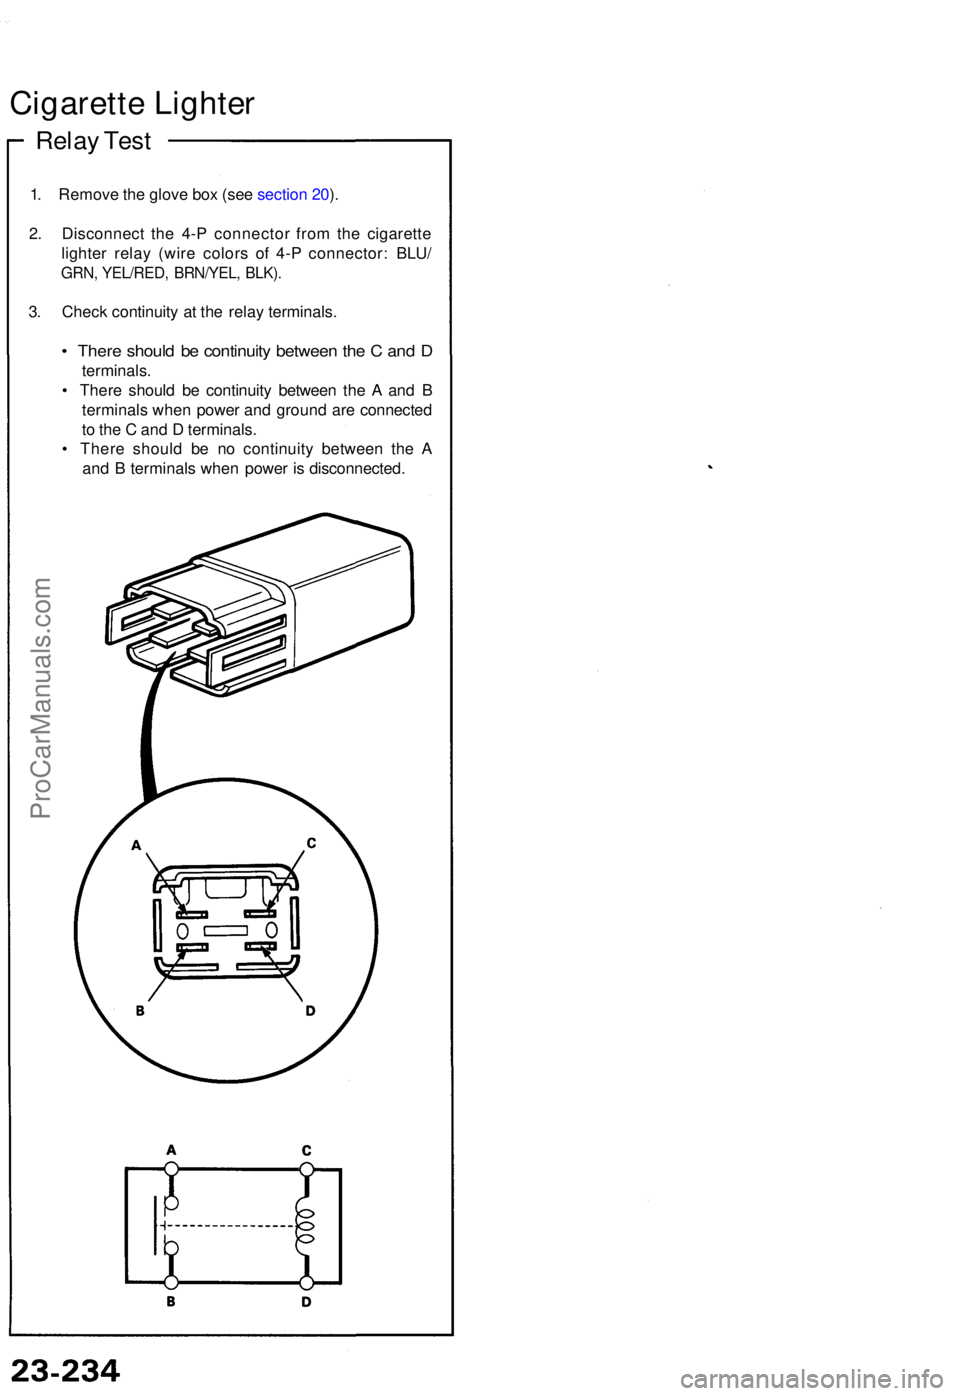
Cigarette Lighte r
Relay Tes t
1. Remov e th e glov e bo x (se e sectio n 20 ).
2 . Disconnec t th e 4- P connecto r fro m th e cigarett e
lighte r rela y (wir e color s o f 4- P connector : BLU /
GRN, YEL/RED , BRN/YEL , BLK) .
3. Chec k continuit y a t th e rela y terminals .
• Ther e shoul d b e continuit y betwee n th e C an d D
terminals .
• Ther e shoul d b e continuit y betwee n th e A an d B
terminal s whe n powe r an d groun d ar e connecte d
t o th e C an d D terminals .
• Ther e shoul d b e n o continuit y betwee n th e A
an d B terminal s whe n powe r i s disconnected .
ProCarManuals.com
Page 879 of 1640
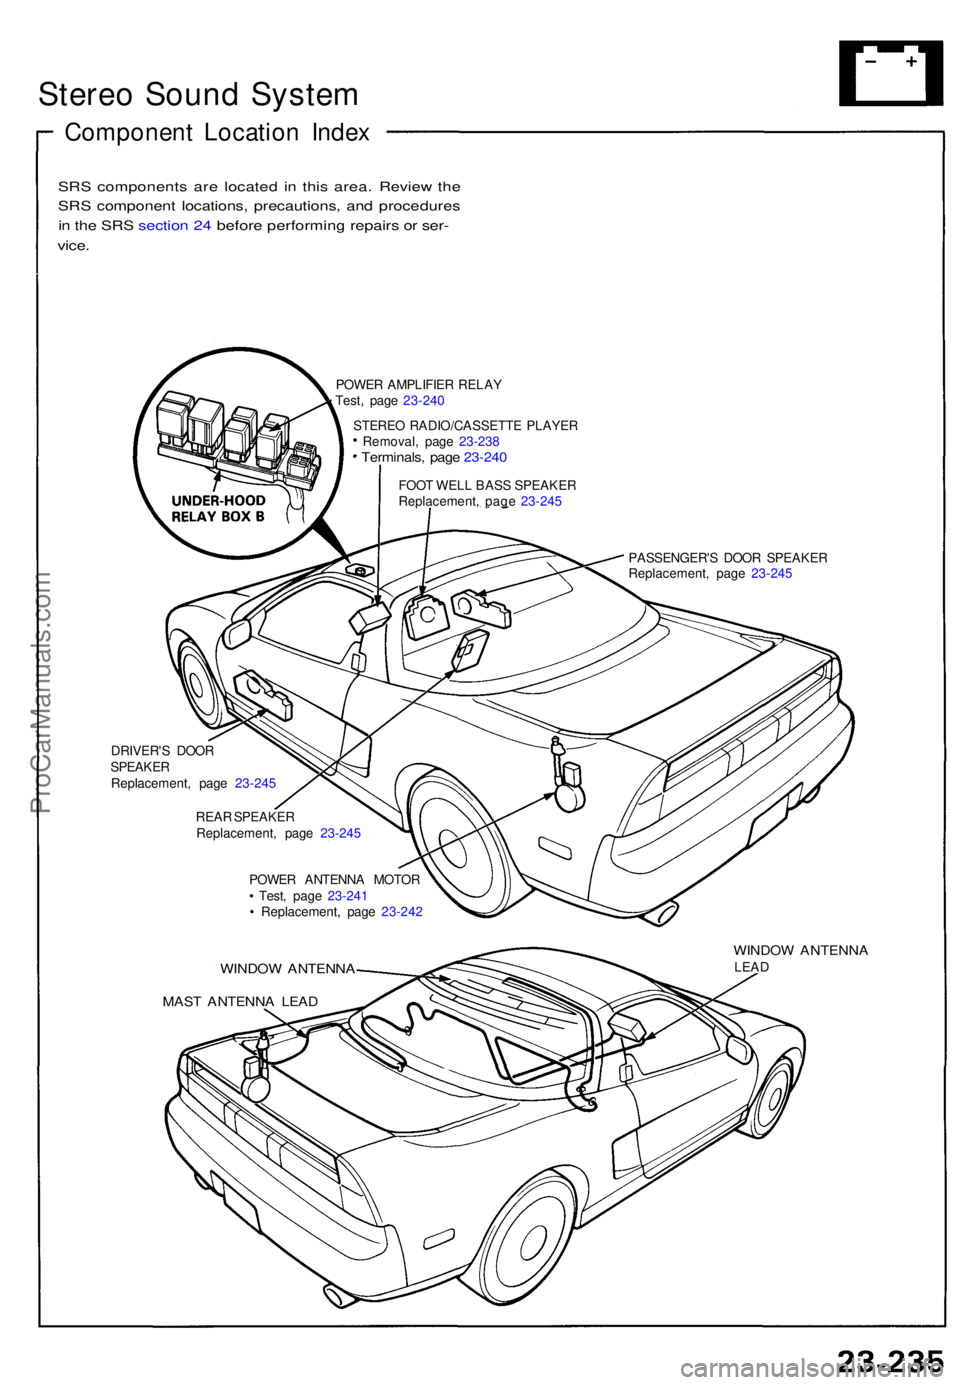
Stereo Soun d Syste m
Componen t Locatio n Inde x
SRS component s ar e locate d i n thi s area . Revie w th e
SR S componen t locations , precautions , an d procedure s
i n th e SR S sectio n 24 befor e performin g repair s o r ser -
vice .
POWE R AMPLIFIE R RELA Y
Test , pag e 23-24 0
STERE O RADIO/CASSETT E PLAYE R
Removal , pag e 23-23 8
Terminals , pag e 23-24 0
FOOT WEL L BAS S SPEAKE R
Replacement , pag e 23-24 5
PASSENGER' S DOO R SPEAKE R
Replacement , pag e 23-24 5
DRIVER' S DOO R
SPEAKE R
Replacement , pag e 23-24 5
REA R SPEAKE R
Replacement , pag e 23-24 5
POWE R ANTENN A MOTO R
• Test , pag e 23-24 1
• Replacement , pag e 23-24 2
WINDO W ANTENN A
MAST ANTENN A LEA D
WINDO W ANTENN ALEAD
ProCarManuals.com
Page 880 of 1640
Stereo Soun d Syste m
Unit Remova l
SRS component s ar e locate d i n thi s area . Revie w th e
SR S componen t locations , precautions , an d procedure s
i n th e SR S sectio n 24 befor e performin g repair s o r ser -
vice .
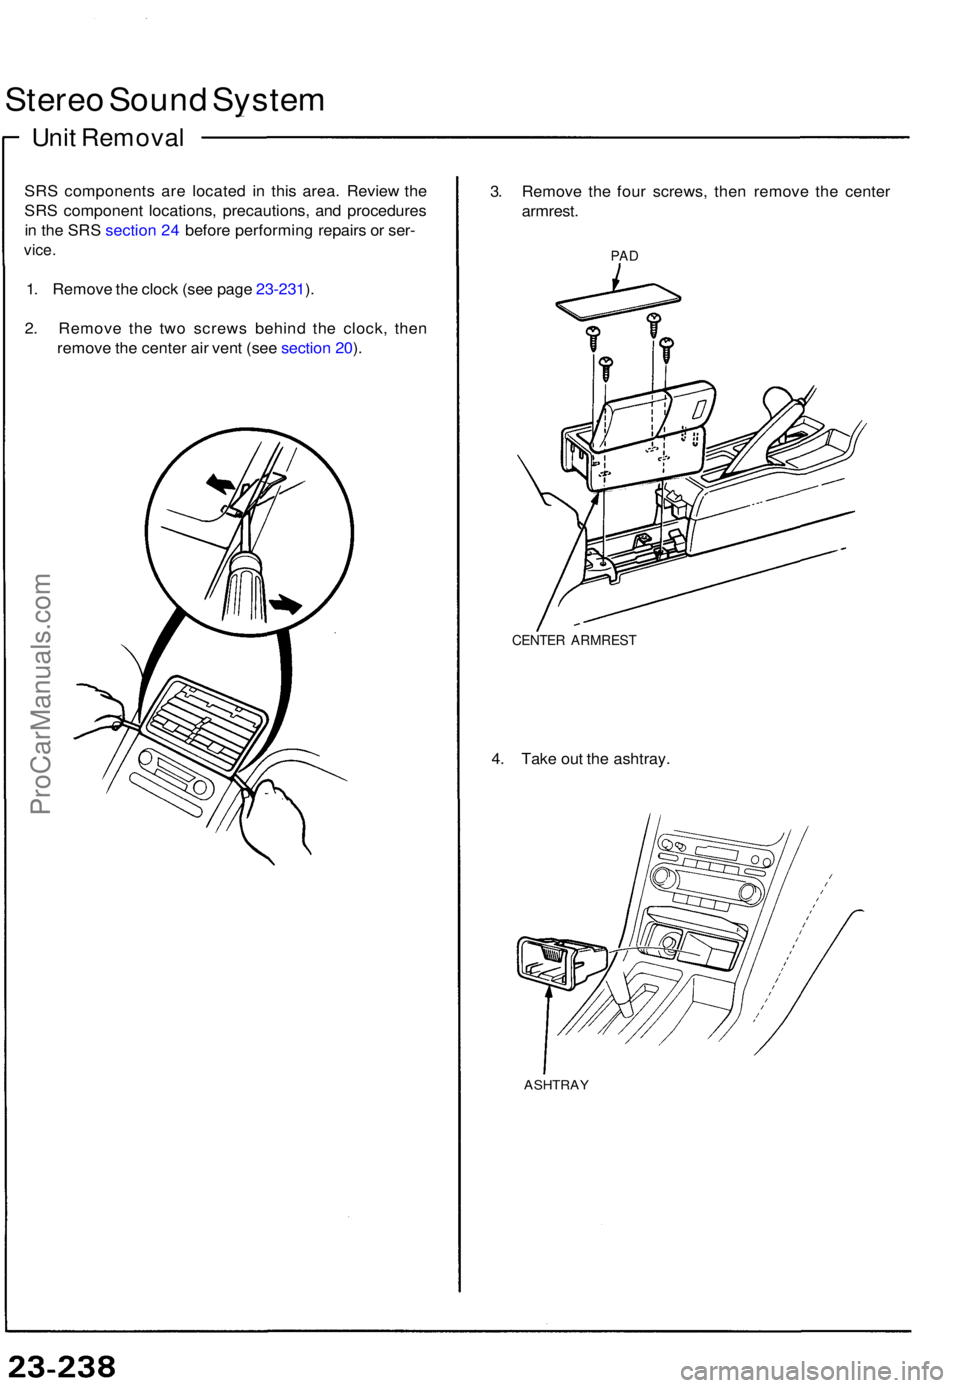
1. Remov e th e cloc k (se e pag e 23-231 ).
2 . Remov e th e tw o screw s behin d th e clock , the n
remov e th e cente r ai r ven t (se e sectio n 20 ). 3
. Remov e th e fou r screws , the n remov e th e cente r
armrest .
PAD
CENTE R ARMRES T
4. Tak e ou t th e ashtray .
ASHTRA Y
ProCarManuals.com
Trending: child lock, ECO mode, seat adjustment, flat tire, jump start, ignition, service schedule
