ACURA NSX 1991 Service Repair Manual
Manufacturer: ACURA, Model Year: 1991,
Model line: NSX,
Model: ACURA NSX 1991
Pages: 1640, PDF Size: 60.48 MB
ACURA NSX 1991 Service Repair Manual
NSX 1991
ACURA
ACURA
https://www.carmanualsonline.info/img/32/56988/w960_56988-0.png
ACURA NSX 1991 Service Repair Manual
Trending: diagram, engine oil capacity, brakes, auxiliary battery, automatic transmission fluid, light, fuse box
Page 861 of 1640
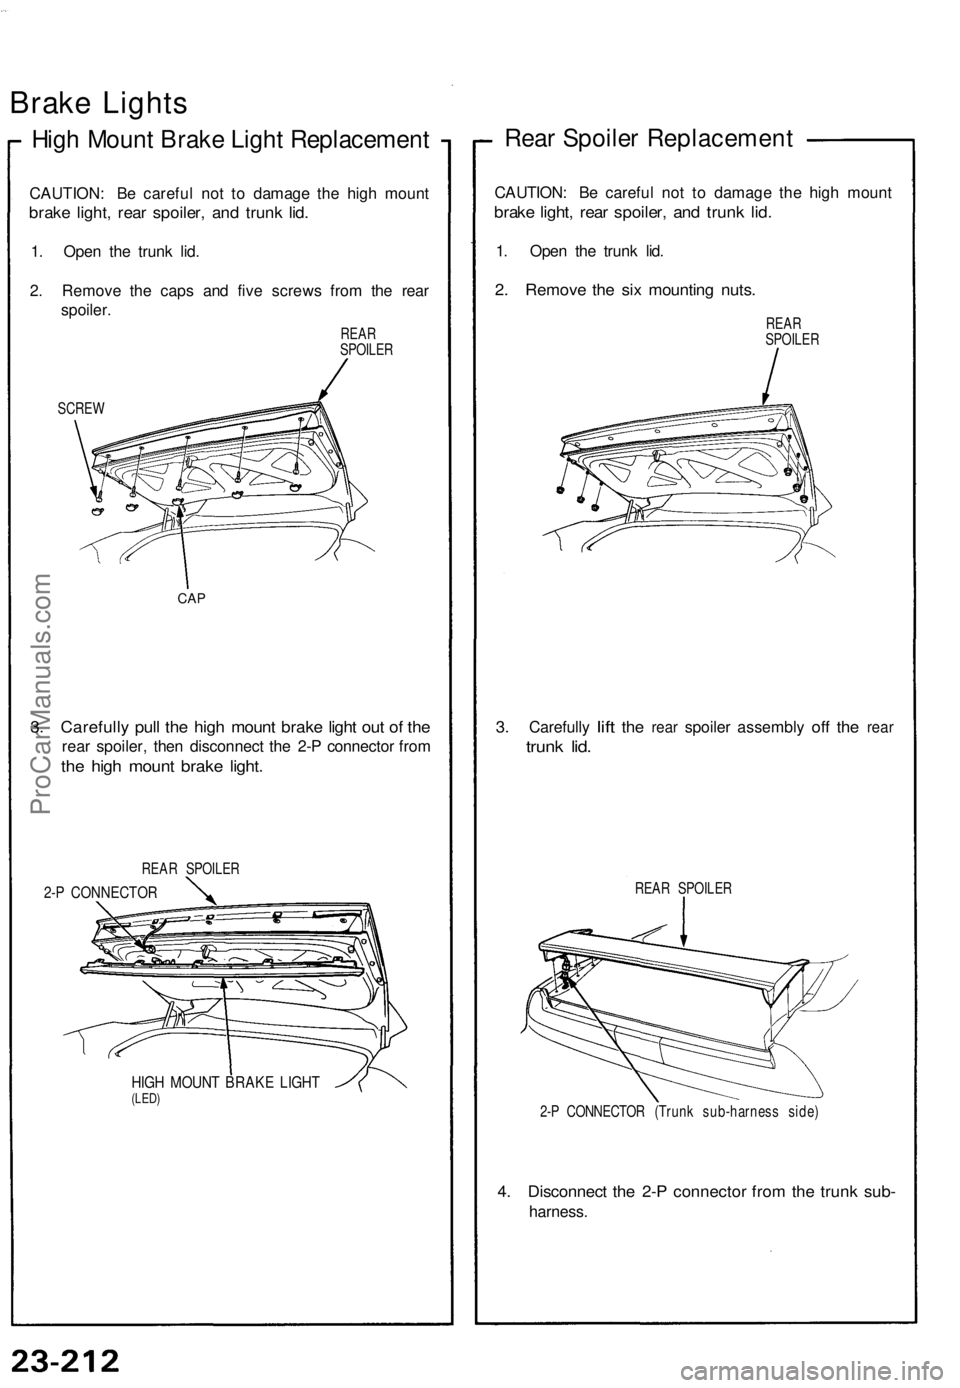
Brake Lights
High Mount Brake Light Replacement
CAUTION: Be careful not to damage the high mount
brake light, rear spoiler, and trunk lid.
1. Open the trunk lid.
2. Remove the caps and five screws from the rear
spoiler.
REAR
SPOILER
SCREW
CAP
3. Carefully pull the high mount brake light out of the
rear spoiler, then disconnect the 2-P connector from
the high mount brake light.
REAR SPOILER
2-P CONNECTOR
HIGH MOUNT BRAKE LIGHT
(LED)
Rear Spoiler Replacement
CAUTION: Be careful not to damage the high mount
brake light, rear spoiler, and trunk lid.
1. Open the trunk lid.
2. Remove the six mounting nuts.
REAR
SPOILER
3.
Carefully
lift
the
rear
spoiler assembly
off the
rear
trunk lid.
REAR SPOILER
2-P CONNECTOR (Trunk sub-harness side)
4. Disconnect the 2-P connector from the trunk sub-
harness.ProCarManuals.com
Page 862 of 1640
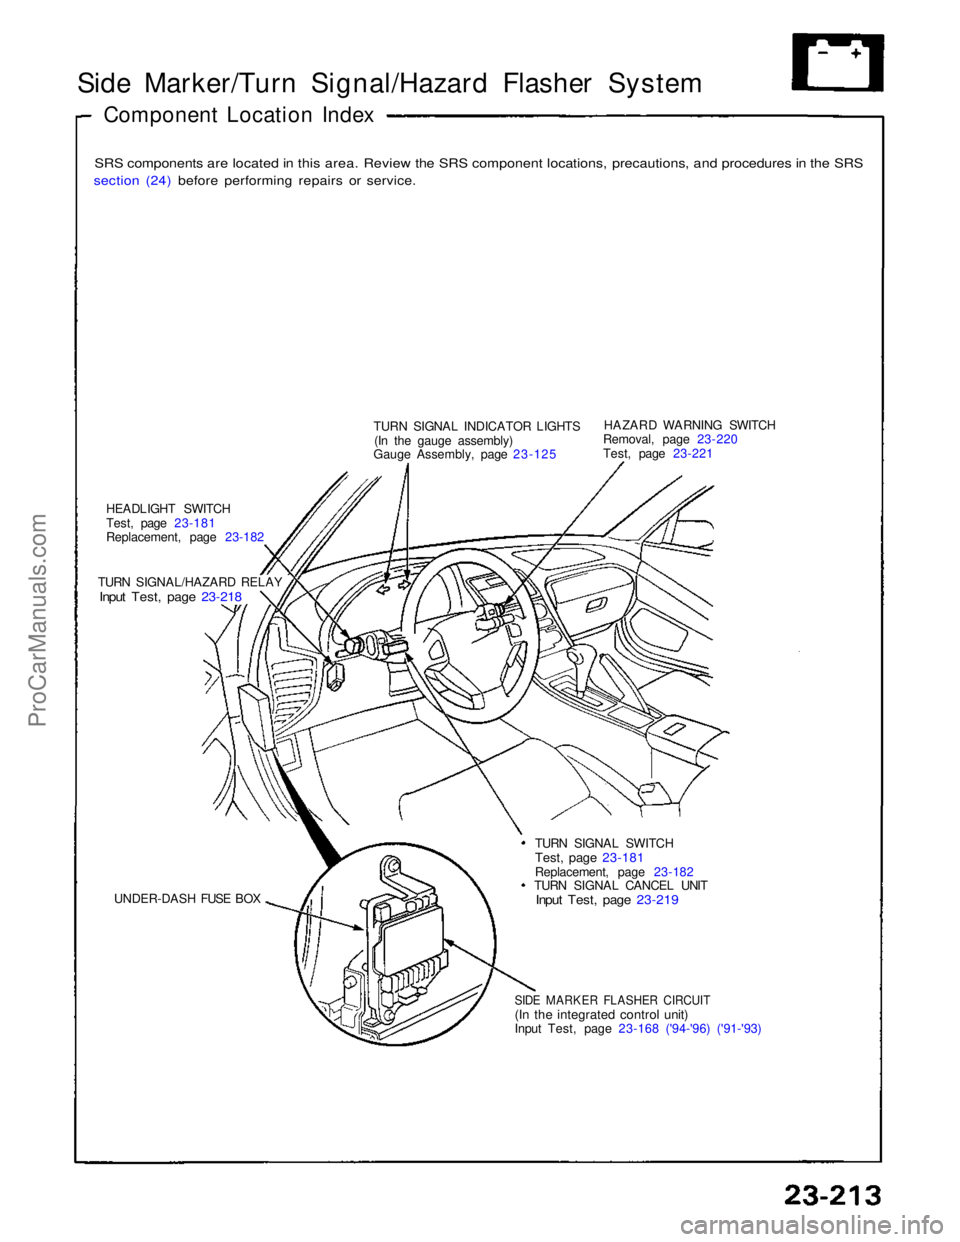
Side Marker/Turn Signal/Hazard Flasher System
Component Location Index
SRS components are located in this area. Review the SRS component locations, precautions, and procedures in the SRS
section (24) before performing repairs or service.
TURN SIGNAL INDICATOR LIGHTS(In the gauge assembly)
Gauge Assembly, page 23-125 HAZARD WARNING SWITCH
Removal, page 23-220
Test, page 23-221
HEADLIGHT SWITCH
Test, page 23-181
Replacement, page 23-182
TURN SIGNAL/HAZARD RELAY
Input Test, page 23-218
UNDER-DASH FUSE BOX TURN SIGNAL SWITCH
Test, page 23-181
Replacement, page 23-182 TURN SIGNAL CANCEL UNIT
Input Test, page 23-219
SIDE MARKER FLASHER CIRCUIT
(In the integrated control unit)
Input Test, page 23-168 ('94-'96) ('91-'93)ProCarManuals.com
Page 863 of 1640
Side Marker/Turn Signal/Hazard Flasher System
Description
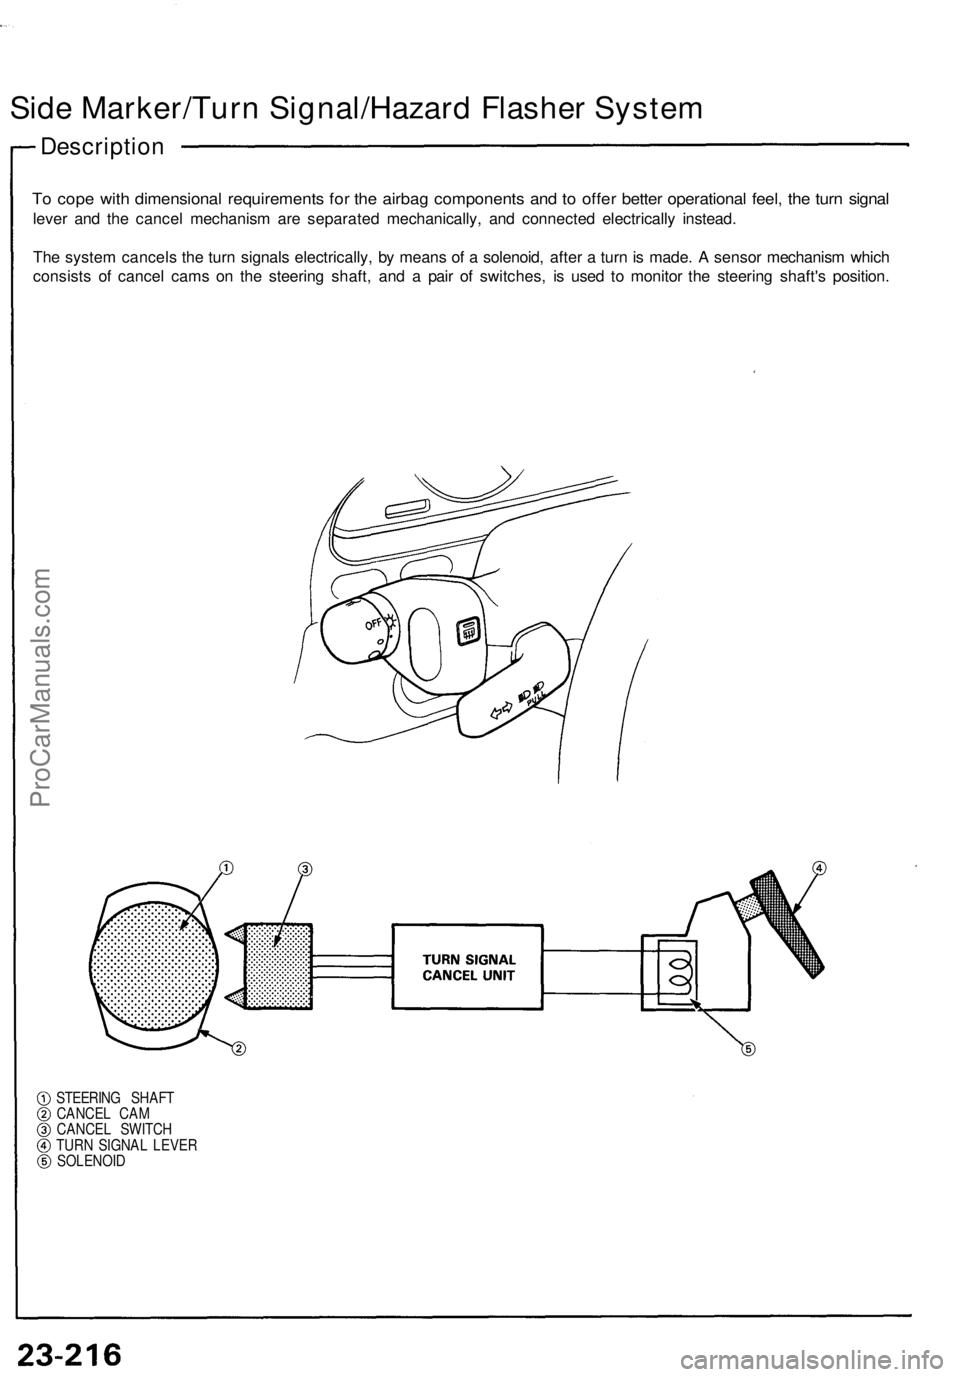
To cope with dimensional requirements for the airbag components and to offer better operational feel, the turn signal
lever and the cancel mechanism are separated mechanically, and connected electrically instead.
The system cancels the turn signals electrically, by means of a solenoid, after a turn is made. A sensor mechanism which
consists of cancel cams on the steering shaft, and a pair of switches, is used to monitor the steering shaft's position.
STEERING SHAFT
CANCEL CAM
CANCEL SWITCH
TURN SIGNAL LEVER
SOLENOIDProCarManuals.com
Page 864 of 1640
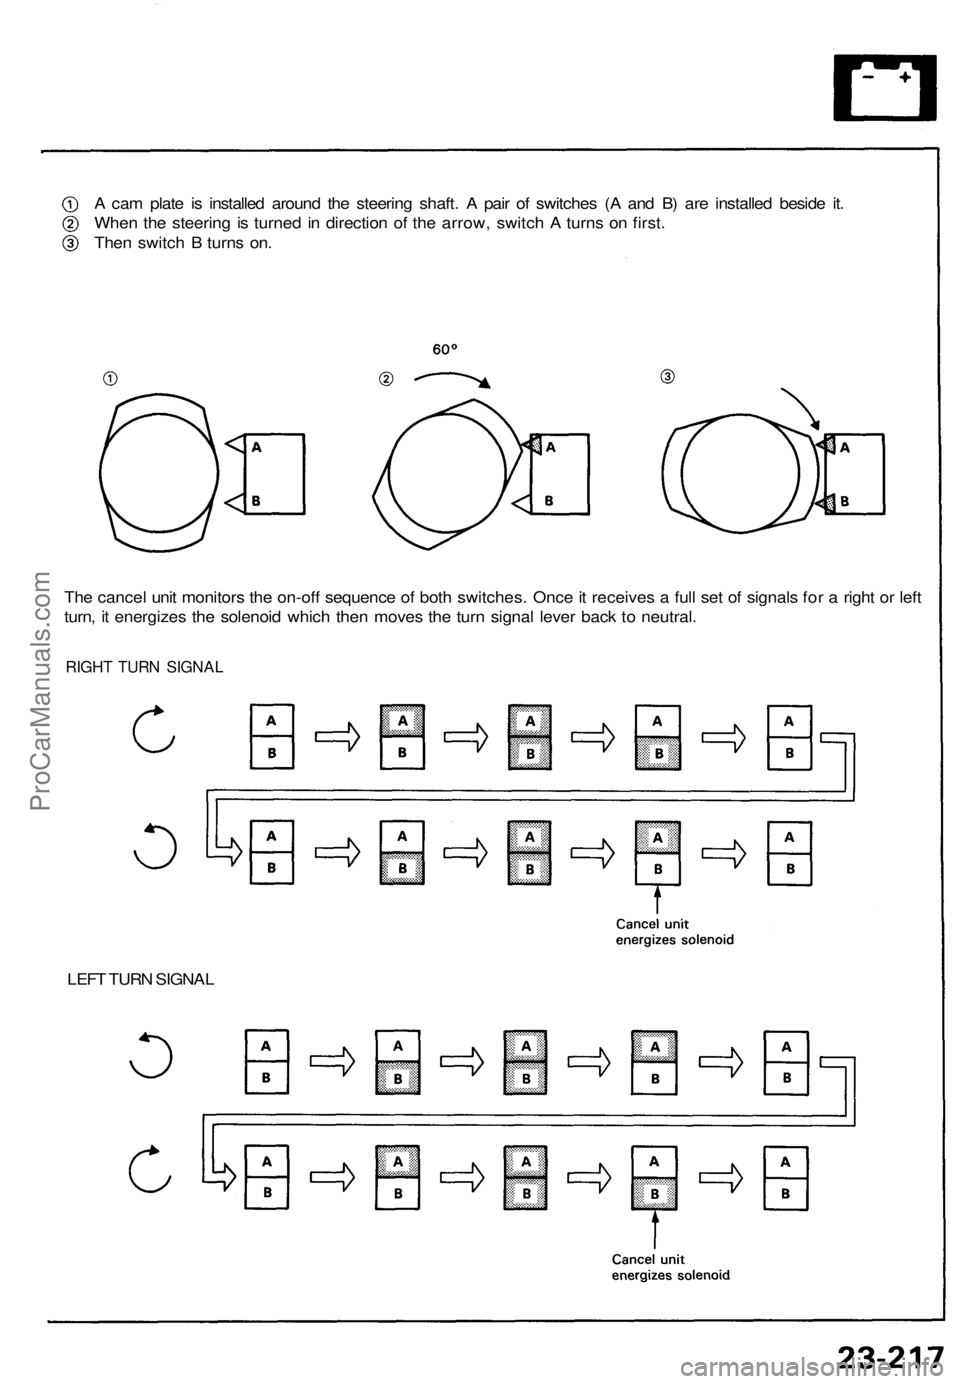
A cam plate is installed around the steering shaft. A pair of switches (A and B) are installed beside it.
When the steering is turned in direction of the arrow, switch A turns on first.
Then switch B turns on.
The cancel unit monitors the on-off sequence of both switches. Once it receives a full set of signals for a right or left
turn, it energizes the solenoid which then moves the turn signal lever back to neutral.
RIGHT TURN SIGNAL
LEFT TURN SIGNALProCarManuals.com
Page 865 of 1640
Side Marker/Turn Signal/Hazard Flasher System
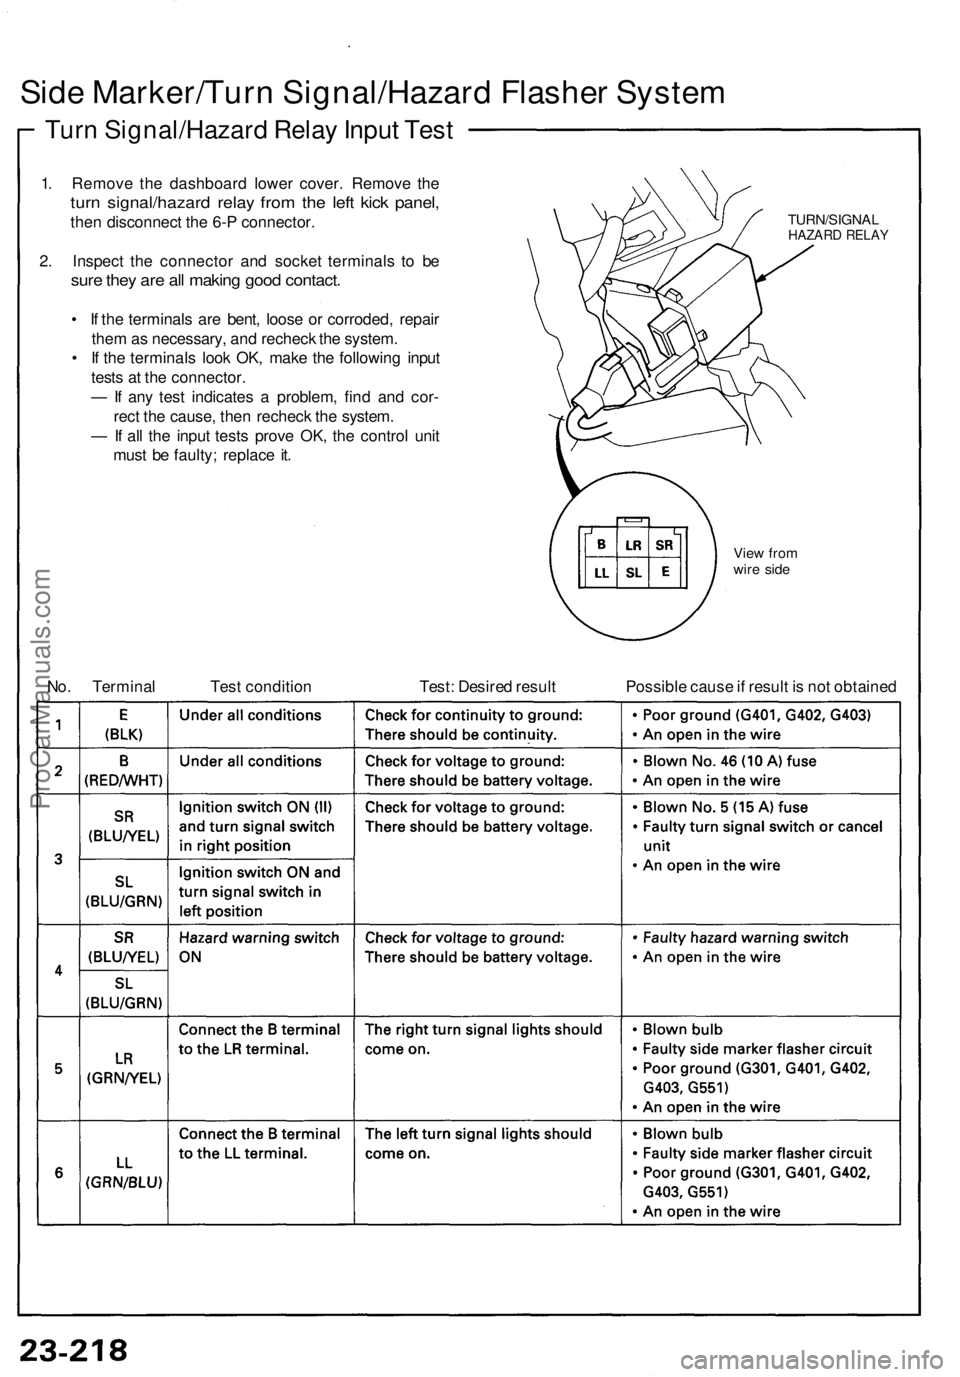
Turn Signal/Hazard Relay Input Test
1. Remove the dashboard lower cover. Remove the
turn signal/hazard relay from the left kick panel,
then disconnect the 6-P connector.
2. Inspect the connector and socket terminals to be
sure they are all making good contact.
• If the terminals are bent, loose or corroded, repair
them as necessary, and recheck the system.
• If the terminals look OK, make the following input
tests at the connector.
— If any test indicates a problem, find and cor-
rect the cause, then recheck the system.
— If all the input tests prove OK, the control unit
must be faulty; replace it.
TURN/SIGNAL
HAZARD RELAY
View from
wire side
No. Terminal
Test condition
Test: Desired result
Possible cause if result is not obtainedProCarManuals.com
Page 866 of 1640
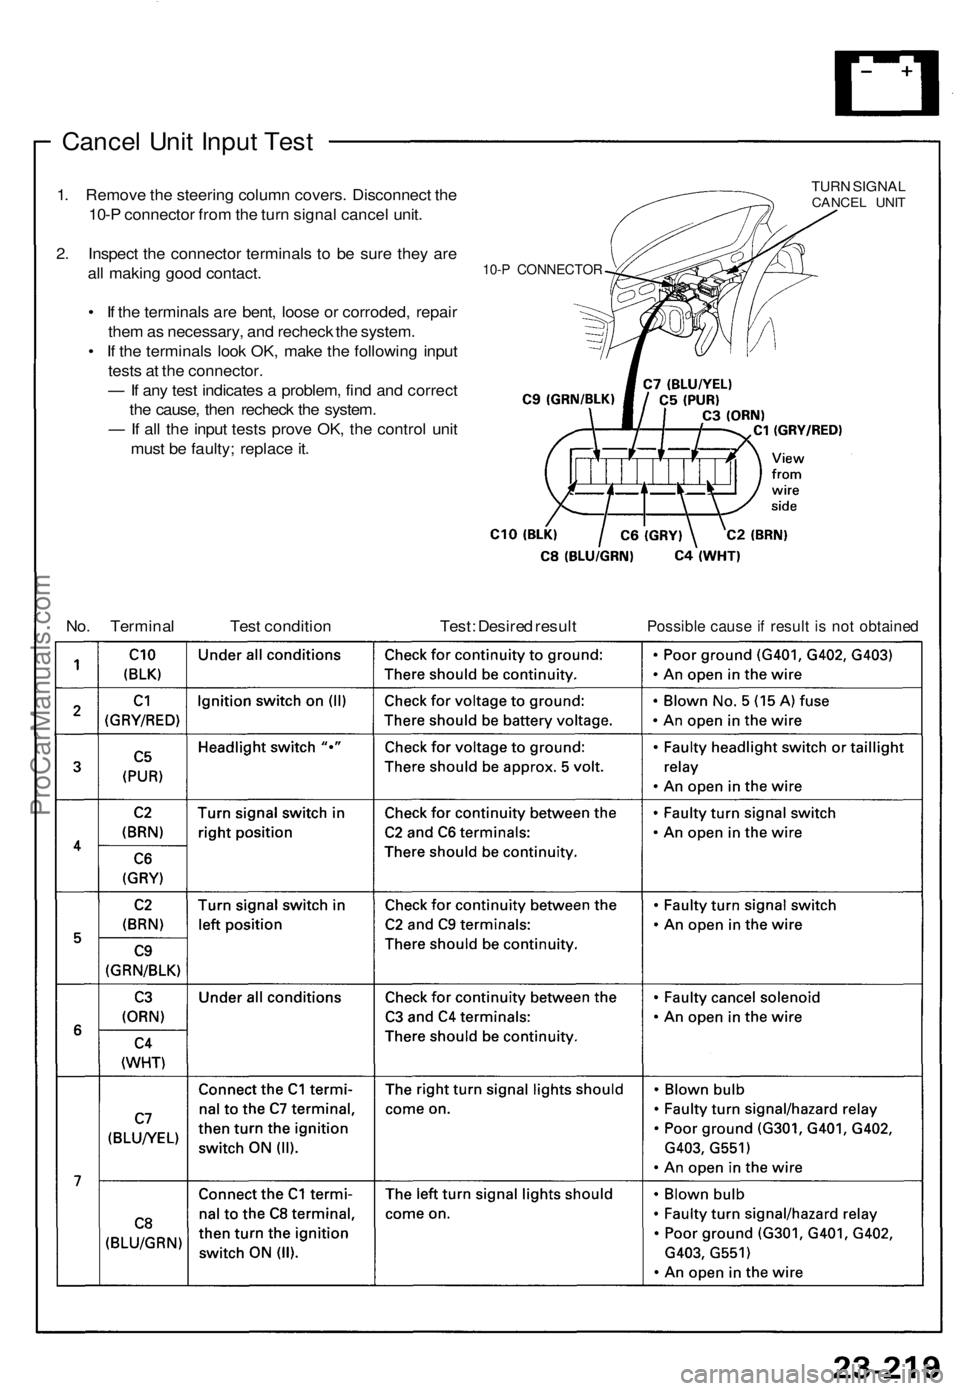
Cancel Unit Input Test
1. Remove the steering column covers. Disconnect the
10-P connector from the turn signal cancel unit.
2. Inspect the connector terminals to be sure they are
all making good contact.
• If the terminals are bent, loose or corroded, repair
them as necessary, and recheck the system.
• If the terminals look OK, make the following input
tests at the connector.
— If any test indicates a problem, find and correct
the cause, then recheck the system.
— If all the input tests prove OK, the control unit
must be faulty; replace it.
10-P CONNECTOR
TURN SIGNAL
CANCEL UNIT
No. Terminal
Test condition
Test: Desired result
Possible cause if result is not obtainedProCarManuals.com
Page 867 of 1640
Side Marker/Tur n Signal/Hazar d Flashe r Syste m
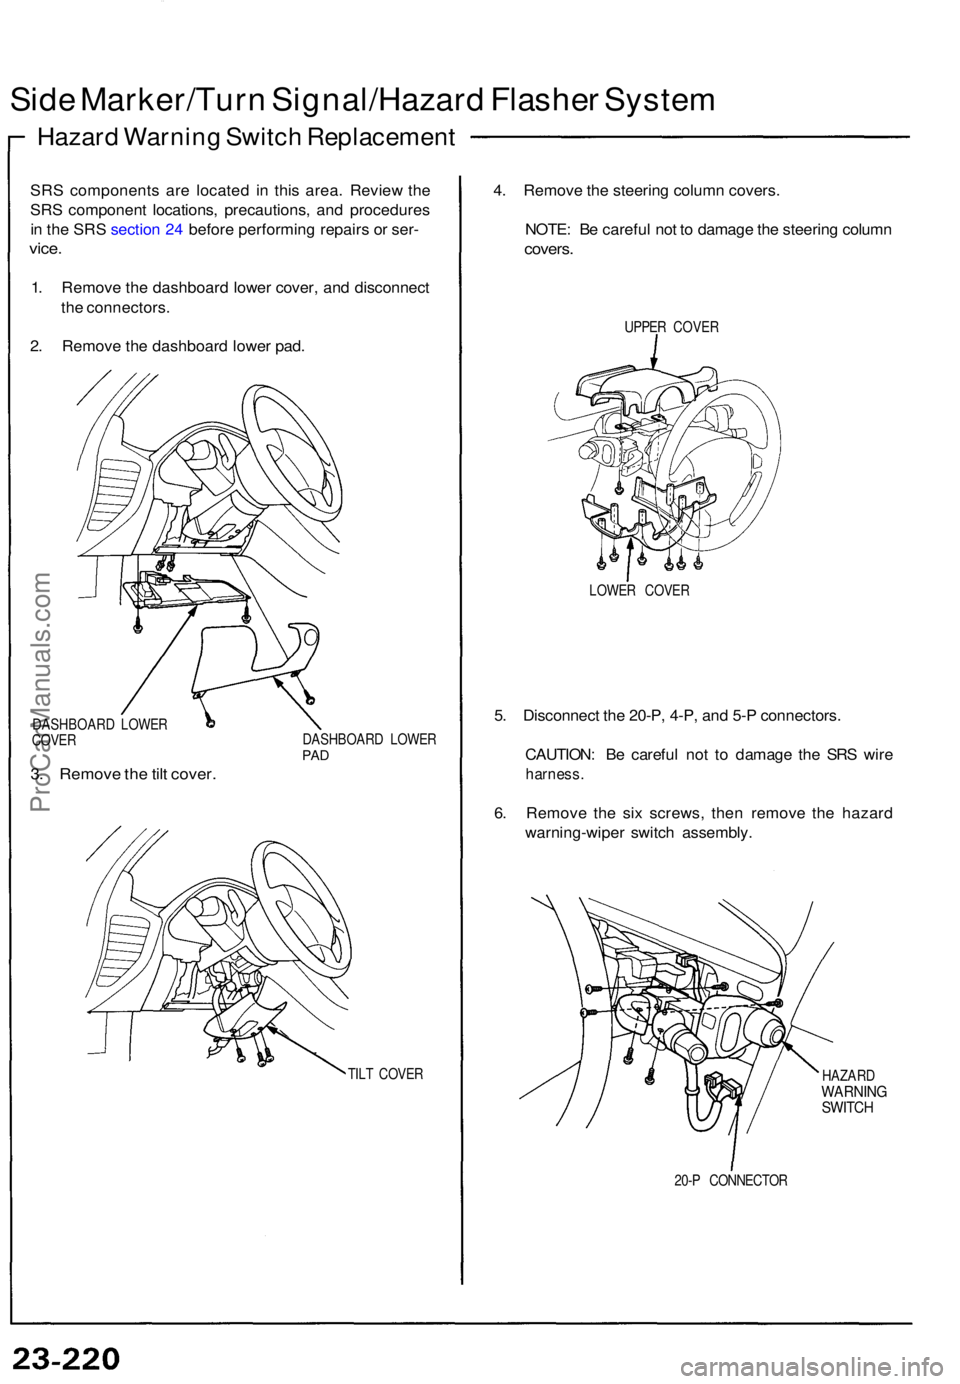
Hazar d Warnin g Switc h Replacemen t
SRS component s ar e locate d i n thi s area . Revie w th e
SR S componen t locations , precautions , an d procedure s
i n th e SR S sectio n 24 befor e performin g repair s o r ser -
vice .
1. Remov e th e dashboar d lowe r cover , an d disconnec t
th e connectors .
2 . Remov e th e dashboar d lowe r pad .
DASHBOAR D LOWE R
COVE R
3. Remov e th e til t cover .
DASHBOAR D LOWE RPAD
TIL T COVE R
4. Remov e th e steerin g colum n covers .
NOTE : B e carefu l no t t o damag e th e steerin g colum n
covers.
UPPER COVE R
LOWE R COVE R
5. Disconnec t th e 20-P , 4-P , an d 5- P connectors .
CAUTION : B e carefu l no t t o damag e th e SR S wir e
harness .
6. Remov e th e si x screws , the n remov e th e hazar d
warning-wipe r switc h assembly .
HAZARDWARNIN GSWITCH
20-P CONNECTO R
ProCarManuals.com
Page 868 of 1640
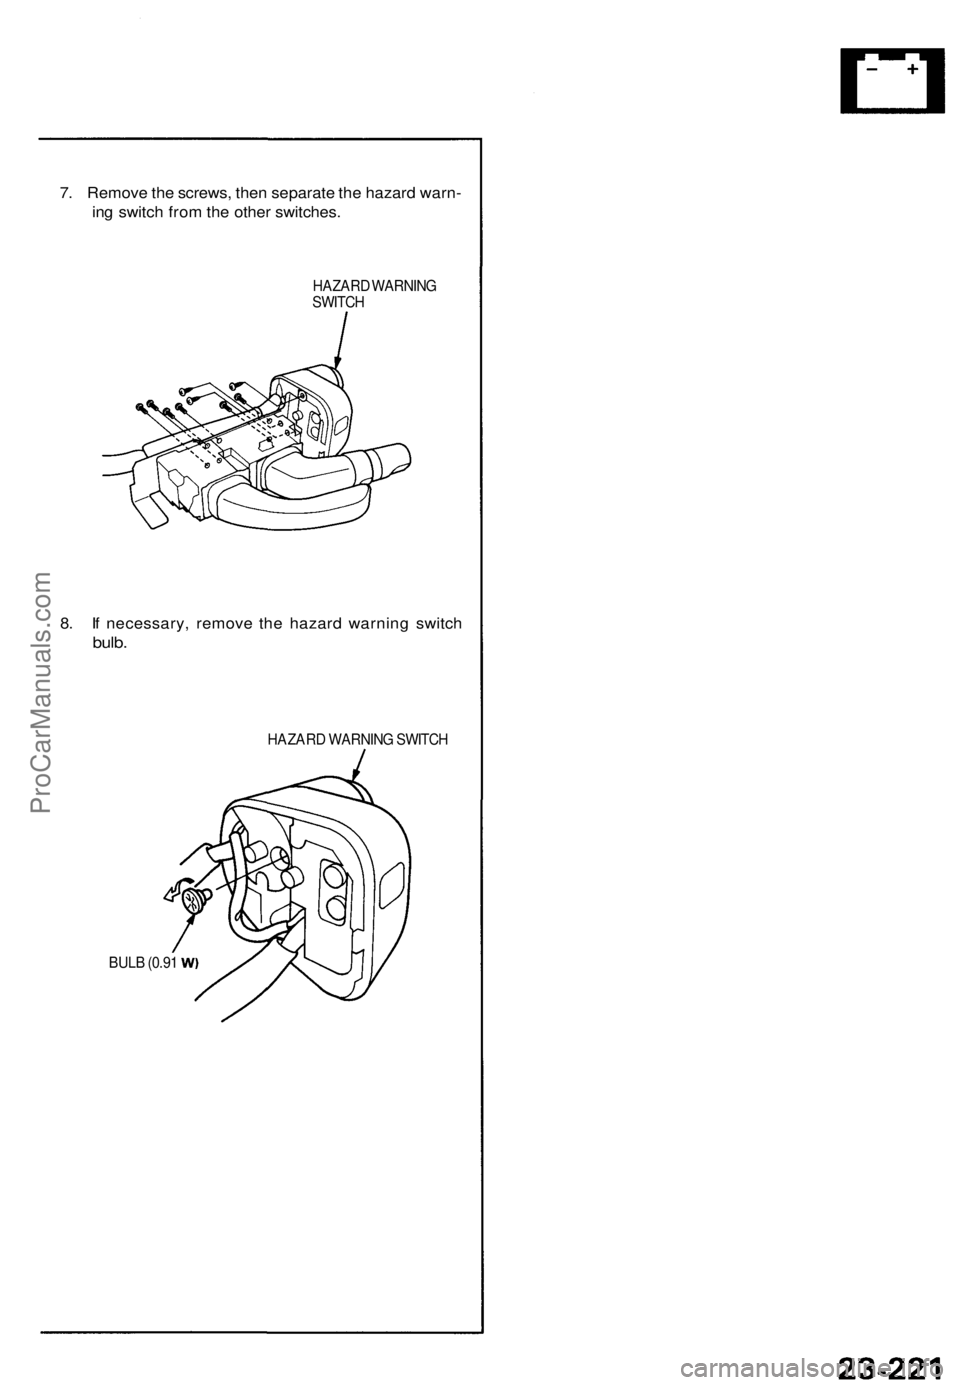
7. Remove the screws, then separate the hazard warn-
ing switch from the other switches.
HAZARD WARNING
SWITCH
8. If necessary, remove the hazard warning switch
bulb.
HAZARD WARNING SWITCH
BULB (0.91ProCarManuals.com
Page 869 of 1640
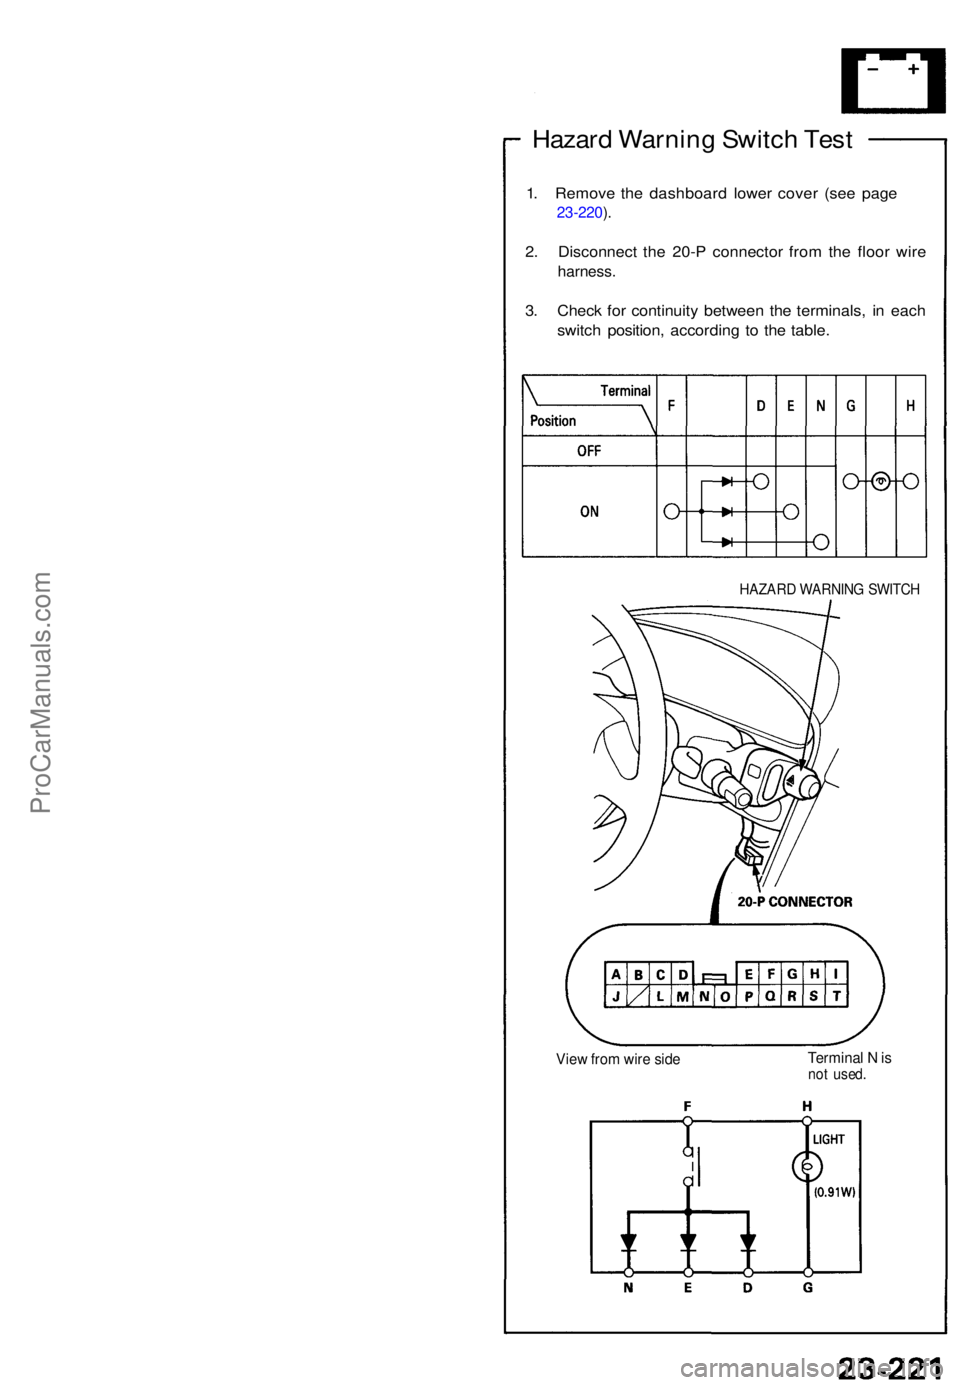
Hazard Warnin g Switc h Tes t
1. Remov e th e dashboar d lowe r cove r (se e pag e
23-220 ).
2 . Disconnec t th e 20- P connecto r fro m th e floo r wir e
harness .
3. Chec k fo r continuit y betwee n th e terminals , i n eac h
switc h position , accordin g t o th e table .
HAZAR D WARNIN G SWITC H
View fro m wir e sid eTermina l N isno t used .
ProCarManuals.com
Page 870 of 1640
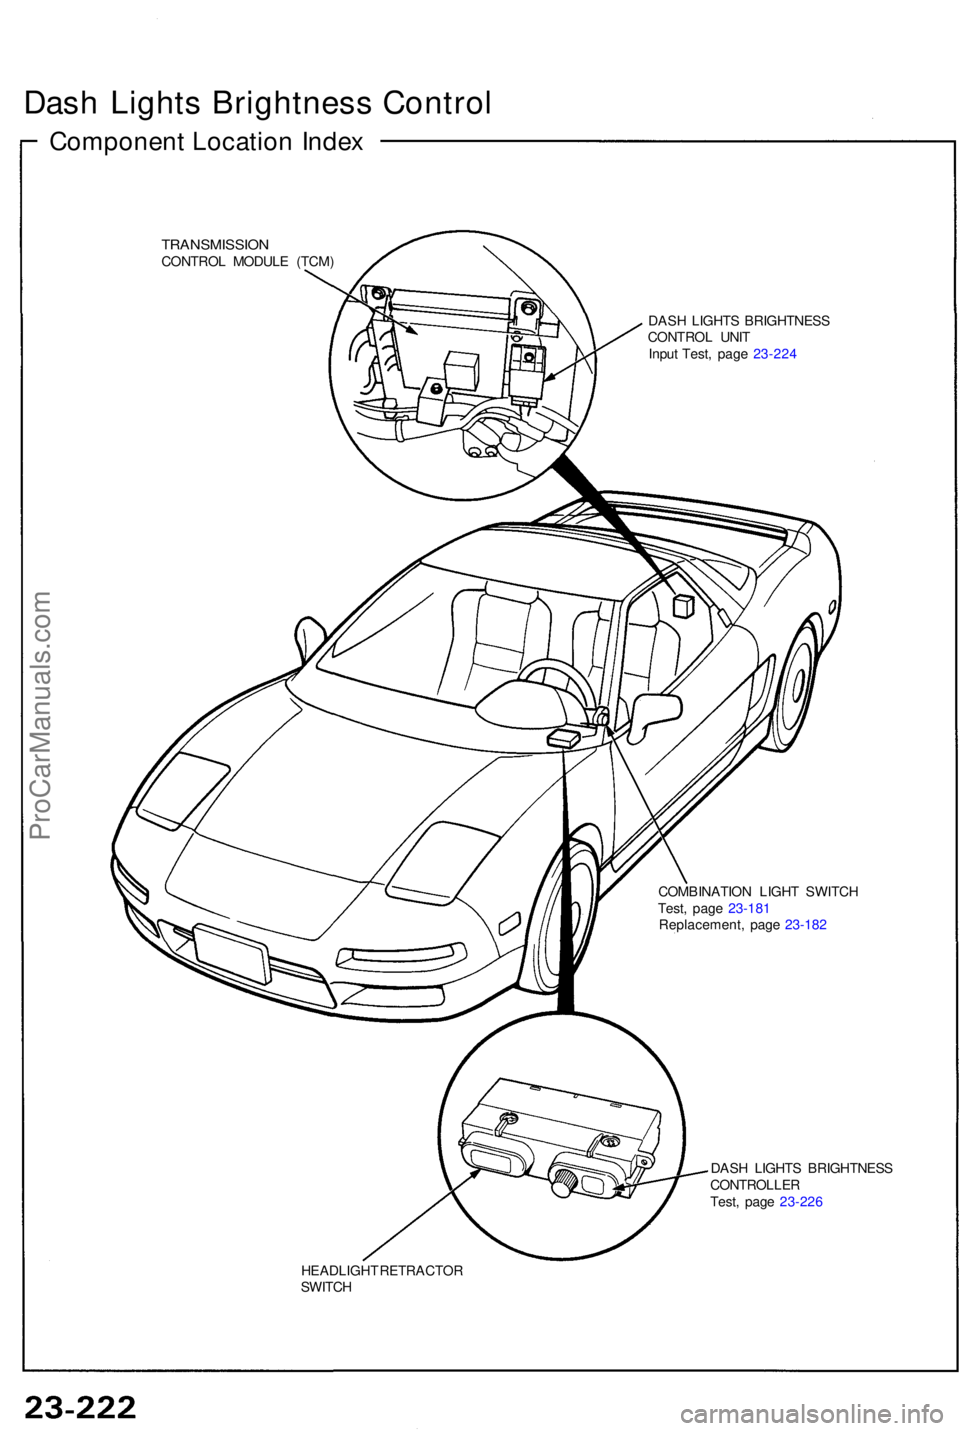
Dash Light s Brightnes s Contro l
Componen t Locatio n Inde x
TRANSMISSIO NCONTROL MODUL E (TCM )
DASH LIGHT S BRIGHTNES S
CONTRO L UNI T
Inpu t Test , pag e 23-22 4
COMBINATIO N LIGH T SWITC H
Test , pag e 23-18 1
Replacement , pag e 23-18 2
DAS H LIGHT S BRIGHTNES S
CONTROLLERTest, pag e 23-22 6
HEADLIGH T RETRACTO R
SWITC H
ProCarManuals.com
Trending: window, check engine, clock reset, wiring, hood release, stop start, AUX
