ACURA NSX 1991 Service Repair Manual
Manufacturer: ACURA, Model Year: 1991, Model line: NSX, Model: ACURA NSX 1991Pages: 1640, PDF Size: 60.48 MB
Page 881 of 1640
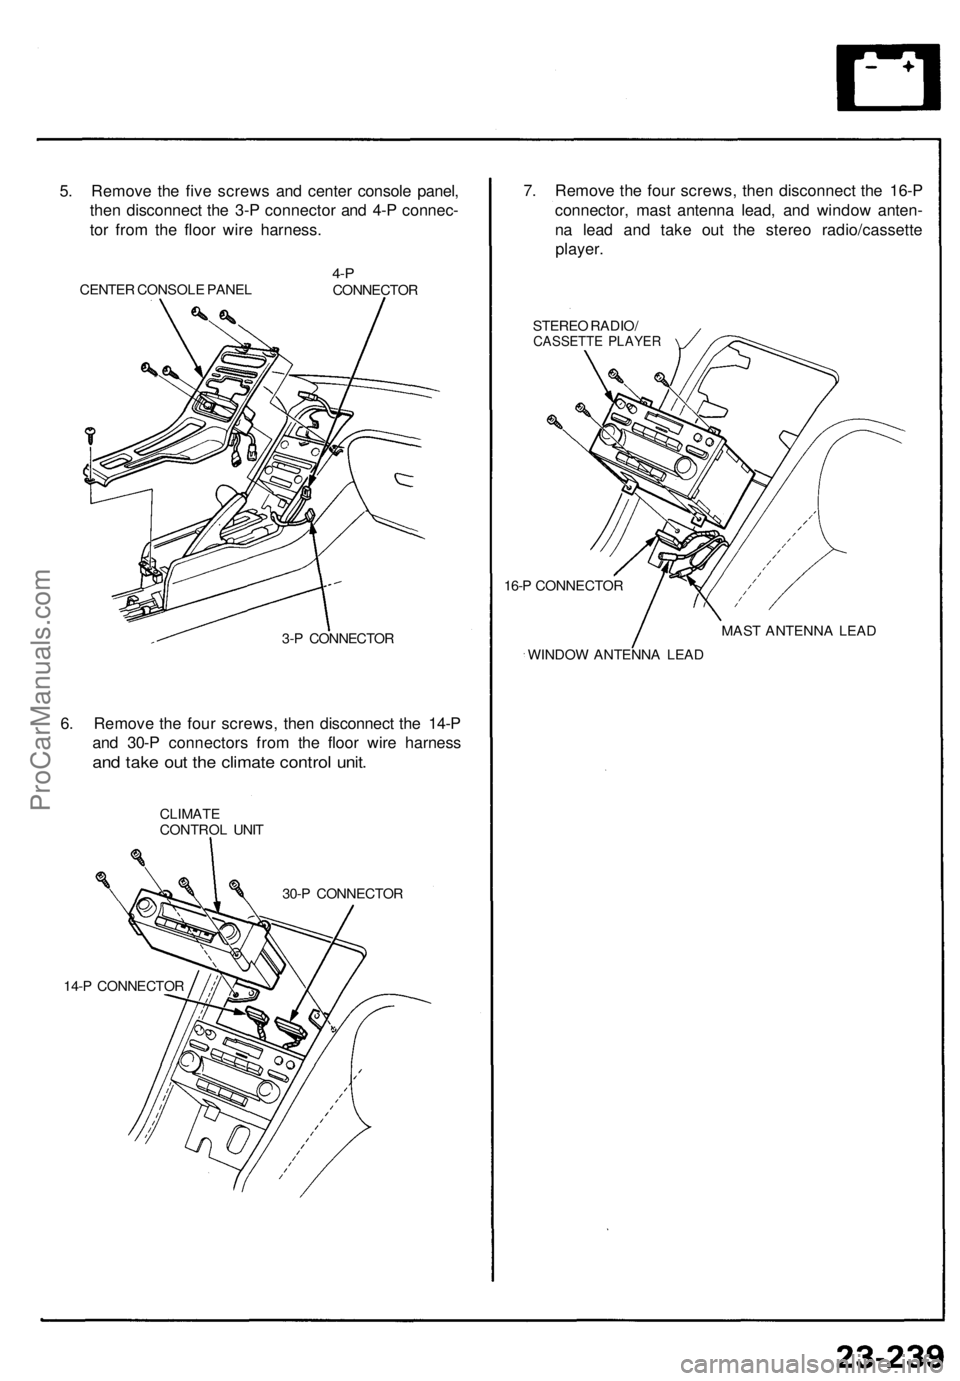
5. Remove the five screws and center console panel,
then disconnect the 3-P connector and 4-P connec-
tor from the floor wire harness.
CENTER CONSOLE PANEL
4-P
CONNECTOR
3-P CONNECTOR
6. Remove the four screws, then disconnect the 14-P
and 30-P connectors from the floor wire harness
and take out the climate control unit.
CLIMATE
CONTROL UNIT
30-P CONNECTOR
14-P CONNECTOR
7. Remove the four screws, then disconnect the 16-P
connector, mast antenna lead, and window anten-
na lead and take out the stereo radio/cassette
player.
STEREO RADIO/
CASSETTE PLAYER
16-P CONNECTOR
WINDOW ANTENNA LEAD
MAST ANTENNA LEADProCarManuals.com
Page 882 of 1640
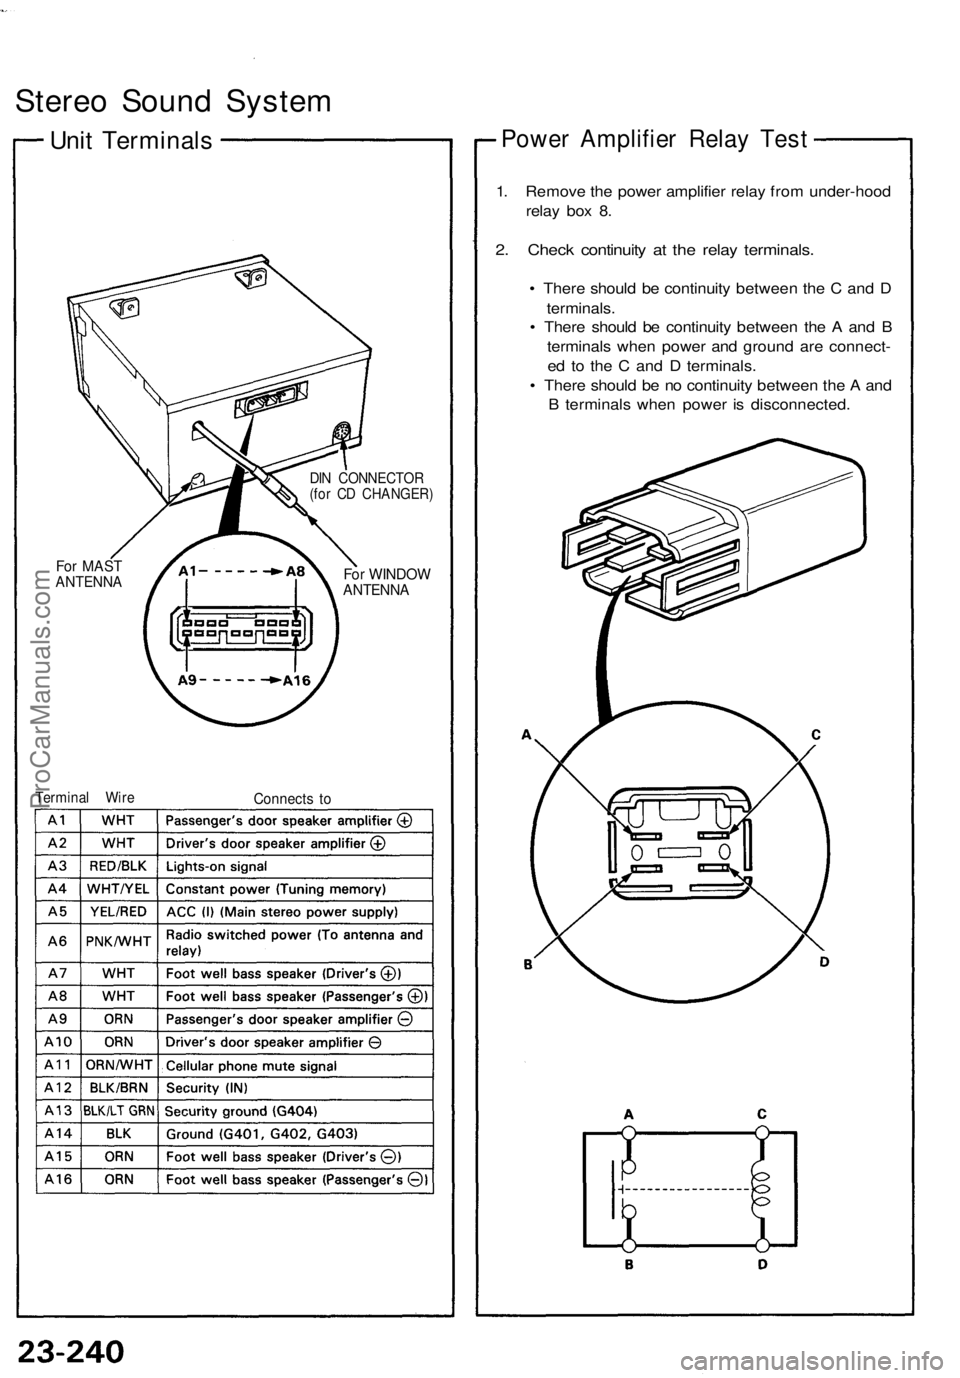
Stereo Sound System
Unit Terminals
For MAST
ANTENNA
DIN CONNECTOR
(for CD CHANGER)
For WINDOW
ANTENNA
Terminal Wire
Connects to
Power Amplifier Relay Test
1. Remove the power amplifier relay from under-hood
relay box 8.
2. Check continuity at the relay terminals.
• There should be continuity between the C and D
terminals.
• There should be continuity between the A and B
terminals when power and ground are connect-
ed to the C and D terminals.
• There should be no continuity between the A and
B terminals when power is disconnected.ProCarManuals.com
Page 883 of 1640
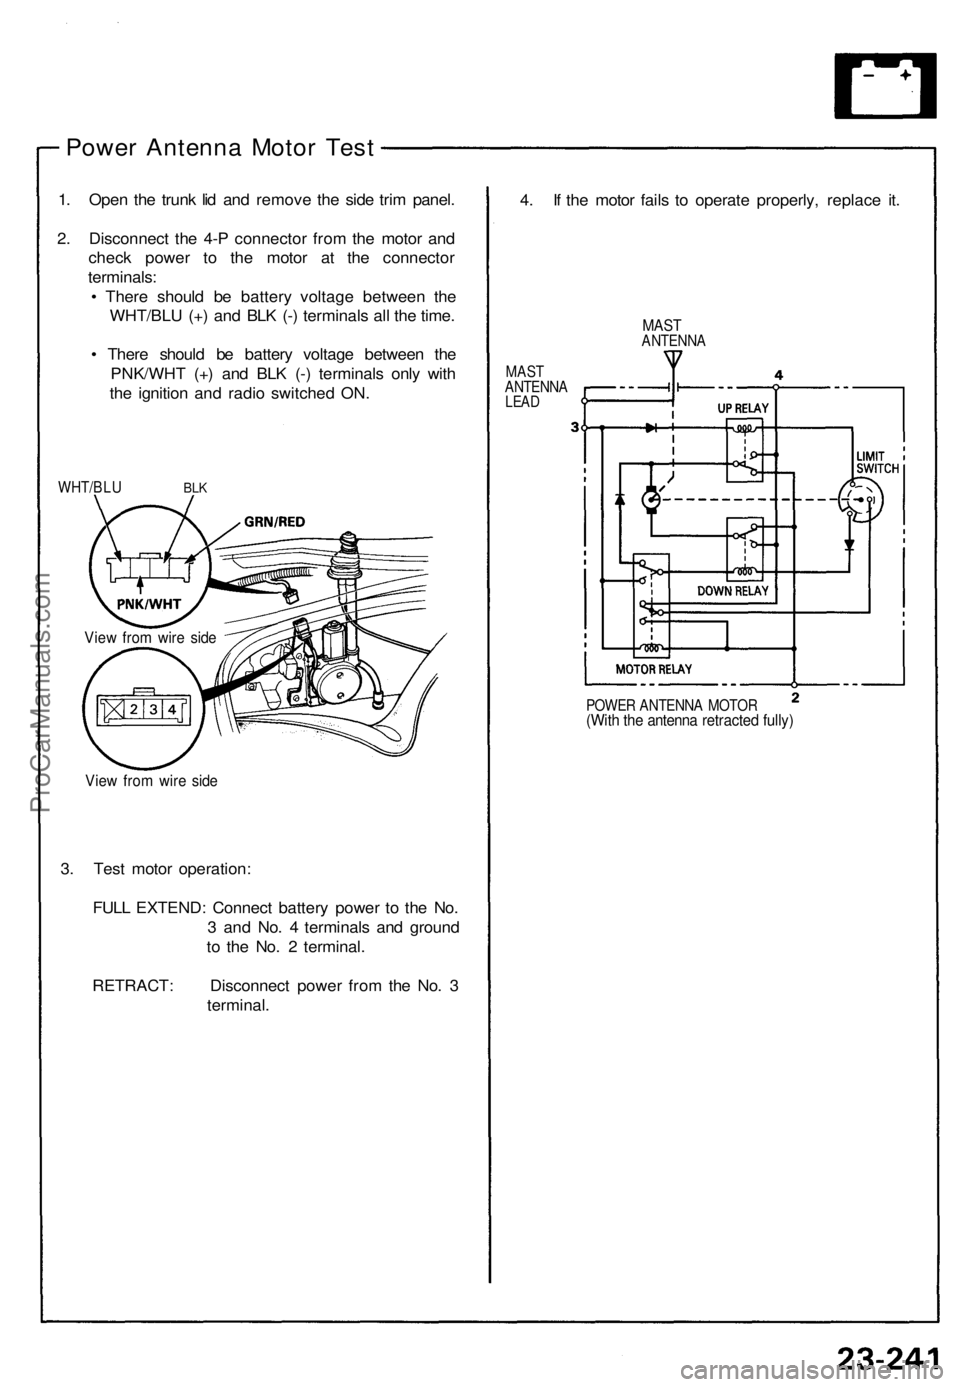
Power Antenna Motor Test
1. Open the trunk lid and remove the side trim panel.
2. Disconnect the 4-P connector from the motor and
check power to the motor at the connector
terminals:
• There should be battery voltage between the
WHT/BLU (+) and BLK (-) terminals all the time.
• There should be battery voltage between the
PNK/WHT (+) and BLK (-) terminals only with
the ignition and radio switched ON.
WHT/BLU
BLK
View from wire side
View from wire side
3. Test motor operation:
FULL EXTEND: Connect battery power to the No.
3 and No. 4 terminals and ground
to the No. 2 terminal.
RETRACT: Disconnect power from the No. 3
terminal.
4. If the motor fails to operate properly, replace it.
MAST
ANTENNA
MAST
ANTENNA
LEAD
POWER ANTENNA MOTOR
(With the antenna retracted fully)ProCarManuals.com
Page 884 of 1640
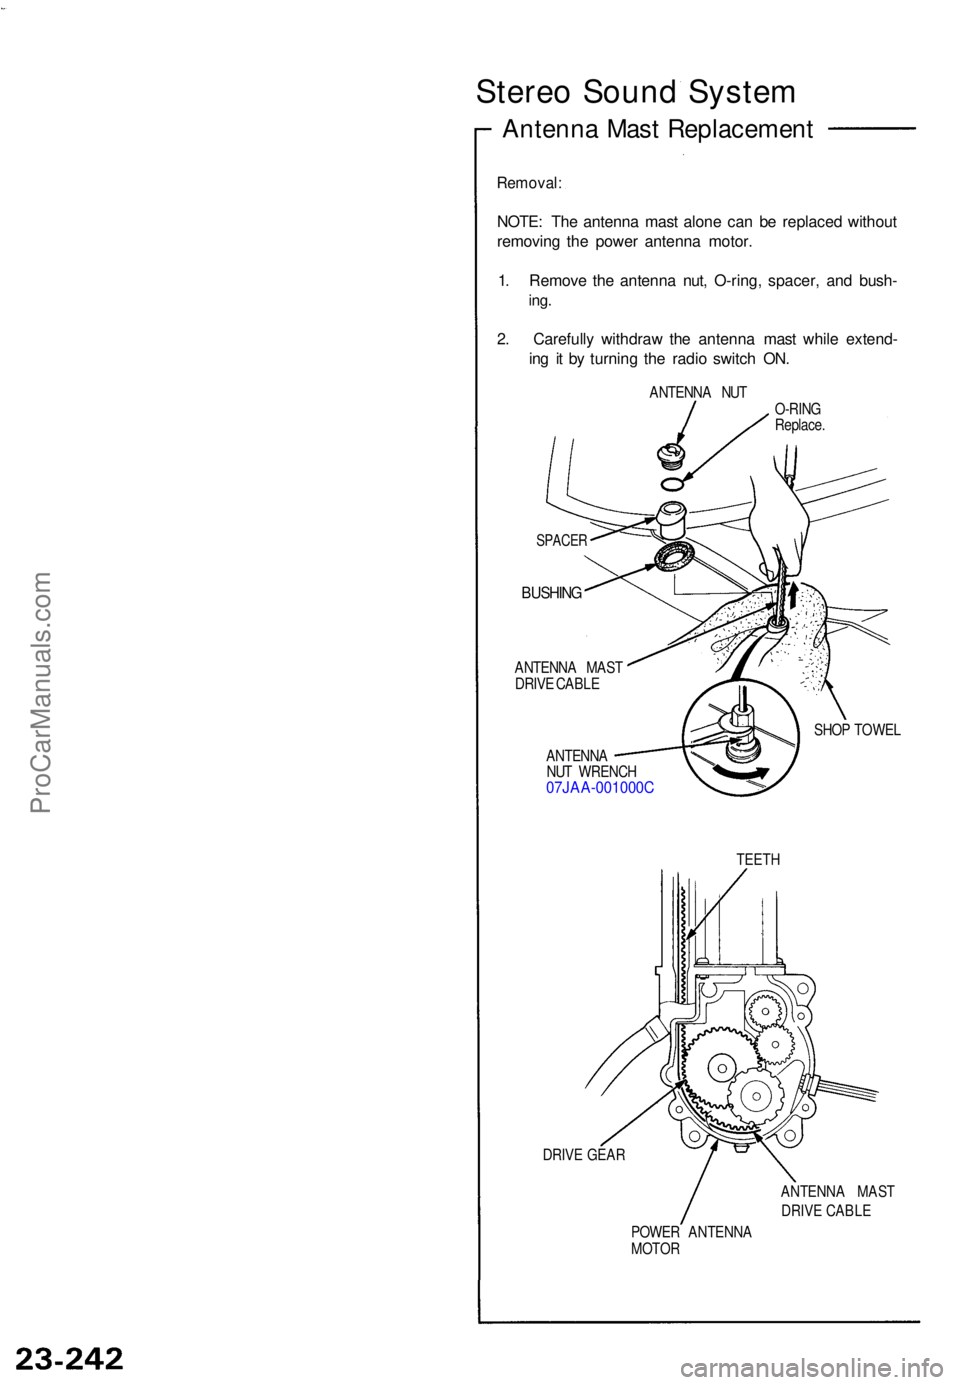
Stereo Soun d Syste m
Antenn a Mas t Replacemen t
Removal:
NOTE: Th e antenn a mas t alon e ca n b e replace d withou t
removin g th e powe r antenn a motor .
1 . Remov e th e antenn a nut , O-ring , spacer , an d bush -
ing.
2. Carefull y withdra w th e antenn a mas t whil e extend -
in g i t b y turnin g th e radi o switc h ON .
ANTENN A NU T
O-RIN G
Replace .
SPACER
BUSHIN G
ANTENN A MAS T
DRIV E CABL E
ANTENN A
NU T WRENC H
07JAA-001000 C
SHOP TOWE L
TEET H
DRIV E GEA R
ANTENNA MAS T
DRIV E CABL E
POWE R ANTENN A
MOTO R
ProCarManuals.com
Page 885 of 1640
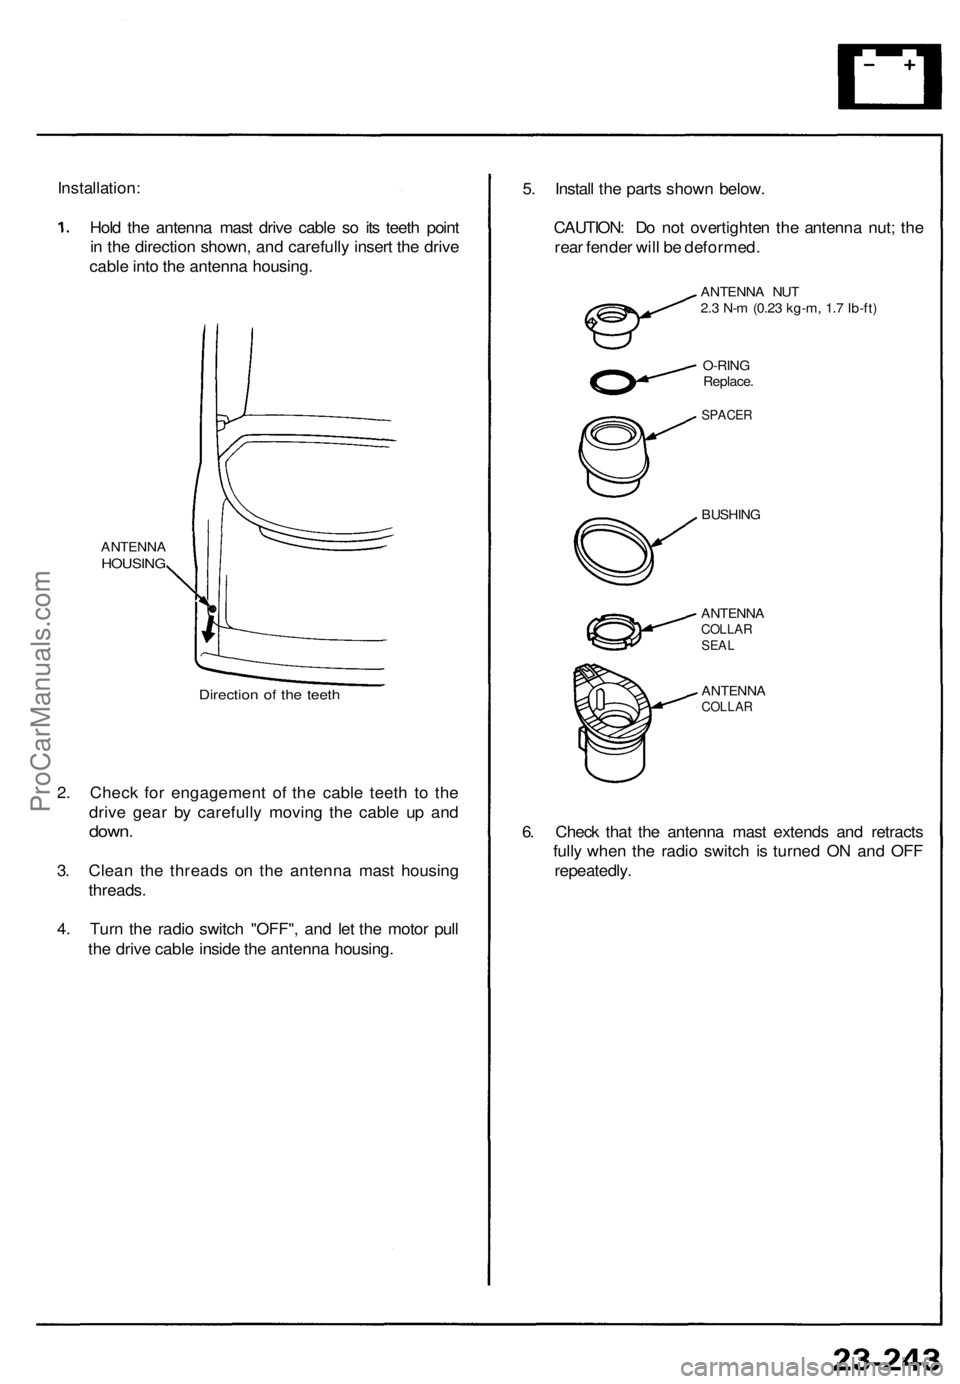
Installation:
Hold the antenna mast drive cable so its teeth point
in the direction shown, and carefully insert the drive
cable into the antenna housing.
ANTENNA
HOUSING
Direction of the teeth
2. Check for engagement of the cable teeth to the
drive gear by carefully moving the cable up and
down.
3. Clean the threads on the antenna mast housing
threads.
4. Turn the radio switch "OFF", and let the motor pull
the drive cable inside the antenna housing.
5. Install the parts shown below.
CAUTION: Do not overtighten the antenna nut; the
rear fender will be deformed.
ANTENNA NUT
2.3 N-m (0.23 kg-m, 1.7 Ib-ft)
O-RING
Replace.
SPACER
BUSHING
ANTENNA
COLLAR
SEAL
ANTENNA
COLLAR
6. Check that the antenna mast extends and retracts
fully when the radio switch is turned ON and OFF
repeatedly.ProCarManuals.com
Page 886 of 1640
Stereo Soun d Syste m
Antenn a Tub e Replacemen t
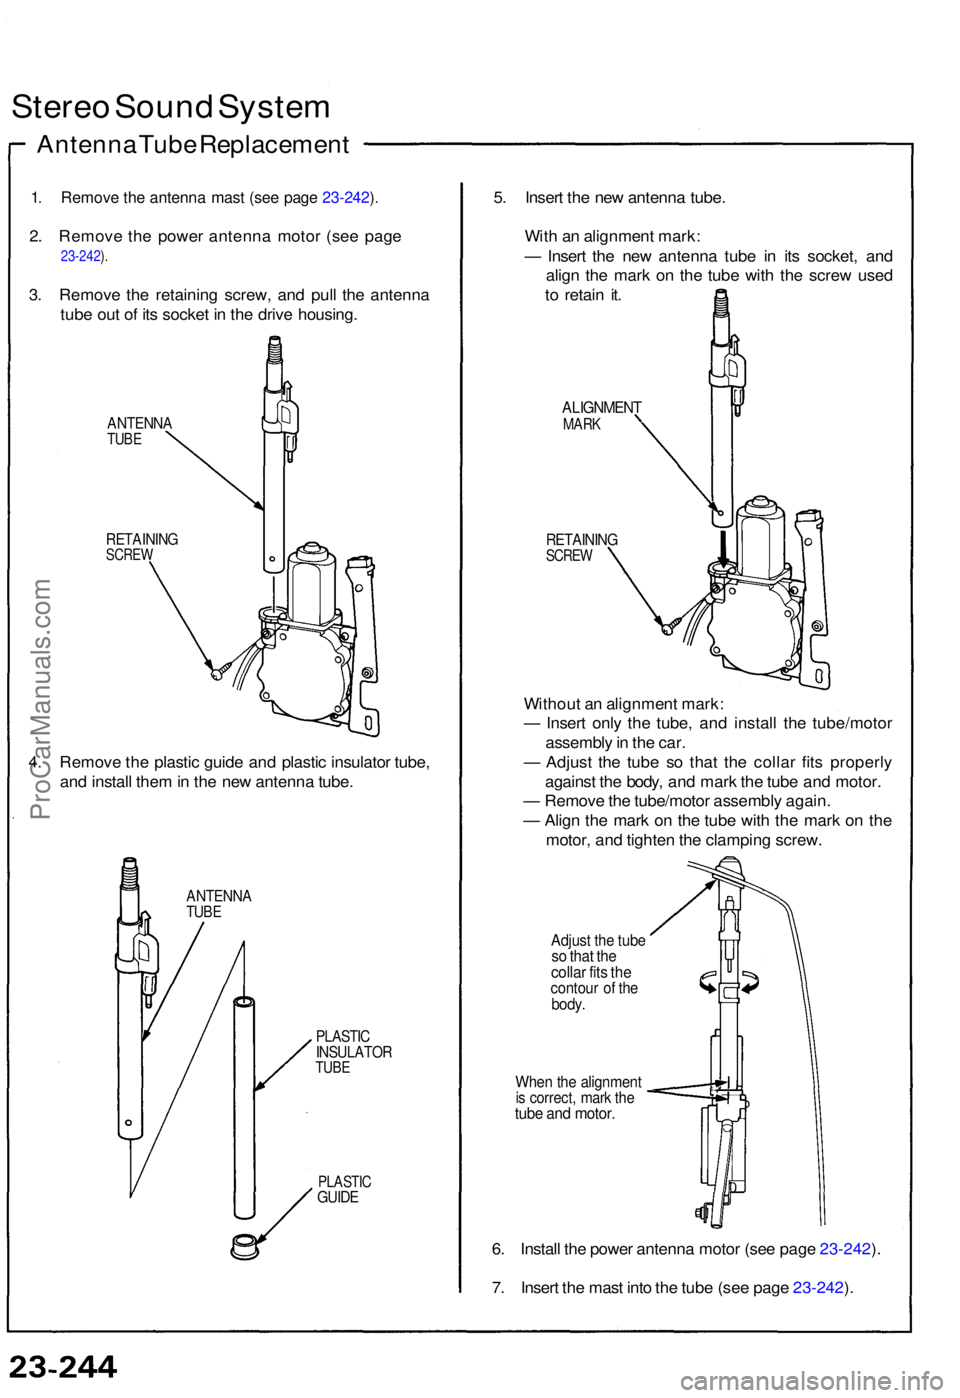
1. Remov e th e antenn a mas t (se e pag e 23-242 ).
2 . Remov e th e powe r antenn a moto r (se e pag e
23-242 ).
3 . Remov e th e retainin g screw , an d pul l th e antenn a
tub e ou t o f it s socke t i n th e driv e housing .
ANTENN ATUBE
RETAININ GSCREW
4. Remov e th e plasti c guid e an d plasti c insulato r tube ,
an d instal l the m in th e ne w antenn a tube .
ANTENN ATUBE
PLASTI CINSULATO RTUBE
PLASTI C
GUIDE
5. Inser t th e ne w antenn a tube .
Wit h a n alignmen t mark :
— Inser t th e ne w antenn a tub e i n it s socket , an d
alig n th e mar k o n th e tub e wit h th e scre w use d
t o retai n it .
ALIGNMEN TMARK
RETAININ GSCREW
Withou t a n alignmen t mark :
— Inser t onl y th e tube , an d instal l th e tube/moto r
assembl y in th e car .
— Adjus t th e tub e s o tha t th e colla r fit s properl y
agains t th e body , an d mar k th e tub e an d motor .
— Remov e th e tube/moto r assembl y again .
— Alig n th e mar k o n th e tub e wit h th e mar k o n th e
motor , an d tighte n th e clampin g screw .
Adjust th e tub eso tha t th ecolla r fit s th econtou r o f th ebody .
When th e alignmen tis correct , mar k th etub e an d motor .
6. Instal l th e powe r antenn a moto r (se e pag e 23-242 ).
7 . Inser t th e mas t int o th e tub e (se e pag e 23-242 ).
ProCarManuals.com
Page 887 of 1640
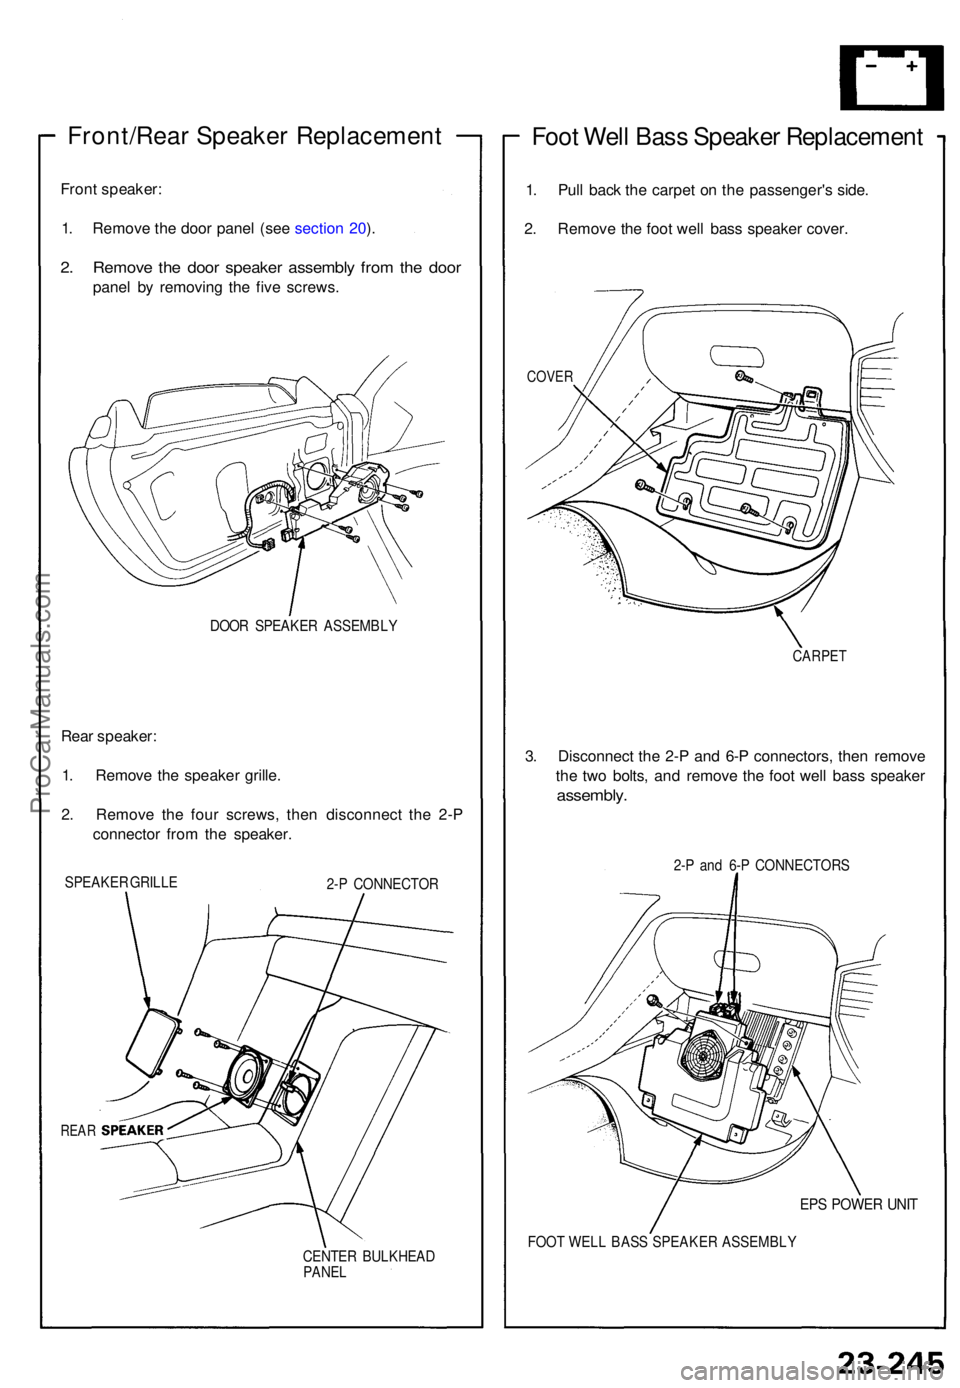
Front/Rear Speake r Replacemen t
Front speaker :
1 . Remov e th e doo r pane l (se e sectio n 20 ).
2 . Remov e th e doo r speake r assembl y fro m th e doo r
pane l b y removin g th e fiv e screws .
DOOR SPEAKE R ASSEMBL Y
Rear speaker :
1 . Remov e th e speake r grille .
2 . Remov e th e fou r screws , the n disconnec t th e 2- P
connecto r fro m th e speaker .
SPEAKE R GRILL E
2-P CONNECTO R
REAR
CENTE R BULKHEA DPANEL
Foot Wel l Bas s Speake r Replacemen t
1. Pul l bac k th e carpe t o n th e passenger' s side .
2 . Remov e th e foo t wel l bas s speake r cover .
COVE R
CARPE T
3. Disconnec t th e 2- P an d 6- P connectors , the n remov e
th e tw o bolts , an d remov e th e foo t wel l bas s speake r
assembly .
2-P an d 6- P CONNECTOR S
EPS POWE R UNI T
FOO T WEL L BAS S SPEAKE R ASSEMBL Y
ProCarManuals.com
Page 888 of 1640
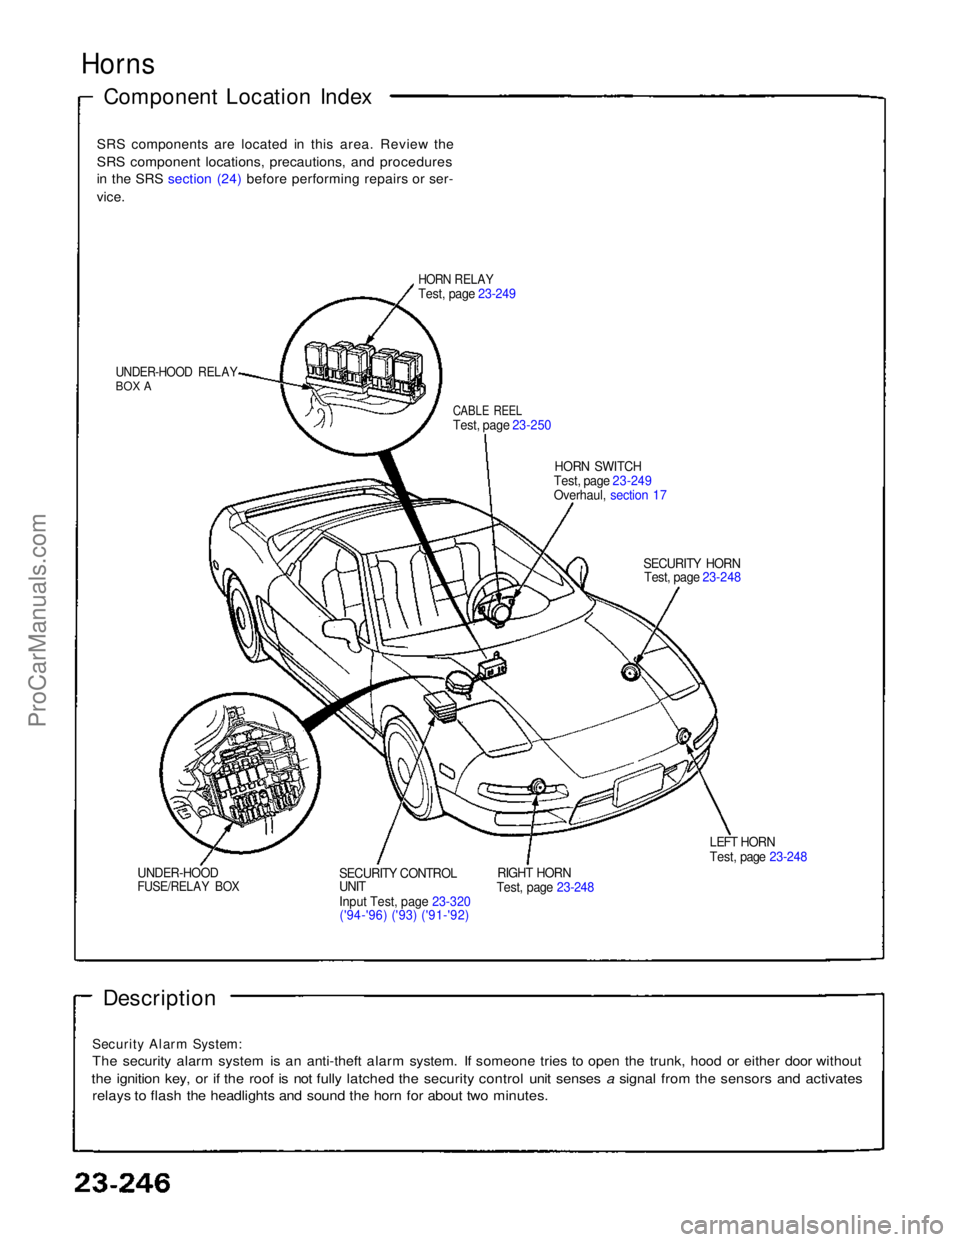
Horns
Component Location Index
SRS components are located in this area. Review the
SRS component locations, precautions, and procedures
in the SRS section (24) before performing repairs or ser-
vice.
HORN RELAY
Test, page 23-249
UNDER-HOOD RELAY
BOX A
CABLE REEL
Test, page 23-250
HORN SWITCH
Test, page 23-249
Overhaul, section 17
SECURITY HORNTest, page 23-248
LEFT HORN
Test, page 23-248
RIGHT HORN
Test, page 23-248
SECURITY CONTROL
UNIT
Inpu
t
Test, page 23-320
('94-'96) ('93) ('91-'92)
UNDER-HOOD
FUSE/RELAY BOX
Description
Security Alarm System:
The security alarm system is an anti-theft alarm system. If someone tries to open the trunk, hood or either door without
the ignition key, or if the roof is not fully latched the security control unit senses a signal from the sensors and activates
relays to flash the headlights and sound the horn for about two minutes.ProCarManuals.com
Page 889 of 1640
Horns
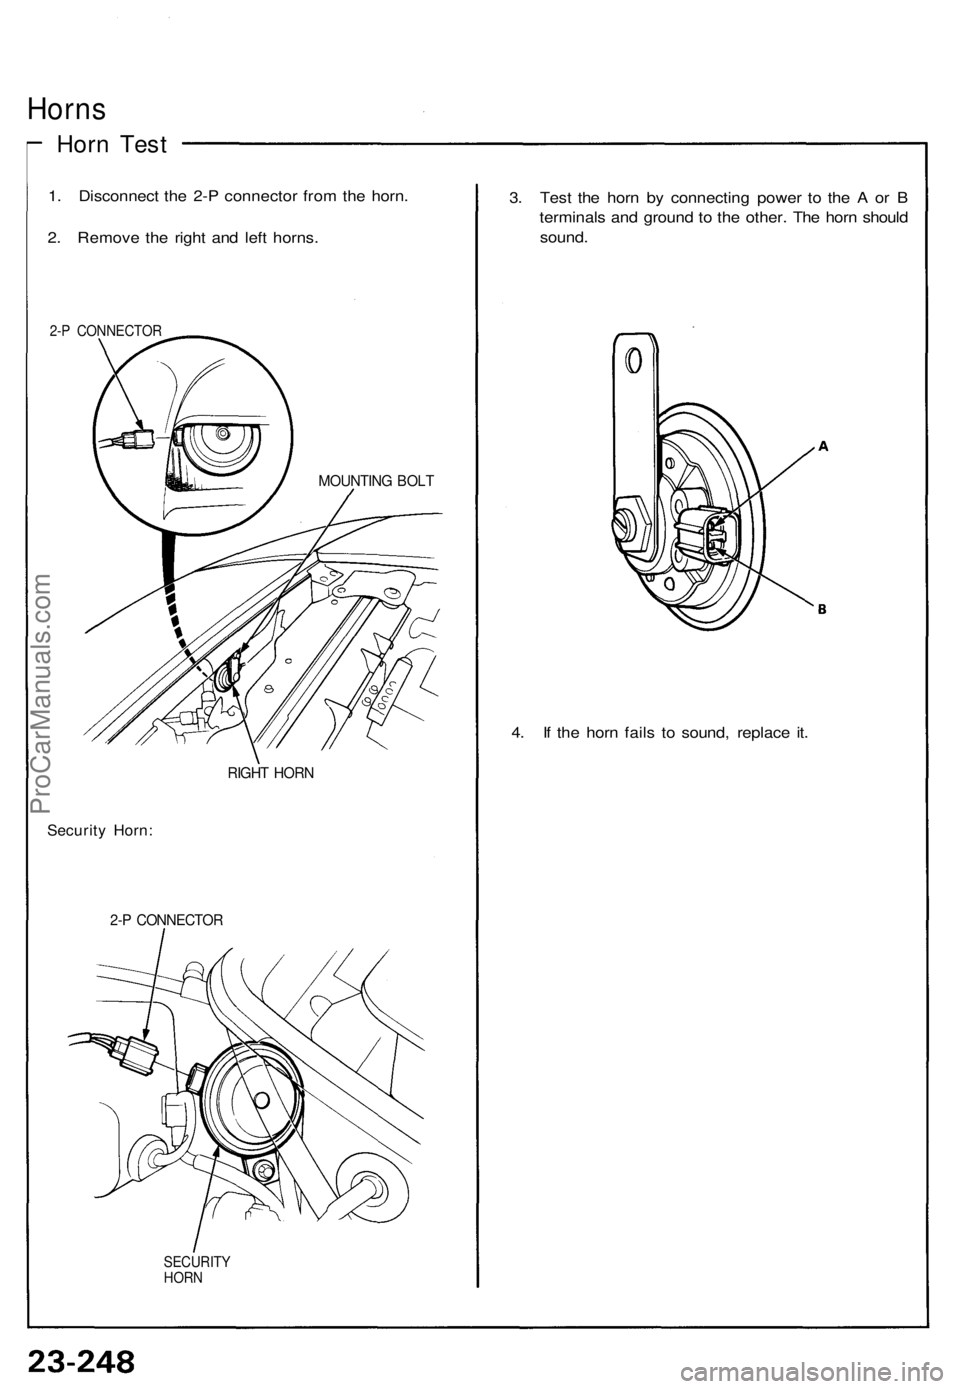
Horn Tes t
1. Disconnec t th e 2- P connecto r fro m th e horn .
2 . Remov e th e righ t an d lef t horns .
2-P CONNECTO R
RIGHT HOR N
Securit y Horn :
2-P CONNECTO R
SECURITY
HOR N
3. Tes t th e hor n b y connectin g powe r t o th e A or B
terminal s an d groun d t o th e other . Th e hor n shoul d
sound .
4 . I f th e hor n fail s t o sound , replac e it .
MOUNTIN G BOL T
ProCarManuals.com
Page 890 of 1640
Switch Tes t
SRS component s ar e locate d i n thi s area . Revie w th e
SR S componen t locations , precautions , an d procedure s
i n th e SR S (sectio n 24 ) befor e performin g repair s o r ser -
vice .
1 . Disconnec t th e batter y negativ e cable , the n discon -
nec t th e positiv e cable .
2 . Mak e sur e th e wheel s ar e turne d straigh t ahead .
3 . Remov e th e dashboar d lowe r cover .
4 . Instal l th e shor t connector s o n th e airba g an d seat -
bel t tensione r connector s (se e sectio n 24 ).
(cont'd )
ProCarManuals.com