ACURA NSX 1997 Service Repair Manual
Manufacturer: ACURA, Model Year: 1997, Model line: NSX, Model: ACURA NSX 1997Pages: 1503, PDF Size: 57.08 MB
Page 1431 of 1503
Wipers/Washers
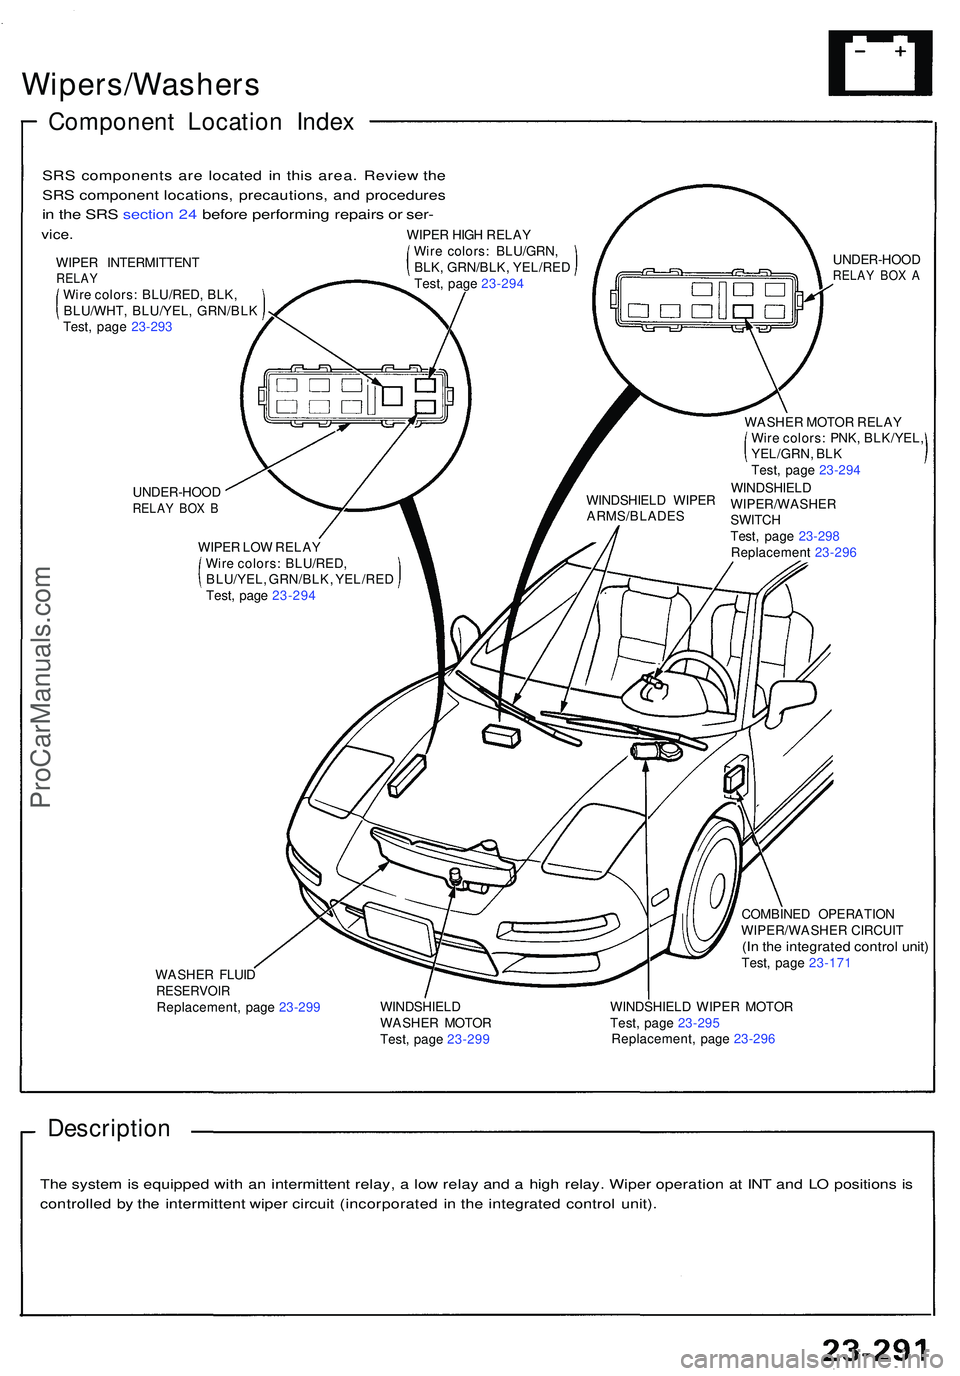
Component Locatio n Inde x
UNDER-HOO DRELAY BO X B
WIPE R LO W RELA Y
Wir e colors : BLU/RED ,
BLU/YEL , GRN/BLK , YEL/RE D
Test , pag e 23-29 4 WASHE
R MOTO R RELA Y
Wir e colors : PNK , BLK/YEL ,
YEL/GRN , BL K
Test , pag e 23-29 4
WINDSHIEL D
WIPER/WASHE R
SWITC H
Test , pag e 23-29 8
Replacemen t 23-29 6
WINDSHIEL
D WIPE R
ARMS/BLADE S UNDER-HOO
D
RELAY BO X A
WASHE R FLUI DRESERVOI RReplacement , pag e 23-29 9 COMBINE
D OPERATIO N
WIPER/WASHE R CIRCUI T
(In th e integrate d contro l unit )Test , pag e 23-17 1
WINDSHIEL D
WASHE R MOTO R
Test , pag e 23-29 9 WINDSHIEL
D WIPE R MOTO R
Test , pag e 23-29 5
Replacement , pag e 23-29 6
Descriptio n
The syste m is equippe d wit h a n intermitten t relay , a lo w rela y an d a hig h relay . Wipe r operatio n a t IN T an d L O position s i s
controlle d b y th e intermitten t wipe r circui t (incorporate d i n th e integrate d contro l unit) .
SR
S component s ar e locate d i n thi s area . Revie w th e
SR S componen t locations , precautions , an d procedure s
in th e SR S sectio n 24 befor e performin g repair s o r ser -
vice .
WIPE R INTERMITTEN TRELAYWire colors : BLU/RED , BLK ,
BLU/WHT , BLU/YEL , GRN/BL K
Test, pag e 23-29 3 WIPE
R HIG H RELA Y
Wir e colors : BLU/GRN ,
BLK , GRN/BLK , YEL/RE D
Test , pag e 23-29 4
ProCarManuals.com
Page 1432 of 1503
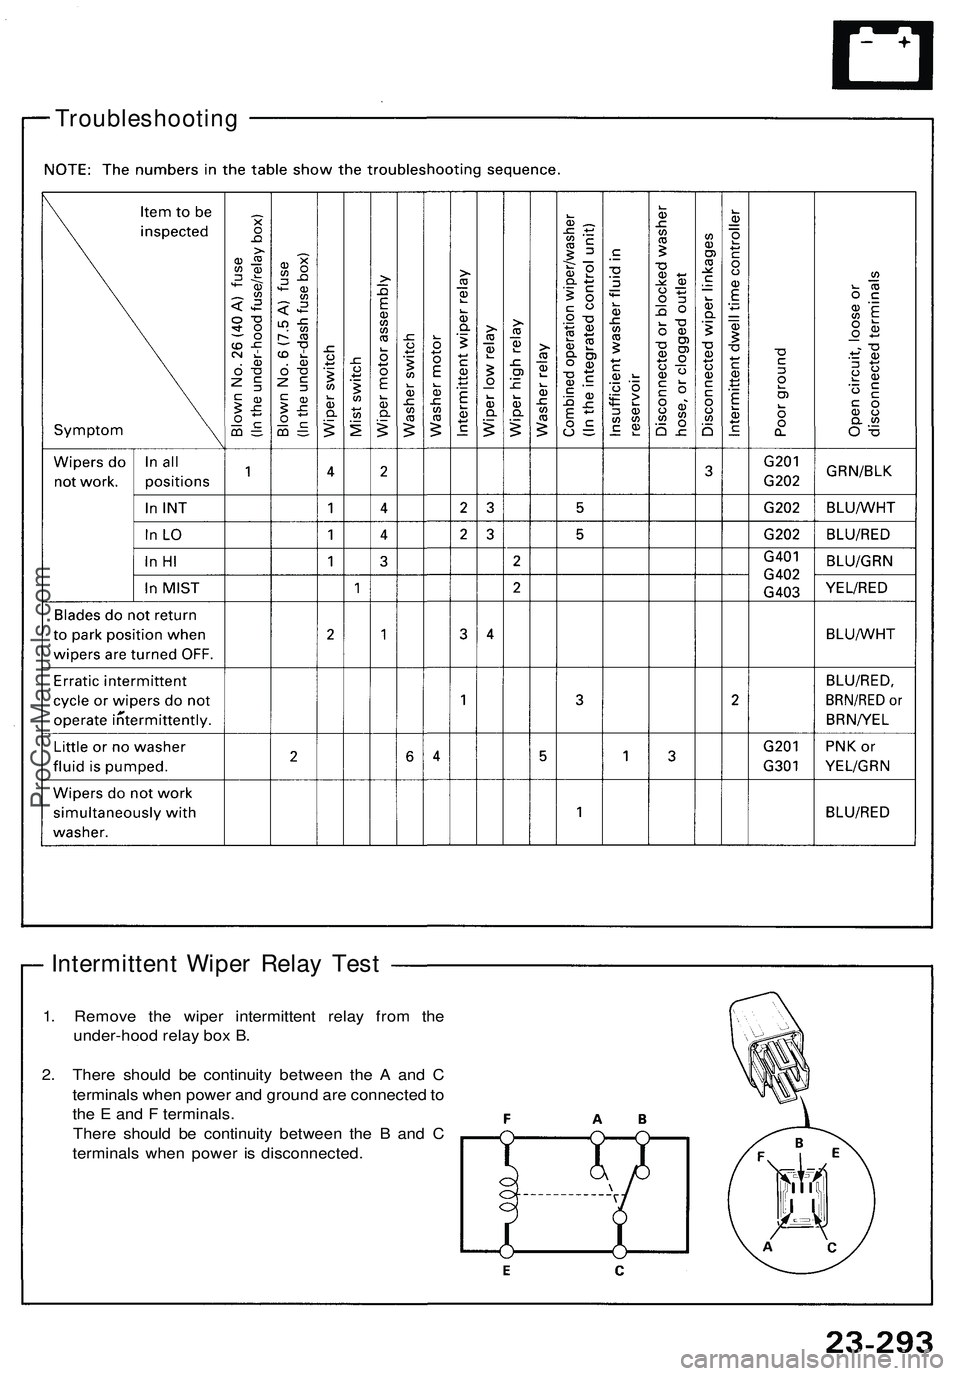
1. Remove the wiper intermittent relay from the
under-hood relay box B.
2. There should be continuity between the A and C
terminals when power and ground are connected to
the E and F terminals.
There should be continuity between the B and C
terminals when power is disconnected.
Troubleshooting
Intermittent Wiper Relay TestProCarManuals.com
Page 1433 of 1503
Wiper/Washer
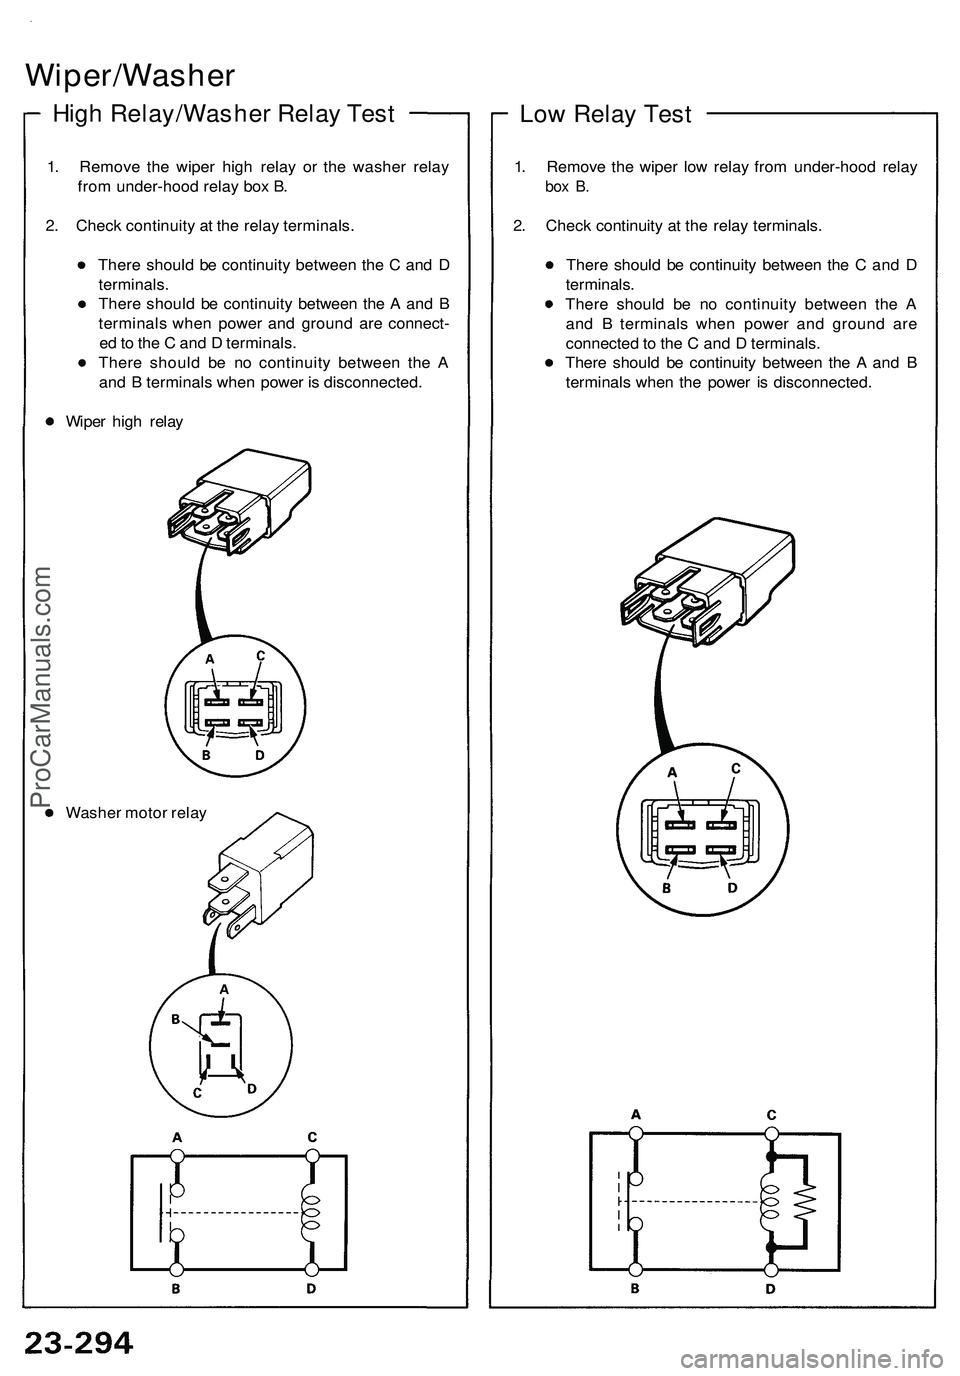
High Relay/Washer Relay Test
1. Remove the wiper high relay or the washer relay
from under-hood relay box B.
2. Check continuity at the relay terminals.
There should be continuity between the C and D
terminals.
There should be continuity between the A and B
terminals when power and ground are connect-
ed to the C and D terminals.
There should be no continuity between the A
and B terminals when power is disconnected.
Wiper high relay
Washer motor relay
Low Relay Test
1. Remove the wiper low relay from under-hood relay
box B.
2. Check continuity at the relay terminals.
There should be continuity between the C and D
terminals.
There should be no continuity between the A
and B terminals when power and ground are
connected to the C and D terminals.
There should be continuity between the A and B
terminals when the power is disconnected.ProCarManuals.com
Page 1434 of 1503
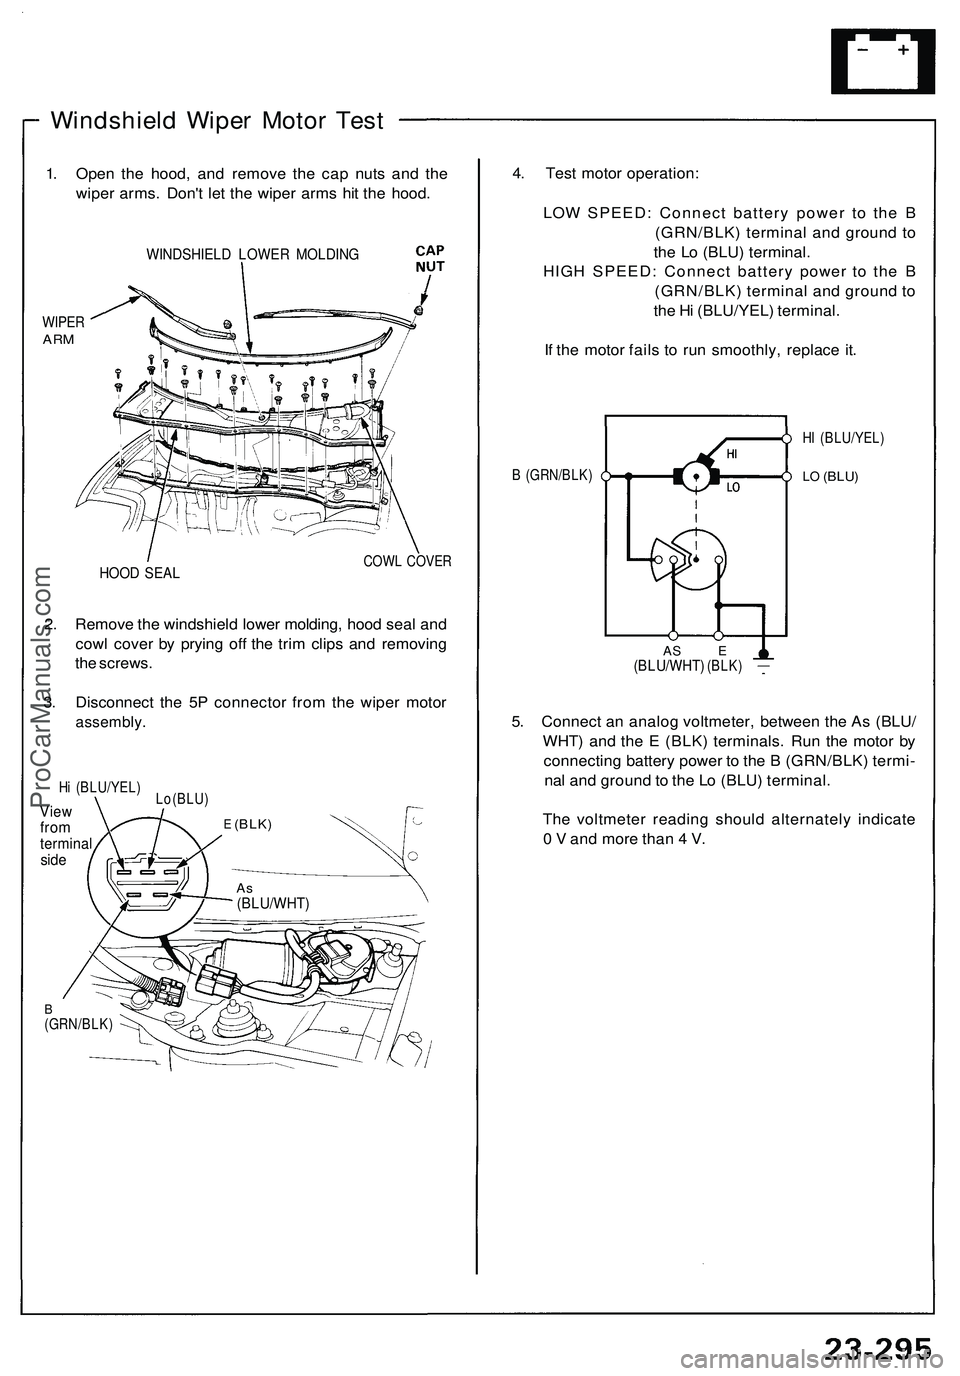
Windshield Wiper Motor Test
1. Open the hood, and remove the cap nuts and the
wiper arms. Don't let the wiper arms hit the hood.
WINDSHIELD LOWER MOLDING
WIPER
ARM
HOOD SEAL
COWL COVER
2. Remove the windshield lower molding, hood seal and
cowl cover by prying off the trim clips and removing
the screws.
3. Disconnect the 5P connector from the wiper motor
assembly.
Hi (BLU/YEL)
View
from
terminal
side
Lo(BLU)
B
(GRN/BLK)
4. Test motor operation:
LOW SPEED: Connect battery power to the B
(GRN/BLK) terminal and ground to
the Lo (BLU) terminal.
HIGH SPEED: Connect battery power to the B
(GRN/BLK) terminal and ground to
the Hi (BLU/YEL) terminal.
If the motor fails to run smoothly, replace it.
5. Connect an analog voltmeter, between the As (BLU/
WHT) and the E (BLK) terminals. Run the motor by
connecting battery power to the B (GRN/BLK) termi-
nal and ground to the Lo (BLU) terminal.
The voltmeter reading should alternately indicate
0 V and more than 4 V.
B (GRN/BLK)
HI (BLU/YEL)
LO
(BLU)
AS E
(BLU/WHT)
(BLK)
E
(BLK)
As
(BLU/WHT)ProCarManuals.com
Page 1435 of 1503
Wiper/Washer
Windshield Wipe r Moto r
Replacemen t
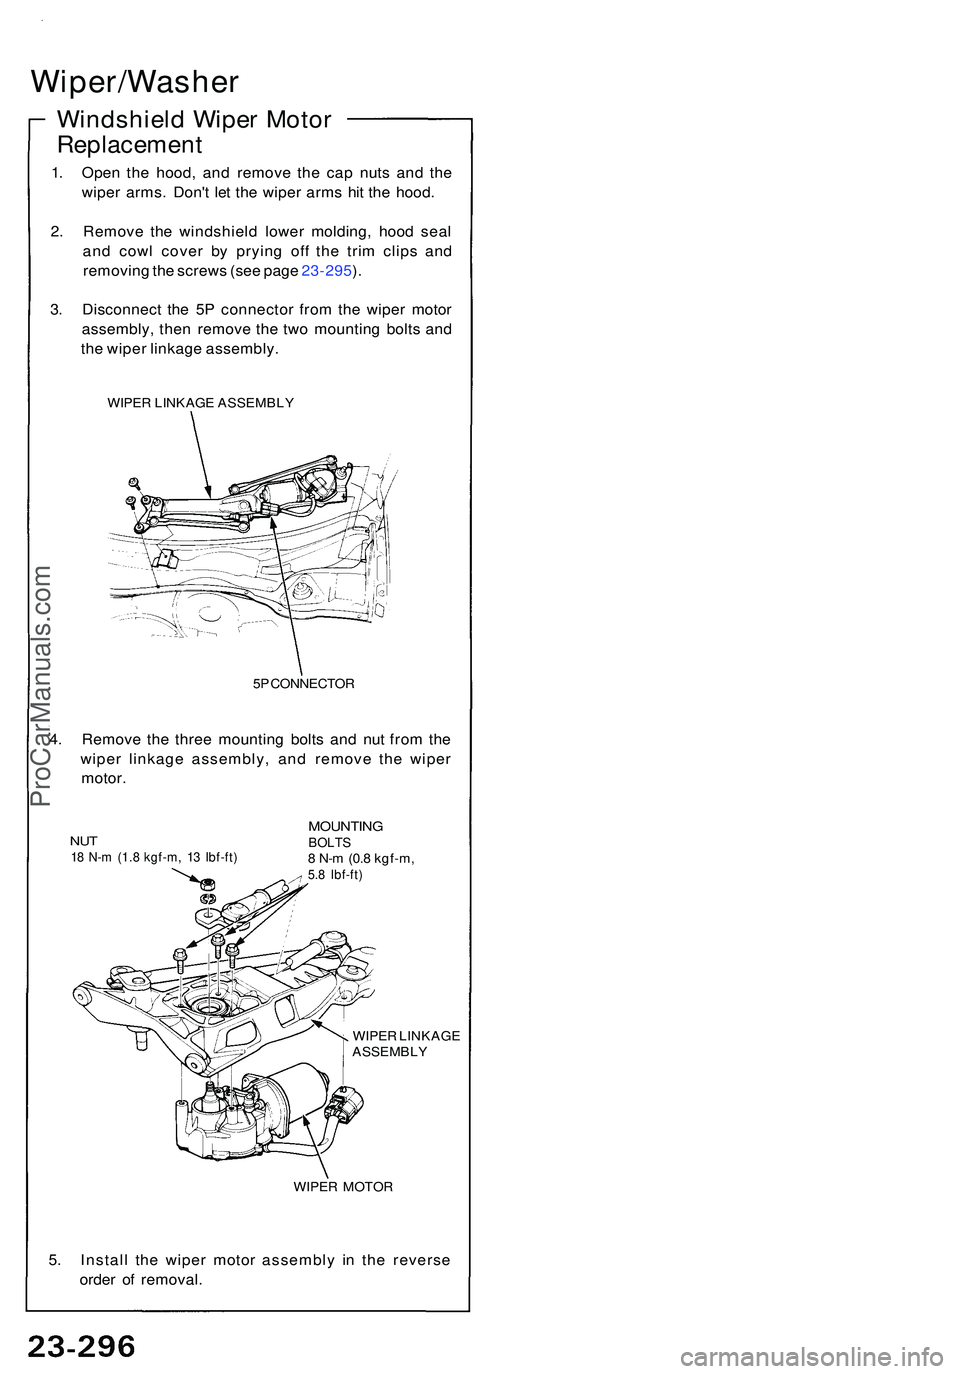
1. Ope n th e hood , an d remov e th e ca p nut s an d th e
wipe r arms . Don' t le t th e wipe r arm s hi t th e hood .
2 . Remov e th e windshiel d lowe r molding , hoo d sea l
an d cow l cove r b y pryin g of f th e tri m clip s an d
removin g th e screw s (se e pag e 23-295 ).
3 . Disconnec t th e 5 P connecto r fro m th e wipe r moto r
assembly , the n remov e th e tw o mountin g bolt s an d
th e wipe r linkag e assembly .
WIPER LINKAG E ASSEMBL Y
5 P CONNECTO R
4. Remov e th e thre e mountin g bolt s an d nu t fro m th e
wipe r linkag e assembly , an d remov e th e wipe r
motor .
NUT18 N- m (1. 8 kgf-m , 1 3 Ibf-ft )
MOUNTIN GBOLTS8 N- m (0. 8 kgf-m ,5.8 Ibf-ft )
WIPER LINKAG E
ASSEMBL Y
WIPE R MOTO R
5. Instal l th e wipe r moto r assembl y i n th e revers e
orde r o f removal .
ProCarManuals.com
Page 1436 of 1503
Windshield Wiper/Washe r Switc h
Replacemen t
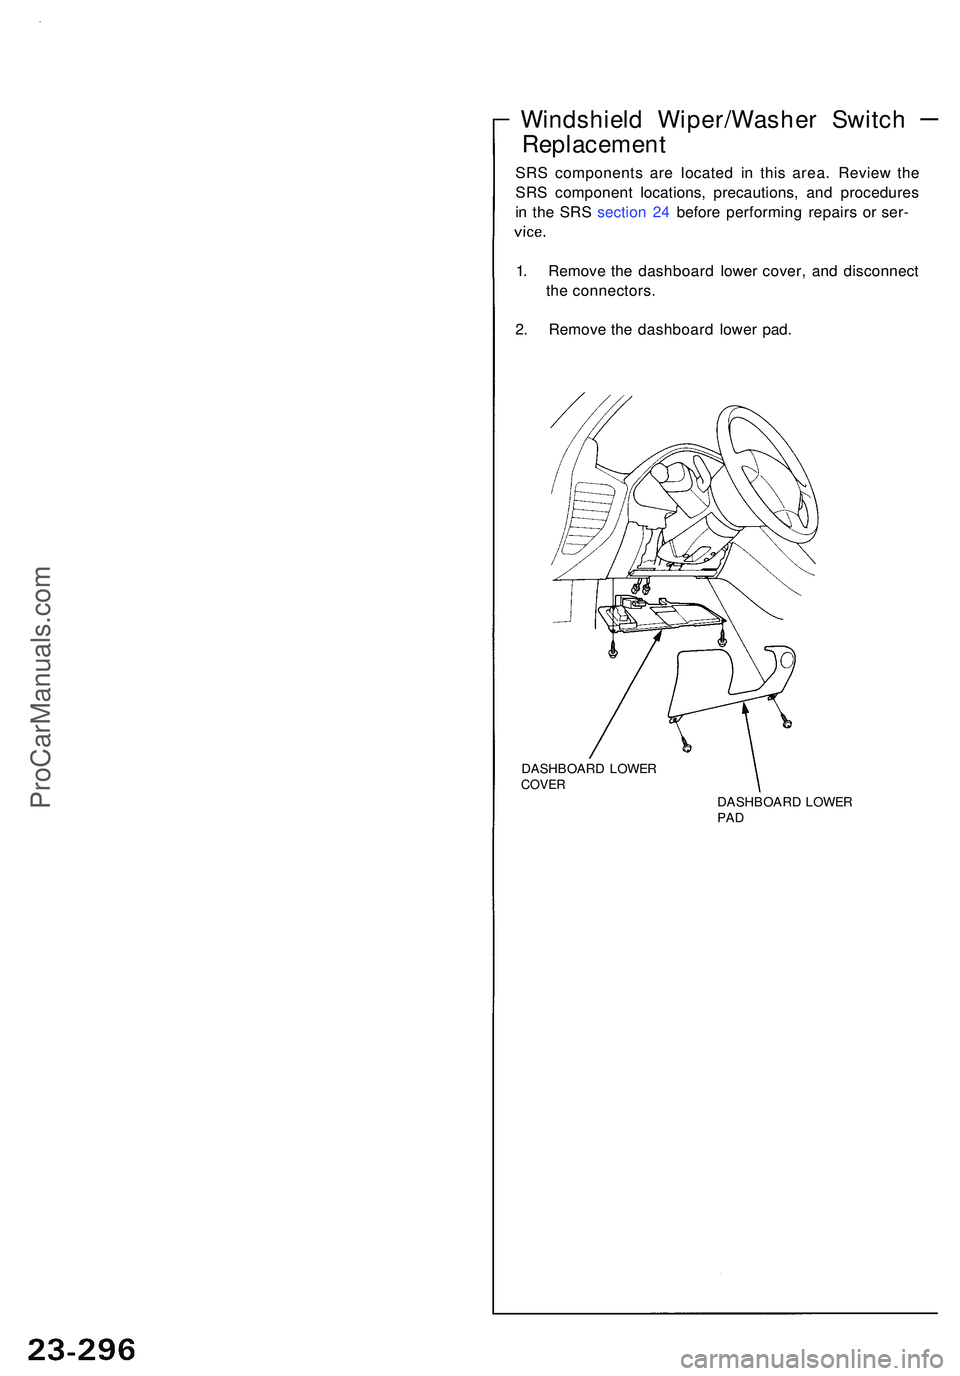
SRS component s ar e locate d i n thi s area . Revie w th e
SR S componen t locations , precautions , an d procedure s
i n th e SR S sectio n 24 befor e performin g repair s o r ser -
1 . Remov e th e dashboar d lowe r cover , an d disconnec t
th e connectors .
2 . Remov e th e dashboar d lowe r pad .
DASHBOAR D LOWE RCOVERDASHBOAR D LOWE RPAD
ProCarManuals.com
Page 1437 of 1503
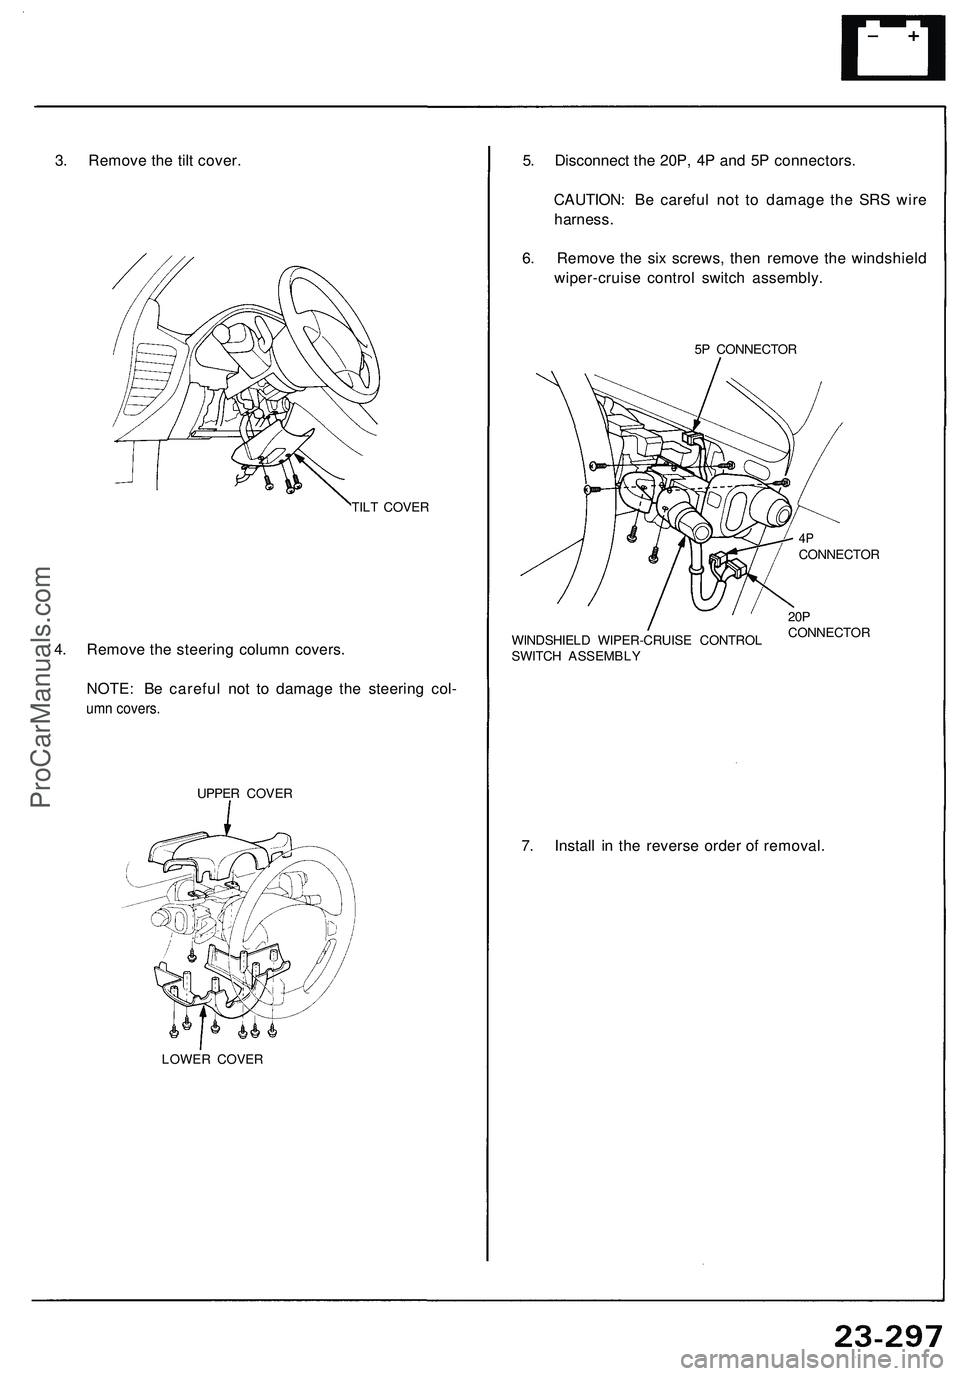
3. Remov e th e til t cover .
TILT COVE R
4. Remov e th e steerin g colum n covers .
NOTE : B e carefu l no t t o damag e th e steerin g col -
umn covers.
UPPE R COVE R
LOWE R COVE R
5. Disconnec t th e 20P , 4 P an d 5 P connectors .
CAUTION : B e carefu l no t t o damag e th e SR S wir e
harness .
6 . Remov e th e si x screws , the n remov e th e windshiel d
wiper-cruis e contro l switc h assembly .
5P CONNECTO R
WINDSHIEL D WIPER-CRUIS E CONTRO L
SWITC H ASSEMBL Y
4PCONNECTO R
20PCONNECTO R
7. Instal l i n th e revers e orde r o f removal .
ProCarManuals.com
Page 1438 of 1503
Wiper/Washer
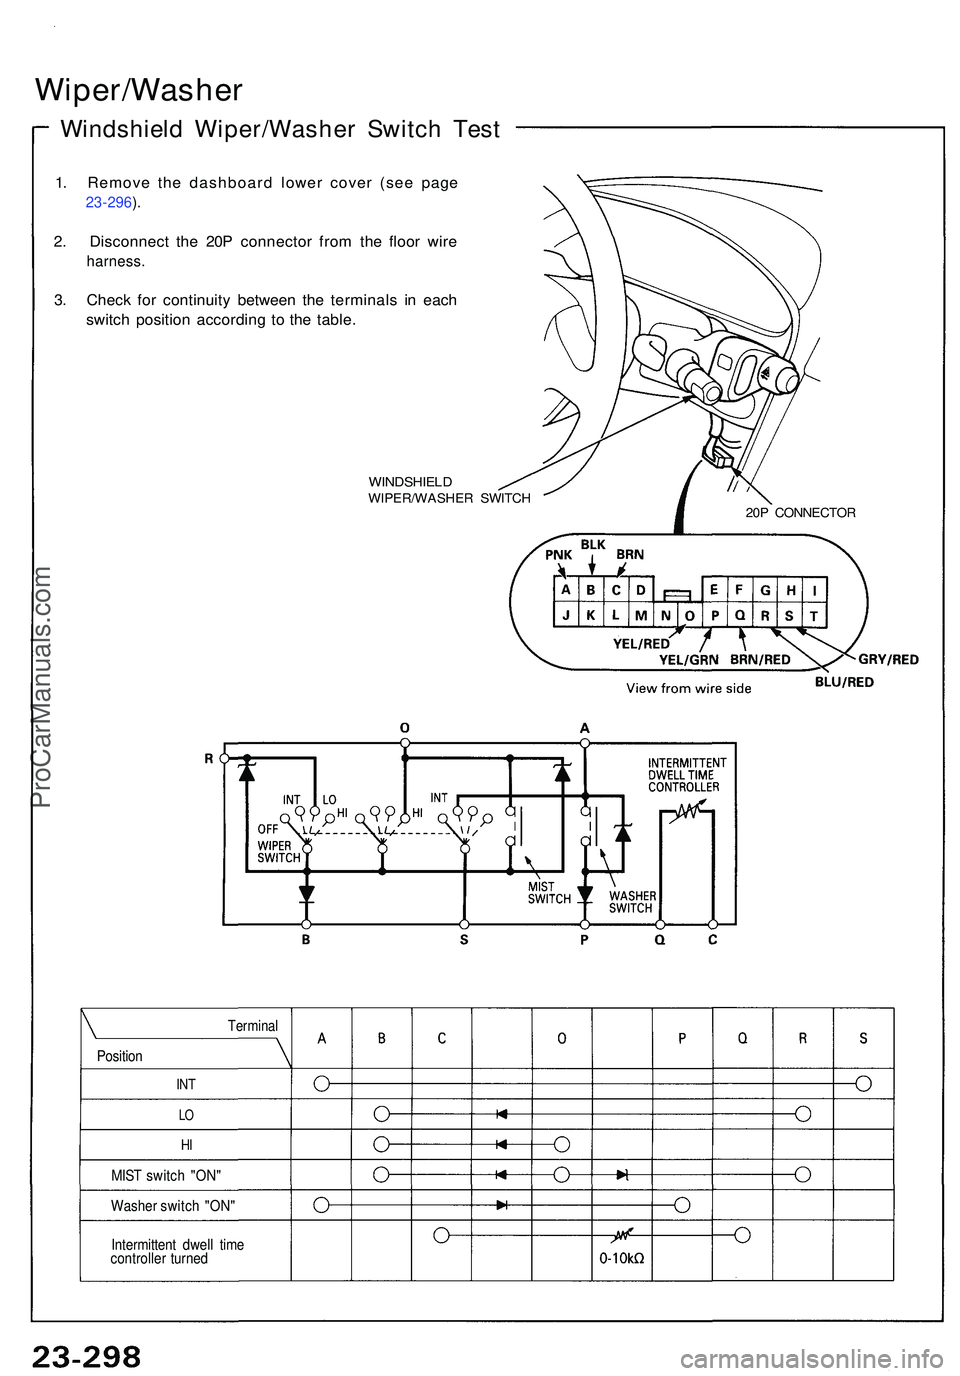
Windshield Wiper/Washe r Switc h Tes t
1. Remov e th e dashboar d lowe r cove r (se e pag e
23-296 ).
2 . Disconnec t th e 20 P connecto r fro m th e floo r wir e
harness .
3. Chec k fo r continuit y betwee n th e terminal s i n eac h
switc h positio n accordin g t o th e table .
WINDSHIEL DWIPER/WASHE R SWITC H
20P CONNECTO R
Intermittent dwel l tim e
controlle r turne d
Positio n
Termina l
INT
LO
H I
MIS T switc h "ON "
Washe r switc h "ON "
ProCarManuals.com
Page 1439 of 1503
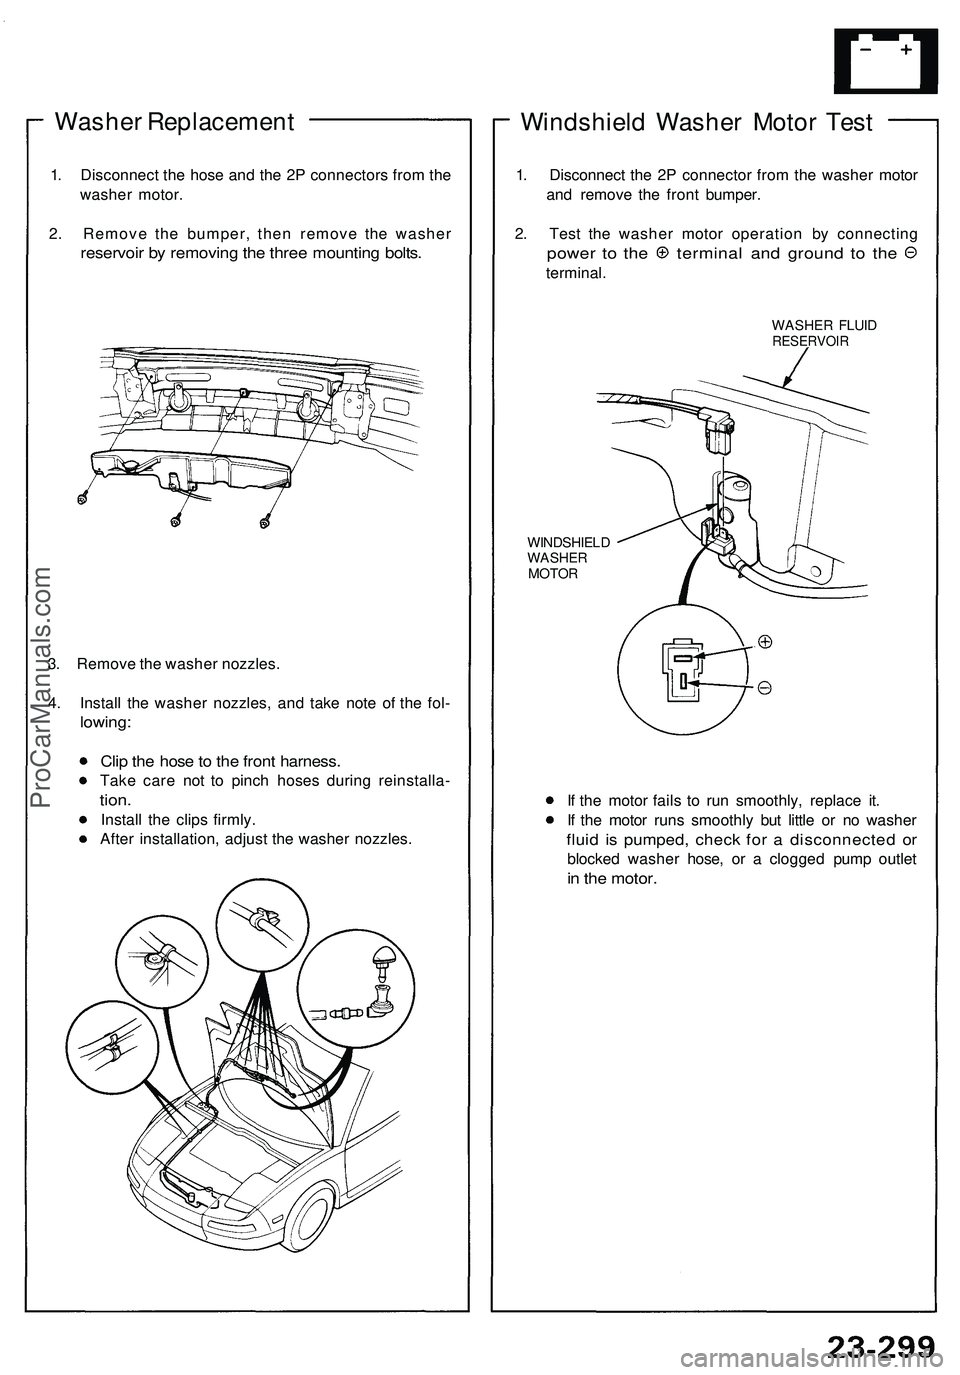
Washer Replacement
1. Disconnect the hose and the 2P connectors from the
washer motor.
2. Remove the bumper, then remove the washer
reservoir by removing the three mounting bolts.
3. Remove the washer nozzles.
4. Install the washer nozzles, and take note of the fol-
lowing:
Clip the hose to the front harness.
Take care not to pinch hoses during reinstalla-
tion.
Install the clips firmly.
After installation, adjust the washer nozzles.
Windshield Washer Motor Test
1. Disconnect the 2P connector from the washer motor
and remove the front bumper.
2. Test the washer motor operation by connecting
power to the terminal and ground to the
terminal.
WASHER FLUID
RESERVOIR
WINDSHIELD
WASHER
MOTOR
If the motor fails to run smoothly, replace it.
If the motor runs smoothly but little or no washer
fluid is pumped, check for a disconnected or
blocked washer hose, or a clogged pump outlet
in the motor.ProCarManuals.com
Page 1440 of 1503
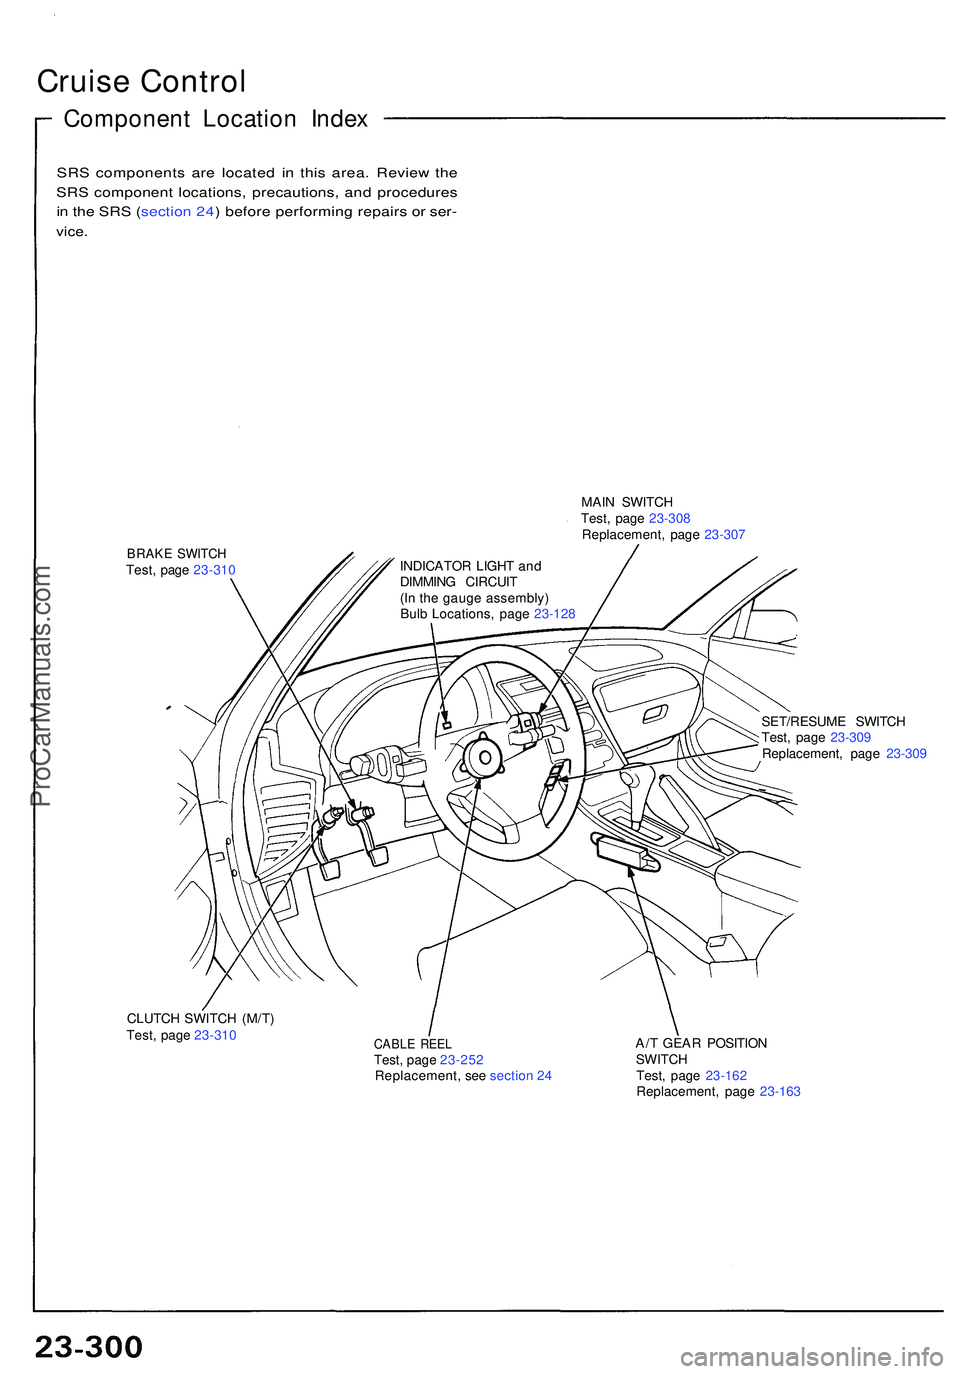
Cruise Contro l
Componen t Locatio n Inde x
SRS component s ar e locate d i n thi s area . Revie w th e
SR S componen t locations , precautions , an d procedure s
i n th e SR S (sectio n 24 ) befor e performin g repair s o r ser -
vice .
MAIN SWITC H
Test , pag e 23-30 8
Replacement , pag e 23-30 7
BRAK E SWITC HTest, pag e 23-31 0
SET/RESUME SWITC H
Test , pag e 23-30 9
Replacement , pag e 23-30 9
CLUTC H SWITC H (M/T )
Test , pag e 23-31 0
CABL E REE LTest, pag e 23-25 2
Replacement , se e sectio n 2 4 A/
T GEA R POSITIO N
SWITC H
Test , page 23-162Replacement , pag e 23-16 3
INDICATO
R LIGH T an d
DIMMIN G CIRCUI T
(I n th e gaug e assembly )
Bul b Locations , pag e 23-12 8
ProCarManuals.com