engine ACURA RL KA9 1996 Service Repair Manual
[x] Cancel search | Manufacturer: ACURA, Model Year: 1996, Model line: RL KA9, Model: ACURA RL KA9 1996Pages: 1954, PDF Size: 61.44 MB
Page 802 of 1954
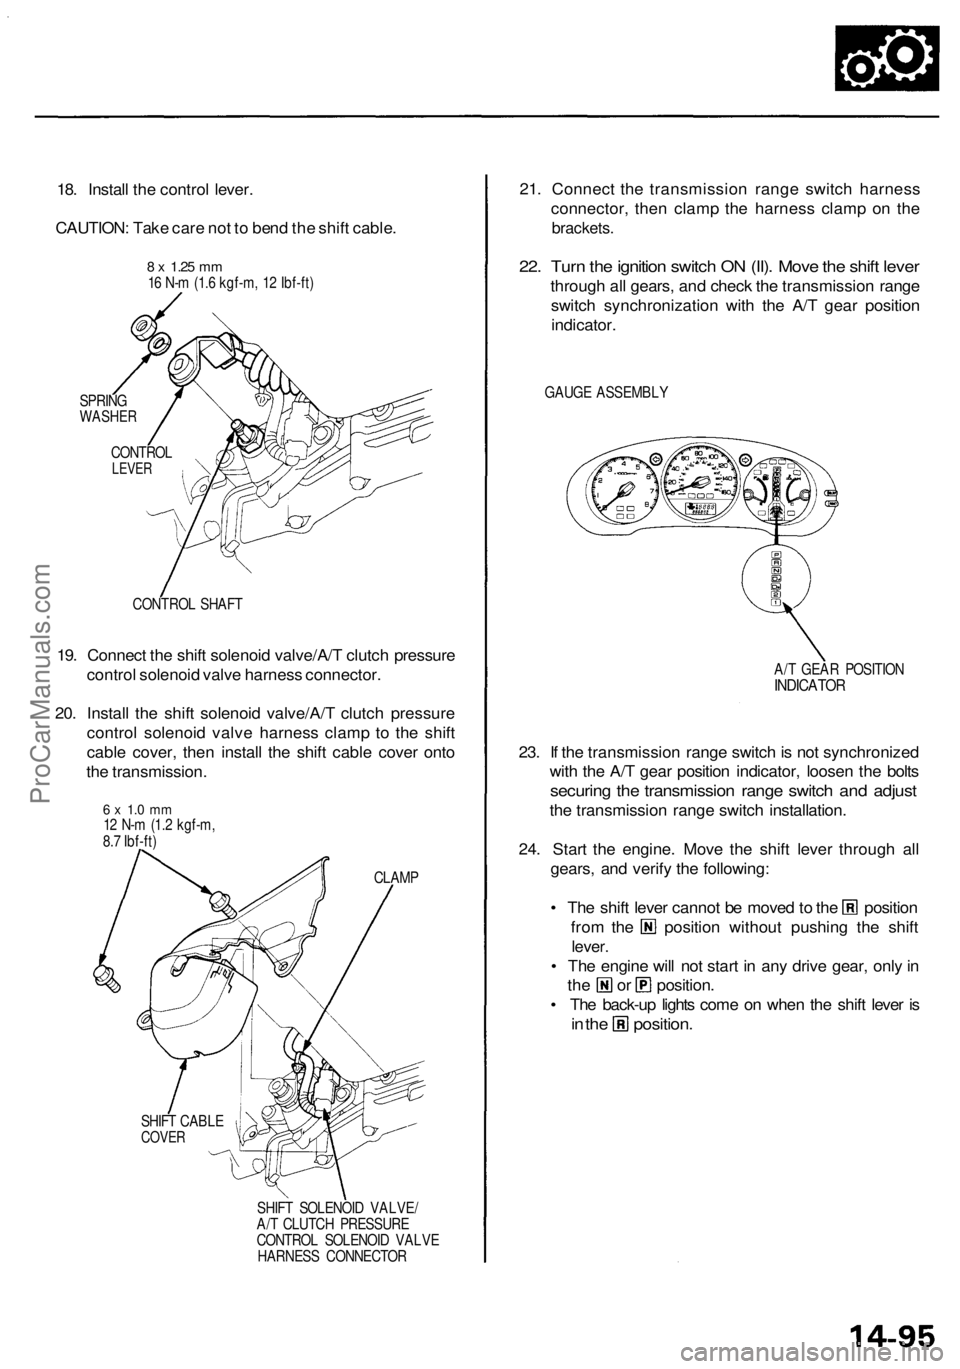
18. Install the control lever.
CAUTION: Take care not to bend the shift cable.
SPRING
WASHER
CONTROL SHAFT
19. Connect the shift solenoid valve/A/T clutch pressure
control solenoid valve harness connector.
20. Install the shift solenoid valve/A/T clutch pressure
control solenoid valve harness clamp to the shift
cable cover, then install the shift cable cover onto
the transmission.
CLAMP
SHIFT CABLE
COVER
SHIFT SOLENOID VALVE/
A/T CLUTCH PRESSURE
CONTROL SOLENOID VALVE
HARNESS CONNECTOR
21. Connect the transmission range switch harness
connector, then clamp the harness clamp on the
brackets.
22. Turn the ignition switch ON (II). Move the shift lever
through all gears, and check the transmission range
switch synchronization with the A/T gear position
indicator.
GAUGE ASSEMBLY
A/T GEAR POSITION
INDICATOR
23. If the transmission range switch is not synchronized
with the A/T gear position indicator, loosen the bolts
securing the transmission range switch and adjust
the transmission range switch installation.
24. Start the engine. Move the shift lever through all
gears, and verify the following:
• The shift lever cannot be moved to the position
from the position without pushing the shift
lever.
• The engine will not start in any drive gear, only in
the or position.
• The back-up lights come on when the shift lever is
in the position.
8 x
1.25
mm
16 N-m (1.6 kgf-m, 12 Ibf-ft)
CONTROL
LEVER
6 x 1.0 mm
12 N-m (1.2 kgf-m,
8.7 Ibf-ft)ProCarManuals.com
Page 811 of 1954
Road Tes t
NOTE : War m u p th e engin e to norma l operatin g temperatur e (th e radiato r fa n come s on) .
1. Appl y parkin g brak e an d bloc k th e wheels . Star t th e engine , the n shif t t o positio n whil e pressin g th e brak e pedal .
Pres s th e accelerato r peda l an d releas e it suddenly . Th e engin e shoul d no t stall .
2. Repea t th e sam e tes t i n position .
3. Test-driv e th e vehicl e o n th e fla t roa d in position . Chec k tha t th e shif t point s occu r a t th e approximat e speed s
shown o n th e nex t page . Als o chec k fo r abnorma l nois e an d clutc h slippage .
NOTE : Throttl e positio n senso r voltag e represent s th e throttl e opening .
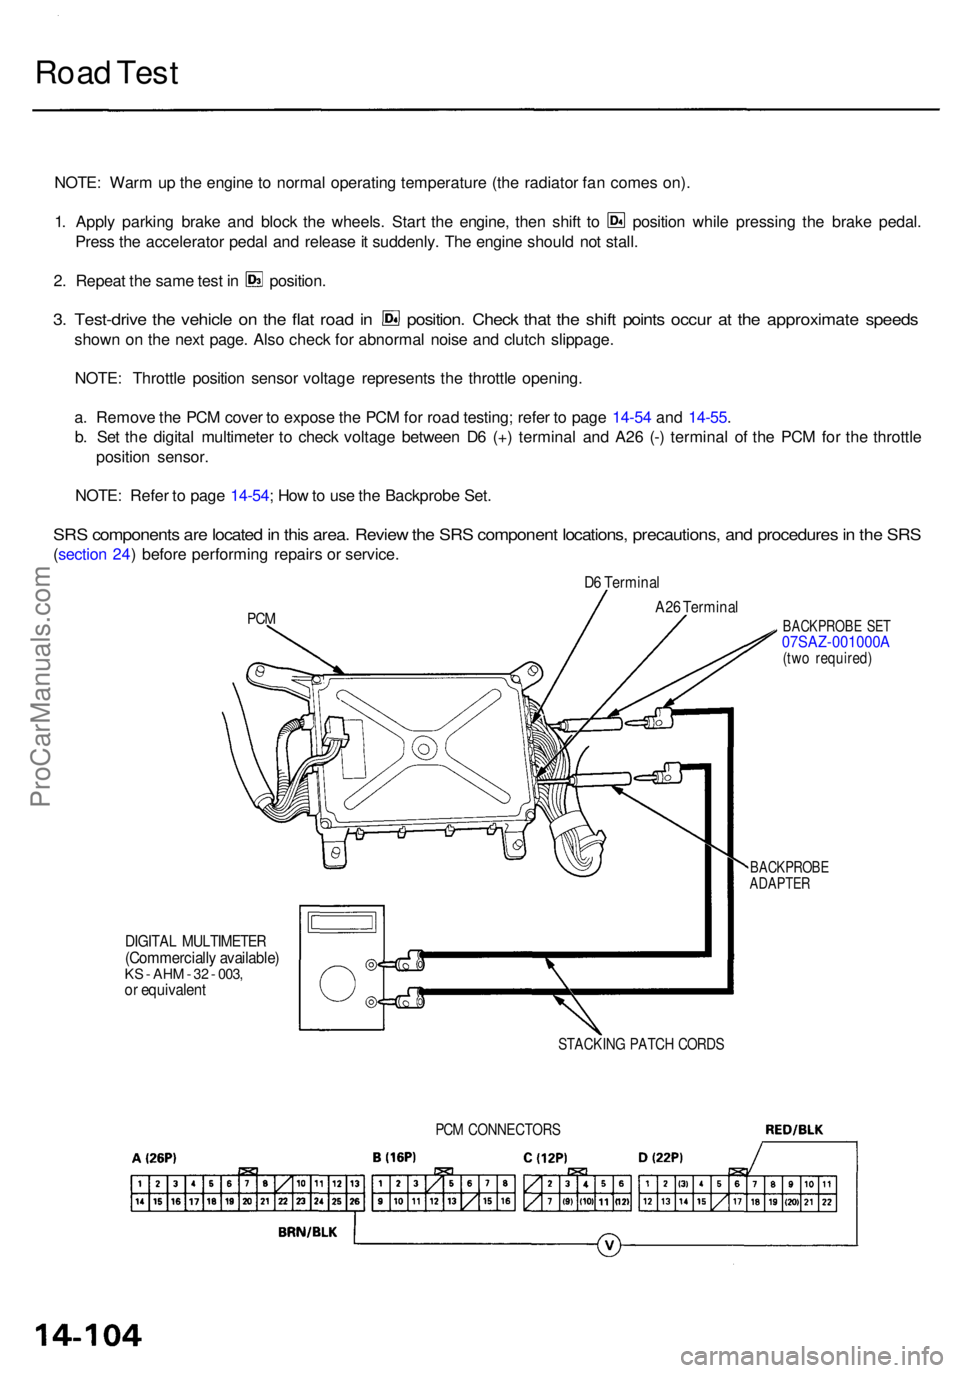
a . Remov e th e PC M cove r t o expos e th e PC M fo r roa d testing ; refe r t o pag e 14-5 4 an d 14-55 .
b . Se t th e digita l multimete r t o chec k voltag e betwee n D 6 (+ ) termina l an d A2 6 (- ) termina l o f th e PC M fo r th e throttl e
positio n sensor .
NOTE : Refe r t o pag e 14-54 ; Ho w to us e th e Backprob e Set .
SRS component s ar e locate d in thi s area . Revie w th e SR S componen t locations , precautions , an d procedure s in th e SR S
(sectio n 24 ) befor e performin g repair s o r service .
PCM
D6 Termina l
DIGITAL MULTIMETE R(Commercially available )KS - AH M - 3 2 - 003 ,or equivalen t
BACKPROB E SE T07SAZ-001000A(two required )
BACKPROB EADAPTER
STACKIN G PATC H CORD S
A26 Termina l
PCM CONNECTOR S
ProCarManuals.com
Page 813 of 1954
Road Tes t
(cont'd )
4. Accelerat e to abou t 3 5 mp h (5 7 km/h ) s o th e transmissio n is i n 4th , the n shif t fro m positio n t o position . Th e vehi -
cl e shoul d immediatel y begi n slowin g dow n fro m engine braking .
CAUTION : D o no t shif t fro m o r positio n to o r positio n a t speed s ove r 6 3 mp h (10 0 km/h) ; yo u ma y dam -
ag e th e transmission .
5 . Chec k fo r abnorma l nois e an d clutc h slippag e in th e followin g positions .
(1st Gear ) Positio n
a . Accelerat e fro m a sto p a t ful l throttle . Chec k tha t ther e is n o abnorma l nois e o r clutc h slippage ,
b . Upshift s shoul d no t occu r wit h th e shif t leve r i n thi s position .
(2nd Gear ) Positio n
a . Accelerat e fro m a sto p a t ful l throttle . Chec k tha t ther e is n o abnorma l nois e o r clutc h slippage ,
b . Upshift s an d downshift s shoul d no t occu r wit h th e shif t leve r i n thi s position .
(Reverse ) Positio n
Accelerat e fro m a sto p a t ful l throttle , an d chec k fo r abnorma l nois e an d clutc h slippage .
6. Tes t i n (Park ) Positio n
Park th e vehicl e o n slop e (approx . 16°) , appl y th e parkin g brake , an d shif t int o position . Releas e th e brake ; th e vehi -
cl e shoul d no t move .
ProCarManuals.com
Page 814 of 1954
Stall Speed
Test
CAUTION:
• To prevent transmission damage, do not test stall speed for more than 10 seconds at a time.
• Do not shift the lever while raising the engine speed.
• Be sure to remove the pressure gauge before testing stall speed.
1. Engage the parking brake, and block the front wheels.
2. Connect a tachometer to the engine, and start the engine.
3. Make sure the A/C switch is OFF.
4. After the engine has warmed up to normal operating temperature (the radiator fan comes on), shift into position.
5. Fully press the brake pedal and accelerator for 6 to 8 seconds, and note engine speed.
6. Allow two minutes for cooling, then repeat the test in and positions.
NOTE:
• Stall speed tests should be used for diagnostic purposes only.
• Stall speed should be the same in and positions.
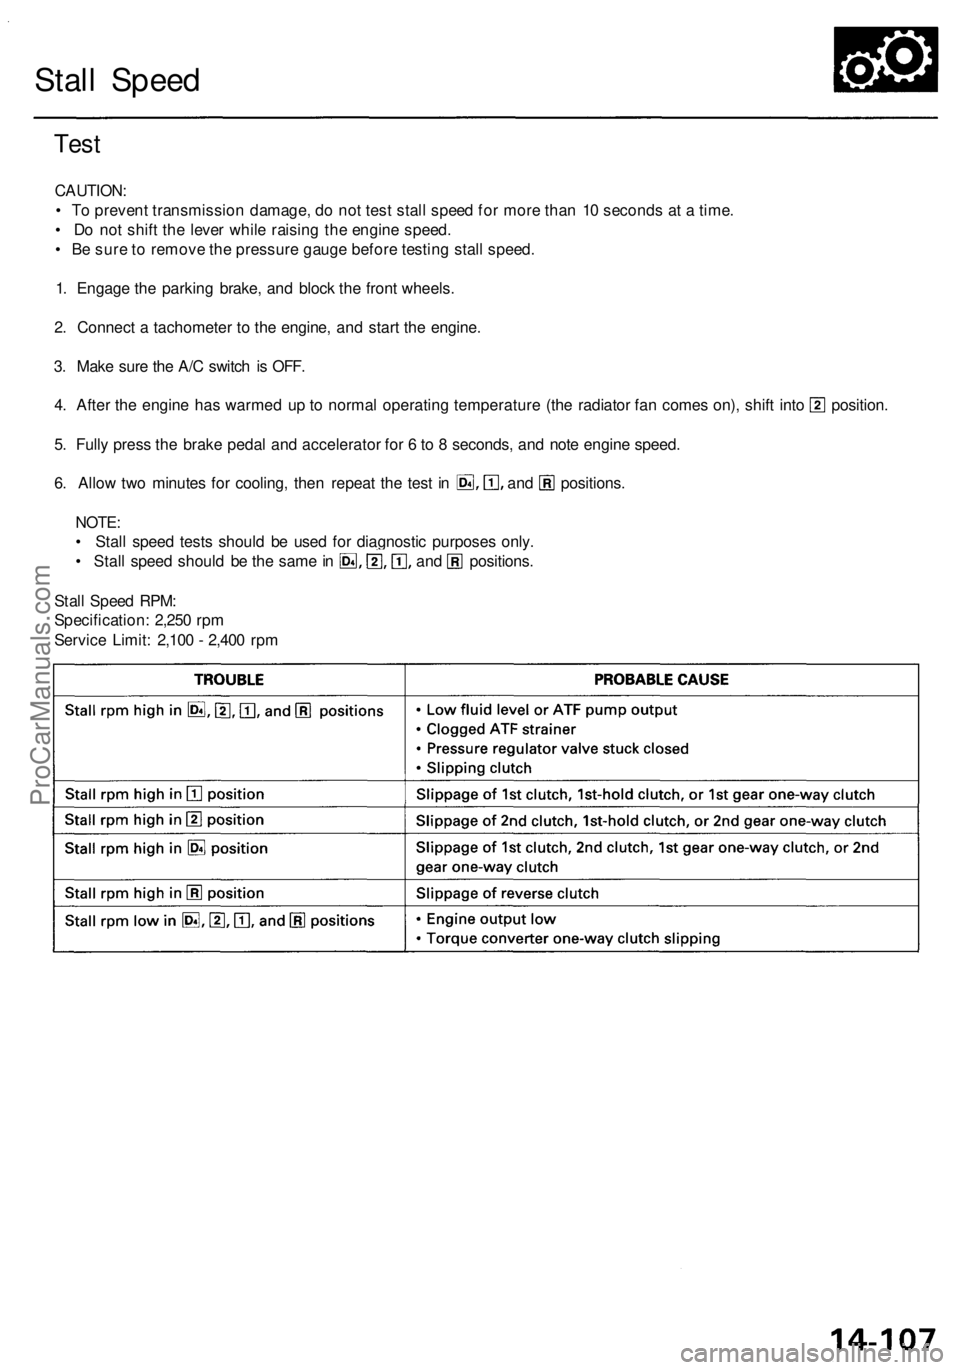
Stall Speed RPM:
Specification: 2,250 rpm
Service Limit: 2,100 - 2,400 rpmProCarManuals.com
Page 815 of 1954
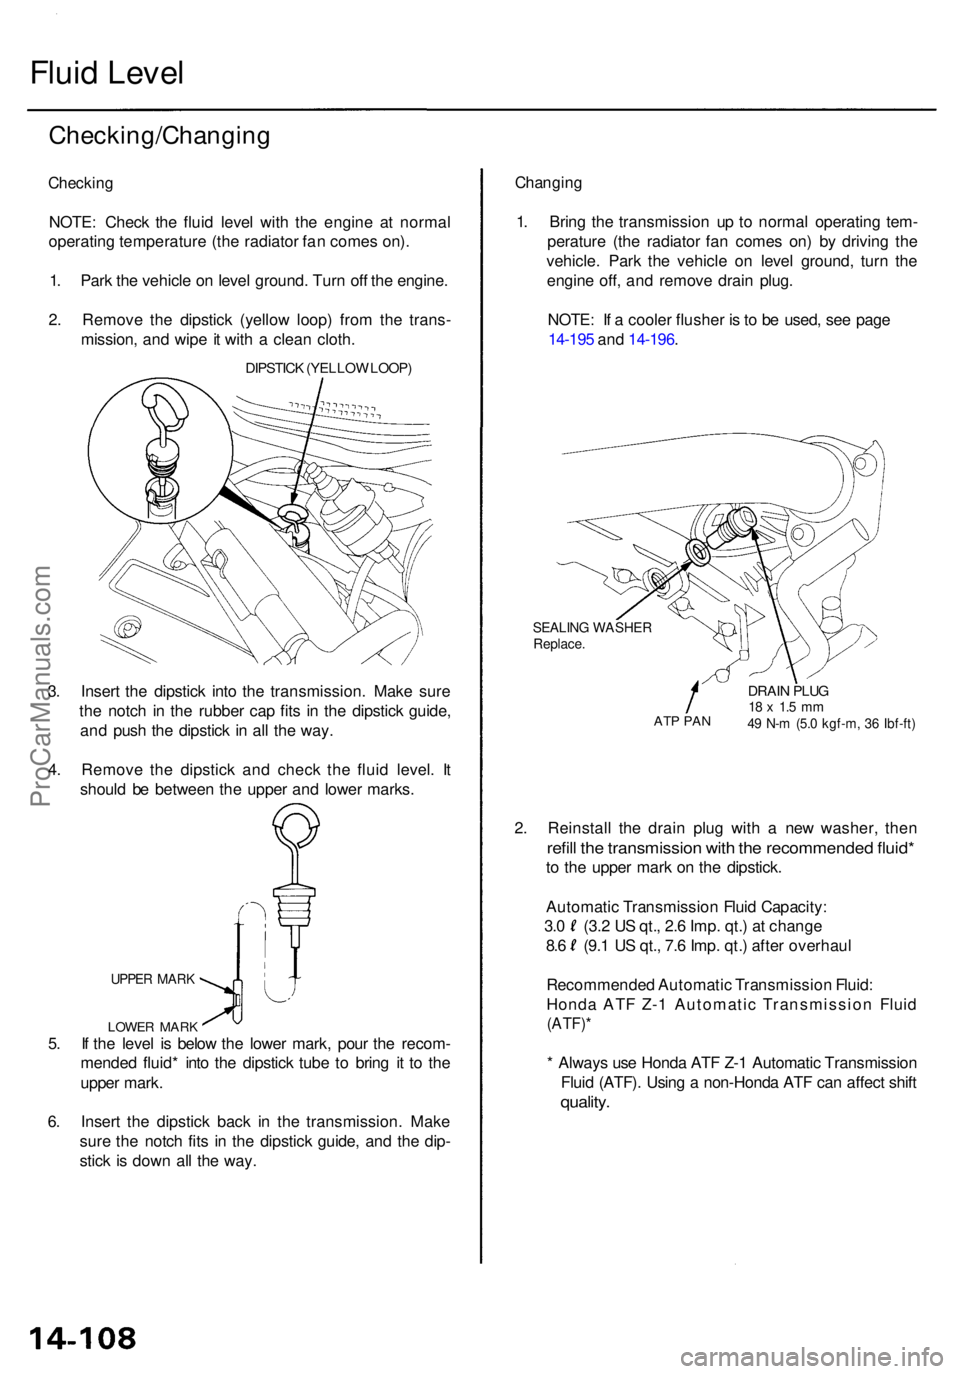
Fluid Leve l
Checking/Changin g
Checking
NOTE: Chec k th e flui d leve l wit h th e engin e a t norma l
operatin g temperatur e (th e radiato r fa n come s on) .
1 . Par k th e vehicl e o n leve l ground . Tur n of f th e engine .
2 . Remov e th e dipstic k (yello w loop ) fro m th e trans -
mission , an d wip e it wit h a clea n cloth .
DIPSTIC K (YELLO W LOOP )
3. Inser t th e dipstic k int o th e transmission . Mak e sur e
th e notc h i n th e rubbe r ca p fit s i n th e dipstic k guide ,
an d pus h th e dipstic k i n al l th e way .
4 . Remov e th e dipstic k an d chec k th e flui d level . I t
shoul d b e betwee n th e uppe r an d lowe r marks .
UPPER MAR K
5. I f th e leve l i s belo w th e lowe r mark , pou r th e recom -
mende d fluid * int o th e dipstic k tub e t o brin g i t t o th e
uppe r mark .
6 . Inser t th e dipstic k bac k i n th e transmission . Mak e
sur e th e notc h fit s i n th e dipstic k guide , an d th e dip -
stic k i s dow n al l th e way .
Changin g
1. Brin g th e transmissio n u p t o norma l operatin g tem -
peratur e (th e radiato r fa n come s on ) b y drivin g th e
vehicle . Par k th e vehicl e o n leve l ground , tur n th e
engin e off , an d remov e drai n plug .
NOTE : I f a coole r flushe r i s to b e used , se e pag e
14-19 5 an d 14-196 .
SEALIN G WASHE RReplace.
ATP PA N
DRAI N PLU G18 x 1. 5 m m49 N- m (5. 0 kgf-m , 3 6 Ibf-ft )
2. Reinstal l th e drai n plu g wit h a ne w washer , the n
refill th e transmissio n wit h th e recommende d fluid *
to th e uppe r mar k o n th e dipstick .
Automati c Transmissio n Flui d Capacity :
3.0 (3. 2 U S qt. , 2. 6 Imp . qt. ) a t chang e
8.6 (9. 1 U S qt. , 7. 6 Imp . qt. ) afte r overhau l
Recommende d Automati c Transmissio n Fluid :
Hond a AT F Z- 1 Automati c Transmissio n Flui d
(ATF) *
* Alway s us e Hond a AT F Z- 1 Automati c Transmissio n
Flui d (ATF) . Usin g a non-Hond a AT F ca n affec t shif t
quality .
LOWE R MAR K
ProCarManuals.com
Page 817 of 1954
Pressure Testing
(cont'd)
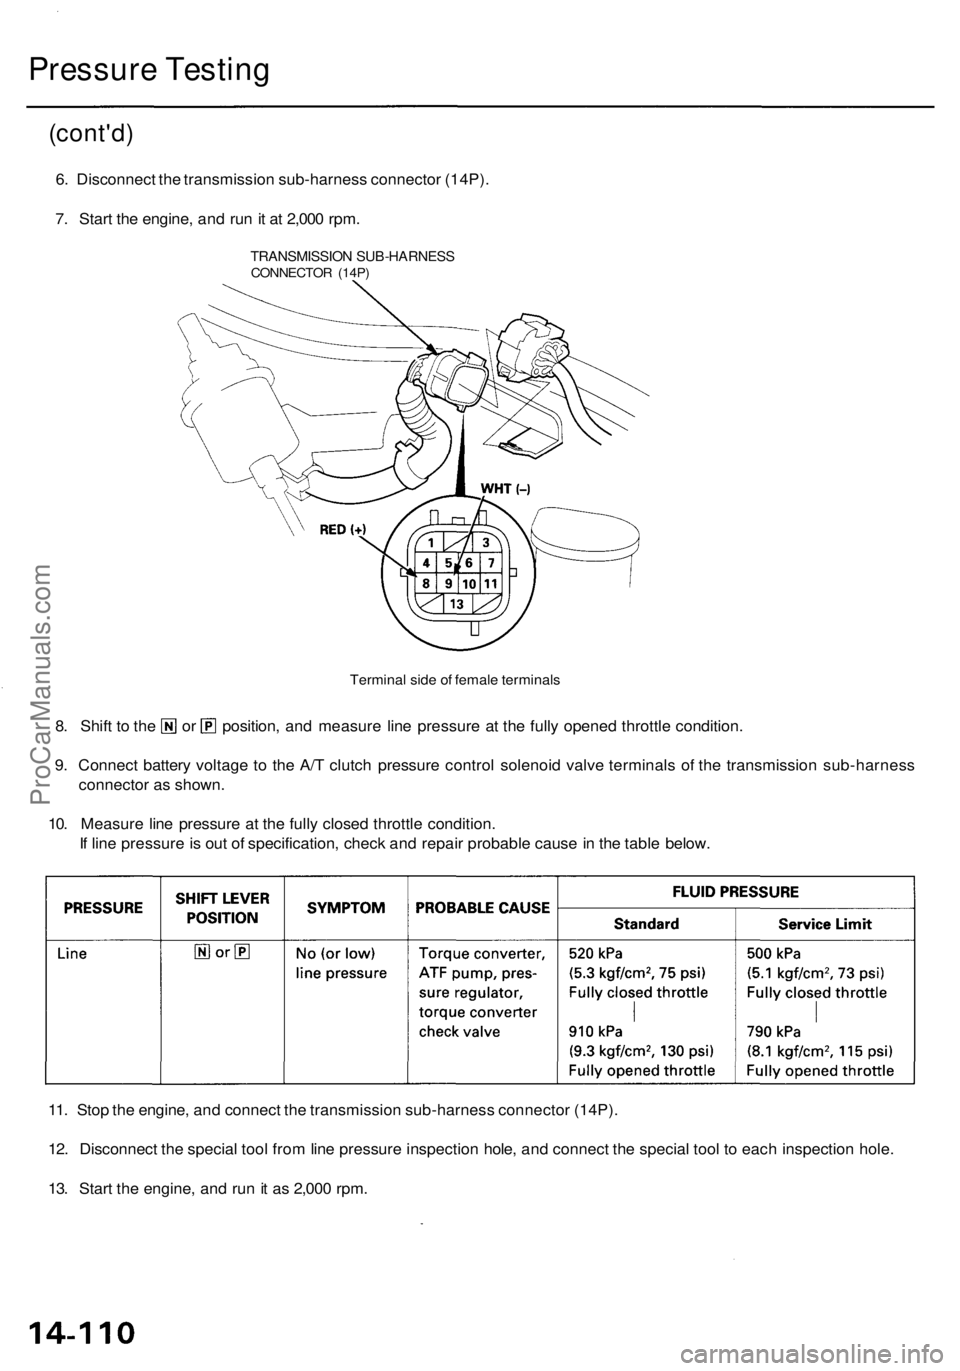
6. Disconnect the transmission sub-harness connector (14P).
7. Start the engine, and run it at 2,000 rpm.
Terminal side of female terminals
8. Shift to the or position, and measure line pressure at the fully opened throttle condition.
9. Connect battery voltage to the A/T clutch pressure control solenoid valve terminals of the transmission sub-harness
connector as shown.
10. Measure line pressure at the fully closed throttle condition.
If line pressure is out of specification, check and repair probable cause in the table below.
11. Stop the engine, and connect the transmission sub-harness connector (14P).
12. Disconnect the special tool from line pressure inspection hole, and connect the special tool to each inspection hole.
13. Start the engine, and run it as 2,000 rpm.
TRANSMISSION SUB-HARNESS
CONNECTOR (14P)ProCarManuals.com
Page 826 of 1954
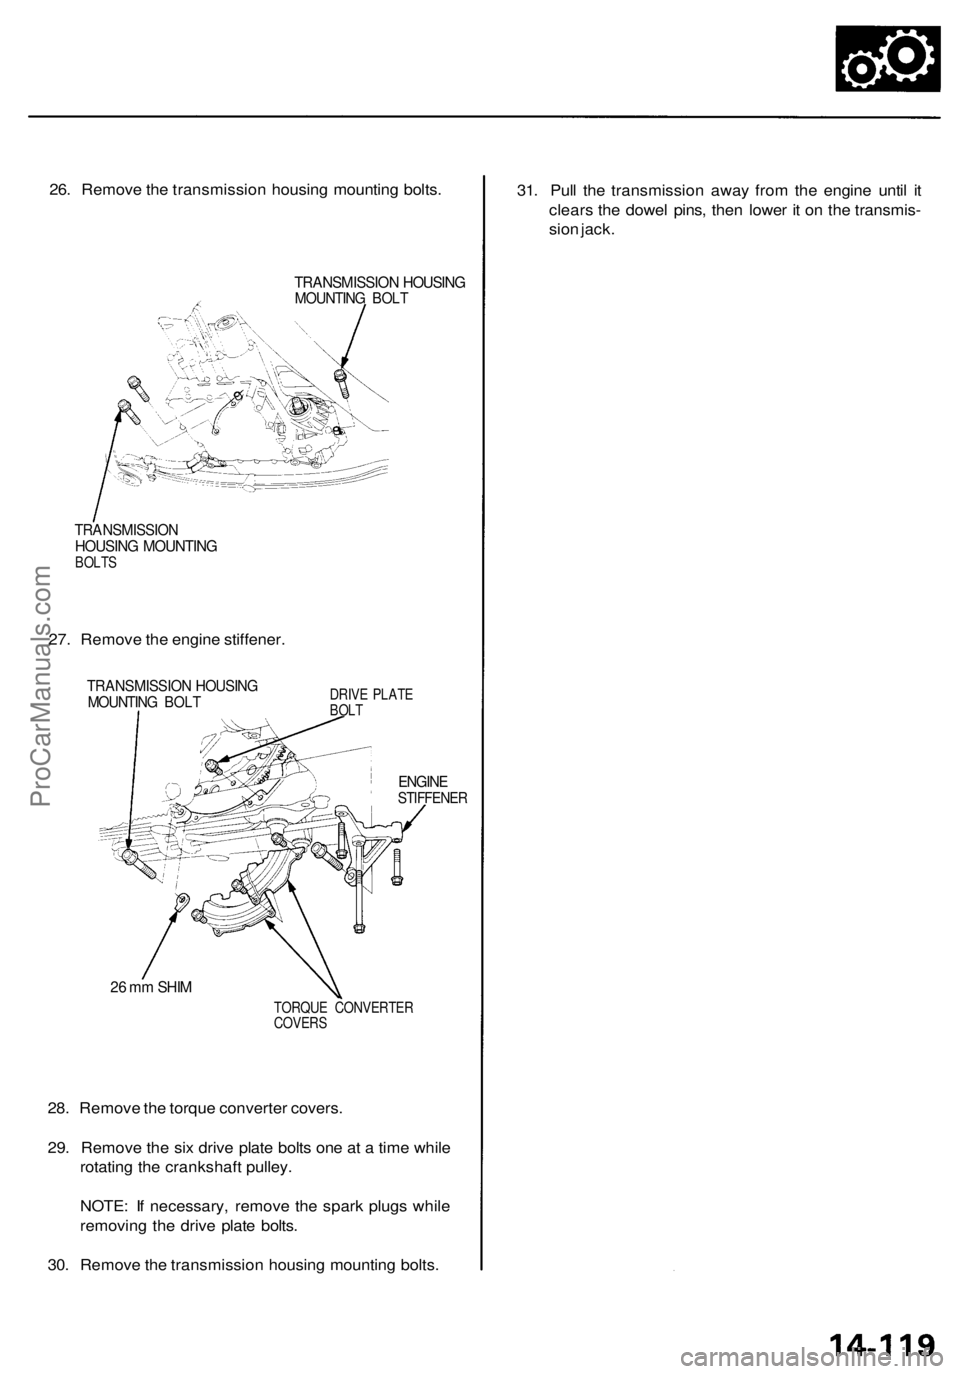
26. Remove the transmission housing mounting bolts.
TRANSMISSION HOUSING
MOUNTING BOLT
TRANSMISSION
HOUSING MOUNTING
BOLTS
27. Remove the engine stiffener.
TRANSMISSION HOUSING
MOUNTING BOLT
DRIVE PLATE
BOLT
ENGINE
STIFFENER
26 mm SHIM
TORQUE CONVERTER
COVERS
28. Remove the torque converter covers.
29. Remove the six drive plate bolts one at a time while
rotating the crankshaft pulley.
NOTE: If necessary, remove the spark plugs while
removing the drive plate bolts.
30. Remove the transmission housing mounting bolts.
31. Pull the transmission away from the engine until it
clears the dowel pins, then lower it on the transmis-
sion jack.ProCarManuals.com
Page 898 of 1954
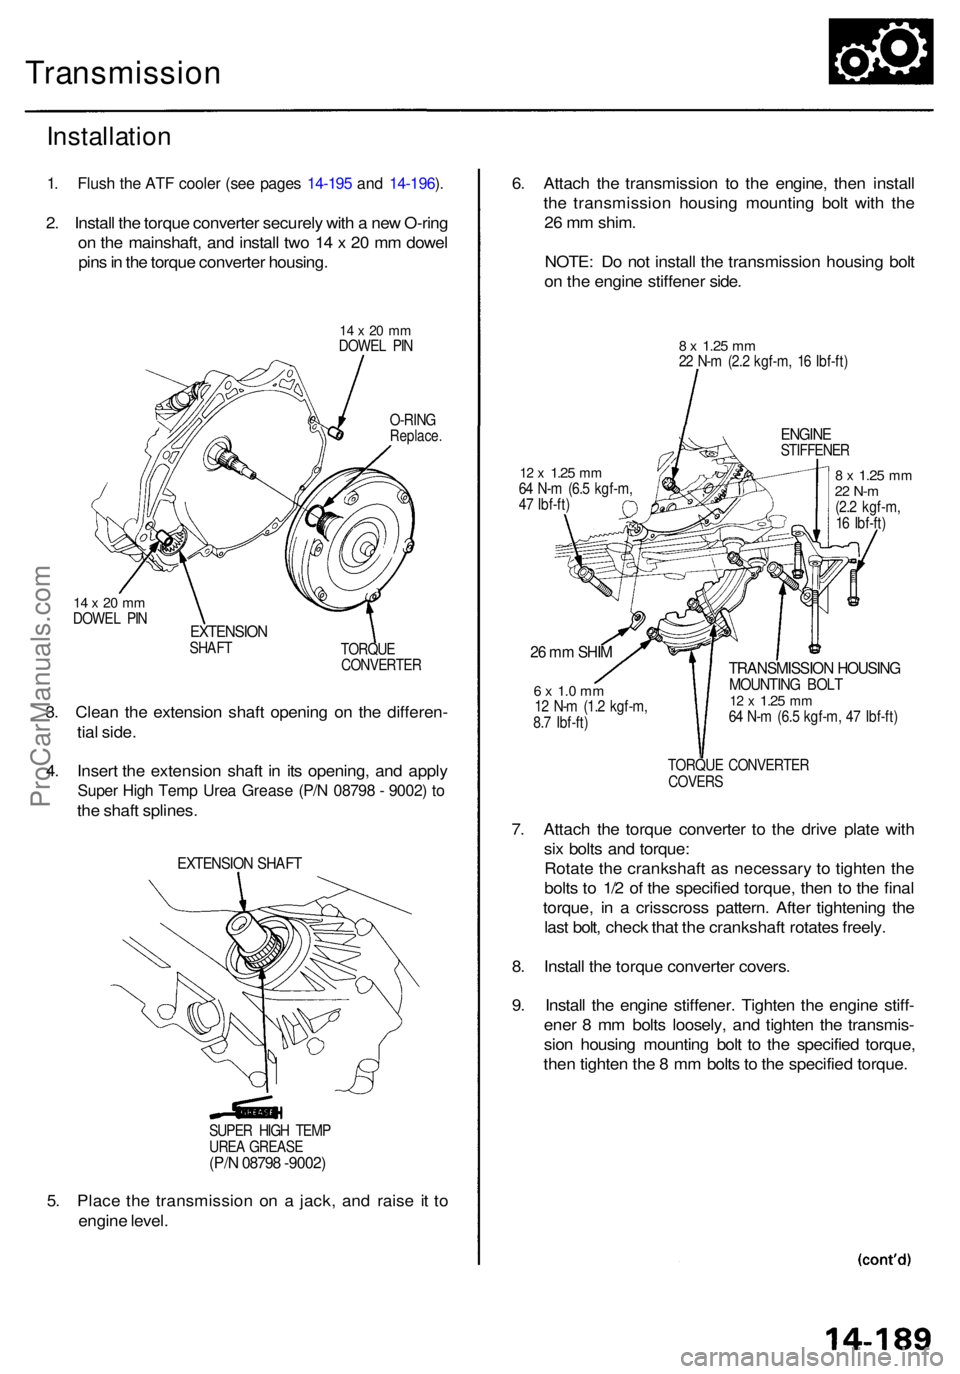
Transmission
Installation
1. Flus h th e AT F coole r (se e page s 14-19 5 an d 14-196 ).
2 . Instal l th e torqu e converte r securel y wit h a ne w O-rin g
o n th e mainshaft , an d instal l tw o 1 4 x 2 0 m m dowe l
pin s in th e torqu e converte r housing .
14 x 20 m mDOWE L PI N
O-RIN G
Replace .
14 x 20 m mDOWE L PI NEXTENSIO NSHAFT
TORQUE
CONVERTE R
3. Clea n th e extensio n shaf t openin g o n th e differen -
tia l side .
4 . Inser t th e extensio n shaf t i n it s opening , an d appl y
Supe r Hig h Tem p Ure a Greas e (P/ N 0879 8 - 9002 ) t o
th e shaf t splines .
EXTENSIO N SHAF T
5. Plac e th e transmissio n o n a jack , an d rais e i t t o
engin e level . 6
. Attac h th e transmissio n t o th e engine , the n instal l
th e transmissio n housin g mountin g bol t wit h th e
2 6 m m shim .
NOTE : D o no t instal l th e transmissio n housin g bol t
o n th e engin e stiffene r side .
8 x 1.2 5 mm22 N- m (2. 2 kgf-m , 1 6 Ibf-ft )
ENGIN ESTIFFENE R
12 x 1.2 5 mm64 N- m (6. 5 kgf-m ,
4 7 Ibf-ft )8 x 1.2 5 mm22 N- m(2.2 kgf-m ,
1 6 Ibf-ft )
26 m m SHI M
6 x 1. 0 m m12 N- m (1. 2 kgf-m ,
8. 7 Ibf-ft )
TRANSMISSIO N HOUSIN GMOUNTIN G BOL T12 x 1.2 5 mm64 N- m (6. 5 kgf-m , 4 7 Ibf-ft )
TORQU E CONVERTE R
COVER S
7. Attac h th e torqu e converte r t o th e driv e plat e wit h
si x bolt s an d torque :
Rotat e th e crankshaf t a s necessar y t o tighte n th e
bolt s t o 1/ 2 o f th e specifie d torque , the n t o th e fina l
torque , i n a crisscros s pattern . Afte r tightenin g th e
las t bolt , chec k tha t th e crankshaf t rotate s freely .
8 . Instal l th e torqu e converte r covers .
9 . Instal l th e engin e stiffener . Tighte n th e engin e stiff -
ene r 8 m m bolt s loosely , an d tighte n th e transmis -
sio n housin g mountin g bol t t o th e specifie d torque ,
the n tighte n th e 8 m m bolt s t o th e specifie d torque .
SUPER HIG H TEM P
URE A GREAS E
(P/N 0879 8 -9002 )
ProCarManuals.com
Page 903 of 1954
Transmission
Installation (cont'd )
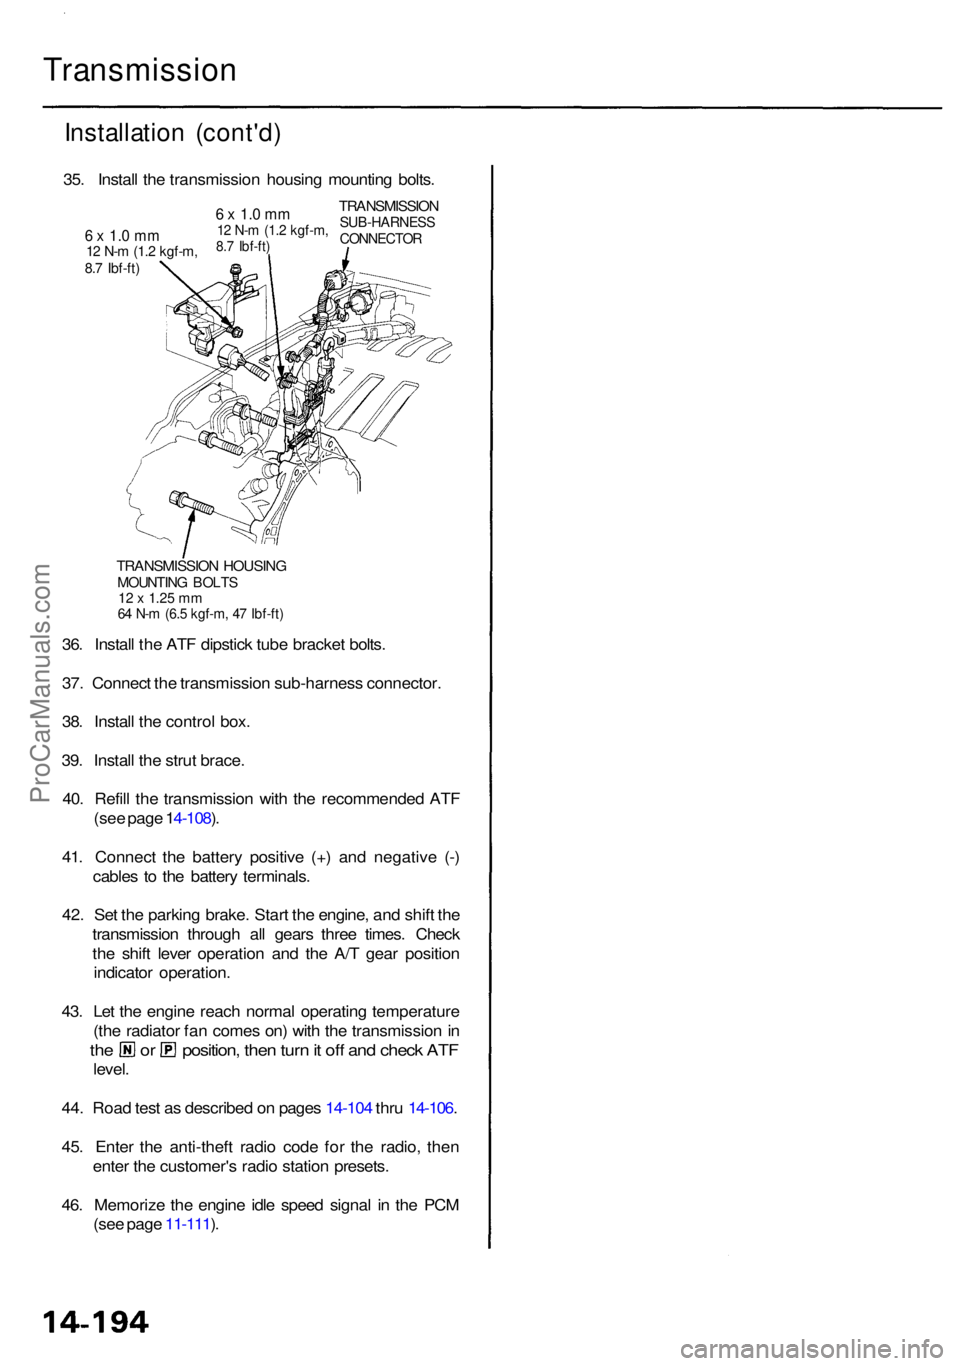
TRANSMISSIO N HOUSIN GMOUNTIN G BOLT S12 x 1.2 5 m m64 N- m (6. 5 kgf-m , 4 7 Ibf-ft )
36. Instal l th e AT F dipstic k tub e bracke t bolts .
37 . Connec t th e transmissio n sub-harnes s connector .
38 . Instal l th e contro l box .
39 . Instal l th e stru t brace .
40 . Refil l th e transmissio n wit h th e recommende d AT F
(se e pag e 1 4-108 ).
41 . Connec t th e batter y positiv e (+ ) an d negativ e (- )
cable s t o th e batter y terminals .
42 . Se t th e parkin g brake . Star t th e engine , an d shif t th e
transmissio n throug h al l gear s thre e times . Chec k
th e shif t leve r operatio n an d th e A/ T gea r positio n
indicato r operation .
43 . Le t th e engin e reac h norma l operatin g temperatur e
(th e radiato r fa n come s on ) wit h th e transmissio n in
th e o r position , the n tur n it of f an d chec k AT F
level .
44 . Roa d tes t a s describe d o n page s 14-10 4 thr u 14-106 .
45 . Ente r th e anti-thef t radi o cod e fo r th e radio , the n
ente r th e customer' s radi o statio n presets .
46 . Memoriz e th e engin e idl e spee d signa l i n th e PC M
(se e pag e 11-111 ).
35
. Instal l th e transmissio n housin g mountin g bolts .
TRANSMISSIO NSUB-HARNES SCONNECTOR
6 x 1. 0 m m12 N- m (1. 2 kgf-m ,8.7 Ibf-ft )6 x 1. 0 m m12 N- m (1. 2 kgf-m ,8.7 Ibf-ft )
ProCarManuals.com
Page 909 of 1954
Link Adjustmen t
• Mak e sur e lifts , jack s an d safet y stand s ar e place d
properl y (se e sectio n 1 ).
• Appl y parkin g
brake, and bloc k rea r wheel s s o vehi -
cle wil l no t rol l of f stand s an d fal l o n yo u whil e work -
ing unde r it .
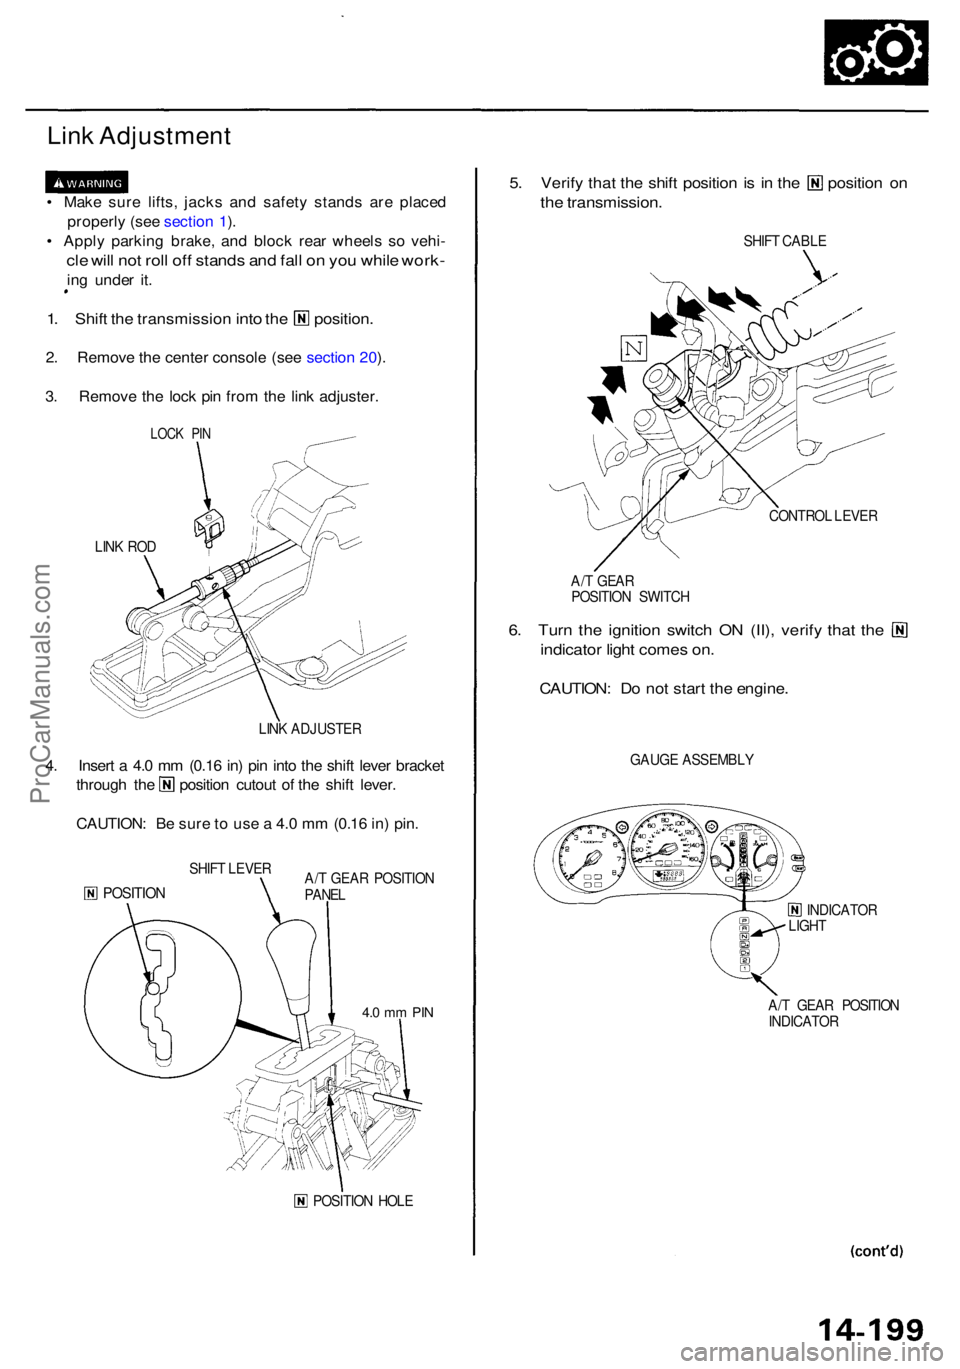
1. Shif t the transmissio n into the position .
2. Remov e th e cente r consol e (se e sectio n 20 ).
3 . Remov e th e loc k pi n fro m th e lin k adjuster .
LINK RO D
LINK ADJUSTE R
4. Inser t a 4. 0 m m (0.1 6 in ) pi n int o th e shif t leve r bracke t
through th e positio n cutou t o f th e shif t lever .
CAUTION : B e sur e t o us e a 4. 0 m m (0.1 6 in ) pin .
SHIF T LEVE R
POSITIO NA/T GEA R POSITIO N
PANE L
POSITIO N HOL E
5. Verif y tha t th e shif t positio n is i n th e positio n o n
the transmission .
SHIFT CABL E
CONTRO L LEVE R
A/ T GEA R
POSITIO N SWITC H
6. Tur n th e ignitio n switc h O N (II) , verif y tha t th e
indicato r ligh t come s on .
CAUTION : D o no t star t th e engine .
GAUGE ASSEMBL Y
INDICATOR
LIGH T
A/ T GEA R POSITIO N
INDICATO R
LOCK PI N
4.0 m m PI N
ProCarManuals.com