ACURA RL KA9 1996 Service Repair Manual
Manufacturer: ACURA, Model Year: 1996, Model line: RL KA9, Model: ACURA RL KA9 1996Pages: 1954, PDF Size: 61.44 MB
Page 441 of 1954
Pistons
Inspectio n
1. Chec k th e pisto n fo r distortio n o r cracks .
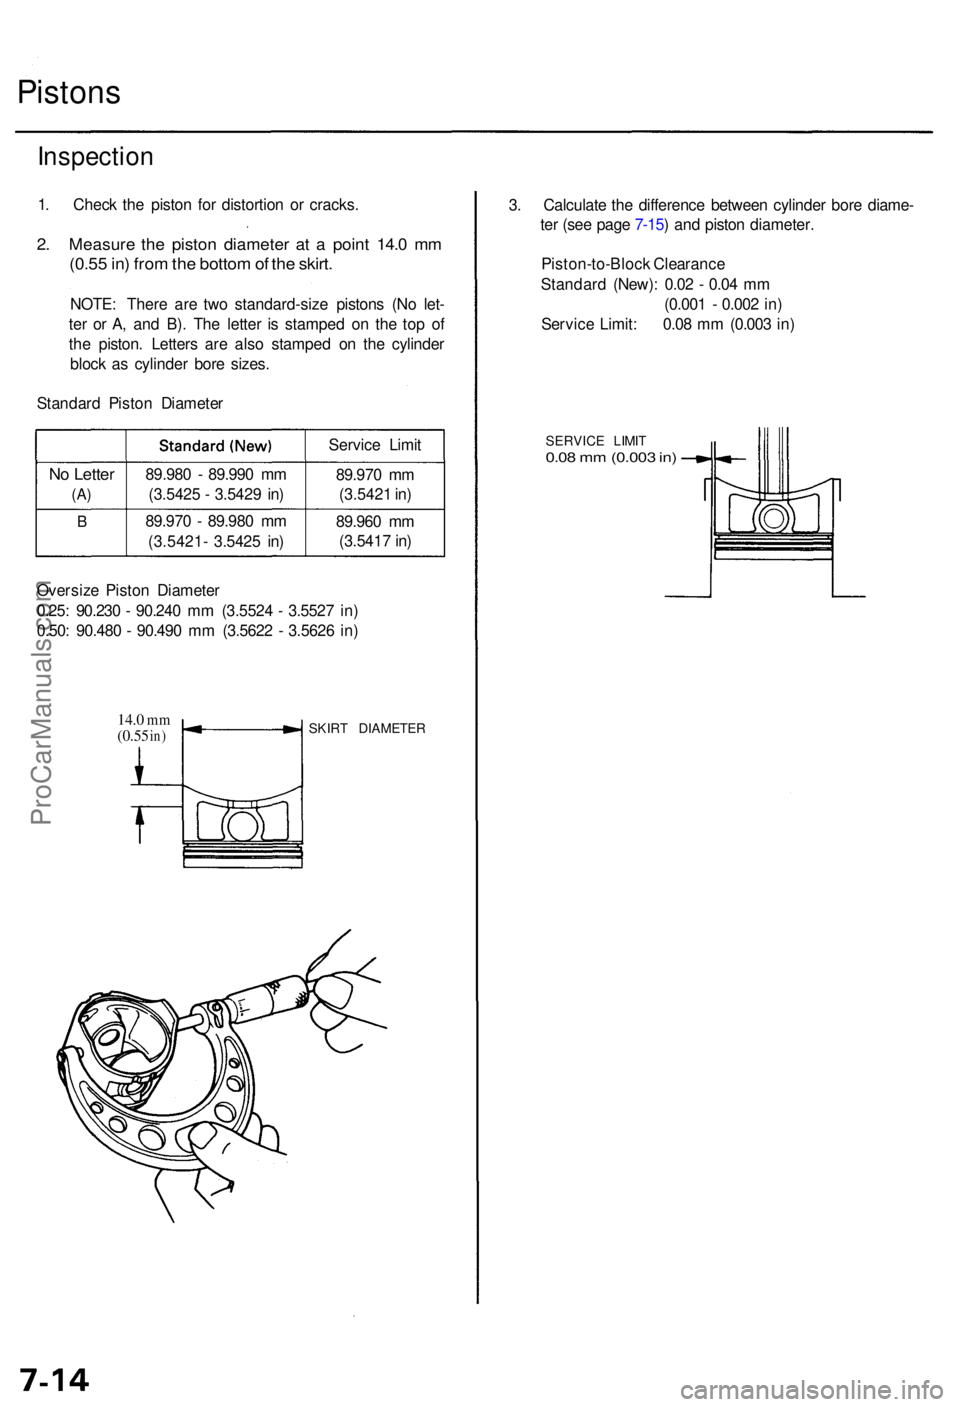
2. Measur e th e pisto n diamete r a t a poin t 14. 0 m m
(0.5 5 in ) fro m th e botto m of th e skirt .
NOTE : Ther e ar e tw o standard-siz e piston s (N o let -
te r o r A , an d B) . Th e lette r i s stampe d o n th e to p o f
th e piston . Letter s ar e als o stampe d o n th e cylinde r
bloc k a s cylinde r bor e sizes .
Standar d Pisto n Diamete r
Oversiz e Pisto n Diamete r
0.25 : 90.23 0 - 90.24 0 m m (3.552 4 - 3.552 7 in )
0.50 : 90.48 0 - 90.49 0 m m (3.562 2 - 3.562 6 in )
SKIR T DIAMETE R14.0 mm(0.5 5 in)
89.98 0 - 89.99 0 m m
(3.542 5 - 3.542 9 in )
89.97 0 - 89.98 0 m m
(3.5421 - 3.542 5 in )
B
No Lette r
(A)
89.97 0 m m
(3.542 1 in )
Servic
e Limi t
89.96 0 m m
(3.541 7 in ) 3
. Calculat e th e differenc e betwee n cylinde r bor e diame -
te r (se e pag e 7-15 ) an d pisto n diameter .
Piston-to-Bloc k Clearanc e
Standar d (New) : 0.0 2 - 0.0 4 m m
(0.00 1 - 0.00 2 in )
Servic e Limit : 0.0 8 m m (0.00 3 in )
SERVIC E LIMI T0.08 m m (0.00 3 in )
ProCarManuals.com
Page 442 of 1954
Cylinder Bloc k
Inspectio n
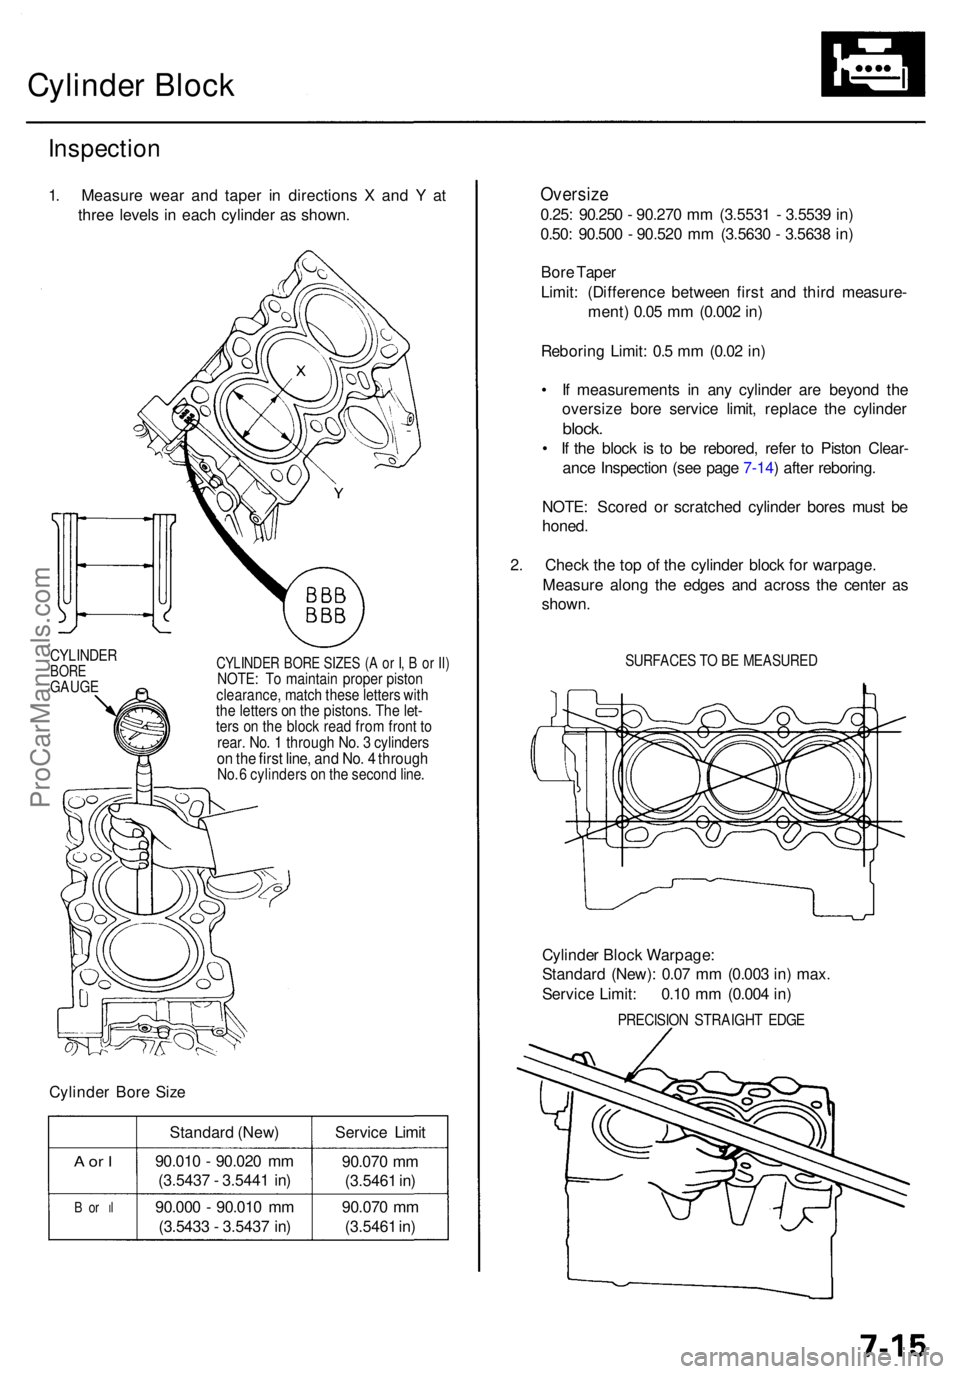
1. Measur e wea r an d tape r i n direction s X an d Y at
thre e level s i n eac h cylinde r a s shown .
CYLINDE R BOR E SIZE S ( A o r I , B or Il )NOTE : T o maintai n prope r pisto n
clearance , matc h thes e letter s wit h
the letter s o n th e pistons . Th e let -ters o n th e bloc k rea d fro m fron t t orear . No . 1 throug h No . 3 cylinder son th e firs t line , an d No . 4 throug hNo. 6 cylinder s o n th e secon d line .
CYLINDE RBOREGAUG E
Cylinde r Bor e Siz e
Standar d (New ) Service Limi t
90.07 0 m m
(3.546 1 in )
90.07 0 m m
(3.546 1 in )
90.01
0 - 90.02 0 m m
(3.543 7 - 3.544 1 in )
90.00 0 - 90.01 0 m m
(3.543 3 - 3.543 7 in )
B o r Il
A o r I
Oversiz e
0.25: 90.25 0 - 90.27 0 m m (3.553 1 - 3.553 9 in )
0.50 : 90.50 0 - 90.52 0 m m (3.563 0 - 3.563 8 in )
Bor e Tape r
Limit : (Differenc e betwee n firs t an d thir d measure -
ment ) 0.0 5 m m (0.00 2 in )
Reborin g Limit : 0. 5 m m (0.0 2 in )
• I f measurement s i n an y cylinde r ar e beyon d th e
oversiz e bor e servic e limit , replac e th e cylinde r
block.
• I f th e bloc k i s t o b e rebored , refe r t o Pisto n Clear -
anc e Inspectio n (se e pag e 7-14 ) afte r reboring .
NOTE : Score d o r scratche d cylinde r bore s mus t b e
honed .
2 . Chec k th e to p o f th e cylinde r bloc k fo r warpage .
Measur e alon g th e edge s an d acros s th e cente r a s
shown .
SURFACE S T O B E MEASURE D
Cylinder Bloc k Warpage :
Standar d (New) : 0.0 7 m m (0.00 3 in ) max .
Servic e Limit : 0.1 0 m m (0.00 4 in )
PRECISIO N STRAIGH T EDG E
ProCarManuals.com
Page 443 of 1954
Cylinder Bloc k
Bore Honin g
1. Measur e th e cylinde r bore s a s show n o n pag e 7-15 .
I f th e cylinde r bloc k i s t o b e reused , hon e th e cylin -
der s an d remeasur e th e bores .
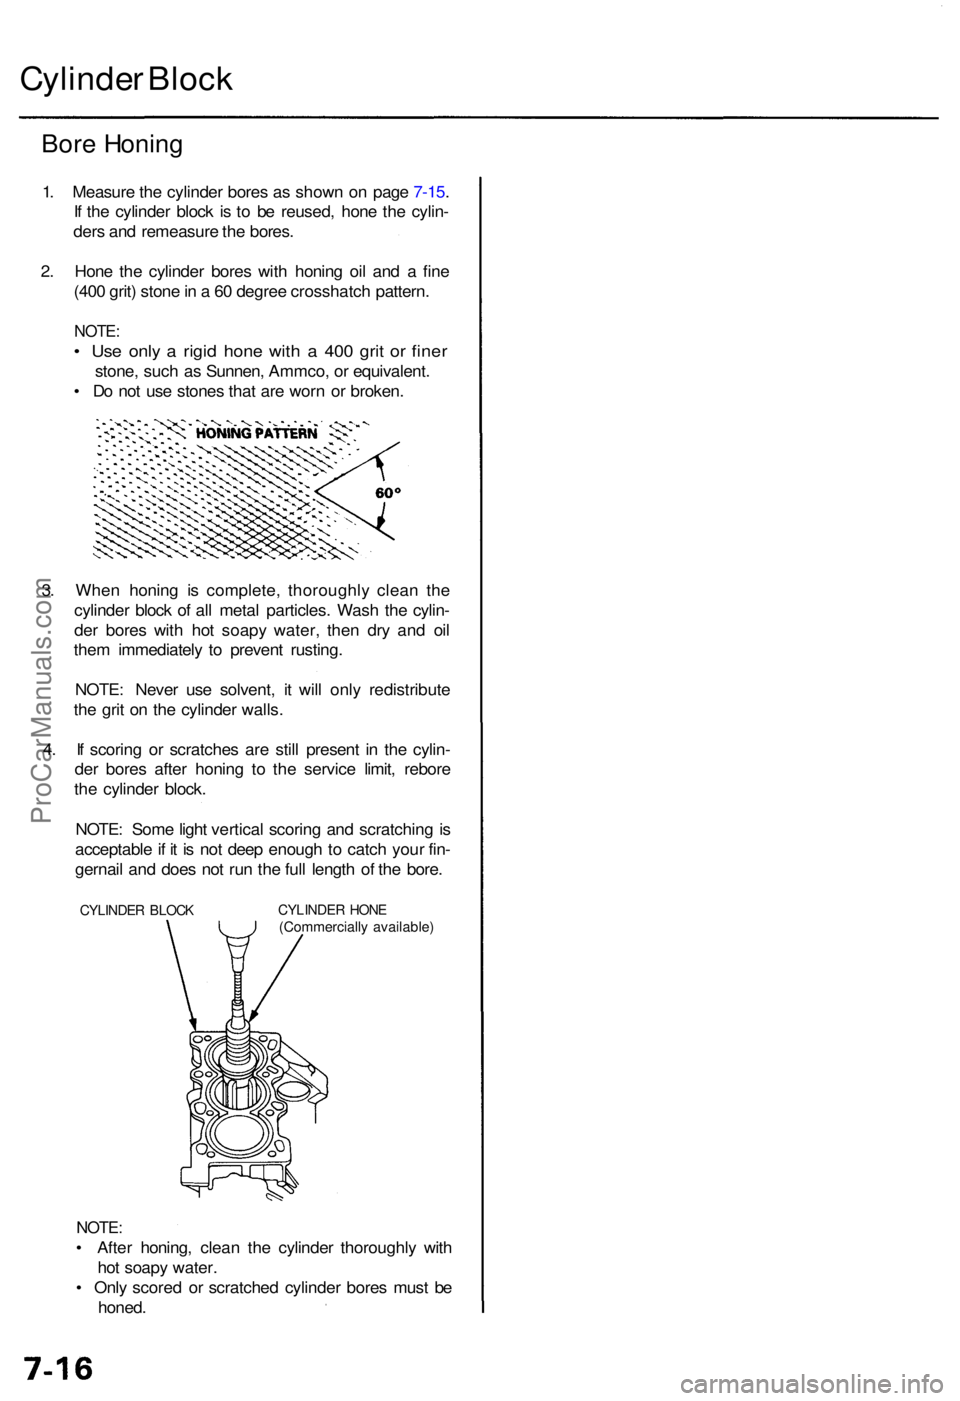
2 . Hon e th e cylinde r bore s wit h honin g oi l an d a fin e
(40 0 grit ) ston e in a 60 degre e crosshatc h pattern .
NOTE:
• Us e onl y a rigi d hon e wit h a 40 0 gri t o r fine r
stone , suc h a s Sunnen , Ammco , o r equivalent .
• D o no t us e stone s tha t ar e wor n o r broken .
3 . Whe n honin g i s complete , thoroughl y clea n th e
cylinde r bloc k o f al l meta l particles . Was h th e cylin -
de r bore s wit h ho t soap y water , the n dr y an d oi l
the m immediatel y t o preven t rusting .
NOTE : Neve r us e solvent , i t wil l onl y redistribut e
th e gri t o n th e cylinde r walls .
4 . I f scorin g o r scratche s ar e stil l presen t i n th e cylin -
de r bore s afte r honin g t o th e servic e limit , rebor e
th e cylinde r block .
NOTE : Som e ligh t vertica l scorin g an d scratchin g is
acceptabl e if i t i s no t dee p enoug h t o catc h you r fin -
gernai l an d doe s no t ru n th e ful l lengt h o f th e bore .
CYLINDE R BLOC KCYLINDE R HON E(Commerciall y available )
NOTE:
• Afte r honing , clea n th e cylinde r thoroughl y wit h
ho t soap y water .
• Onl y score d o r scratche d cylinde r bore s mus t b e
honed .
ProCarManuals.com
Page 444 of 1954
Piston Pins
Removal
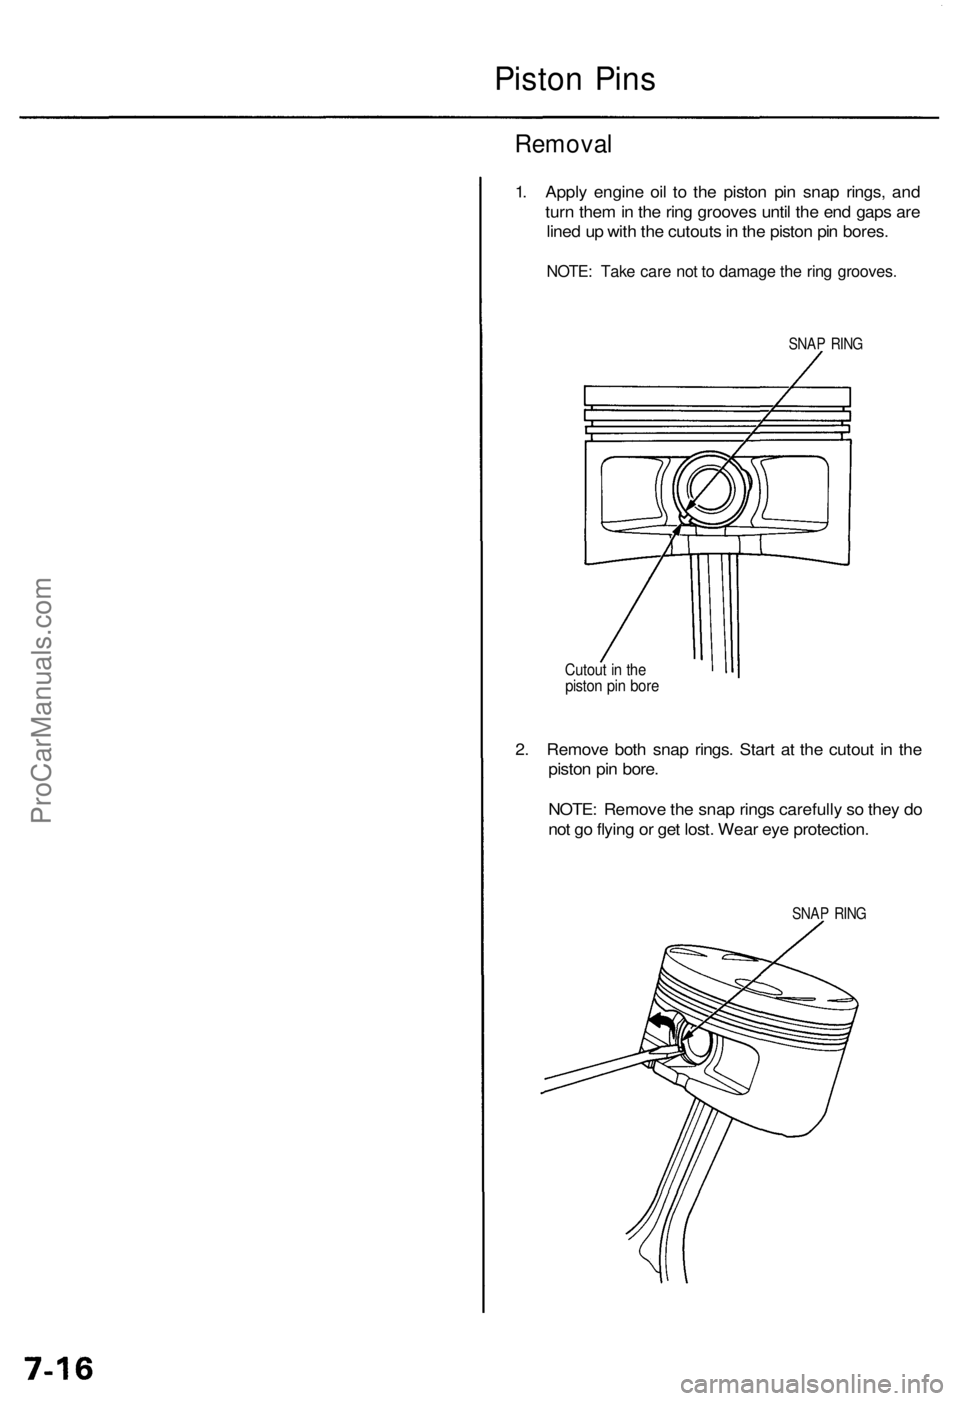
1. Apply engine oil to the piston pin snap rings, and
turn them in the ring grooves until the end gaps are
lined up with the cutouts in the piston pin bores.
NOTE: Take care not to damage the ring grooves.
SNAP RING
Cutout in the
piston pin bore
2. Remove both snap rings. Start at the cutout in the
piston pin bore.
NOTE: Remove the snap rings carefully so they do
not go flying or get lost. Wear eye protection.
SNAP RINGProCarManuals.com
Page 445 of 1954
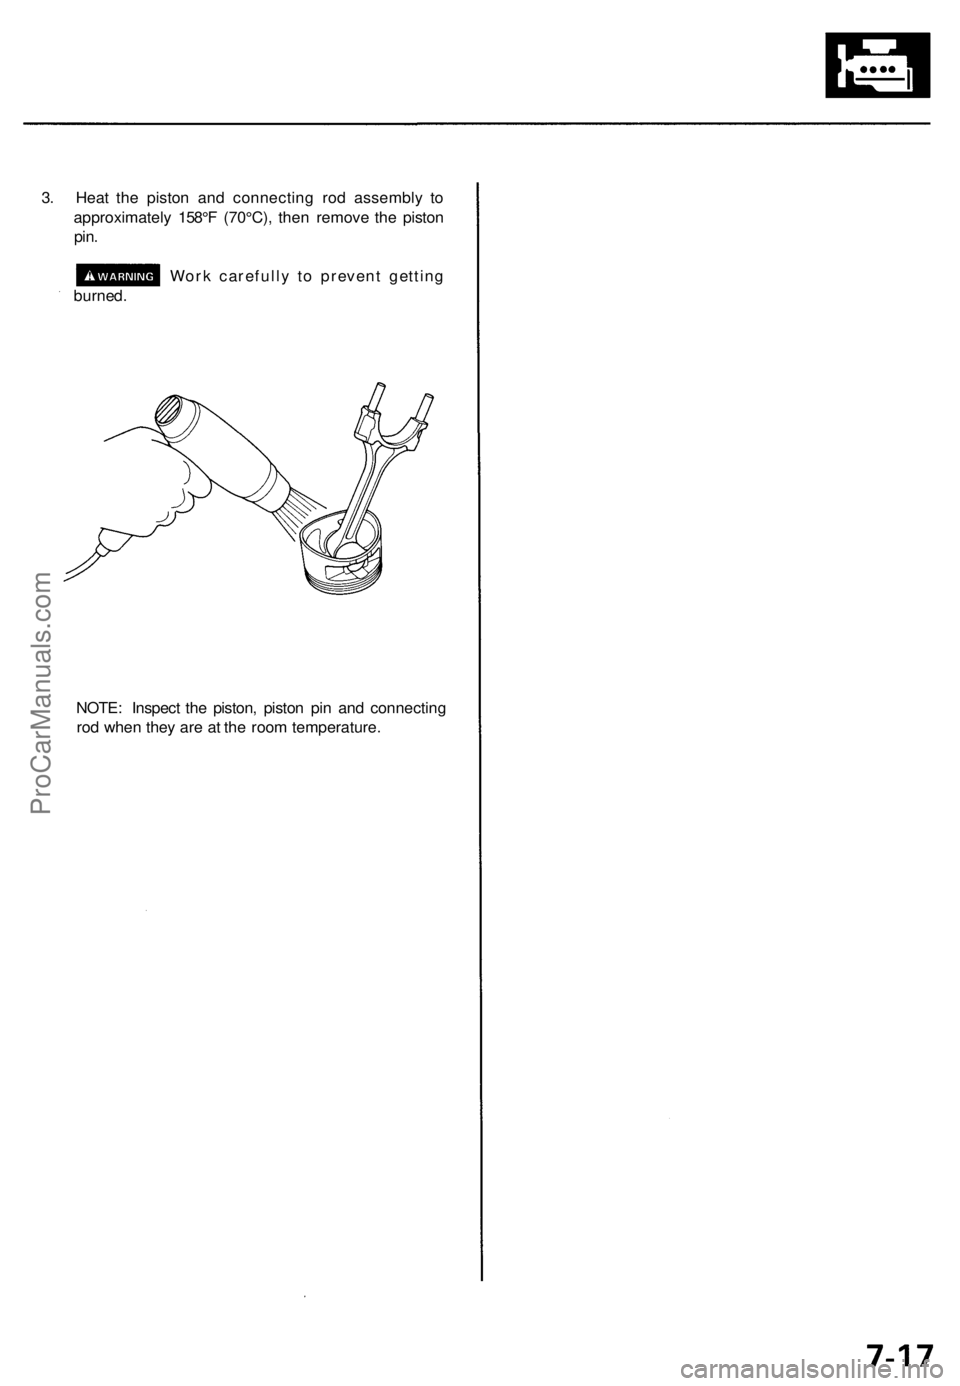
3. Hea t th e pisto n an d connectin g ro d assembl y t o
approximatel y 158° F (70°C) , the n remov e th e pisto n
pin.
Wor k carefull y t o preven t gettin g
burned .
NOTE : Inspec t th e piston , pisto n pi n an d connectin g
ro d whe n the y ar e a t th e roo m temperature .
ProCarManuals.com
Page 446 of 1954
Connecting Rod s
Selectio n
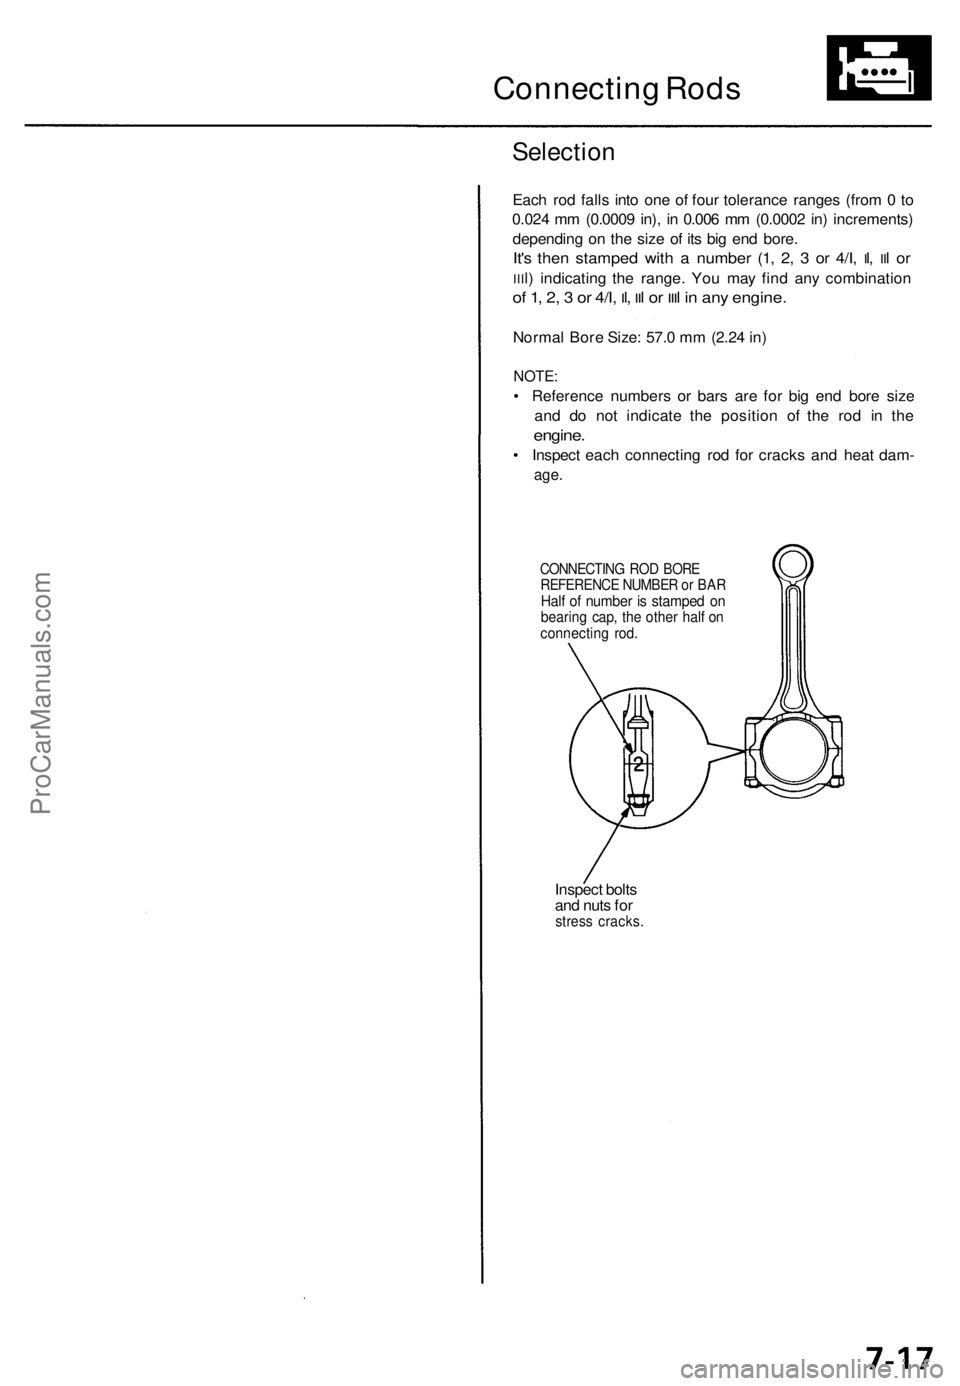
Each ro d fall s int o on e o f fou r toleranc e range s (fro m 0 to
0.02 4 m m (0.000 9 in) , i n 0.00 6 m m (0.000 2 in ) increments )
dependin g o n th e siz e o f it s bi g en d bore .
It's the n stampe d wit h a numbe r (1 , 2 , 3 or 4/I , Il, IIl o r
IIIl) indicatin g th e range . Yo u ma y fin d an y combinatio n
of 1 , 2 , 3 or 4/I , Il, IIl o r IIIl i n an y engine .
Normal Bor e Size : 57. 0 m m (2.2 4 in )
NOTE :
• Referenc e number s o r bar s ar e fo r bi g en d bor e siz e
an d d o no t indicat e th e positio n of the ro d i n th e
engine .
• Inspec t eac h connectin g ro d fo r crack s an d hea t dam -
age.
CONNECTIN G RO D BOR EREFERENC E NUMBE R o r BA RHalf o f numbe r i s stampe d o nbearin g cap , th e othe r hal f o nconnectin g rod .
Inspec t bolt s
an d nut s fo r
stres s cracks .
ProCarManuals.com
Page 447 of 1954
Piston Pin s
Inspectio n
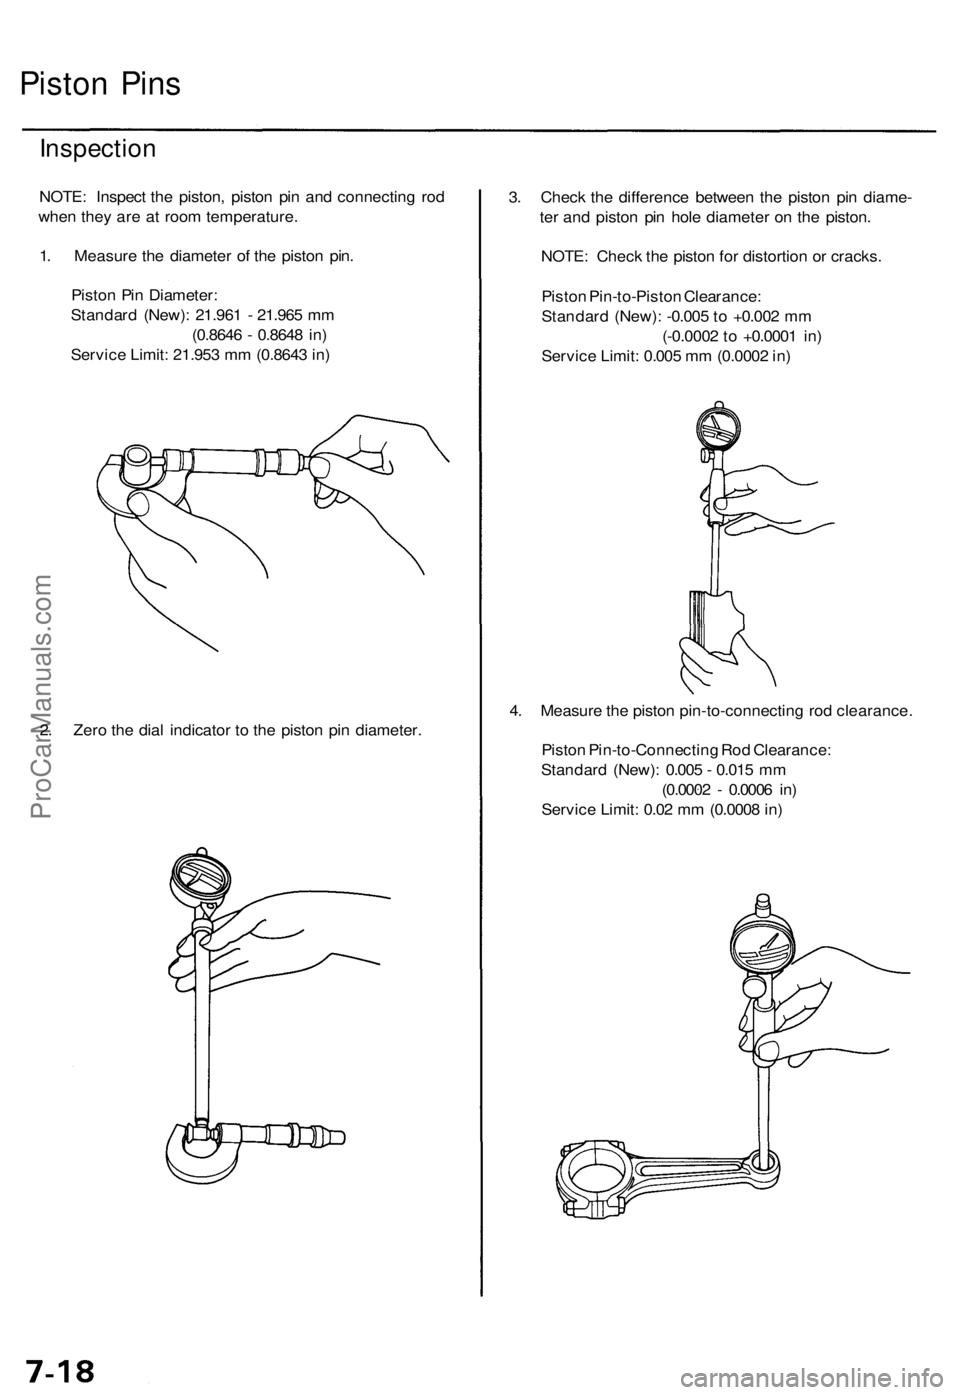
NOTE: Inspec t th e piston , pisto n pi n an d connectin g ro d
whe n the y ar e a t roo m temperature .
1 . Measur e th e diamete r o f th e pisto n pin .
Pisto n Pi n Diameter :
Standar d (New) : 21.96 1 - 21.96 5 m m
(0.864 6 - 0.864 8 in )
Servic e Limit : 21.95 3 m m (0.864 3 in )
2 . Zer o th e dia l indicato r t o th e pisto n pi n diameter . 4
. Measur e th e pisto n pin-to-connectin g ro d clearance .
Pisto n Pin-to-Connectin g Ro d Clearance :
Standar d (New) : 0.00 5 - 0.01 5 m m
(0.000 2 - 0.000 6 in )
Servic e Limit : 0.0 2 m m (0.000 8 in )
3
. Chec k th e differenc e betwee n th e pisto n pi n diame -
te r an d pisto n pi n hol e diamete r o n th e piston .
NOTE : Chec k th e pisto n fo r distortio n o r cracks .
Pisto n Pin-to-Pisto n Clearance :
Standar d (New) : -0.00 5 t o +0.00 2 m m
(-0.000 2 t o +0.000 1 in )
Servic e Limit : 0.00 5 m m (0.000 2 in )
ProCarManuals.com
Page 448 of 1954
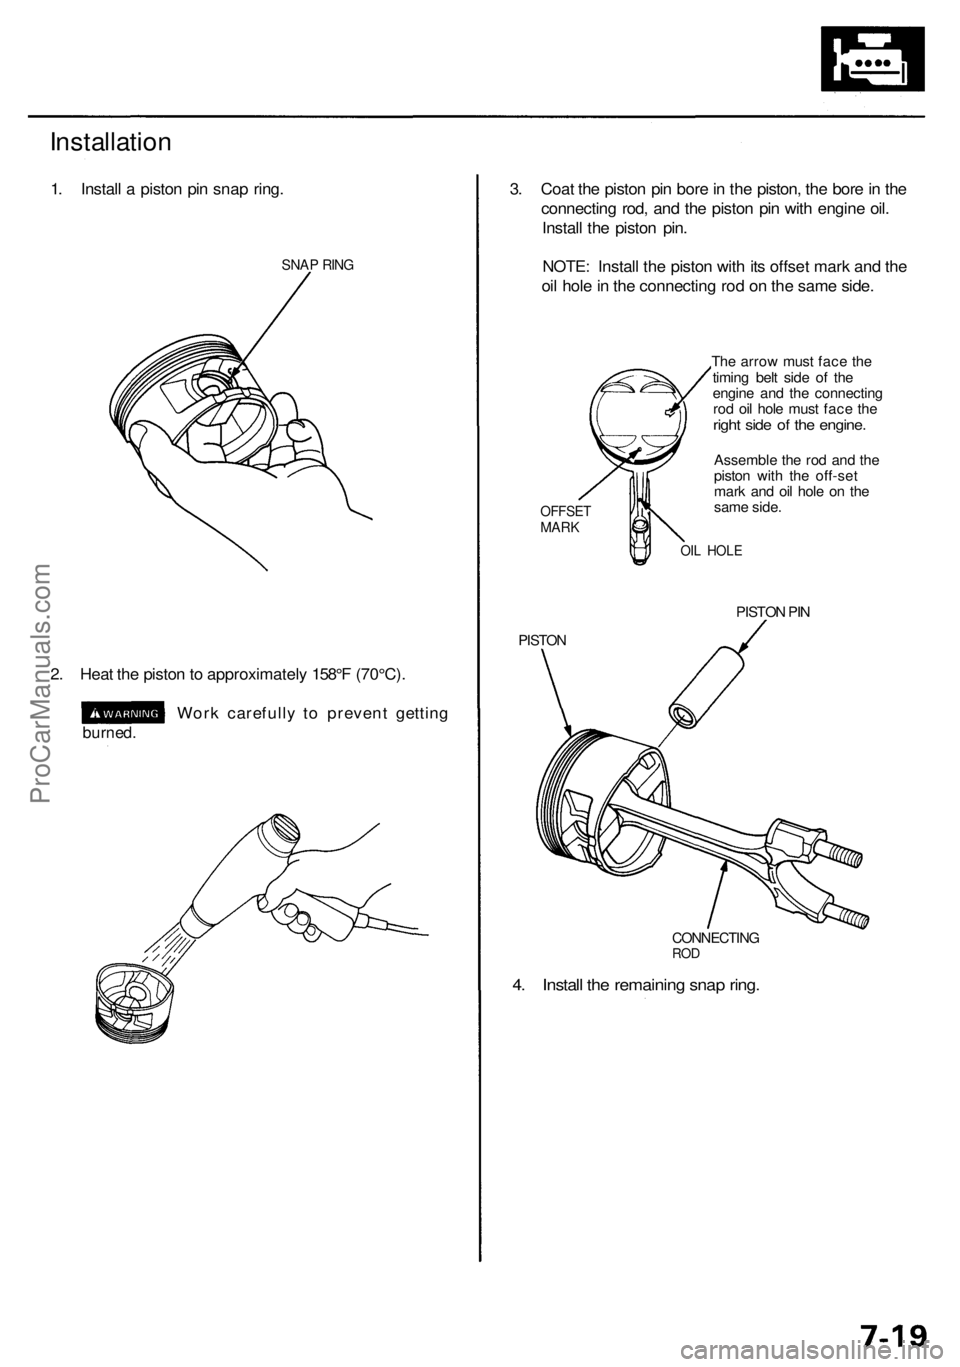
4. Instal l th e remainin g sna p ring .
CONNECTIN GROD
Installatio n
1. Instal l a pisto n pi n sna p ring .
SNA P RIN G
3. Coa t th e pisto n pi n bor e in th e piston , th e bor e in th e
connectin g rod , an d th e pisto n pi n wit h engin e oil .
Instal l th e pisto n pin .
NOTE : Instal l th e pisto n wit h it s offse t mar k an d th e
oi l hol e in th e connectin g ro d o n th e sam e side .
OFFSE TMARK
OIL HOL E
The arro w mus t fac e th e
timin g bel t sid e o f th e
engin e an d th e connectin g
ro d oi l hol e mus t fac e th e
righ t sid e o f th e engine .
Assembl e th e ro d an d th e
pisto n wit h th e off-se t
mar k an d oi l hol e o n th e
sam e side .
PISTO N
PISTON PI N
2. Hea t th e pisto n to approximatel y 158° F (70°C) .
Wor k carefull y t o preven t gettin g
burned.
ProCarManuals.com
Page 449 of 1954
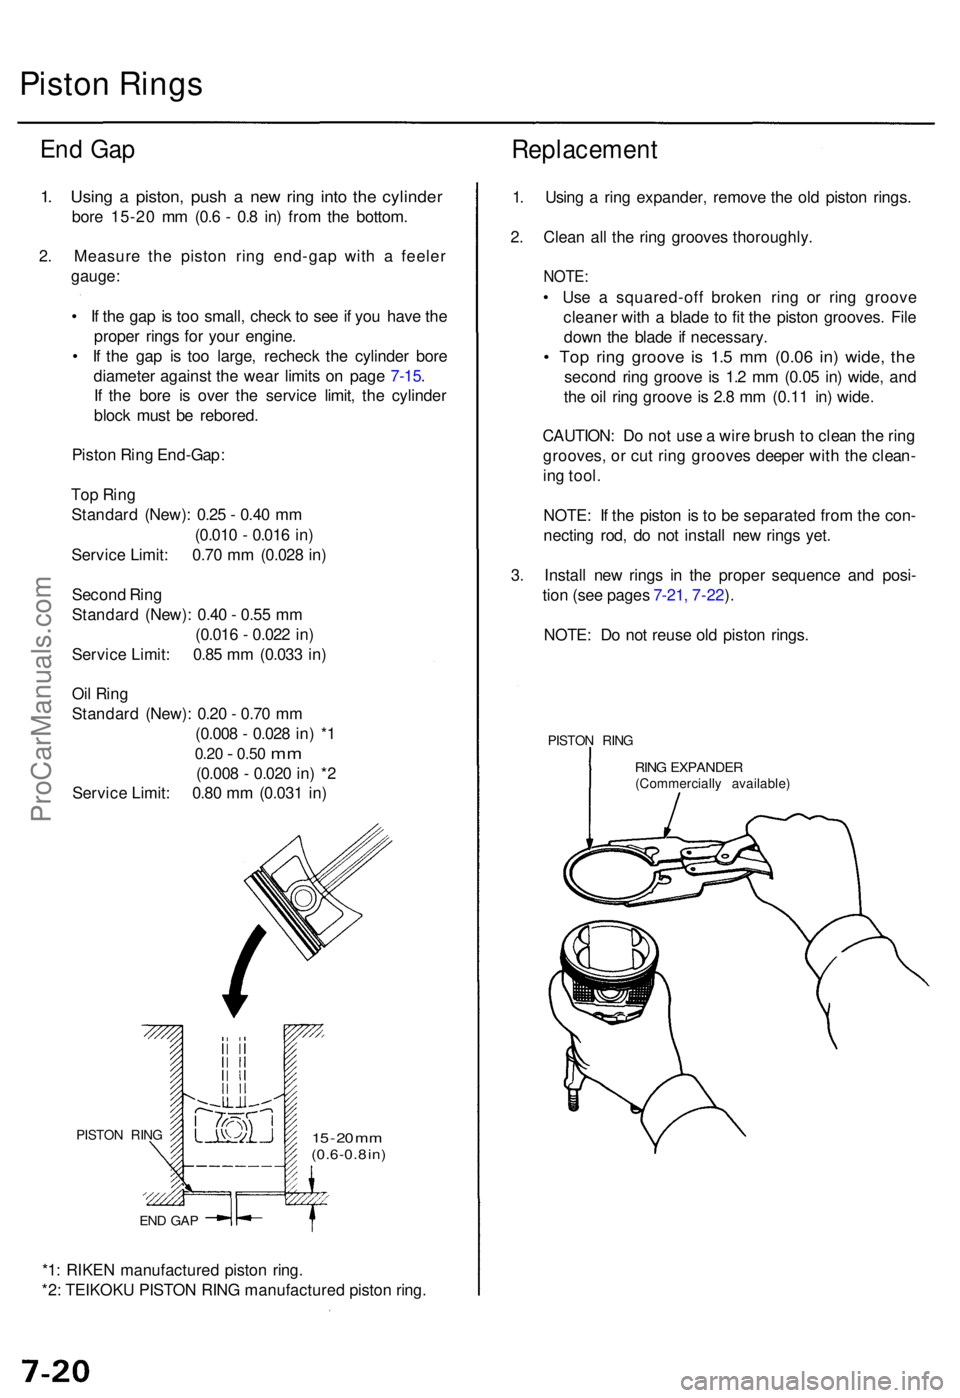
*1: RIKE N manufacture d pisto n ring .
*2 : TEIKOK U PISTO N RIN G manufacture d pisto n ring .
PISTO N RIN G
END GA P
15 - 2 0 m m(0.6-0. 8 in )
Pisto n Ring s
End Ga p
1. Usin g a piston , pus h a ne w rin g int o th e cylinde r
bore 15-2 0 m m (0. 6 - 0. 8 in ) fro m th e bottom .
2 . Measur e th e pisto n rin g end-ga p wit h a feele r
gauge :
• I f th e ga p is to o small , chec k t o se e if yo u hav e th e
prope r ring s fo r you r engine .
• I f th e ga p i s to o large , rechec k th e cylinde r bor e
diamete r agains t th e wea r limit s o n pag e 7-15 .
I f th e bor e i s ove r th e servic e limit , th e cylinde r
bloc k mus t b e rebored .
Pisto n Rin g End-Gap :
To p Rin g
Standar d (New) : 0.2 5 - 0.4 0 m m
(0.01 0 - 0.01 6 in )
Servic e Limit : 0.7 0 m m (0.02 8 in )
Secon d Rin g
Standar d (New) : 0.4 0 - 0.5 5 m m
(0.01 6 - 0.02 2 in )
Servic e Limit : 0.8 5 m m (0.03 3 in )
Oi l Rin g
Standar d (New) : 0.2 0 - 0.7 0 m m
(0.00 8 - 0.02 8 in ) * 1
0.2 0 - 0.5 0 mm
(0.00 8 - 0.02 0 in ) * 2
Servic e Limit : 0.8 0 m m (0.03 1 in )
Replacemen t
1. Usin g a rin g expander , remov e th e ol d pisto n rings .
2 . Clea n al l th e rin g groove s thoroughly .
NOTE:
• Us e a squared-of f broke n rin g o r rin g groov e
cleane r wit h a blad e t o fi t th e pisto n grooves . Fil e
dow n th e blad e i f necessary .
• To p rin g groov e i s 1. 5 m m (0.0 6 in ) wide , th e
secon d rin g groov e i s 1. 2 m m (0.0 5 in ) wide , an d
th e oi l rin g groov e is 2. 8 m m (0.1 1 in ) wide .
CAUTION : D o no t us e a wir e brus h to clea n th e rin g
grooves , o r cu t rin g groove s deepe r wit h th e clean -
in g tool .
NOTE : I f th e pisto n i s t o b e separate d fro m th e con -
nectin g rod , d o no t instal l ne w ring s yet .
3 . Instal l ne w ring s i n th e prope r sequenc e an d posi -
tio n (se e page s 7-21 , 7-22 ).
NOTE : D o no t reus e ol d pisto n rings .
PISTO N RIN G
RING EXPANDE R(Commerciall y available )
ProCarManuals.com
Page 450 of 1954
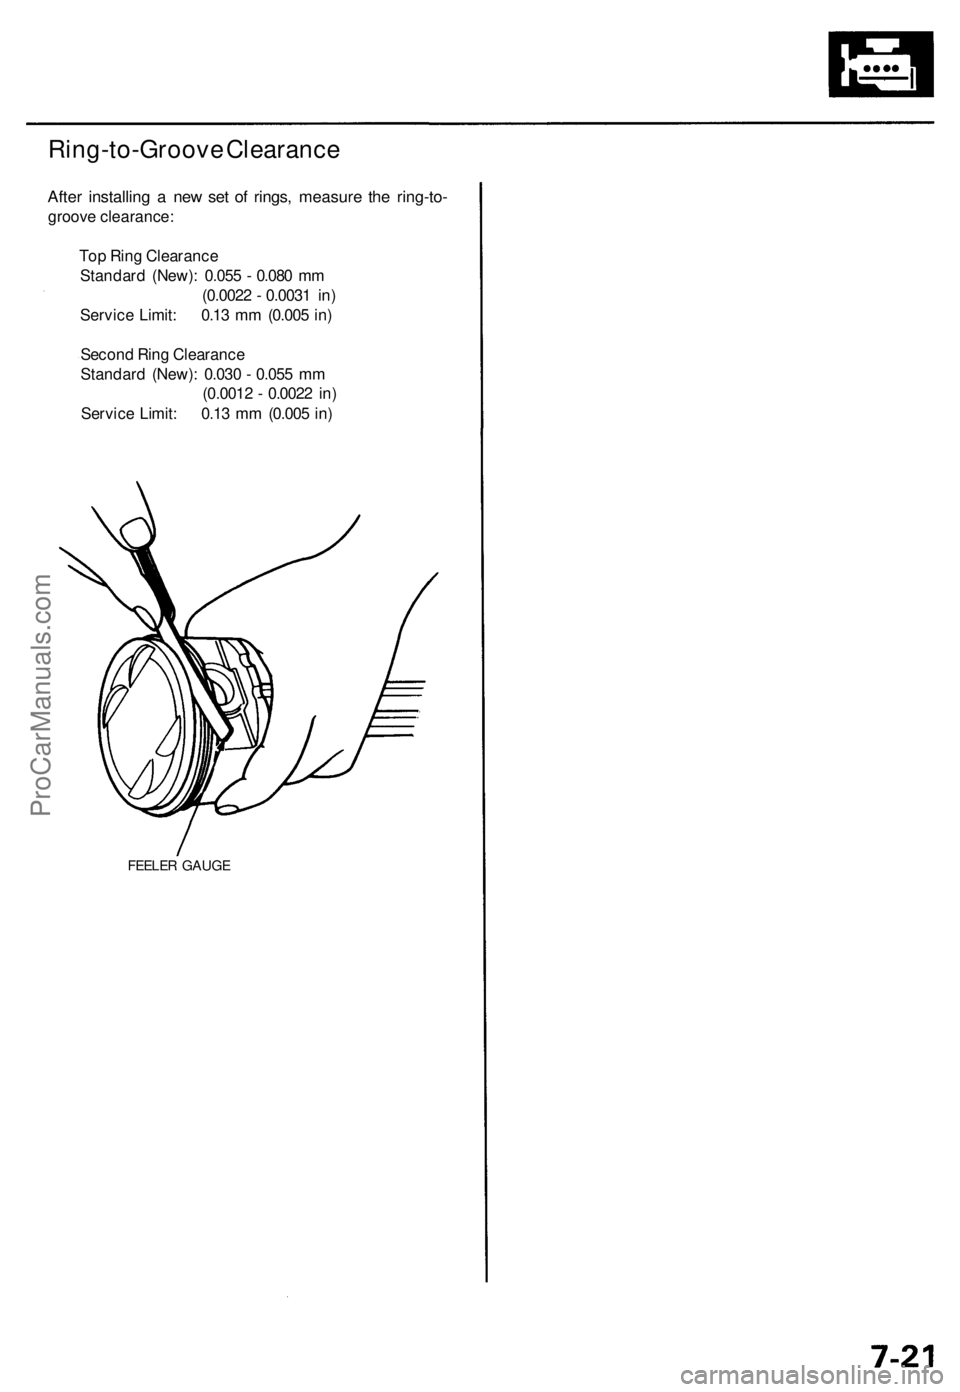
Ring-to-Groove Clearance
After installing a new set of rings, measure the ring-to-
groove clearance:
Top Ring Clearance
Standard (New): 0.055 - 0.080 mm
(0.0022 - 0.0031 in)
Service Limit: 0.13 mm (0.005 in)
Second Ring Clearance
Standard (New): 0.030 - 0.055 mm
(0.0012 - 0.0022 in)
Service Limit: 0.13 mm (0.005 in)
FEELER GAUGEProCarManuals.com