ACURA RL KA9 1996 Service Repair Manual
Manufacturer: ACURA, Model Year: 1996, Model line: RL KA9, Model: ACURA RL KA9 1996Pages: 1954, PDF Size: 61.44 MB
Page 451 of 1954
Alignment
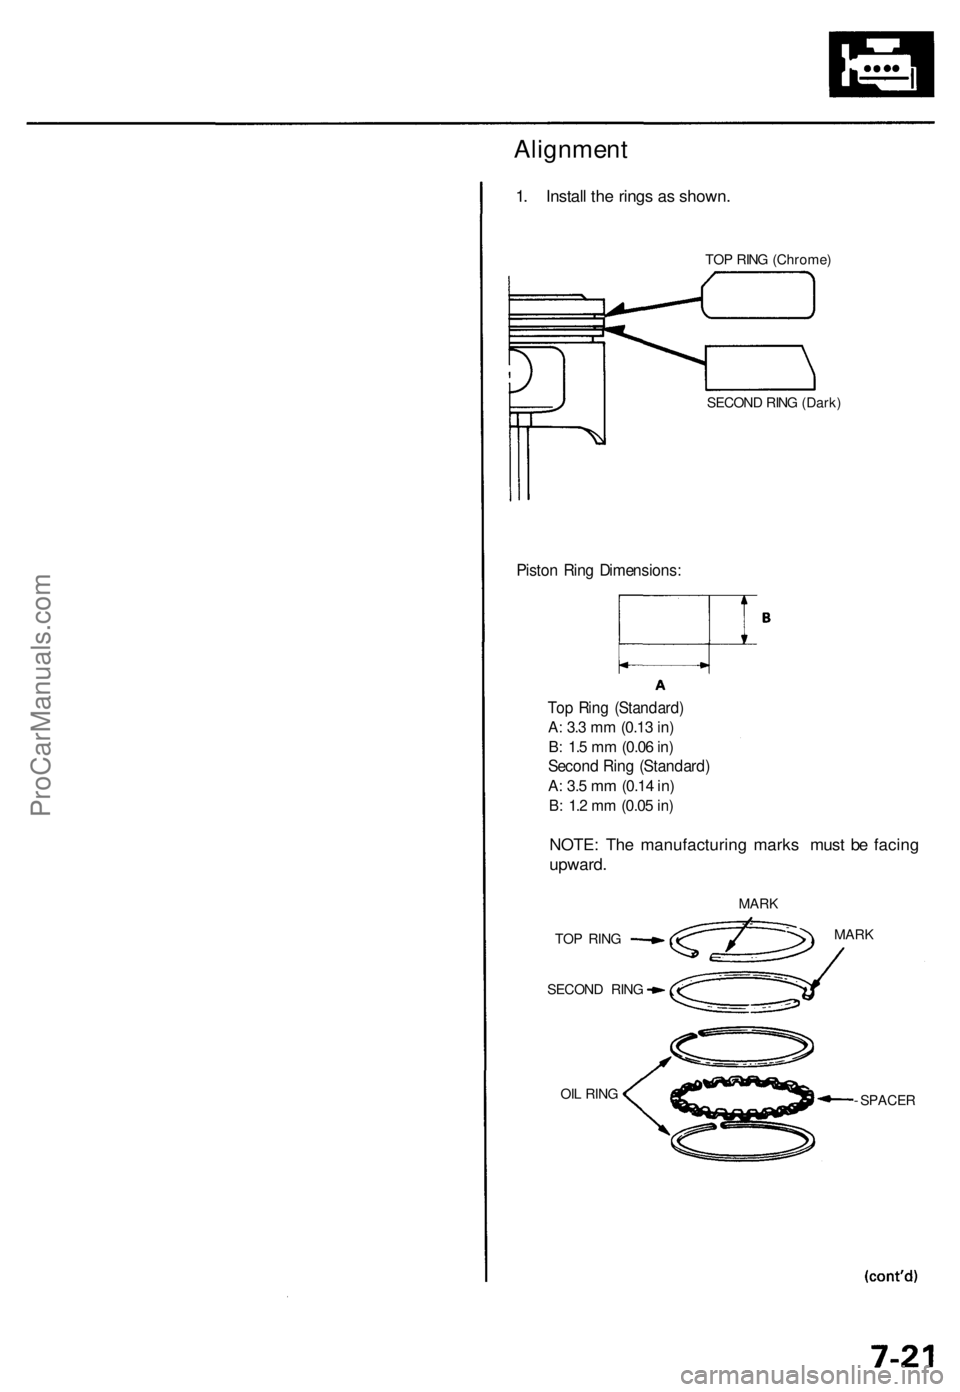
1. Install the rings as shown.
TOP RING (Chrome)
SECOND RING (Dark)
Piston Ring Dimensions:
Top Ring (Standard)
A: 3.3 mm
(0.13
in)
B: 1.5 mm
(0.06
in)
Second Ring (Standard)
A: 3.5 mm
(0.14
in)
B: 1.2 mm
(0.05
in)
NOTE: The manufacturing marks must be facing
upward.
OIL RING
MARK
- SPACER
TOP RING
SECOND RING
MARKProCarManuals.com
Page 452 of 1954
Piston Ring s
Alignmen t (cont'd )
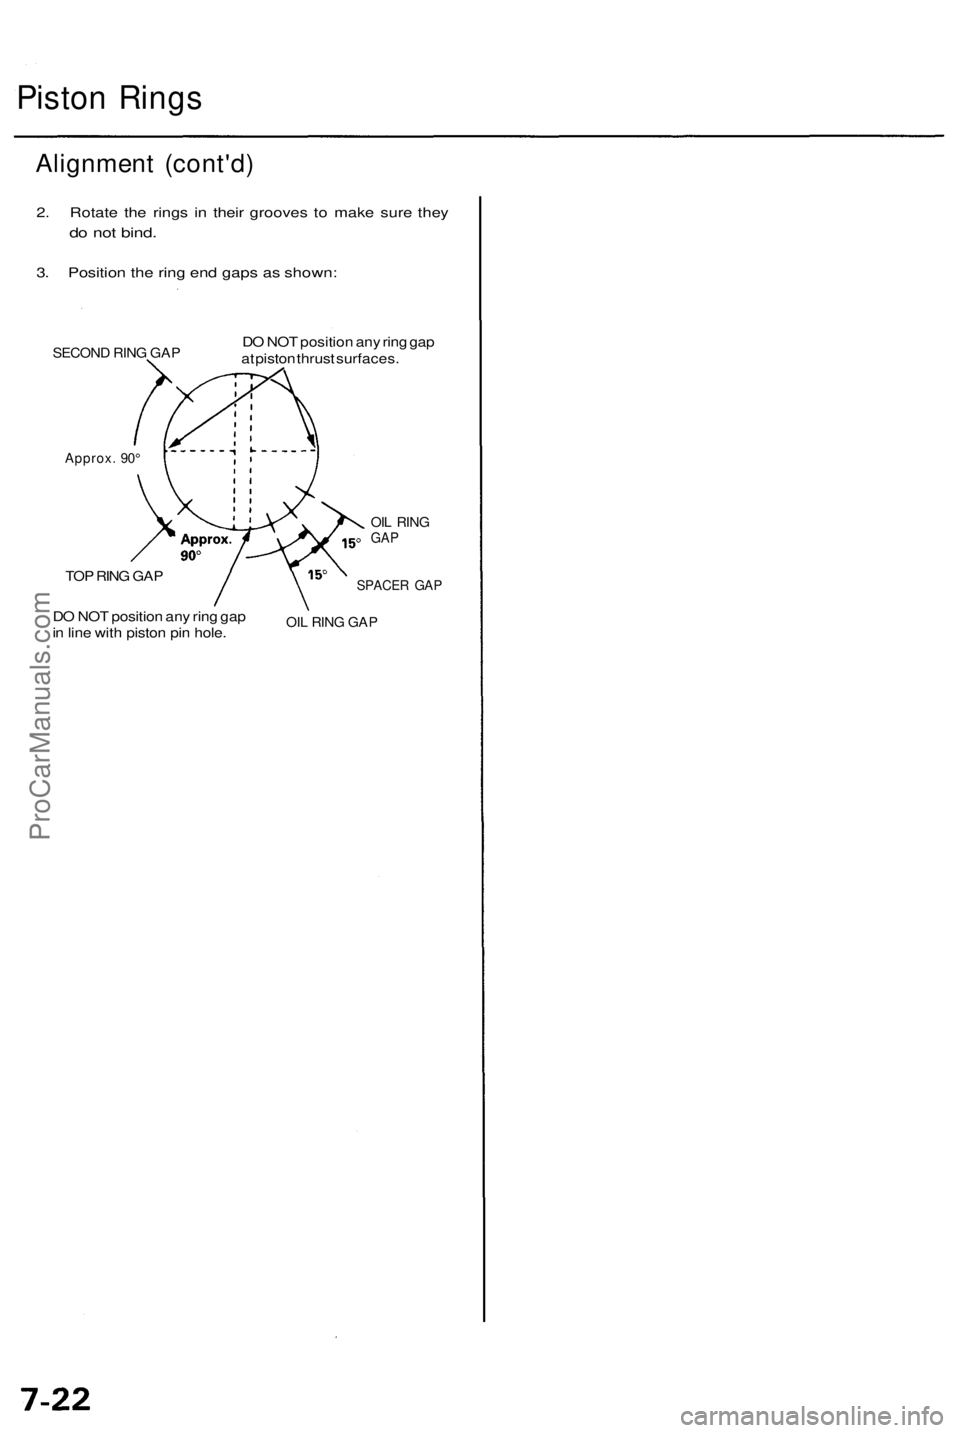
2. Rotat e th e ring s i n thei r groove s t o mak e sur e the y
do no t bind .
3. Positio n th e rin g en d gap s a s shown :
SECON D RIN G GA PDO NO T positio n an y rin g ga p
a t pisto n thrus t surfaces .
Approx. 90 °
TOP RIN G GA P
DO NO T positio n an y rin g ga p
i n lin e wit h pisto n pi n hole .
OIL RIN GGAP
SPACE R GA P
OIL RIN G GA P
ProCarManuals.com
Page 453 of 1954
Crankshaft Oi l Sea l
Installatio n
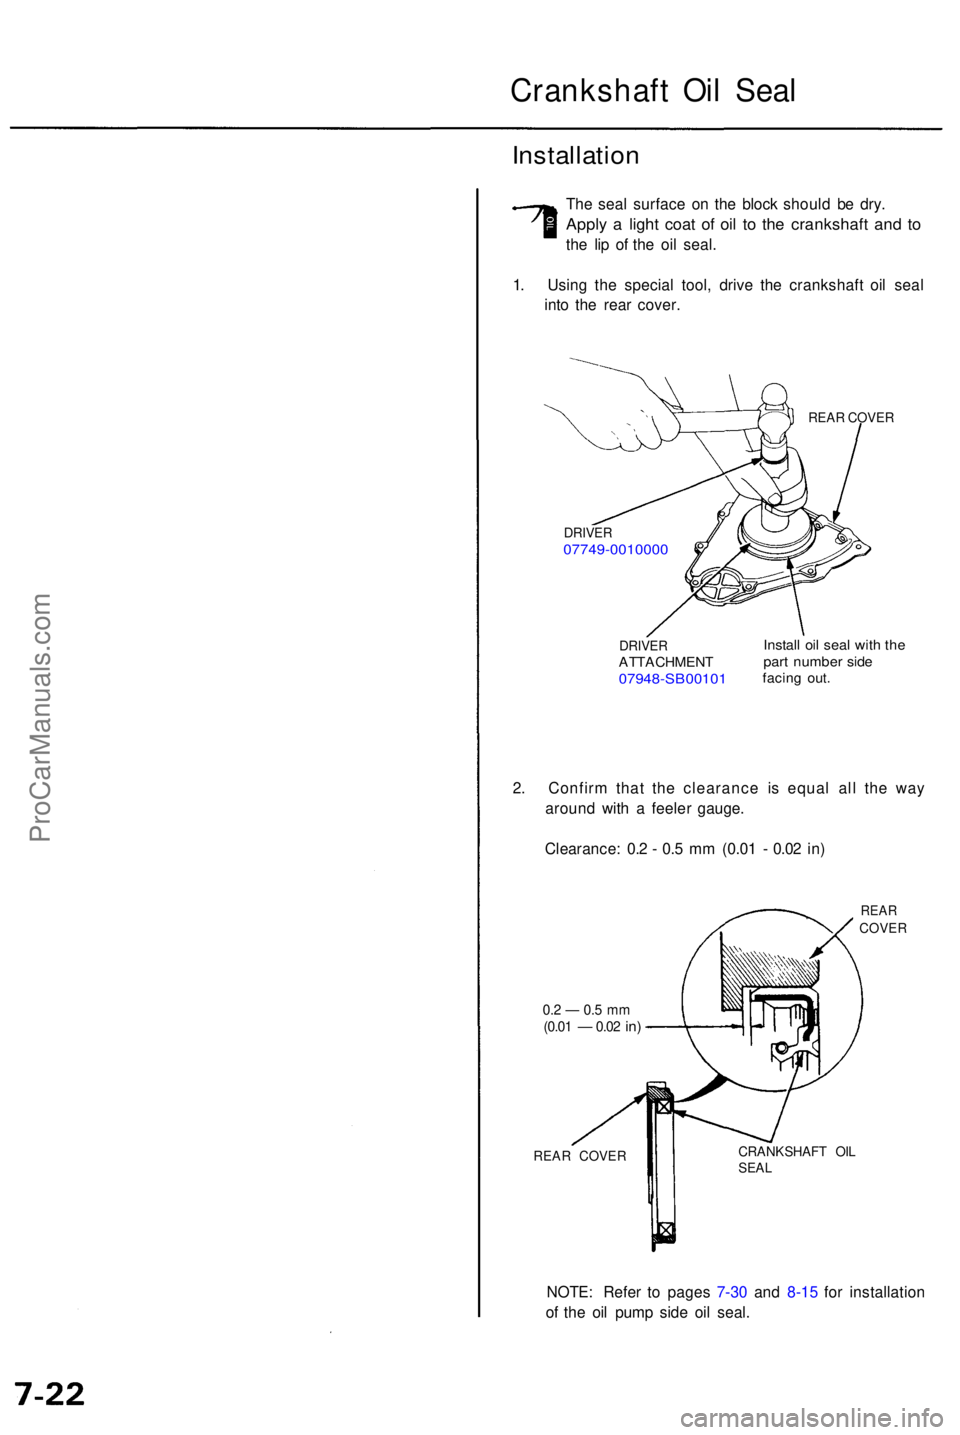
The sea l surfac e o n th e bloc k shoul d b e dry .
Appl y a ligh t coa t o f oi l t o th e crankshaf t an d t o
th e li p o f th e oi l seal .
1 . Usin g th e specia l tool , driv e th e crankshaf t oi l sea l
int o th e rea r cover .
REAR COVE R
DRIVE RATTACHMEN T07948-SB0010 1
Install oi l sea l wit h th epar t numbe r sid efacin g out .
2. Confir m tha t th e clearanc e i s equa l al l th e wa y
aroun d wit h a feele r gauge .
Clearance : 0. 2 - 0. 5 m m (0.0 1 - 0.0 2 in )
0.2 — 0.5 m m(0.0 1 — 0.02 in)
REA R COVE R
REARCOVE R
CRANKSHAF T OI L
SEA L
NOTE : Refe r t o page s 7-3 0 an d 8-1 5 fo r installatio n
o f th e oi l pum p sid e oi l seal .
DRIVE R07749-001000 0
ProCarManuals.com
Page 454 of 1954
3. Stop after the ring compressor pops free, and check
the connecting rod-to-crank journal alignment
before pushing the piston into place.
4. Install the rod caps with bearings, and torque the
nuts to 44 N-m (4.5 kgf-m, 33 Ibf-ft).
RUBBER HOSES
CORRECT
Pistons
Installation
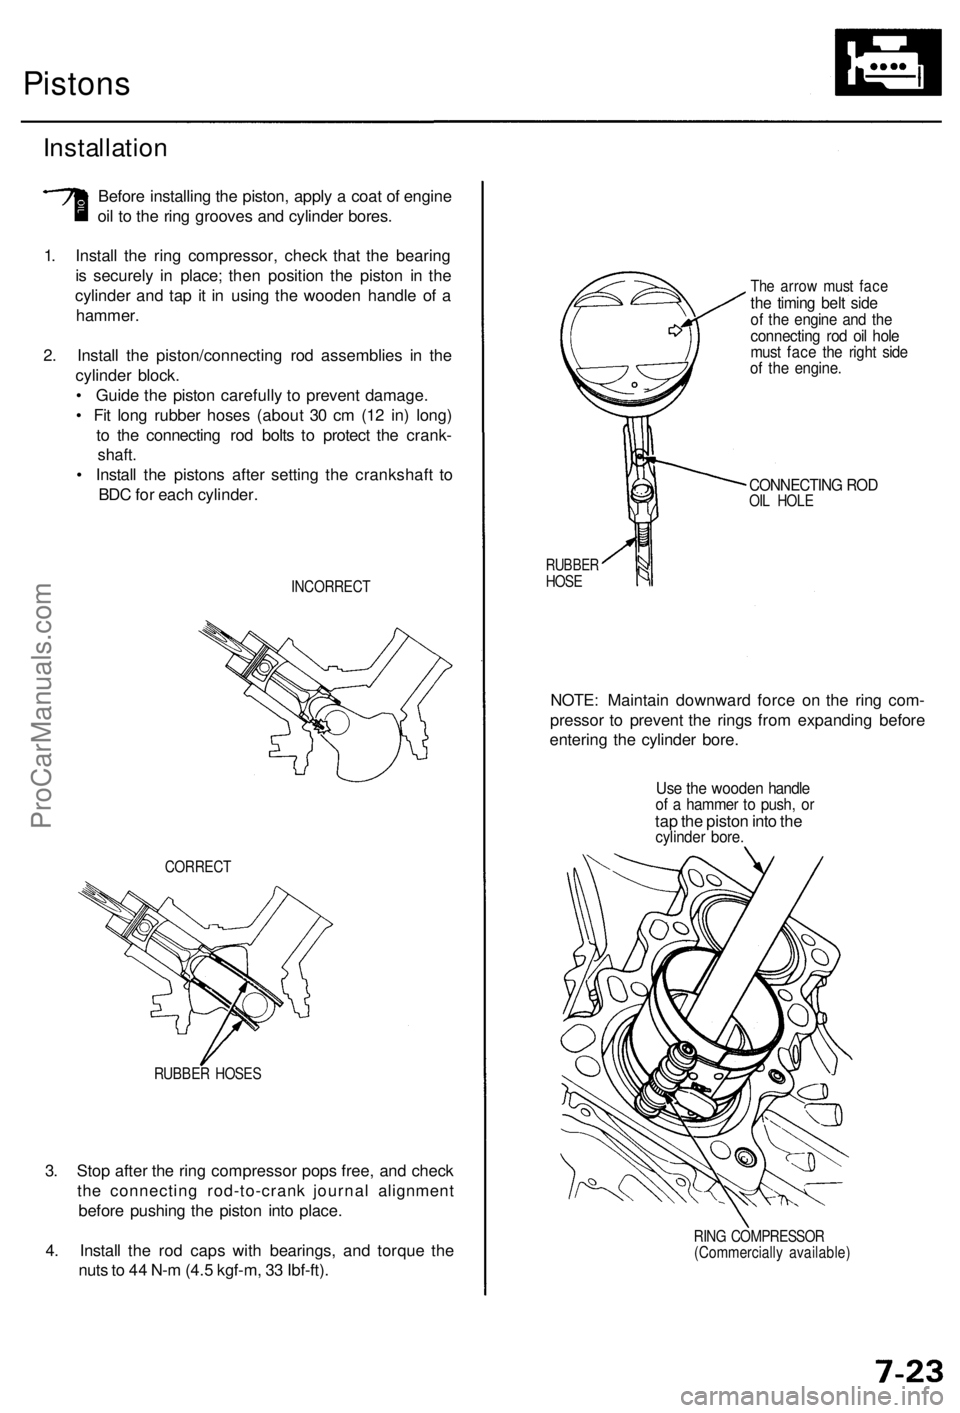
Before installing the piston, apply a coat of engine
oil to the ring grooves and cylinder bores.
1. Install the ring compressor, check that the bearing
is securely in place; then position the piston in the
cylinder and tap it in using the wooden handle of a
hammer.
2. Install the piston/connecting rod assemblies in the
cylinder block.
• Guide the piston carefully to prevent damage.
• Fit long rubber hoses (about 30 cm (12 in) long)
to the connecting rod bolts to protect the crank-
shaft.
• Install the pistons after setting the crankshaft to
BDC for each cylinder.
INCORRECT
The arrow must face
the timing belt side
of the engine and the
connecting rod oil hole
must face the right side
of the engine.
CONNECTING ROD
OIL HOLE
RUBBER
HOSE
NOTE: Maintain downward force on the ring com-
pressor to prevent the rings from expanding before
entering the cylinder bore.
Use the wooden handle
of a hammer to push, or
tap the piston into the
cylinder bore.
RING COMPRESSOR
(Commercially available)ProCarManuals.com
Page 455 of 1954
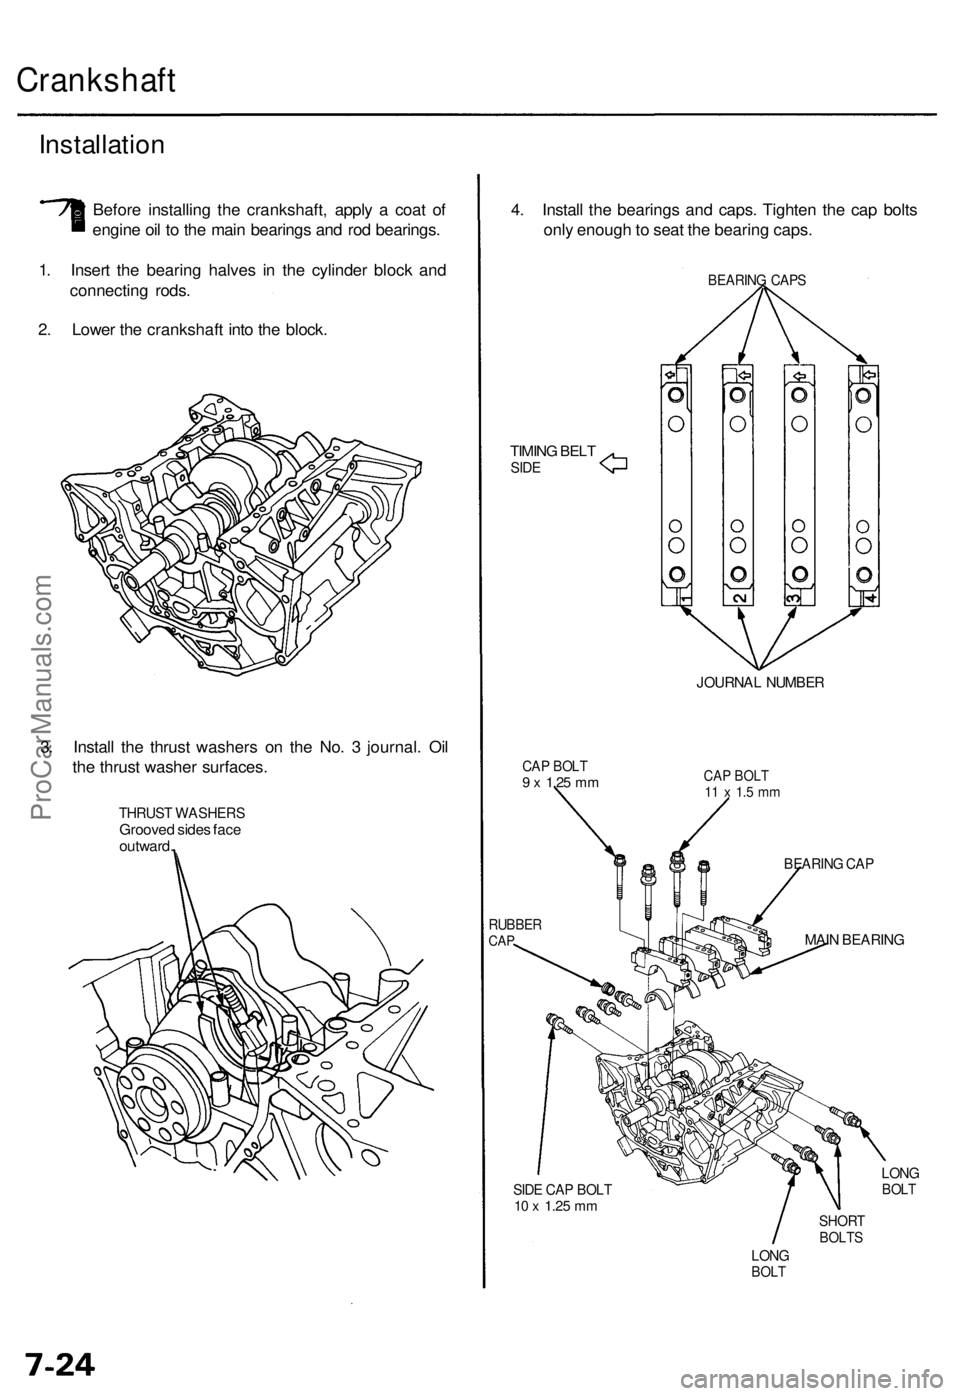
Crankshaft
Installation
Before installin g th e crankshaft , appl y a coa t o f
engin e oi l t o th e mai n bearing s an d ro d bearings .
1 . Inser t th e bearin g halve s i n th e cylinde r bloc k an d
connectin g rods .
2 . Lowe r th e crankshaf t int o th e block . 4
. Instal l th e bearing s an d caps . Tighte n th e ca p bolt s
onl y enoug h to sea t th e bearin g caps .
TIMIN G BEL TSIDE
BEARIN G CAP S
JOURNA L NUMBE R
CAP BOL T9 x 1.2 5 mmCA P BOL T11 x 1. 5 m m
BEARIN G CA P
MAI N BEARIN G
LONGBOL T
SHOR TBOLTS
LONGBOL T
SIDE CA P BOL T10 x 1.2 5 mm
RUBBE RCAP
THRUS T WASHER SGrooved side s fac e
outward .
3. Instal l th e thrus t washer s o n th e No . 3 journal . Oi l
th e thrus t washe r surfaces .
ProCarManuals.com
Page 456 of 1954
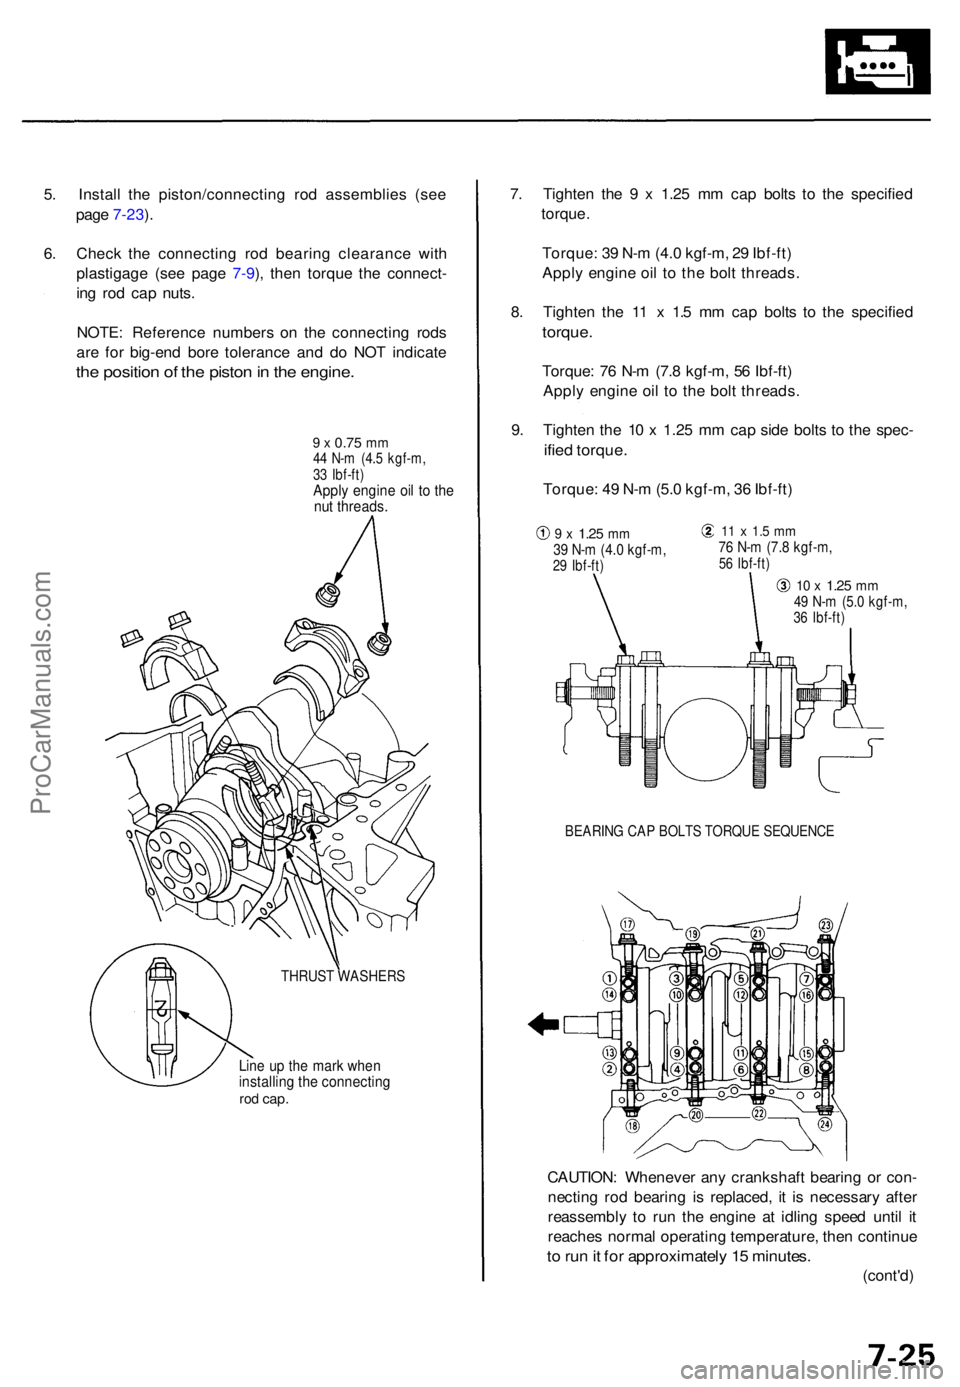
Line u p th e mar k whe ninstallin g th e connectin grod cap .
THRUS T WASHER S
5. Instal l th e piston/connectin g ro d assemblie s (se e
pag e 7-23 ).
6 . Chec k th e connectin g ro d bearin g clearanc e wit h
plastigag e (se e pag e 7-9 ), the n torqu e th e connect -
in g ro d ca p nuts .
NOTE : Referenc e number s o n th e connectin g rod s
ar e fo r big-en d bor e toleranc e an d d o NO T indicat e
the positio n o f th e pisto n in th e engine .
9 x 0.7 5 mm44 N- m (4. 5 kgf-m ,33 Ibf-ft )Apply engin e oi l t o th enut threads .
7. Tighte n th e 9 x 1.2 5 m m ca p bolt s t o th e specifie d
torque .
Torque : 3 9 N- m (4. 0 kgf-m , 2 9 Ibf-ft )
Appl y engin e oi l t o th e bol t threads .
8 . Tighte n th e 1 1 x 1. 5 m m ca p bolt s t o th e specifie d
torque.
Torque : 7 6 N- m (7. 8 kgf-m , 5 6 Ibf-ft )
Appl y engin e oi l t o th e bol t threads .
9 . Tighte n th e 1 0 x 1.2 5 m m ca p sid e bolt s t o th e spec -
ified torque .
Torque : 4 9 N- m (5. 0 kgf-m , 3 6 Ibf-ft )
9 x 1.2 5 mm39 N- m (4. 0 kgf-m ,29 Ibf-ft )
11 x 1. 5 m m76 N- m (7. 8 kgf-m ,56 Ibf-ft )
10 x 1.2 5 mm49 N- m (5. 0 kgf-m ,36 Ibf-ft )
BEARIN G CA P BOLT S TORQU E SEQUENC E
CAUTION: Wheneve r an y crankshaf t bearin g o r con -
nectin g ro d bearin g is replaced , i t i s necessar y afte r
reassembl y t o ru n th e engin e a t idlin g spee d unti l i t
reache s norma l operatin g temperature , the n continu e
to ru n it fo r approximatel y 1 5 minutes .
(cont'd)
ProCarManuals.com
Page 457 of 1954
Crankshaft
Installation (cont'd)
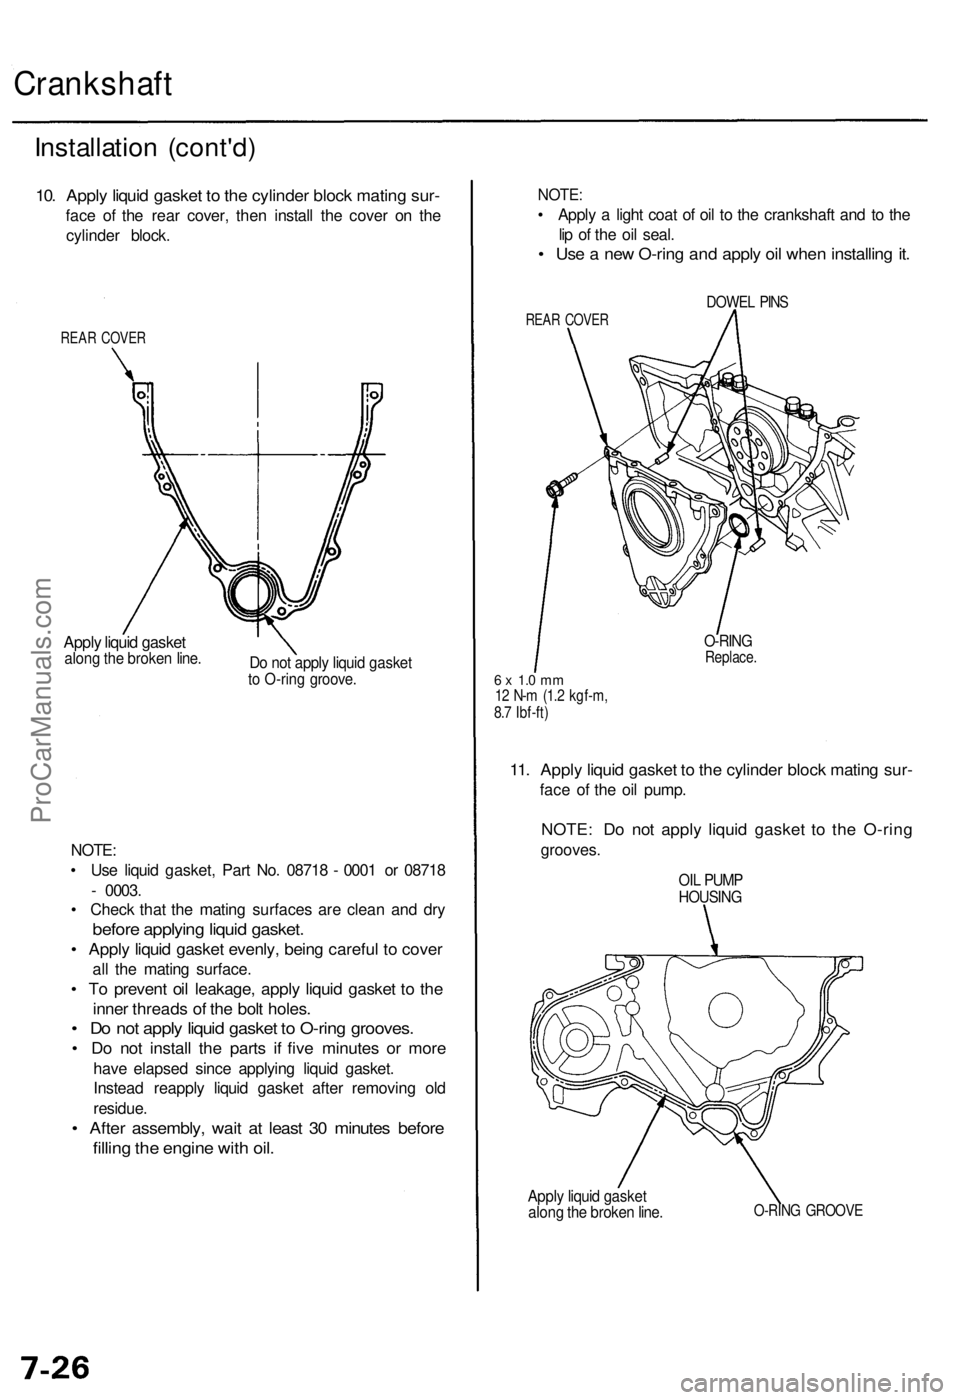
10. Apply liquid gasket to the cylinder block mating sur-
face of the rear cover, then install the cover on the
cylinder block.
REAR COVER
Apply liquid gasket
along the broken line.
Do not apply liquid gasket
to O-ring groove.
NOTE:
• Use liquid gasket, Part No. 08718 - 0001 or 08718
- 0003.
• Check that the mating surfaces are clean and dry
before applying liquid gasket.
• Apply liquid gasket evenly, being careful to cover
all the mating surface.
• To prevent oil leakage, apply liquid gasket to the
inner threads of the bolt holes.
• Do not apply liquid gasket to O-ring grooves.
• Do not install the parts if five minutes or more
have elapsed since applying liquid gasket.
Instead reapply liquid gasket after removing old
residue.
• After assembly, wait at least 30 minutes before
filling the engine with oil.
Apply liquid gasket
along the broken line.
O-RING GROOVE
NOTE:
• Apply a light coat of oil to the crankshaft and to the
lip of the oil seal.
• Use a new O-ring and apply oil when installing it.
REAR COVER
DOWEL PINS
6 x 1.0 mm
12 N-m (1.2 kgf-m,
8.7 Ibf-ft)
O-RING
Replace.
11. Apply liquid gasket to the cylinder block mating sur-
face of the oil pump.
NOTE: Do not apply liquid gasket to the O-ring
grooves.
OIL PUMP
HOUSINGProCarManuals.com
Page 458 of 1954
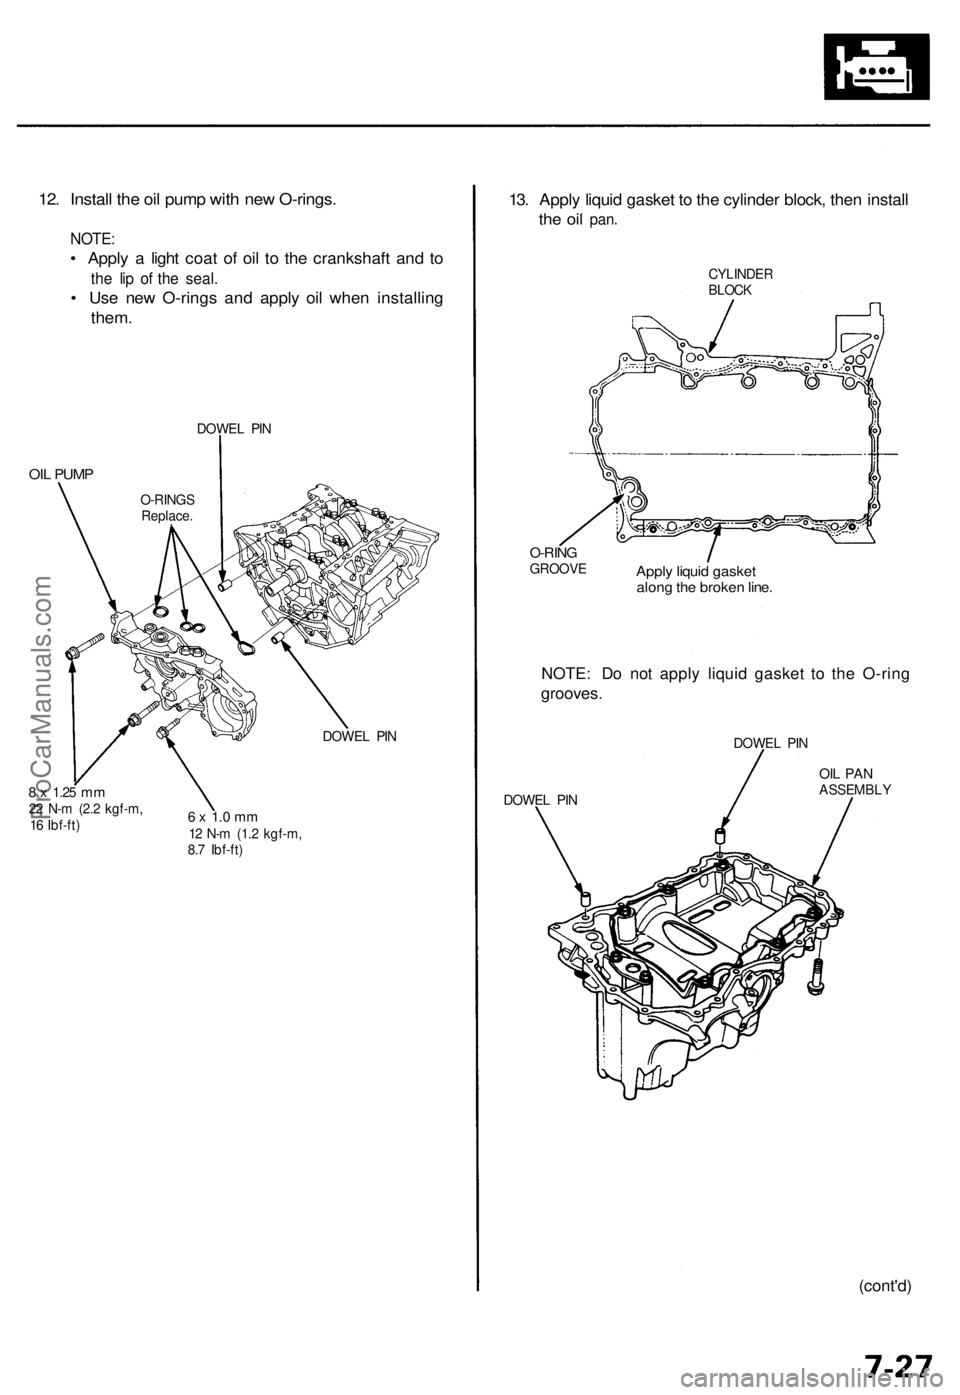
12. Instal l th e oi l pum p wit h ne w O-rings .
NOTE:
• Appl y a ligh t coa t o f oi l t o th e crankshaf t an d t o
th e li p o f th e seal .
• Us e ne w O-ring s an d appl y oi l whe n installin g
them.
DOWE L PI N
O-RING S
Replace .
OIL PUM P
DOWE L PI N
6 x 1. 0 m m12 N- m (1. 2 kgf-m ,
8. 7 Ibf-ft )
8 x 1.2 5 mm22 N- m (2. 2 kgf-m ,
1 6 Ibf-ft ) DOWE
L PI N DOWE
L PI N
OIL PA NASSEMBL Y
NOTE: D o no t appl y liqui d gaske t t o th e O-rin g
grooves .
13. Appl y liqui d gaske t t o th e cylinde r block , the n instal l
the oi l pan .
CYLINDE RBLOCK
Apply liqui d gaske talong th e broke n line .
O-RIN GGROOV E
(cont'd)
ProCarManuals.com
Page 459 of 1954
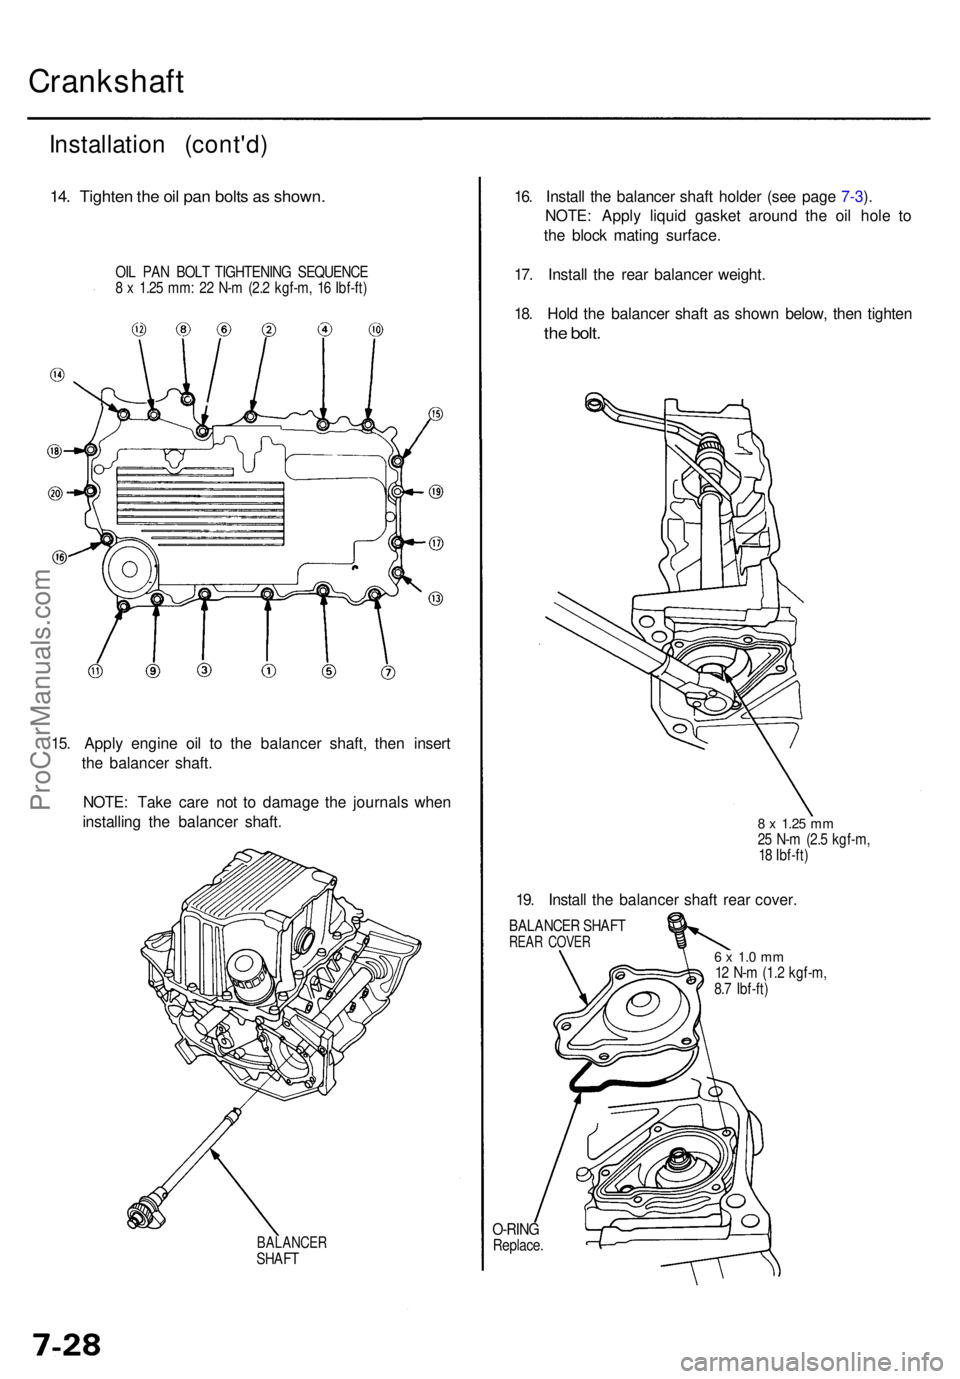
BALANCERSHAFT
Crankshaf t
Installation (cont'd )
14. Tighte n th e oi l pa n bolt s a s shown .
OIL PA N BOL T TIGHTENIN G SEQUENC E
8 x 1.2 5 mm : 2 2 N- m (2. 2 kgf-m , 1 6 Ibf-ft )
15. Appl y engin e oi l t o th e balance r shaft , the n inser t
th e balance r shaft .
NOTE : Tak e car e no t t o damag e th e journal s whe n
installin g th e balance r shaft . 16
. Instal l th e balance r shaf t holde r (se e pag e 7-3 ).
NOTE : Appl y liqui d gaske t aroun d th e oi l hol e t o
th e bloc k matin g surface .
17 . Instal l th e rea r balance r weight .
18 . Hol d th e balance r shaf t a s show n below , the n tighte n
the bolt .
8 x 1.2 5 mm25 N- m (2. 5 kgf-m ,
1 8 Ibf-ft )
19. Instal l th e balance r shaf t rea r cover .
BALANCE R SHAF TREAR COVE R6 x 1. 0 m m12 N- m (1. 2 kgf-m ,
8. 7 Ibf-ft )
O-RIN GReplace .
ProCarManuals.com
Page 460 of 1954
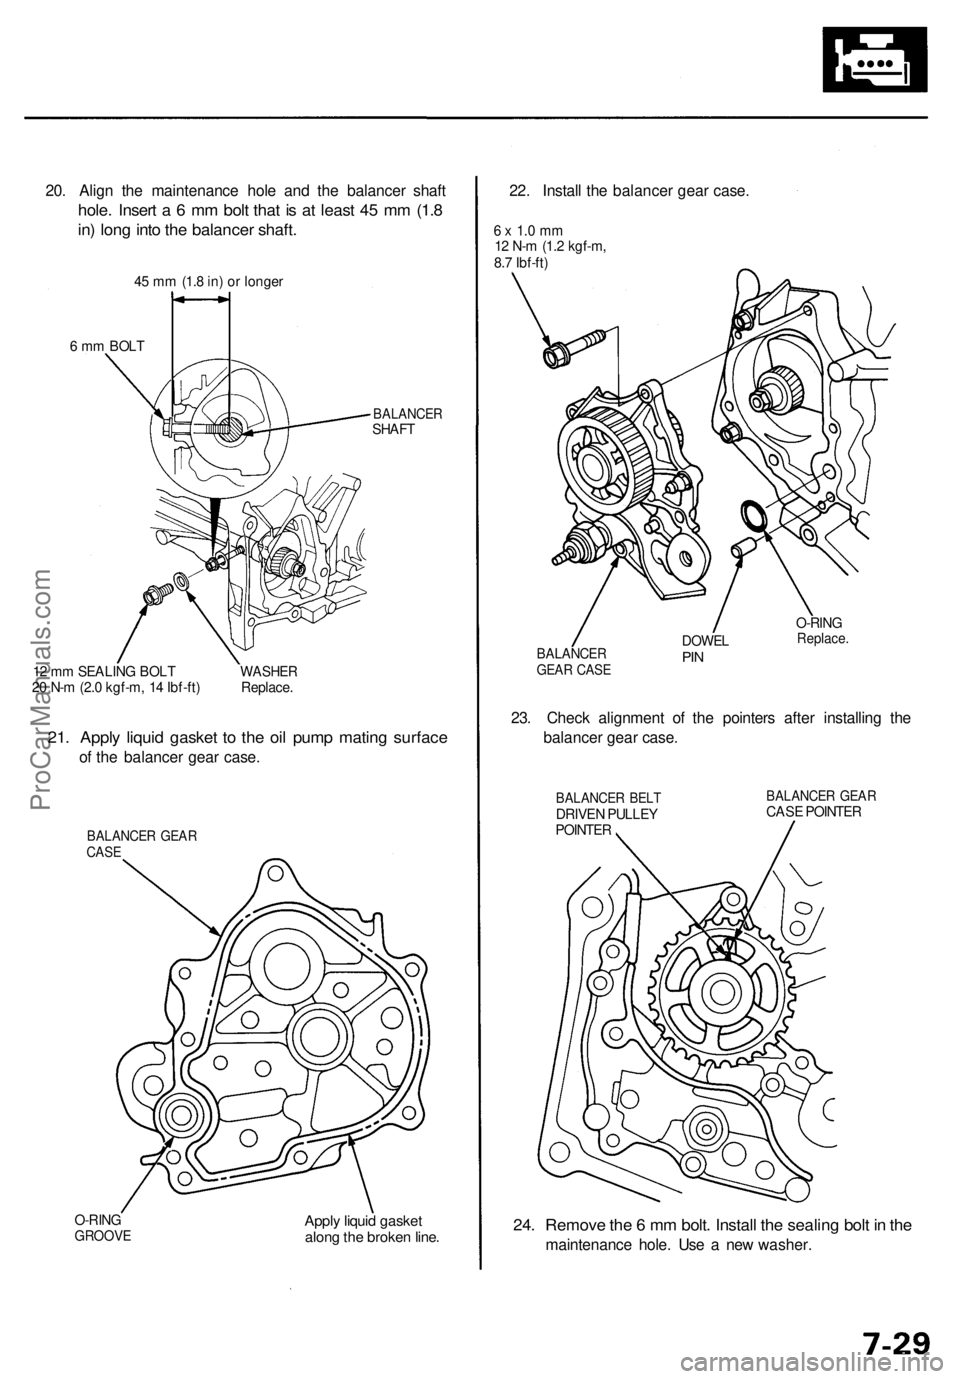
20. Align the maintenance hole and the balancer shaft
hole. Insert a 6 mm bolt that is at least 45 mm (1.8
in) long into the balancer shaft.
45 mm (1.8 in) or longer
6 mm BOLT
BALANCER
SHAFT
12 mm SEALING BOLT
20 N-m (2.0 kgf-m, 14 Ibf-ft)
WASHER
Replace.
21. Apply liquid gasket to the oil pump mating surface
of the balancer gear case.
BALANCER GEAR
CASE
O-RING
GROOVE
Apply liquid gasket
along the broken line.
24. Remove the 6 mm bolt. Install the sealing bolt in the
maintenance hole. Use a new washer.
22. Install the balancer gear case.
6 x 1.0 mm
12 N-m (1.2 kgf-m,
8.7 Ibf-ft)
BALANCER
GEAR CASE
DOWEL
PIN
O-RING
Replace.
23. Check alignment of the pointers after installing the
balancer gear case.
BALANCER BELT
DRIVEN PULLEY
POINTER
BALANCER GEAR
CASE POINTERProCarManuals.com