ACURA RL KA9 1996 Service Repair Manual
Manufacturer: ACURA, Model Year: 1996, Model line: RL KA9, Model: ACURA RL KA9 1996Pages: 1954, PDF Size: 61.44 MB
Page 461 of 1954
Crankshaft Oi l Seal s
Installatio n (engin e remova l no t required )
NOTE: Th e sea l surfac e o n th e bloc k shoul d b e dry .
Appl y a ligh t coa t o f greas e t o th e crankshaf t an d t o th e
lips o f th e seals .
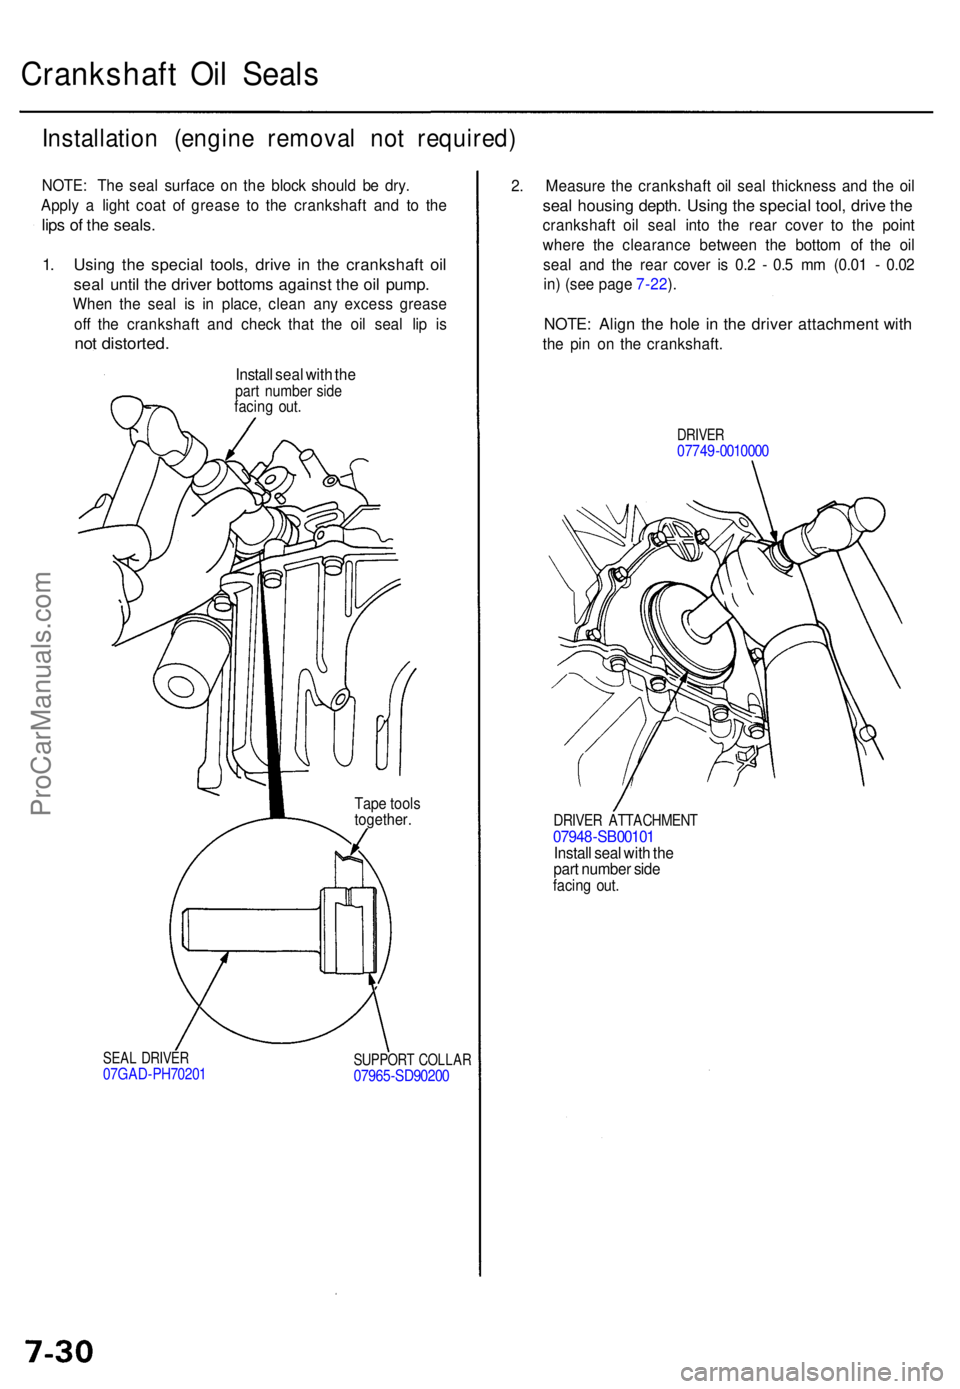
1. Usin g th e specia l tools , driv e i n th e crankshaf t oi l
sea l unti l th e drive r bottom s agains t th e oi l pump .
When th e sea l i s i n place , clea n an y exces s greas e
of f th e crankshaf t an d chec k tha t th e oi l sea l li p i s
no t distorted .
Install sea l wit h th epar t numbe r sid efacin g out .
Tape tool stogether .
SEAL DRIVE R07GAD-PH7020 1SUPPOR T COLLA R07965-SD9020 0
2. Measur e th e crankshaf t oi l sea l thicknes s an d th e oi l
sea l housin g depth . Usin g th e specia l tool , driv e th e
crankshaf t oi l sea l int o th e rea r cove r t o th e poin t
wher e th e clearanc e betwee n th e botto m o f th e oi l
sea l an d th e rea r cove r i s 0. 2 - 0. 5 m m (0.0 1 - 0.0 2
in ) (se e pag e 7-22 ).
NOTE : Alig n th e hol e i n th e drive r attachmen t wit h
the pi n o n th e crankshaft .
DRIVER07749-001000 0
DRIVER ATTACHMEN T07948-SB0010 1
Instal l sea l wit h th e
par t numbe r sid e
facin g out .
ProCarManuals.com
Page 462 of 1954
Special Tool s
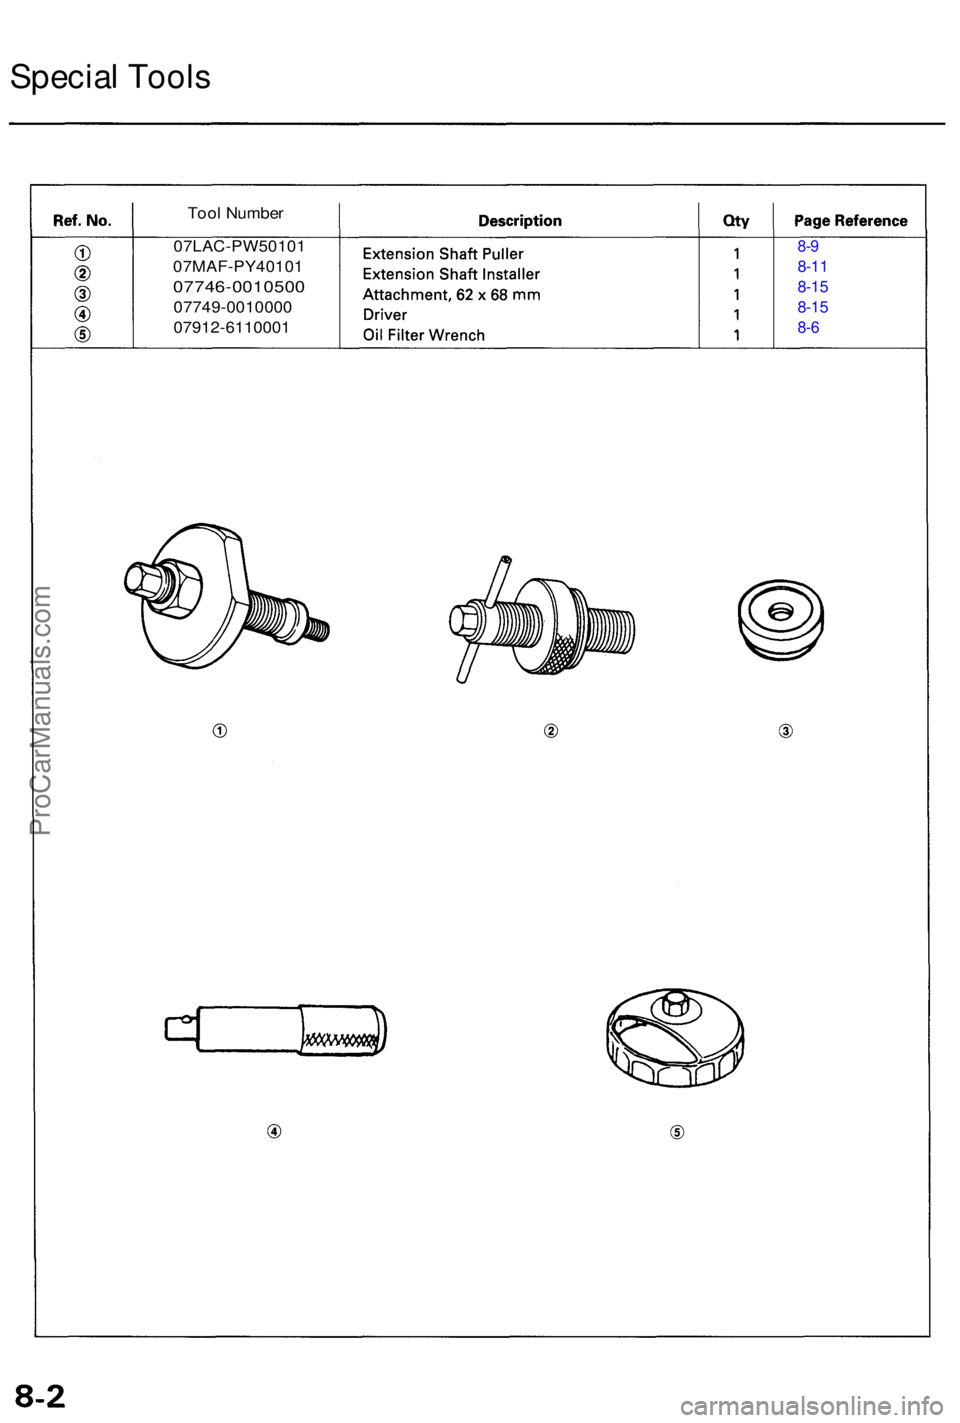
07LAC-PW5010 1
07MAF-PY4010 1
07746-0010500
07749-0010000
07912-611000 1
Too
l Numbe r
8-9
8-1 1
8-1 5
8-1 5
8-6
ProCarManuals.com
Page 463 of 1954
Illustrated Inde x
NOTE :
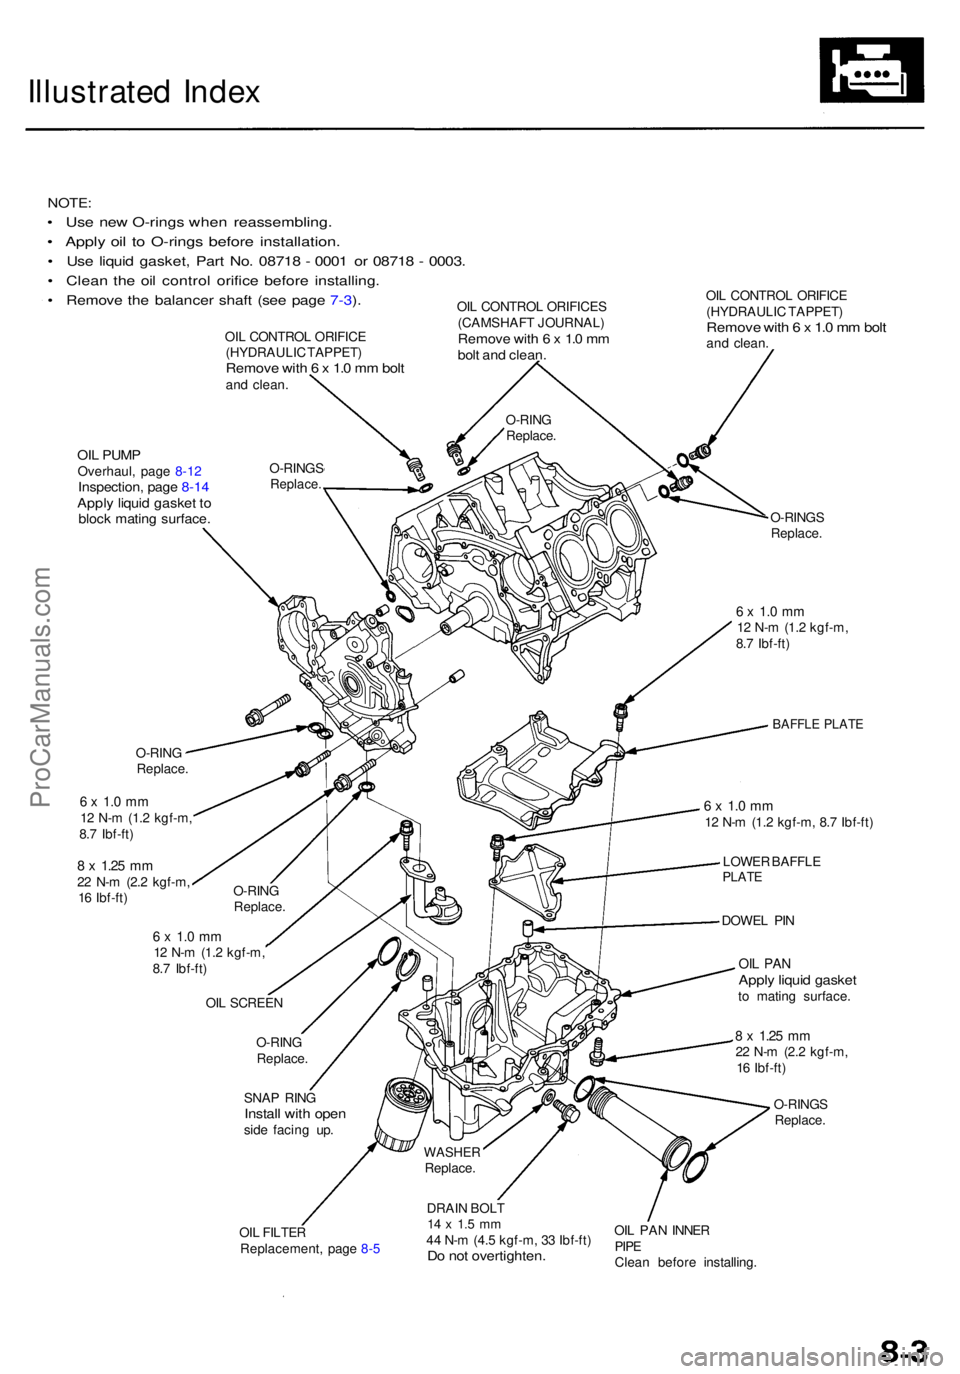
• Us e ne w O-ring s whe n reassembling .
• Appl y oi l t o O-ring s befor e installation .
• Us e liqui d gasket , Par t No . 0871 8 - 000 1 o r 0871 8 - 0003 .
• Clea n th e oi l contro l orific e befor e installing .
• Remov e th e balance r shaf t (se e pag e 7-3 ).
OI L CONTRO L ORIFIC E
(HYDRAULI C TAPPET )
Remove wit h 6 x 1. 0 m m bol tand clean . OI
L CONTRO L ORIFICE S
(CAMSHAF T JOURNAL )
Remove wit h 6 x 1. 0 m mbol t an d clean .
OIL PUM POverhaul , pag e 8-1 2Inspection , pag e 8-1 4Appl y liqui d gaske t t obloc k matin g surface .
O-RINGReplace .
6 x 1. 0 m m12 N- m (1. 2 kgf-m ,
8. 7 Ibf-ft )
8 x 1.2 5 mm22 N- m (2. 2 kgf-m ,
1 6 Ibf-ft ) OI
L CONTRO L ORIFIC E
(HYDRAULI C TAPPET )
Remove wit h 6 x 1. 0 m m bol tand clean .
O-RING S
Replace .
6 x 1. 0 m m12 N- m (1. 2 kgf-m ,
8. 7 Ibf-ft )
BAFFL E PLAT E
6 x 1. 0 m m12 N- m (1. 2 kgf-m ,
8. 7 Ibf-ft )
SNAP RIN G
Instal l wit h ope nside facin g up .
6 x 1. 0 m m12 N- m (1. 2 kgf-m , 8. 7 Ibf-ft )
LOWE R BAFFL E
PLATE
DOWE L PI N
OIL PA NAppl y liqui d gaske tto matin g surface .
8 x 1.2 5 mm22 N- m (2. 2 kgf-m ,
1 6 Ibf-ft )
O-RING S
Replace .
OI L FILTE R
Replacement , pag e 8- 5 DRAI
N BOL T
14 x 1. 5 m m44 N- m (4. 5 kgf-m , 3 3 Ibf-ft )Do no t overtighten .
OIL PA N INNE RPIPEClea n befor e installing .
O-RIN
G
Replace .
O-RING S
Replace .
O-RING
Replace .
OI L SCREE N
O-RIN G
Replace .
WASHE RReplace.
ProCarManuals.com
Page 464 of 1954
Engine Oi l
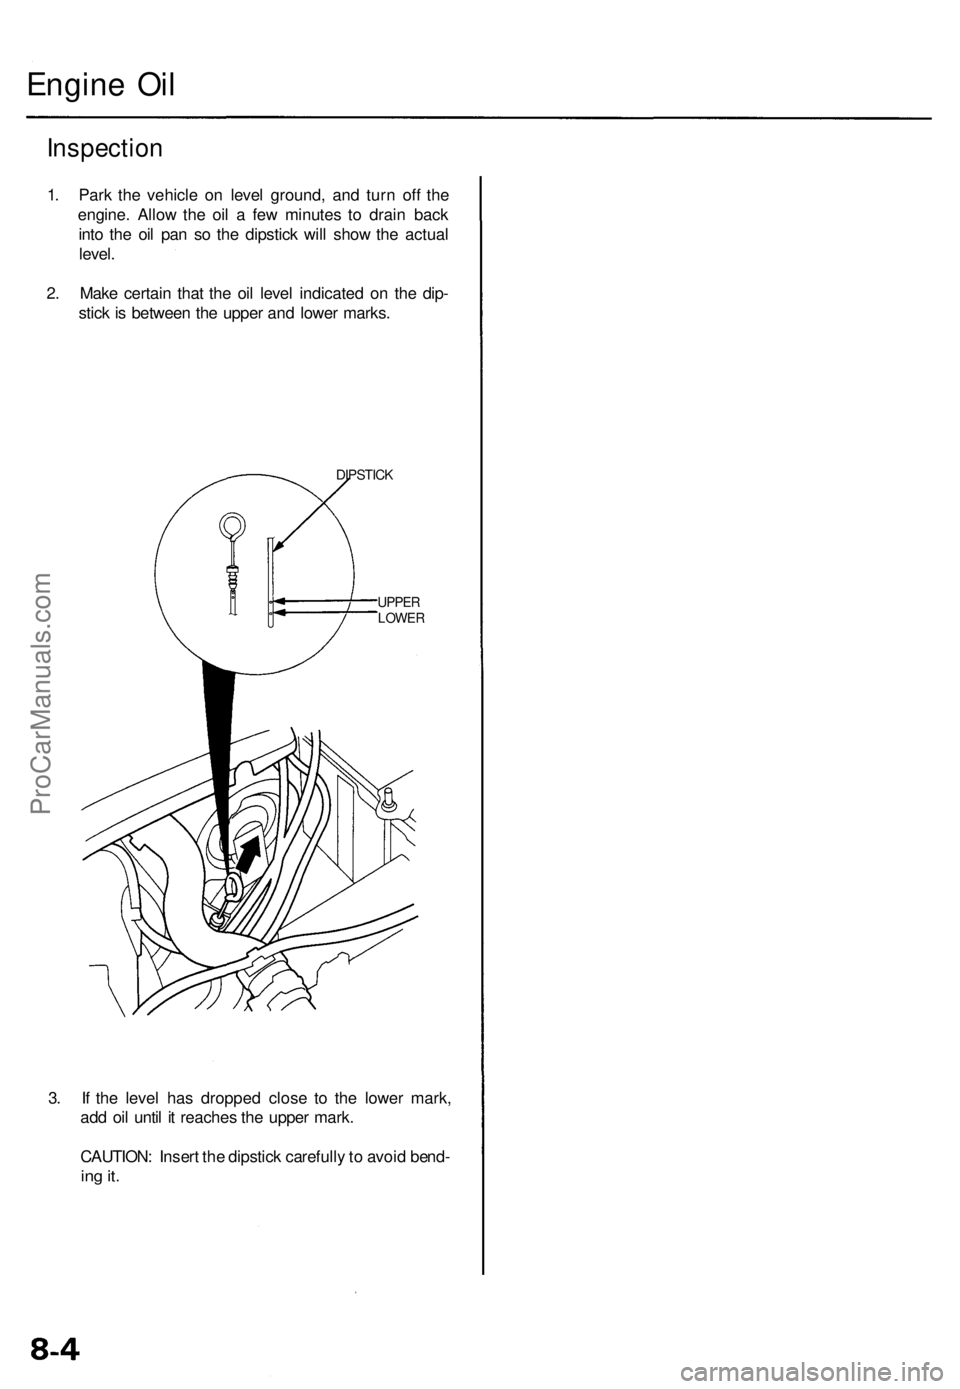
1. Par k th e vehicl e o n leve l ground , an d tur n of f th e
engine . Allo w th e oi l a fe w minute s t o drai n bac k
int o th e oi l pa n s o th e dipstic k wil l sho w th e actua l
level .
2 . Mak e certai n tha t th e oi l leve l indicate d o n th e dip -
stic k is betwee n th e uppe r an d lowe r marks .
DIPSTIC K
UPPERLOWE R
3. I f th e leve l ha s droppe d clos e t o th e lowe r mark ,
ad d oi l unti l i t reache s th e uppe r mark .
CAUTION : Inser t th e dipstic k carefull y to avoi d bend -
ing it .
Inspectio n
ProCarManuals.com
Page 465 of 1954
Engine Oi l
Replacemen t
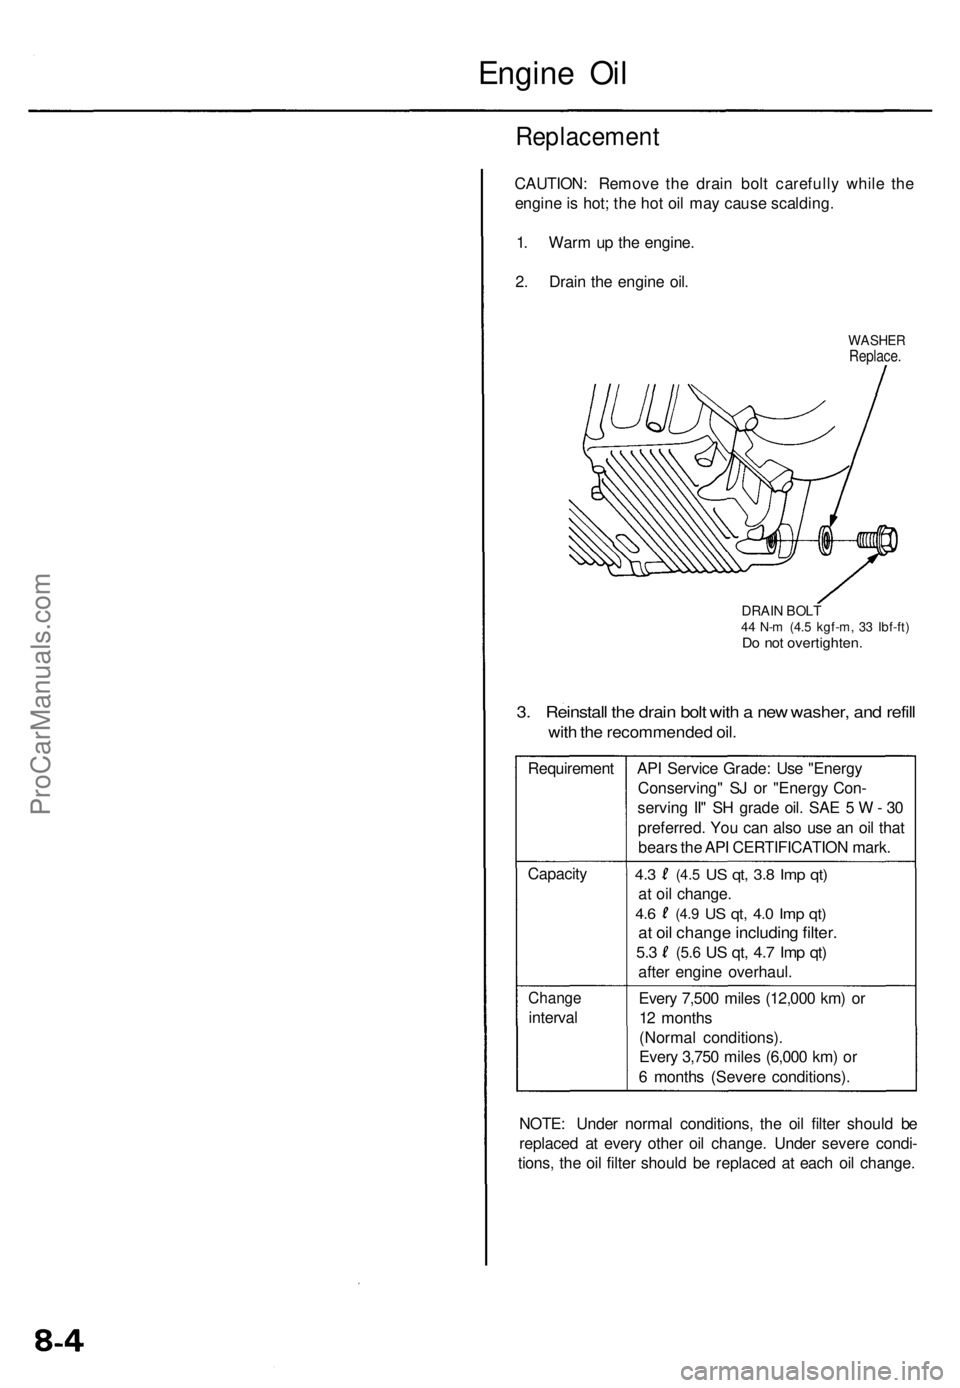
CAUTION: Remov e th e drai n bol t carefull y whil e th e
engin e is hot ; th e ho t oi l ma y caus e scalding .
1 . War m u p th e engine .
2 . Drai n th e engin e oil .
WASHE RReplace.
DRAIN BOL T44 N- m (4. 5 kgf-m , 3 3 Ibf-ft )Do no t overtighten .
3. Reinstal l th e drai n bol t wit h a ne w washer , an d refil l
with th e recommende d oil .
Requiremen tAPI Servic e Grade : Us e "Energ y
Conserving " S J o r "Energ y Con -
servin g II " S H grad e oil . SA E 5 W - 30
preferred . Yo u ca n als o us e a n oi l tha t
bear s th e AP I CERTIFICATIO N mark .
Capacit y
4.3 (4. 5 US qt , 3. 8 Im p qt )
at oi l change .
4.6 (4. 9 US qt , 4. 0 Im p qt )
at oi l chang e includin g filter .
5.3 (5. 6 US qt , 4. 7 Im p qt )
afte r engin e overhaul .
Change
interval Ever
y 7,50 0 mile s (12,00 0 km ) o r
1 2 month s
(Norma l conditions) .
Ever y 3,75 0 mile s (6,00 0 km ) o r
6 month s (Sever e conditions) .
NOTE : Unde r norma l conditions , th e oi l filte r shoul d b e
replace d a t ever y othe r oi l change . Unde r sever e condi -
tions , th e oi l filte r shoul d b e replace d a t eac h oi l change .
ProCarManuals.com
Page 466 of 1954
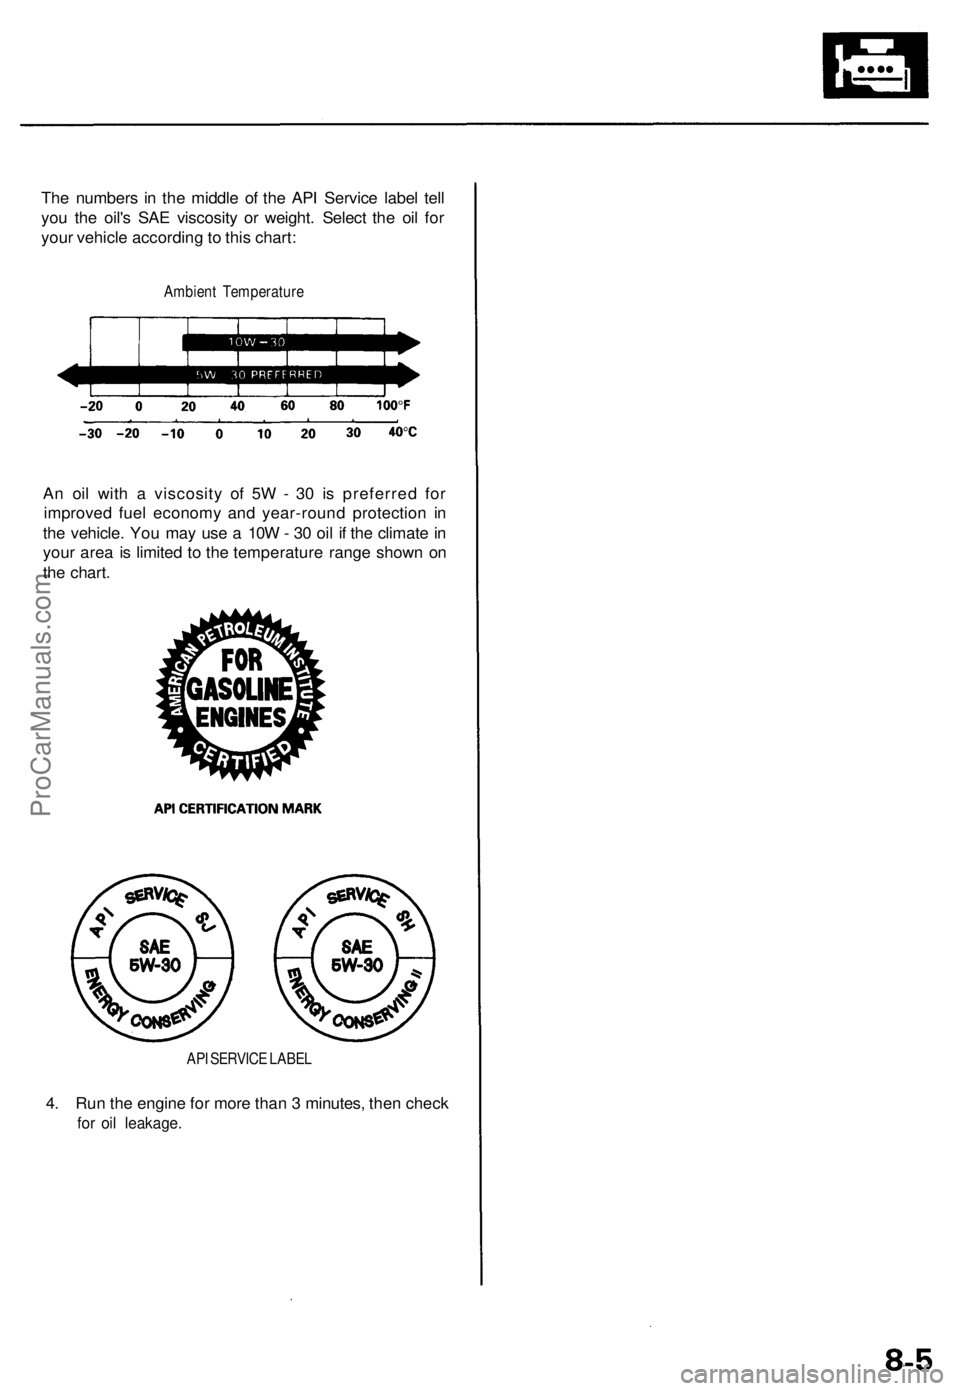
The numbers in the middle of the API Service label tell
you the oil's SAE viscosity or weight. Select the oil for
your vehicle according to this chart:
Ambient Temperature
An oil with a viscosity of 5W - 30 is preferred for
improved fuel economy and year-round protection in
the vehicle. You may use a 10W - 30 oil if the climate in
your area is limited to the temperature range shown on
the chart.
API SERVICE LABEL
4. Run the engine for more than 3 minutes, then check
for oil leakage.ProCarManuals.com
Page 467 of 1954
Oil Filter
Replacement
CAUTION: Loosen the engine oil filter carefully while
the engine is hot, the hot oil may cause scalding.
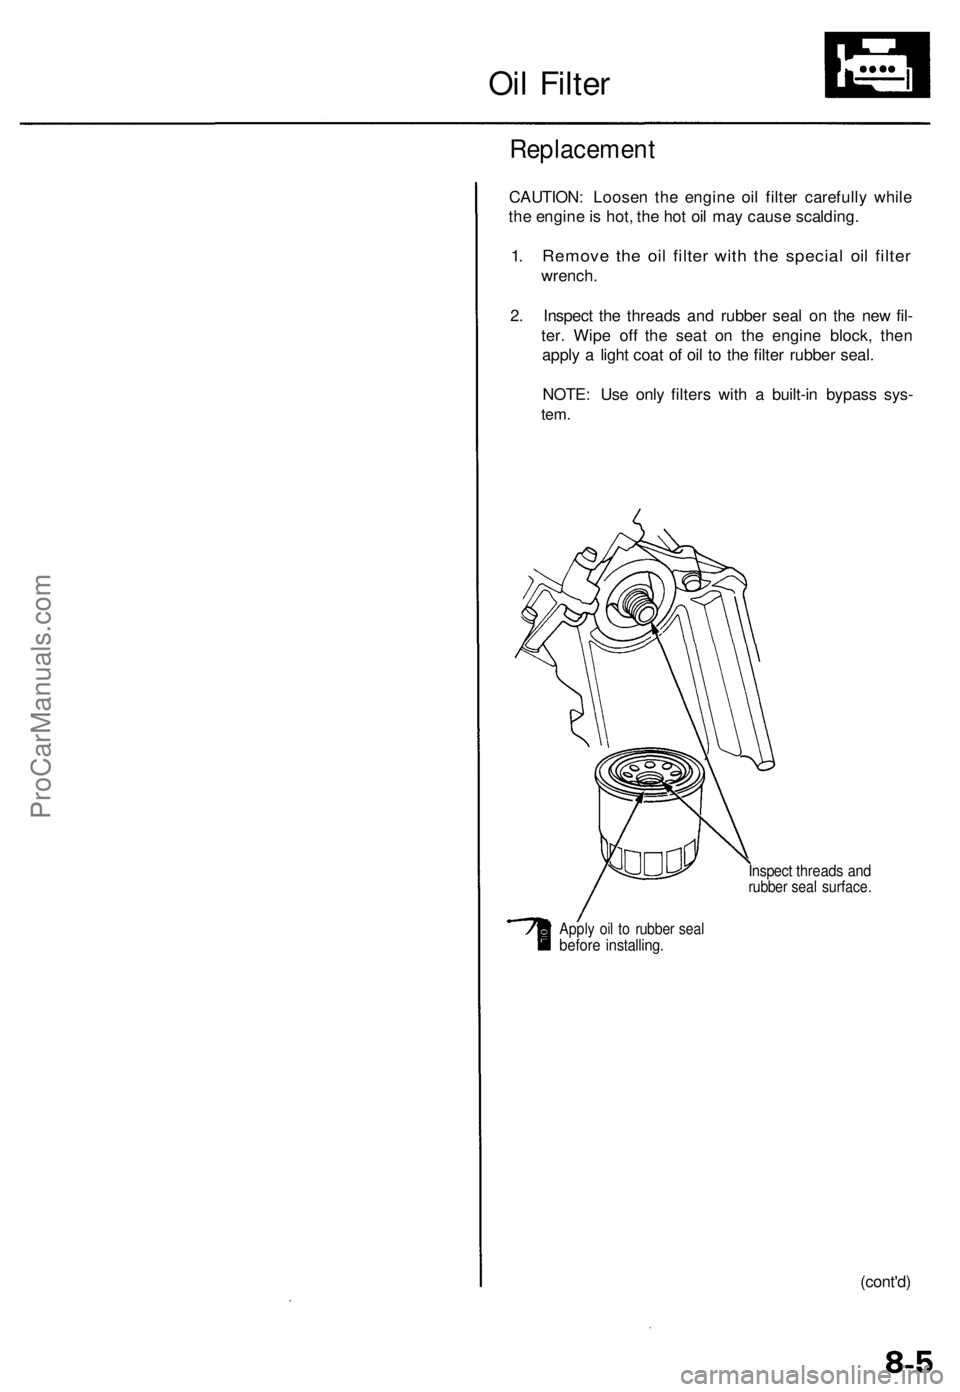
1. Remove the oil filter with the special oil filter
wrench.
2. Inspect the threads and rubber seal on the new fil-
ter. Wipe off the seat on the engine block, then
apply a light coat of oil to the filter rubber seal.
NOTE: Use only filters with a built-in bypass sys-
tem.
Inspect threads and
rubber seal surface.
Apply oil to rubber seal
before installing.
(cont'd)ProCarManuals.com
Page 468 of 1954
Replacement (cont'd )
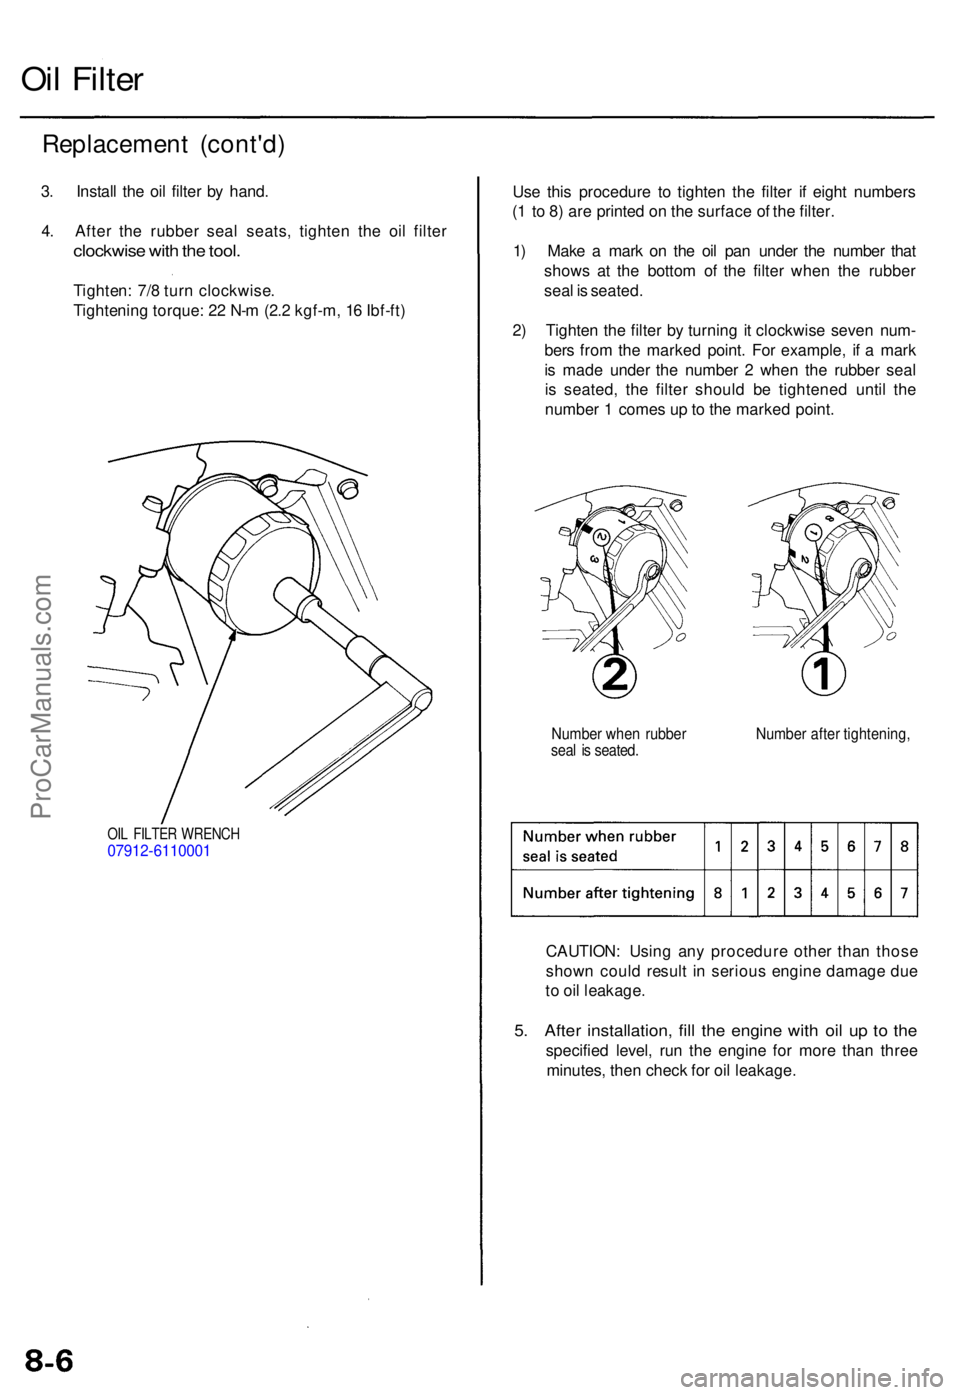
3. Instal l th e oi l filte r b y hand .
4 . Afte r th e rubbe r sea l seats , tighte n th e oi l filte r
clockwis e wit h th e tool .
Tighten : 7/ 8 tur n clockwise .
Tightenin g torque : 2 2 N- m (2. 2 kgf-m , 1 6 Ibf-ft )
Oil Filte r
OIL FILTE R WRENC H07912-611000 1
Use thi s procedur e t o tighte n th e filte r i f eigh t number s
( 1 t o 8 ) ar e printe d o n th e surfac e o f th e filter .
1 ) Mak e a mar k o n th e oi l pa n unde r th e numbe r tha t
show s a t th e botto m o f th e filte r whe n th e rubbe r
sea l i s seated .
2 ) Tighte n th e filte r b y turnin g i t clockwis e seve n num -
ber s fro m th e marke d point . Fo r example , i f a mar k
i s mad e unde r th e numbe r 2 whe n th e rubbe r sea l
i s seated , th e filte r shoul d b e tightene d unti l th e
numbe r 1 come s u p to th e marke d point .
Numbe r whe n rubbe r Numbe r afte r tightening ,seal i s seated .
CAUTION : Usin g an y procedur e othe r tha n thos e
show n coul d resul t i n seriou s engin e damag e du e
t o oi l leakage .
5. Afte r installation , fil l th e engin e wit h oi l u p t o th e
specifie d level , ru n th e engine for mor e tha n thre e
minutes , the n chec k fo r oi l leakage .
ProCarManuals.com
Page 469 of 1954
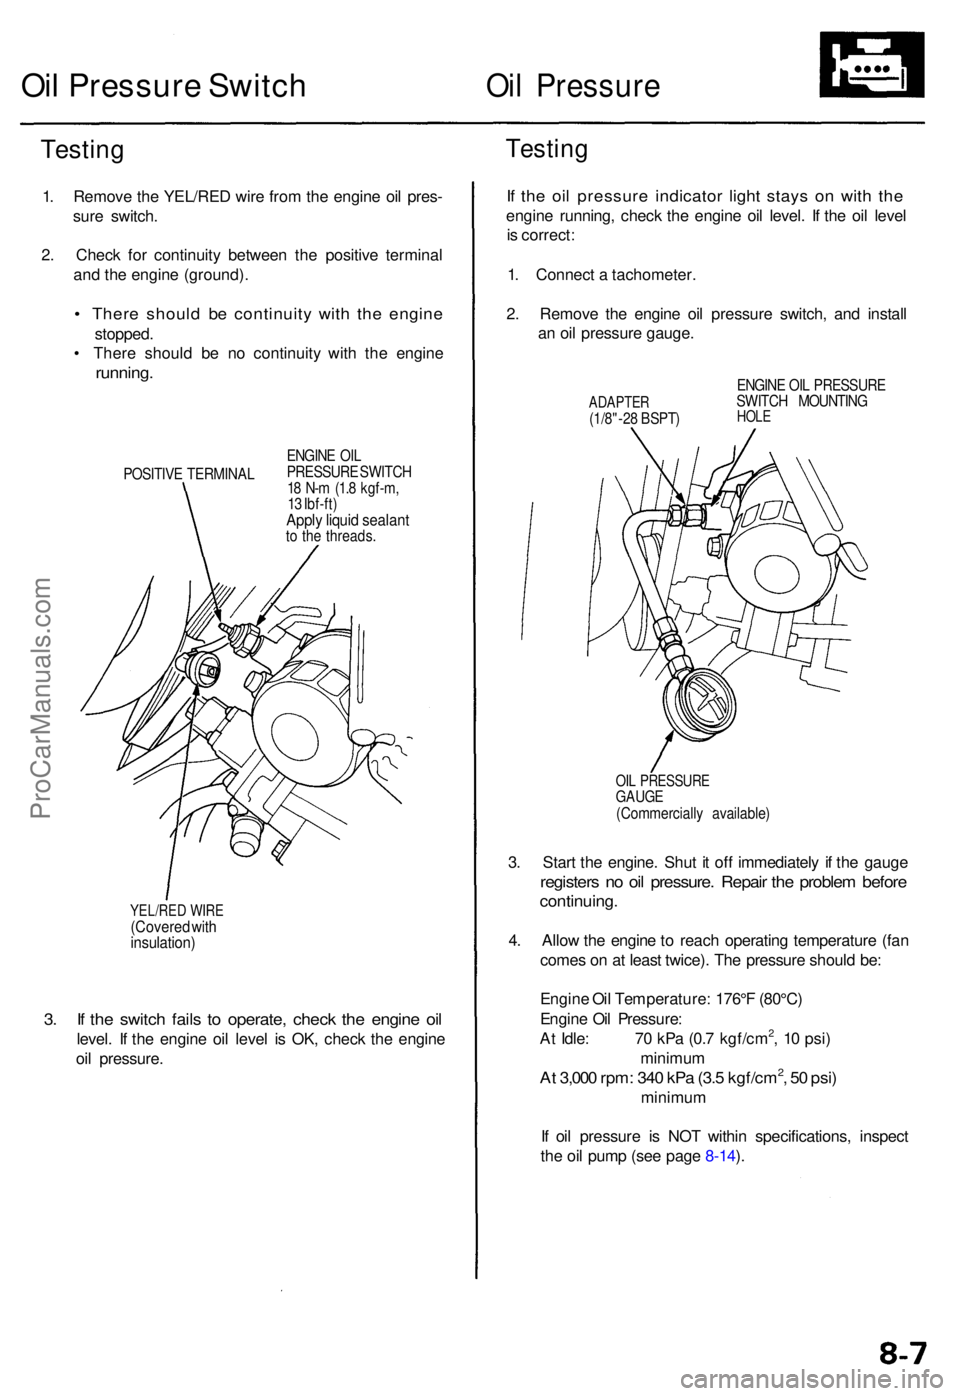
3. I f th e switc h fail s t o operate , chec k th e engin e oi l
level . I f th e engin e oi l leve l i s OK , chec k th e engin e
oi l pressure .
YEL/RED WIR E(Covere d wit hinsulation )
Testing
1. Remov e th e YEL/RE D wir e fro m th e engin e oi l pres -
sur e switch .
2 . Chec k fo r continuit y betwee n th e positiv e termina l
an d th e engin e (ground) .
• Ther e shoul d b e continuit y wit h th e engin e
stopped .
• Ther e shoul d b e n o continuit y wit h th e engin e
running .
POSITIV E TERMINA LENGIN
E OI L
PRESSUR E SWITC H
1 8 N- m (1. 8 kgf-m ,
1 3 Ibf-ft )
Apply liqui d sealan tto th e threads .
Oil Pressur e Switc hOil Pressur e
Testing
If th e oi l pressur e indicato r ligh t stay s o n wit h th e
engin e running , chec k th e engin e oi l level . I f th e oi l leve l
i s correct :
1 . Connec t a tachometer .
2 . Remov e th e engin e oi l pressur e switch , an d instal l
a n oi l pressur e gauge .
ADAPTE R(1/8"-28 BSPT ) ENGIN
E OI L PRESSUR E
SWITC H MOUNTIN GHOLE
OIL PRESSUR EGAUGE(Commerciall y available )
3. Star t th e engine . Shu t i t of f immediatel y i f th e gaug e
register s n o oi l pressure . Repai r th e proble m befor e
continuing .
4. Allo w th e engin e to reac h operatin g temperatur e (fa n
come s o n a t leas t twice) . Th e pressur e shoul d be :
Engin e Oi l Temperature : 176° F (80°C )
Engin e Oi l Pressure :
A t Idle : 7 0 kP a (0. 7 kgf/cm
2, 1 0 psi )
minimu m
At 3,00 0 rpm : 34 0 kP a (3. 5 kgf/cm2, 5 0 psi )
minimu m
I f oi l pressur e i s NO T withi n specifications , inspec t
th e oi l pum p (se e pag e 8-14 ).
ProCarManuals.com
Page 470 of 1954
Oil Pa n
Remova l
Engine remova l i s no t require d i n thi s procedure .
• Mak e sur e jack s an d safet y stand s ar e place d properl y
(se e sectio n 1 ).
• Appl y th e parkin g brak e an d bloc k th e rea r wheel s s o
th e vehicl e wil l no t rol l of f stand s whil e yo u ar e
workin g unde r it .
CAUTION :
• Us e fende r cover s t o avoi d damagin g painte d sur -
faces .
• Unplu g th e wirin g connector s carefull y whil e holdin g
th e connecto r portio n to avoi d damaging .
• Mar k al l wirin g an d hose s t o avoi d misconnection .
Also , b e sur e tha t the y d o no t contac t othe r wirin g
o r hose s o r interfer e wit h othe r parts .
1 . Loose n th e idle r pulle y cente r nu t an d adjustin g bolt ,
the n remov e th e ai r conditionin g (A/C ) compresso r
bel t (se e pag e 5-7 ).
2 . Disconnec t th e powe r steerin g pressur e (PSP )
switc h connector , the n remov e th e powe r steerin g
pum p bel t an d pum p (se e pag e 5-8 ).
3 . Remov e th e lef t an d righ t sid e exhaus t manifol d
covers (se e pag e 9-4 ).
4 . Rais e th e hois t t o ful l height .
5 . Remov e th e fron t tires/wheel s an d splas h shiel d
(se e pag e 5-8 ).
6 . Remov e th e dampe r fork s (se e sectio n 18 ).
7 . Disconnec t th e suspensio n lowe r ar m bal l joint s
with the specia l tool . Refe r t o sectio n 1 8 fo r th e
prope r procedure .
8 . Remov e th e driveshaft s an d intermediat e shaf t (se e
sectio n 16 ).
9 . Drai n th e differentia l oil . Reinstal l th e drai n plu g usin g
a ne w washe r (se e sectio n 15 ).
10 . Drai n th e engin e oil . Reinstal l th e drai n bol t usin g a
ne w washe r (se e pag e 8-4 ).
11 . Disconnec t th e vehicl e spee d senso r (VSS ) connec -
tor , the n remov e th e VSS/powe r steerin g spee d
senso r (se e pag e 5-9 ).
D o no t disconnec t th e flui d hoses .
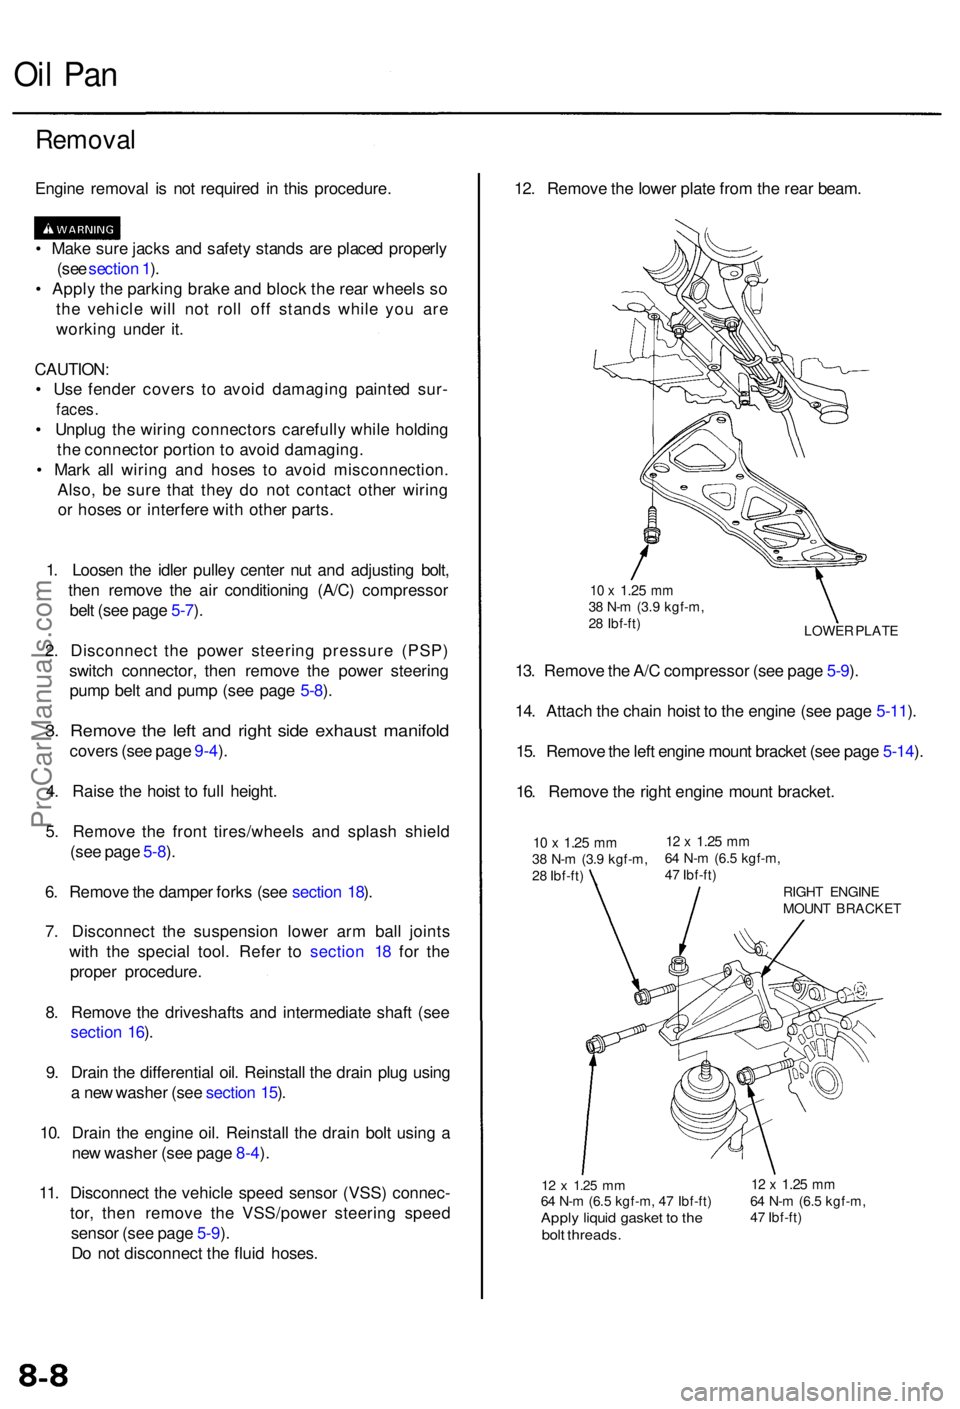
12 x 1.2 5 mm64 N- m (6. 5 kgf-m , 4 7 Ibf-ft )Apply liqui d gaske t t o th ebol t threads .
12 x 1.2 5 mm64 N- m (6. 5 kgf-m ,
4 7 Ibf-ft )
12. Remov e th e lowe r plat e fro m th e rea r beam .
LOWE R PLAT E
10 x 1.2 5 mm38 N- m (3. 9 kgf-m ,
2 8 Ibf-ft )
13. Remov e th e A/ C compresso r (se e pag e 5-9 ).
14 . Attac h th e chai n hois t t o th e engin e (se e pag e 5-11 ).
15 . Remov e th e lef t engin e moun t bracke t (se e pag e 5-14 ).
16 . Remov e th e righ t engin e moun t bracket .
10 x 1.2 5 mm38 N- m (3. 9 kgf-m ,
2 8 Ibf-ft )12 x 1.2 5 mm64 N- m (6. 5 kgf-m ,
4 7 Ibf-ft )
RIGHT ENGIN E
MOUN T BRACKE T
ProCarManuals.com