engine ACURA RL KA9 1996 Service Manual PDF
[x] Cancel search | Manufacturer: ACURA, Model Year: 1996, Model line: RL KA9, Model: ACURA RL KA9 1996Pages: 1954, PDF Size: 61.44 MB
Page 403 of 1954
Cylinder Head s
Remova l (cont'd )
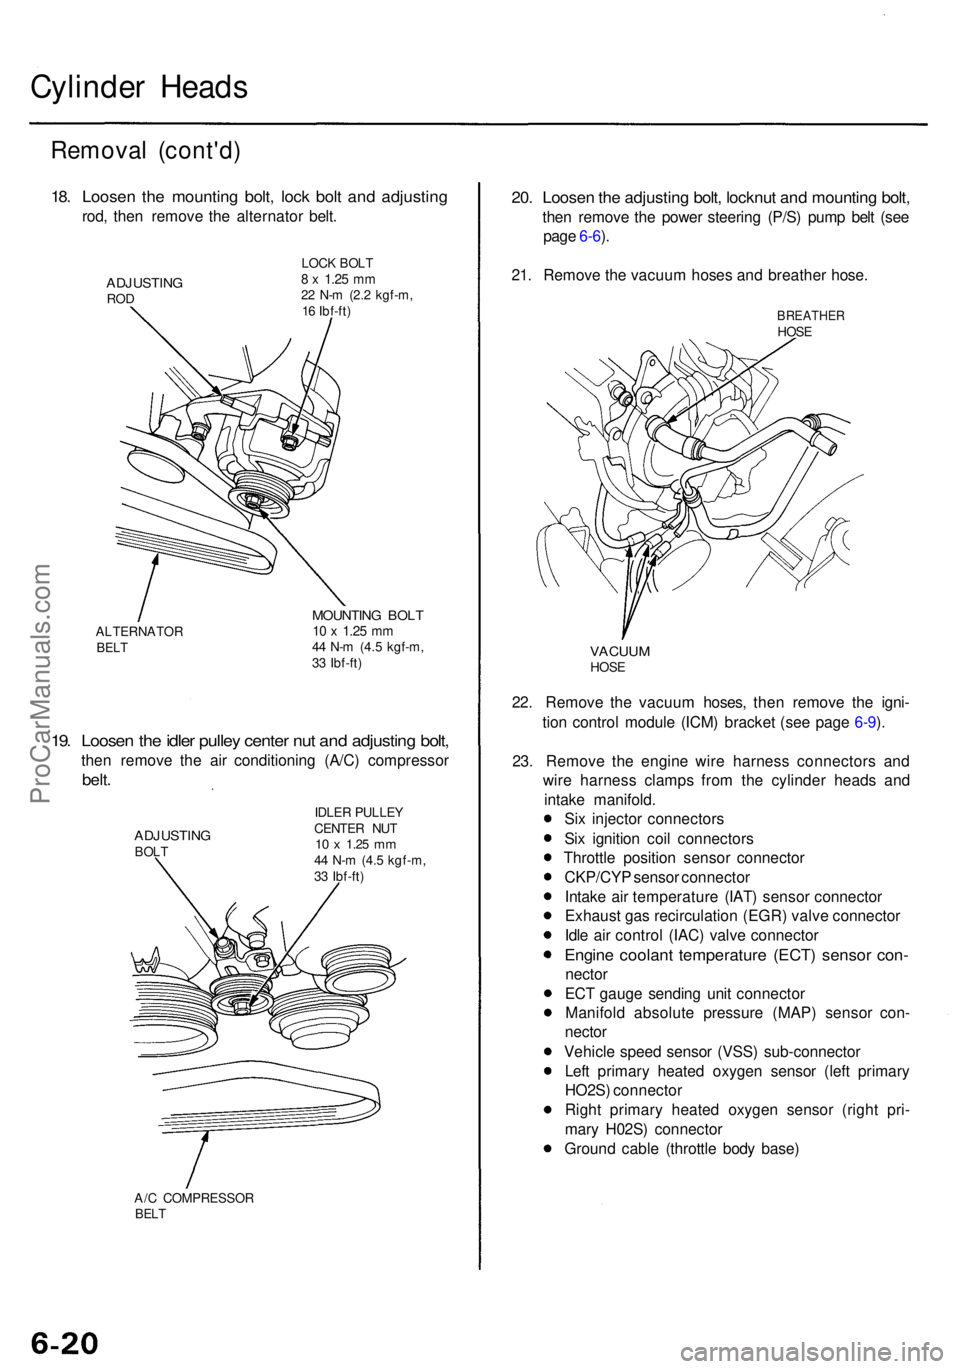
18. Loose n th e mountin g bolt , loc k bol t an d adjustin g
rod, the n remov e th e alternato r belt .
ADJUSTIN GROD
LOC K BOL T8 x 1.2 5 mm22 N- m (2. 2 kgf-m ,
1 6 Ibf-ft )
ALTERNATO R
BELT
MOUNTIN G BOL T10 x 1.2 5 mm44 N- m (4. 5 kgf-m ,
3 3 Ibf-ft )
19. Loose n th e idle r pulle y cente r nu t an d adjustin g bolt ,
then remov e th e ai r conditionin g (A/C ) compresso r
belt.
ADJUSTIN GBOLT IDLE
R PULLE Y
CENTE R NU T10 x 1.2 5 mm44 N- m (4. 5 kgf-m ,
3 3 Ibf-ft )
A/ C COMPRESSO R
BELT
20. Loose n th e adjustin g bolt , locknu t an d mountin g bolt ,
then remov e th e powe r steerin g (P/S ) pum p bel t (se e
pag e 6-6 ).
21 . Remov e th e vacuu m hose s an d breathe r hose .
22 . Remov e th e vacuu m hoses , the n remov e th e igni -
tio n contro l modul e (ICM ) bracke t (se e pag e 6-9 ).
23 . Remov e th e engin e wir e harnes s connector s an d
wir e harnes s clamp s fro m th e cylinde r head s an d
intak e manifold .
Si x injecto r connector s
Si x ignitio n coi l connector s
Throttl e positio n senso r connecto r
CKP/CY P senso r connecto r
Intak e ai r temperatur e (IAT ) senso r connecto r
Exhaus t ga s recirculatio n (EGR ) valv e connecto r
Idl e ai r contro l (IAC ) valv e connecto r
Engine coolan t temperatur e (ECT ) senso r con -
necto r
EC T gaug e sendin g uni t connecto r
Manifol d absolut e pressur e (MAP ) senso r con -
necto r
Vehicl e spee d senso r (VSS ) sub-connecto r
Lef t primar y heate d oxyge n senso r (lef t primar y
HO2S ) connecto r
Righ t primar y heate d oxyge n senso r (righ t pri -
mar y H02S ) connecto r
Groun d cabl e (throttl e bod y base )
VACUU MHOSE
BREATHE RHOSE
ProCarManuals.com
Page 422 of 1954
Hydraulic Tappets
Bleeding
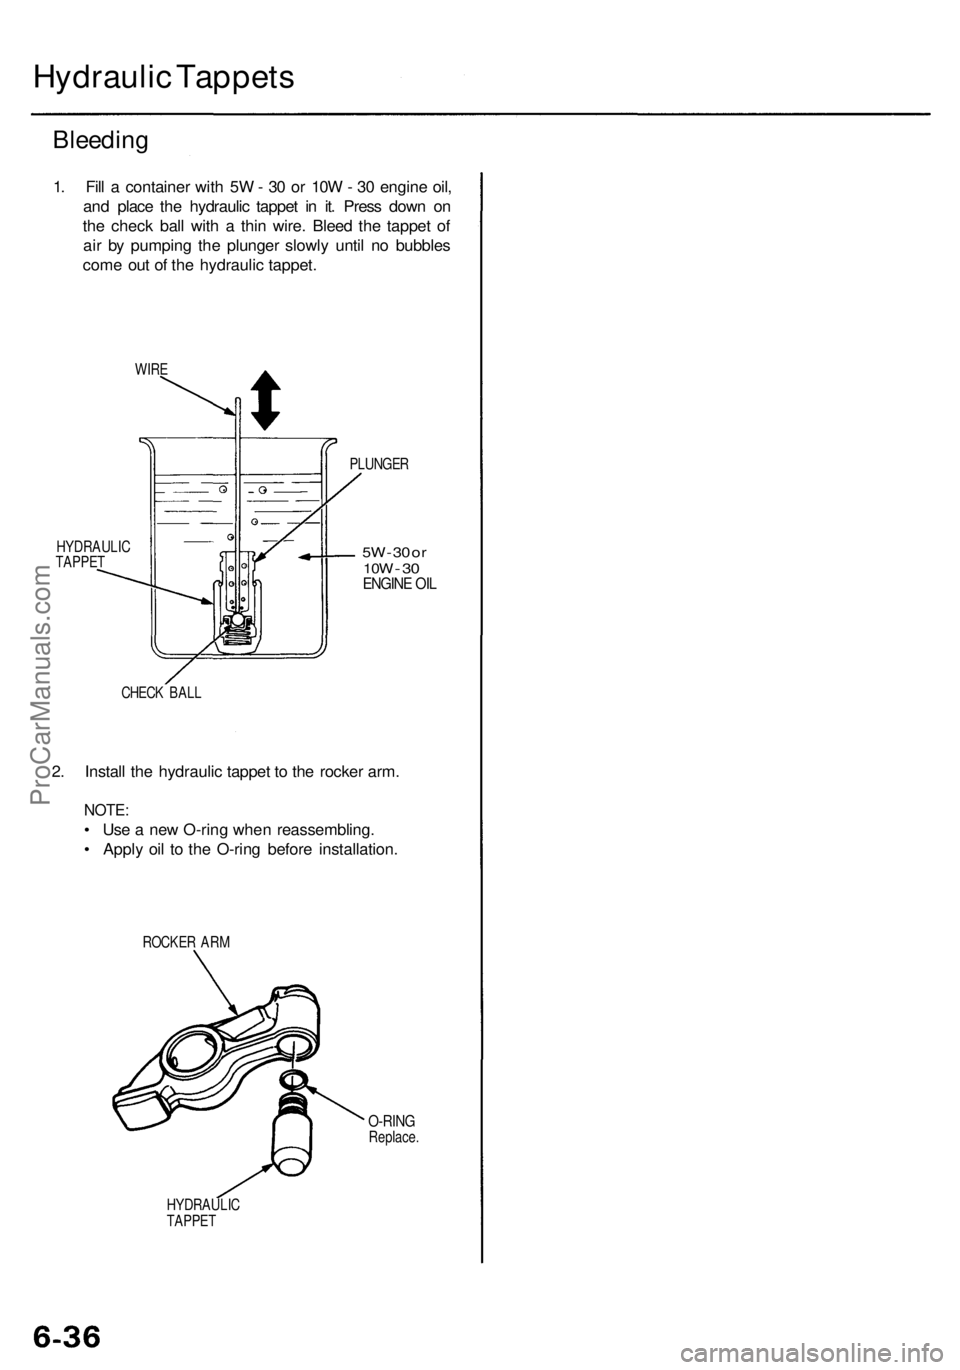
1. Fill a container with 5W - 30 or 10W - 30 engine oil,
and place the hydraulic tappet in it. Press down on
the check ball with a thin wire. Bleed the tappet of
air by pumping the plunger slowly until no bubbles
come out of the hydraulic tappet.
WIRE
HYDRAULIC
TAPPET
PLUNGER
5W
- 30 or
10W
-
30
ENGINE OIL
CHECK BALL
2. Install the hydraulic tappet to the rocker arm.
NOTE:
• Use a new O-ring when reassembling.
• Apply oil to the O-ring before installation.
ROCKER ARM
O-RING
Replace.
HYDRAULIC
TAPPETProCarManuals.com
Page 426 of 1954
Cylinder Heads
Installation (cont'd)
4. Install the cylinder heads on the cylinder block.
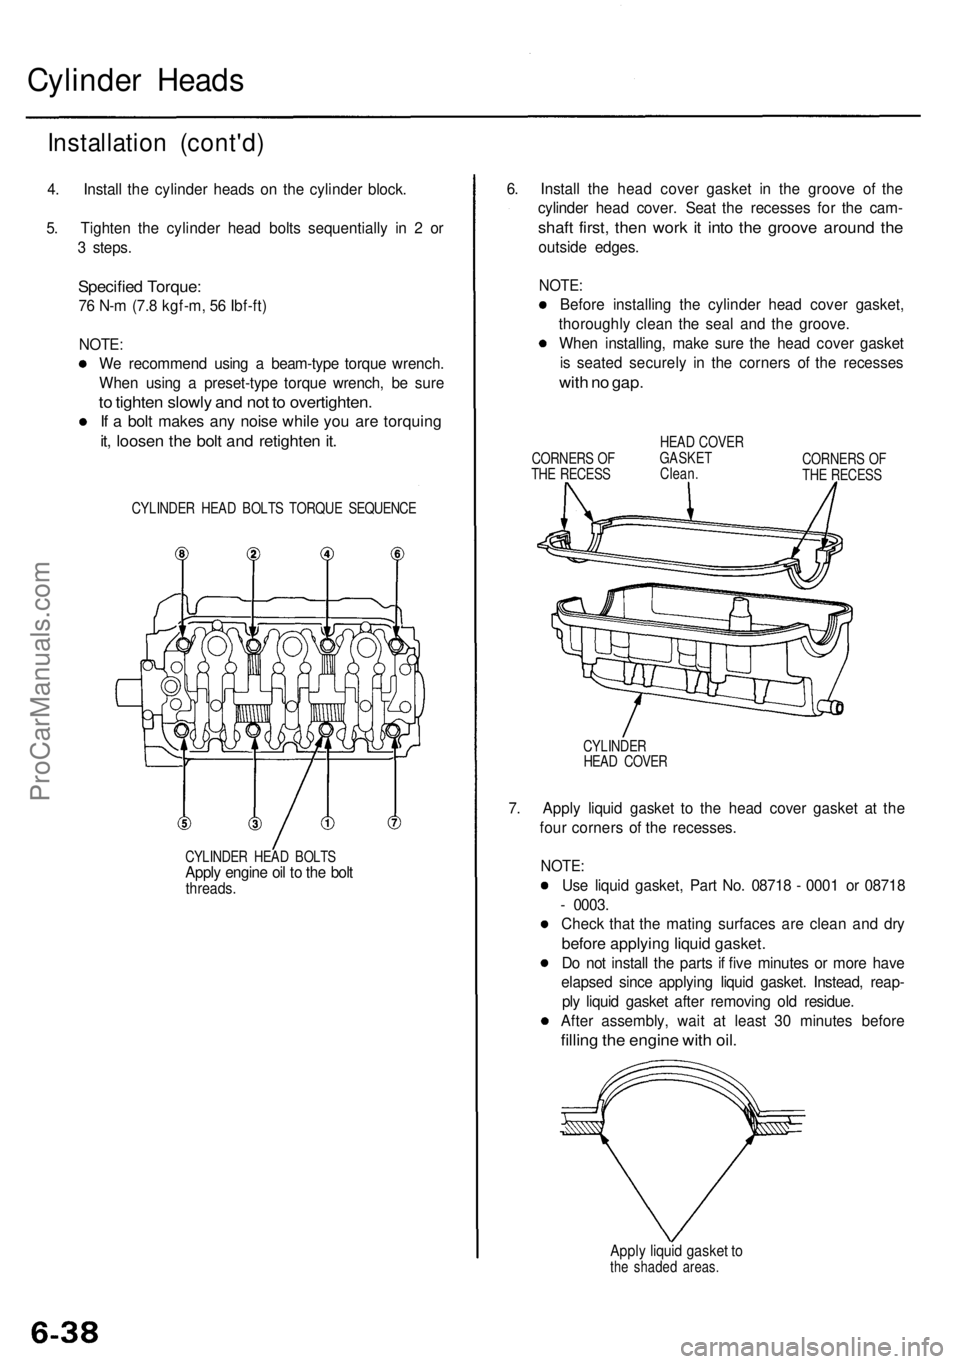
5. Tighten the cylinder head bolts sequentially in 2 or
3 steps.
Specified Torque:
76 N-m (7.8 kgf-m, 56 Ibf-ft)
NOTE:
We recommend using a beam-type torque wrench.
When using a preset-type torque wrench, be sure
to tighten slowly and not to overtighten.
If a bolt makes any noise while you are torquing
it, loosen the bolt and retighten it.
CYLINDER HEAD BOLTS TORQUE SEQUENCE
CYLINDER HEAD BOLTS
Apply engine oil to the bolt
threads.
6. Install the head cover gasket in the groove of the
cylinder head cover. Seat the recesses for the cam-
shaft first, then work it into the groove around the
outside edges.
NOTE:
Before installing the cylinder head cover gasket,
thoroughly clean the seal and the groove.
When installing, make sure the head cover gasket
is seated securely in the corners of the recesses
with no gap.
CORNERS OF
THE RECESS
HEAD COVER
GASKET
Clean.
CORNERS OF
THE RECESS
CYLINDER
HEAD COVER
7. Apply liquid gasket to the head cover gasket at the
four corners of the recesses.
NOTE:
Use liquid gasket, Part No. 08718 - 0001 or 08718
- 0003.
Check that the mating surfaces are clean and dry
before applying liquid gasket.
Do not install the parts if five minutes or more have
elapsed since applying liquid gasket. Instead, reap-
ply liquid gasket after removing old residue.
After assembly, wait at least 30 minutes before
filling the engine with oil.
Apply liquid gasket to
the shaded areas.ProCarManuals.com
Page 430 of 1954
Illustrated Index
Lubricate all internal parts with engine oil during reassembly.
NOTE: Use liquid gasket, Part No. 08718 - 0001 or 08718 - 0003.
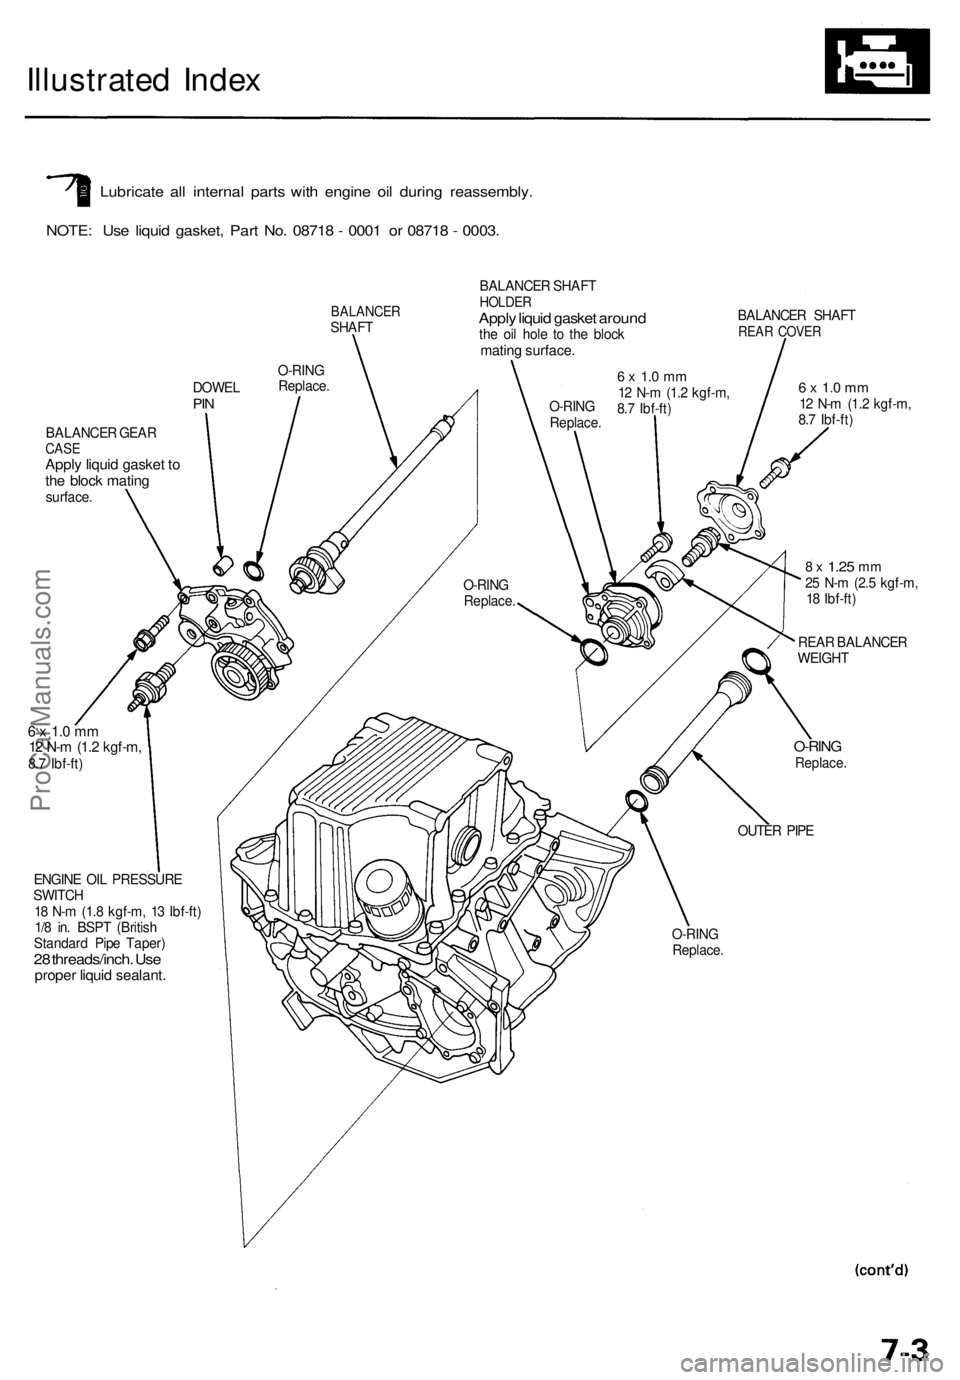
BALANCER
SHAFT
O-RING
Replace.
DOWEL
PIN
BALANCER GEAR
CASE
Apply liquid gasket to
the block mating
surface.
BALANCER SHAFT
HOLDER
Apply liquid gasket around
the oil hole to the block
mating surface.
O-RING
Replace.
6 x 1.0 mm
12 N-m (1.2 kgf-m,
8.7 Ibf-ft)
BALANCER SHAFT
REAR COVER
6 x 1.0 mm
12 N-m (1.2 kgf-m,
8.7 Ibf-ft)
8 x
1.25
mm
25 N-m (2.5 kgf-m,
18 Ibf-ft)
REAR BALANCER
WEIGHT
O-RING
Replace.
OUTER PIPE
O-RING
Replace.
ENGINE OIL PRESSURE
SWITCH
18 N-m (1.8 kgf-m, 13 Ibf-ft)
1/8 in. BSPT (British
Standard Pipe Taper)
28 threads/inch. Use
proper liquid sealant.
6 x 1.0 mm
12 N-m (1.2 kgf-m,
8.7 Ibf-ft)
O-RING
Replace.ProCarManuals.com
Page 431 of 1954
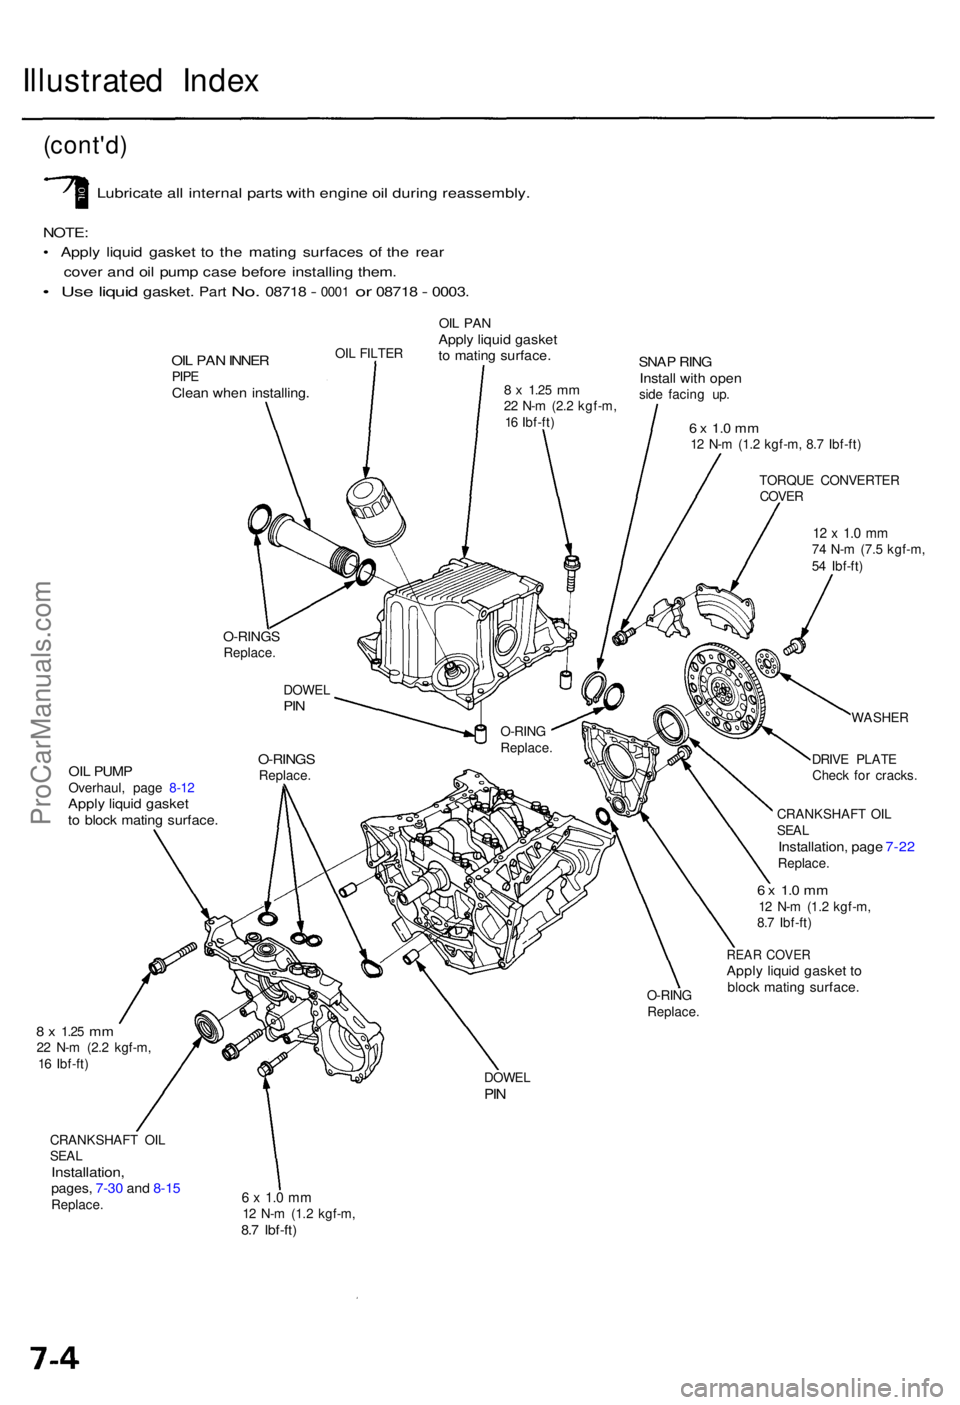
Illustrated Inde x
(cont'd )
Lubricat e al l interna l part s wit h engine oil durin g reassembly .
NOTE:
• Appl y liqui d gaske t t o th e matin g surface s o f th e rea r
cove r an d oi l pum p cas e befor e installin g them .
• Use liqui d gasket . Part No. 0871 8 - 0001 or 0871 8 - 0003 .
OIL PA N INNE RPIPEClea n whe n installing .
OIL FILTE R
OIL PA NAppl y liqui d gaske tto matin g surface .
8 x 1.2 5 mm22 N- m (2. 2 kgf-m ,
1 6 Ibf-ft )
SNAP RIN GInstal l wit h ope nside facin g up .
6 x 1. 0 m m12 N- m (1. 2 kgf-m , 8. 7 Ibf-ft )
TORQU E CONVERTE R
COVE R
12 x 1. 0 m m74 N- m (7. 5 kgf-m ,
5 4 Ibf-ft )
WASHE R
DRIV E PLAT E
Chec k fo r cracks .
CRANKSHAF T OI L
SEA L
Installation , pag e 7-2 2Replace .
6 x 1. 0 m m12 N- m (1. 2 kgf-m ,
8. 7 Ibf-ft )
REAR COVE RApply liqui d gaske t t obloc k matin g surface .O-RING
Replace .
DOWE L
PIN
6 x 1. 0 m m12 N- m (1. 2 kgf-m ,8.7 Ibf-ft )
CRANKSHAF T OI L
SEA L
Installation ,pages, 7-3 0 an d 8-1 5Replace .
8 x 1.2 5 mm22 N- m (2. 2 kgf-m ,
1 6 Ibf-ft )
OIL PUM POverhaul , pag e 8-1 2Appl y liqui d gaske tto bloc k matin g surface .
O-RINGSReplace .
DOWE
L
PIN
O-RIN GReplace .
O-RINGSReplace .
ProCarManuals.com
Page 434 of 1954
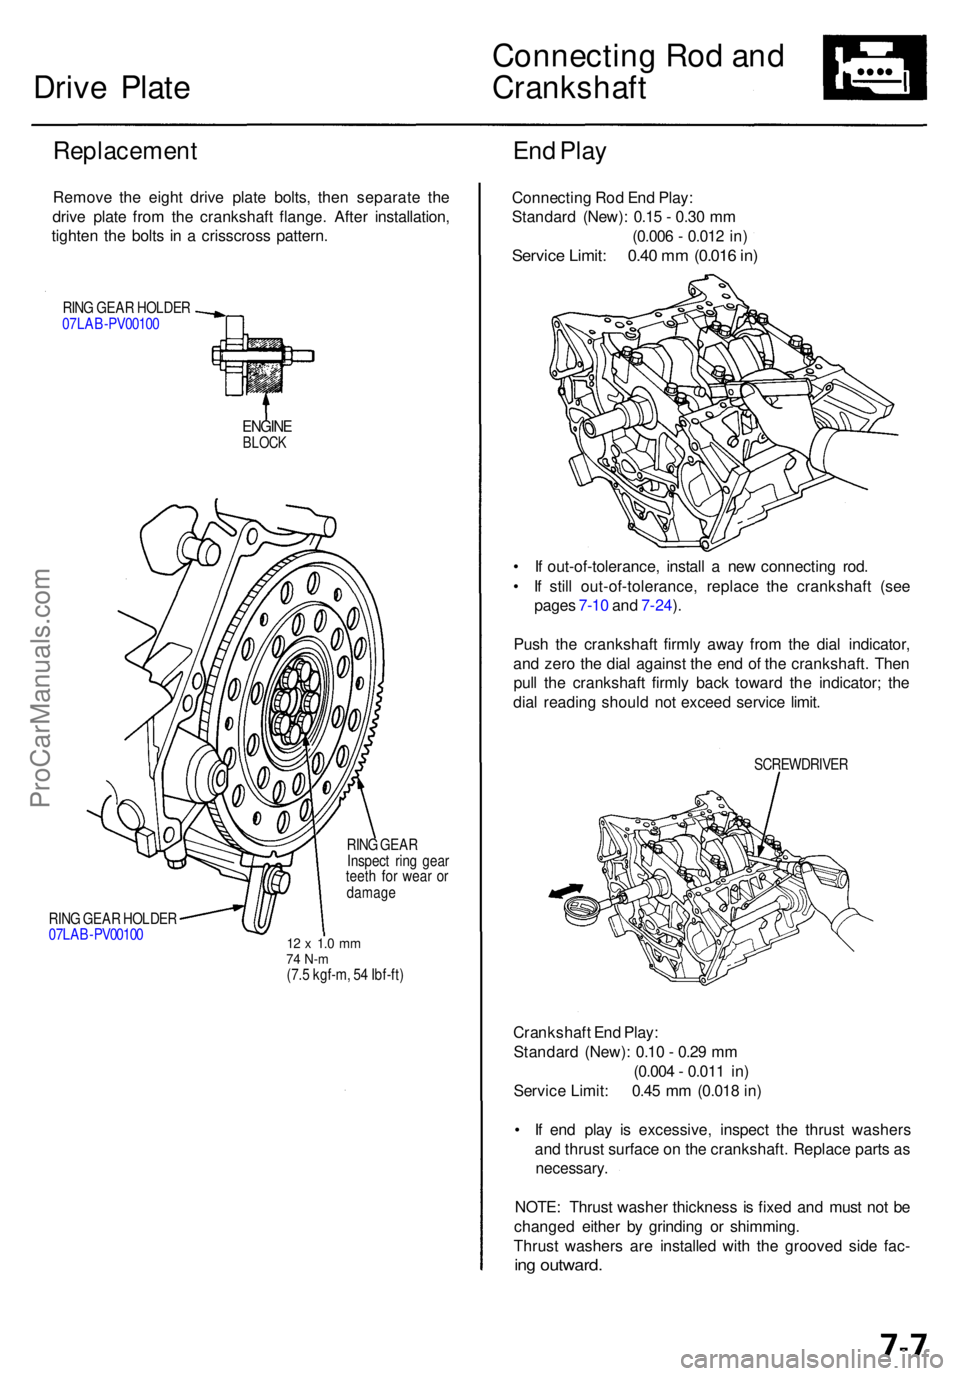
RING GEA R HOLDE R
07LA B-PV0010 0
12 x 1. 0 m m74 N- m(7.5 kgf-m , 5 4 Ibf-ft )
Drive Plat e
Replacemen t
Remove th e eigh t driv e plat e bolts , the n separat e th e
driv e plat e fro m th e crankshaf t flange . Afte r installation ,
tighte n th e bolt s i n a crisscros s pattern .
RING GEA R HOLDE R
07LA B-PV0010 0
ENGINEBLOCK
RING GEA R
Inspec t rin g gea r
teet h fo r wea r o r
damag e
Connectin g Ro d an d
Crankshaf t
End Pla y
Connectin g Ro d En d Play :
Standar d (New) : 0.1 5 - 0.3 0 m m
(0.00 6 - 0.01 2 in )
Servic e Limit : 0.4 0 m m (0.01 6 in )
• I f out-of-tolerance , instal l a ne w connectin g rod .
• I f stil l out-of-tolerance , replac e th e crankshaf t (se e
page s 7-1 0 an d 7-24 ).
Pus h th e crankshaf t firml y awa y fro m th e dia l indicator ,
an d zer o th e dia l agains t th e en d o f th e crankshaft . The n
pul l th e crankshaf t firml y bac k towar d th e indicator ; th e
dia l readin g shoul d no t excee d servic e limit .
SCREWDRIVE R
Crankshaft En d Play :
Standar d (New) : 0.1 0 - 0.2 9 m m
(0.00 4 - 0.01 1 in )
Servic e Limit : 0.4 5 m m (0.01 8 in )
• I f en d pla y i s excessive , inspec t th e thrust washer s
an d thrus t surfac e o n th e crankshaft . Replac e part s a s
necessary .
NOTE: Thrus t washe r thicknes s i s fixe d an d mus t no t b e
change d eithe r b y grindin g o r shimming .
Thrus t washer s ar e installe d wit h th e groove d sid e fac -
ing outward .
ProCarManuals.com
Page 439 of 1954

Pistons and Crankshaft
Removal (cont'd)
11. Remove the bearing from the cap. Keep all caps/bear-
ings in order.
12. Remove the upper bearing halves from the connecting
rods, and set them aside with their respective caps.
13. After removing each piston/connecting rod assem-
bly, reinstall the cap on the rod.
14. To avoid mixup during reassembly, mark each pis-
ton/connecting rod assembly with its cylinder num-
ber.
NOTE: The existing number on the connecting rod
does not indicate its position in the engine, it indicates
the rod bore size.
15. Remove the bearing cap bolts and bearing cap side
bolts, then remove the bearing cap.
RUBBER
CAP
MAIN BEARING
CAP
To help with removal of the caps, install the cap bolts in
the outside bolt holes.
CAP BOLT
MAIN BEARING CAPS
16. Lift the crankshaft out of the cylinder block, being
careful not to damage the journals.
CRANKSHAFT
17. Reinstall the main caps and bearings on the cylin-
der block in proper order.ProCarManuals.com
Page 444 of 1954
Piston Pins
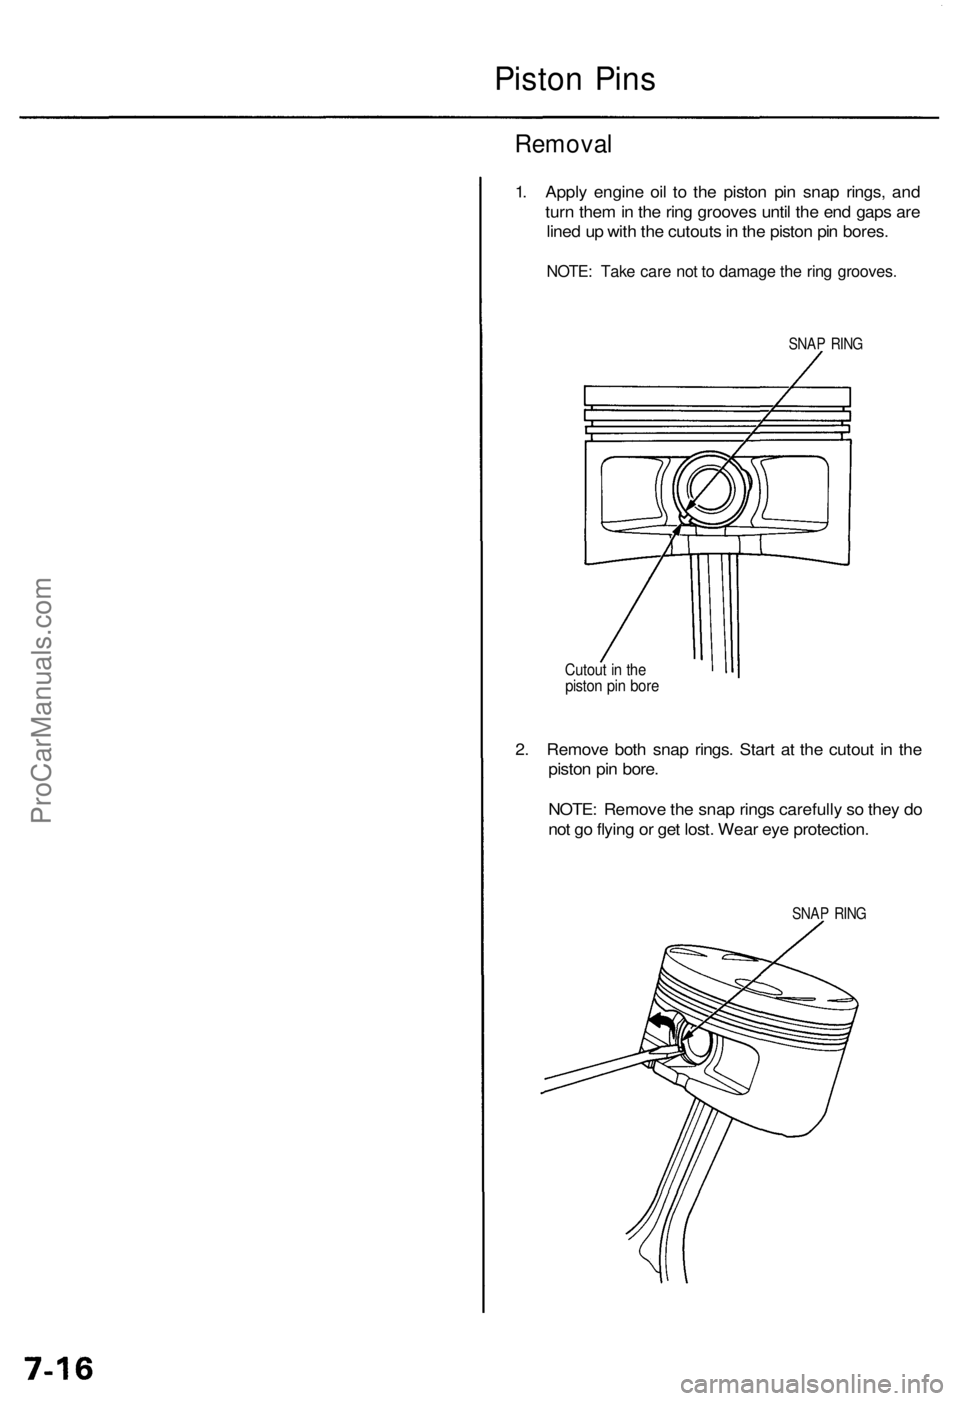
Removal
1. Apply engine oil to the piston pin snap rings, and
turn them in the ring grooves until the end gaps are
lined up with the cutouts in the piston pin bores.
NOTE: Take care not to damage the ring grooves.
SNAP RING
Cutout in the
piston pin bore
2. Remove both snap rings. Start at the cutout in the
piston pin bore.
NOTE: Remove the snap rings carefully so they do
not go flying or get lost. Wear eye protection.
SNAP RINGProCarManuals.com
Page 446 of 1954
Connecting Rod s
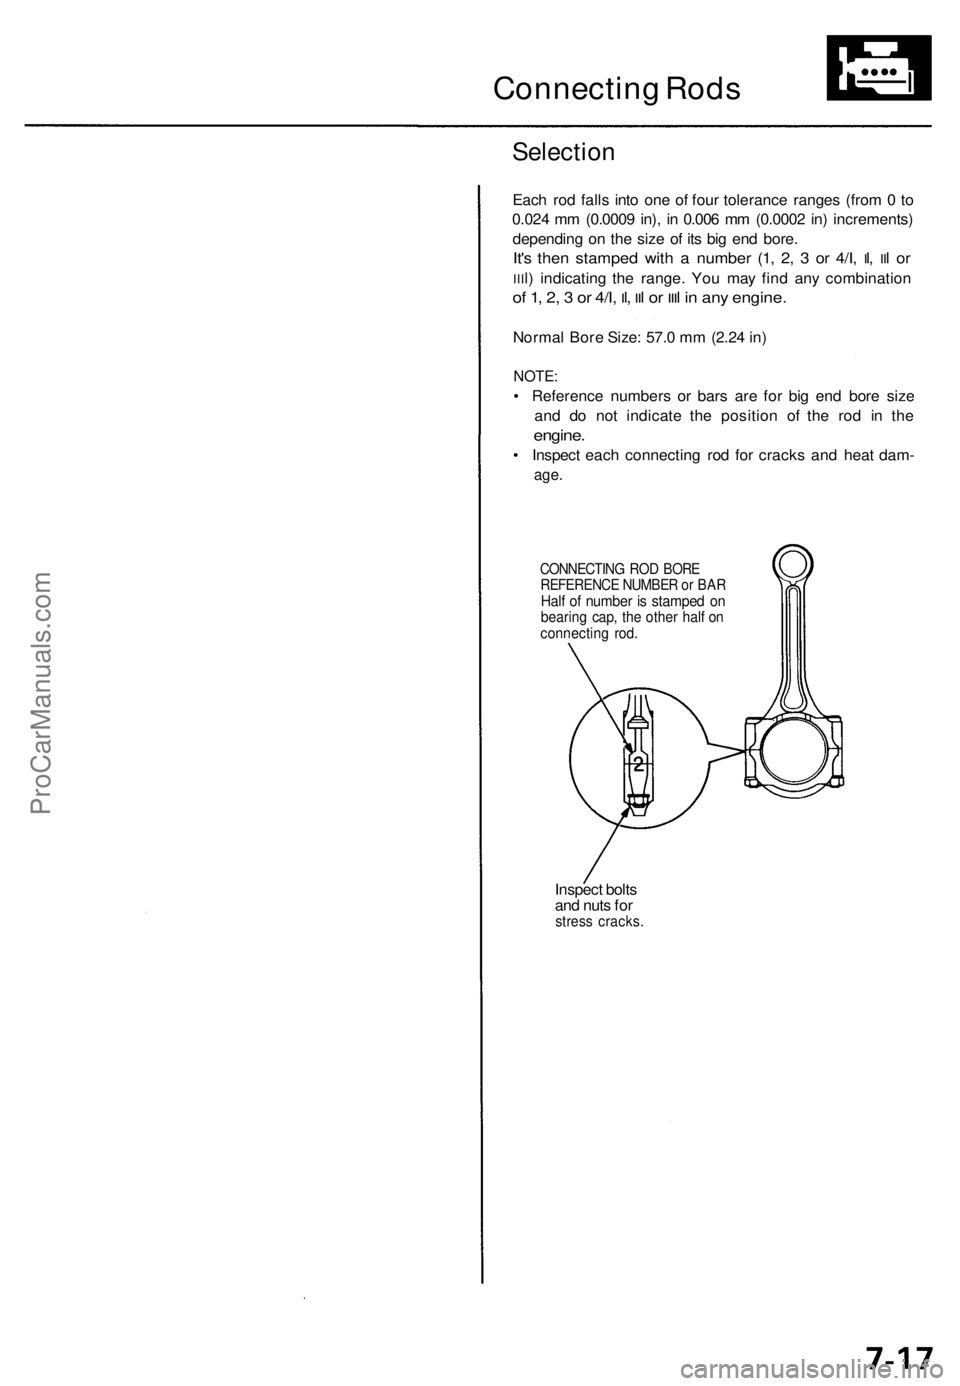
Selectio n
Each ro d fall s int o on e o f fou r toleranc e range s (fro m 0 to
0.02 4 m m (0.000 9 in) , i n 0.00 6 m m (0.000 2 in ) increments )
dependin g o n th e siz e o f it s bi g en d bore .
It's the n stampe d wit h a numbe r (1 , 2 , 3 or 4/I , Il, IIl o r
IIIl) indicatin g th e range . Yo u ma y fin d an y combinatio n
of 1 , 2 , 3 or 4/I , Il, IIl o r IIIl i n an y engine .
Normal Bor e Size : 57. 0 m m (2.2 4 in )
NOTE :
• Referenc e number s o r bar s ar e fo r bi g en d bor e siz e
an d d o no t indicat e th e positio n of the ro d i n th e
engine .
• Inspec t eac h connectin g ro d fo r crack s an d hea t dam -
age.
CONNECTIN G RO D BOR EREFERENC E NUMBE R o r BA RHalf o f numbe r i s stampe d o nbearin g cap , th e othe r hal f o nconnectin g rod .
Inspec t bolt s
an d nut s fo r
stres s cracks .
ProCarManuals.com
Page 448 of 1954
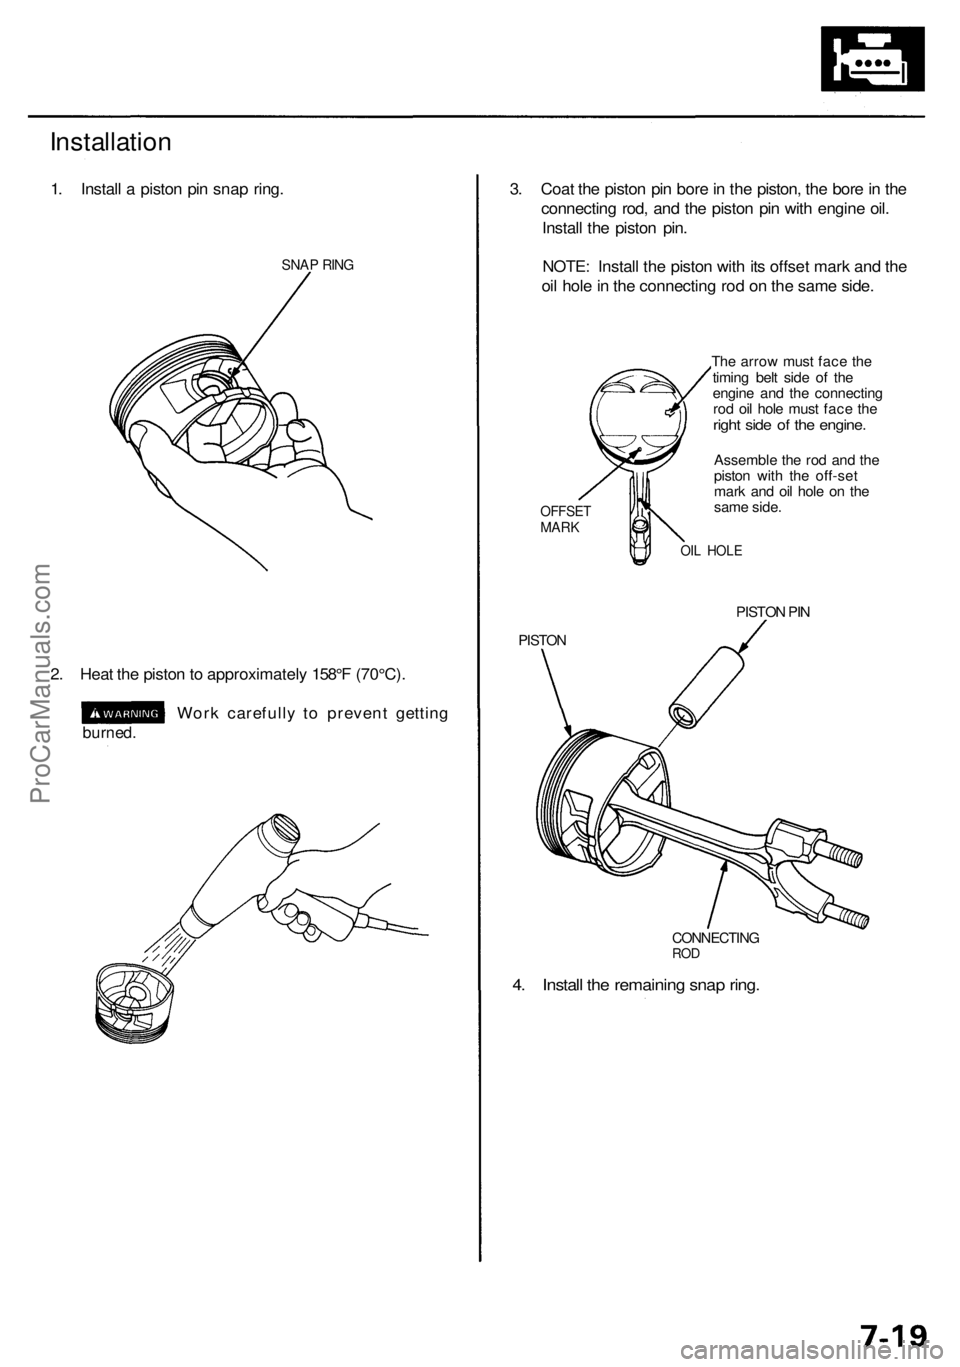
4. Instal l th e remainin g sna p ring .
CONNECTIN GROD
Installatio n
1. Instal l a pisto n pi n sna p ring .
SNA P RIN G
3. Coa t th e pisto n pi n bor e in th e piston , th e bor e in th e
connectin g rod , an d th e pisto n pi n wit h engin e oil .
Instal l th e pisto n pin .
NOTE : Instal l th e pisto n wit h it s offse t mar k an d th e
oi l hol e in th e connectin g ro d o n th e sam e side .
OFFSE TMARK
OIL HOL E
The arro w mus t fac e th e
timin g bel t sid e o f th e
engin e an d th e connectin g
ro d oi l hol e mus t fac e th e
righ t sid e o f th e engine .
Assembl e th e ro d an d th e
pisto n wit h th e off-se t
mar k an d oi l hol e o n th e
sam e side .
PISTO N
PISTON PI N
2. Hea t th e pisto n to approximatel y 158° F (70°C) .
Wor k carefull y t o preven t gettin g
burned.
ProCarManuals.com