ACURA TL 1995 Service Repair Manual
Manufacturer: ACURA, Model Year: 1995, Model line: TL, Model: ACURA TL 1995Pages: 1771, PDF Size: 62.49 MB
Page 1411 of 1771
Headliner
Replacemen t
CAUTION: Whe n pryin g wit h a fla t ti p screwdriver , wra p
i t wit h protectiv e tap e t o preven t damage .
NOTE:
Take car e no t t o ben d an d scratc h th e headliner .
B e carefu l no t t o damag e th e dashboar d an d othe r inte -
rior trim .
1. Remove :
Fron t an d rea r doo r sil l molding s (on e side , se e
pag e 20-57 )
Fron t an d rea r doo r tri m (bot h sides , se e page s
20-57 ,20- 58)
Fron t pilla r tri m (on e side , se e pag e 20-58 )
Cente r pilla r lowe r tri m (on e side , se e pag e 20-57 )
Rea r pilla r tri m (on e side , se e pag e 20-59 )
Spotligh t an d spotligh t tri m (se e pag e 20-35 )
Rearvie w mirro r (se e pag e 20-35 )
Ceilin g ligh t (se e sectio n 23 )
Window antenna termina l cove r (se e pag e 20-43 )
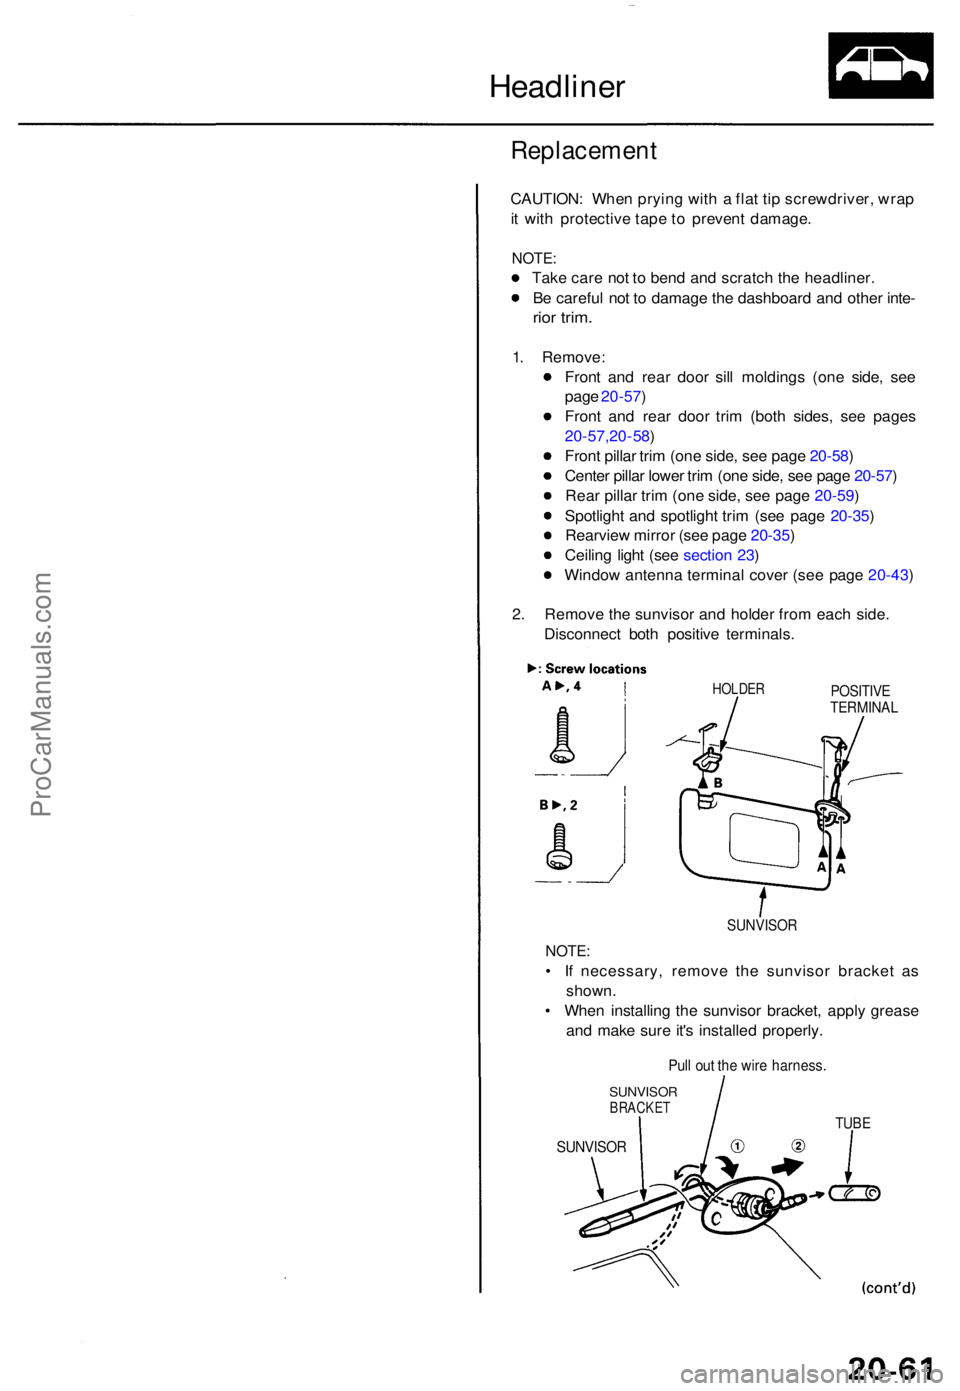
2 . Remov e th e sunviso r an d holde r fro m eac h side .
Disconnec t bot h positiv e terminals .
HOLDERPOSITIV ETERMINA L
SUNVISOR
NOTE:
• I f necessary , remov e th e sunviso r bracke t a s
shown .
• Whe n installin g th e sunviso r bracket , appl y greas e
an d mak e sur e it' s installe d properly .
Pull ou t th e wir e harness .
SUNVISO RBRACKETTUBE
SUNVISO R
ProCarManuals.com
Page 1412 of 1771
Headliner
Replacemen t (cont'd )
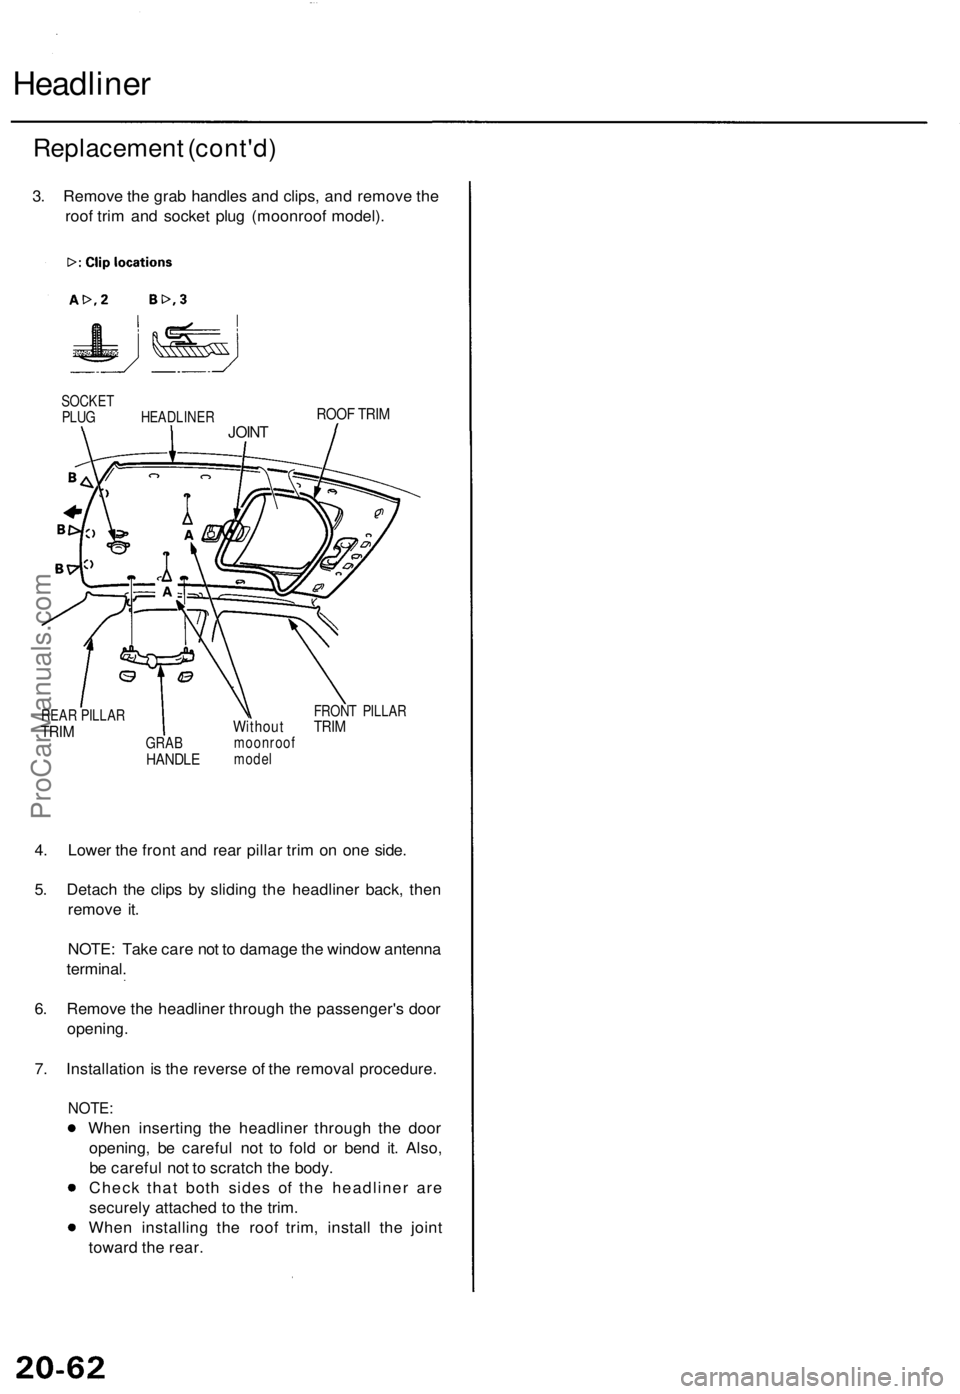
3. Remov e th e gra b handle s an d clips , an d remov e th e
roo f tri m an d socke t plu g (moonroo f model) .
SOCKE T
PLU G HEAD LINER
REA R PILLA R
TRIM
ROO F TRI M
GRA BHANDL E
FRONT PILLA RWithou t TRI Mmoonroo fmodel
4. Lowe r th e fron t an d rea r pilla r tri m o n on e side .
5 . Detac h th e clip s b y slidin g th e headline r back , the n
remov e it .
NOTE : Tak e car e no t t o damag e th e windo w antenn a
terminal .
6 . Remov e th e headline r throug h th e passenger' s doo r
opening .
7 . Installatio n is th e revers e o f th e remova l procedure .
NOTE:
When insertin g th e headline r throug h th e doo r
opening , b e carefu l not to fol d o r ben d it . Also ,
b e carefu l no t t o scratc h th e body .
Chec k tha t bot h side s o f th e headline r ar e
securel y attache d t o th e trim .
Whe n installin g th e roo f trim , instal l th e join t
towar d th e rear .
JOINT
ProCarManuals.com
Page 1413 of 1771
Carpet
Replacemen t
SRS component s ar e locate d in thi s area . Revie w th e SR S
componen t locations , precautions , an d procedure s i n th e
SR S (sectio n 24 ) befor e performin g repair s o r service .
1 . Remove :
Fron t sea t (se e pag e 20-71 )
Rea r sea t cushio n (se e pag e 20-85 )
Fron t doo r sil l moldin g (se e pag e 20-57 )
Rea r doo r sil l moldin g (se e pag e 20-57 )
Fron t sea t bel t lowe r ancho r (se e pag e 20-88 )
Cente r pilla r lowe r tri m (se e pag e 20-57 )
Cente r consol e (se e pag e 20-64 )
Dashboar d cente r tri m (se e pag e 20-67 )
Opene r cove r (se e pag e 20-115 )
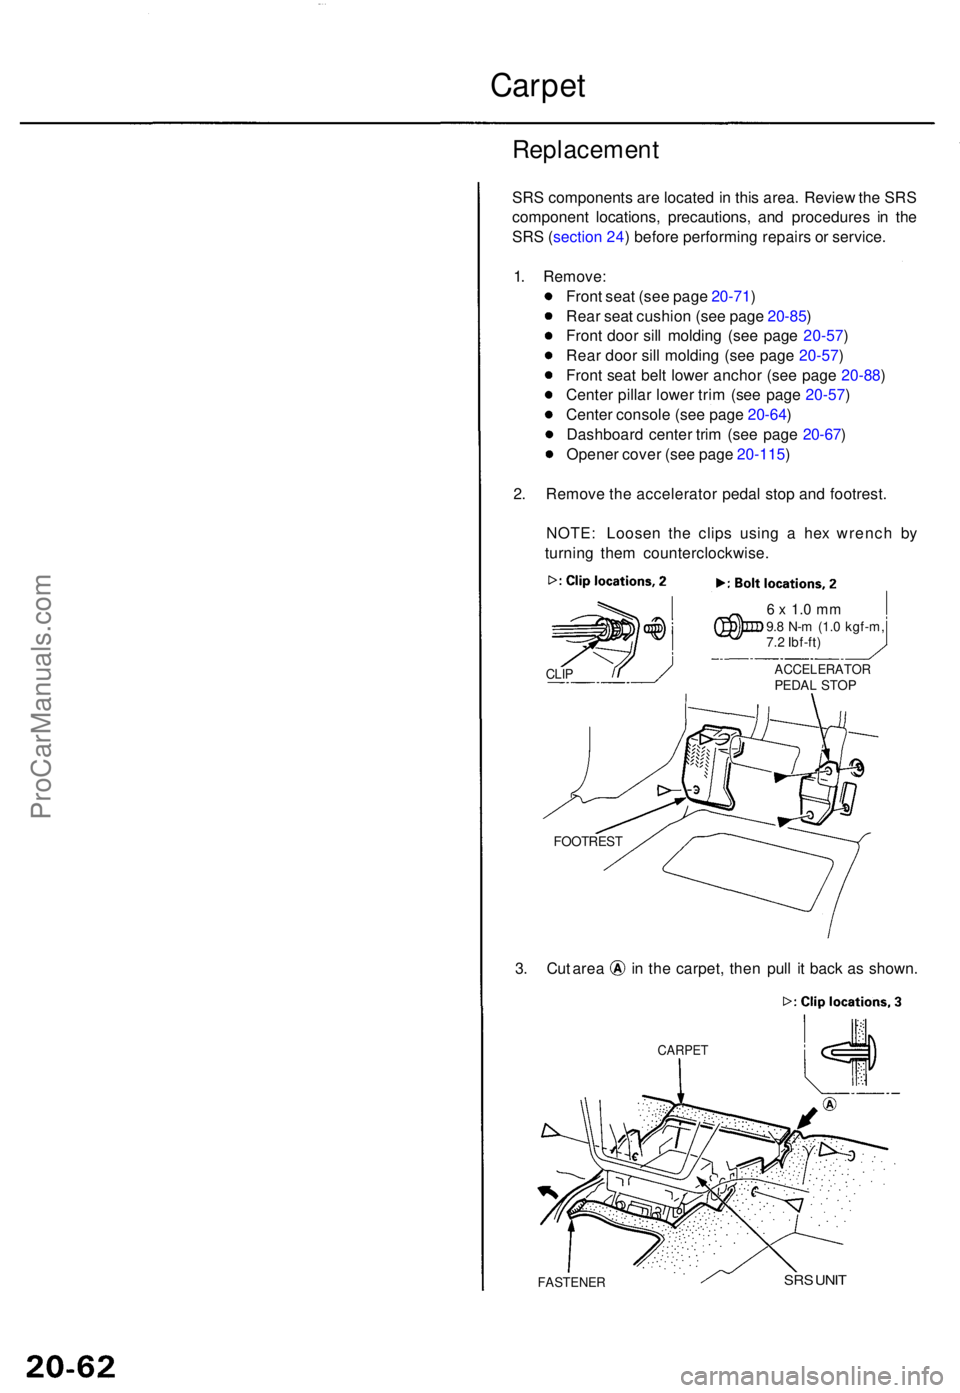
2 . Remov e th e accelerato r peda l sto p an d footrest .
NOTE : Loose n th e clip s usin g a he x wrenc h b y
turnin g the m counterclockwise .
6 x 1. 0 m m9.8 N- m (1. 0 kgf-m ,
7. 2 Ibf-ft )
3. Cu t are a i n th e carpet , the n pul l i t bac k a s shown .
CARPE T
FASTENE RSRS UNI T
FOOTRES T
ACCELERATO RPEDAL STO PCLIP
ProCarManuals.com
Page 1414 of 1771
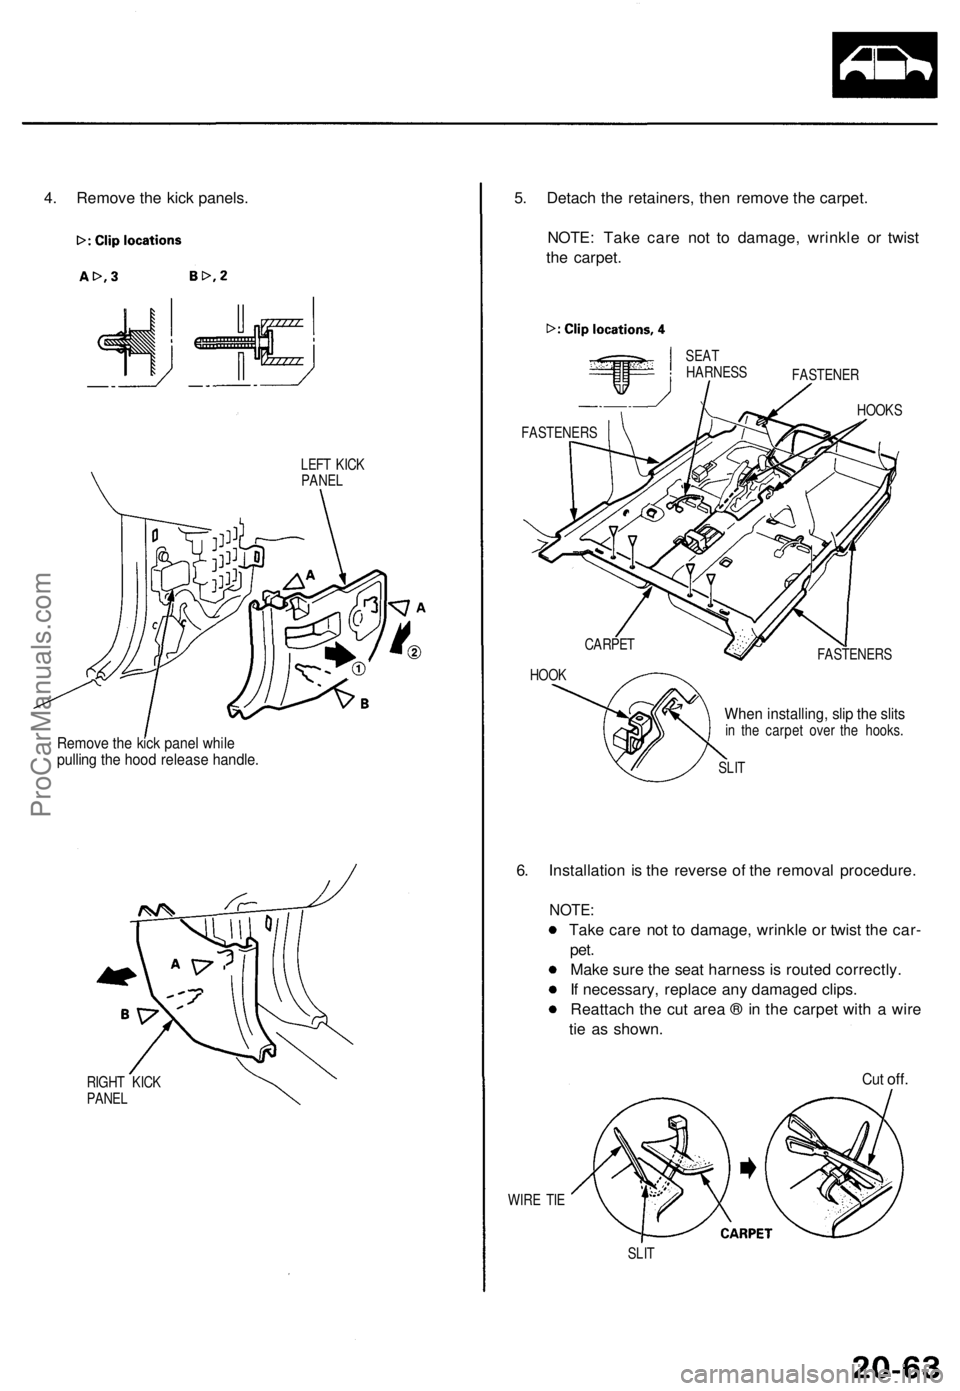
4. Remove the kick panels.
LEFT KICK
PANEL
Remove the kick panel while
pulling the hood release handle.
RIGHT KICK
PANEL
5. Detach the retainers, then remove the carpet.
NOTE: Take care not to damage, wrinkle or twist
the carpet.
CARPET
HOOK
FASTENERS
When installing, slip the slits
in the carpet over the hooks.
SLIT
6. Installation is the reverse of the removal procedure.
NOTE:
Take care not to damage, wrinkle or twist the car-
pet.
Make sure the seat harness is routed correctly.
If necessary, replace any damaged clips.
Reattach the cut area ® in the carpet with a wire
tie as shown.
Cut
off.
WIRE TIE
SLIT
SEAT
HARNESS
FASTENERS
FASTENER
HOOKSProCarManuals.com
Page 1415 of 1771
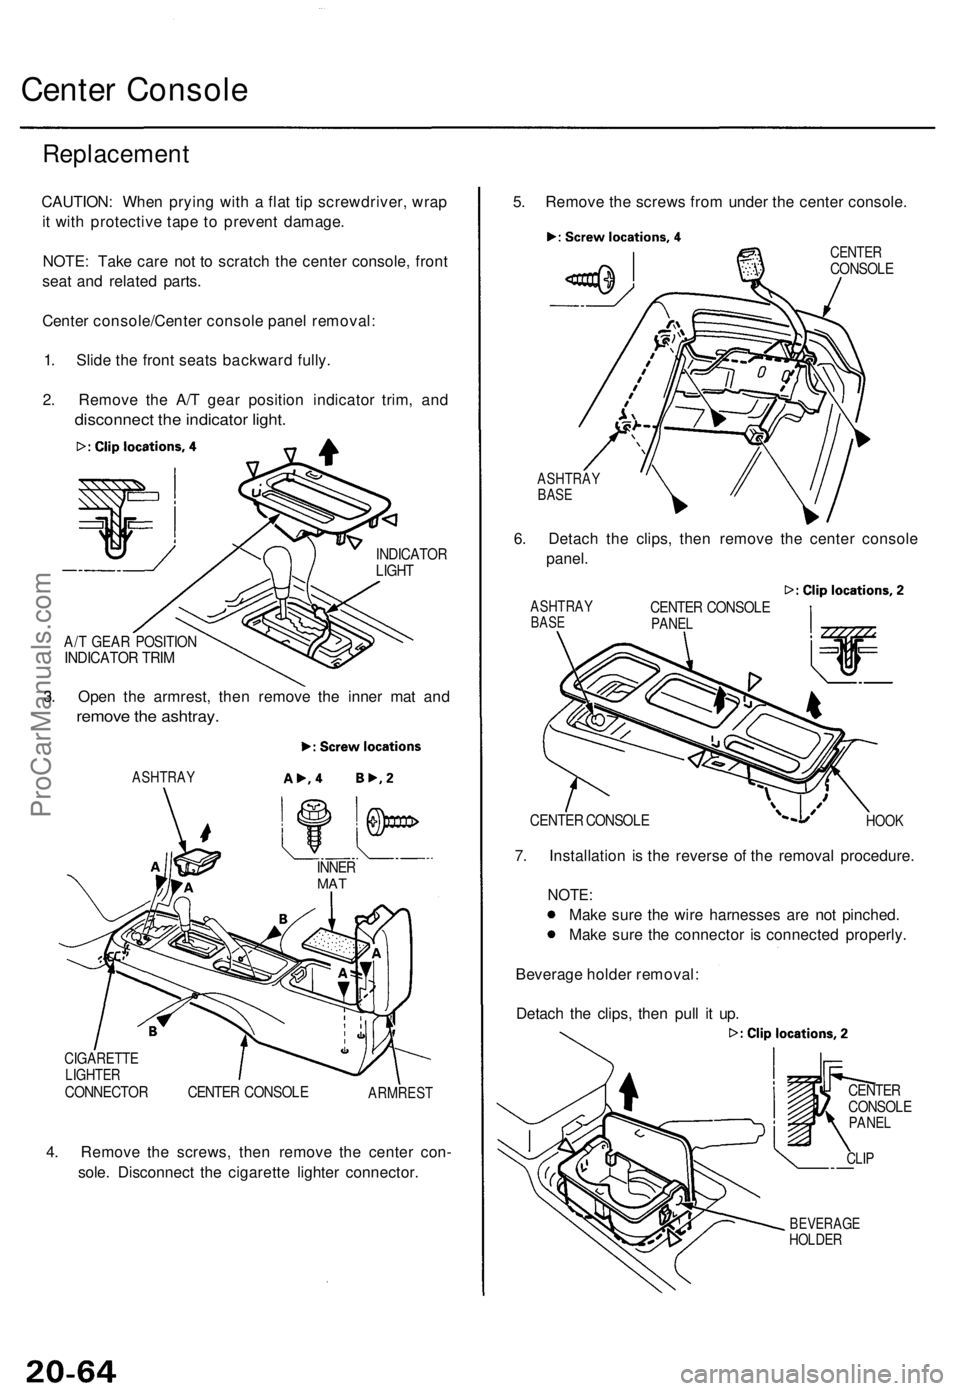
Center Console
Replacement
CAUTION: When prying with a flat tip screwdriver, wrap
it with protective tape to prevent damage.
NOTE: Take care not to scratch the center console, front
seat and related parts.
Center console/Center console panel removal:
1. Slide the front seats backward fully.
2. Remove the A/T gear position indicator trim, and
disconnect the indicator light.
INDICATOR
LIGHT
A/T GEAR POSITION
INDICATOR TRIM
3. Open the armrest, then remove the inner mat and
remove the ashtray.
ASHTRAY
CIGARETTE
LIGHTER
CONNECTOR CENTER CONSOLE
ARMREST
4. Remove the screws, then remove the center con-
sole. Disconnect the cigarette lighter connector.
5. Remove the screws from under the center console.
CENTER
CONSOLE
ASHTRAY
BASE
6. Detach the clips, then remove the center console
panel.
ASHTRAY
BASE
CENTER CONSOLE
PANEL
7. Installation is the reverse of the removal procedure.
NOTE:
Make sure the wire harnesses are not pinched.
Make sure the connector is connected properly.
Beverage holder removal:
Detach the clips, then pull it up.
CENTER
CONSOLE
PANEL
CLIP
BEVERAGE
HOLDER
INNER
MAT
HOOK
CENTER CONSOLEProCarManuals.com
Page 1416 of 1771
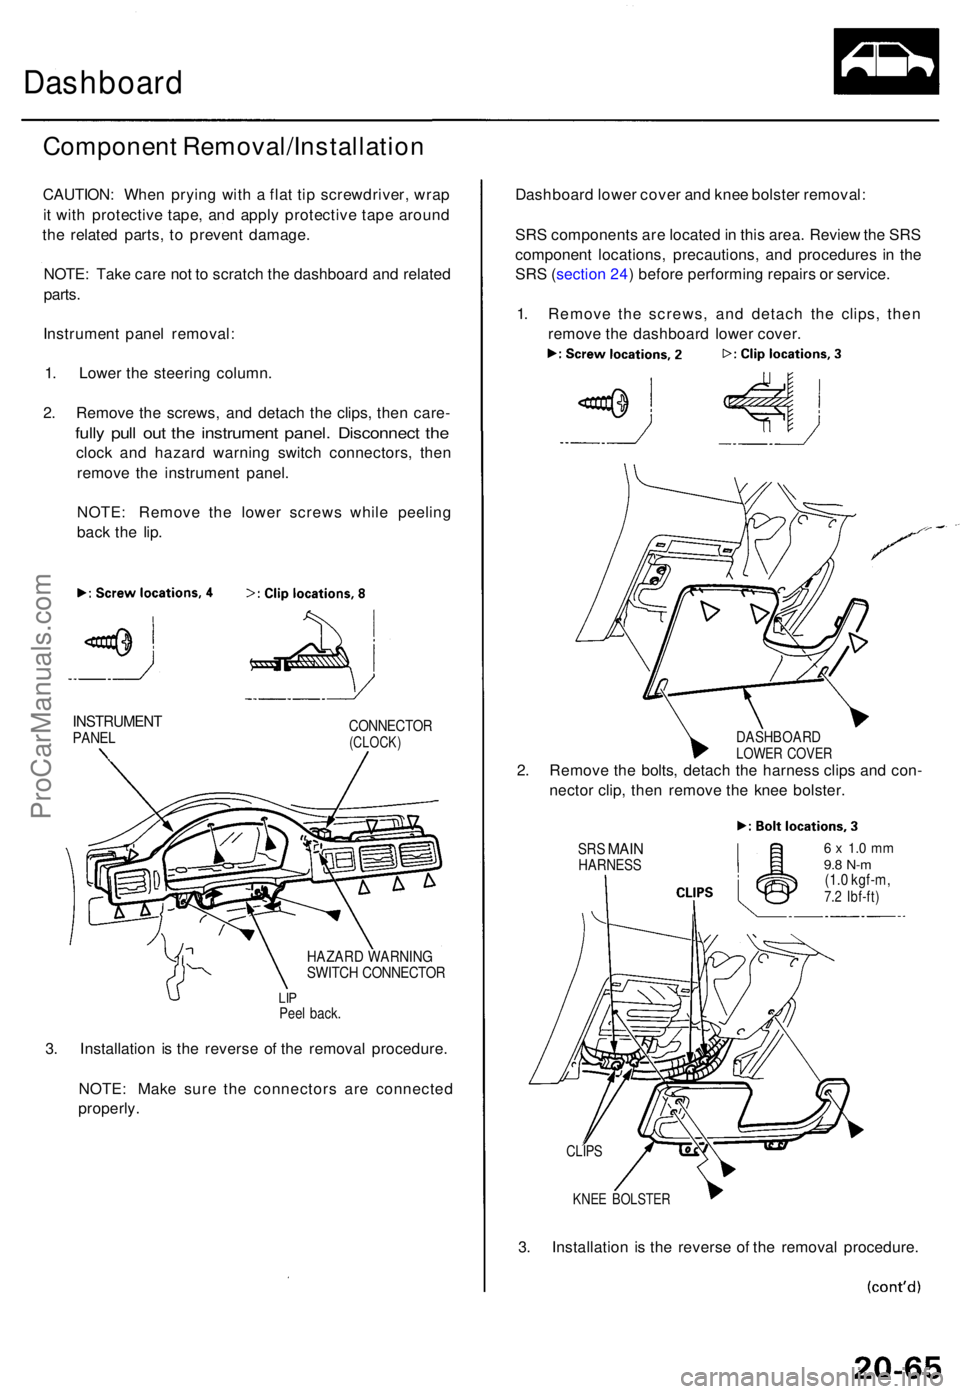
Dashboard
Componen t Removal/Installatio n
CAUTION: Whe n pryin g wit h a fla t ti p screwdriver , wra p
i t wit h protectiv e tape , an d appl y protectiv e tap e aroun d
th e relate d parts , t o preven t damage .
NOTE : Tak e car e no t t o scratc h th e dashboar d an d relate d
parts .
Instrumen t pane l removal :
1 . Lowe r th e steerin g column .
2 . Remov e th e screws , an d detac h th e clips , the n care -
fully pul l ou t th e instrumen t panel . Disconnec t th e
cloc k an d hazar d warnin g switc h connectors , the n
remov e th e instrumen t panel .
NOTE : Remov e th e lowe r screw s whil e peelin g
bac k th e lip .
INSTRUMEN TPANELCONNECTO R(CLOCK)
HAZARD WARNIN GSWITCH CONNECTO R
LIPPee l back .
3. Installatio n i s th e revers e o f th e remova l procedure .
NOTE : Mak e sur e th e connector s ar e connecte d
properly . Dashboar
d lowe r cove r an d kne e bolste r removal :
SR S component s ar e locate d in thi s area . Revie w th e SR S
componen t locations , precautions , an d procedure s i n th e
SR S (sectio n 24 ) befor e performin g repair s o r service .
1 . Remov e th e screws , an d detac h th e clips , the n
remov e th e dashboar d lowe r cover .
DASHBOAR DLOWER COVE R2. Remov e th e bolts , detac h th e harnes s clip s an d con -
necto r clip , the n remov e th e kne e bolster .
SRS MAI NHARNES S6 x 1. 0 m m9.8 N- m(1.0 kgf-m ,7.2 Ibf-ft )
KNEE BOLSTE R
3. Installatio n i s th e revers e o f th e remova l procedure .
CLIPS
ProCarManuals.com
Page 1417 of 1771
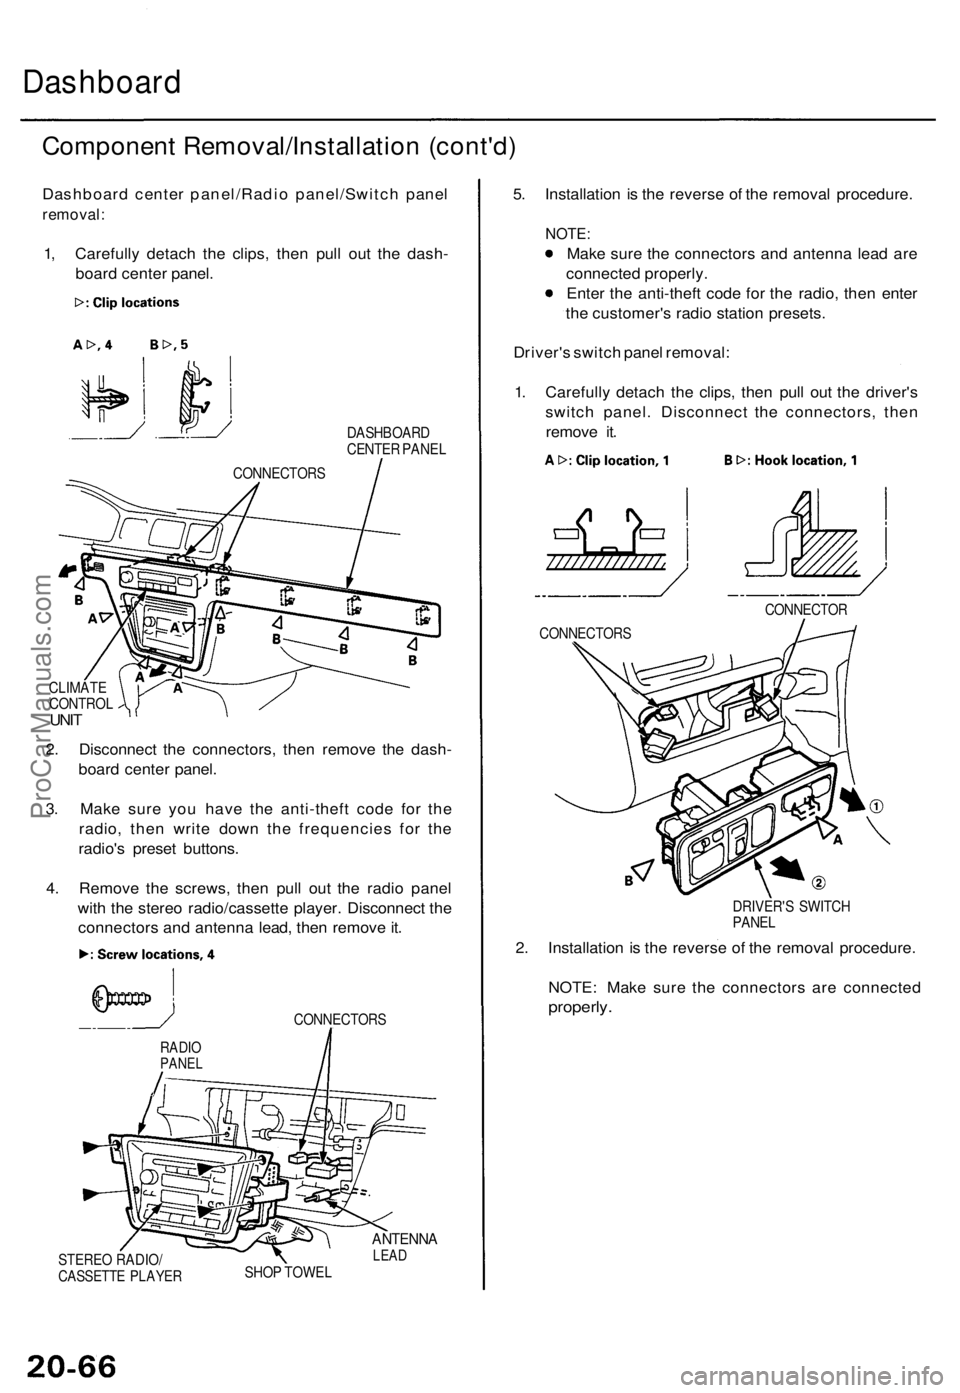
Dashboard
Component Removal/Installation (cont'd)
Dashboard center panel/Radio panel/Switch panel
removal:
1, Carefully detach the clips, then pull out the dash-
board center panel.
DASHBOARD
CENTER PANEL
CLIMATE
CONTROL
UNIT
2. Disconnect the connectors, then remove the dash-
board center panel.
3. Make sure you have the anti-theft code for the
radio, then write down the frequencies for the
radio's preset buttons.
4. Remove the screws, then pull out the radio panel
with the stereo radio/cassette player. Disconnect the
connectors and antenna lead, then remove it.
CONNECTORS
STEREO RADIO/
CASSETTE PLAYER
ANTENNA
LEAD
SHOP TOWEL
5. Installation is the reverse of the removal procedure.
NOTE:
Make sure the connectors and antenna lead are
connected properly.
Enter the anti-theft code for the radio, then enter
the customer's radio station presets.
Driver's switch panel removal:
1. Carefully detach the clips, then pull out the driver's
switch panel. Disconnect the connectors, then
remove it.
DRIVER'S SWITCH
PANEL
2. Installation is the reverse of the removal procedure.
NOTE: Make sure the connectors are connected
properly.
RADIO
PANEL
CONNECTOR
CONNECTORS
CONNECTORSProCarManuals.com
Page 1418 of 1771
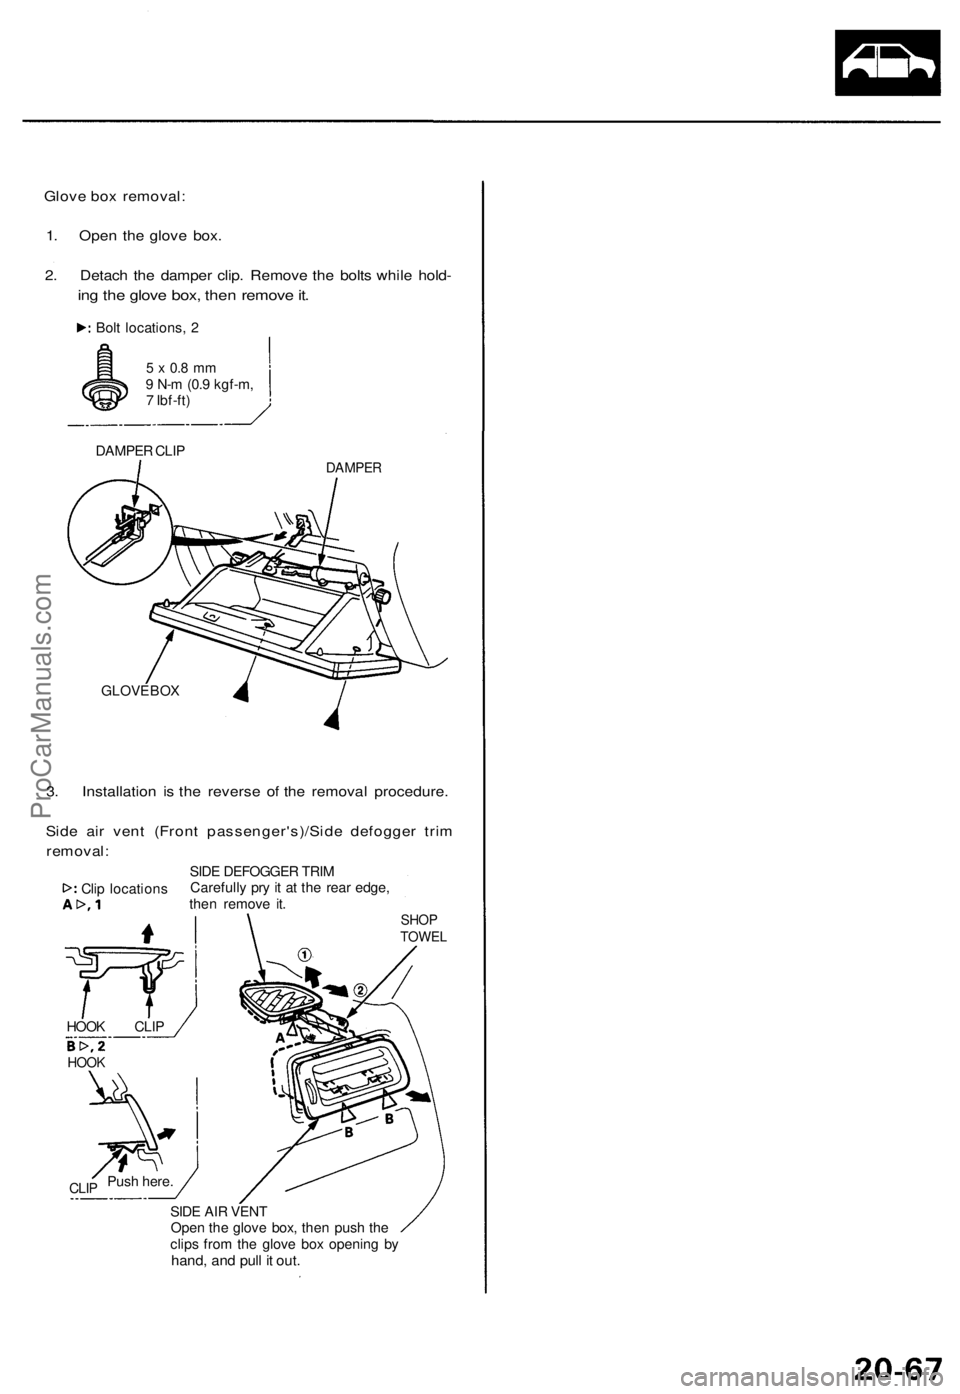
Glove box removal:
1. Open the glove box.
2. Detach the damper clip. Remove the bolts while hold-
ing the glove box, then remove it.
5 x 0.8 mm
9 N-m (0.9 kgf-m,
7 Ibf-ft)
DAMPER CLIP
DAMPER
GLOVE BOX
SIDE AIR VENT
Open the glove box, then push the
clips from the glove box opening by
hand, and pull it out.
Bolt locations, 2
3. Installation is the reverse of the removal procedure.
Side air vent (Front passenger's)/Side defogger trim
removal:
Clip locations
SIDE DEFOGGER TRIM
Carefully pry it at the rear edge,
then remove it.
SHOP
TOWEL
HOOK CLIP
HOOK
CLIP
Push here.ProCarManuals.com
Page 1419 of 1771
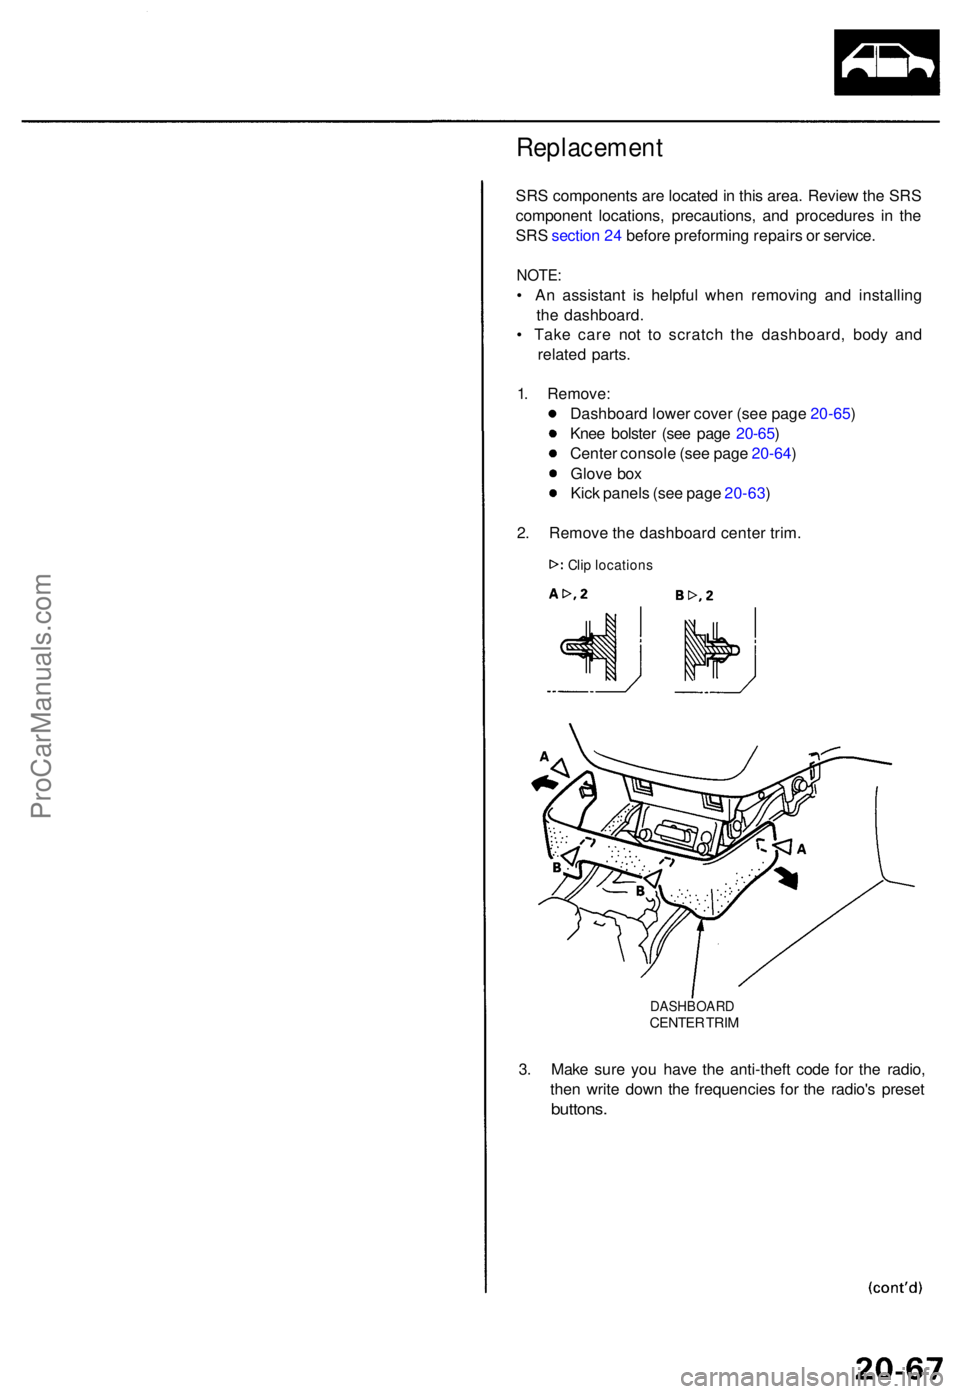
Replacement
SRS component s ar e locate d in thi s area . Revie w th e SR S
componen t locations , precautions , an d procedure s i n th e
SR S sectio n 24 befor e preformin g repair s o r service .
NOTE:
• A n assistan t i s helpfu l whe n removin g an d installin g
th e dashboard .
• Tak e car e no t t o scratc h th e dashboard , bod y an d
relate d parts .
1 . Remove :
Dashboar d lowe r cove r (se e pag e 20-65 )
Kne e bolste r (se e pag e 20-65 )
Cente r consol e (se e pag e 20-64 )
Glov e bo x
Kic k panel s (se e pag e 20-63 )
2 . Remov e th e dashboar d cente r trim .
DASHBOAR DCENTER TRI M
3. Mak e sur e yo u hav e th e anti-thef t cod e fo r th e radio ,
the n writ e dow n th e frequencie s fo r th e radio' s prese t
buttons .
Clip location s
ProCarManuals.com
Page 1420 of 1771
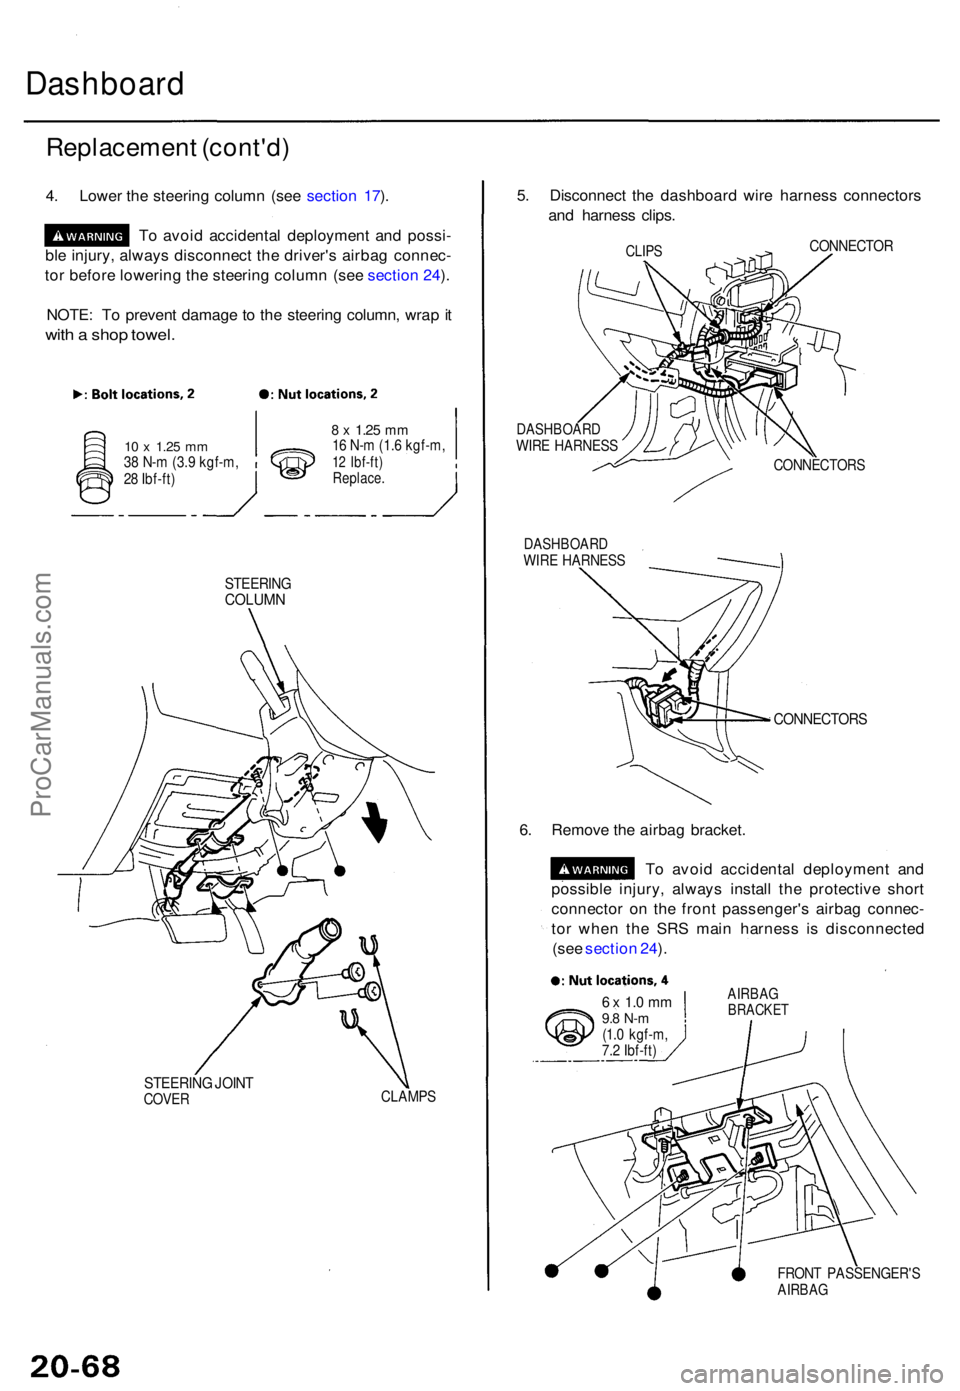
Dashboard
Replacemen t (cont'd )
4. Lowe r th e steerin g colum n (se e sectio n 17 ).
T o avoi d accidenta l deploymen t an d possi -
bl e injury , alway s disconnec t th e driver' s airba g connec -
to r befor e lowerin g th e steerin g colum n (se e sectio n 24 ).
NOTE : T o preven t damag e t o th e steerin g column , wra p it
wit h a sho p towel.
10 x 1.2 5 mm38 N- m (3. 9 kgf-m ,
2 8 Ibf-ft )
8 x 1.2 5 mm16 N- m (1. 6 kgf-m ,12 Ibf-ft )Replace .
STEERIN GCOLUMN
STEERIN G JOIN TCOVE RCLAMP S
5. Disconnec t th e dashboar d wir e harnes s connector s
an d harnes s clips .
CLIPSCONNECTO R
DASHBOAR DWIRE HARNES S
DASHBOAR DWIRE HARNES S CONNECTOR
S
CONNECTORS
6. Remov e th e airba g bracket .
T o avoi d accidenta l deploymen t an d
possibl e injury , alway s instal l th e protectiv e shor t
connecto r o n th e fron t passenger' s airba g connec -
to r whe n th e SR S mai n harnes s i s disconnecte d
(se e sectio n 24 ).
6 x 1. 0 m m9.8 N- m(1.0 kgf-m ,
7. 2 Ibf-ft )
AIRBA GBRACKE T
FRONT PASSENGER' SAIRBAG
ProCarManuals.com