ACURA TL 1995 Service Repair Manual
Manufacturer: ACURA, Model Year: 1995,
Model line: TL,
Model: ACURA TL 1995
Pages: 1771, PDF Size: 62.49 MB
ACURA TL 1995 Service Repair Manual
TL 1995
ACURA
ACURA
https://www.carmanualsonline.info/img/32/56993/w960_56993-0.png
ACURA TL 1995 Service Repair Manual
Trending: rear view mirror, Breaks, steering wheel adjustment, reset, radio controls, spark plugs, charging
Page 1371 of 1771
Doors
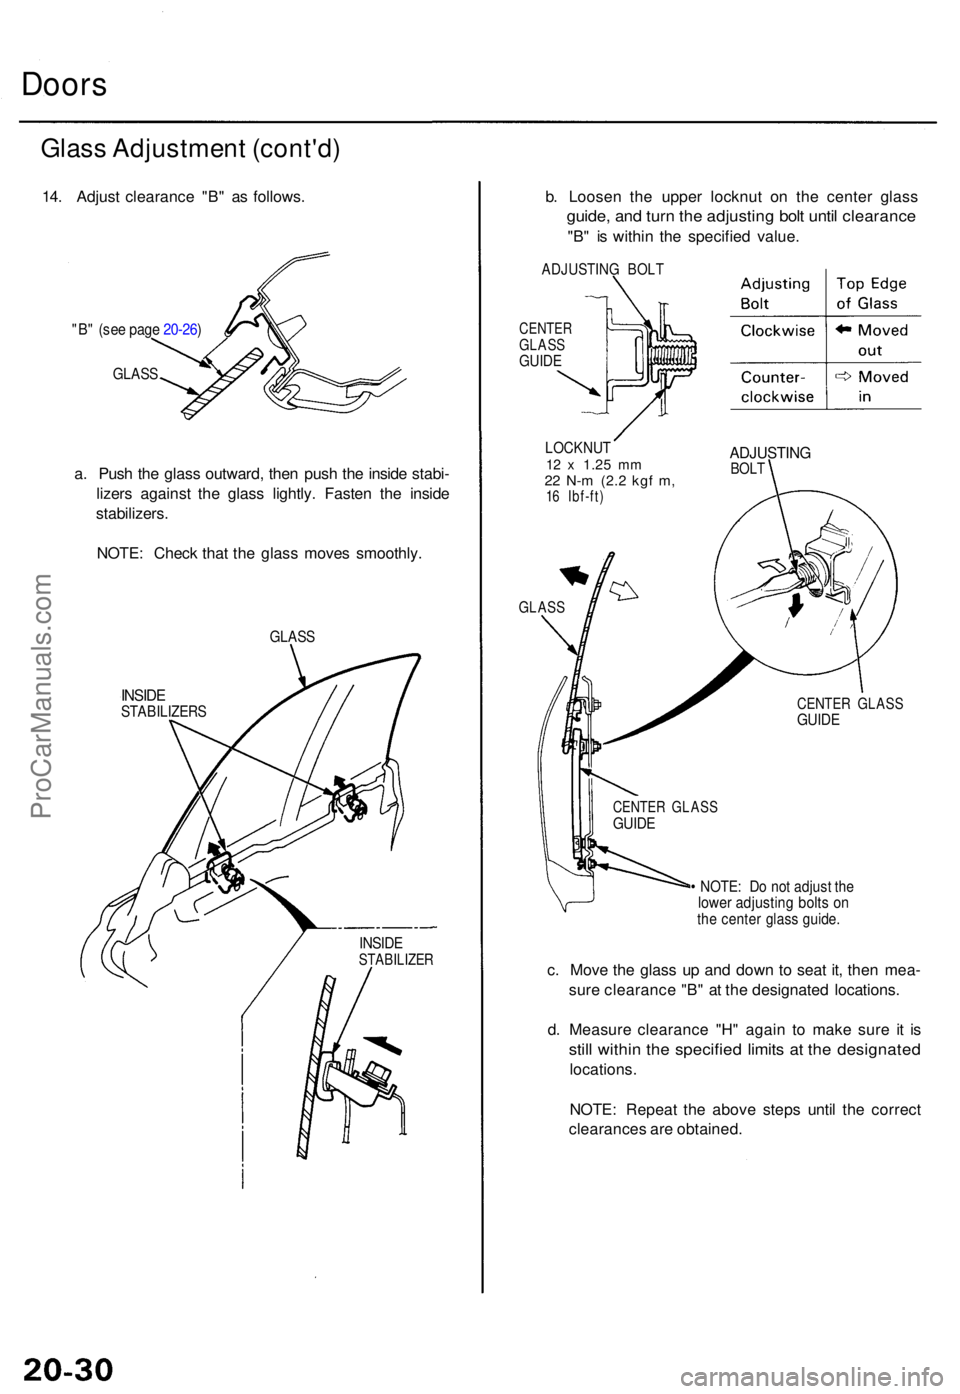
Glass Adjustmen t (cont'd )
14. Adjus t clearanc e "B " a s follows .
"B" (se e pag e 20-26 )
GLAS S
a. Pus h th e glas s outward , the n pus h th e insid e stabi -
lizer s agains t th e glas s lightly . Faste n th e insid e
stabilizers .
NOTE : Chec k tha t th e glas s move s smoothly .
GLASS
INSIDESTABILIZER S
INSIDESTABILIZE R
b. Loose n th e uppe r locknu t o n th e cente r glas s
guide, an d tur n th e adjustin g bol t unti l clearanc e
"B" i s withi n th e specifie d value .
ADJUSTIN G BOL T
CENTE RGLASSGUIDE
LOCKNU T12 x 1.2 5 mm22 N- m (2. 2 kgf m ,16 Ibf-ft )
ADJUSTIN GBOLT
GLAS S
• NOTE : D o no t adjus t th elowe r adjustin g bolt s o nthe cente r glas s guide .
c. Mov e th e glas s u p an d dow n t o sea t it , the n mea -
sur e clearanc e "B " a t th e designate d locations .
d . Measur e clearanc e "H " agai n t o mak e sur e i t i s
stil l withi n th e specifie d limit s a t th e designate d
locations.
NOTE : Repea t th e abov e step s unti l th e correc t
clearance s ar e obtained .
CENTER GLAS SGUIDE
CENTE R GLAS SGUIDE
ProCarManuals.com
Page 1372 of 1771
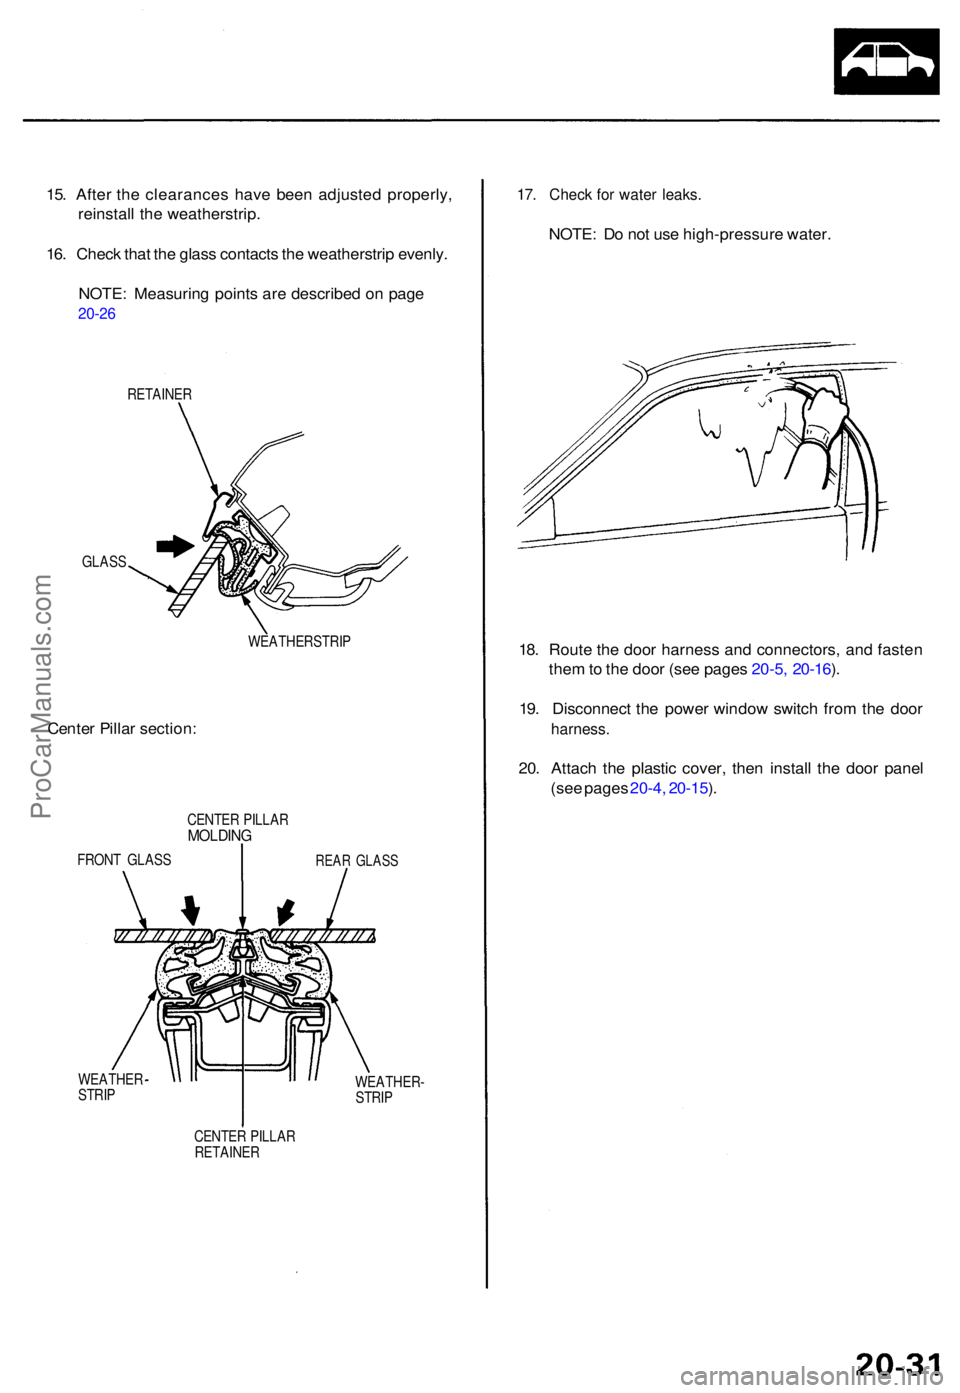
15. Afte r th e clearance s hav e bee n adjuste d properly ,
reinstal l th e weatherstrip .
16 . Chec k tha t th e glas s contact s th e weatherstri p evenly .
NOTE : Measurin g point s ar e describe d o n pag e
20-2 6
RETAINE R
GLAS S
WEATHERSTRIP
Center Pilla r section :
CENTER PILLA RMOLDIN G
FRONT GLAS SREAR GLAS S
WEATHE R
STRI P WEATHER
-
STRIP
CENTE R PILLA R
RETAINE R
17. Chec k fo r wate r leaks .
NOTE: D o no t us e high-pressur e water .
18 . Rout e th e doo r harnes s an d connectors , an d faste n
the m to th e doo r (se e page s 20-5 , 20-16 ).
19 . Disconnec t th e powe r windo w switc h fro m th e doo r
harness .
20. Attac h th e plasti c cover , the n instal l th e doo r pane l
(se e page s 20-4 , 20-15 ).
ProCarManuals.com
Page 1373 of 1771
Doors
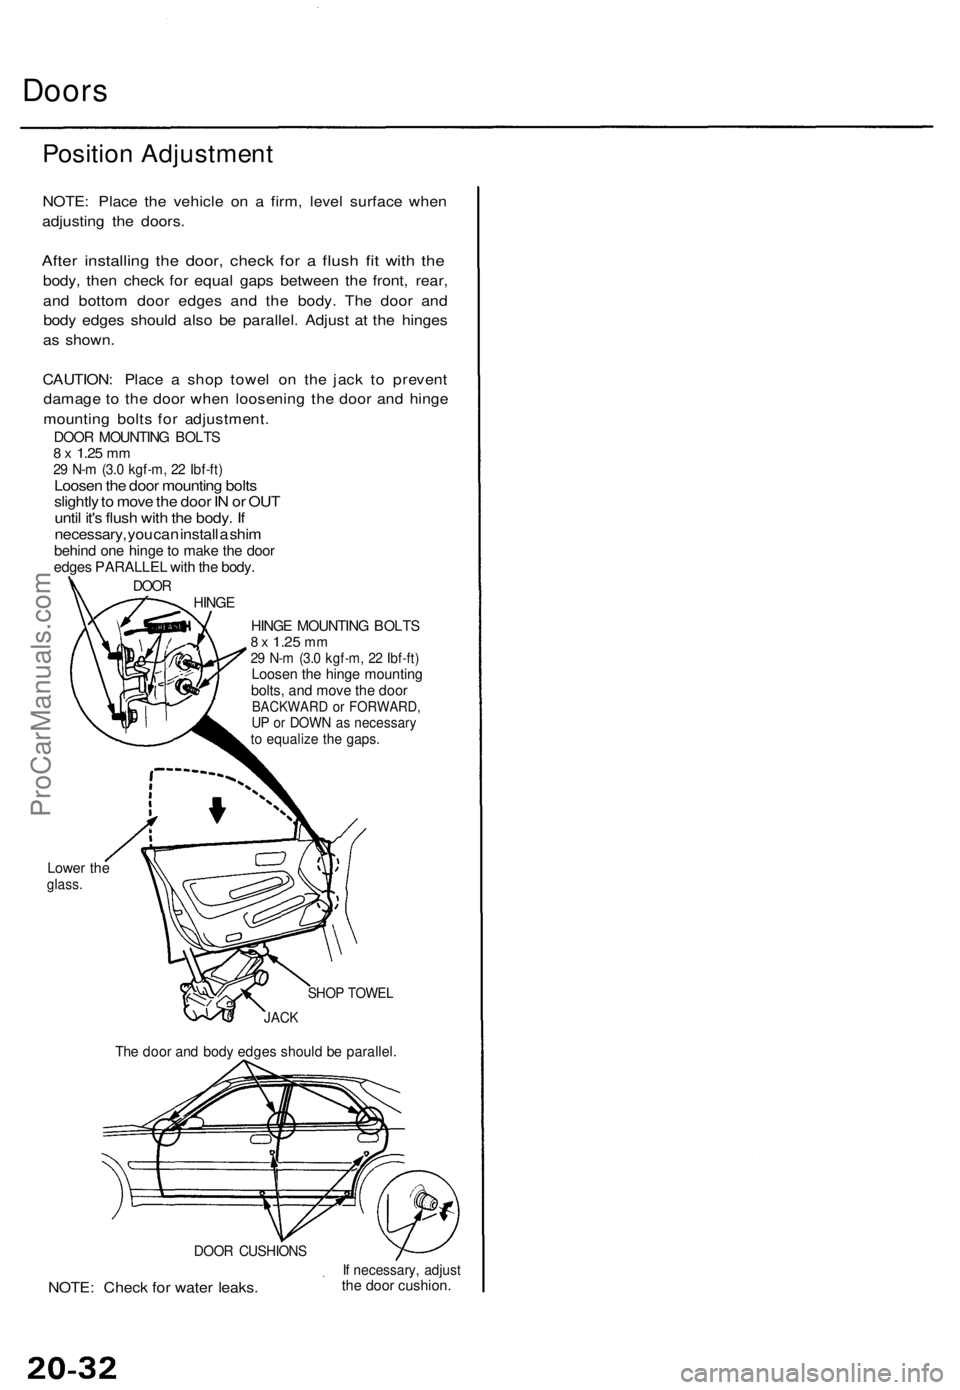
Positio n Adjustmen t
NOTE: Plac e th e vehicl e o n a firm , leve l surfac e whe n
adjustin g th e doors .
After installin g th e door , chec k fo r a flus h fi t wit h th e
body , the n chec k fo r equa l gap s betwee n th e front , rear ,
an d botto m doo r edge s an d th e body . Th e doo r an d
bod y edge s shoul d als o b e parallel . Adjus t a t th e hinge s
a s shown .
CAUTION : Plac e a sho p towe l o n th e jac k t o preven t
damag e t o th e doo r whe n loosenin g th e doo r an d hing e
mountin g bolt s fo r adjustment .
DOOR MOUNTIN G BOLT S8 x 1.2 5 mm29 N- m (3. 0 kgf-m , 2 2 Ibf-ft )Loose n th e doo r mountin g bolt s
slightl y to mov e th e doo r I N o r OU T
unti l it' s flus h wit h th e body . I f
necessary , yo u ca n instal l a shi m
behin d on e hing e to mak e th e doo redge s PARALLE L wit h th e body .
DOORHING E
HINGE MOUNTIN G BOLT S8 x 1.2 5 mm29 N- m (3. 0 kgf-m , 2 2 Ibf-ft )Loose n th e hing e mountin gbolts, an d mov e th e doo rBACKWAR D o r FORWARD ,UP o r DOW N a s necessar yto equaliz e th e gaps .
Lower th eglass .
DOOR CUSHION S
NOTE: Chec k fo r wate r leaks .If necessary , adjustth e doo r cushion .
SHOP TOWE L
JACK
The doo r an d bod y edge s shoul d b e parallel .
ProCarManuals.com
Page 1374 of 1771
Doors
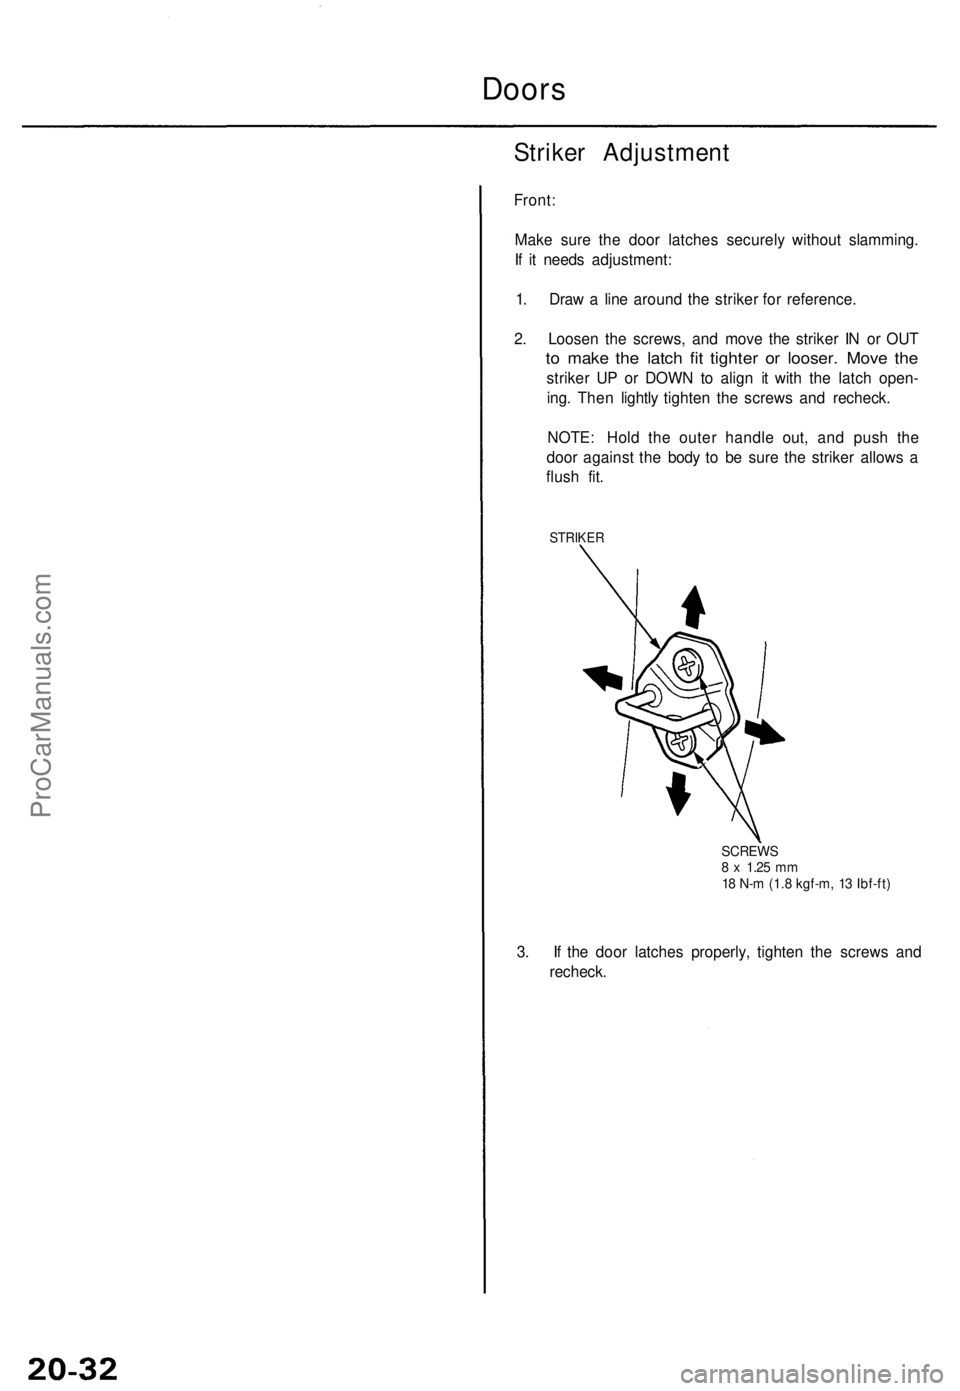
Strike r Adjustmen t
Front:
Make sur e th e doo r latche s securel y withou t slamming .
I f i t need s adjustment :
1 . Dra w a lin e aroun d th e strike r fo r reference .
2 . Loose n th e screws , an d mov e th e strike r I N o r OU T
to mak e th e latc h fi t tighte r o r looser . Mov e th e
strike r U P o r DOW N t o alig n i t wit h th e latc h open -
ing . The n lightl y tighte n th e screw s an d recheck .
NOTE : Hol d th e oute r handl e out , an d pus h th e
doo r agains t th e bod y t o b e sur e th e strike r allow s a
flus h fit .
STRIKE R
SCREW S8 x 1.2 5 mm18 N- m (1. 8 kgf-m , 1 3 Ibf-ft )
3. I f th e doo r latche s properly , tighte n th e screw s an d
recheck .
ProCarManuals.com
Page 1375 of 1771
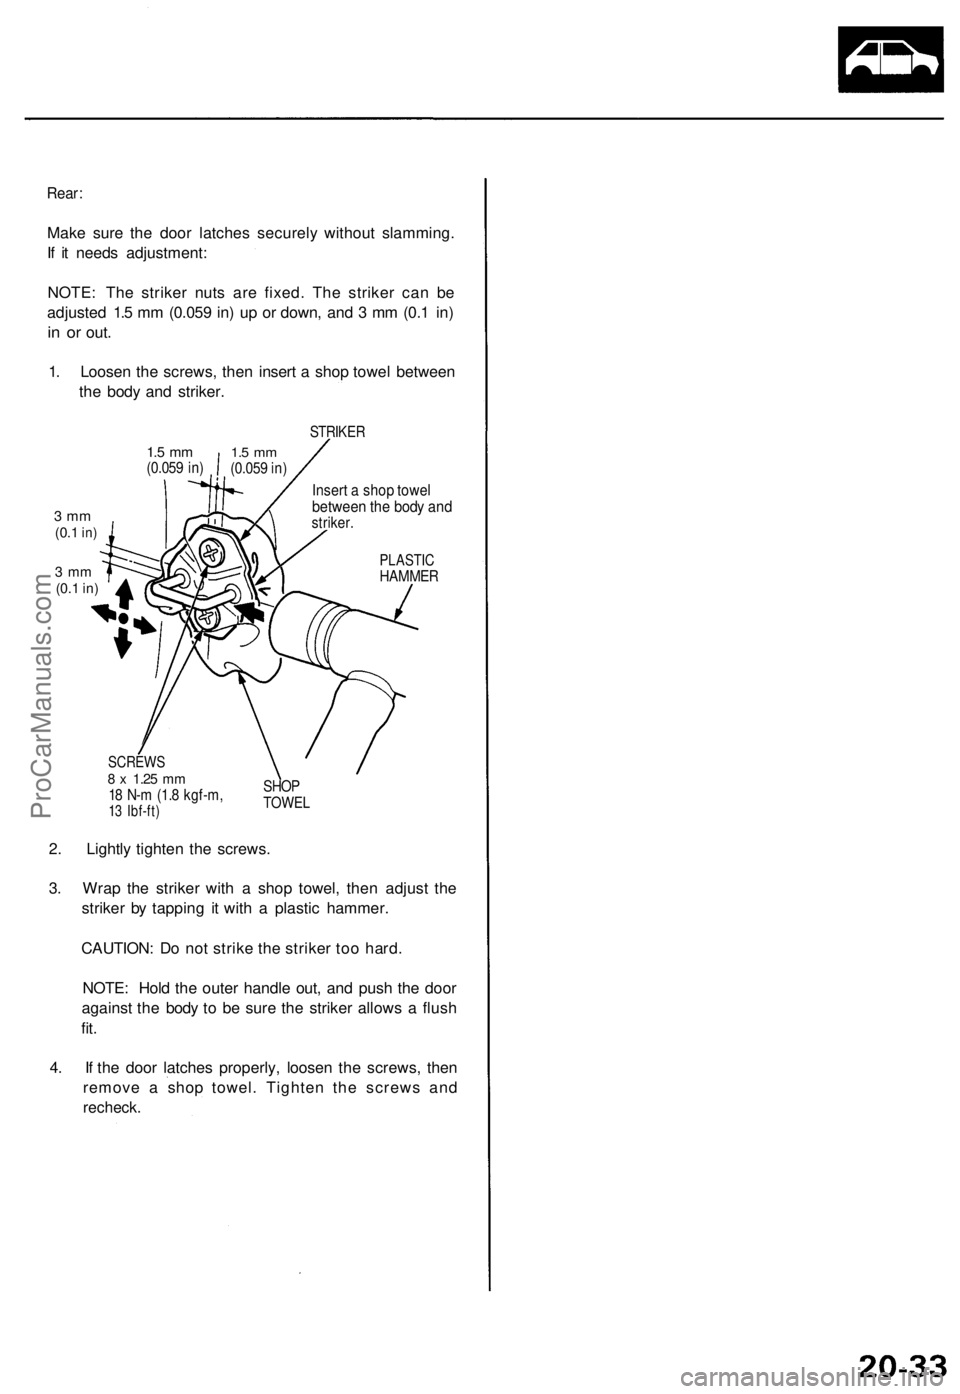
Rear:
Make sure the door latches securely without slamming.
If it needs adjustment:
NOTE: The striker nuts are fixed. The striker can be
adjusted 1.5 mm (0.059 in) up or down, and 3 mm (0.1 in)
in or
out.
1. Loosen the screws, then insert a shop towel between
the body and striker.
3 mm
(0.1
in)
STRIKER
Insert a shop towel
between the body and
striker.
PLASTIC
HAMMER
SCREWS
8 x
1.25
mm
18 N-m (1.8 kgf-m,
13 Ibf-ft)
SHOP
TOWEL
2. Lightly tighten the screws.
3. Wrap the striker with a shop towel, then adjust the
striker by tapping it with a plastic hammer.
CAUTION: Do not strike the striker too hard.
NOTE: Hold the outer handle out, and push the door
against the body to be sure the striker allows a flush
fit.
4. If the door latches properly, loosen the screws, then
remove a shop towel. Tighten the screws and
recheck.
3 mm
(0.1
in)
1.5 mm
(0.059 in)
1.5 mm
(0.059 in)ProCarManuals.com
Page 1376 of 1771
Mirrors
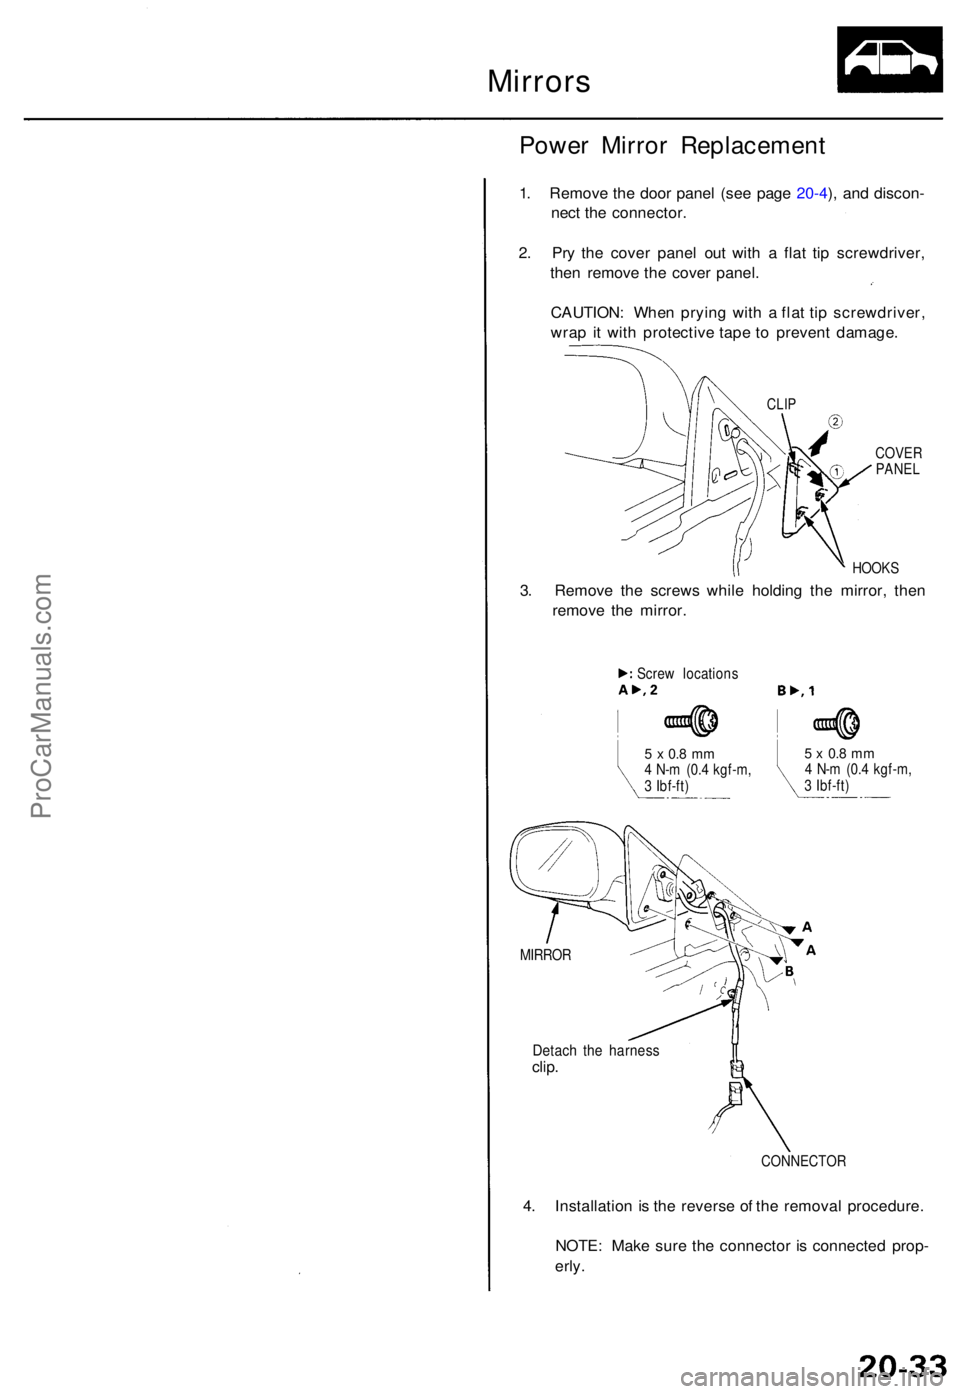
Power Mirro r Replacemen t
1. Remov e th e doo r pane l (se e pag e 20-4 ), an d discon -
nec t th e connector .
2 . Pr y th e cove r pane l ou t wit h a fla t ti p screwdriver ,
the n remov e th e cove r panel .
CAUTION : Whe n pryin g wit h a fla t ti p screwdriver ,
wra p i t wit h protectiv e tap e t o preven t damage .
COVER
PANE L
HOOK S
3. Remov e th e screw s whil e holdin g th e mirror , the n
remov e th e mirror .
Detach th e harnes sclip.
CONNECTO R
4. Installatio n i s th e revers e o f th e remova l procedure .
NOTE : Mak e sur e th e connecto r i s connecte d prop -
erly .
CLIP
5 x 0. 8 m m4 N- m (0. 4 kgf-m ,
3 Ibf-ft )5 x 0. 8 m m4 N- m (0. 4 kgf-m ,
3 Ibf-ft )
Scre
w location s
MIRRO R
ProCarManuals.com
Page 1377 of 1771
Mirrors
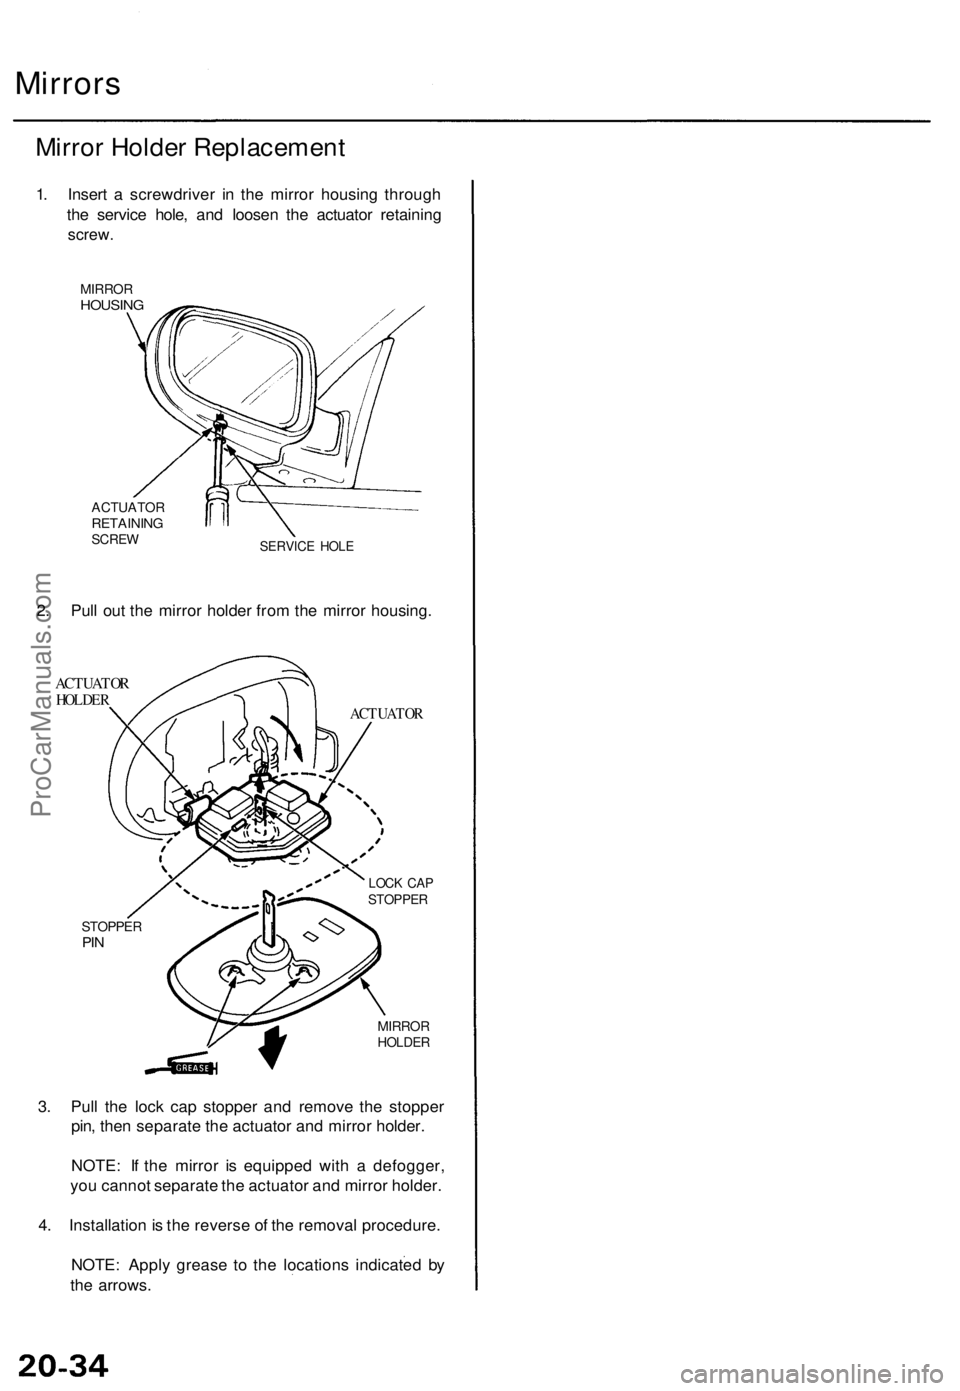
Mirror Holder Replacement
1. Insert a screwdriver in the mirror housing through
the service hole, and loosen the actuator retaining
screw.
MIRROR
HOUSING
ACTUATOR
RETAINING
SCREW
SERVICE HOLE
2. Pull out the mirror holder from the mirror housing.
ACTUATOR
HOLDER
ACTUATOR
LOCK CAP
STOPPER
STOPPER
PIN
MIRROR
HOLDER
3. Pull the lock cap stopper and remove the stopper
pin, then separate the actuator and mirror holder.
NOTE: If the mirror is equipped with a defogger,
you cannot separate the actuator and mirror holder.
4. Installation is the reverse of the removal procedure.
NOTE: Apply grease to the locations indicated by
the arrows.ProCarManuals.com
Page 1378 of 1771
Mirrors
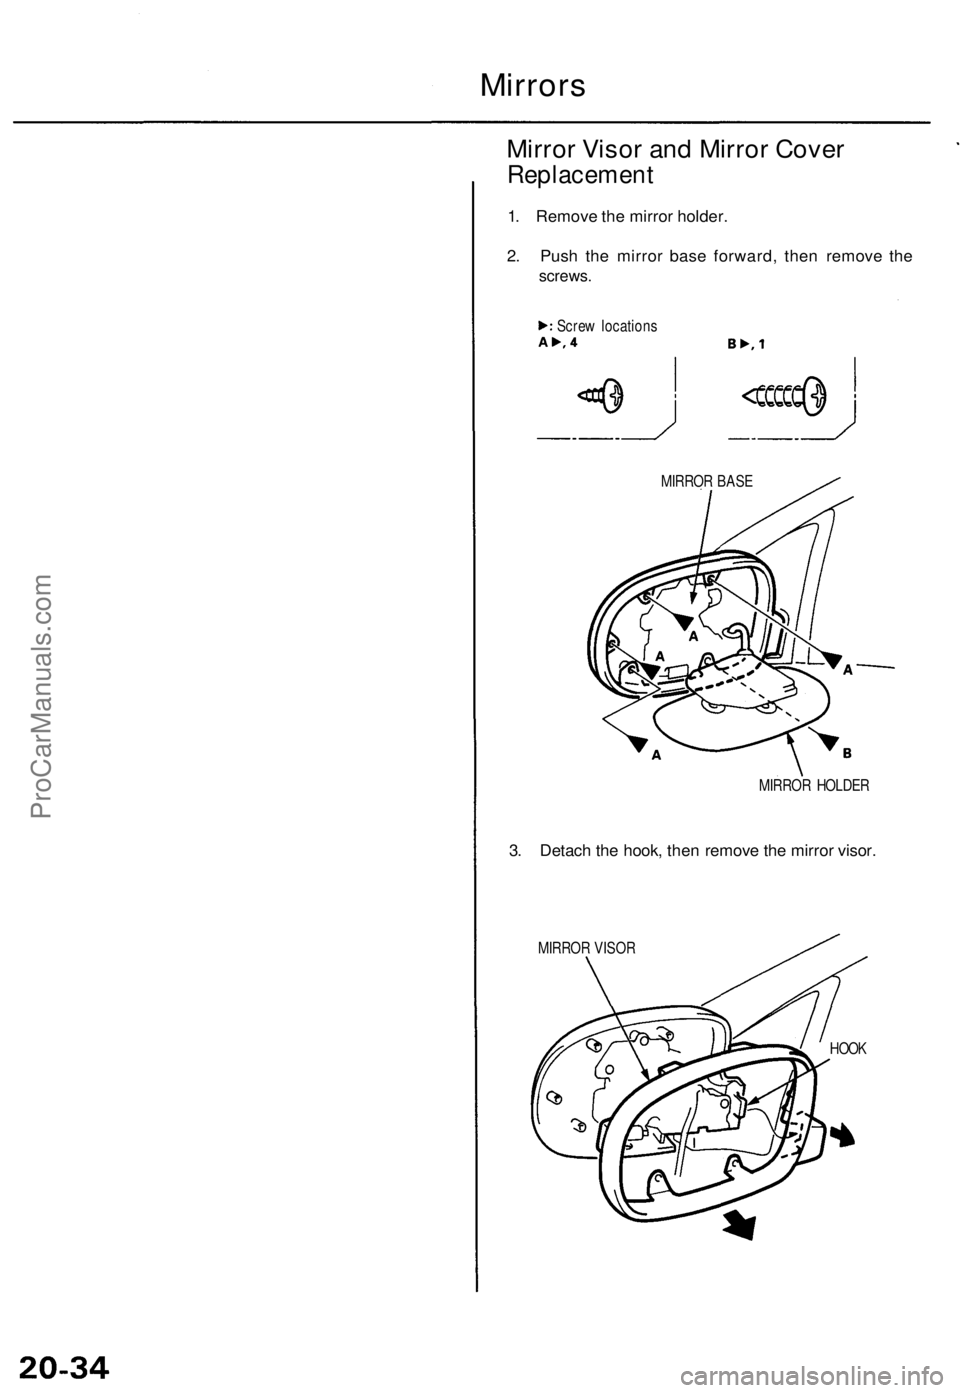
Mirror Viso r an d Mirro r Cove r
Replacemen t
1. Remov e th e mirro r holder .
2 . Pus h th e mirro r bas e forward , the n remov e th e
screws .
MIRRO R BAS E
MIRRO R HOLDE R
3. Detac h th e hook , the n remov e th e mirro r visor .
MIRRO R VISO R
Scre
w location s
HOOK
ProCarManuals.com
Page 1379 of 1771
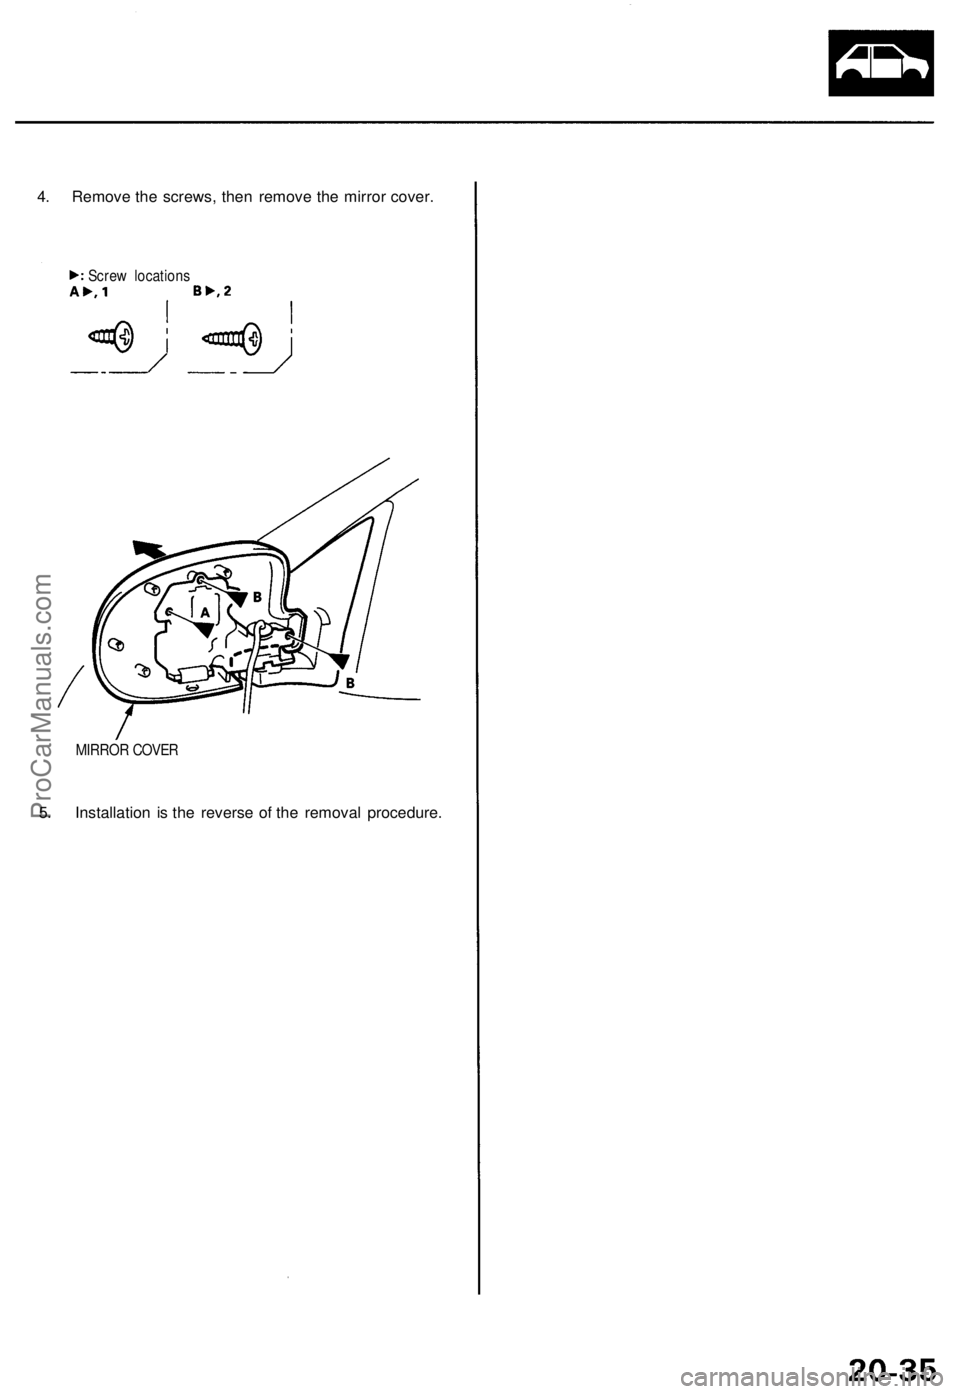
4. Remove the screws, then remove the mirror cover.
MIRROR COVER
5. Installation is the reverse of the removal procedure.
Screw locationsProCarManuals.com
Page 1380 of 1771
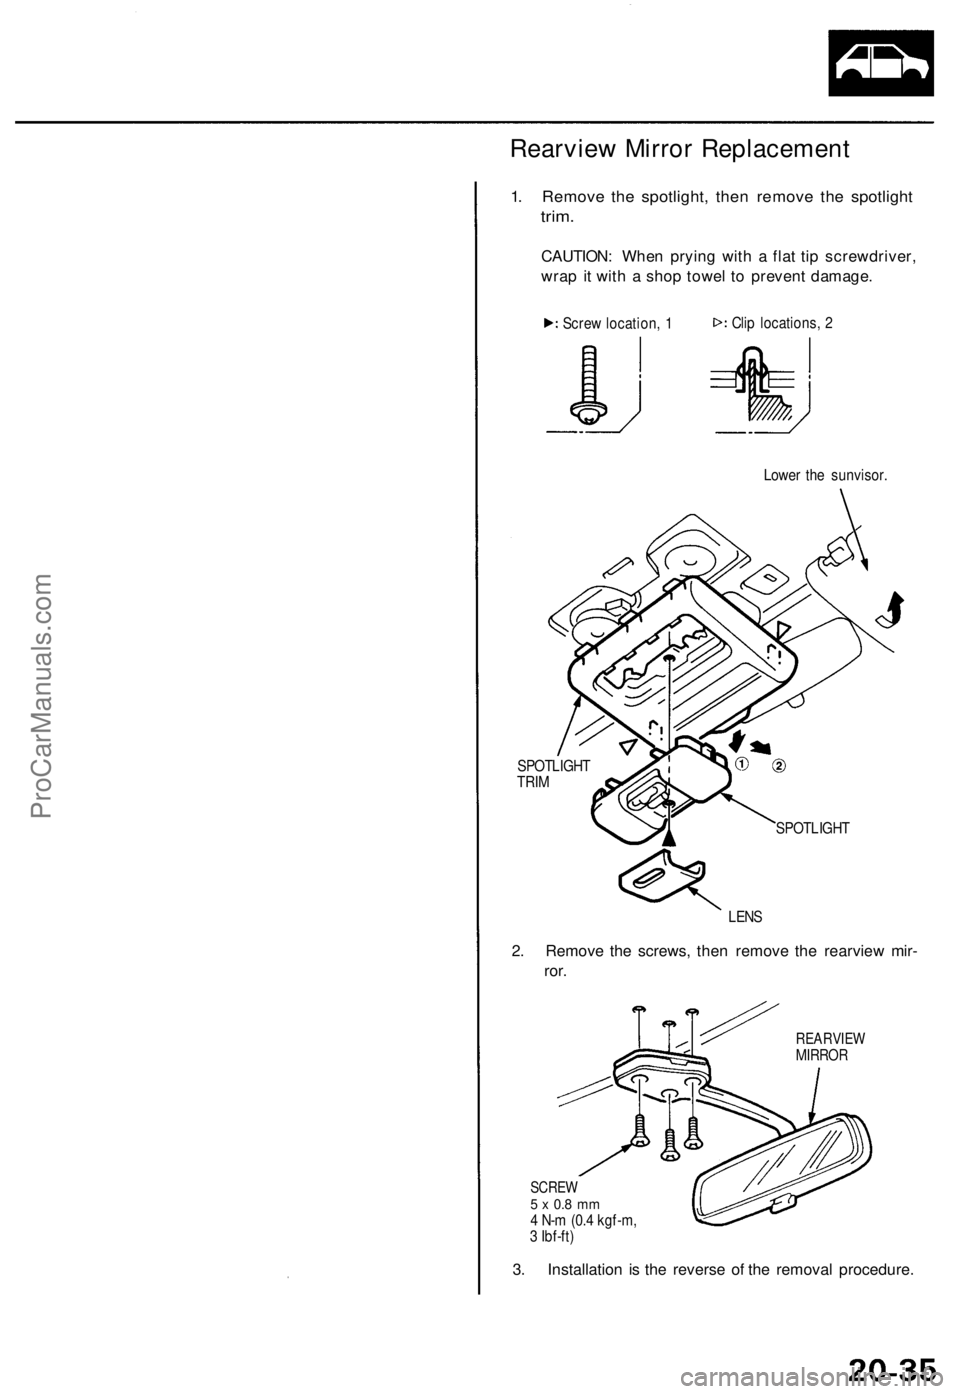
Rearview Mirror Replacement
1. Remove the spotlight, then remove the spotlight
trim.
CAUTION: When prying with a flat tip screwdriver,
wrap it with a shop towel to prevent damage.
Lower the sunvisor.
SPOTLIGHT
TRIM
SPOTLIGHT
LENS
2. Remove the screws, then remove the rearview mir-
ror.
REARVIEW
MIRROR
SCREW
5 x 0.8 mm
4 N-m (0.4 kgf-m,
3 Ibf-ft)
3. Installation is the reverse of the removal procedure.
Screw location, 1
Clip locations, 2ProCarManuals.com
Trending: ignition, check engine, buttons, window, width, air filter, coolant

