ACURA TL 1995 Service Repair Manual
Manufacturer: ACURA, Model Year: 1995, Model line: TL, Model: ACURA TL 1995Pages: 1771, PDF Size: 62.49 MB
Page 1421 of 1771
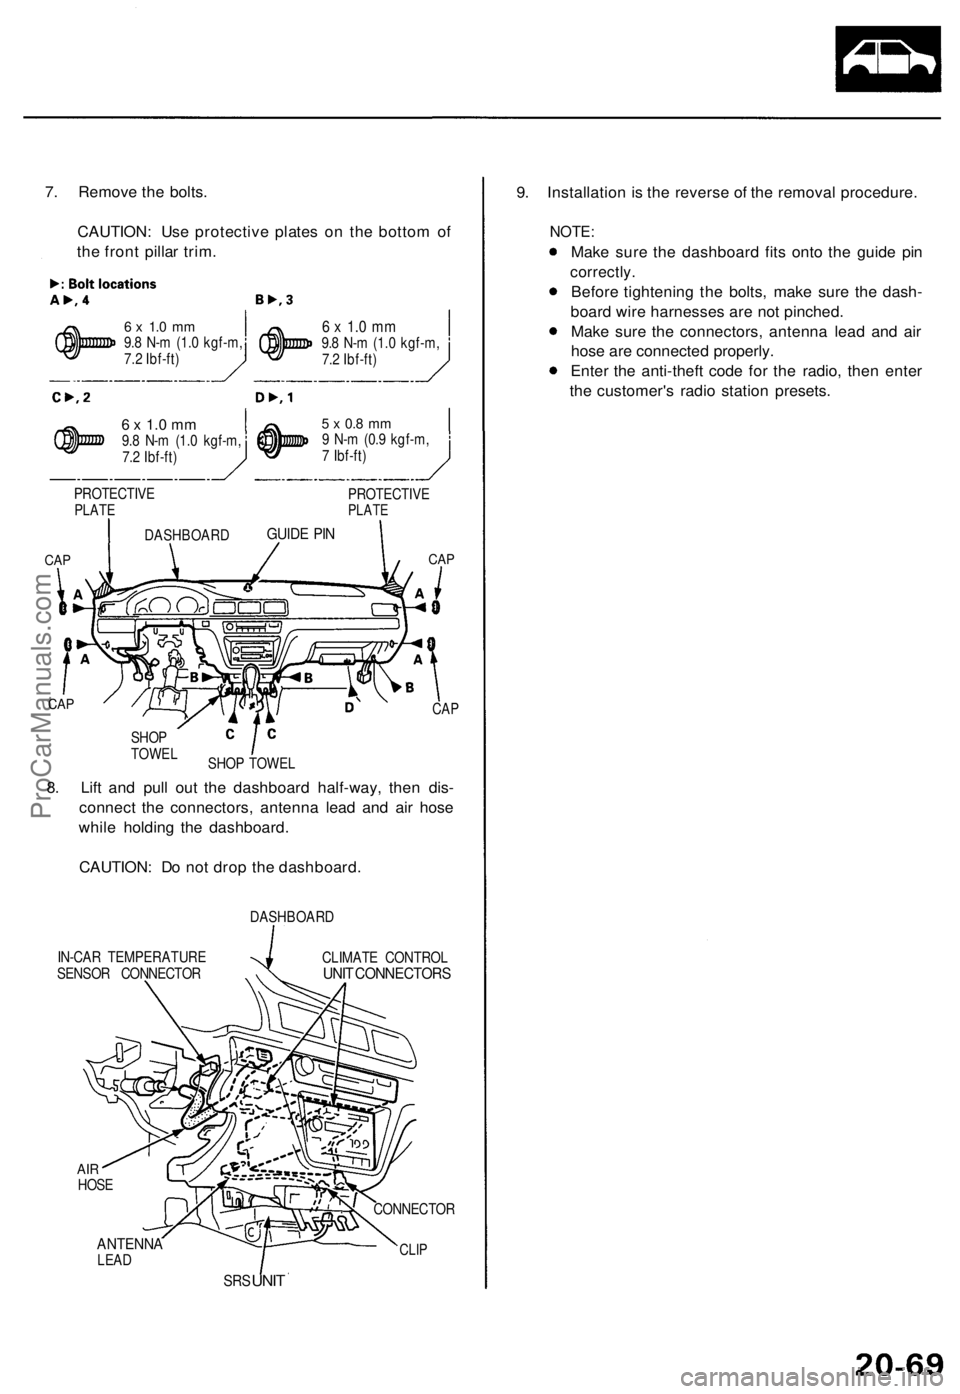
7. Remov e th e bolts .
CAUTION : Us e protectiv e plate s o n th e botto m o f
th e fron t pilla r trim .
6 x 1. 0 m m9.8 N- m (1. 0 kgf-m ,
7. 2 Ibf-ft )
6 x 1. 0 m m9.8 N- m (1. 0 kgf-m ,
7. 2 Ibf-ft )
6 x 1. 0 m m9.8 N- m (1. 0 kgf-m ,
7. 2 Ibf-ft )
PROTECTIV E
PLATE
CAP CA
P
IN-CA R TEMPERATUR E
SENSO R CONNECTO RDASHBOAR
D
CLIMAT E CONTRO LUNIT CONNECTOR S
ANTENNALEAD
SRS UNI T 9
. Installatio n i s th e revers e o f th e remova l procedure .
NOTE:
Make sur e th e dashboar d fit s ont o th e guid e pi n
correctly .
Before tightenin g th e bolts , mak e sur e th e dash -
boar d wir e harnesse s ar e no t pinched .
Mak e sur e th e connectors , antenn a lea d an d ai r
hos e ar e connecte d properly .
Ente r th e anti-thef t cod e fo r th e radio , the n ente r
th e customer' s radi o statio n presets .
CLIP
CONNECTO R
8. Lif t an d pul l ou t th e dashboar d half-way , the n dis -
connec t th e connectors , antenn a lea d an d ai r hos e
whil e holdin g th e dashboard .
CAUTION : D o no t dro p th e dashboard .
CAP
SHO P TOWE L
SHO
P
TOWE L
CAP
DASHBOAR DGUIDE PI N
5 x 0. 8 m m9 N- m (0. 9 kgf-m ,
7 Ibf-ft )
PROTECTIV E
PLATE
AIRHOS E
ProCarManuals.com
Page 1422 of 1771
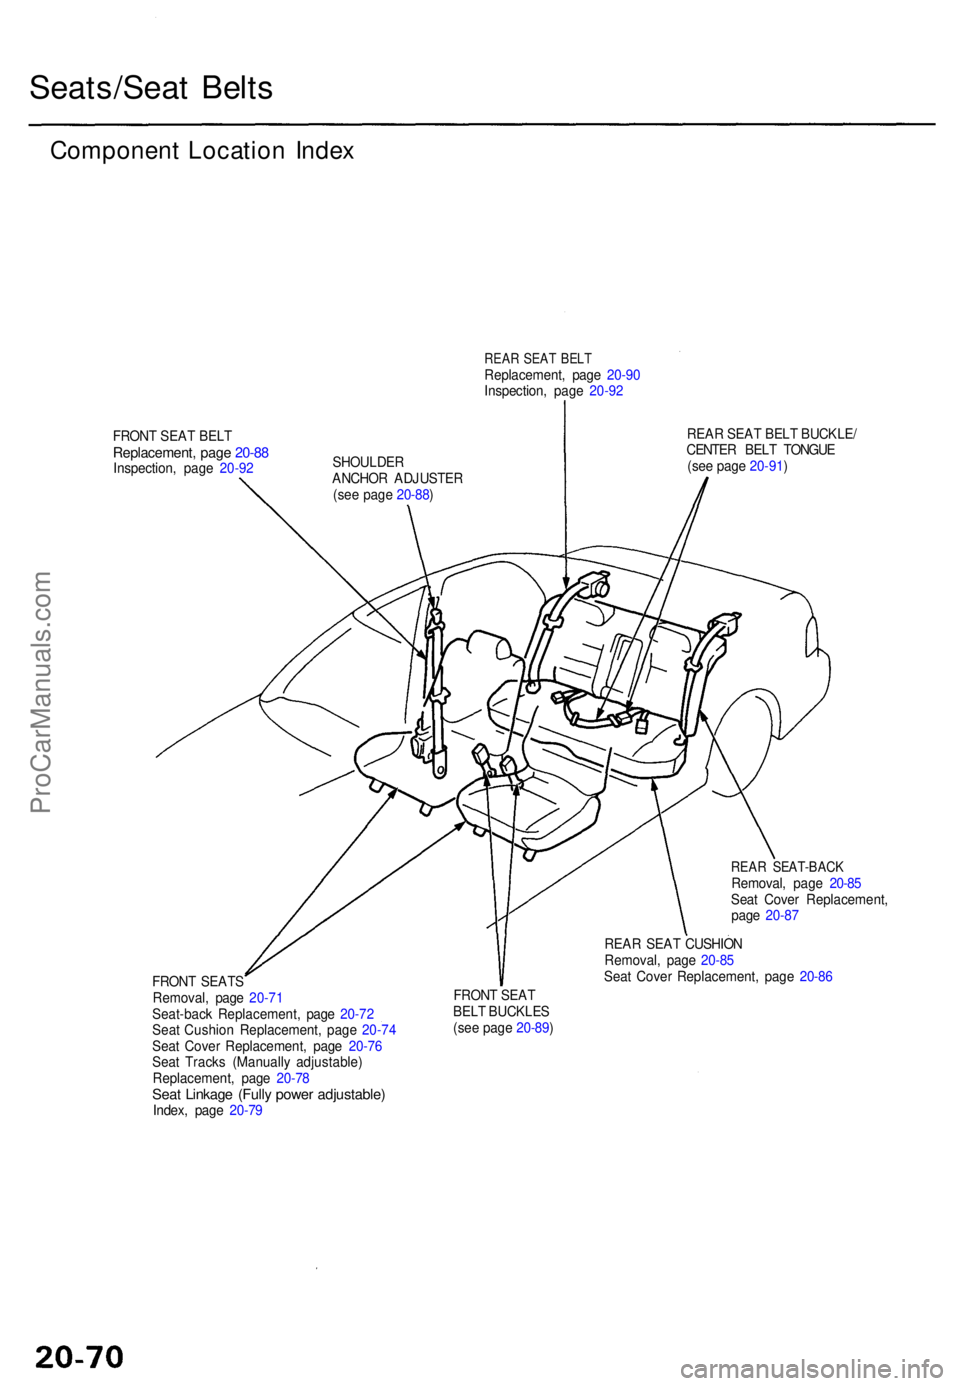
Seats/Seat Belt s
Componen t Locatio n Inde x
REAR SEA T BEL TReplacement , pag e 20-9 0
Inspection , pag e 20-9 2
FRON T SEA T BEL T
Replacement , pag e 20-8 8Inspection , pag e 20-9 2 SHOULDE
R
ANCHO R ADJUSTE R
(se e pag e 20-88 ) REA
R SEA T BEL T BUCKLE /
CENTE R BEL T TONGU E
(se e pag e 20-91 )
FRON T SEAT S
Removal , pag e 20-7 1
Seat-bac k Replacement , pag e 20-7 2
Sea t Cushio n Replacement , pag e 20-7 4
Sea t Cove r Replacement , pag e 20-7 6
Sea t Track s (Manuall y adjustable )
Replacement , pag e 20-7 8
Seat Linkag e (Full y powe r adjustable )Index, pag e 20-7 9
REA R SEAT-BAC KRemoval, pag e 20-8 5
Sea t Cove r Replacement ,
pag e 20-8 7
REA R SEA T CUSHIO N
Removal , pag e 20-8 5
Sea t Cove r Replacement , pag e 20-8 6
FRON T SEA T
BEL T BUCKLE S
(se e pag e 20-89 )
ProCarManuals.com
Page 1423 of 1771
Front Seat
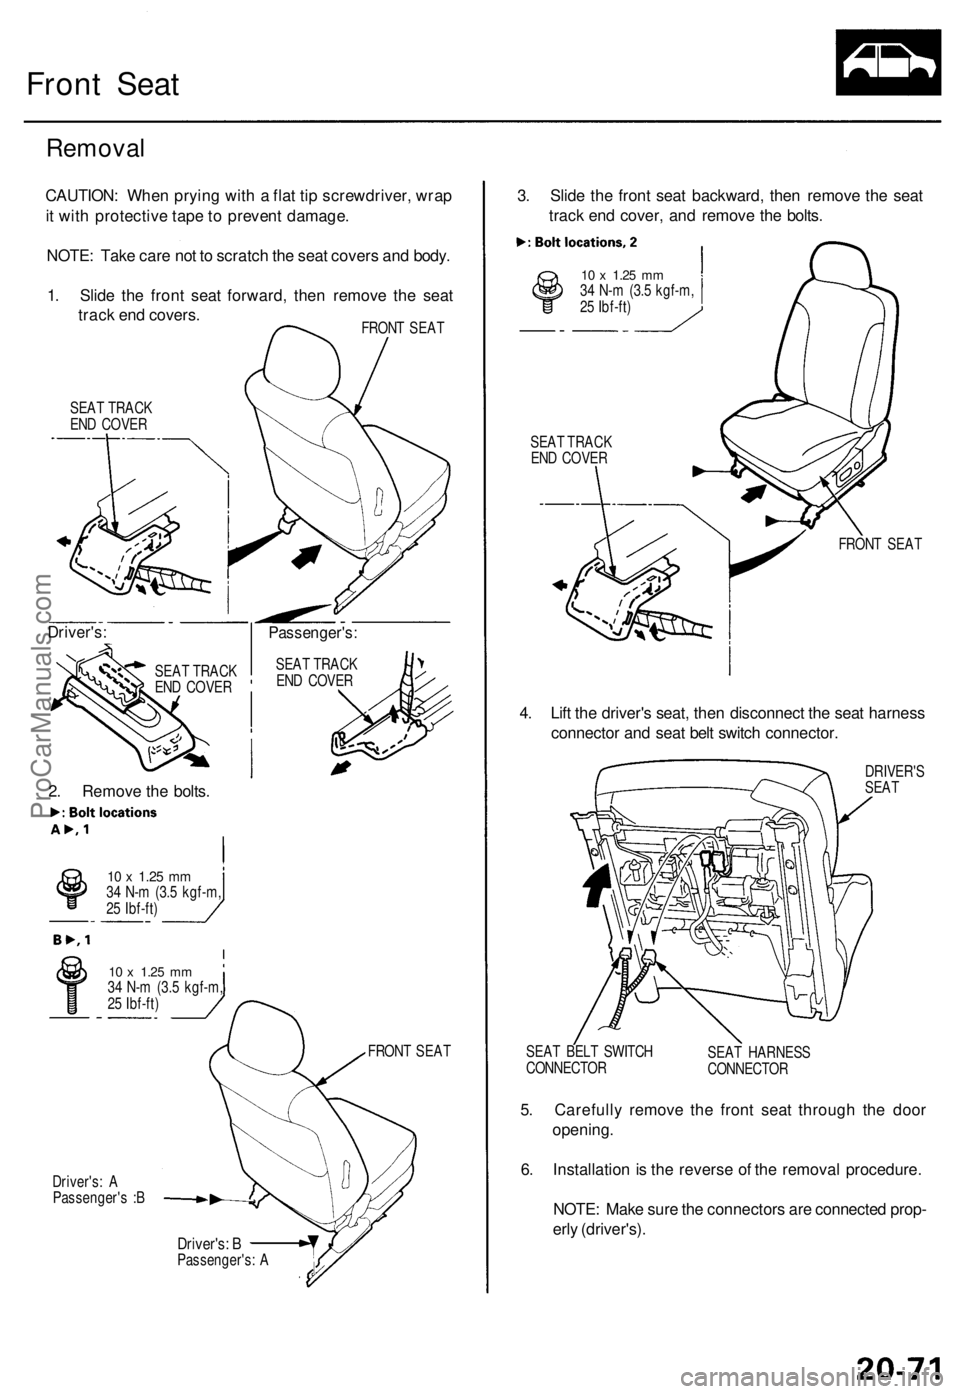
Removal
CAUTION: When prying with a flat tip screwdriver, wrap
it with protective tape to prevent damage.
NOTE: Take care not to scratch the seat covers and body.
1. Slide the front seat forward, then remove the seat
track end covers.
FRONT SEAT
SEAT TRACK
END COVER
2. Remove the bolts.
10 x
1.25
mm
34 N-m (3.5 kgf-m,
25 Ibf-ft)
FRONT SEAT
Driver's: A
Passenger's :B
Driver's: B
Passenger's: A
3. Slide the front seat backward, then remove the seat
track end cover, and remove the bolts.
10 x
1.25
mm
34 N-m (3.5 kgf-m,
25 Ibf-ft)
SEAT TRACK
END COVER
FRONT SEAT
4. Lift the driver's seat, then disconnect the seat harness
connector and seat belt switch connector.
DRIVER'S
SEAT
SEAT BELT SWITCH
CONNECTOR
SEAT HARNESS
CONNECTOR
5. Carefully remove the front seat through the door
opening.
6. Installation is the reverse of the removal procedure.
NOTE: Make sure the connectors are connected prop-
erly (driver's).
10 x
1.25
mm
34 N-m (3.5 kgf-m,
25 Ibf-ft)
Passenger's:
SEAT TRACK
END COVER
SEAT TRACK
END COVER
Driver's:ProCarManuals.com
Page 1424 of 1771
Front Sea t
Seat-bac k Replacemen t
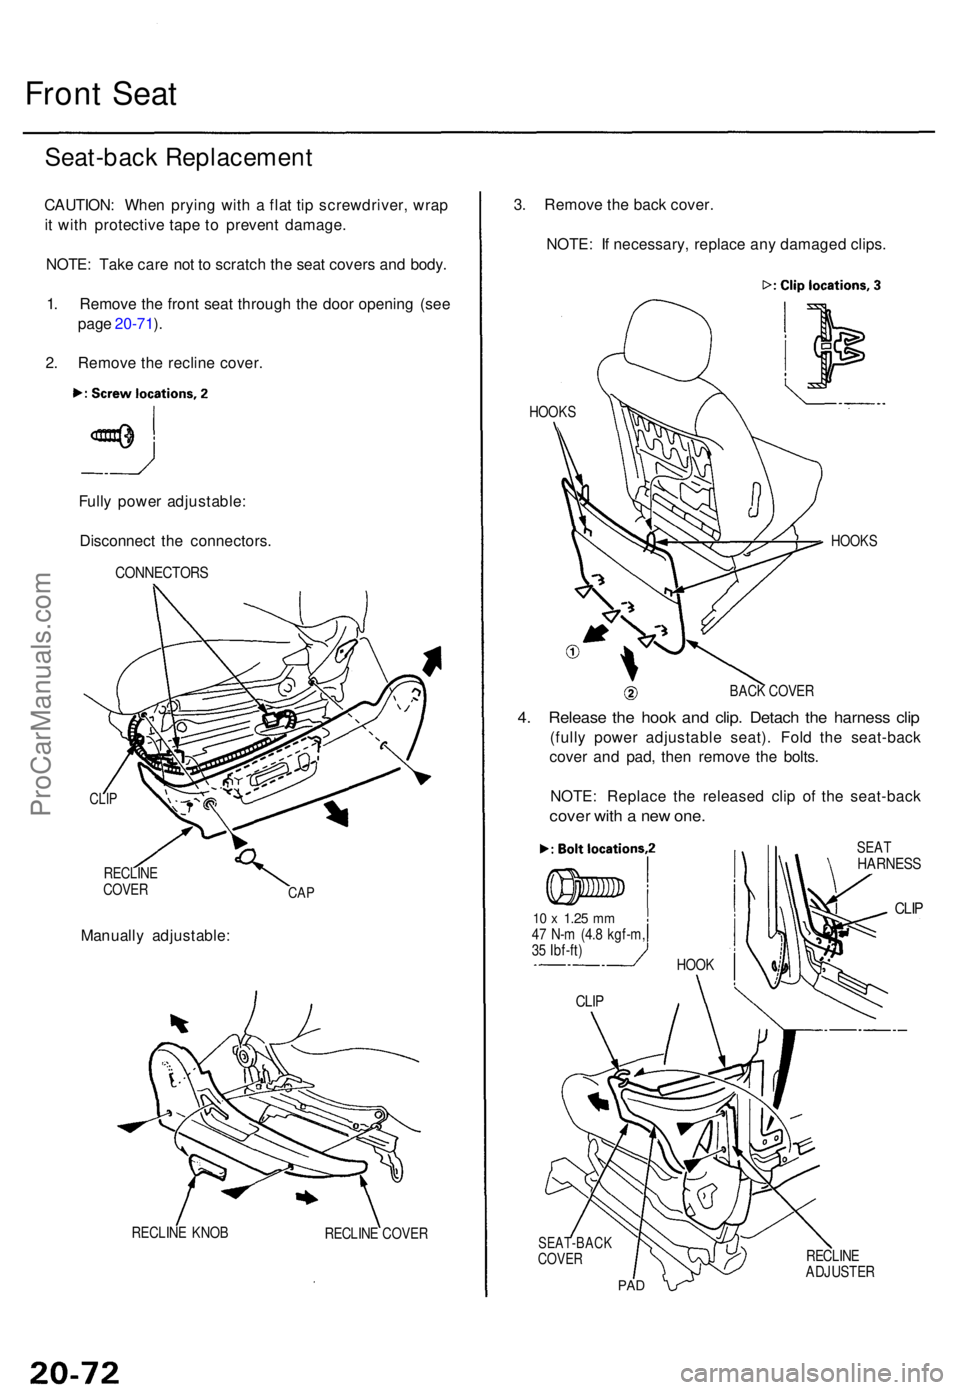
CAUTION: Whe n pryin g wit h a fla t ti p screwdriver , wrap
i t wit h protectiv e tap e t o preven t damage .
NOTE : Tak e car e no t t o scratc h th e sea t cover s an d body .
1 . Remov e th e fron t sea t throug h th e doo r openin g (se e
pag e 20-71 ).
2 . Remov e th e reclin e cover .
Full y powe r adjustable :
Disconnec t th e connectors .
CONNECTOR S
RECLINE
COVE R
Manuall y adjustable :
CAP
RECLIN E KNO B
RECLINE COVE R
3. Remov e th e bac k cover .
NOTE : I f necessary , replac e an y damage d clips .
HOOK S
HOOKS
BAC K COVE R
4. Releas e th e hoo k an d clip . Detac h th e harnes s cli p
(full y powe r adjustabl e seat) . Fol d th e seat-bac k
cove r an d pad , the n remov e th e bolts .
NOTE : Replac e th e release d cli p o f th e seat-bac k
cover wit h a ne w one .
10 x 1.2 5 mm47 N- m (4. 8 kgf-m ,
3 5 Ibf-ft )
CLIP
SEA THARNES S
CLIP
SEAT-BAC KCOVER
PAD
RECLIN E
ADJUSTE R
CLIP
HOO K
ProCarManuals.com
Page 1425 of 1771
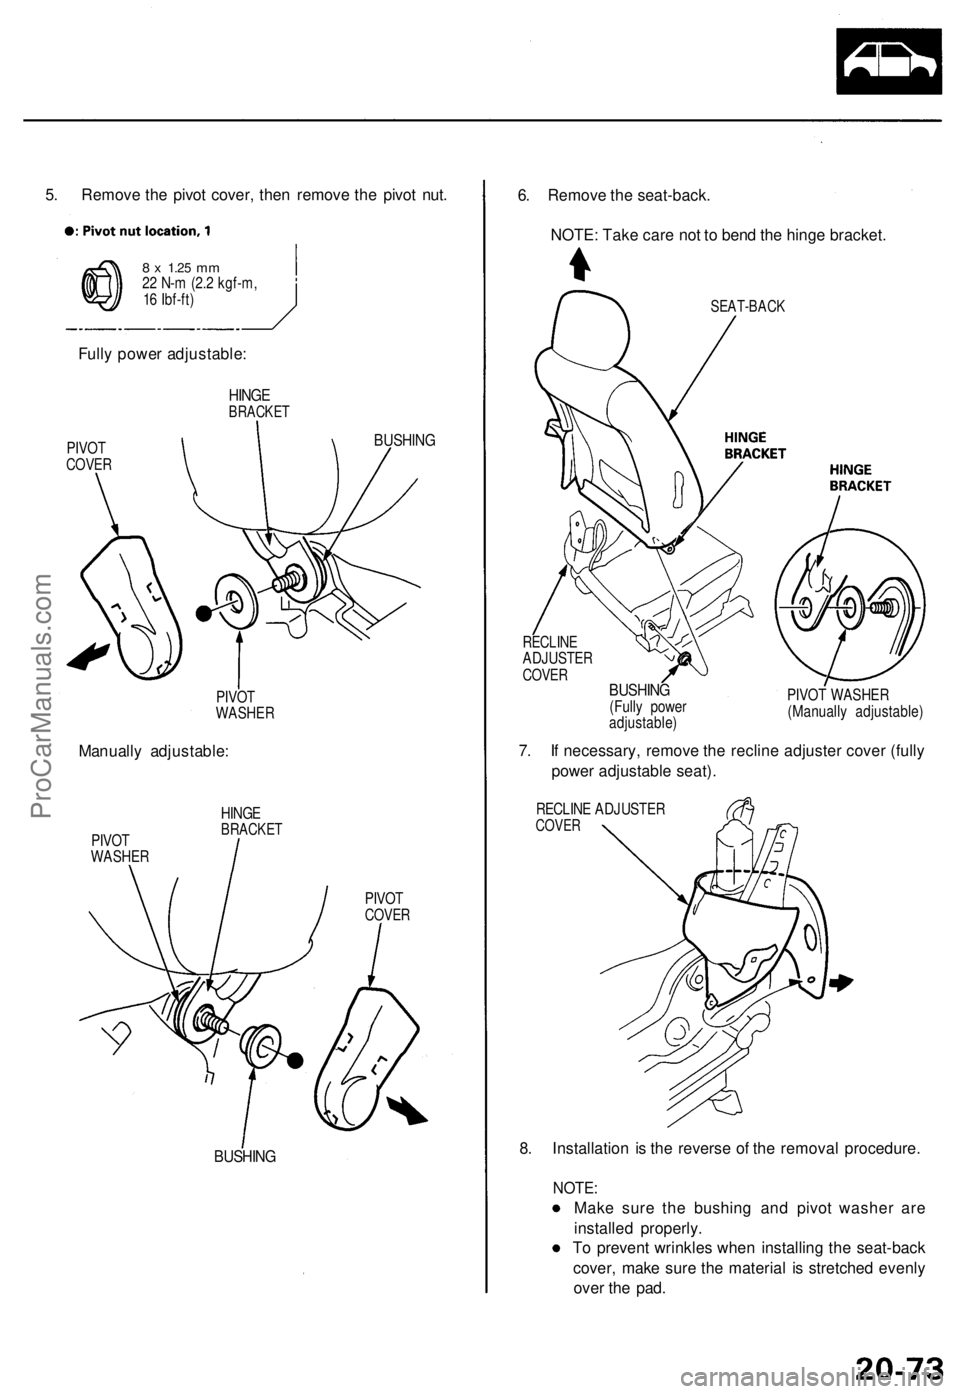
5. Remove the pivot cover, then remove the pivot nut.
8 x
1.25
mm
22 N-m (2.2 kgf-m,
16 Ibf-ft)
Fully power adjustable:
HINGE
BRACKET
PIVOT
COVER
PIVOT
WASHER
Manually adjustable:
PIVOT
WASHER
HINGE
BRACKET
BUSHING
BUSHING
PIVOT
COVER
6. Remove the seat-back.
NOTE: Take care not to bend the hinge bracket.
SEAT-BACK
RECLINE
ADJUSTER
COVER
BUSHING
(Fully power
adjustable)
PIVOT WASHER
(Manually adjustable)
7. If necessary, remove the recline adjuster cover (fully
power adjustable seat).
RECLINE ADJUSTER
COVER
8. Installation is the reverse of the removal procedure.
NOTE:
Make sure the bushing and pivot washer are
installed properly.
To prevent wrinkles when installing the seat-back
cover, make sure the material is stretched evenly
over the pad.ProCarManuals.com
Page 1426 of 1771
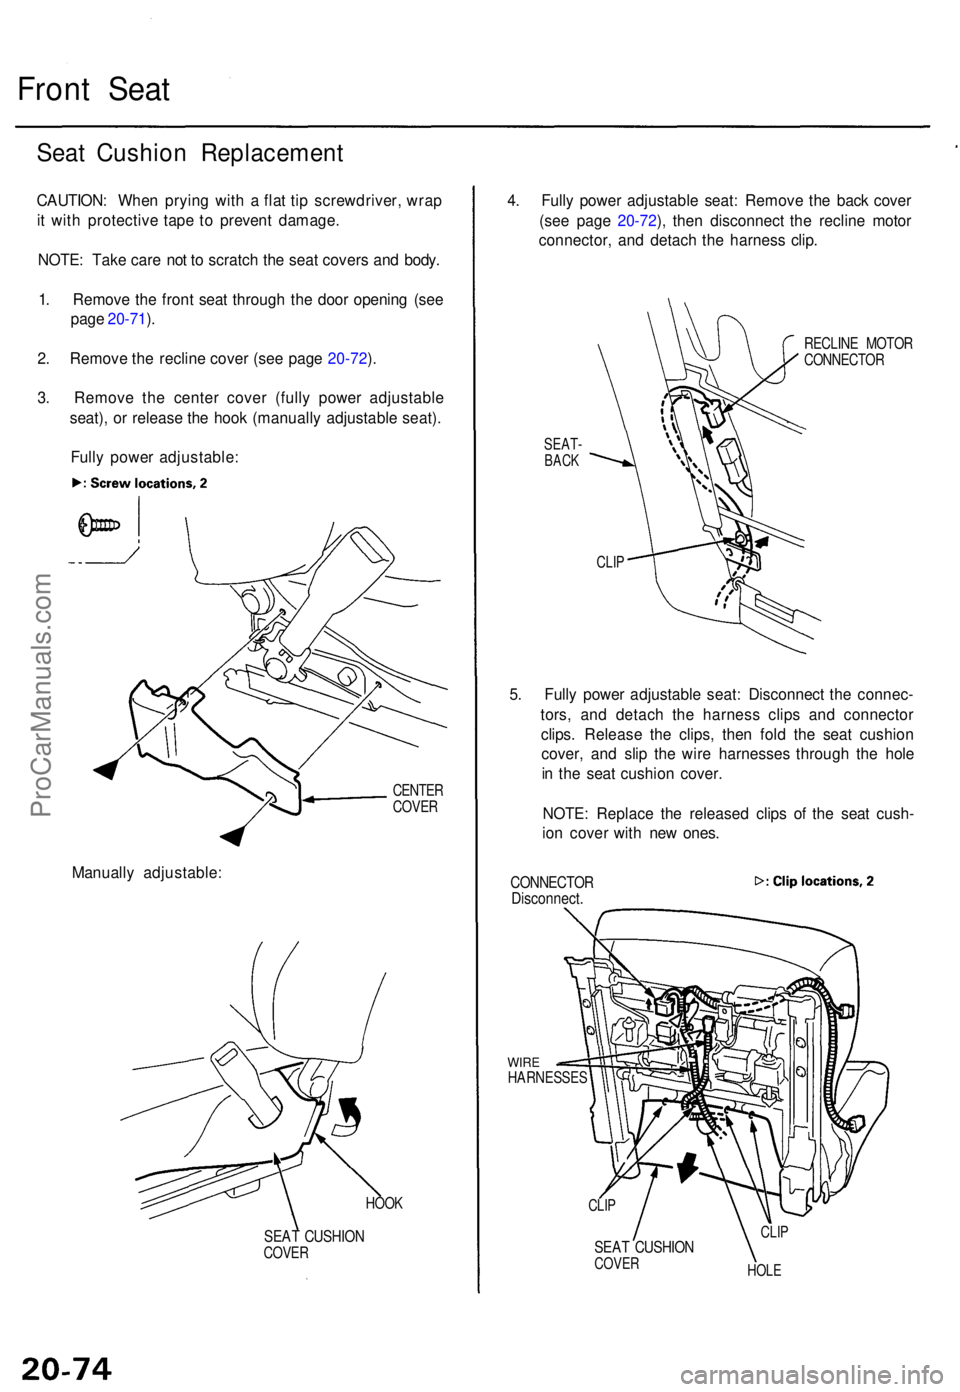
Front Sea t
Seat Cushio n Replacemen t
CAUTION: Whe n pryin g wit h a fla t ti p screwdriver , wra p
i t wit h protectiv e tap e t o preven t damage .
NOTE : Tak e car e no t t o scratc h th e sea t cover s an d body .
1 . Remov e th e fron t sea t throug h th e doo r openin g (se e
pag e 20-71 ).
2 . Remov e th e reclin e cove r (se e pag e 20-72 ).
3 . Remov e th e cente r cove r (full y powe r adjustabl e
seat) , o r releas e th e hoo k (manuall y adjustabl e seat) .
Full y powe r adjustable :
CENTER
COVE R
Manuall y adjustable :
HOOK
SEAT CUSHIO NCOVER
4. Full y powe r adjustabl e seat : Remov e th e bac k cove r
(se e pag e 20-72 ), the n disconnec t th e reclin e moto r
connector , an d detac h th e harnes s clip .
SEAT -BACK
RECLIN E MOTO R
CONNECTO R
CLIP
5. Full y powe r adjustabl e seat : Disconnec t th e connec -
tors , an d detac h th e harnes s clip s an d connecto r
clips . Releas e th e clips , the n fol d th e sea t cushio n
cover , an d sli p th e wir e harnesse s throug h th e hol e
i n th e sea t cushio n cover .
NOTE : Replac e th e release d clip s o f th e sea t cush -
io n cove r wit h ne w ones .
CONNECTO RDisconnect.
WIREHARNESSE S
CLIP
SEA T CUSHIO NCOVERHOLE
CLIP
ProCarManuals.com
Page 1427 of 1771
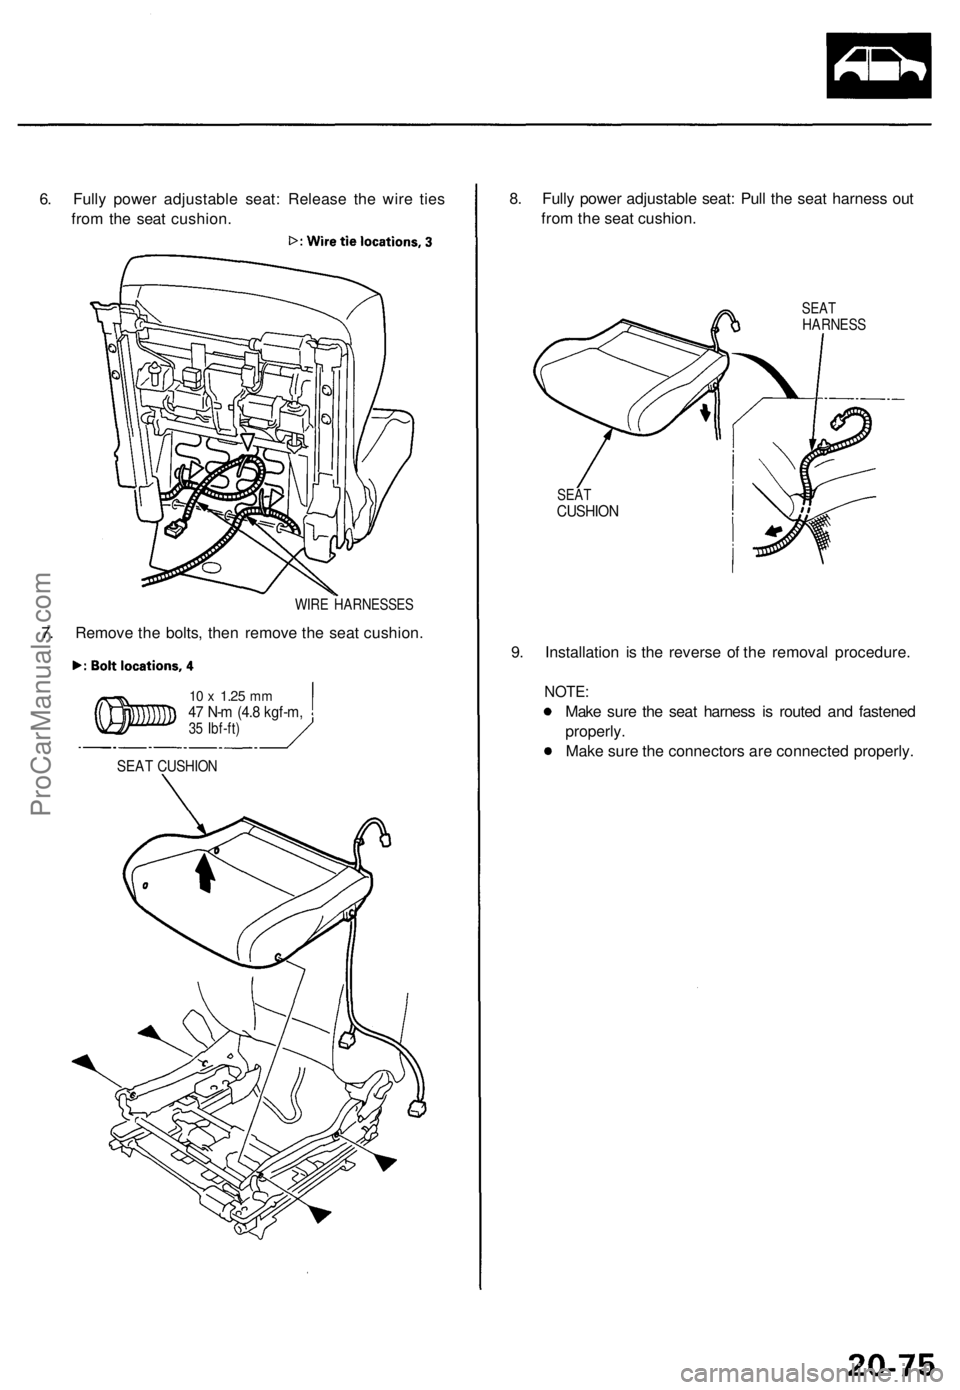
6. Fully power adjustable seat: Release the wire ties
from the seat cushion.
WIRE HARNESSES
7. Remove the bolts, then remove the seat cushion.
10 x
1.25
mm
47 N-m (4.8 kgf-m,
35 Ibf-ft)
SEAT CUSHION
8. Fully power adjustable seat: Pull the seat harness out
from the seat cushion.
SEAT
HARNESS
SEAT
CUSHION
9. Installation is the reverse of the removal procedure.
NOTE:
Make sure the seat harness is routed and fastened
properly.
Make sure the connectors are connected properly.ProCarManuals.com
Page 1428 of 1771
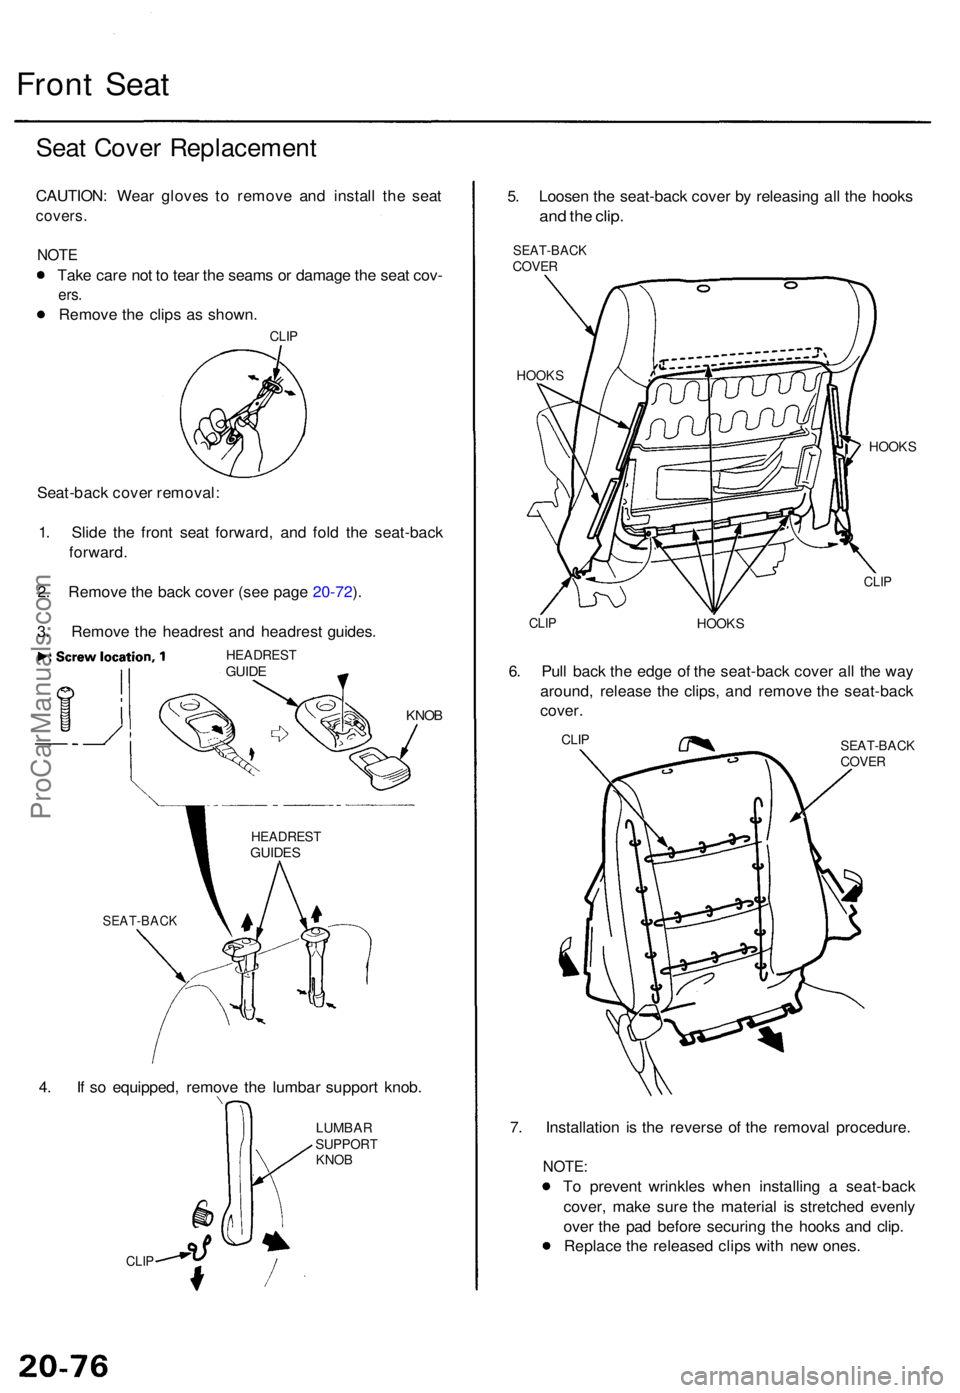
Front Sea t
Seat Cove r Replacemen t
CAUTION: Wea r glove s t o remov e an d instal l th e sea t
covers .
NOTE
Take car e no t t o tea r th e seam s o r damag e th e sea t cov -
ers.
Remov e th e clip s a s shown .
CLIP
Seat-bac k cove r removal :
1 . Slid e th e fron t sea t forward , an d fol d th e seat-bac k
forward .
2 . Remov e th e bac k cove r (se e pag e 20-72 ).
3 . Remov e th e headres t an d headres t guides .
HEADRES TGUIDE
KNOB
4. I f s o equipped , remov e th e lumba r suppor t knob .
LUMBA RSUPPOR TKNOB
CLIP
5. Loose n th e seat-bac k cove r b y releasin g al l th e hook s
and th e clip .
SEAT-BAC KCOVER
HOOK S
HOOKS
CLIPHOOK S
6. Pul l bac k th e edg e o f th e seat-bac k cove r al l th e wa y
around , releas e th e clips , an d remov e th e seat-bac k
cover .
CLIPSEAT-BAC KCOVER
7. Installatio n i s th e revers e o f th e remova l procedure .
NOTE:
To preven t wrinkle s whe n installin g a seat-bac k
cover , mak e sur e th e materia l i s stretche d evenl y
ove r th e pa d befor e securin g th e hook s an d clip .
Replac e th e release d clip s wit h ne w ones.
CLI P
SEAT-BAC K
HEADRESTGUIDES
ProCarManuals.com
Page 1429 of 1771
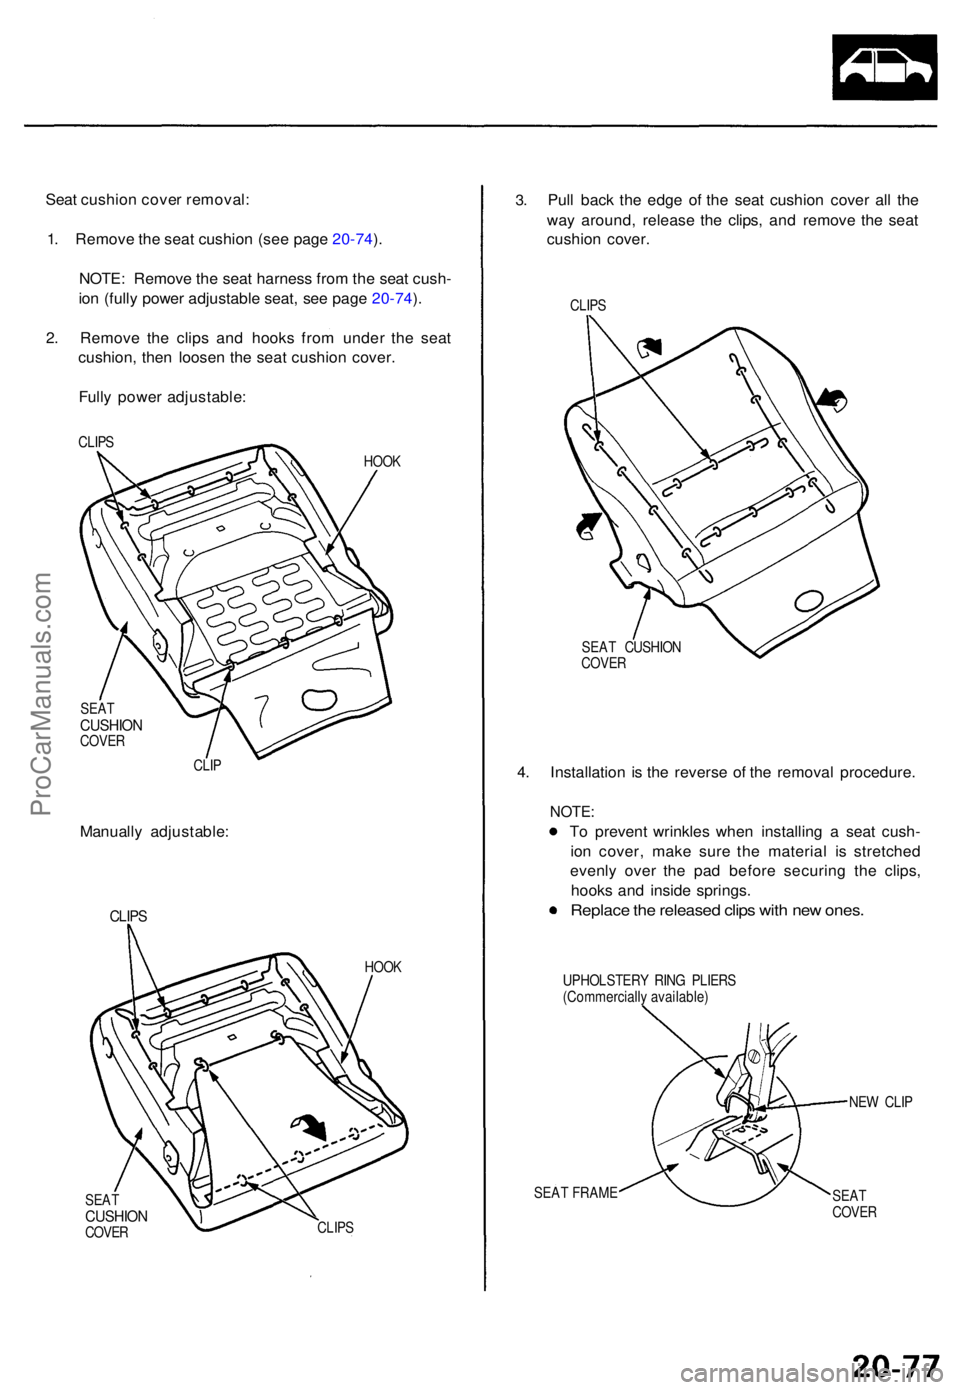
SEATCUSHIO NCOVER
CLIP
Manuall y adjustable :
CLIPS
HOO K
SEA T
CUSHIO NCOVER CLIP
S
3.Pul l bac k th e edg e o f th e sea t cushio n cove r al l th e
wa y around , releas e th e clips , an d remov e th e sea t
cushio n cover .
CLIPS
SEA T CUSHIO N
COVE R
4. Installatio n i s th e revers e o f th e remova l procedure .
NOTE:
To preven t wrinkle s whe n installin g a sea t cush -
io n cover , mak e sur e th e materia l i s stretche d
evenl y ove r th e pa d befor e securin g th e clips ,
hook s an d insid e springs .
Replace th e release d clip s wit h ne w ones .
UPHOLSTER Y RIN G PLIER S
(Commerciall y available )
SEA T FRAM E NE
W CLI P
SEA T
COVE R
Seat cushio n cove r removal :
1 . Remov e th e sea t cushio n (se e pag e 20-74 ).
NOTE : Remov e th e sea t harnes s fro m th e sea t cush -
io n (full y powe r adjustabl e seat , se e pag e 20-74 ).
2 . Remov e th e clip s an d hook s fro m unde r th e sea t
cushion , the n loose n th e sea t cushio n cover .
Full y powe r adjustable :
HOOK
CLIP
S
ProCarManuals.com
Page 1430 of 1771
Front Sea t
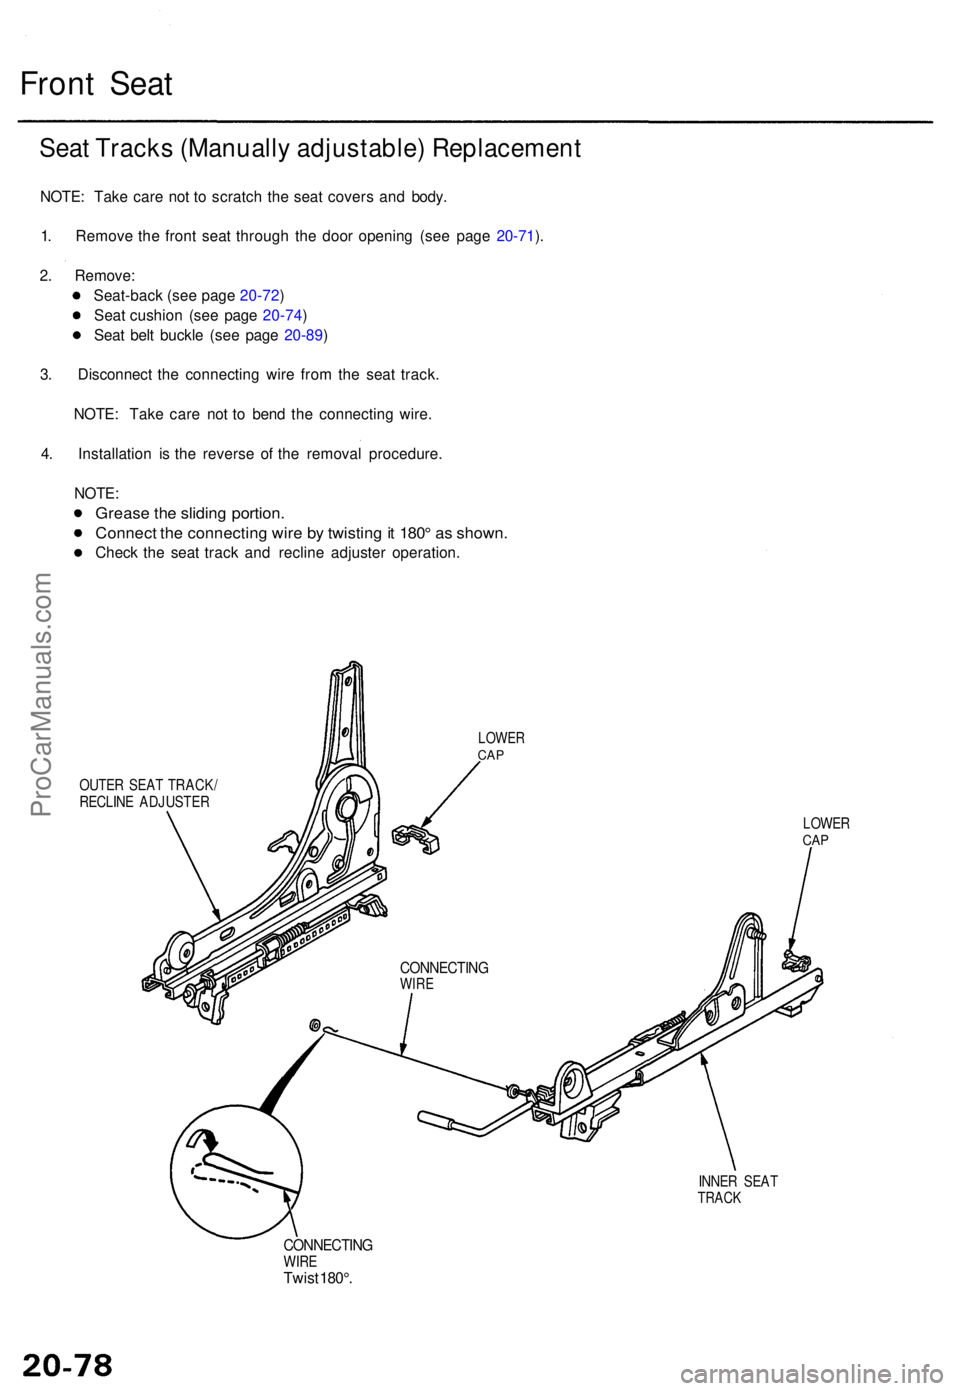
Seat Track s (Manuall y adjustable ) Replacemen t
NOTE: Tak e car e no t t o scratc h th e sea t cover s an d body .
1 . Remov e th e fron t sea t throug h th e doo r openin g (se e pag e 20-71 ).
2 . Remove :
Seat-bac k (se e pag e 20-72 )
Sea t cushio n (se e pag e 20-74 )
Sea t bel t buckl e (se e pag e 20-89 )
3 . Disconnec t th e connectin g wir e fro m th e sea t track .
NOTE : Tak e car e no t t o ben d th e connectin g wire .
4 . Installatio n i s th e revers e o f th e remova l procedure .
NOTE :
Greas e th e slidin g portion .
Connec t th e connectin g wir e b y twistin g it 180 ° a s shown .
Check th e sea t trac k an d reclin e adjuste r operation .
OUTER SEA T TRACK /
RECLIN E ADJUSTE R
LOWERCAP
INNE R SEA TTRAC K
CONNECTIN GWIRETwis t 180° .
LOWE RCAP
CONNECTIN GWIRE
ProCarManuals.com