ACURA TL 1995 Service Repair Manual
Manufacturer: ACURA, Model Year: 1995, Model line: TL, Model: ACURA TL 1995Pages: 1771, PDF Size: 62.49 MB
Page 1441 of 1771
Rear Seat
Removal (cont'd)
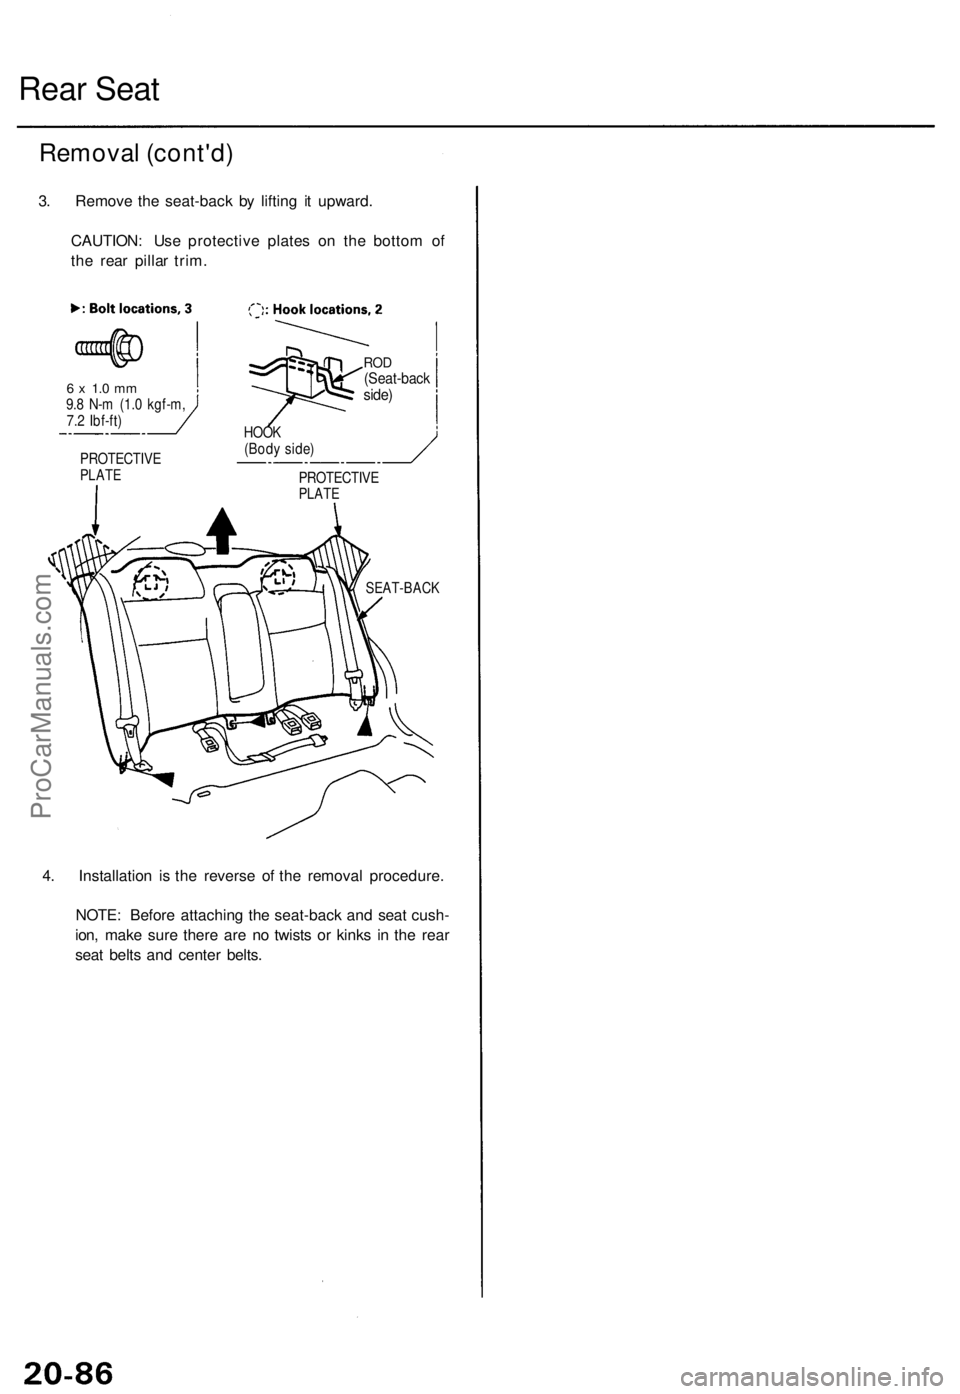
3. Remove the seat-back by lifting it upward.
CAUTION: Use protective plates on the bottom of
the rear pillar trim.
6 x 1.0 mm
9.8 N-m (1.0 kgf-m,
7.2 Ibf-ft)
4. Installation is the reverse of the removal procedure.
NOTE: Before attaching the seat-back and seat cush-
ion, make sure there are no twists or kinks in the rear
seat belts and center belts.
SEAT-BACK
PROTECTIVE
PLATE
PROTECTIVE
PLATE
HOOK
(Body side)
ROD
(Seat-back
side)ProCarManuals.com
Page 1442 of 1771
Rear Sea t
Seat Cove r Replacemen t
CAUTION: Wea r glove s t o remov e an d instal l th e sea t
covers .
NOTE:
Take car e no t t o tea r th e seam s o r damag e th e sea t
covers .
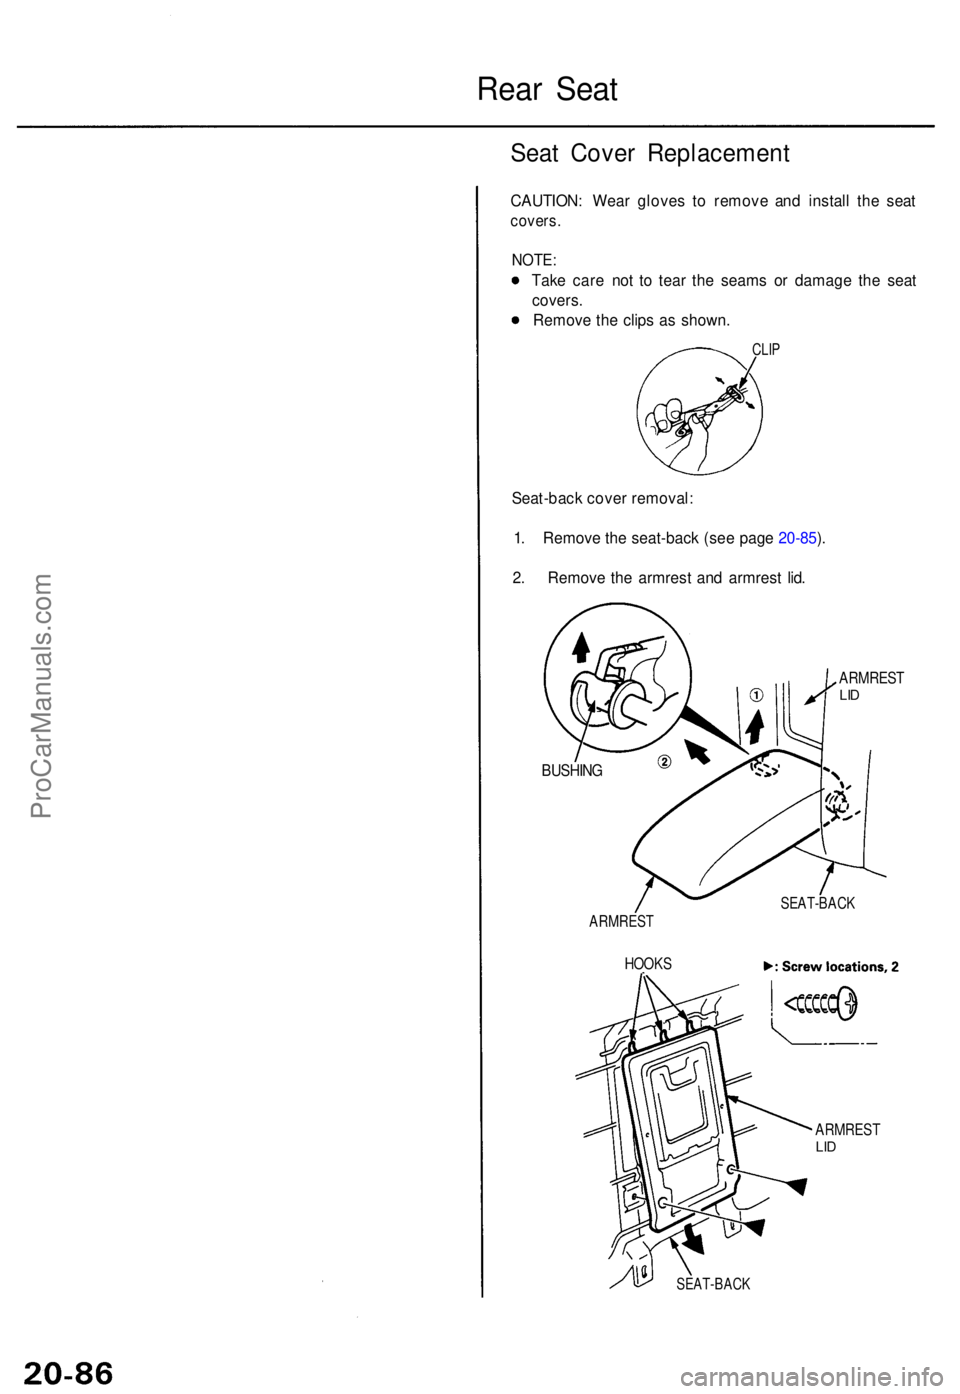
Remov e th e clip s a s shown .
CLIP
Seat-bac k cove r removal :
1 . Remov e th e seat-bac k (se e pag e 20-85 ).
2 . Remov e th e armres t an d armres t lid .
ARMRES TLID
ARMRES TLID
BUSHIN G
SEAT-BAC K
ARMREST
HOOKS
SEAT-BAC K
ProCarManuals.com
Page 1443 of 1771
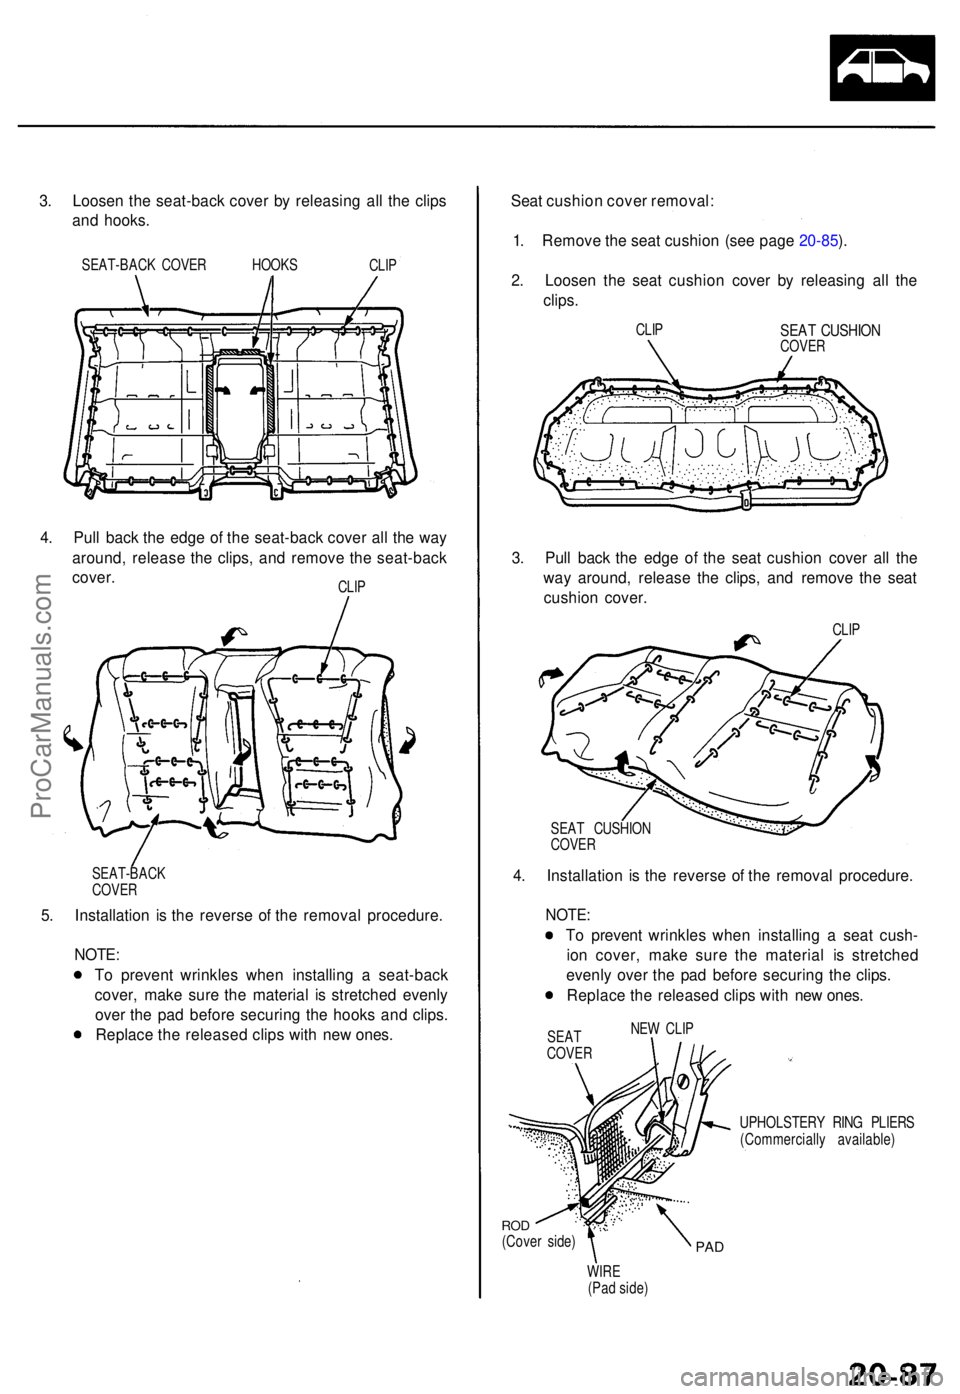
3. Loose n th e seat-bac k cove r b y releasin g al l th e clip s
an d hooks .
SEAT-BAC K COVE R HOOK S
CLIP
4. Pul l bac k th e edg e o f th e seat-bac k cove r al l th e wa y
around , releas e th e clips , an d remov e th e seat-bac k
cover .
CLIP
SEAT-BAC K
COVE R
5. Installatio n i s th e revers e o f th e remova l procedure .
NOTE:
To preven t wrinkle s whe n installin g a seat-bac k
cover , mak e sur e th e materia l i s stretche d evenl y
ove r th e pa d befor e securin g th e hook s an d clips .
Replac e th e release d clip s wit h ne w ones . Sea
t cushio n cove r removal :
1 . Remov e th e sea t cushio n (se e pag e 20-85 ).
2 . Loose n th e sea t cushio n cove r b y releasin g al l th e
clips .
CLIPSEA T CUSHIO NCOVER
3. Pul l bac k th e edg e o f th e sea t cushio n cove r al l th e
wa y around , releas e th e clips , an d remov e th e sea t
cushio n cover .
CLIP
SEA T CUSHIO N
COVER
4. Installatio n i s th e revers e o f th e remova l procedure .
NOTE:
To preven t wrinkle s whe n installin g a sea t cush -
io n cover , mak e sur e th e materia l i s stretche d
evenl y ove r th e pa d befor e securin g th e clips .
Replac e th e release d clip s wit h ne w ones .
SEATCOVE R
NEW CLI P
UPHOLSTER Y RIN G PLIER S
(Commerciall y available )
ROD(Cove r side )PAD
WIR E(Pad side )
ProCarManuals.com
Page 1444 of 1771
Seat Belt
Inspection
Retractor Inspection
1. Before installing the retractor, check that the seat belt
can be pulled out freely.
2. Make sure that the seat belt does not lock when the
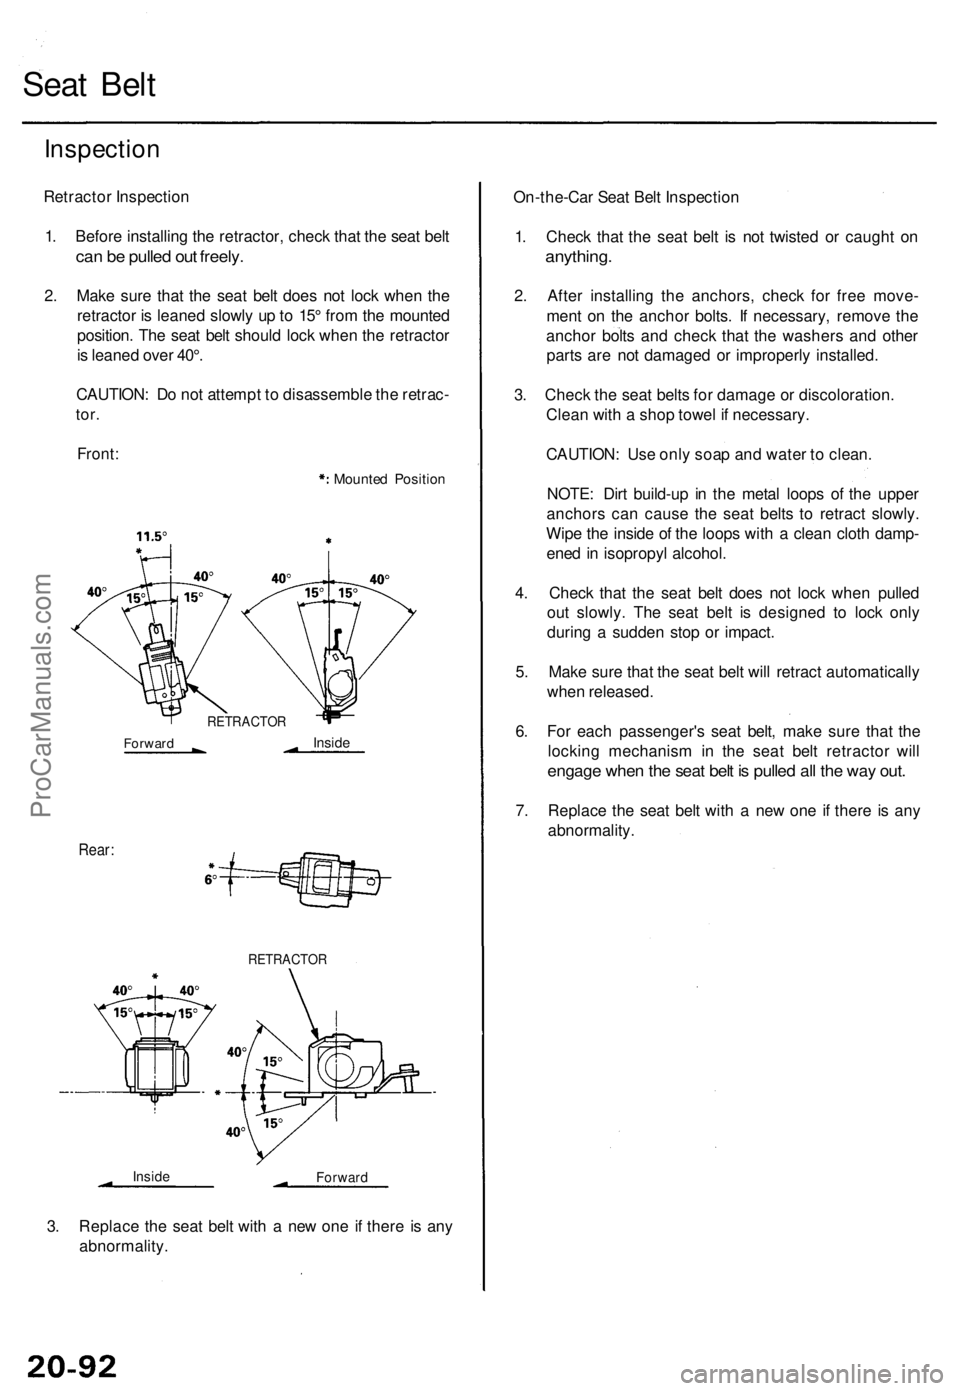
retractor is leaned slowly up to 15° from the mounted
position. The seat belt should lock when the retractor
is leaned over 40°.
CAUTION: Do not attempt to disassemble the retrac-
tor.
Front:
Mounted Position
Rear:
RETRACTOR
Inside
Forward
3. Replace the seat belt with a new one if there is any
abnormality.
On-the-Car Seat Belt Inspection
1. Check that the seat belt is not twisted or caught on
anything.
2. After installing the anchors, check for free move-
ment on the anchor bolts. If necessary, remove the
anchor bolts and check that the washers and other
parts are not damaged or improperly installed.
3. Check the seat belts for damage or discoloration.
Clean with a shop towel if necessary.
CAUTION: Use only soap and water to clean.
NOTE: Dirt build-up in the metal loops of the upper
anchors can cause the seat belts to retract slowly.
Wipe the inside of the loops with a clean cloth damp-
ened in isopropyl alcohol.
4. Check that the seat belt does not lock when pulled
out slowly. The seat belt is designed to lock only
during a sudden stop or impact.
5. Make sure that the seat belt will retract automatically
when released.
6. For each passenger's seat belt, make sure that the
locking mechanism in the seat belt retractor will
engage when the seat belt is pulled all the way out.
7. Replace the seat belt with a new one if there is any
abnormality.
RETRACTOR
Forward
InsideProCarManuals.com
Page 1445 of 1771
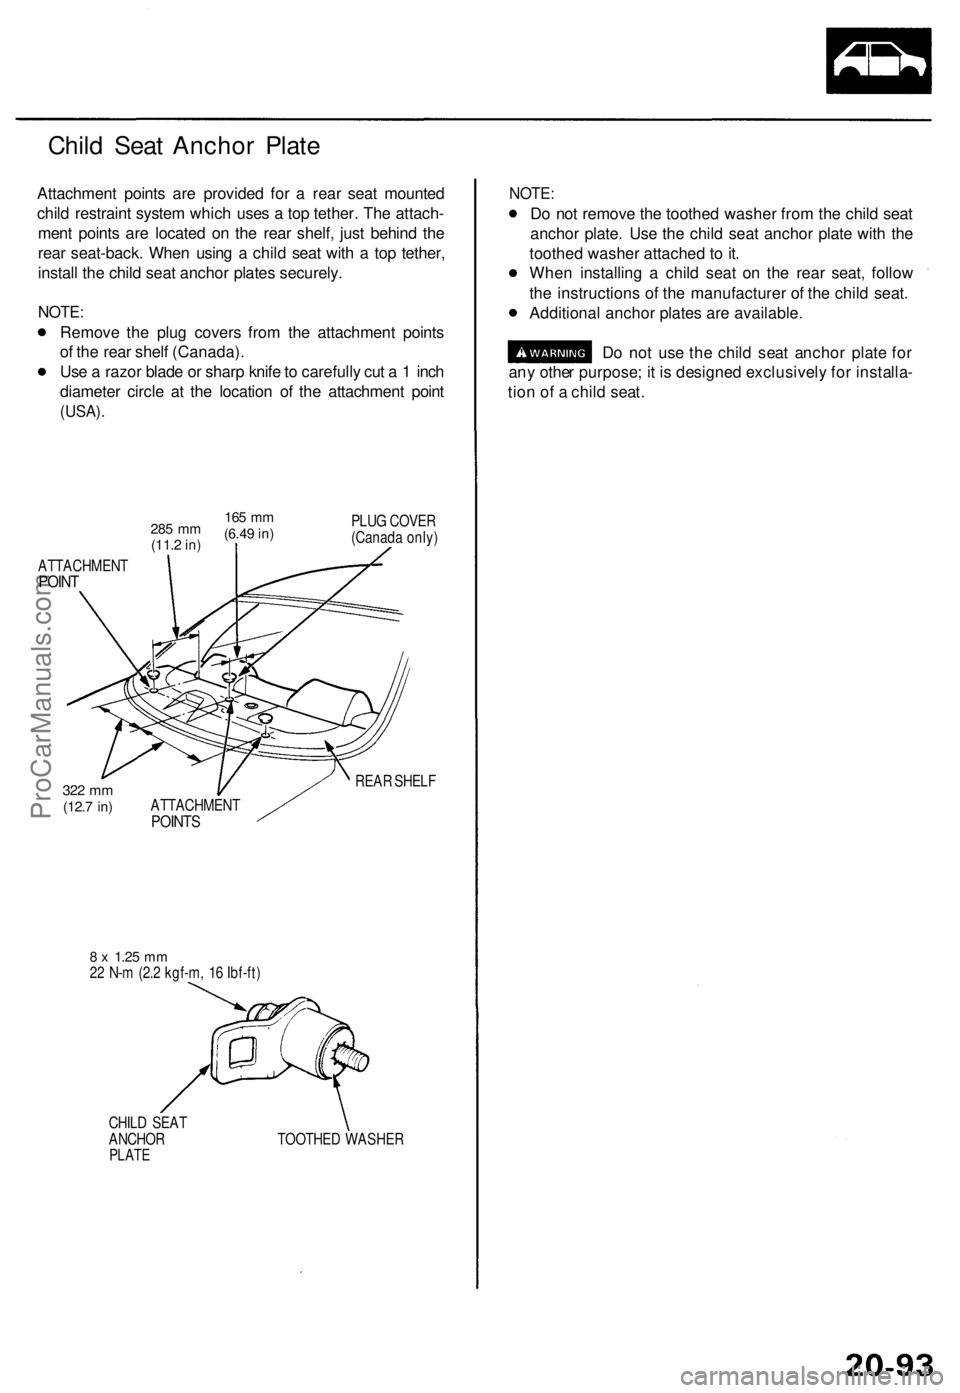
Child Sea t Ancho r Plat e
Attachmen t point s ar e provide d fo r a rea r sea t mounte d
chil d restrain t syste m whic h use s a to p tether . Th e attach -
men t point s ar e locate d o n th e rea r shelf , jus t behin d th e
rea r seat-back . Whe n usin g a chil d sea t wit h a to p tether ,
instal l th e chil d sea t ancho r plate s securely .
NOTE:
Remov e th e plu g cover s fro m th e attachmen t point s
o f th e rea r shel f (Canada) .
Us e a razo r blad e o r shar p knif e to carefull y cu t a 1 inc h
diamete r circl e a t th e locatio n o f th e attachmen t poin t
(USA) .
285 m m(11. 2 in)
165 m m
(6.4 9 in)PLU G COVE R
(Canad a only )
ATTACHMEN T
POINT
322 m m(12. 7 in)
REA R SHEL F
ATTACHMEN T
POINTS
8 x 1.2 5 mm22 N- m (2. 2 kgf-m , 1 6 Ibf-ft )
CHIL D SEA T
ANCHO R
PLATETOOTHE D WASHE R
NOTE:
Do no t remov e th e toothe d washe r fro m th e chil d sea t
ancho r plate . Us e th e chil d sea t ancho r plat e wit h th e
toothe d washe r attache d t o it .
Whe n installin g a chil d sea t o n th e rea r seat , follo w
th e instruction s o f th e manufacture r o f th e chil d seat .
Additiona l ancho r plate s ar e available .
D o no t us e th e chil d sea t ancho r plat e fo r
an y othe r purpose ; i t i s designe d exclusivel y fo r installa -
tio n o f a chil d seat .
ProCarManuals.com
Page 1446 of 1771
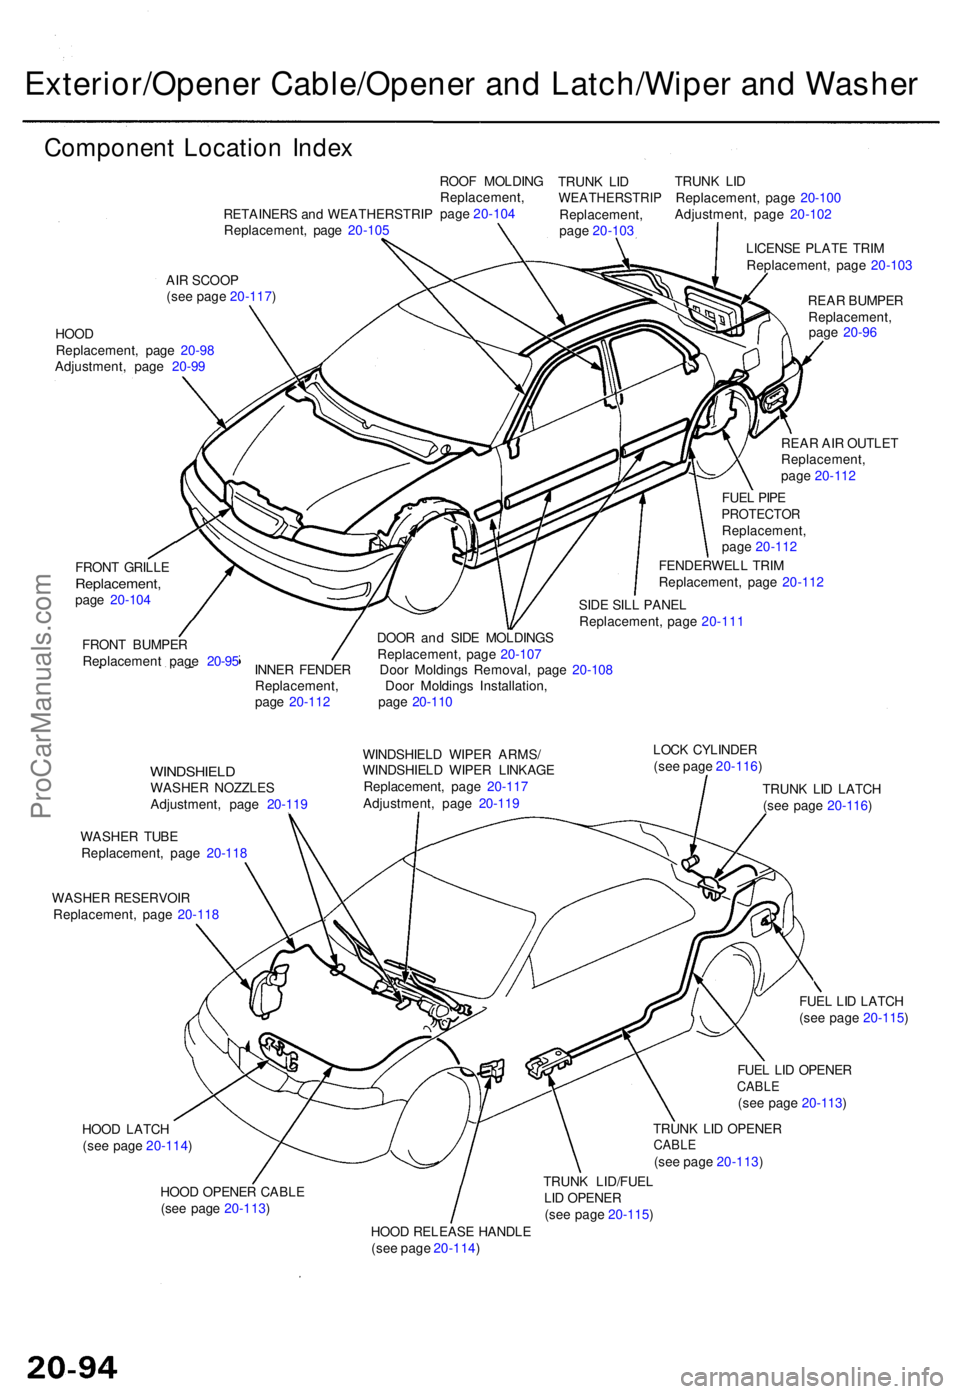
Exterior/Opener Cable/Opene r an d Latch/Wipe r an d Washe r
Componen t Locatio n Inde x
FRON T GRILL EReplacement ,page 20-10 4
FRON T BUMPE R
Replacemen t page 20-9 5 REA
R AI R OUTLE T
Replacement ,
pag e 20-11 2
FUE L PIP E
PROTECTO RReplacement ,
pag e 20-11 2
FENDERWEL L TRI M
Replacement , pag e 20-11 2
SID E SIL L PANE L
Replacement , pag e 20-11 1
DOO R an d SID E MOLDING S
Replacement , pag e 20-10 7
INNE R FENDE R Doo r Molding s Removal , pag e 20-10 8
Replacement , Doo r Molding s Installation ,
pag e 20-11 2 pag e 20-11 0
WINDSHIEL DWASHER NOZZLE S
Adjustment , pag e 20-11 9
WASHE R TUB E
Replacement , pag e 20-11 8
WASHE R RESERVOI R
Replacement , pag e 20-11 8
HOO D LATC H
(se e pag e 20-114 )
HOO D OPENE R CABL E
(se e pag e 20-113 ) WINDSHIEL
D WIPE R ARMS /
WINDSHIEL D WIPE R LINKAG E
Replacement , pag e 20-11 7
Adjustment , pag e 20-11 9 LOC
K CYLINDE R
(se e pag e 20-116 )
TRUN K LI D LATC H
(se e pag e 20-116 )
FUE L LI D LATC H
(se e pag e 20-115 )
FUE L LI D OPENE R
CABLE(see pag e 20-113 )
TRUN K LI D OPENE R
CABLE(see pag e 20-113 )
HOO D RELEAS E HANDL E
(se e pag e 20-114 ) TRUN
K LID/FUE L
LI D OPENE R
(se e pag e 20-115 ) REA
R BUMPE R
Replacement ,
pag e 20-9 6
LICENS
E PLAT E TRI M
Replacement , pag e 20-10 3
TRUN
K LI D
Replacement , pag e 20-10 0
Adjustment , pag e 20-10 2
TRUN
K LI D
WEATHERSTRI PReplacement,
pag e 20-10 3
ROO
F MOLDIN G
Replacement ,
pag e 20-10 4
RETAINER S an d WEATHERSTRI P
Replacement , pag e 20-10 5
AI R SCOO P
(se e pag e 20-117 )
HOO D
Replacement , pag e 20-98
Adjustment , pag e 20-9 9
ProCarManuals.com
Page 1447 of 1771
Front Bumpe r
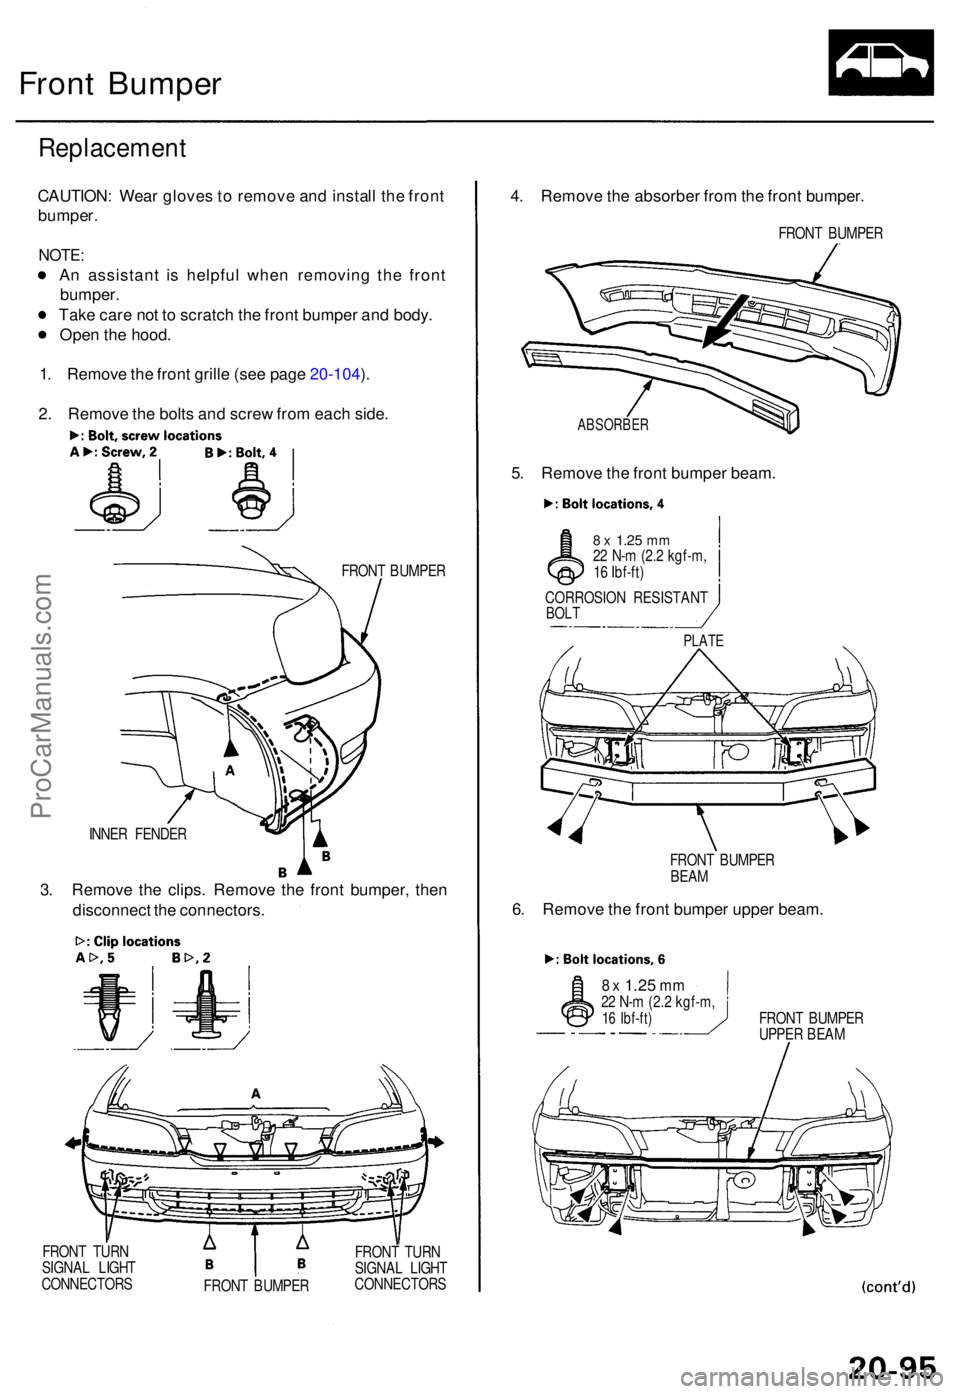
Replacemen t
CAUTION: Wea r glove s t o remov e an d instal l th e fron t
bumper .
NOTE:
An assistan t i s helpfu l whe n removin g th e fron t
bumper .
Tak e car e no t t o scratc h th e fron t bumpe r an d body .
Ope n th e hood .
1 . Remov e th e fron t grill e (se e pag e 20-104 ).
2 . Remov e th e bolt s an d scre w fro m eac h side .
FRON T BUMPE R
INNE R FENDE R
3. Remov e th e clips . Remov e th e fron t bumper , the n
disconnec t th e connectors .
FRONT TUR N
SIGNA L LIGH T
CONNECTOR S
4. Remov e th e absorbe r fro m th e fron t bumper .
FRONT BUMPE R
ABSORBE R
5. Remov e th e fron t bumpe r beam .
8 x 1.2 5 mm22 N- m (2. 2 kgf-m ,
1 6 Ibf-ft )
CORROSIO N RESISTAN T
BOLT
PLAT E
FRON T BUMPE R
BEA M
6. Remov e th e fron t bumpe r uppe r beam .
8 x 1.2 5 mm22 N- m (2. 2 kgf-m ,16 Ibf-ft )FRON T BUMPE R
UPPE R BEA M
FRON T TUR N
SIGNA L LIGH T
CONNECTOR S
FRON T BUMPE R
ProCarManuals.com
Page 1448 of 1771
Front Bumper
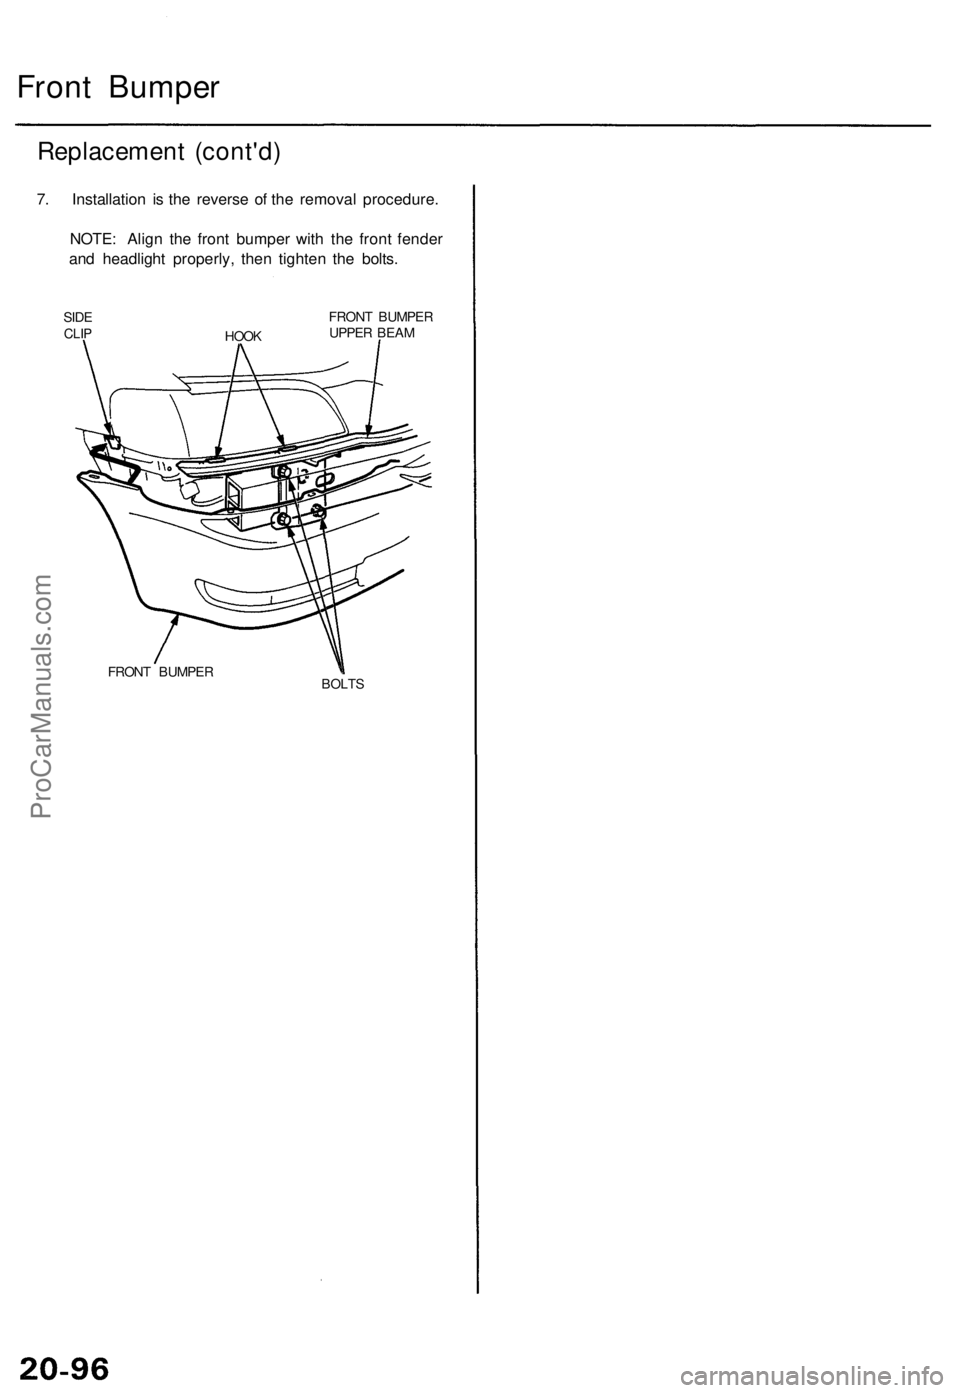
Replacement (cont'd)
7. Installation is the reverse of the removal procedure.
NOTE: Align the front bumper with the front fender
and headlight properly, then tighten the bolts.
HOOK
FRONT BUMPER
UPPER BEAM
FRONT BUMPER
BOLTS
SIDE
CLIPProCarManuals.com
Page 1449 of 1771
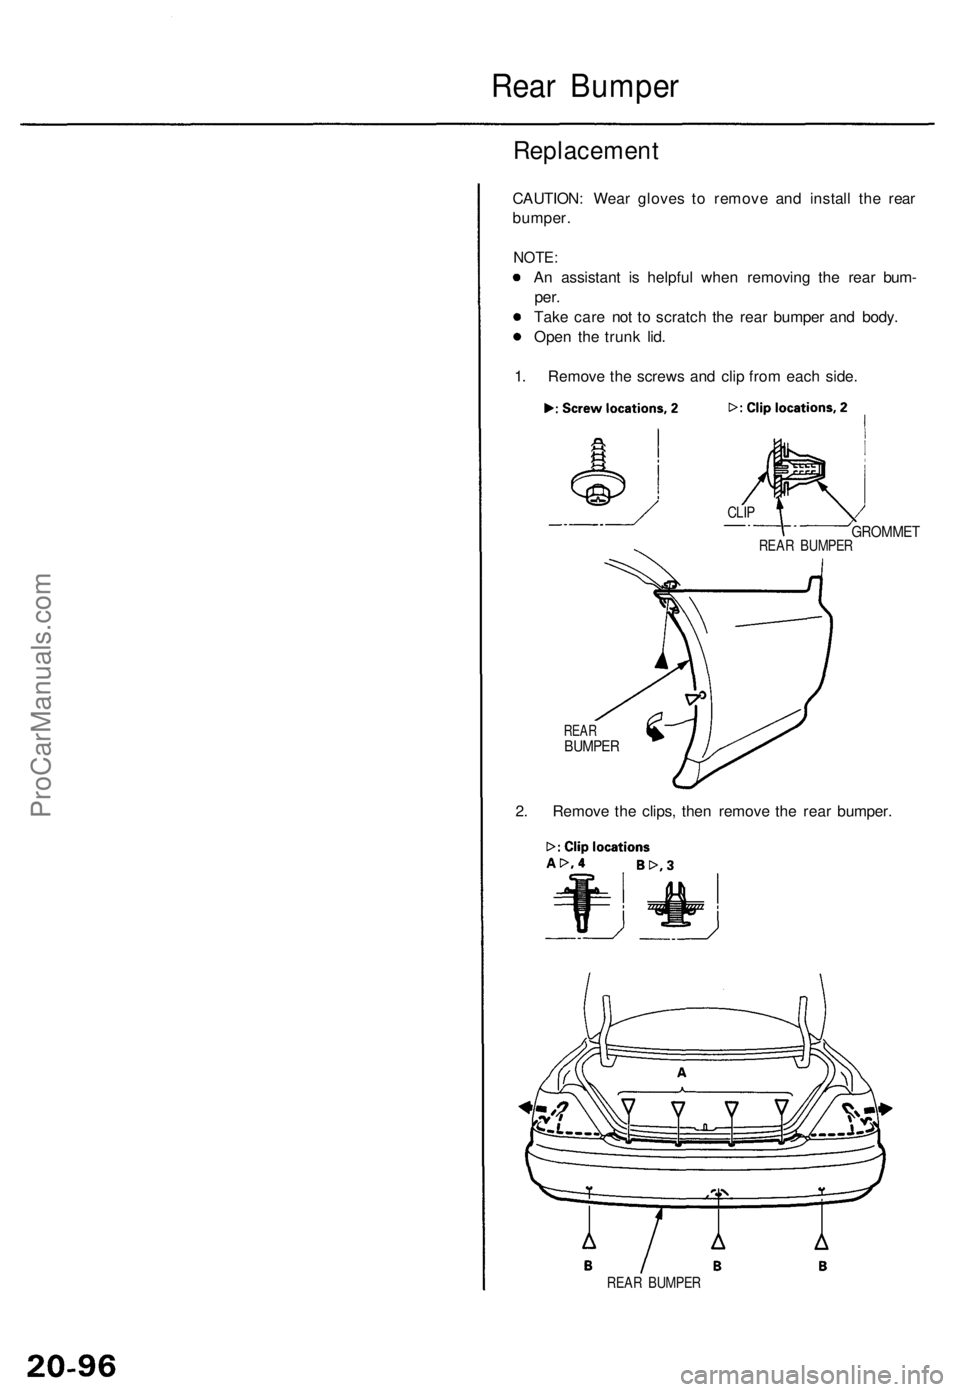
Rear Bumpe r
Replacemen t
CAUTION: Wea r glove s t o remov e an d instal l th e rea r
bumper .
NOTE:
An assistan t i s helpfu l whe n removin g th e rea r bum -
per.
Tak e car e no t t o scratc h th e rea r bumpe r an d body .
Ope n th e trun k lid .
1 . Remov e th e screw s an d cli p fro m eac h side .
GROMME T
REARBUMPE R
2. Remov e th e clips , the n remov e th e rea r bumper .
REAR BUMPE R
REAR BUMPE R
CLIP
ProCarManuals.com
Page 1450 of 1771
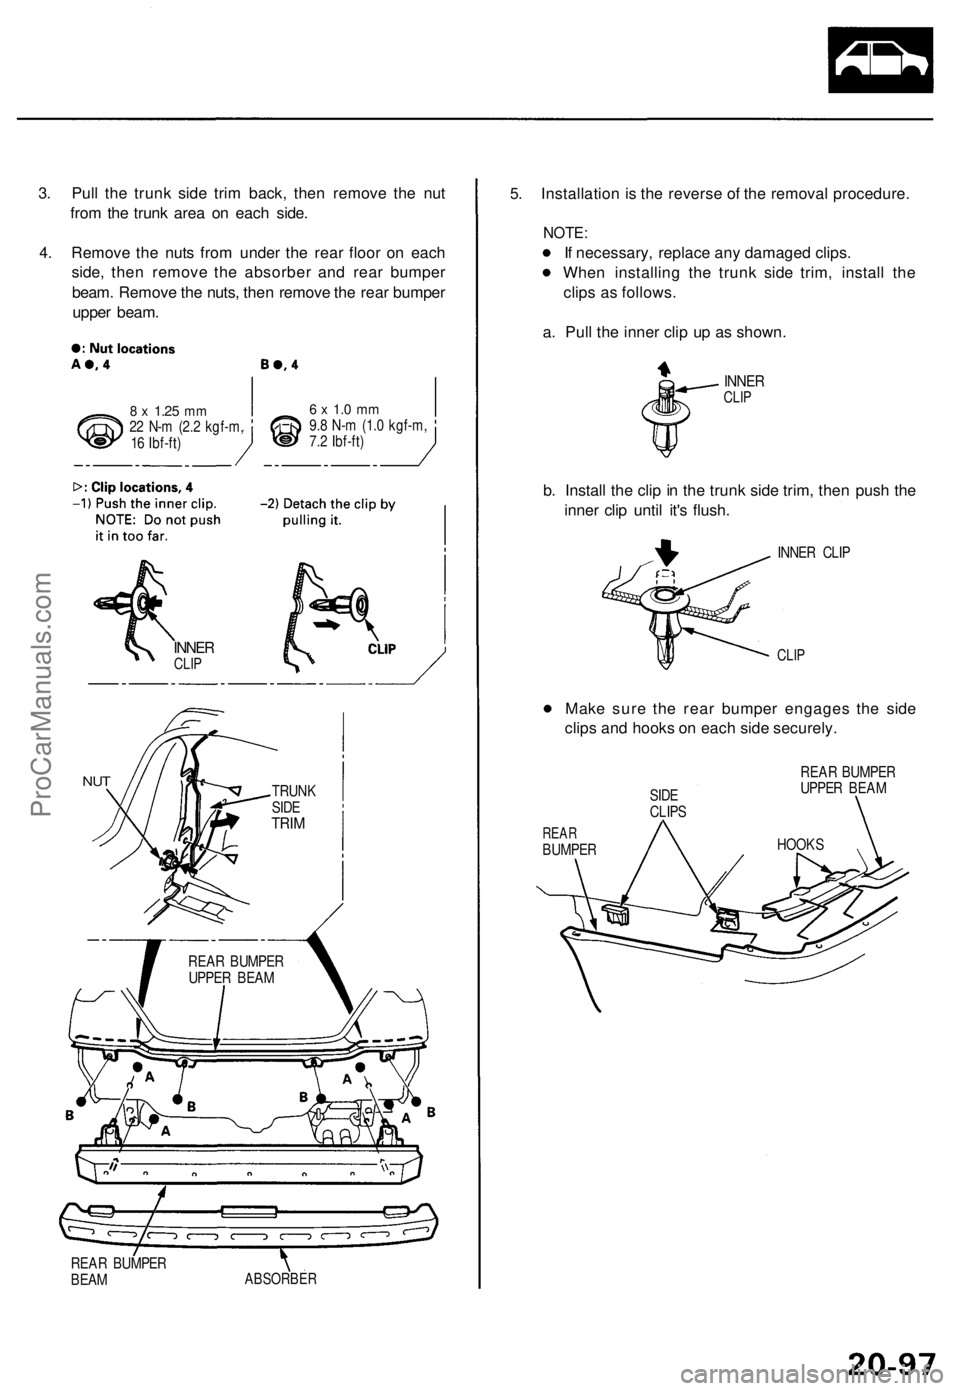
3. Pull the trunk side trim back, then remove the nut
from the trunk area on each side.
4. Remove the nuts from under the rear floor on each
side, then remove the absorber and rear bumper
beam. Remove the nuts, then remove the rear bumper
upper beam.
8 x
1.25
mm
22 N-m (2.2 kgf-m,
16 Ibf-ft)
6 x 1.0 mm
9.8 N-m (1.0 kgf-m,
7.2 Ibf-ft)
INNER
CLIP
NUT
REAR BUMPER
UPPER BEAM
REAR BUMPER
BEAM
5. Installation is the reverse of the removal procedure.
NOTE:
If necessary, replace any damaged clips.
When installing the trunk side trim, install the
clips as follows.
a. Pull the inner clip up as shown.
INNER
CLIP
b. Install the clip in the trunk side trim, then push the
inner clip until it's flush.
INNER CLIP
CLIP
Make sure the rear bumper engages the side
clips and hooks on each side securely.
SIDE
CLIPS
REAR BUMPER
UPPER BEAM
REAR
BUMPER
ABSORBER
HOOKS
TRUNK
SIDE
TRIMProCarManuals.com