torque ASTON MARTIN V8 VANTAGE 2010 Owner's Guide
[x] Cancel search | Manufacturer: ASTON MARTIN, Model Year: 2010, Model line: V8 VANTAGE, Model: ASTON MARTIN V8 VANTAGE 2010Pages: 947, PDF Size: 43.21 MB
Page 143 of 947
Convertible Roof (01.17)
Body System (01.00)
May 2007 Workshop Manual 1-12-5
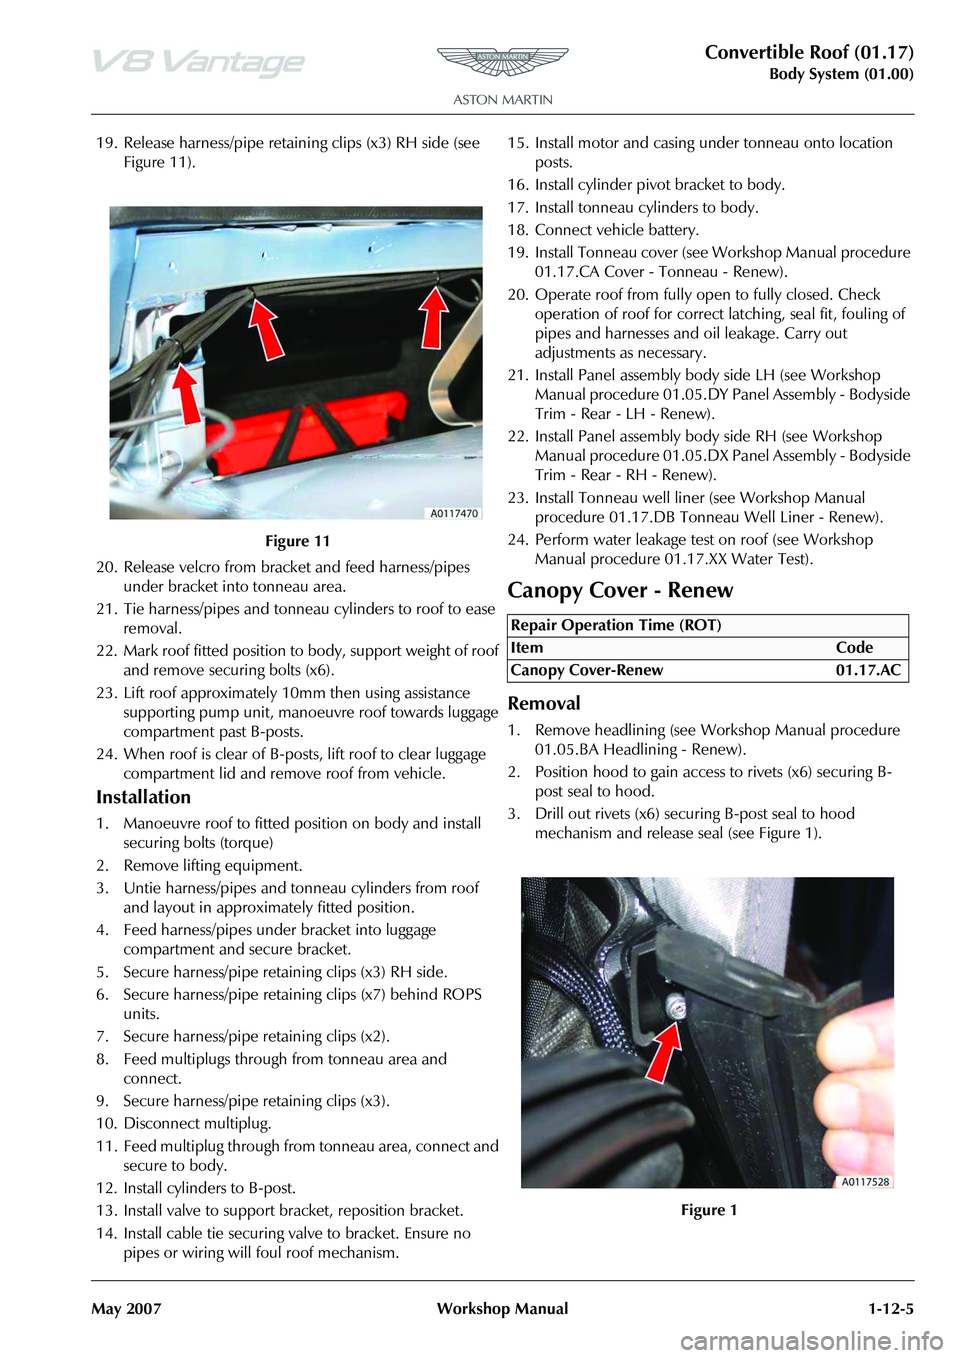
19. Release harness/pipe retaining clips (x3) RH side (see Figure 11).
20. Release velcro from bracket and feed harness/pipes under bracket into tonneau area.
21. Tie harness/pipes and tonneau cylinders to roof to ease removal.
22. Mark roof fitted position to body, support weight of roof and remove securing bolts (x6).
23. Lift roof approximately 10mm then using assistance
supporting pump unit, manoeuvre roof towards luggage
compartment past B-posts.
24. When roof is clear of B-post s, lift roof to clear luggage
compartment lid and remove roof from vehicle.
Installation
1. Manoeuvre roof to fitted position on body and install securing bolts (torque)
2. Remove lifting equipment.
3. Untie harness/pipes and tonneau cylinders from roof and layout in approximately fitted position.
4. Feed harness/pipes under bracket into luggage compartment and secure bracket.
5. Secure harness/pipe retaining clips (x3) RH side.
6. Secure harness/pipe retaining clips (x7) behind ROPS units.
7. Secure harness/pipe retaining clips (x2).
8. Feed multiplugs through from tonneau area and connect.
9. Secure harness/pipe retaining clips (x3).
10. Disconnect multiplug.
11. Feed multiplug through from tonneau area, connect and secure to body.
12. Install cylinders to B-post.
13. Install valve to support bracket, reposition bracket.
14. Install cable tie securing valve to bracket. Ensure no pipes or wiring will foul roof mechanism. 15. Install motor and casing under tonneau onto location
posts.
16. Install cylinder pivot bracket to body.
17. Install tonneau cylinders to body.
18. Connect vehicle battery.
19. Install Tonneau cover (see Workshop Manual procedure 01.17.CA Cover - Tonneau - Renew).
20. Operate roof from fully open to fully closed. Check operation of roof for correct latching, seal fit, fouling of
pipes and harnesses and oil leakage. Carry out
adjustments as necessary.
21. Install Panel assembly bo dy side LH (see Workshop
Manual procedure 01.05.DY Panel Assembly - Bodyside
Trim - Rear - LH - Renew).
22. Install Panel assembly body side RH (see Workshop Manual procedure 01.05.DX Pa nel Assembly - Bodyside
Trim - Rear - RH - Renew).
23. Install Tonneau well line r (see Workshop Manual
procedure 01.17.DB Tonneau Well Liner - Renew).
24. Perform water leakage test on roof (see Workshop Manual procedure 01.17.XX Water Test).
Canopy Cover - Renew
Removal
1. Remove headlining (see Workshop Manual procedure
01.05.BA Headlining - Renew).
2. Position hood to gain access to rivets (x6) securing B- post seal to hood.
3. Drill out rivets (x6) secu ring B-post seal to hood
mechanism and release seal (see Figure 1).
Figure 11
Repair Operation Time (ROT)
Page 210 of 947

Bumpers (01.19)
Body System (01.00)1-13-2 Workshop Manual May 2007
Specifications
Maintenance
Front Bumper Cover - Renew
Removal
1. Raise vehicle on ramp.
2. Remove front number plate and plinth (see Workshop Manual procedure 01.19.BD Licence Plate - Plinth
Assembly - Front - Renew).
3. Remove valance (see Workshop Manual procedure 01.19.AF Panel - Front Valance - Renew).
4. Remove screws (x2) securing front of undertray to bumper (see Figure 1).
5. Remove screws (x5) LH front wheel arch liner to bumper.
6. Remove screws (x5) RH front wheel arch liner to bumper.
7. Remove bolts (x3 securing LH air box to mounting brackets.
8. Remove bolts (x3 securing RH air box to mounting brackets. 9. Remove bolts (x6) securing bumper to front wing (see
Figure 2)
.
10. With assistance, release bumper from clips (x2) and
remove bumper (see Figure 3).
11. Remove mesh (clips x8).
Installation
1. Install mesh (clips x8).
2. With assistance position bumper and secure in clips (x2).
3. Install bolts (x6) bumper to front wing.
4. Install bolts (x3 securing RH air box to mounting brackets.
5. Install bolts (x3 securing LH air box to mounting brackets.
6. Install screws (x5) LH front wheel arch liner to bumper.
7. Install screws (x5) RH front wheel arch liner to bumper.
8. Install screws (x2) securing front undertray to bumper.
Torque Figures
DescriptionNm
Front Bumper to bumper bracket 4-5
Rear Bumper to Bumper Bracket 2-3
Repair Operation Time (ROT)
01-19-005
Figure 2
Figure 3
Remove Bolts x6
Front Bumper
01-19-001
01-19-004
Page 217 of 947

Restraining Devices (01.20)
Body System (01.00)
May 2007 Workshop Manual 1-14-5
2. Remove sub woofer enclosure (see Workshop Manual procedure 15.03.GA Subwoofer Enclosure - Premium -
Renew).
3. Remove speaker grille.
4. Remove bolts (x2) and screw (x1) securing upper quarter trim moulding to body and rear bulkhead panel.
5. Feed seatbelt through trim moulding aperture and
remove moulding.
6. Remove foam cover, disconnect speaker multiplug, remove upper trim quarter moulding.
7. Remove bolts (x4) securing seat belt upper anchor
mounting plate (see Figure 1).
8. Release seat belt from anchor mounting plate, remove mounting plate.
9. Disconnect pre-tensioner mu ltiplug, release multiplug
from mounting bracket.
10. Remove bolts (x4) securing seat belt mounting bracket to body.
11. Remove seat belt assembly.
12. Remove bolt securing seat belt stalk to seat frame,
remove stalk.Installation
1. Position seat belt stalk to seat frame, install and torque tighten bolt.
2. Install seat belt assembly, in stall and torque tighten bolts
(x4).
3. Install seat belt in upper anchor mounting plate.
4. Position seat belt upper anchor mounting plate, install and torque tighten bolts (x4).
5. Connect pre-tensioner multip lug, secure multiplug in
mounting bracket.
6. Position quarter moulding, connect speaker multiplug, secure foam cover.
7. Feed seat belt harness th rough quarter trim moulding.
8. Install quarter trim moulding, install and tighten bolts (x3).
9. Install sub woofer enclos ure (see Workshop Manual
procedure 15.03.GA Subwoofer Enclosure - Premium -
Renew).
10. Install front seat (see Workshop Manual procedure 01.10.AB Seat Assembly - Front - LH - Remove for
Access and Refit).
RH Front Seat Belt - Renew
Removal
1. Remove front seat (see Workshop Manual procedure 01.10.AA Seat Assembly - Front - RH - Remove for
Access and Refit).
2. Remove moulding assembly - quartet trim upper - RH (see Workshop Manual proc edure 01.05.CL Moulding
Assembly - Quarter Trim Upper - RH - Renew).
3. Remove bolts (x5) securing seat belt upper anchor
mounting plate (see Figure 1).
4. Release seat belt from anchor mounting plate, remove mounting plate.
Figure 1
Figure 2
A0120184
A0120185
Repair Operation Time (ROT)
A0120186
Page 218 of 947
Restraining Devices (01.20)
Body System (01.00)1-14-6 Workshop Manual May 2007
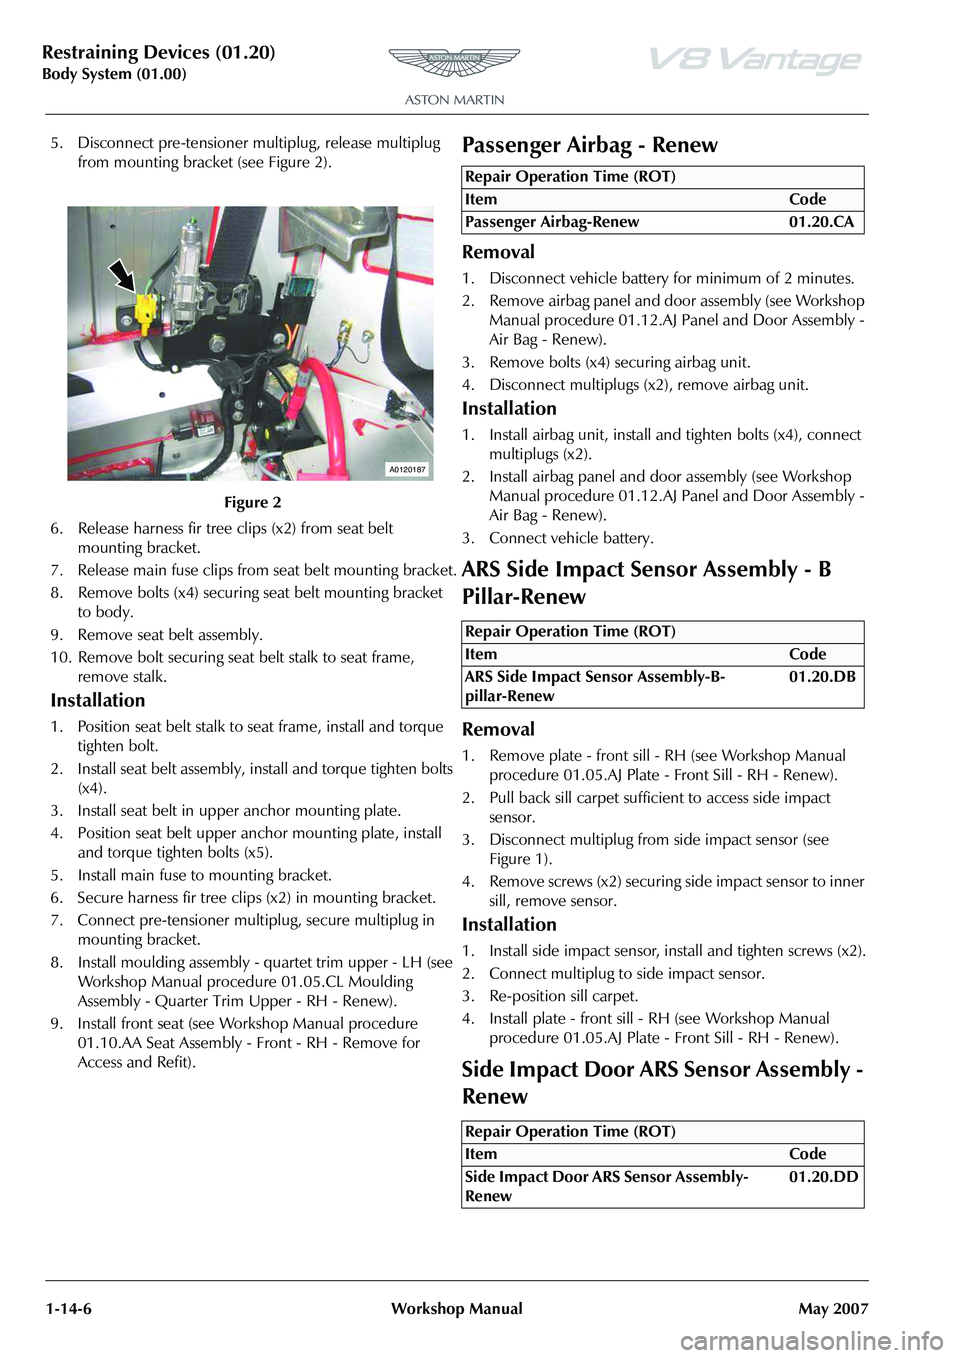
5. Disconnect pre-tensioner mu ltiplug, release multiplug
from mounting bracket (see Figure 2).
6. Release harness fir tree clips (x2) from seat belt mounting bracket.
7. Release main fuse clips from seat belt mounting bracket.
8. Remove bolts (x4) securing seat belt mounting bracket to body.
9. Remove seat belt assembly.
10. Remove bolt securing seat belt stalk to seat frame, remove stalk.
Installation
1. Position seat belt stalk to seat frame, install and torque tighten bolt.
2. Install seat belt assembly, in stall and torque tighten bolts
(x4).
3. Install seat belt in upper anchor mounting plate.
4. Position seat belt upper anchor mounting plate, install and torque tighten bolts (x5).
5. Install main fuse to mounting bracket.
6. Secure harness fir tree clips (x2) in mounting bracket.
7. Connect pre-tensioner multip lug, secure multiplug in
mounting bracket.
8. Install moulding assembly - quartet trim upper - LH (see Workshop Manual procedure 01.05.CL Moulding
Assembly - Quarter Trim Upper - RH - Renew).
9. Install front seat (see Workshop Manual procedure 01.10.AA Seat Assembly - Front - RH - Remove for
Access and Refit).
Passenger Airbag - Renew
Removal
1. Disconnect vehicle battery for minimum of 2 minutes.
2. Remove airbag panel and door assembly (see Workshop Manual procedure 01.12.AJ Panel and Door Assembly -
Air Bag - Renew).
3. Remove bolts (x4) securing airbag unit.
4. Disconnect multiplugs (x2), remove airbag unit.
Installation
1. Install airbag unit, install and tighten bolts (x4), connect multiplugs (x2).
2. Install airbag panel and d oor assembly (see Workshop
Manual procedure 01.12.AJ Panel and Door Assembly -
Air Bag - Renew).
3. Connect vehicle battery.
ARS Side Impact Sensor Assembly - B
Pillar-Renew
Removal
1. Remove plate - front sill - RH (see Workshop Manual procedure 01.05.AJ Plate - Front Sill - RH - Renew).
2. Pull back sill carpet sufficient to access side impact sensor.
3. Disconnect multiplug from side impact sensor (see Figure 1).
4. Remove screws (x2) securing side impact sensor to inner
sill, remove sensor.
Installation
1. Install side impact sensor, install and tighten screws (x2).
2. Connect multiplug to side impact sensor.
3. Re-position sill carpet.
4. Install plate - front sill - RH (see Workshop Manual procedure 01.05.AJ Plate - Front Sill - RH - Renew).
Side Impact Door ARS Sensor Assembly -
Renew
Figure 2
A0120187
Repair Operation Time (ROT)
ItemCode
Passenger Airbag -Renew 01.20.CA
Repair Operation Time (ROT)
ItemCode
ARS Side Impact Sensor Assembly-B-
pillar-Renew 01.20.DB
Repair Operation Time (ROT)
ItemCode
Side Impact Door ARS Sensor Assembly-
Renew 01.20.DD
Page 224 of 947
Subframes (02.03)
Frame and Mounting (02.00)
2-1-2 Workshop Manual May 2007
Frame and Mounting (02.00)
Subframes (02.03)
Specifications
Maintenance
Front Subframe-Renew
Removal
1. Switch battery isolation switch ‘OFF’.
2. Raise vehicle on ramp.
3. Remove RH wheel arch liner (see Workshop Manual procedure 01.02.GB Wheel Arch Liner - Front - RH -
Renew).
4. Remove LH wheel arch liner (see Workshop Manual procedure 01.02.FB Wheel Arch Liner - Front - LH -
Renew)
5. Remove road wheel/s.
6. Remove front spring/damper assemblies (see Workshop Manual procedure 04.03.AA Spring and Damper
Assembly - Front Pair - Renew).
7. Remove nuts (x2) from track rod ends to vertical link.
8. Using special tool 204-523, release track rod end from vertical link.
9. Disconnect ABS sensor multiplugs then release sensor harness clips (x6) from upper suspension arm and
vertical link.
10. Disconnect brake pad wear sensor multiplug then release sensor harness clips (x2) from upper suspension
arms. 11. Remove Allen bolts (x4) from brake callipers to vertical
link and tie callipers aside.
12. Remove Torx screws (x4) from brake disc to hub and remove brake disc.
13. Remove anti-roll bar links nuts (x2) and washers (x2).
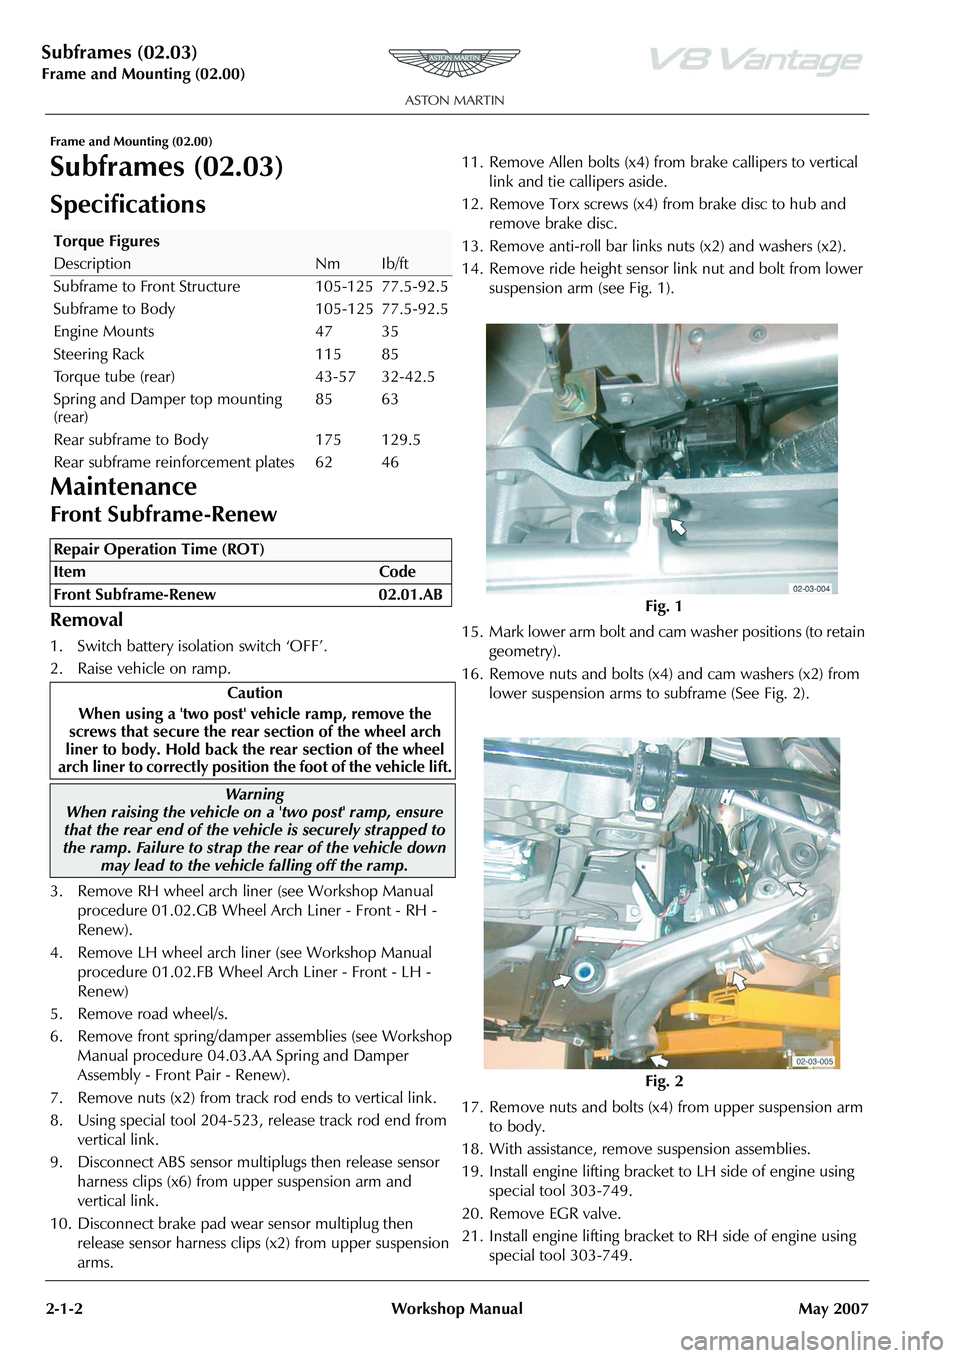
14. Remove ride height sensor link nut and bolt from lower
suspension arm (see Fig. 1).
15. Mark lower arm bolt and cam washer positions (to retain
geometry).
16. Remove nuts and bolts (x4) and cam washers (x2) from lower suspension arms to subframe (See Fig. 2).
17. Remove nuts and bolts (x4) from upper suspension arm to body.
18. With assistance, remove suspension assemblies.
19. Install engine lifting bracket to LH side of engine using special tool 303-749.
20. Remove EGR valve.
21. Install engine lifting bracket to RH side of engine using special tool 303-749.
Torque Figures
DescriptionNmIb/ft
Subframe to Front Structure 105-125 77.5-92.5
Subframe to Body 105-125 77.5-92.5
Engine Mounts 47 35
Steering Rack 115 85
Torque tube (rear) 43-57 32-42.5
Spring and Damper top mounting
(rear) 85 63
Rear subframe to Body 175 129.5
Rear subframe reinforcement plates 62 46
Repair Operation Time (ROT)
Warning
When raising the vehicle on a 'two post' ramp, ensure
that the rear end of the vehi cle is securely strapped to
the ramp. Failure to strap th e rear of the vehicle down
may lead to the vehicl e falling off the ramp.
Fig. 1
Fig. 2
Page 225 of 947
Subframes (02.03)
Frame and Mounting (02.00)
May 2007 Workshop Manual 2-1-3
22. Install cross brace support brackets 303-021-02 (x6).
23. Support engine using special tool SPX M553D.
24. Remove undertray (see Workshop Manual procedure 01.02.NB Undertray - Front - Renew).
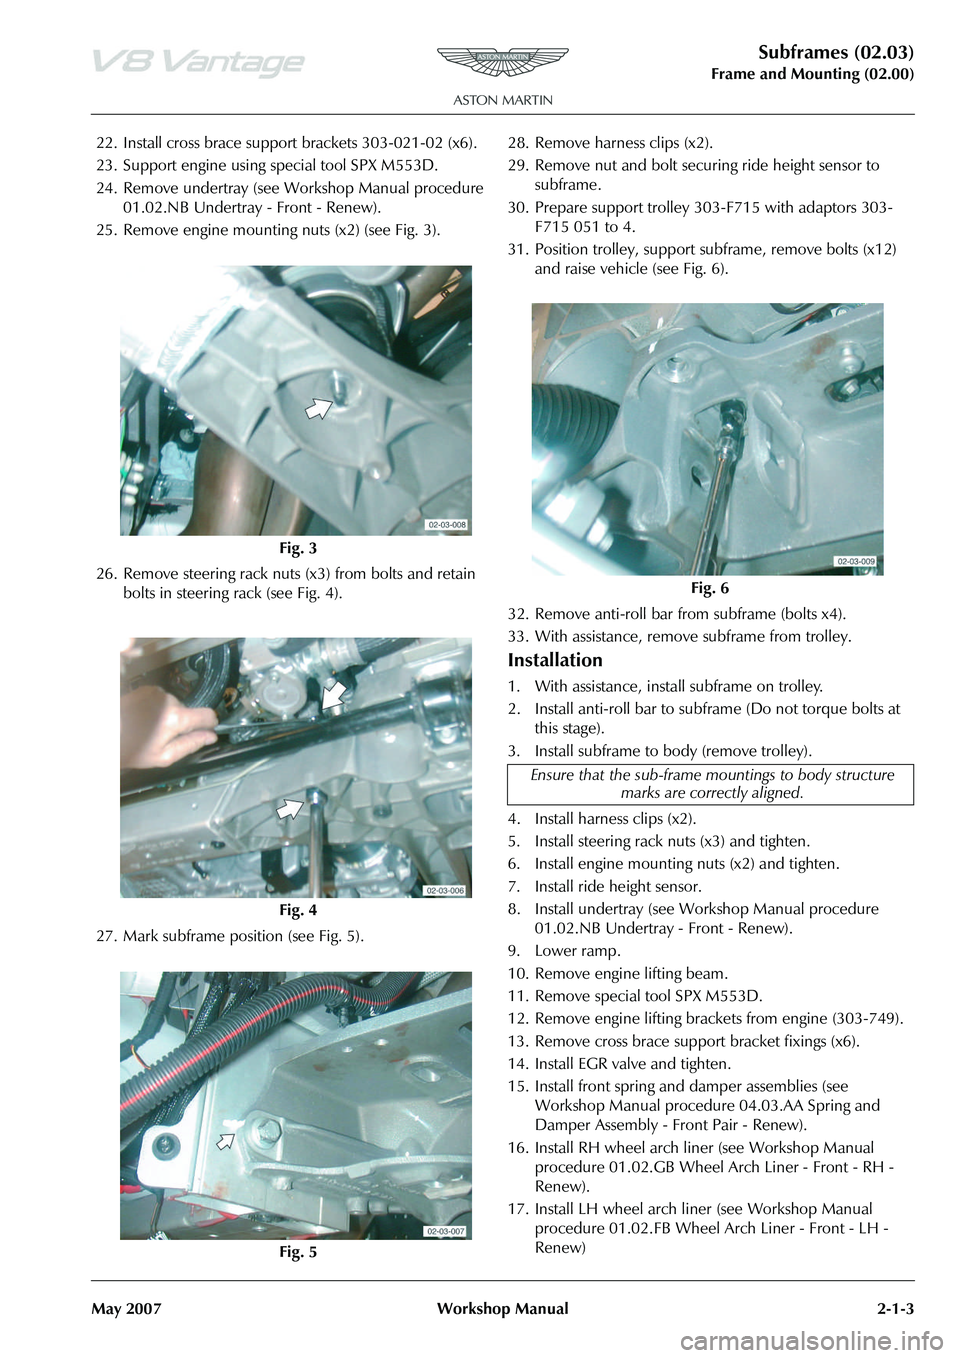
25. Remove engine mounting nuts (x2) (see Fig. 3).
26. Remove steering rack nuts (x3) from bolts and retain bolts in steering rack (see Fig. 4).
27. Mark subframe position (see Fig. 5). 28. Remove harness clips (x2).
29. Remove nut and bolt securi
ng ride height sensor to
subframe.
30. Prepare support trolley 30 3-F715 with adaptors 303-
F715 051 to 4.
31. Position trolley, support subframe, remove bolts (x12)
and raise vehicle (see Fig. 6).
32. Remove anti-roll bar from subframe (bolts x4).
33. With assistance, remove subframe from trolley.
Installation
1. With assistance, install subframe on trolley.
2. Install anti-roll bar to subframe (Do not torque bolts at this stage).
3. Install subframe to body (remove trolley).
4. Install harness clips (x2).
5. Install steering rack nuts (x3) and tighten.
6. Install engine mounting nuts (x2) and tighten.
7. Install ride height sensor.
8. Install undertray (see Workshop Manual procedure 01.02.NB Undertray - Front - Renew).
9. Lower ramp.
10. Remove engine lifting beam.
11. Remove special tool SPX M553D.
12. Remove engine lifting brack ets from engine (303-749).
13. Remove cross brace suppo rt bracket fixings (x6).
14. Install EGR valve and tighten.
15. Install front spring and damper assemblies (see Workshop Manual procedure 04.03.AA Spring and
Damper Assembly - Front Pair - Renew).
16. Install RH wheel arch li ner (see Workshop Manual
procedure 01.02.GB Wheel Arch Liner - Front - RH -
Renew).
17. Install LH wheel arch liner (see Workshop Manual procedure 01.02.FB Wheel Arch Liner - Front - LH -
Renew)
Fig. 3
Fig. 4
Fig. 5
Fig. 6
Ensure that the sub-frame mo untings to body structure
marks are correctly aligned.
Page 226 of 947
Subframes (02.03)
Frame and Mounting (02.00)
2-1-4 Workshop Manual May 2007
18. With assistance, install suspension assemblies, lower suspension arms, nuts and bolts and cam washers
(x2)(do not torque tighten at this stage).
19. Install upper suspension arms to body (do not torque tighten at this stage).
20. Install ride height sensor link to lower suspension arm and tighten.
21. Install and tighten nuts (x2) from track rod ends to vertical link.
22. Install anti-roll bar to links nuts and washers (x2) and tighten.
23. Clean and install brake discs and install and tighten Torx screws (x4)).
24. Install brake callipers and to rque tighten Allen bolts (x4).
25. Connect brake pad wear sensor multiplug and secure harness clips (x4) in upper suspension arms.
26. Connect ABS sensor multiplugs and secure harness clips (x6) in upper suspension arms and vertical links.
27. Install road wheel/s.
28. Lower vehicle on ramp.
29. Torque tighten suspension nuts and bolts.
30. Battery isolation switch ‘ON’.
31. 4 wheel alignment check and adjust (See Workshop Manual procedure 04.00.AD 4 Wheel Alignment -
Check and Adjust).
Front Subframe-Remove/Refit
Removal
1. Switch battery isolation switch ‘OFF’.
2. Raise vehicle on ramp.
3. Remove road wheel(s).
4. Remove RH wheel arch liner (See Workshop Manual procedure 01.02.GB Wheel Arch Liner - Front - RH -
Renew).
5. Remove LH wheel arch liner (See Workshop Manual procedure 01.02.FB Wheel Arch Liner - Front - LH -
Renew). 6. Remove front spring and damper assemblies (See
Workshop Manual proced ure 04.03.AA Spring &
Damper Assembly - Front Pair - Renew).
7. Remove nuts (x2) from track rod ends to vertical link.
8. Using special tool 204 - 52, release track rod end from vertical link.
9. Disconnect ABS sensor mu ltiplug and release sensor
harness clips (x6) from upper suspension arm and
vertical link.
10. Disconnect brake pad wear sensor multiplug and release sensor harness clips (x4) from upper suspension arm.
11. Remove Allen bolts (x4) from brake callipers to vertical link and tie callipers aside.
12. Remove Torx screws (x4) from brake disc to hub and remove brake disc.
13. Remove anti-roll bar links nuts (x2) and washers (x2).
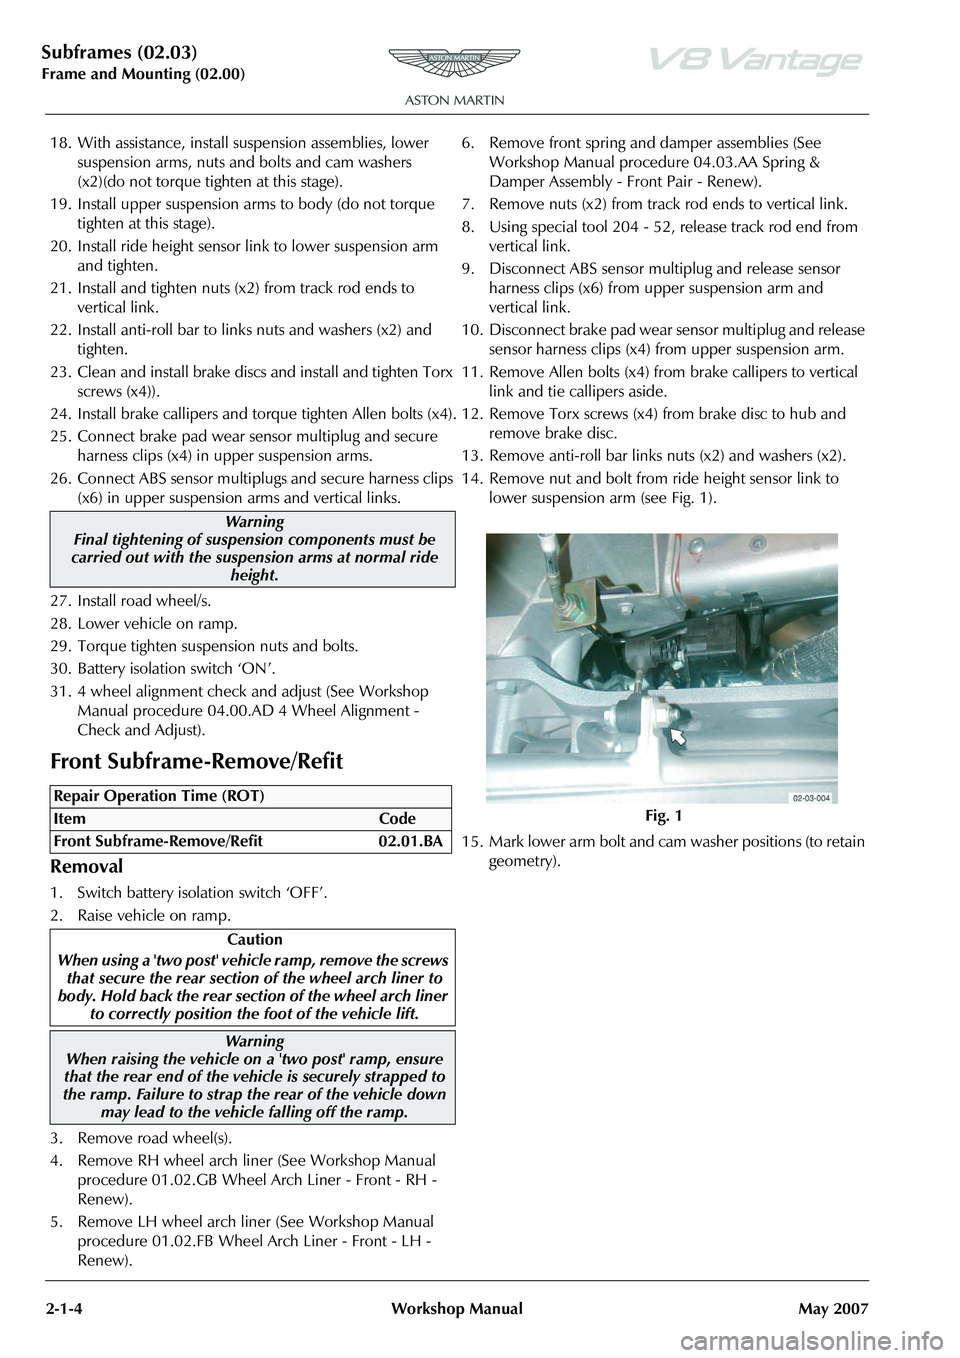
14. Remove nut and bolt from ride height sensor link to lower suspension arm (see Fig. 1).
15. Mark lower arm bolt and cam washer positions (to retain
geometry).
Warning
Final tightening of suspension components must be
carried out with the suspension arms at normal ride
height.
Repair Operation Time (ROT)
Warning
When raising the vehicle on a 'two post' ramp, ensure
that the rear end of the vehi cle is securely strapped to
the ramp. Failure to strap th e rear of the vehicle down
may lead to the vehicl e falling off the ramp.
Fig. 1
Page 228 of 947
Subframes (02.03)
Frame and Mounting (02.00)
2-1-6 Workshop Manual May 2007
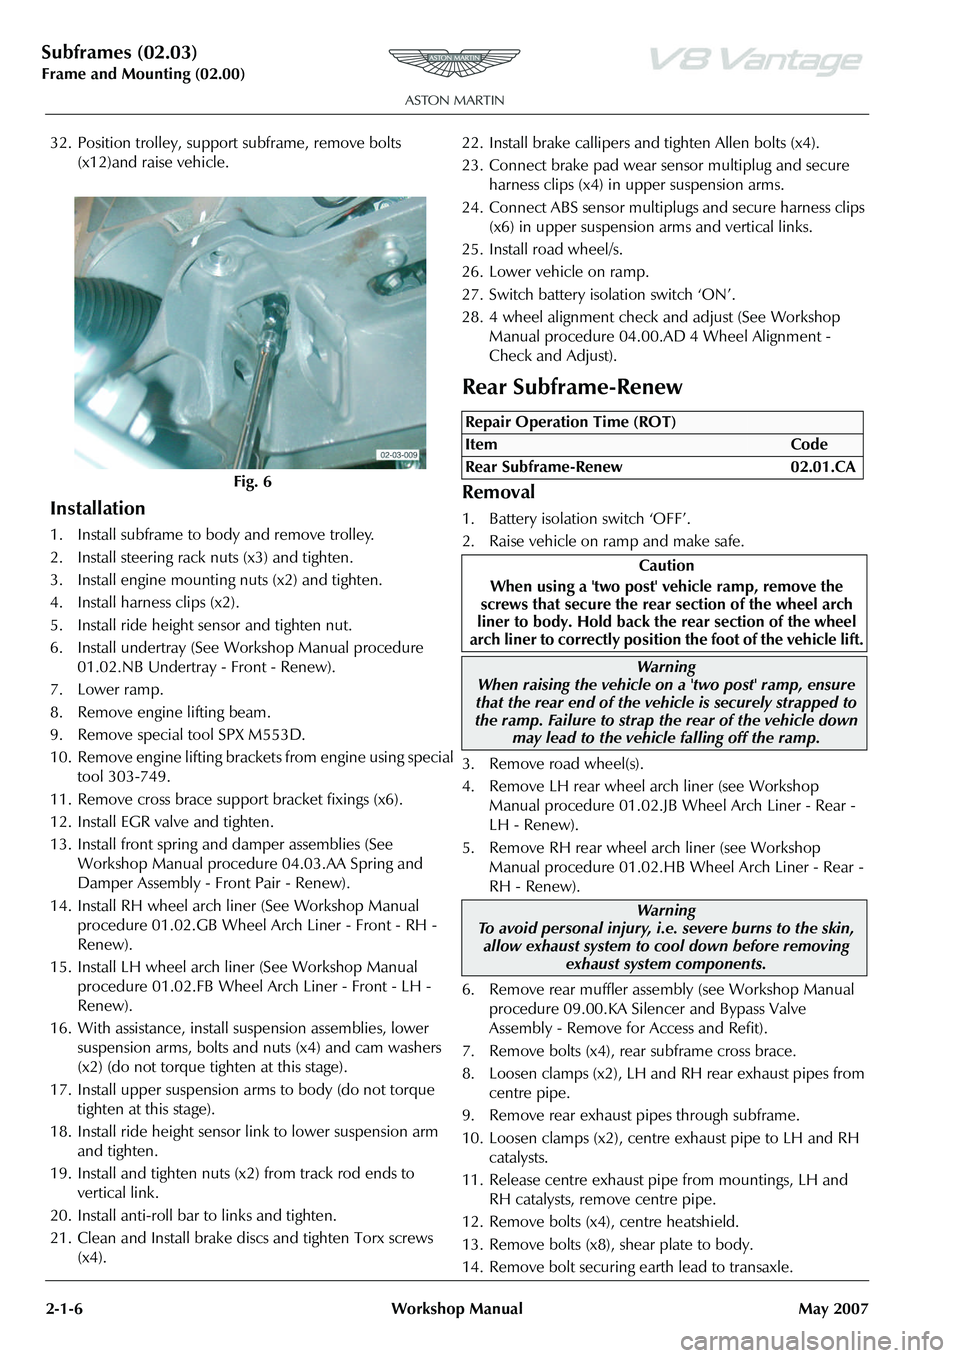
32. Position trolley, support subframe, remove bolts (x12)and raise vehicle.
Installation
1. Install subframe to body and remove trolley.
2. Install steering rack nuts (x3) and tighten.
3. Install engine mounting nuts (x2) and tighten.
4. Install harness clips (x2).
5. Install ride height sensor and tighten nut.
6. Install undertray (See Workshop Manual procedure 01.02.NB Undertray - Front - Renew).
7. Lower ramp.
8. Remove engine lifting beam.
9. Remove special tool SPX M553D.
10. Remove engine lifting bracket s from engine using special
tool 303-749.
11. Remove cross brace support bracket fixings (x6).
12. Install EGR valve and tighten.
13. Install front spring and damper assemblies (See Workshop Manual procedure 04.03.AA Spring and
Damper Assembly - Front Pair - Renew).
14. Install RH wheel arch liner (See Workshop Manual procedure 01.02.GB Wheel Arch Liner - Front - RH -
Renew).
15. Install LH wheel arch liner (See Workshop Manual procedure 01.02.FB Wheel Arch Liner - Front - LH -
Renew).
16. With assistance, install suspension assemblies, lower suspension arms, bolts and nuts (x4) and cam washers
(x2) (do not torque tighten at this stage).
17. Install upper suspension arms to body (do not torque tighten at this stage).
18. Install ride height sensor link to lower suspension arm and tighten.
19. Install and tighten nuts (x2) from track rod ends to vertical link.
20. Install anti-roll bar to links and tighten.
21. Clean and Install brake discs and tighten Torx screws (x4). 22. Install brake callipers and tighten Allen bolts (x4).
23. Connect brake pad wear se
nsor multiplug and secure
harness clips (x4) in upper suspension arms.
24. Connect ABS sensor multiplu gs and secure harness clips
(x6) in upper suspension arms and vertical links.
25. Install road wheel/s.
26. Lower vehicle on ramp.
27. Switch battery isolation switch ‘ON’.
28. 4 wheel alignment check and adjust (See Workshop Manual procedure 04.00.AD 4 Wheel Alignment -
Check and Adjust).
Rear Subframe-Renew
Removal
1. Battery isolation switch ‘OFF’.
2. Raise vehicle on ramp and make safe.
3. Remove road wheel(s).
4. Remove LH rear wheel arch liner (see Workshop Manual procedure 01.02.JB Wheel Arch Liner - Rear -
LH - Renew).
5. Remove RH rear wheel arch liner (see Workshop Manual procedure 01.02.HB Wheel Arch Liner - Rear -
RH - Renew).
6. Remove rear muffler asse mbly (see Workshop Manual
procedure 09.00.KA Silencer and Bypass Valve
Assembly - Remove for Access and Refit).
7. Remove bolts (x4), rear subframe cross brace.
8. Loosen clamps (x2), LH and RH rear exhaust pipes from
centre pipe.
9. Remove rear exhaust pipes through subframe.
10. Loosen clamps (x2), centre exhaust pipe to LH and RH
catalysts.
11. Release centre exhaust pipe from mountings, LH and RH catalysts, remove centre pipe.
12. Remove bolts (x4), centre heatshield.
13. Remove bolts (x8), shear plate to body.
14. Remove bolt securing earth lead to transaxle.
Fig. 6
Repair Operation Time (ROT)
ItemCode
Rear Subframe-Renew 02.01.CA
Caution
When using a 'two post' vehicle ramp, remove the
screws that secure the rear section of the wheel arch
liner to body. Hold back the rear section of the wheel
arch liner to correctly position the foot of the vehicle lift.
Warning
When raising the vehicle on a 'two post' ramp, ensure
that the rear end of the vehi cle is securely strapped to
the ramp. Failure to strap th e rear of the vehicle down
may lead to the vehicl e falling off the ramp.
Warning
To avoid personal injury, i.e. severe burns to the skin, allow exhaust system to cool down before removing
exhaust system components.
Page 229 of 947
Subframes (02.03)
Frame and Mounting (02.00)
May 2007 Workshop Manual 2-1-7
15. Use tool (206-103) and release each handbrake cable from mounting brackets, re lease inner cable eyelets
from calliper levers.
16. Remove bolts (x2) and nuts (x2), handbrake cables to subframe.
17. Use tool (206-103) and release handbrake cables from subframe brackets.
18. Release handbrake cable from clip, tie handbrake cable aside.
19. Loosen and disconnect each brake pipe from body bracket. Plug brake pipes
.
20. Remove bolt, fuel filler pipe to damper mounting.
21. Remove nut securing fuel fi ller pipe to body, tie filler
pipe aside.
22. Remove bolts (x4 each side), securing spring/damper assemblies.
23. Position drain tray to collect oil spillage.
24. Loosen and disconnect unions (x2), transaxle oil cooler.
Plug pipe connections.
25. Remove drain tray.
26. Disconnect multiplug, release harness clips (x2), transaxle harness, RH rear wheel arch.
27. Mark subframe position to body.
28. Position subframe trolley (303-F715), under subframe.
29. Lower vehicle until subfra me rests on support trolley.
30. Remove bolts (x6), securing subframe to body.
31. Raise vehicle to gain access to gear selector cables.
32. Using (308-642), release se lector cables (x2) from ball
joints, release selector cables from bracket.
33. Remove torque tube to transaxle bolts (x8).
34. Move subframe support trolley rearwards to give a clearance between torque tube and transaxle.
35. Carefully raise vehicle from subframe.
Installation
1. Clean transaxle and mating face on torque tube.
2. Position subframe assembly underneath vehicle.
3. Lower vehicle to align transaxle to propshaft splines.
4. Move subframe assembly forward, engage propshaft splines, locating dowels, transaxle to torque tube.
5. Install bolts (x8), torque tube to transaxle, torque tighten bolts.
6. Install gear selector cables on levers and in bracket.
7. Lower vehicle onto subframe mountings, align to marks, install and torque tighten bolts (x6).
8. Position spring/damper assemblies, install bolts (x8).
9. Position fuel filler pipe, install and torque tighten bolt.
10. Position fuel filler pipe to body, install and tighten nut to correct torque.
11. Position handbrake cables to subframe, install bolts (x4), torque bolts. 12. Install handbrake cables to callipers.
13. Remove plugs, install brake pipes.
14. Remove plugs, install transaxle oil cooler pipes, tighten
unions to correct torque.
15. Position earth lead to transaxle, install and torque tighten bolt.
16. Install transaxle harness multiplug, secure harness clips (x2).
17. Install shear plate, install and torque tighten bolts (x8).
18. Install heat shield, install and torque tighten bolts (x4).
19. Clean exhaust pipe connections, apply exhaust sealant to connections.
20. Install centre pipe to mountings and catalysts, torque tighten clamp nuts.
21. Install rear exhaust pipes to centre pipe, torque tighten clamp nuts.
22. Position subframe cross brace, install and torque bolts.
23. Install rear muffler (see Workshop Manual procedure 09.00.KA Silencer and Bypass Valve Assembly - Remove
for Access and Refit).
24. Install LH rear wheel arch liner (see Workshop Manual procedure 01.02.JB Wheel Arch Liner - Rear - LH -
Renew).
25. Install RH rear wheel arch liner (see Workshop Manual procedure 01.02.HB Wheel Arch Liner - Rear - RH -
Renew).
26. Bleed brake system (see Workshop Manual procedure 06.07.DD Brake Hydraulic System - Flush/Refill/Bleed
27. Adjust handbrake (see Wo rkshop Manual procedure
06.05.DC Handbrake Cable Assembly - Adjust).
28. Install road Wheel(s).
29. Lower vehicle on ramp and remove safety equipment.
Rear Subframe-Remove/Refit
Removal
1. Disconnect vehicle battery.
2. Remove rear subframe asse mbly (see Workshop Manual
procedure 02.01.CA Subframe Assembly - Rear -
Remove for Access and Refit).
3. Mark driveshafts to transaxle flanges for assembly purposes.
4. Remove and discard Allen bolts (x12), collect plates (x6), driveshaft flanges to transaxle.
5. Attach slings to transaxle, connect suitable hoist and
take weight of transaxle.
6. Remove nuts (x2). hydramounts to subframe.
7. With assistance, raise and remove transaxle from subframe.
Caution
Always plug pipe connections to prevent ingress of dirt.
Repair Operation Time (ROT)
Page 230 of 947
Subframes (02.03)
Frame and Mounting (02.00)
2-1-8 Workshop Manual May 2007
8. Remove bolts (x2), remove both spring/damper assemblies.
9. Remove nuts (x2), anti-roll bar links to lower suspension
arms.
10. Remove bolts (x4). anti-roll bar to subframe. Remove anti-roll bar.
11. Disconnect ABS sensor mult iplugs (x2), release sensor
harness clips (x4) from both toe control arms.
12. Disconnect brake pad wear sensor multiplugs (x2). Release connectors (x2) from subframe.
13. Loosen and disconnect brake pipe unions (x2) from subframe brackets. Pl ug pipe connections.
14. Disconnect multiplug fr om ride height sensor.
15. Remove nut/bolt securing ride height sensor link to
upper suspension arm.
16. Remove bolts (x2), ride height sensor to subframe. Remove sensor.
17. Remove nuts/bolts (x2) and cam washers (x2), toe control arms to subframe.
18. Remove bolts (x2), nuts/bolts (x2) and cam washers (x2),
securing lower suspension arms to subframe
19. Remove nuts/bolts (x4), upper suspension arms to subframe.
20. With assistance, remove suspension assemblies from subframe.
21. Remove heatshield clips (x2) from rear of subframe.
22. Release clips (x23), ha rness to subframe, remove
harness.
23. Release brake pipes from cl ips (x7), remove pipes (x2).
24. Remove brake pipe clips (x5) from subframe.
Installation
1. Clean suspension components and brake pipes.
2. Instal brake pipe clips (x5) in subframe.
3. Install brake pipes (x2) in clips (x7).
4. Install harness and secure with clips (x23).
5. Install heatshield clips (x2).
6. With assistance, install suspension assemblies in subframe.
7. Install bolts/nuts (x4), upper suspension arm to subframe. Do not torque tighten at this stage.
8. Install bolts (x2), bolts/nuts (x2) and cam washers (x2) securing lower suspension arm to subframe. Do not
torque tighten at this stage.
9. Position toe control arm, install bolts (x2, cam washers (x2 and nuts (x2). Do not torque tighten at this stage.
10. Install ride height sensor, in stall and torque tighten bolts
(x2).
11. Align ride height sensor li nk to upper suspension arm,
install bolt/nut, tighten to correct torque.
12. Connect multiplug to ride height sensor. 13. Remove pipe plugs, install and torque tighten brake
pipe unions.
14. Connect brake pad wear sensor multiplugs, install in subframe brackets.
15. Connect ABS sensor multiplugs (x2), install harness clips (x4), in toe control arms.
16. Install anti-roll bar, install bolts (x4). Do not torque tighten at this stage.
17. Align anti-roll bar links to lower suspension arms. Install nuts (x2), do not torque tighten at this stage.
18. Install spring/damper assemblies (x2). Install bolts (x2), do not torque tighten at this stage
19. With assistance, install transaxle in subframe. Install and torque tighten hydramount nuts (x2).
20. Lower hoist, remove slings.
21. Align driveshafts to transaxle flanges, install plates (x6), new Allen bolts (x12) and tighten to correct torque.
22. Install rear subframe asse mbly (see Workshop Manual
procedure 02.01.CA Subframe Assembly - Rear -
Remove for Access and Refit).
23. Connect vehicle battery.
24. 4 wheel alignment check/adjust (see Workshop Manual procedure 04.00.AD 4 Wheel Alignment - Check and
Adjust).
25. Final torque tighten all suspension nuts/bolts.
RH/LH Transmission Rear Hydromount
Isolator Assembly-Renew
Removal
1. Raise vehicle on ramp.
2. Remove rear exhaust silenc er (see Workshop Manual
procedure 09.00.KA Silencer and Bypass Valve
Assembly - Remove for Access and Refit).
3. Remove bolts (x4) from subframe cross brace.
4. Loosen clamp nut and release rear exhaust pipe from centre pipe.
5. Remove rear exhaust pipe through subframe.
6. Position hydraulic lift er to support transaxle.
Caution
Always plug pipe connections to prevent ingress of dirt.
New Allen bolts should have a thread lock coating.
Caution
Final tightening of suspension components must be
carried out with the suspensi on arms at normal ride
height.
Repair Operation Time (ROT)
ItemCode
Transmission Rear Hydromount
Isolator Assembly-Renew RH
02.03.BC
Transmission Rear Hydromount
Isolator Assembly-Renew LH
02.03.BD
Warning
To avoid personal injury, i.e. severe burns to the skin, allow exhaust system to cool down before removing
exhaust system components.