technical data AUDI Q7 2010 Owner´s Manual
[x] Cancel search | Manufacturer: AUDI, Model Year: 2010, Model line: Q7, Model: AUDI Q7 2010Pages: 390, PDF Size: 93.04 MB
Page 125 of 390

On the road Ill _______________ __.
Applies to veh icles : w ith electrically adju stab le steer ing wheel
Electrically adjustable steering wheel
The height and reach of the stee ring wheel ca n be ele ctri
c ally adj usted to sui t th e d river.
Firs t, a djust t he dr iver's se at correct ly.
Height adjustment
Fig . 120 Sw itch for
s teering whee l ad ju st
ment
- Push t he s witch © up or down=> fig. 12 0. The st ee ring
w he el heig ht chang es f or as long as you press t he swi tch .
Reach adjustment
- Push t he switc h© forward or backward=> fig . 120 . T he
ste ering w hee l reac h changes for as long as yo u press the
swi tch .
The re m ust be at least 10 inches (25 cm) between you r chest and the
cen ter of the steering whee l. If you cannot sit more than 10 inches
(25 cm) from the steer ing wheel, see if adapt ive equ ipment is ava il
able to h elp you reach the pedals and increase the distance from the
steeri ng wheel.
For detailed information on how to adjust the dr iver 's seat , see
~ page 84.
Con tro ls a nd e quip
m en t Vehicle
OP-eration
The steering wheel ca n be adjusted even when the ign ition is turned
O ff. For veh icles with sea t memory, the individu al pos it io ns for the
steer ing wheel can be sto red along with t he seat pos it ion.
& WARNING
Improper use of steering wheel adjustment and imprope r seating
position can cau se seriou s per sonal injury.
• Adjust the steering wheel column only when the vehicle i s not
moving to prevent loss of vehicle control.
• Adjust the driver 's seat or steering wheel so that there is a
minimum of 10 in ches (25 cm) between your chest and the
steering wheel~
page 190, fig. 183. If you cannot maintain this
minimum distance , the airbag system cannot prote ct you prop
erly.
• If phy sical limitations prevent you from sitting 10 inches (25
cm ) or more from the steering wheel, check with you r authorized
Audi dealer to see if adaptive equipment is available .
• If the steering wheel is aligned with your face , the supple·
mental driver 's airbag cannot provide as much protection in an
accident. Always make sure that the steering wheel is aligned with
your che st.
• Always hold the steering wheel with your hands at the 9 o'clock
and 3 o'clock po sition s to reduce the risk of personal injury if the
drive r's airbag deploys.
• Never hold the steering wheel at the 12 o'clock po sition or with
your hands inside the steering wheel rim or on the steering wheel
hub. Holding the steering wheel the wrong way can cause serious
injuries to the hands, arms and head if the driver's airbag
deploy s.•
Vehicle care Do-it-yourselt service iTechnical data
Page 127 of 390

On the road Ill _______________ __.
& WARNING
• Never remove the key from the ignition lock while the vehicle
is moving. The steering wheel will lock , cau sing loss of control.
• If you ha ve to leave your vehicle, even for ju st a minute, alw ays
remove the ignition key and take it with you. This i s especially
important if you are going to leave children unattended in the
vehicle. The children could start the engine or use other vehicle c ontrols . Unsupervised us e of vehicle controls (for example, power
windows) can cause serious personal inju ries.
0 Note
• If the ~ symbol in the display blinks, there is a malfunction in the
electronic stee ring column lock. Follow the instr uctions in
~ page 31, "Steering malfu nction i" .
• If the ~ symbol in the display blinks, there is a malfunction in the
electronic ignition lock . Follow the instr uctions in~
page 31, "Igni
t ion lock malfunct ion ~" .
(I] Tips
• If you release the ignit ion key i n pos it io n @ , the key automati cally
returns to pos ition
(D .
• If you open the driver 's doo r whe n the ignition is sw itched on, a
buzze r sounds and the message
Ignition is on appears in the instru
ment cl uster d isplay. Please swi tch the ignition off. •
Ignition key safety lock
The ignition key con on ly be removed when the selector
lever is in the "P" (Pork) positi on.
After turning off the ignition, the ign ition key can only be removed
from the ignition lock when the se lector lever is in the "P " (Park) posi-
Con tro ls a nd e quip
m en t Vehicle
OP-eration
tion. After you have removed the key, the selector lever is locked and
canno t be move d.•
Starting and stopping the engine
Starting the engine
The engine can only be started with your original A udi
key.
Fig . 12 2 Ignitio n key
posit io ns
Vehicles with gasoline engine:
- Step on the brake .
- Move the se lec tor lever into P or N
~ &.
- T urn th e ig niti on key to posit io n @ ~ fig. 122 -do not
d epress th e gas pedal wh en sta rting th e engine .
Vehicles with diesel engine:
-Step on the brake .
- Move the se lec tor lever into P or N
~ &.
Vehicle care Do-it-yourselt service iTechnical data
Page 129 of 390
_________________________________________________ O_ n_ t_ h_ e_ r _o_ a_d _ __.fflll
0 Note
Do not stop the engine immediately after hard or extended driving .
Keep the engine running for approximately two minutes to prevent
excessive heat build-up.•
Starting and stopping the engine
with Convenience key
Applies to veh icle s: with Con venie nce ke y
Starting the engine with the {START) button
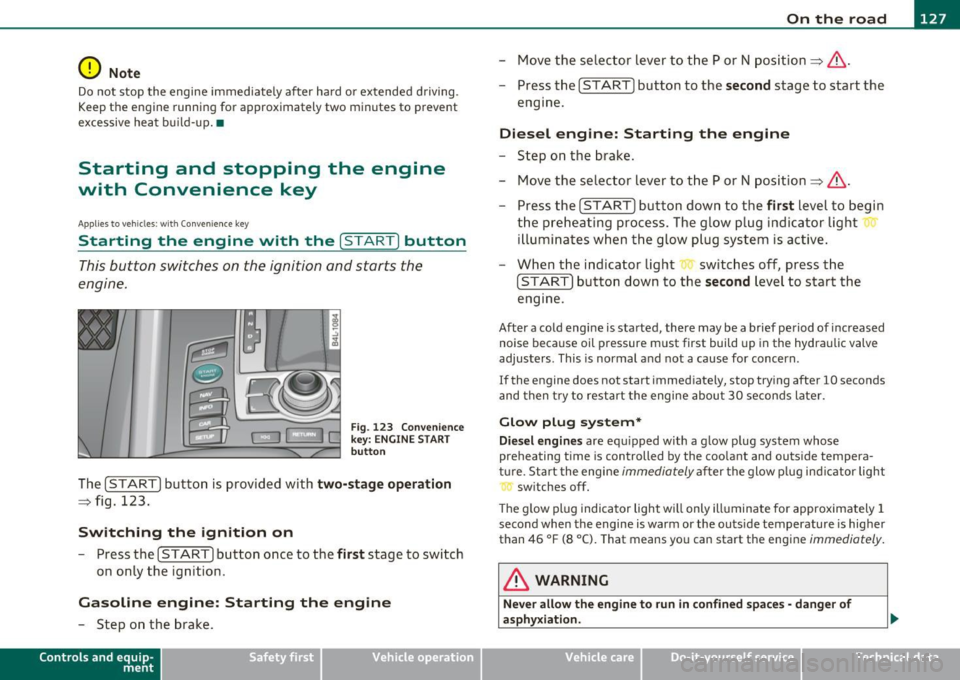
This button switches on the ignition and starts the
engine.
Fig . 123 Convenience
key: ENGINE START
button
The [START] button is provided with two-stage operation
=:> fig. 123.
Switching the ignition on
- Press the [ START] button once to the first stage to switch
on only the ignition .
Gasoline engine: Starting the engine
-Step on the brake.
Contro ls a nd e quip
m en t Vehicle
OP-eration
-Move the selector lever to the P or N position =:>& .
- Press the
[START] button to the second stage to start the
engine.
Diesel engine: Starting the engine
- Step on the brake.
- Move the selector lever to the P or N position =:>& .
- Press the
[START] button down to the first level to begin
the preheating process. The glow plug indicator light
illuminates when the glow plug system is active.
- When the indicator light switches off, press the
[START] button down to the second level to start the
engine.
After a cold engine is started, there may be a brief period of increased
noise because oil pressure must first build up in the hydraulic valve
adjusters . This is normal and not a cause for concern .
If the engine does not start immediately, stop trying after 10 seconds
and then try to restart the engine about 30 seconds later.
Glow plug system*
Diesel engines are equipped with a glow plug system whose
preheating time is controlled by the coolant and outside tempera
ture . Start the engine
immediately after the glow plug indicator light
switches off.
Th e glow plug indicator light will only illuminate for approximately 1
second when the engine is warm or the outs ide temperature is higher
than 46 °F (8 °C). That means you can start the engine
immediately.
& WARNING
Never allow the engine to run in confined spaces· danger of
asphyxiation.
Vehicle care Do-it-yourselt service iTechnical data
Page 131 of 390
_________________________________________________ O_ n_ t_ h_ e_ r _o_ a_d _ __.ffl'I
A ppli es to veh icl es: wi th Conven ie nc e key
Driver messages in the instrument cluster
display
If a function is not present, a driver message appears.
No key identified
This message appears when the [START] button is pressed if there is
no master key inside the vehicle or if the system does not recognize
it. For example, the master key cannot be recognized if it is covered
by an object (e.g. aluminum brief case) which
screens the radio
signal. Electronic devices such as cell phones can also interfere with
the radio signal.
Press brake pedal to start engine
This message appears if you press the I ST ART ] button to start the
engine and do not depress the brake pedal. The engine can only be
started if the brake pedal is depressed.
Engage Nor P to start engine
This message appears when the engine is started if the selector lever
for the automatic transmission is not in the P or N position . The
engine can only be started with the selector in these positions.
Key not in vehicle
This message appears along with the ' symbol if the master key is
removed from the vehicle with the engine running . It is intended to
remind you (e.g. when changing drivers) not to continue the journey
without the master key.
If the master key is no longer in the vehicle, you cannot switch off the
ignition after stopping the engine and you also cannot start the
engine again. Moreover, you cannot lock the vehicle from the outside
with the key.
Con tro ls a nd e quip
m en t Vehicle
OP-eration
Shift to P otherwise vehicle can roll away. Doors do not lock if you
are not in P.
This message appears for safety reasons along with a warning buzzer
if the selector lever for the automatic transmission is not in the P
position when the ignition is switched off with the
[STOP] button and
the driver's door is opened. Move the selector lever to the P position,
otherwise the vehicle is not secured against rolling away. You also
cannot lock the vehicle using the locking button on the door handle
or using the remote key.
To engage steering lock, press and hold STOP button
This message appears for safety reasons if the engine and the ignition
have been switched off by pressing the
[STOP] button once, and then
the driver's door is opened. In this instance, the steering is not
locked. The steering is locked:
• If you press the
[STOP] button again for more than 1 second.
• If you close the driver's door and lock your vehicle from the
outside. •
Parking brake
Operation
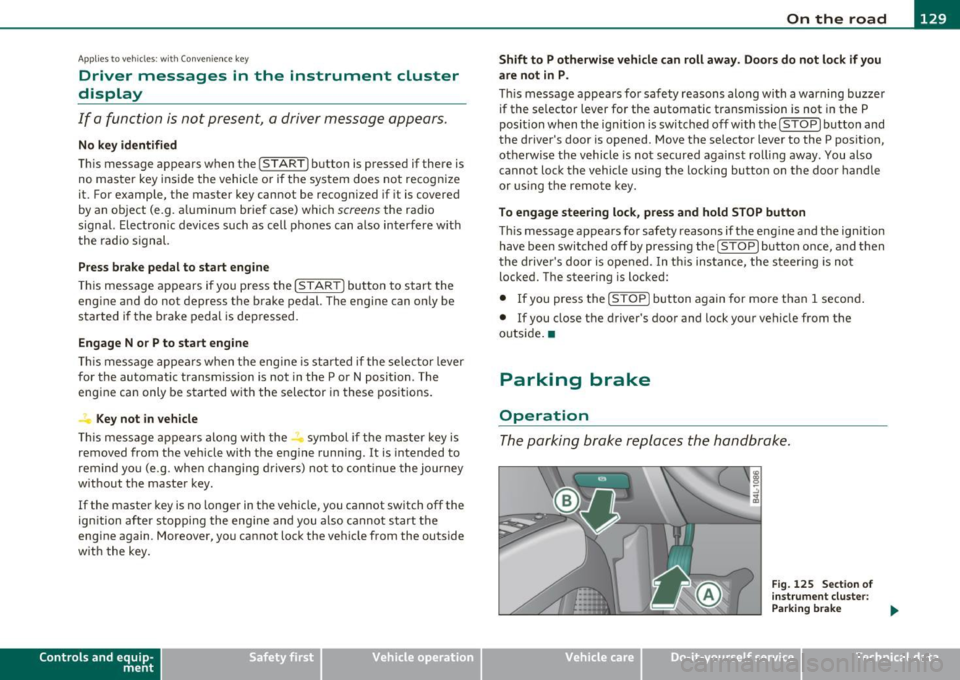
The parking brake replaces the handbrake.
Vehicle care
Fig. 125 Section of
instrument cluster:
Parking brake
~
Do-it-yourselt service iTechnical data
Page 133 of 390
On the road -
----------------
& WARNING (co ntinued )
• When parking on hills, always turn the wheel s so that the front
wheels will fir st roll into the curb, if the vehicle should start to
roll.
• Never allow anyone -especially small children -to remain in
the vehicle when it i s locked. Locked door s make it more d ifficult
for rescuer s to acce ss the pa ssenger compartment in the event of
an emergency. Danger to life!
• Never leave children un supervised in the vehicle . Children
could release the parking brake or mo ve the gearshift lever out of
gear . The vehicle could start to roll away and cause an accident .
• No matter what the season is , the temperature in a parked
vehicle can reach dangerou s levels.
0 Note
• Please exerc ise care when you park your vehicle in parking areas
with park ing barriers or c urbs. Pa rking barriers and c urbs vary in
height and co uld damage you r bumpe r and related componen ts as
the front of your vehicle moves over a barrier or curb that is too h igh,
as you par k or a s yo u back out of a p arking s pot. I n or der to be s ure
that no such damage can occ ur, yo u may wish to stop short of having
t he fro nt t ires of you r ca r tou ch the pa rk in g barrier or curb.
• Please a lso exerc ise except ional care when yo u drive up or down
s t eep ram ps or drive ove r curb s or other obst acles, for which t he
vehicle is not designed, because components of the vehicle close to
t he g roun d, s uch as bumpe r cove rs, spoilers and s uspension and
exhaust system components, may become damaged. •
Starting on hills
Hill Hold makes it easier to start on hills.
Controls and equip
ment Safety first
T
he system is activated whe n the brake peda l is depressed for a few
s econds .
For this, t he vehicle mus t be st andi ng in u phill driving direc
t ion .
After releas ing the brake pedal, the brake power is he ld for a
brief
moment to preve nt the vehi cle from rolling back when s tarting. At
this time, you can easi ly begin to move your vehicle .
& WARNING
• If you did not begin moving immediately after releasing the
brake pedal, under certain circumstances, the vehicle wou ld begin
to roll backward. Depress the brake pedal immediately or engage
the parking brake .
• Should the engine stall , depress the brake pedal immediately
or engage the parking brake .
• In order to prevent the vehicle from rolling back unintention
ally when starting in stop-and-go traffic, keep the brake pedal
depressed for a few seconds before driving off .
• When you leave the vehicle -even if only briefly - , sw itch off
the ignition and make sure to remove the ignition key . Also
engage the parking brake to prevent your vehicle from rolling
unintentionally. This particularly applies if children are left in the
vehicle -danger of accident! •
Vehicle care Technical data
Page 135 of 390
On the road -
----------------
Change speed in increments of 1 mph (1 km/h) by lightly pressing the
lever. If you keep the lever pressed down, you w ill alter your speed in
5 mph (10 km/h) increments.
You can also press the accelerator pedal down to increase your speed,
e .g . if you want to pass someone. The speed you saved earlier will
resume as soon as you release the accelerator pedal.
If, however, you exceed your saved speed by 5 mph (10 km/h) for
longer than 5 minutes, the cruise control will turn off temporarily .
The symbo l will go out but the saved speed will be retained. •
Presetting your speed
You can preset your desired speed while the vehicle is not
moving.
- Turn on the ignition.
- Pull lever into position
(D => page 132, fig. 126.
- Press the lever in the 0 or O direction to increase or
decrease your speed .
- Re lease the lever to save that speed .
This function makes it possible, for example, to save the speed you
want befo re driving on the h ighway . Once on the h ighway, act ivate
the cruise control by pulling the lever toward
(D. •
Switching the system off
Temporary deactivation
- Press the brake pedal, or
- Press the lever into position@ (not clicked into place)
=> page 132, fig. 126, or
Controls and equip
ment Safety first
-
Drive for longer than 5 m inutes at more than 5 mph
(10 km/h) above the stored speed.
Sw itching off completely
- Press lever into position@ (clicked into place), or
- Switch the ignition off.
The system retains the saved speed if you deactivate the cruise
cont rol tempo rar ily. To resume the saved speed, release the brake
pedal and pull the lever to position
(D.
Switching the ignition off e rases the saved speed.
& WARNING
You sho uld onl y retu rn to the saved sp ee d if it i s not t oo fast f or
the cu rrent tr affic condition s -ris k of an accident! •
Vehicle care Technical data
Page 137 of 390

________________________________________ ...:.A...:..;:. d...:.a ...!.p_ t_ i_ v _e _ C_r_ u _ i_s _e _ C_o _n_ t_ r_ o_ l __ _
& WARNING (continued)
the veh icle s afely when you follow another vehicle too closely.
Alway s rem ember that the Adaptive Cruise Control has a braking
powe r that is only about 30 % of the vehicle's maximum braking
ability. The automatic braking function cannot bring th e ve hicle to
a sudden or emergency stop . Always be prepared to brake and take
evasive action to avoid collisions and other accident situations .
• Never allow the closing speed between you and other vehicles
to be so high that the Adaptive Cruise Control may not be able to
slow your vehicle safely. If closing speed is too h igh, you must
apply the brake s your self to reduce the ri sk of a rear-end cra sh .
• Never rest your foot on the accelerator pedal , especially when
the Adaptive Crui se Control is being used. Pressure on the acceler
ator will overr ide the ACC braking function and prevent the brakes
from being applied when ACC detects a situation when the brake s
must be applied .
• Never u se Adaptive Cruise Control when you cannot drive safely
at a steady speed, including on city streets , on winding roads or
when road conditions are poor (for example , on ice, gravel, in fog ,
heavy rain or on wet roads that increase the risk of hydroplaning ).
• The radar sensor's
vi sion can be redu ced by rain, snow and
heavy road spray. These and similar conditions can prevent vehi
cle s up ahead from being accurately detected and in some cases
they may not be detected at all. Do not use ACC when the radar
sensors cannot accurately detect vehicles mo ving ahead of you in
traffic .
• Always turn off Adaptive Crui se Control when entering turn
lanes, exit lanes and con struction zones or in similar situat ions
because the vehicle will automatically accelerate to the stored
speed when the road ahead i s clear .
• To prevent unintended operation , always switch ACC off when
it is not being used .
Controls and equip
ment Safety first
(I] Tips
•
For safety reaso ns, t he stored speed is deleted when the igni tion
is turned off .
• T he Elect ronic Stabilization Program (ESP) and the Ant i- Slip Regu
lat ion (ASR) cannot be deactivated when the Adaptive Cruise Contro l
is sw itched on . If the ES P and t he Anti -S li p Reg ula tio n (ASR) has been
deactivated and you then switch on the Adaptive Cruise Control, the
E S P fu nction will also be a ctivated au toma tically.
• Damage cause d by accidents and some minor coll is ions can affect
t he radar se nsor se ttings and cause the syste m to malfunction o r
switch off completely .
• Th e radar sensor cover is heated. In win ter conditions, you should
st ill chec k befo re dr iv ing to make sure it is free of ice and snow. If
ne cessa ry, clean the area nea r the rada r sensor carefully ::}
page 134,
fig . 128.
• T o ensure tha t the radar sensor is not block ed, fore ign objects
(e.g. stickers, la rger license plate mo unts, add·on parts) must not
cove r th e ar ea nea r the radar senso r::} page 13 4, fig. 12 8. T he area
near the ra dar senso r must not be painted, e ither.
• For Declaration o f Compliance to United Sta tes FCC and Indus try
Cana da regulat ions ::}
page 369. •
Vehicle care Technical data
Page 139 of 390
__________________________________________ A_ d_ a_,_ p_t _iv _ e_C_ r_u _i _ s _e _C_ o_n_ t_ r_ o_ l __ ffl'II
preparation. Th is function does not p erfo rm any e mergency braki ng
man eu ver s by its elf; th e dr iver m ust alway s app ly the b ra kes .
& WARNING
If ACC initiates a braking maneuver, the brake pedal will be
retracted . Interference with the brake pedal can prevent ACC from
slowing the vehicle down and cause a crash and serious personal
injury .
• Never put anything
in the driver's footwell or let anything fall
into it. An object in the driver 's footwell can interfere with the
pedals and prevent the accelerator from being used to override
ACC or prevent ACC from being switched off when the brake pedal
is depressed and also prevent the vehicle from being slowed down
or stopped.
• Only use floor mats that keep the area around the pedals free
and that can be securely fastened to the footwell.
• Never drive with your foot underneath the brake pedal.
• Always read and heed the information and WARNINGS~
& in
" Description " on
page 134.
& WARNING
• Never rely on the distance control feature of ACC alone to
prevent rear-end collisions. Always be prepared to brake and take
evasive action to avoid collisions and other accident situations.
• Never allow the closing speed between you and other vehicles
to be so high that the Adaptive Cruise Control may not be able to slow your vehicle safely. If closing speed is too high , you must
apply the brakes yourself to reduce the risk of a rear-end crash.
[I] Tips
Please note tha t the amount of accelerat ion the Adaptive Cr uise
Control uses depends on t he D istance sett ing se lected. DIS TA NCE 1
give s yo u acc eler ation th at is dy namic and sport y. DI STANC E 4, on th e
Controls and equip
ment Safety first
o
ther hand , gives more moderate acce lera tion . For more info rmation
a b out t he tim e inte rvals ~
page 14 0, "Ho w is the di stanc e (tim e
interval) se t?".
• P lease no te th at if the A dapt ive Cruis e Con trol has b egun braking
t he vehicle a nd the dr ive r ch oos es to brake the vehicle addit io nally,
th e bra kes m ay feel "h ard". Thi s is s imply due to th e p res sur e buil d
up of th e initia l braking.
• Adaptive Cr uise C ontr ol is sw itche d off aft e r p ressing the foot
bra ke. T he speed saved up this poin t can be resumed . To resume the
s aved s peed, rele ase the b rake ped al and pull th e control lever
t oward you~
page 139, "Turning Adaptive Cr uise Contro l off
tempora rily" .•
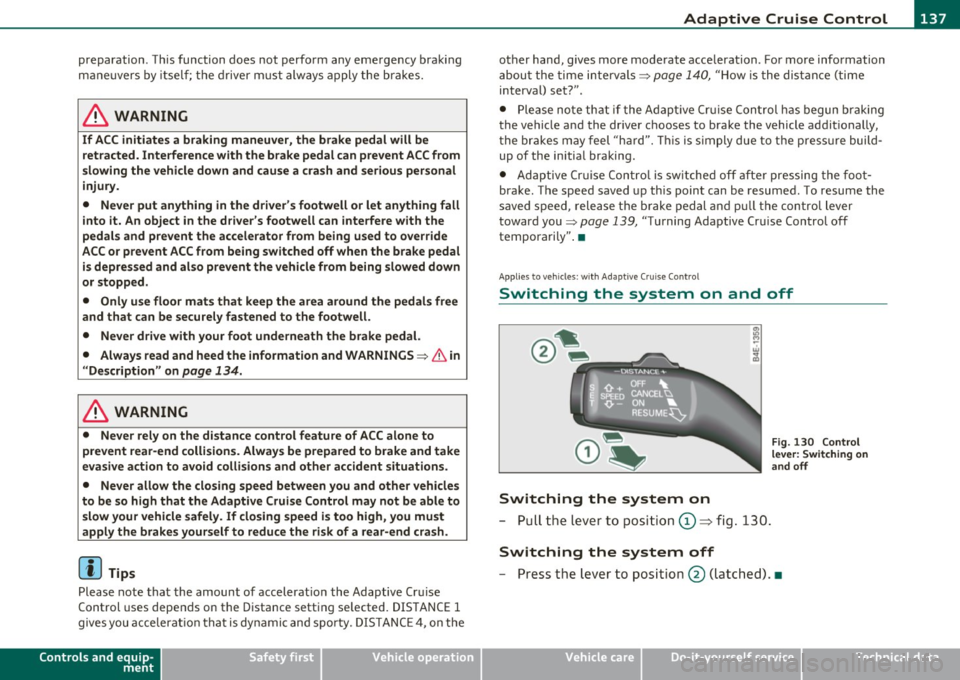
A pp lies to ve hicle s: with Ad apti ve Cru ise Con tro l
Switching the system on and off
Switching the system on
- P ull th e lever t o posit ion © => fig . 130.
Switching the system off
Fig . 130 Control
lever: Switch ing on
an d off
- P ress t he lever to posit io n @ (latc hed). •
Vehicle care Technical data
Page 141 of 390

__________________________________________ A_ d_a""" p:....- t_iv _ e_ C_ r_ u _is _ e_C_ o_n_ t_ r_ o_ l_....J_
- Press the lev er downwards Q and hold it. As long as you
hold the control switch down, the li ght diode d isplay in the
speedo meter LED d isplay moves bac kward and the speed
is reduced .
After releasing t he co ntro l switch, the system regulates the speed to
the val ue just set .
After each adjustment, the new ly-set speed is shown for a short time
in the Information line=>
page 145.
& WARNING
Improper use of th e Adaptive Cruis e Control features and inatten
tion can lead to an accident causing serious personal injury.
• It is dangerous to use the "RESUM E" feature when the previ
ously set speed is too high fo r existing road, traffic or weather
c onditions .
• Alway s read and he ed the information and WARNINGS=>
& in
" Description " on
page 134 .
[I] Tips
You ca n increase your speed at any time by steppi ng on the acceler
ator pedal. After you release the accelerator peda l, the sys tem
adjusts back down to the speed you previously set . A new desired
sp eed can b e stored at any time by press ing t he [SET ] button
=> page 138, fig . 131. •
Con tro ls a nd e quip
m en t Vehicle
OP-eration
Applies to vehicles : w ith A dapt ive Cruise Cont rol
Turning Adaptive Cruise Control off
temporarily
In some situations it makes sense to turn Adaptive Cruise
Control off temporarily.
Turning control off temporarily
Fig. 133 Co ntrol
le ver: Turni ng Adap
ti ve Cruise Con trol off
te mp orar ily
Fig. 134 Display in
the speedo meter
-To sh ut off the cont rol w ith the save function, either
depress t he brake pedal, or
- Press t he lever in the directio n of t he arrow @=> fig . 133 . ._
Vehicle care Do-it-yourselt service iTechnical data
Page 143 of 390

____________________________________________ A_ d_ a...::p_ t _ iv_e_ C_ r_u _i_s _e _ C_o_ n_ t_r _o _l __ _
For examp le, if the interval DISTANCE 3 is set, a veh icle in front is
followe d at a
time in terval of 1. 8 seconds .
For a speed of
50 mph (80 km /h ) this would be equivalent to a
distance of
131 feet (40 meters ) to the vehicle in front.
Symbol Dynam ics
Distance at 25 mph (40 km/h)
Di stan ce at 50 mph (80 km/h )
Distance at 75 mph (120 km /h)
DISTANCE 1
c:::, _c:::, _ _ _
1 second
Sporting
36 Feet ( 11 Meters)
72 F eet ( 22 Mete rs)
108 F eet (33 Meters)
How your ve hicle responds w hen accelerating and fo llow ing other
vehicles with ACC opera ting can be adapte d to your pe rsonal wi shes
through different driving programs. Depending on wh ic h driving
prog ram and which d istance yo u choose, you r veh icle w ill respond
Settings
Symbol for time interval Support for :
Response in "dynamic " driving program
Response in "standard " driving program
Response in "comfort " driving program DISTANCE 1
c:::,_c:::, ___
Bu
m pe r-t o-b umper
tra ffic, brisk driving
1
2
3
(dynamic) 1 -----2 ----- 3 ----- 4 ----- 5 (comfortable)
Controls and equip
ment Safety first
The distances g
iven here are nom inal values. The vehicle speed may
excee d or f all shor t of these target speeds, depending o n the driving
situat ion and the dr iving style of the veh icle ahead .
DISTANCE 2
~ __ c:::, __
1.3 s eco nds
Standard
95 F eet ( 29 Mete rs)
14 4 Fee t (44 Meters)
DISTANCE 3
c:::, ___ c:::,_
1.8 second s
Standa rd
6 6 Feet (20 Meters)
13 1 Feet (4 0 Meters)
197 Feet (60 Meters)
DISTANCE 4
c:::, ____ c:::,
2.3 seconds
Comfo rtable
82 Feet (25 Meters)
16 7 F eet (51 Meters)
249 F eet (76 Meters)
more dynamically or more comfortably when accelerating and
bra king . The setting is se lec ted throug h the MM I menu
Adaptive
Cruise Control =>
page 147, "MMI settings".
DISTANCE 2 DISTANCE 3 DISTANCE 4
~--~--~---~-~----~
Bumper-to-bump er Bum per-to-b umper Secondary roads, tra iler
traff ic, " keeping pace" traff ic, "keeping pace" operat ion
comfortab ly comfortably
2 2 3
3
3 4
4 4 5
Vehicle care Technical data