low beam BMW MOTORRAD G 650 XCHALLENGE 2007 Rider's Manual (in English)
[x] Cancel search | Manufacturer: BMW MOTORRAD, Model Year: 2007, Model line: G 650 XCHALLENGE, Model: BMW MOTORRAD G 650 XCHALLENGE 2007Pages: 138, PDF Size: 2.23 MB
Page 20 of 138
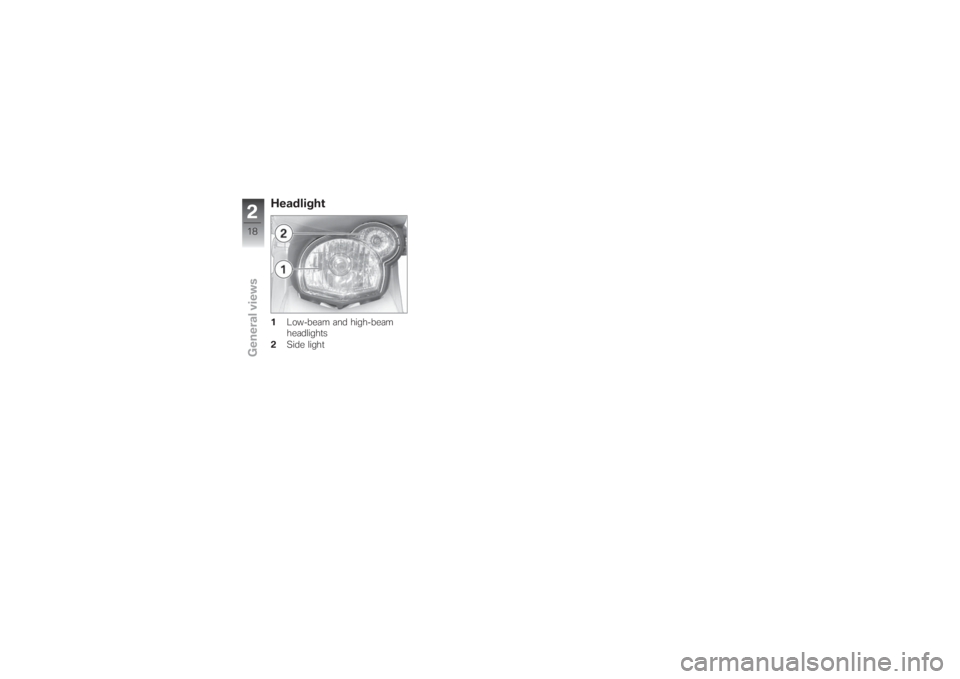
Headlight1Low-beam and high-beam
headlights
2Side light
218zGeneral views
Page 33 of 138
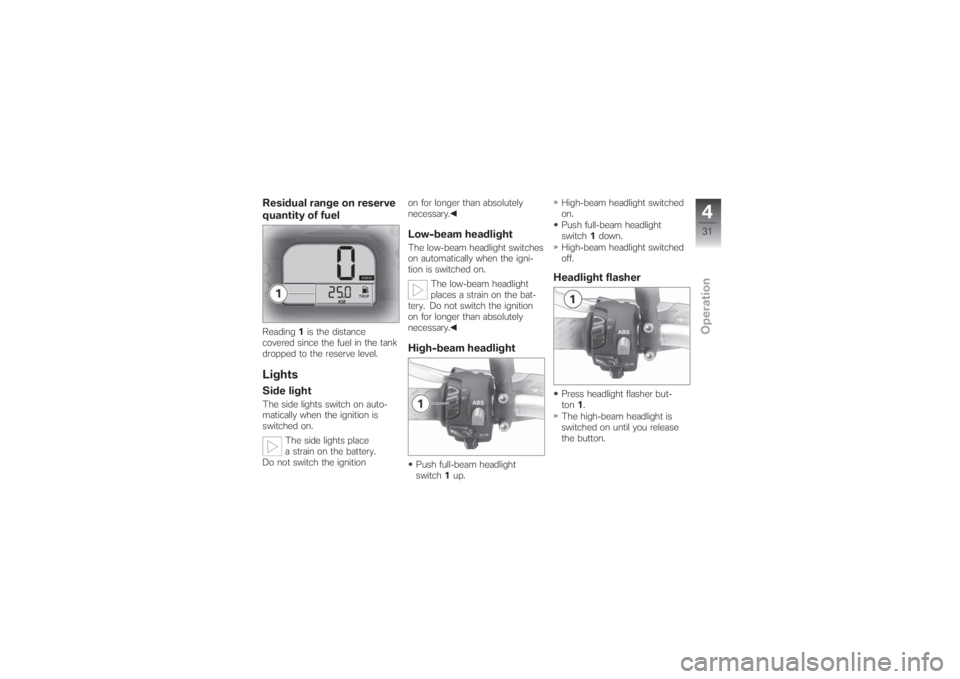
Residual range on reserve
quantity of fuelReading1is the distance
covered since the fuel in the tank
dropped to the reserve level.LightsSide lightThe side lights switch on auto-
matically when the ignition is
switched on.
The side lights place
a strain on the battery.
Do not switch the ignitionon for longer than absolutely
necessary.
Low-beam headlightThe low-beam headlight switches
on automatically when the igni-
tion is switched on.
The low-beam headlight
places a strain on the bat-
tery. Do not switch the ignition
on for longer than absolutely
necessary.High-beam headlightPush full-beam headlight
switch1up.High-beam headlight switched
on.
Push full-beam headlight
switch1down.
High-beam headlight switched
off.
Headlight flasherPress headlight flasher but-
ton1.
The high-beam headlight is
switched on until you release
the button.
431zOperation
Page 43 of 138
Tyre pressure, front
1.9 bar (two-up and/or with
luggage, tyre cold)
Tyre pressure, rear
2 bar (one-up, tyre cold)
2.2 bar (two-up and/or with
luggage, tyre cold)
If tyre pressure is too low:
Correct tyre pressure.
HeadlightAdjusting headlight for
driving on right/driving on
leftThe motorcycle's headlight beam
is symmetric, so there is no need
for modification if you intend rid-
ing in a country where the op-
posite rule of the road applies.
Beam throw and air
pressure in the Air
Damping SystemHeadlight beam throw is kept
constant when the air pressure
in the Air Damping System is
adjusted to suit load.
Air-pressure adjustment might
not suffice only if the motorcycle
is very heavily loaded. Under
these circumstances, headlight
beam throw has to be adjusted
to suit the weight carried by the
motorcycle.
Consult a specialist work-
shop, preferably an au-
thorised BMW Motorrad deal-
er, if you are unsure whether
the headlight basic setting is
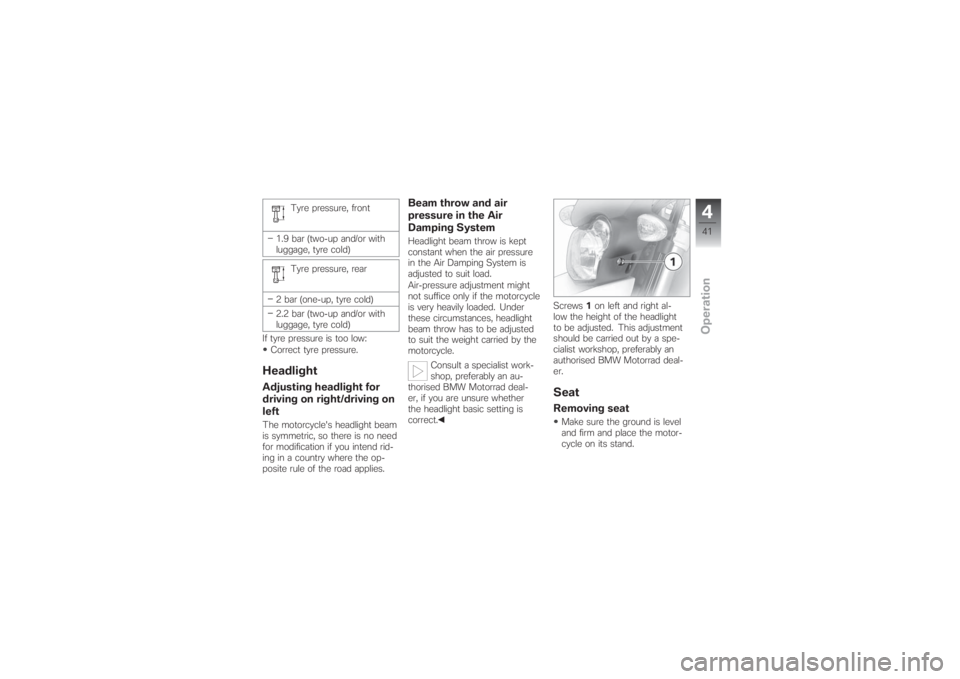
correct.Screws1on left and right al-
low the height of the headlight
to be adjusted. This adjustment
should be carried out by a spe-
cialist workshop, preferably an
authorised BMW Motorrad deal-
er.
SeatRemoving seatMake sure the ground is level
and firm and place the motor-
cycle on its stand.
441zOperation
Page 86 of 138
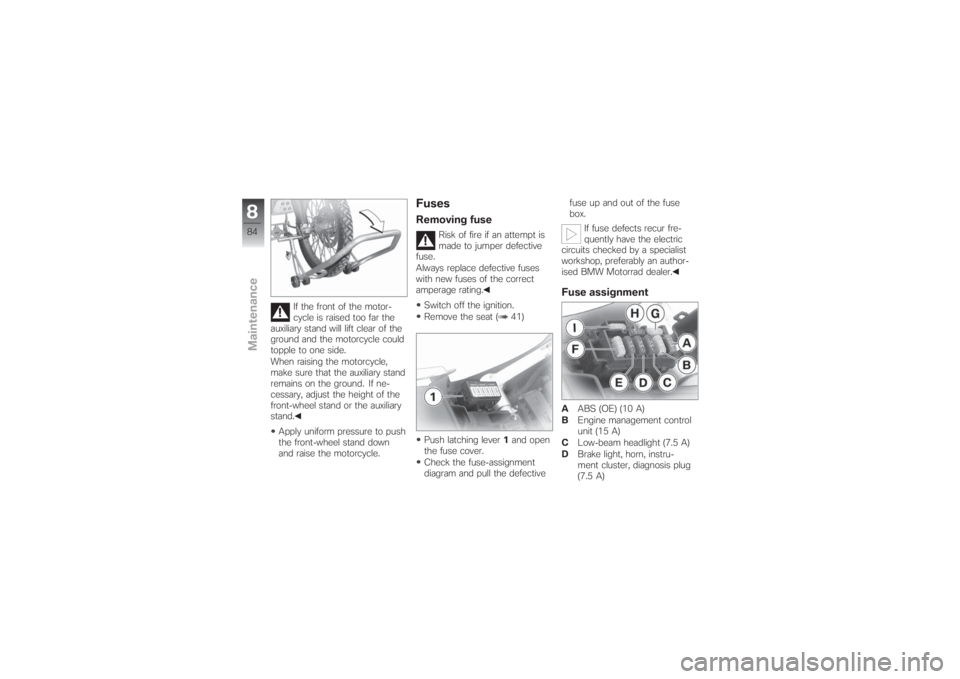
If the front of the motor-
cycle is raised too far the
auxiliary stand will lift clear of the
ground and the motorcycle could
topple to one side.
When raising the motorcycle,
make sure that the auxiliary stand
remains on the ground. If ne-
cessary, adjust the height of the
front-wheel stand or the auxiliary
stand.
Apply uniform pressure to push
the front-wheel stand down
and raise the motorcycle.
FusesRemoving fuse
Risk of fire if an attempt is
made to jumper defective
fuse.
Always replace defective fuses
with new fuses of the correct
amperage rating.
Switch off the ignition.
Remove the seat ( 41)
Push latching lever1and open
the fuse cover.
Check the fuse-assignment
diagram and pull the defectivefuse up and out of the fuse
box.
If fuse defects recur fre-
quently have the electric
circuits checked by a specialist
workshop, preferably an author-
ised BMW Motorrad dealer.
Fuse assignmentAABS (OE) (10 A)
BEngine management control
unit (15 A)
CLow-beam headlight (7.5 A)
DBrake light, horn, instru-
ment cluster, diagnosis plug
(7.5 A)
884zMaintenance
Page 88 of 138
BulbsNotes
A defective bulb places
your safety at risk because
it is easier for other users to
oversee the motorcycle.
Replace defective bulbs as
soon as possible; always carry a
complete set of spare bulbs if
possible.
The bulb is pressurised and
can cause injury if dam-
aged.
Wear protective goggles and
gloves when changing bulbs.
The types of bulb fitted to
your motorcycle are listed
in the section entitled "Technical
data".
Do not touch the glass of
new bulbs with your fingers.
Use a clean, dry cloth to hold
the bulbs when handling them.
Dirt deposits, in particular oil andgrease, interfere with heat radi-
ation from the bulb. This leads
to overheating and shortens the
bulb's operating life.
Removing headlight
housing
If it is not standing firmly,
the motorcycle could topple
in the course of the operations
described below.
Always make sure that the
motorcycle is stable and firmly
supported.
Make sure the ground is level
and firm and place the motor-
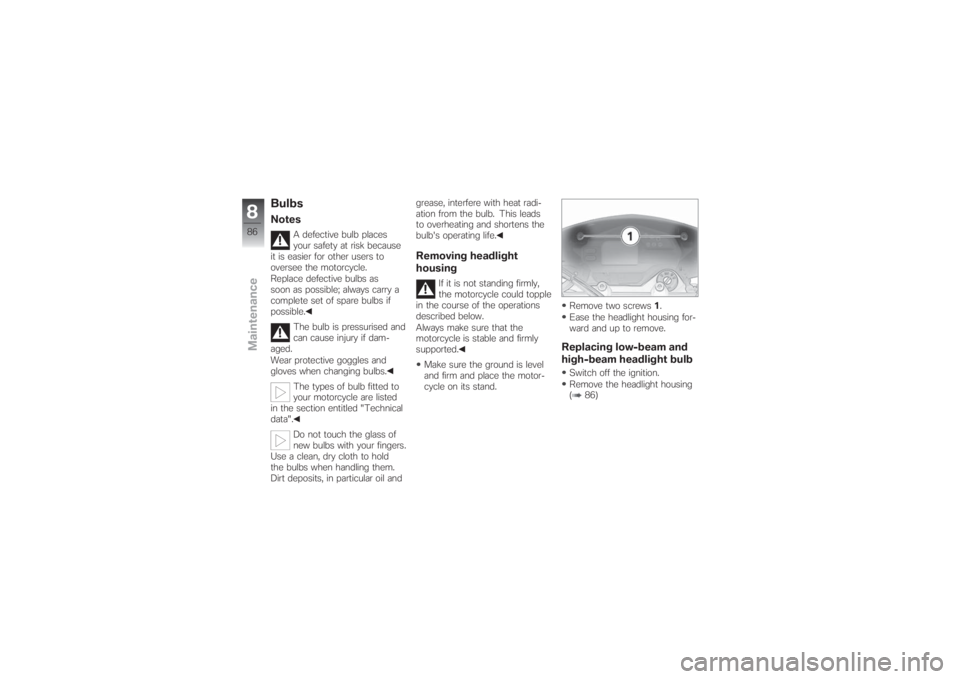
cycle on its stand.Remove two screws1.
Ease the headlight housing for-
ward and up to remove.
Replacing low-beam and
high-beam headlight bulbSwitch off the ignition.
Remove the headlight housing
( 86)
886zMaintenance
Page 89 of 138
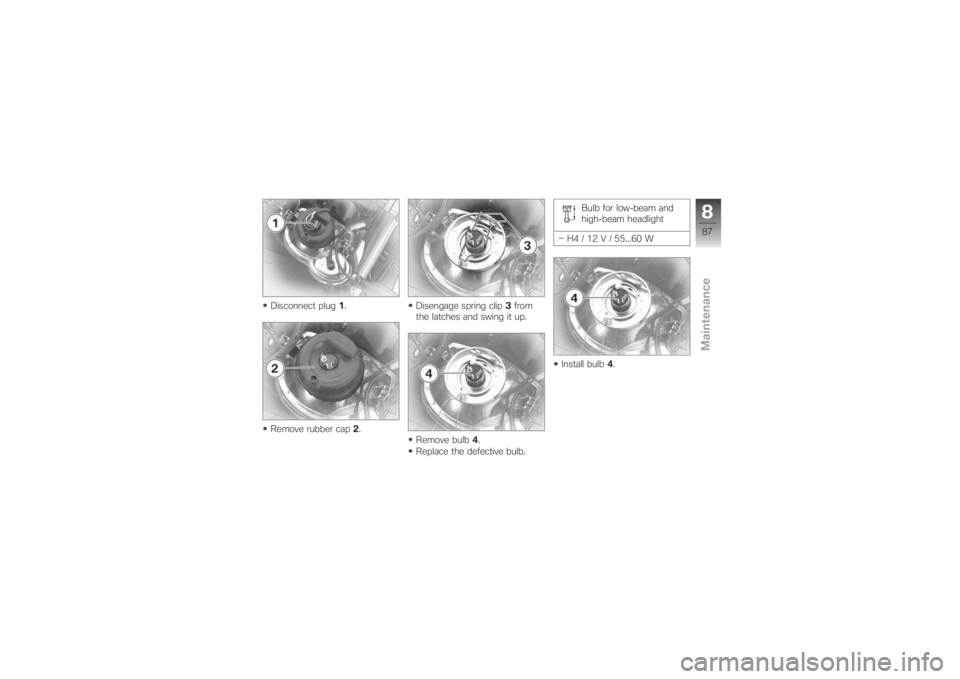
Disconnect plug1.
Remove rubber cap2.Disengage spring clip3from
the latches and swing it up.
Remove bulb4.
Replace the defective bulb.Bulb for low-beam and
high-beam headlight
H4 / 12 V / 55...60 W
Install bulb4.
887zMaintenance
Page 120 of 138
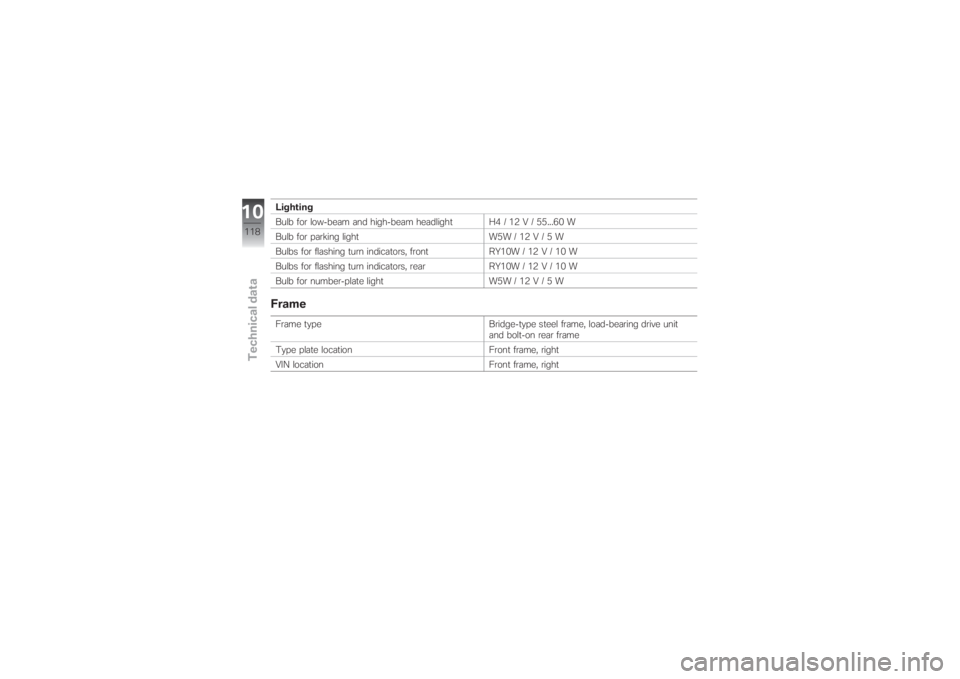
Lighting
Bulb for low-beam and high-beam headlight H4 / 12 V / 55...60 W
Bulb for parking light W5W / 12 V / 5 W
Bulbs for flashing turn indicators, front RY10W / 12 V / 10 W
Bulbs for flashing turn indicators, rear RY10W / 12 V / 10 W
Bulb for number-plate light W5W / 12 V / 5 WFrameFrame type Bridge-type steel frame, load-bearing drive unit
and bolt-on rear frame
Type plate location Front frame, right
VIN location Front frame, right
10118zTechnical data
Page 133 of 138
A
Abbreviations and symbols, 6
ABS
Engineering details, 55
Fuses, 13, 85
Self-diagnosis, 48
Switching off and on, 15, 33
Warnings, 23
Accessories
Notes, 60
Power socket, 60
Air Damping System, 34
Adjusting air pressure, 34, 35
Air pressure and
temperature, 35
Fore-and-aft tilt indicator, 11,
35
Periods of disuse, 36
Air filter, 14
Replacing, 92
Auxiliary stand, 81
B
Battery
Charging, 97
Maintenance instructions, 96Removing and installing, 98
Technical data, 117
Voltmeter, 20, 30
BMW Motorrad service, 122
BMW Motorrad Service
Card, 122
Brake fluid
Checking level, 69
Reservoir, front, 13
Reservoir, rear, 13
Brake pads
Running in, 49
Test, 68
Brakes
Notes, 50
Technical data, 114
Test, 67
Bulbs
Notes on replacement, 86
Replacing low-beam headlight
bulb, 86
Replacing number-plate light
bulbs, 91
Replacing rear light, 91
Replacing side-light bulb, 89Replacing turn indicator
bulb, 90
Technical data, 118
C
Care, 103
Chain
Adjusting tension, 74
Checking tension, 74
Checking wear, 75
Lubricating, 73
Checklist, 46
Clock, 20
Adjusting, 17, 29
Clutch
Adjusting play, 73
Checking play, 72
Technical data, 112
Confirmation of maintenance
work, 124
Coolant
Checking level, 71
Fore-and-aft tilt indicator, 11
Topping up, 72
12131zIndex
Page 134 of 138
Coolant temperature
Warning, 22
D
Damping
Adjusting, 11, 13
Dimensions, 119
Display, 28
Overview, 20
Selecting readings, 17, 28
E
Electrics
Technical data, 117
Emergency off switch (kill
switch), 16, 32
Engine
Starting, 16, 46
Technical data, 110
Engine oil
Checking level, 65
Filler neck, 14
Oil dipstick, 14
Technical data, 111
Topping up, 67Engine oil pressure
Warning, 22
Equipment, 7
F
Frame
Technical data, 118
Front-wheel stand, 82
Fuel
Filler neck, 13
Refuelling, 52
Technical data, 4, 111
Warning, 22
Fuses, 14, 84
ABS, 85
G
General views
Display, 20
Headlight, 18
Instrument cluster, 17
Left handlebar fitting, 15
Left side, 11
Right handlebar fitting, 16
Right side, 13
Status indicators, 20Telltale lights, 20
Underneath the seat, 14
Warnings, 20
H
Handlebar fitting, left
Overview, 15
Handlebar fitting, right
Overview, 16
Headlight
Beam throw, 41
Driving on right/driving on
left, 41
General views, 18
Replacing low-beam headlight
bulb, 86
Replacing side-light bulb, 89
Headlight flasher, 15, 31
High-beam headlight, 18
Switch, 15
Telltale light, 20
Horn, 15
I
Idle
Telltale light, 20
12132zIndex
Page 135 of 138
Ignition
Switching on and off, 28
Ignition switch, 27
Instrument cluster
Overview, 17
J
Jump starting, 95
K
Keys, 28
L
Laying up, 106
Lights
High-beam headlight, 31
Low-beam headlight, 31
Side light, 31
Low-beam headlight, 18
Luggage
Correct loading, 61
M
Maintenance, 123
Notes, 64Mirrors
Adjusting, 33
Motorcycle
Care, 103
Laying up, 106
Overview, 11, 13
Parking, 51
Restoring to use, 106
Multifunction display
See display, 17
N
Number-plate carrier
Removing and installing, 100
O
Odometer and tripmeters, 20
Resetting, 17, 29
Off-roading
Notes, 49
P
Pneumatic pump, 34
Removing and installing, 34
Power socket, 11, 60
Pre-ride check, 47R
Rear-wheel drive
Technical data, 113
Refuelling, 52
Restoring to use, 106
Rider's Manual
Stowage, 14
Running gear
Technical data, 113
Running in, 48
S
Safety instructions, 44
Seat
Lock, 13
Removing and installing, 41
Service, 122
Service Card, 122
Side light, 18
Spark plugs
Technical data, 117
Speedometer, 20
Standards, 7
Starter, 16
Starting, 46
12133zIndex