CHERY TIGGO 2009 Service Repair Manual
Manufacturer: CHERY, Model Year: 2009, Model line: TIGGO, Model: CHERY TIGGO 2009Pages: 1903, PDF Size: 33.38 MB
Page 151 of 1903
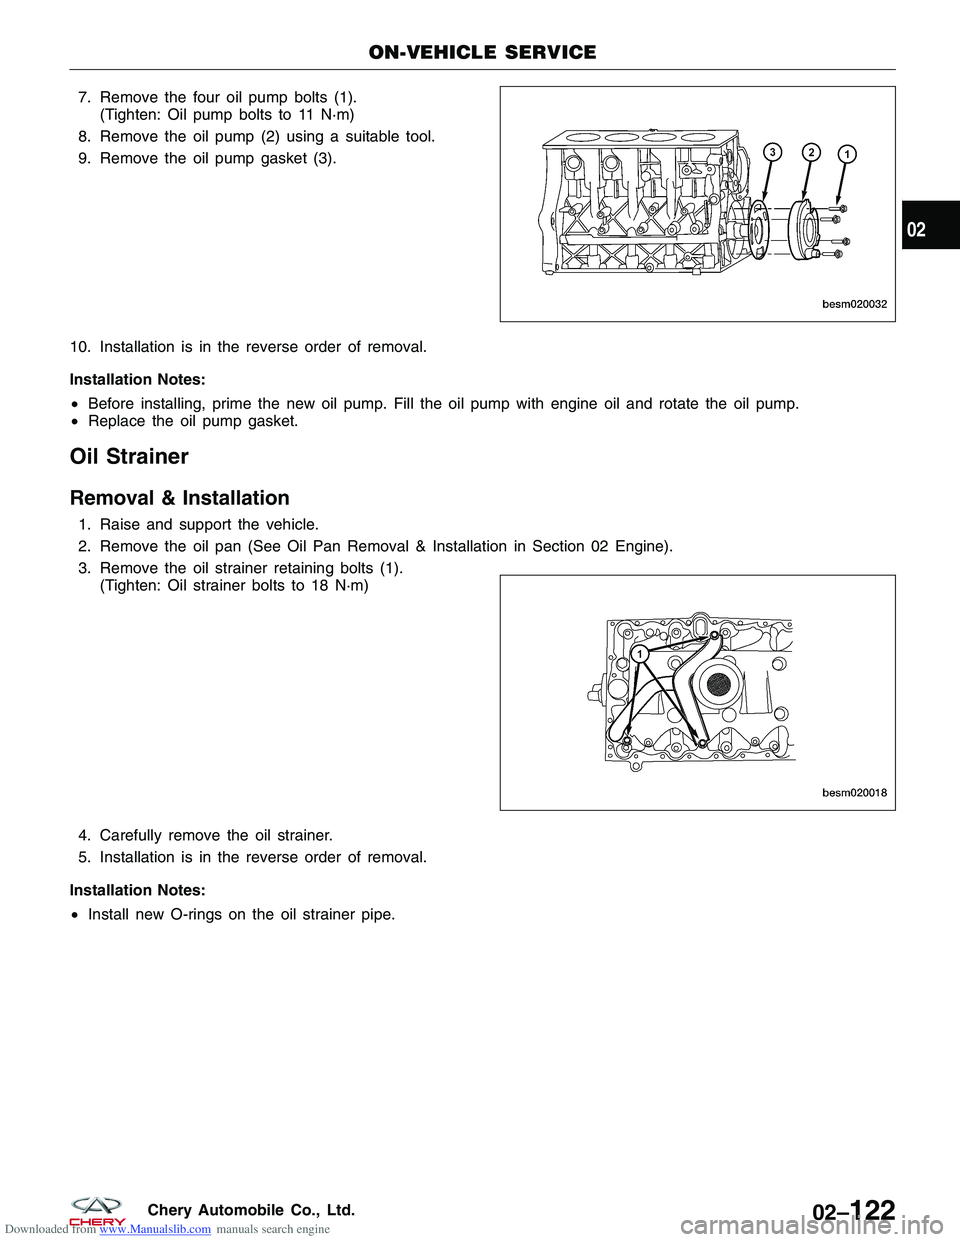
Downloaded from www.Manualslib.com manuals search engine 7. Remove the four oil pump bolts (1).(Tighten: Oil pump bolts to 11 N·m)
8. Remove the oil pump (2) using a suitable tool.
9. Remove the oil pump gasket (3).
10. Installation is in the reverse order of removal.
Installation Notes:
• Before installing, prime the new oil pump. Fill the oil pump with engine oil and rotate the oil pump.
• Replace the oil pump gasket.
Oil Strainer
Removal & Installation
1. Raise and support the vehicle.
2. Remove the oil pan (See Oil Pan Removal & Installation in Section 02 Engine).
3. Remove the oil strainer retaining bolts (1).
(Tighten: Oil strainer bolts to 18 N·m)
4. Carefully remove the oil strainer.
5. Installation is in the reverse order of removal.
Installation Notes:
• Install new O-rings on the oil strainer pipe.
ON-VEHICLE SERVICE
BESM020032
BESM020018
02
02–122Chery Automobile Co., Ltd.
Page 152 of 1903
Downloaded from www.Manualslib.com manuals search engine ENGINE UNIT REPAIR
Engine Block
Specifications
Torque Specifications
DESCRIPTIONTORQUE (N·m)
Connecting Rod Cap Bolts 1st Step: Tighten the bolt to 25 N·m
2nd Step: Tighten the bolt an additional 90°
Main Bearing Cap Bolts 1st Step: Tighten the bolt to 45 N·m
2nd Step: Tighten the bolt an additional 180°
Lower Cylinder Block Bolts 23
Clearance Specifications
DESCRIPTIONSPECIFICATION (mm)
Surface Distortion Limit 0.15
Inner Diameter Standard 84
Out-Of-Round < 0.008
Taper < 0.01
Disassembly
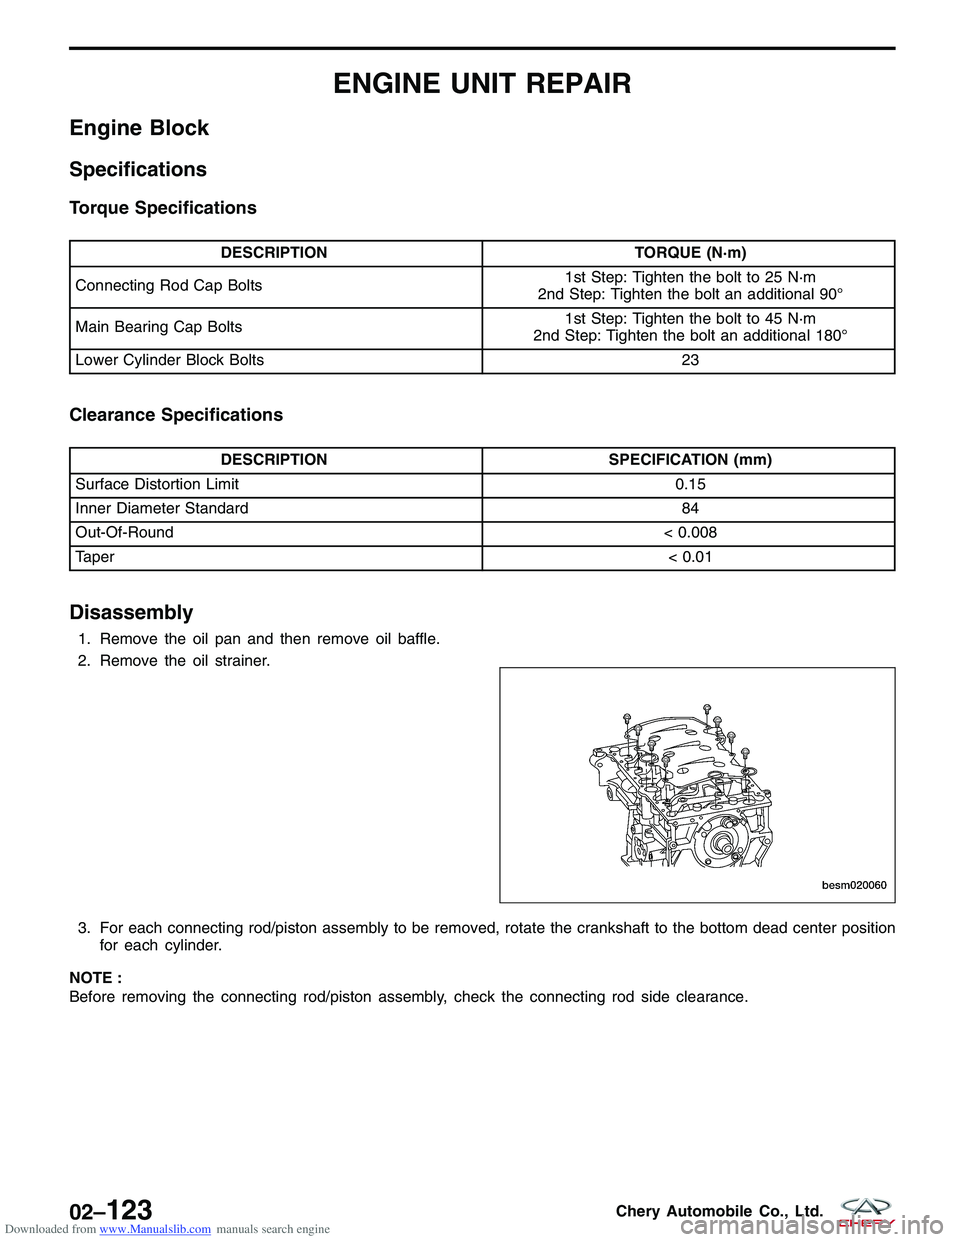
1. Remove the oil pan and then remove oil baffle.
2. Remove the oil strainer.
3. For each connecting rod/piston assembly to be removed, rotate the crankshaft to the bottom dead center position
for each cylinder.
NOTE :
Before removing the connecting rod/piston assembly, check the connecting rod side clearance.
BESM020060
02–123Chery Automobile Co., Ltd.
Page 153 of 1903
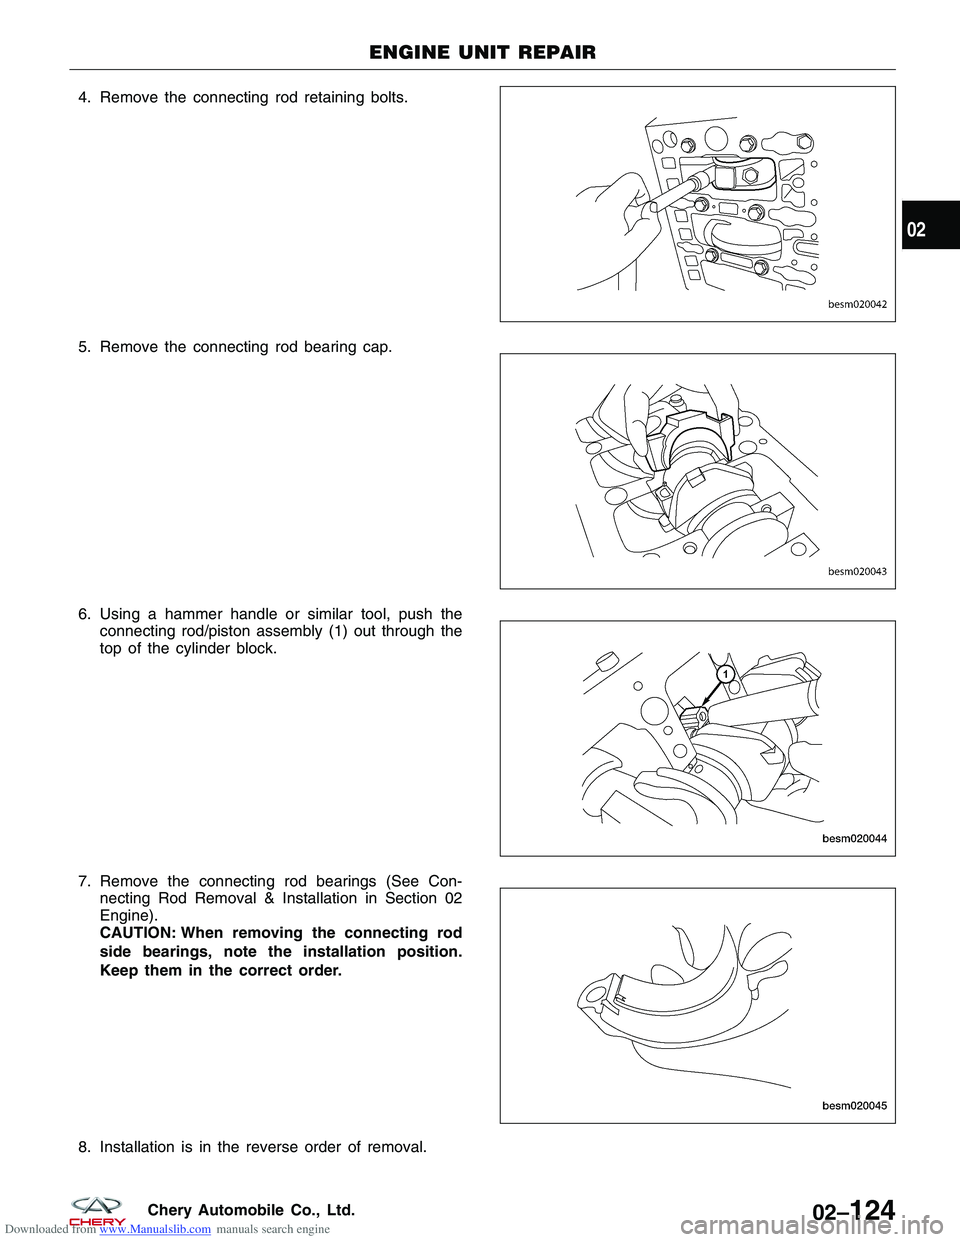
Downloaded from www.Manualslib.com manuals search engine 4. Remove the connecting rod retaining bolts.
5. Remove the connecting rod bearing cap.
6. Using a hammer handle or similar tool, push theconnecting rod/piston assembly (1) out through the
top of the cylinder block.
7. Remove the connecting rod bearings (See Con- necting Rod Removal & Installation in Section 02
Engine).
CAUTION: When removing the connecting rod
side bearings, note the installation position.
Keep them in the correct order.
8. Installation is in the reverse order of removal.
ENGINE UNIT REPAIR
BESM020042
BESM020043
BESM020044
BESM020045
02
02–124Chery Automobile Co., Ltd.
Page 154 of 1903
Downloaded from www.Manualslib.com manuals search engine Inspection
NOTE :
All measurements should be taken with the engine block at room temperature, 21°C.
Engine Block
•Clean cylinder block thoroughly and check all core hole plugs for evidence of leaking.
• Examine block and cylinder bores for cracks or fractures.
• Check block deck surfaces for flatness. Deck surface must be within service limit of 0.050 mm.
Cylinder Bore
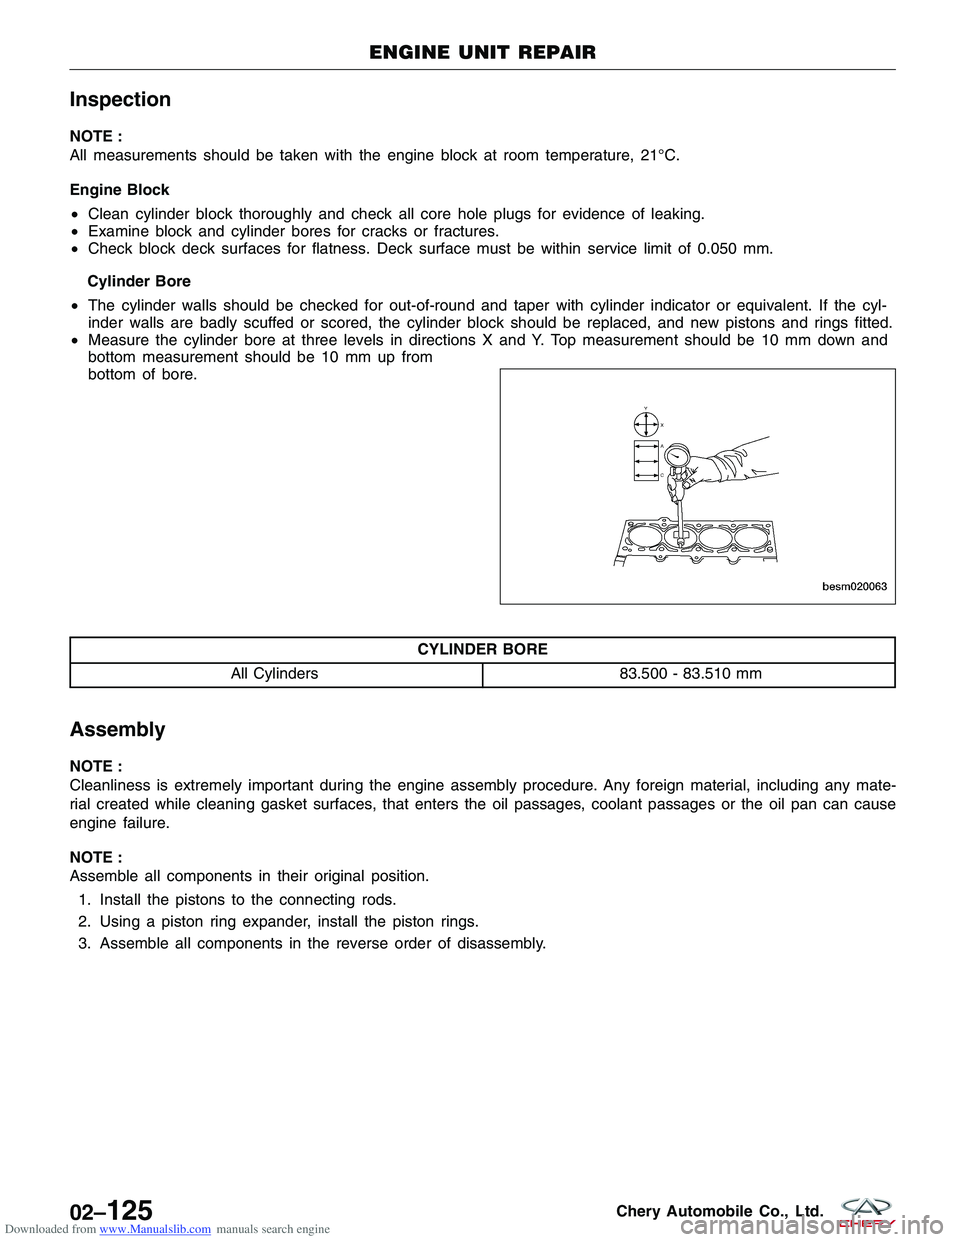
• The cylinder walls should be checked for out-of-round and taper with cylinder indicator or equivalent. If the cyl-
inder walls are badly scuffed or scored, the cylinder block should be replaced, and new pistons and rings fitted.
• Measure the cylinder bore at three levels in directions X and Y. Top measurement should be 10 mm down and
bottom measurement should be 10 mm up from
bottom of bore.
CYLINDER BORE
All Cylinders 83.500 - 83.510 mm
Assembly
NOTE :
Cleanliness is extremely important during the engine assembly procedure. Any foreign material, including any mate-
rial created while cleaning gasket surfaces, that enters the oil passages, coolant passages or the oil pan can cause
engine failure.
NOTE :
Assemble all components in their original position.
1. Install the pistons to the connecting rods.
2. Using a piston ring expander, install the piston rings.
3. Assemble all components in the reverse order of disassembly.
ENGINE UNIT REPAIR
BESM020063
02–125Chery Automobile Co., Ltd.
Page 155 of 1903
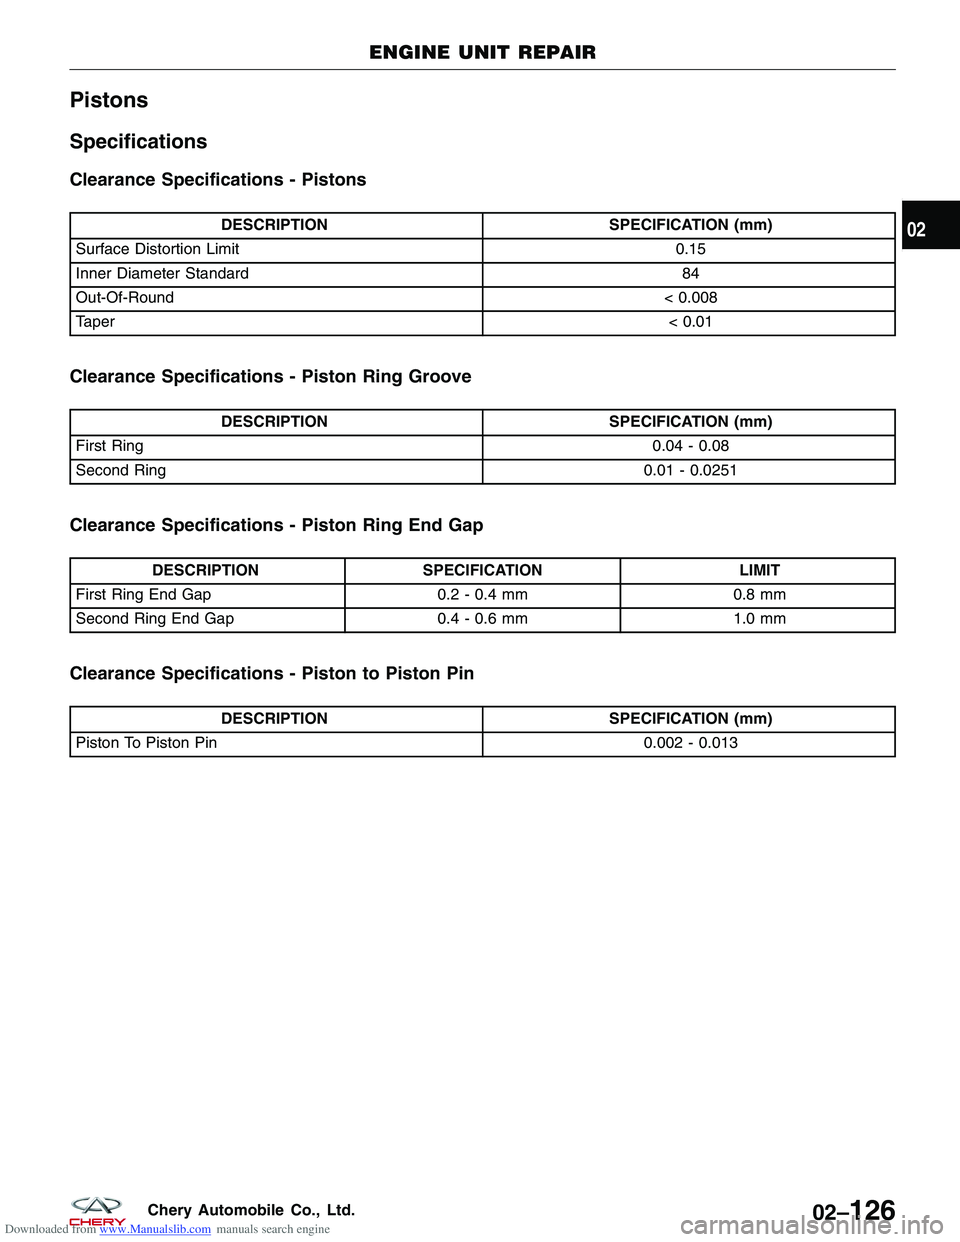
Downloaded from www.Manualslib.com manuals search engine Pistons
Specifications
Clearance Specifications - Pistons
DESCRIPTIONSPECIFICATION (mm)
Surface Distortion Limit 0.15
Inner Diameter Standard 84
Out-Of-Round < 0.008
Taper < 0.01
Clearance Specifications - Piston Ring Groove
DESCRIPTIONSPECIFICATION (mm)
First Ring 0.04 - 0.08
Second Ring 0.01 - 0.0251
Clearance Specifications - Piston Ring End Gap
DESCRIPTIONSPECIFICATION LIMIT
First Ring End Gap 0.2 - 0.4 mm0.8 mm
Second Ring End Gap 0.4 - 0.6 mm1.0 mm
Clearance Specifications - Piston to Piston Pin
DESCRIPTION SPECIFICATION (mm)
Piston To Piston Pin 0.002 - 0.013
ENGINE UNIT REPAIR
02
02–126Chery Automobile Co., Ltd.
Page 156 of 1903
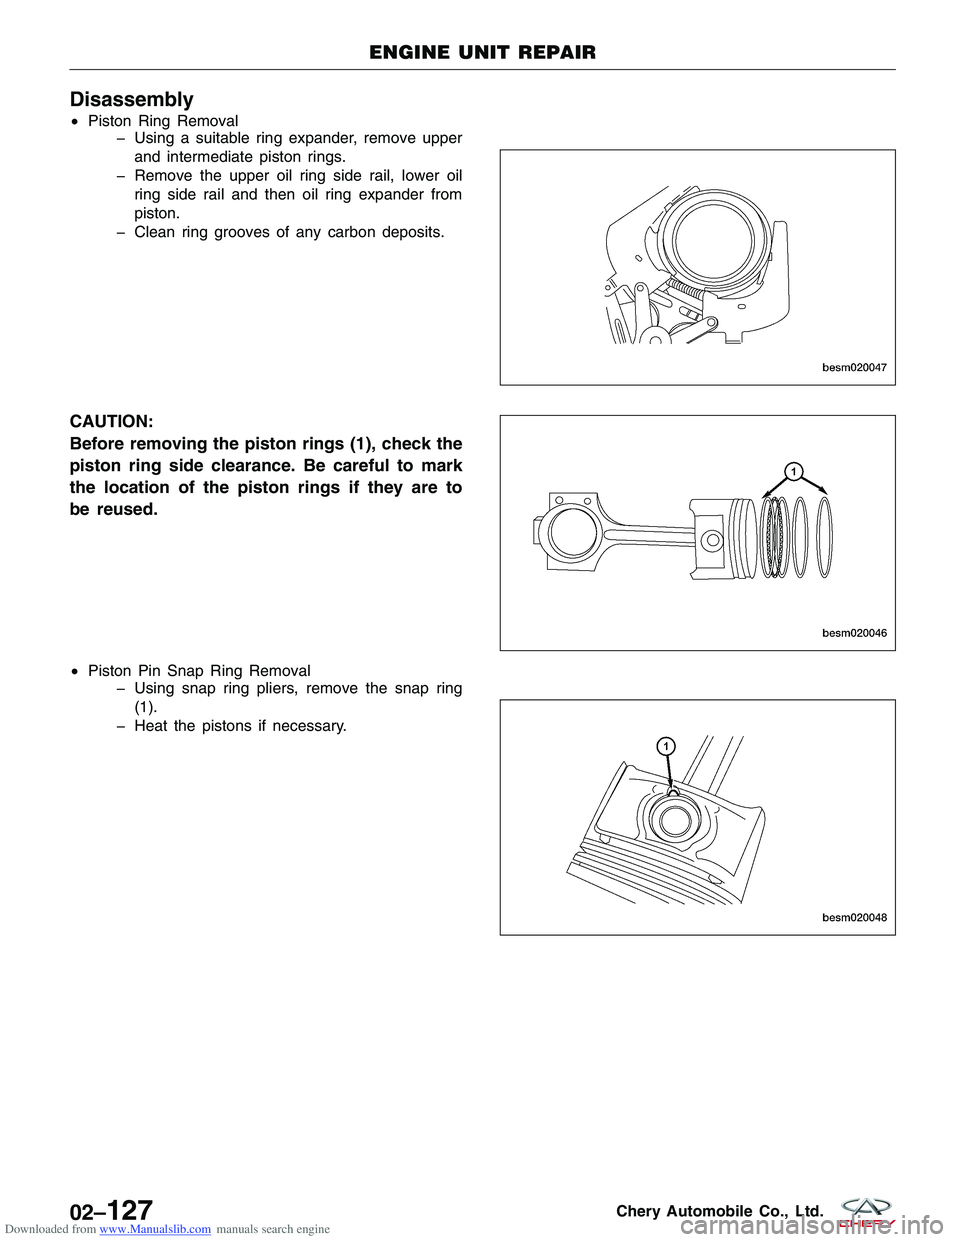
Downloaded from www.Manualslib.com manuals search engine Disassembly
•Piston Ring Removal
� Using a suitable ring expander, remove upper
and intermediate piston rings.
� Remove the upper oil ring side rail, lower oil ring side rail and then oil ring expander from
piston.
� Clean ring grooves of any carbon deposits.
CAUTION:
Before removing the piston rings (1), check the
piston ring side clearance. Be careful to mark
the location of the piston rings if they are to
be reused.
• Piston Pin Snap Ring Removal
� Using snap ring pliers, remove the snap ring
(1).
� Heat the pistons if necessary.
ENGINE UNIT REPAIR
BESM020047
BESM020046
BESM020048
02–127Chery Automobile Co., Ltd.
Page 157 of 1903
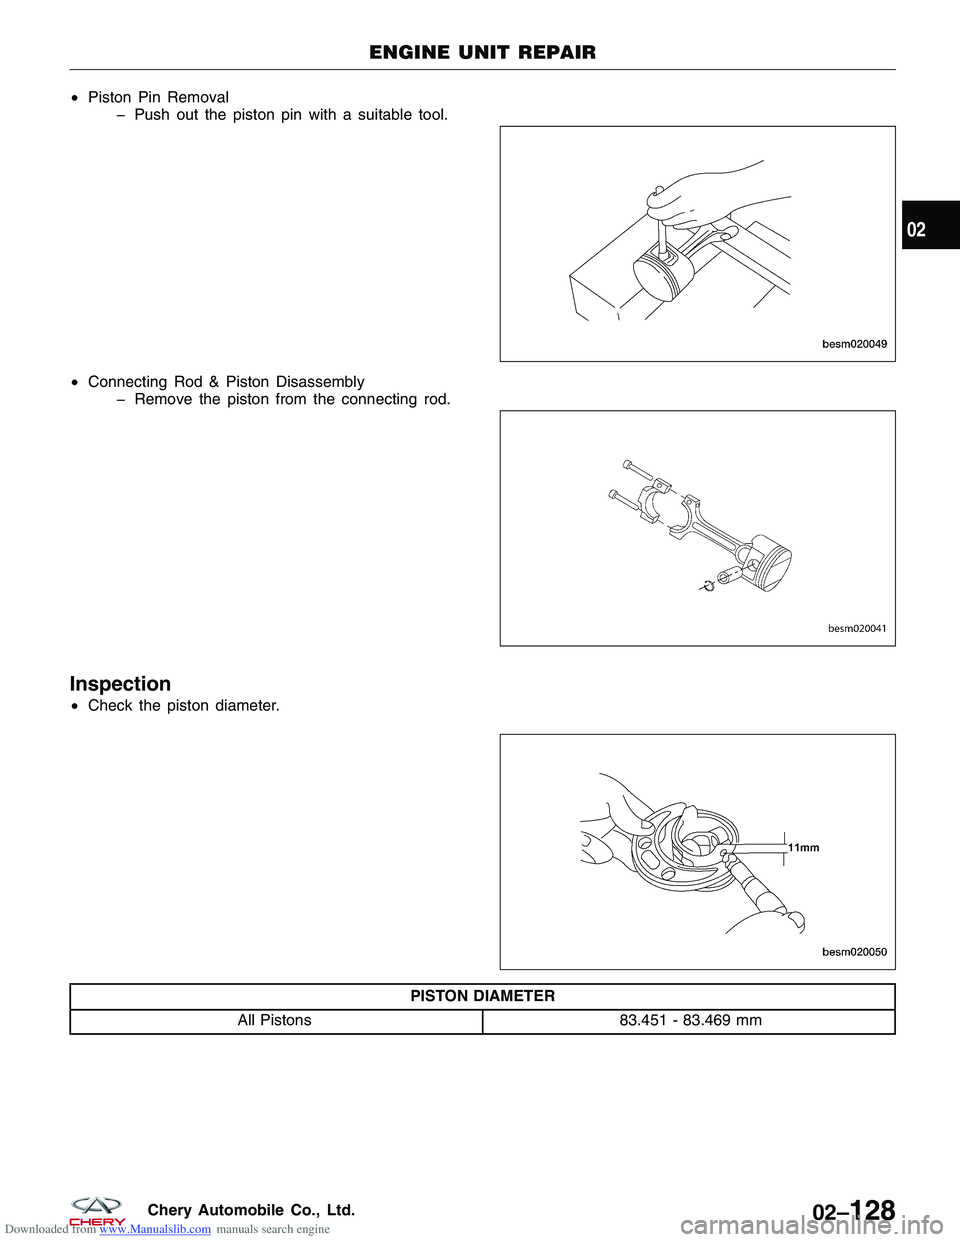
Downloaded from www.Manualslib.com manuals search engine •Piston Pin Removal
� Push out the piston pin with a suitable tool.
• Connecting Rod & Piston Disassembly
� Remove the piston from the connecting rod.
Inspection
•Check the piston diameter.
PISTON DIAMETER
All Pistons 83.451 - 83.469 mm
ENGINE UNIT REPAIR
BESM020049
BESM020041
BESM020050
02
02–128Chery Automobile Co., Ltd.
Page 158 of 1903
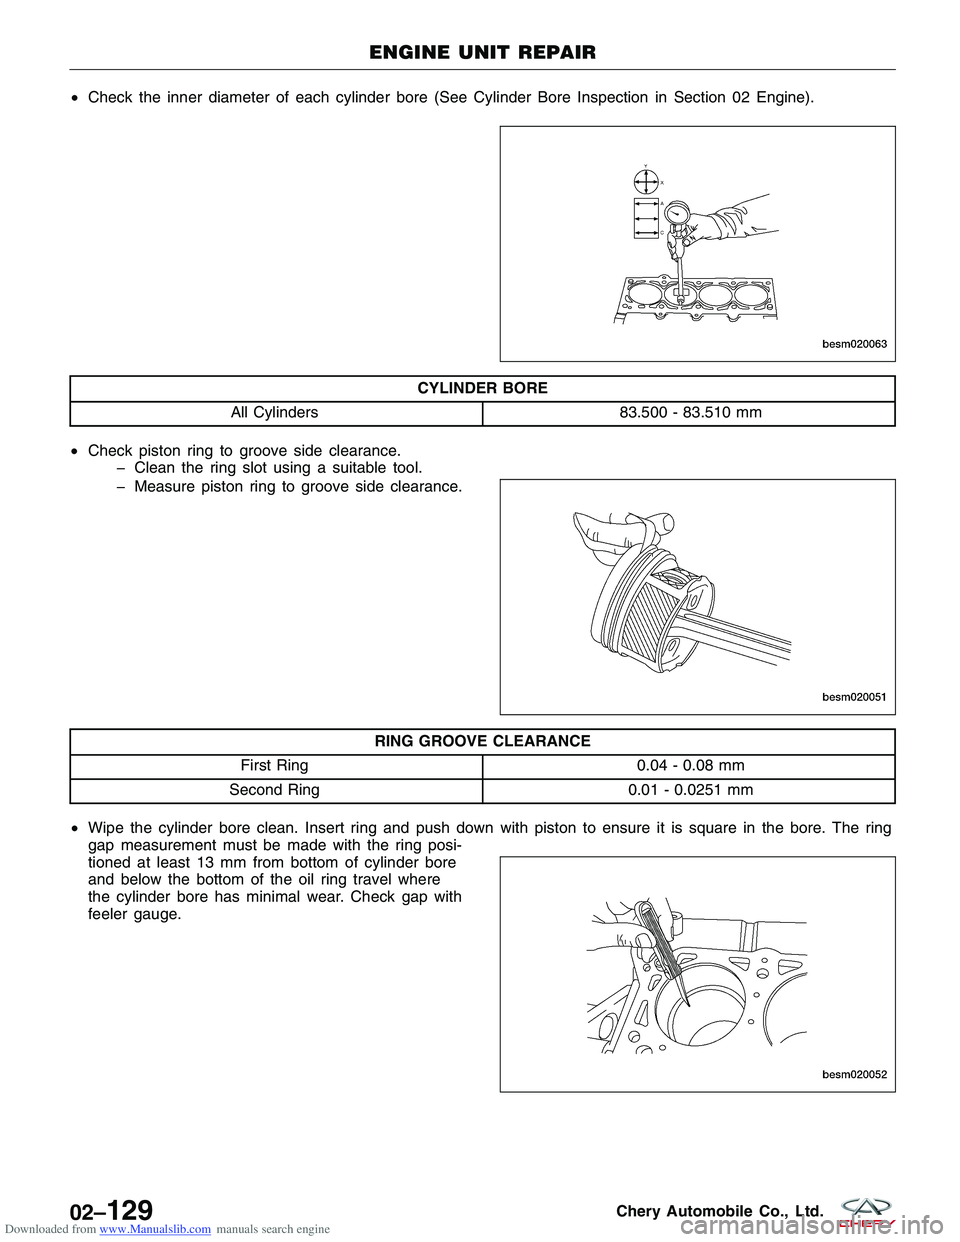
Downloaded from www.Manualslib.com manuals search engine •Check the inner diameter of each cylinder bore (See Cylinder Bore Inspection in Section 02 Engine).
CYLINDER BORE
All Cylinders 83.500 - 83.510 mm
• Check piston ring to groove side clearance.
� Clean the ring slot using a suitable tool.
� Measure piston ring to groove side clearance.
RING GROOVE CLEARANCE
First Ring 0.04 - 0.08 mm
Second Ring 0.01 - 0.0251 mm
• Wipe the cylinder bore clean. Insert ring and push down with piston to ensure it is square in the bore. The ring
gap measurement must be made with the ring posi-
tioned at least 13 mm from bottom of cylinder bore
and below the bottom of the oil ring travel where
the cylinder bore has minimal wear. Check gap with
feeler gauge.
ENGINE UNIT REPAIR
BESM020063
BESM020051
BESM020052
02–129Chery Automobile Co., Ltd.
Page 159 of 1903
Downloaded from www.Manualslib.com manuals search engine RING END GAP CLEARANCE
First Ring 0.2 - 0.4 mm 0.8 mm
Second Ring 0.4 - 0.6 mm 1.0 mm
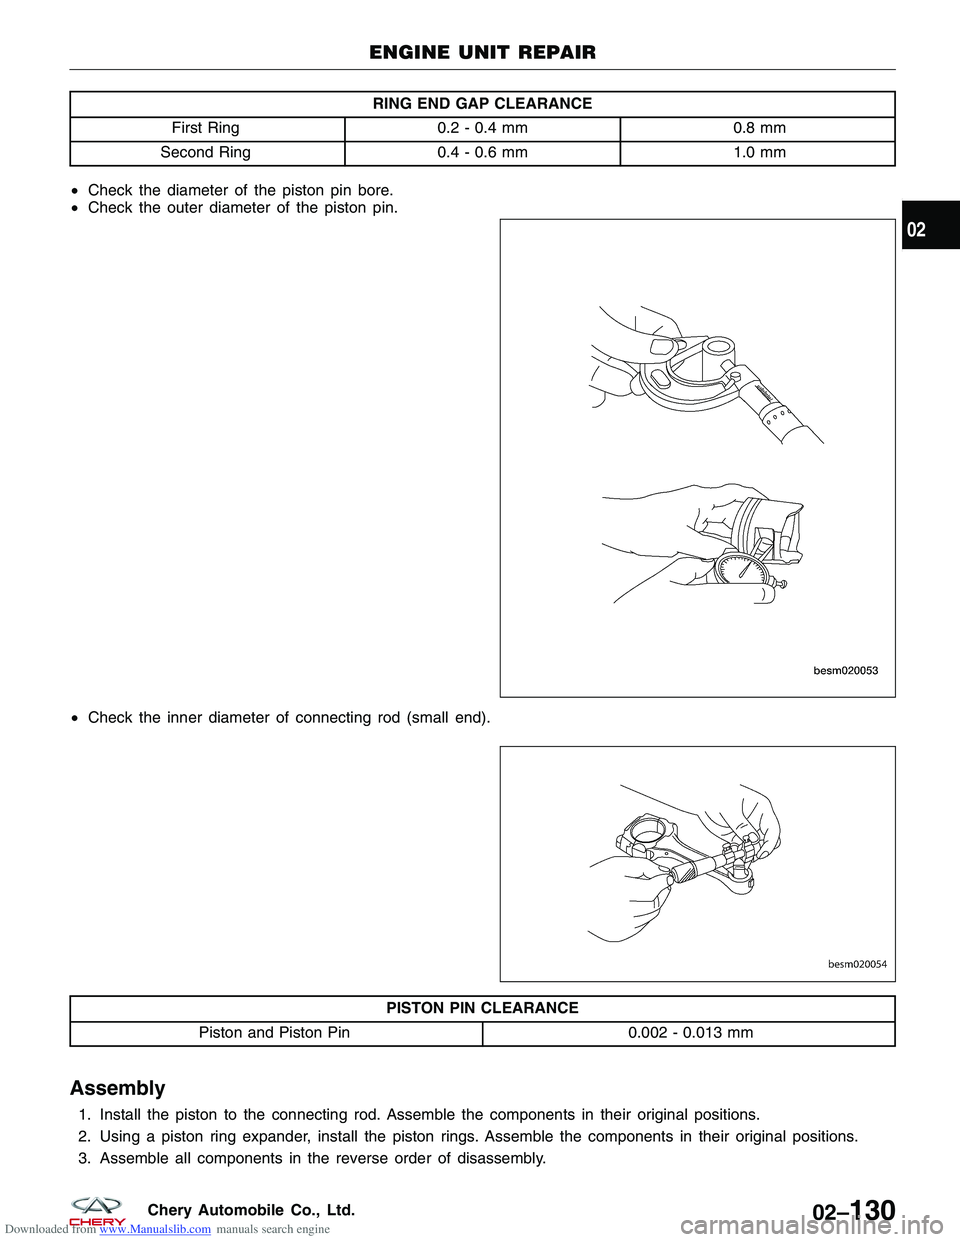
• Check the diameter of the piston pin bore.
• Check the outer diameter of the piston pin.
• Check the inner diameter of connecting rod (small end).
PISTON PIN CLEARANCE
Piston and Piston Pin 0.002 - 0.013 mm
Assembly
1. Install the piston to the connecting rod. Assemble the components in their original positions.
2. Using a piston ring expander, install the piston rings. Assemble the components in their original positions.
3. Assemble all components in the reverse order of disassembly.
ENGINE UNIT REPAIR
BESM020053
BESM020054
02
02–130Chery Automobile Co., Ltd.
Page 160 of 1903
Downloaded from www.Manualslib.com manuals search engine Connecting Rods
Specifications
Torque Specifications
DESCRIPTIONTORQUE (N·m)
Connecting Rod Bolts 1st Step: Tighten bolts to 25 N·m
2nd Step: Tighten the connecting rod bolts an additional 90°
Clearance Specifications
DESCRIPTION SPECIFICATION (mm)
Connecting Rod Radial Clearance 0.016 - 0.051
Connecting Rod Axial Clearance 0.002 - 0.013
Disassembly
1. Remove the connecting rod cap bolts.
2. Remove the connecting rod bearing cap.
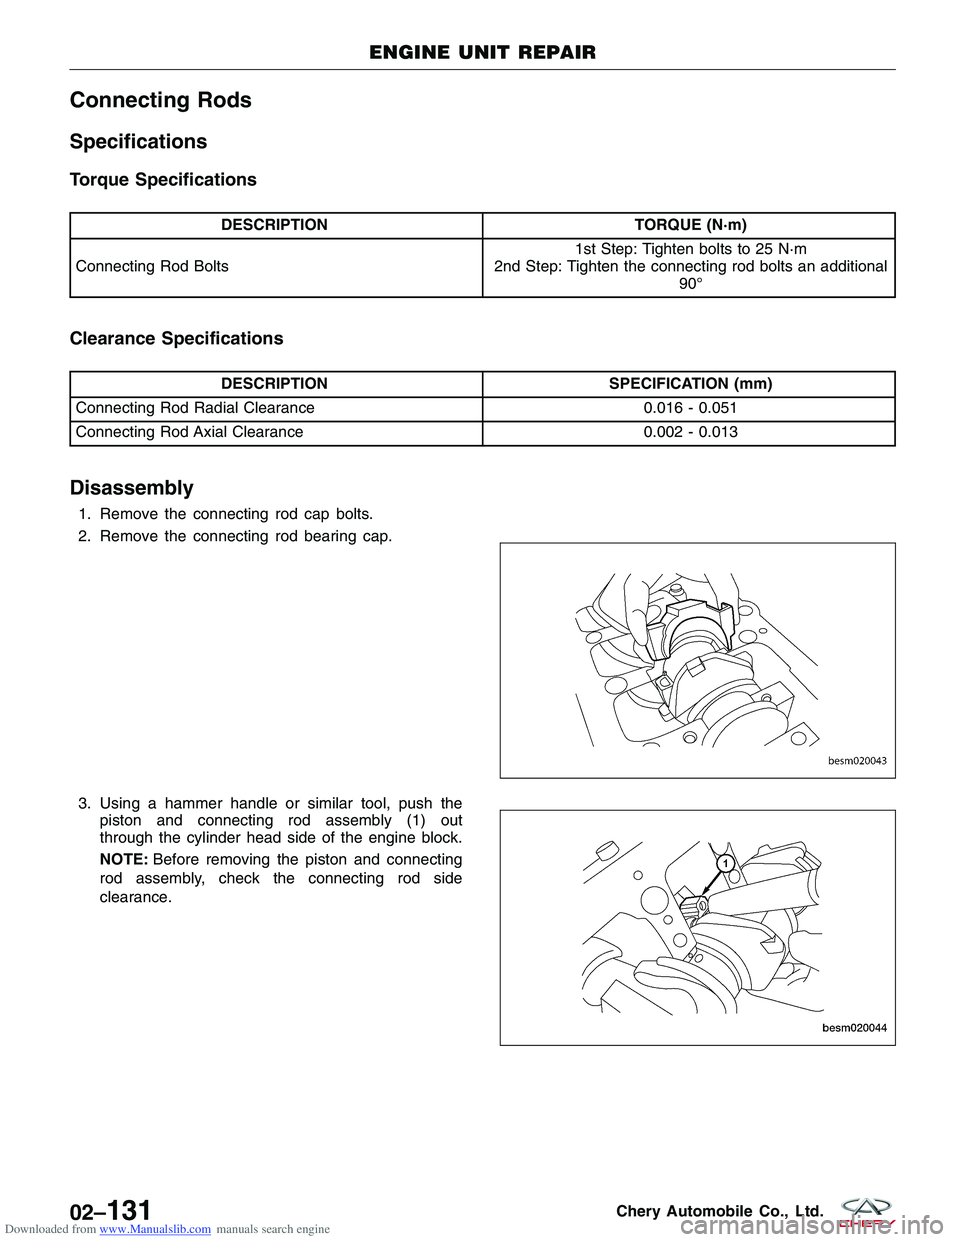
3. Using a hammer handle or similar tool, push the
piston and connecting rod assembly (1) out
through the cylinder head side of the engine block.
NOTE: Before removing the piston and connecting
rod assembly, check the connecting rod side
clearance.
ENGINE UNIT REPAIR
BESM020043
BESM020044
02–131Chery Automobile Co., Ltd.