CHERY TIGGO 2009 Service Manual PDF
Manufacturer: CHERY, Model Year: 2009, Model line: TIGGO, Model: CHERY TIGGO 2009Pages: 1903, PDF Size: 33.38 MB
Page 71 of 1903
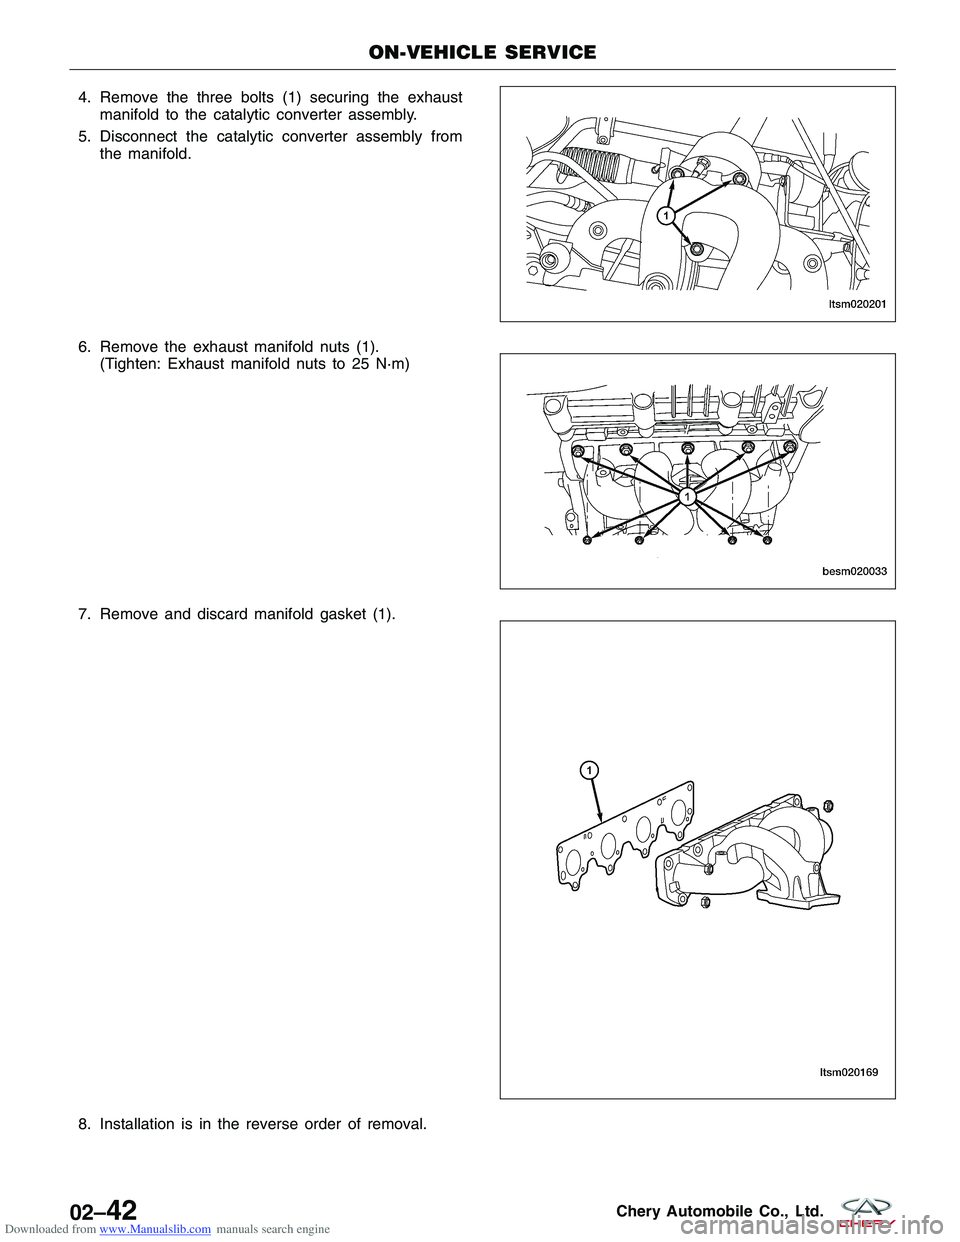
Downloaded from www.Manualslib.com manuals search engine 4. Remove the three bolts (1) securing the exhaustmanifold to the catalytic converter assembly.
5. Disconnect the catalytic converter assembly from the manifold.
6. Remove the exhaust manifold nuts (1). (Tighten: Exhaust manifold nuts to 25 N·m)
7. Remove and discard manifold gasket (1).
8. Installation is in the reverse order of removal.
ON-VEHICLE SERVICE
LTSM020201
BESM020033
LTSM020169
02–42Chery Automobile Co., Ltd.
Page 72 of 1903
Downloaded from www.Manualslib.com manuals search engine Installation Notes:
•Clean all surfaces of manifold and cylinder head.
• Install a new exhaust manifold gasket during installation.
Intake Manifold
Removal & Installation
1. Disconnect the negative battery cable.
2. Remove the engine cover.
3. Drain the cooling system (See Cooling System Draining and Filling in Section 06 Cooling).
WARNING!
Always allow the engine to cool before opening the cooling system. Do not loosen the coolant pressure relief
cap when the engine is operating or the cooling system is hot. The cooling system is under pressure; steam and
hot liquid can come out forcefully when the cap is loosened slightly. Failure to follow these instructions may
result in serious personal injury.
4. Remove the coolant fan & radiator assembly (See Coolant Fan & Radiator Assembly Removal & Installation in
Section 06 Cooling).
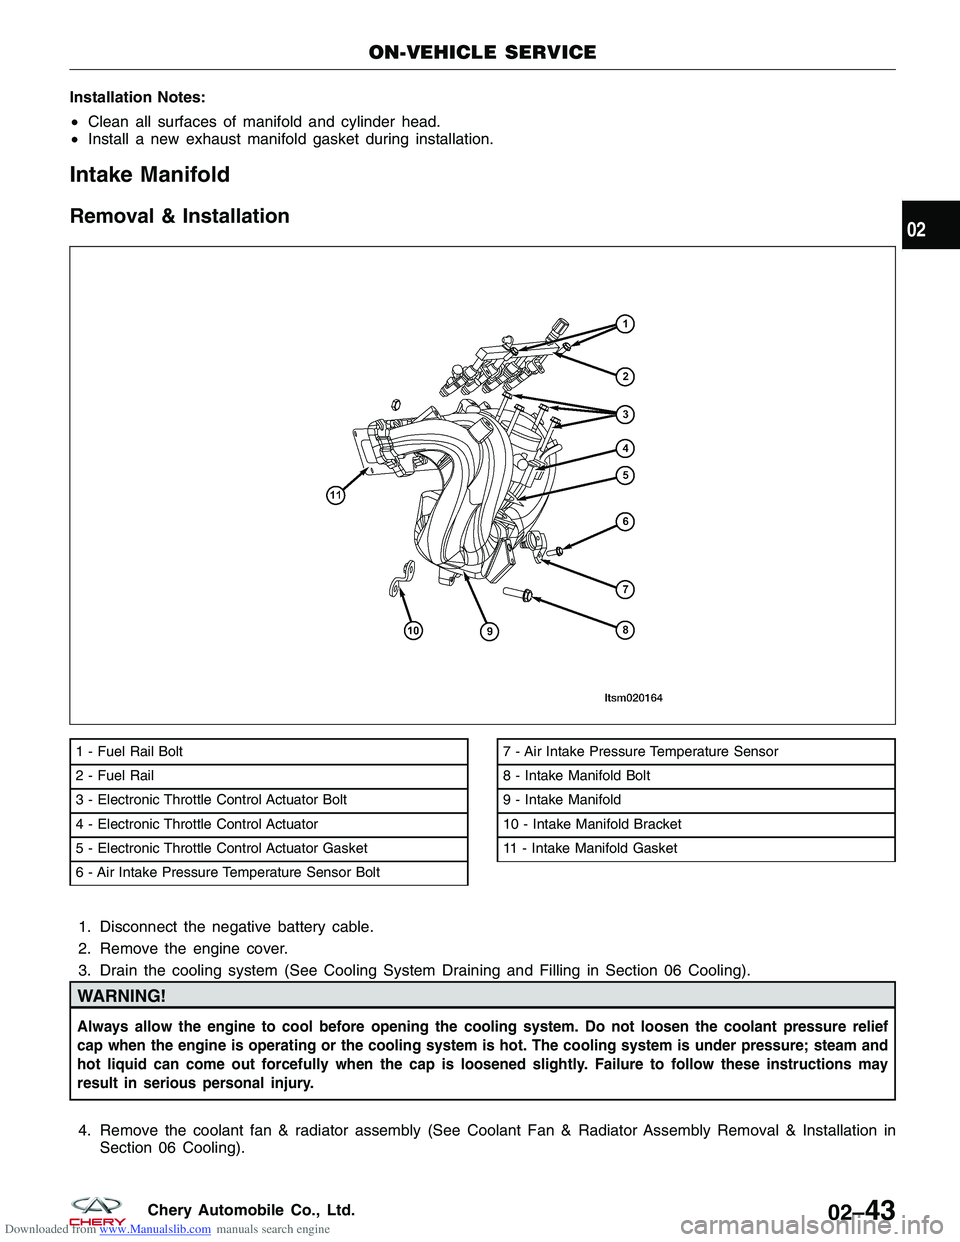
1 - Fuel Rail Bolt
2 - Fuel Rail
3 - Electronic Throttle Control Actuator Bolt
4 - Electronic Throttle Control Actuator
5 - Electronic Throttle Control Actuator Gasket
6 - Air Intake Pressure Temperature Sensor Bolt7 - Air Intake Pressure Temperature Sensor
8 - Intake Manifold Bolt
9 - Intake Manifold
10 - Intake Manifold Bracket
11 - Intake Manifold Gasket
ON-VEHICLE SERVICE
LTSM020164
02
02–43Chery Automobile Co., Ltd.
Page 73 of 1903
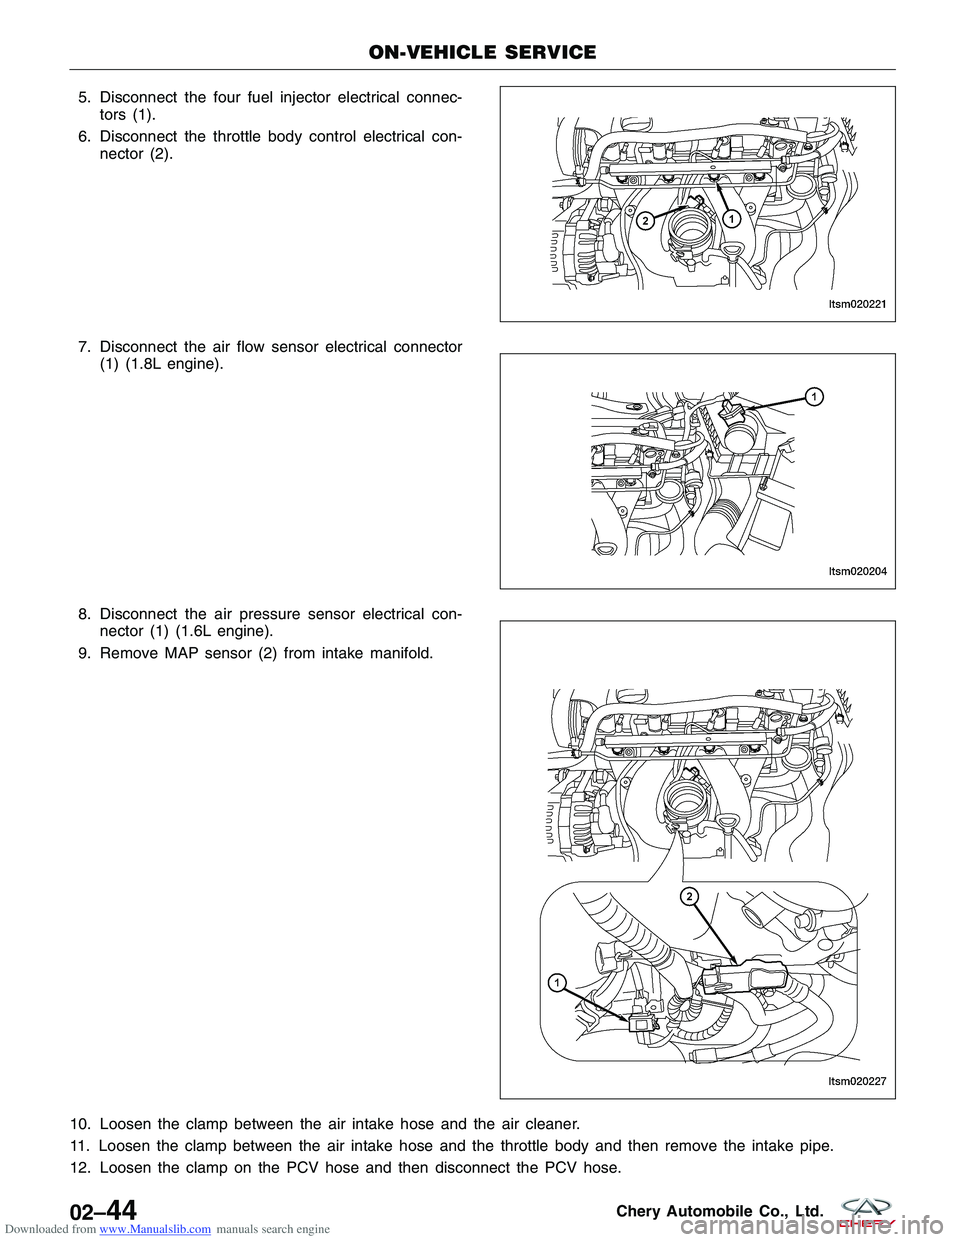
Downloaded from www.Manualslib.com manuals search engine 5. Disconnect the four fuel injector electrical connec-tors (1).
6. Disconnect the throttle body control electrical con- nector (2).
7. Disconnect the air flow sensor electrical connector (1) (1.8L engine).
8. Disconnect the air pressure sensor electrical con- nector (1) (1.6L engine).
9. Remove MAP sensor (2) from intake manifold.
10. Loosen the clamp between the air intake hose and the air cleaner.
11. Loosen the clamp between the air intake hose and the throttle body and then remove the intake pipe.
12. Loosen the clamp on the PCV hose and then disconnect the PCV hose.
ON-VEHICLE SERVICE
LTSM020221
LTSM020204
LTSM020227
02–44Chery Automobile Co., Ltd.
Page 74 of 1903
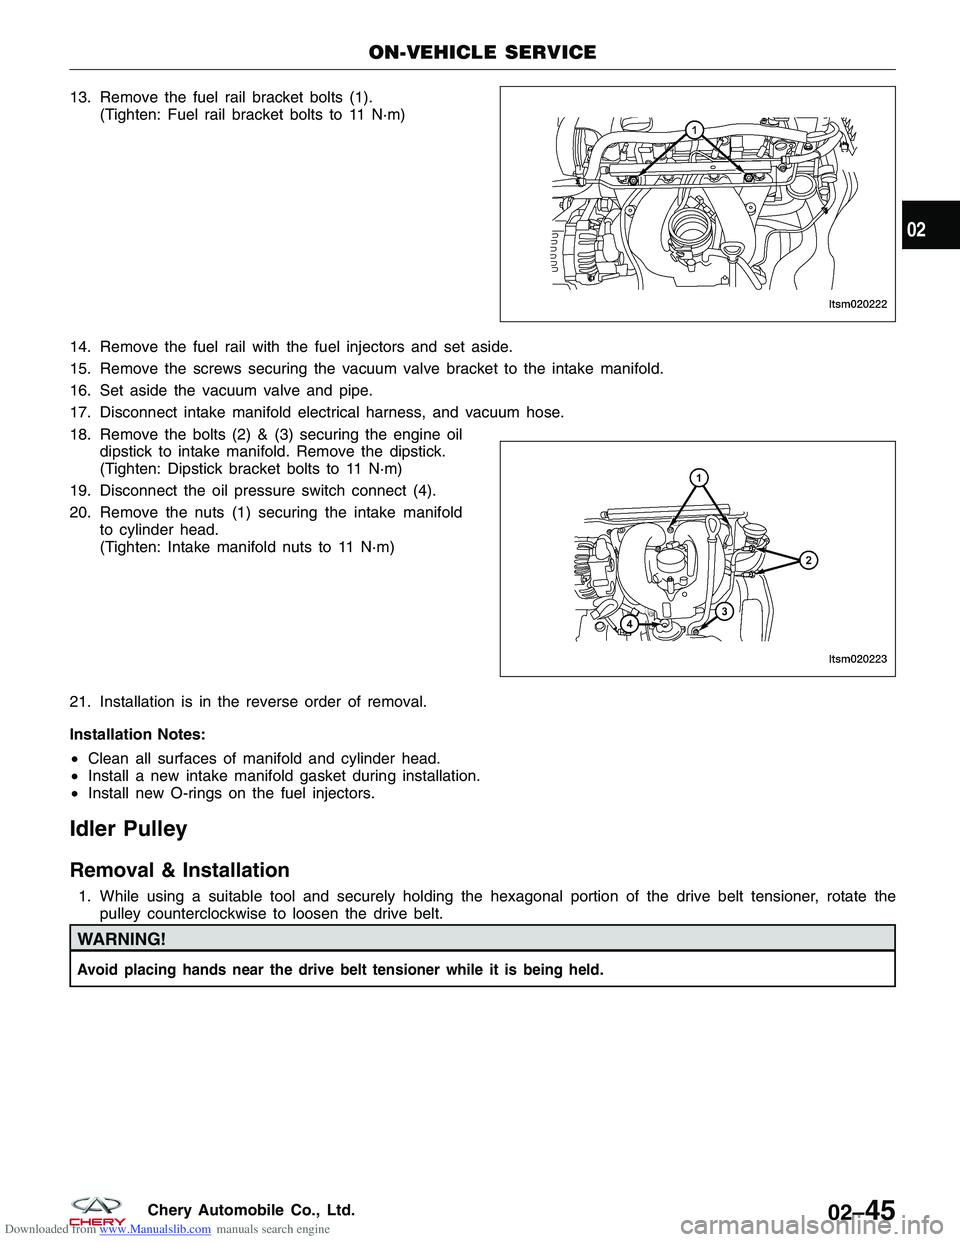
Downloaded from www.Manualslib.com manuals search engine 13. Remove the fuel rail bracket bolts (1).(Tighten: Fuel rail bracket bolts to 11 N·m)
14. Remove the fuel rail with the fuel injectors and set aside.
15. Remove the screws securing the vacuum valve bracket to the intake manifold.
16. Set aside the vacuum valve and pipe.
17. Disconnect intake manifold electrical harness, and vacuum hose.
18. Remove the bolts (2) & (3) securing the engine oil dipstick to intake manifold. Remove the dipstick.
(Tighten: Dipstick bracket bolts to 11 N·m)
19. Disconnect the oil pressure switch connect (4).
20. Remove the nuts (1) securing the intake manifold to cylinder head.
(Tighten: Intake manifold nuts to 11 N·m)
21. Installation is in the reverse order of removal.
Installation Notes:
• Clean all surfaces of manifold and cylinder head.
• Install a new intake manifold gasket during installation.
• Install new O-rings on the fuel injectors.
Idler Pulley
Removal & Installation
1. While using a suitable tool and securely holding the hexagonal portion of the drive belt tensioner, rotate the
pulley counterclockwise to loosen the drive belt.
WARNING!
Avoid placing hands near the drive belt tensioner while it is being held.
ON-VEHICLE SERVICE
LTSM020222
LTSM020223
02
02–45Chery Automobile Co., Ltd.
Page 75 of 1903
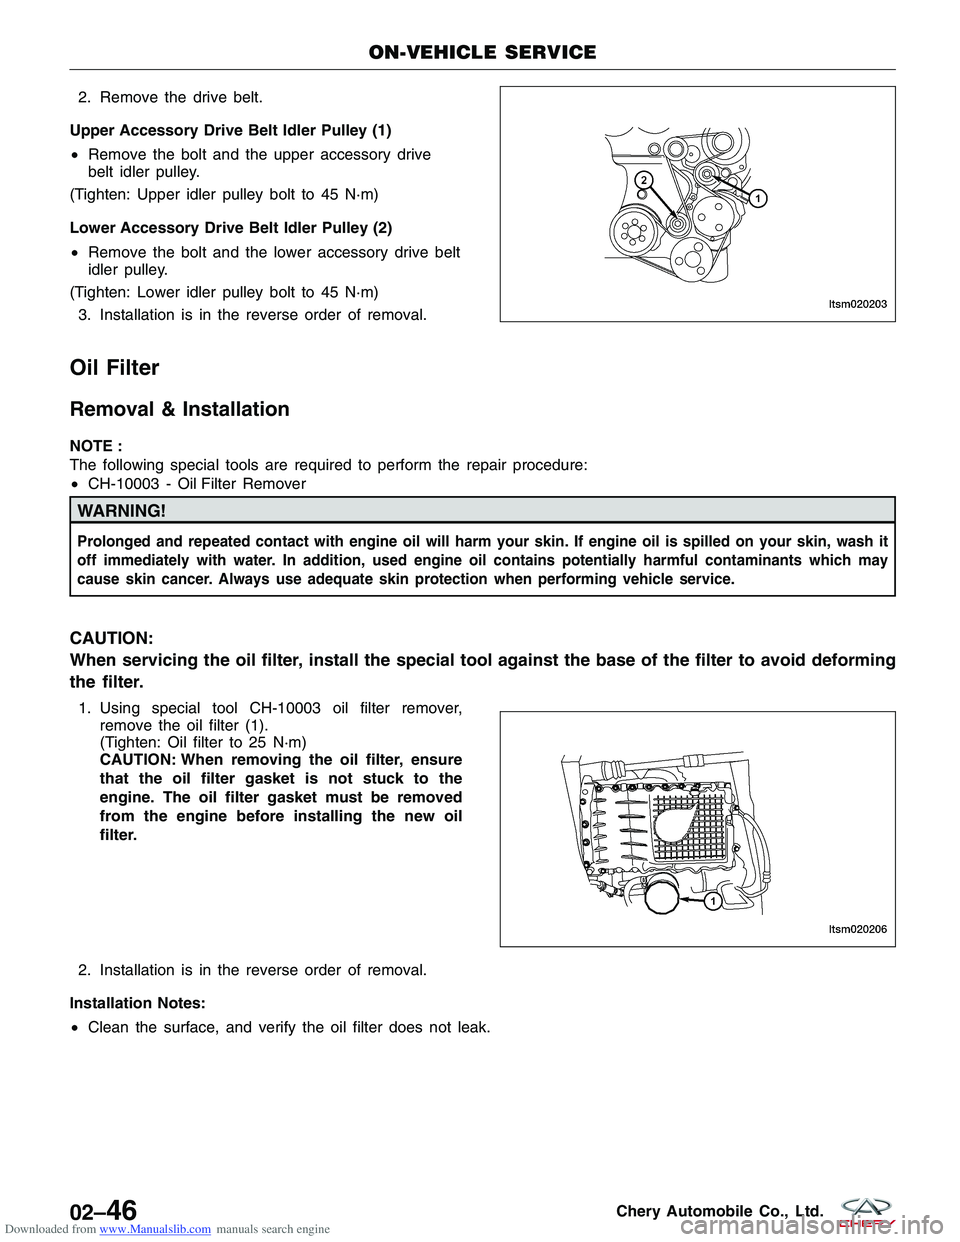
Downloaded from www.Manualslib.com manuals search engine 2. Remove the drive belt.
Upper Accessory Drive Belt Idler Pulley (1)
• Remove the bolt and the upper accessory drive
belt idler pulley.
(Tighten: Upper idler pulley bolt to 45 N·m)
Lower Accessory Drive Belt Idler Pulley (2)
• Remove the bolt and the lower accessory drive belt
idler pulley.
(Tighten: Lower idler pulley bolt to 45 N·m) 3. Installation is in the reverse order of removal.
Oil Filter
Removal & Installation
NOTE :
The following special tools are required to perform the repair procedure:
• CH-10003 - Oil Filter Remover
WARNING!
Prolonged and repeated contact with engine oil will harm your skin. If engine oil is spilled on your skin, wash it
off immediately with water. In addition, used engine oil contains potentially harmful contaminants which may
cause skin cancer. Always use adequate skin protection when performing vehicle service.
CAUTION:
When servicing the oil filter, install the special tool against the base of the filter to avoid deforming
the filter.
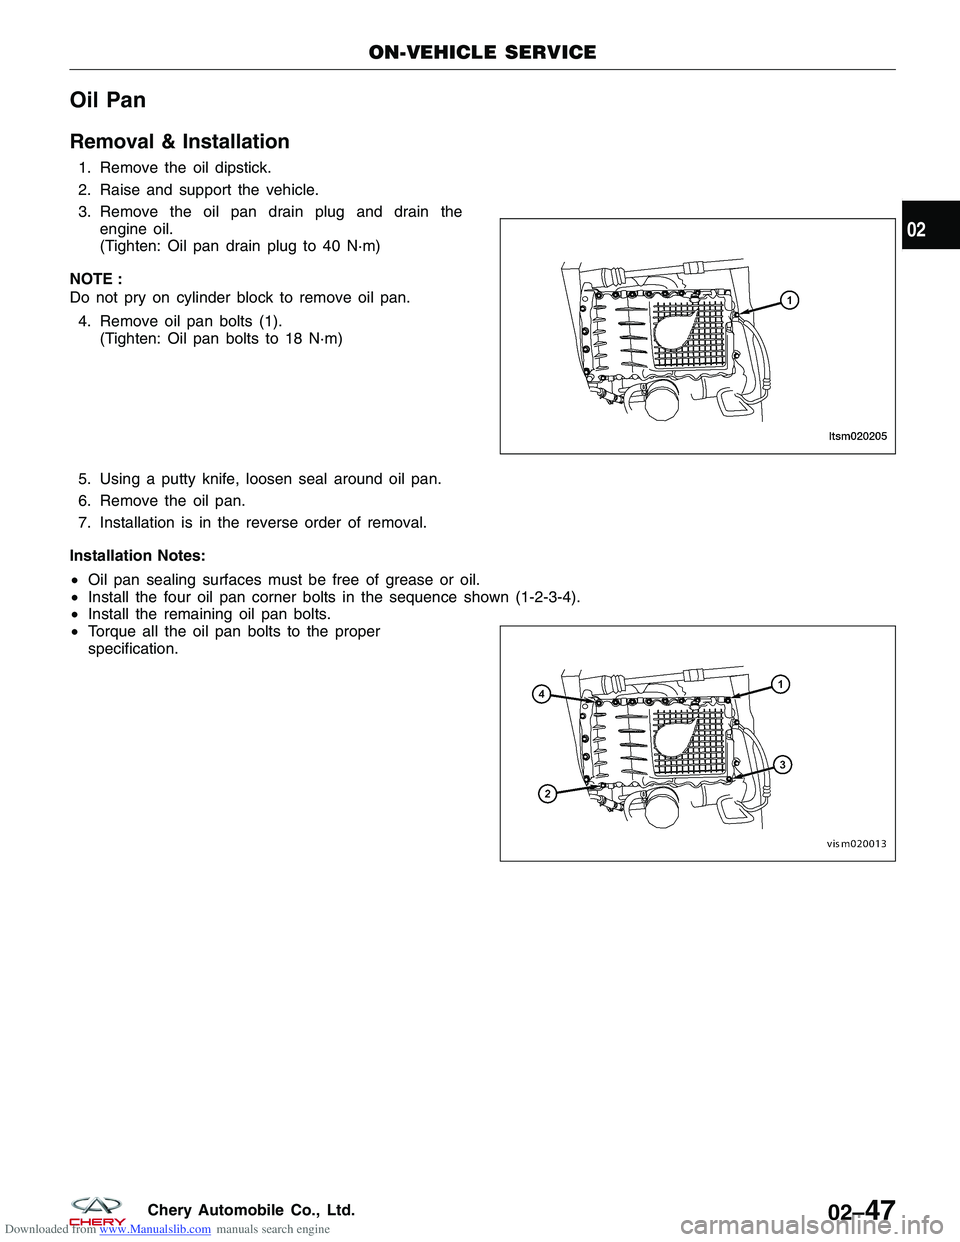
1. Using special tool CH-10003 oil filter remover,
remove the oil filter (1).
(Tighten: Oil filter to 25 N·m)
CAUTION: When removing the oil filter, ensure
that the oil filter gasket is not stuck to the
engine. The oil filter gasket must be removed
from the engine before installing the new oil
filter.
2. Installation is in the reverse order of removal.
Installation Notes:
• Clean the surface, and verify the oil filter does not leak.
ON-VEHICLE SERVICE
LTSM020203
LTSM020206
02–46Chery Automobile Co., Ltd.
Page 76 of 1903
Downloaded from www.Manualslib.com manuals search engine Oil Pan
Removal & Installation
1. Remove the oil dipstick.
2. Raise and support the vehicle.
3. Remove the oil pan drain plug and drain theengine oil.
(Tighten: Oil pan drain plug to 40 N·m)
NOTE :
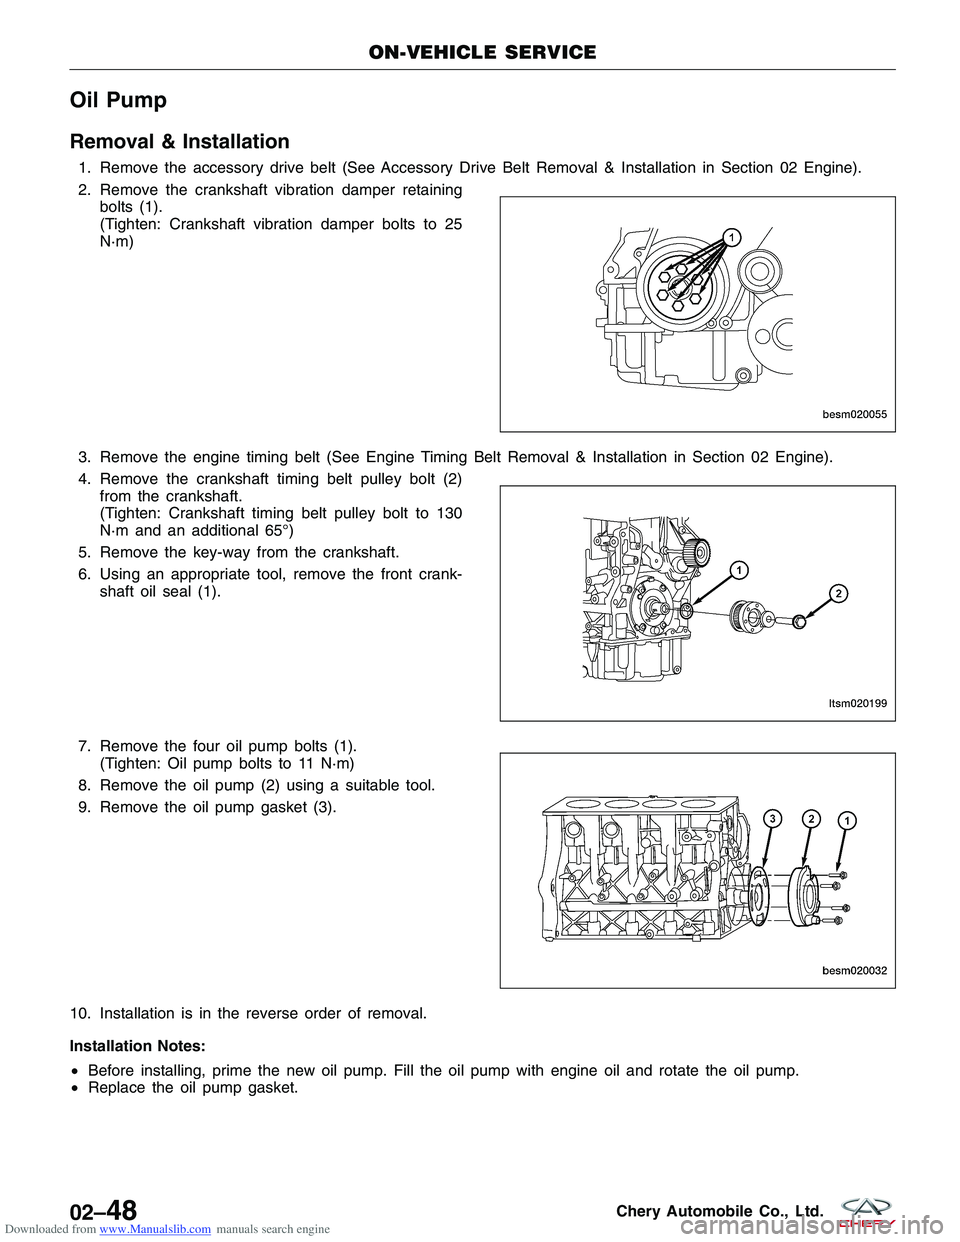
Do not pry on cylinder block to remove oil pan. 4. Remove oil pan bolts (1). (Tighten: Oil pan bolts to 18 N·m)
5. Using a putty knife, loosen seal around oil pan.
6. Remove the oil pan.
7. Installation is in the reverse order of removal.
Installation Notes:
• Oil pan sealing surfaces must be free of grease or oil.
• Install the four oil pan corner bolts in the sequence shown (1-2-3-4).
• Install the remaining oil pan bolts.
• Torque all the oil pan bolts to the proper
specification.
ON-VEHICLE SERVICE
LTSM020205
VISM020013
02
02–47Chery Automobile Co., Ltd.
Page 77 of 1903
Downloaded from www.Manualslib.com manuals search engine Oil Pump
Removal & Installation
1. Remove the accessory drive belt (See Accessory Drive Belt Removal & Installation in Section 02 Engine).
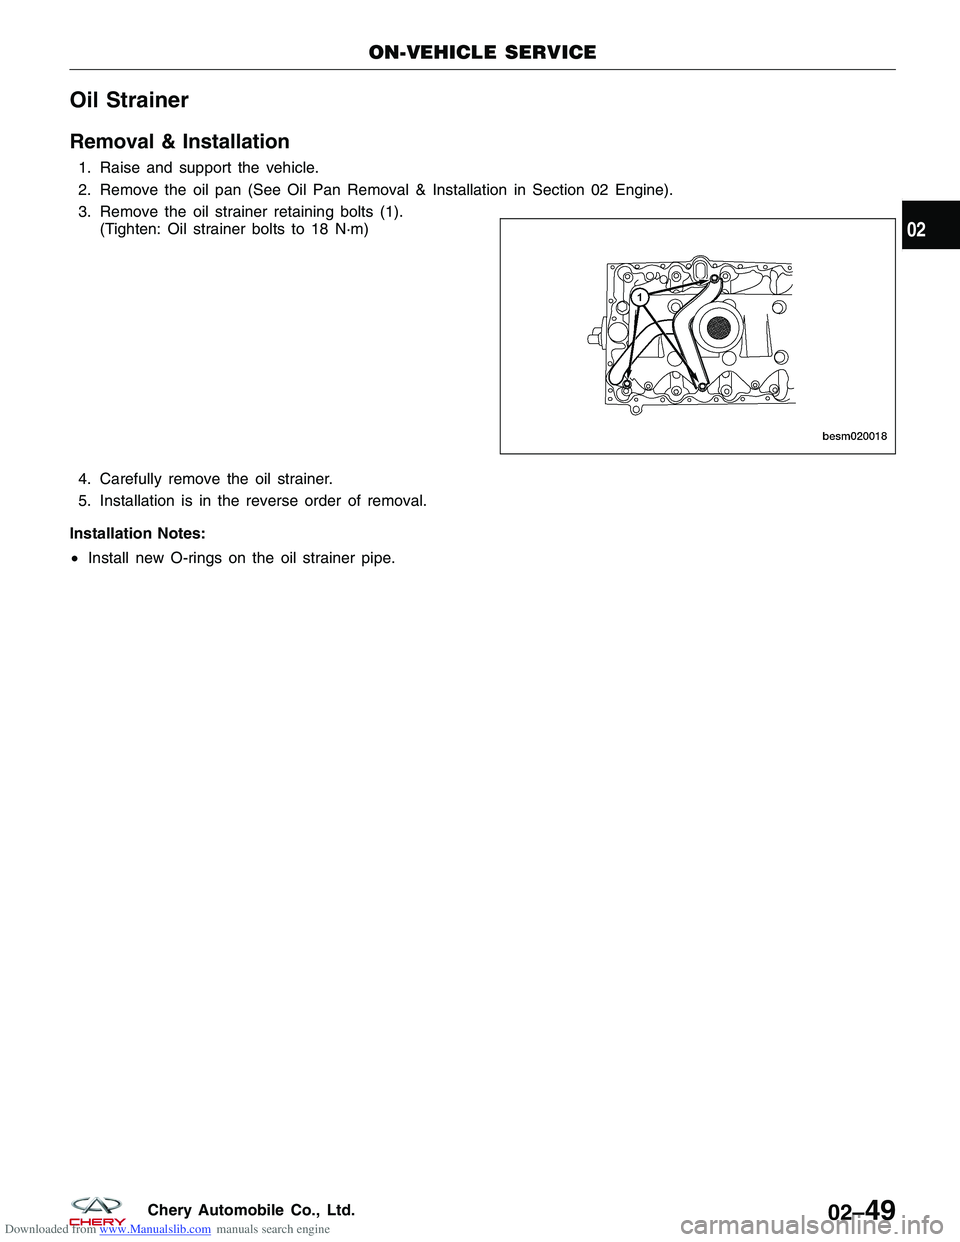
2. Remove the crankshaft vibration damper retainingbolts (1).
(Tighten: Crankshaft vibration damper bolts to 25
N·m)
3. Remove the engine timing belt (See Engine Timing Belt Removal & Installation in Section 02 Engine).
4. Remove the crankshaft timing belt pulley bolt (2) from the crankshaft.
(Tighten: Crankshaft timing belt pulley bolt to 130
N·m and an additional 65°)
5. Remove the key-way from the crankshaft.
6. Using an appropriate tool, remove the front crank- shaft oil seal (1).
7. Remove the four oil pump bolts (1). (Tighten: Oil pump bolts to 11 N·m)
8. Remove the oil pump (2) using a suitable tool.
9. Remove the oil pump gasket (3).
10. Installation is in the reverse order of removal.
Installation Notes:
• Before installing, prime the new oil pump. Fill the oil pump with engine oil and rotate the oil pump.
• Replace the oil pump gasket.
ON-VEHICLE SERVICE
BESM020055
LTSM020199
BESM020032
02–48Chery Automobile Co., Ltd.
Page 78 of 1903
Downloaded from www.Manualslib.com manuals search engine Oil Strainer
Removal & Installation
1. Raise and support the vehicle.
2. Remove the oil pan (See Oil Pan Removal & Installation in Section 02 Engine).
3. Remove the oil strainer retaining bolts (1).(Tighten: Oil strainer bolts to 18 N·m)
4. Carefully remove the oil strainer.
5. Installation is in the reverse order of removal.
Installation Notes:
• Install new O-rings on the oil strainer pipe.
ON-VEHICLE SERVICE
BESM020018
02
02–49Chery Automobile Co., Ltd.
Page 79 of 1903
Downloaded from www.Manualslib.com manuals search engine ENGINE UNIT REPAIR
Engine Block
Specifications
Torque Specifications
DESCRIPTIONTORQUE (N·m)
Connecting Rod Cap Bolts 1st Step: Tighten the bolt to 25 N·m
2nd Step: Tighten the bolt an additional 90°
Main Bearing Cap Bolts 1st Step: Tighten the bolt to 45 N·m
2nd Step: Tighten the bolt an additional 180°
Lower Cylinder Block Bolts 23
Clearance Specifications
DESCRIPTIONSPECIFICATION (mm)
Surface Distortion Limit 0.15
Inner Diameter Standard 81
Out-Of-Round < 0.008
Taper < 0.01
Disassembly
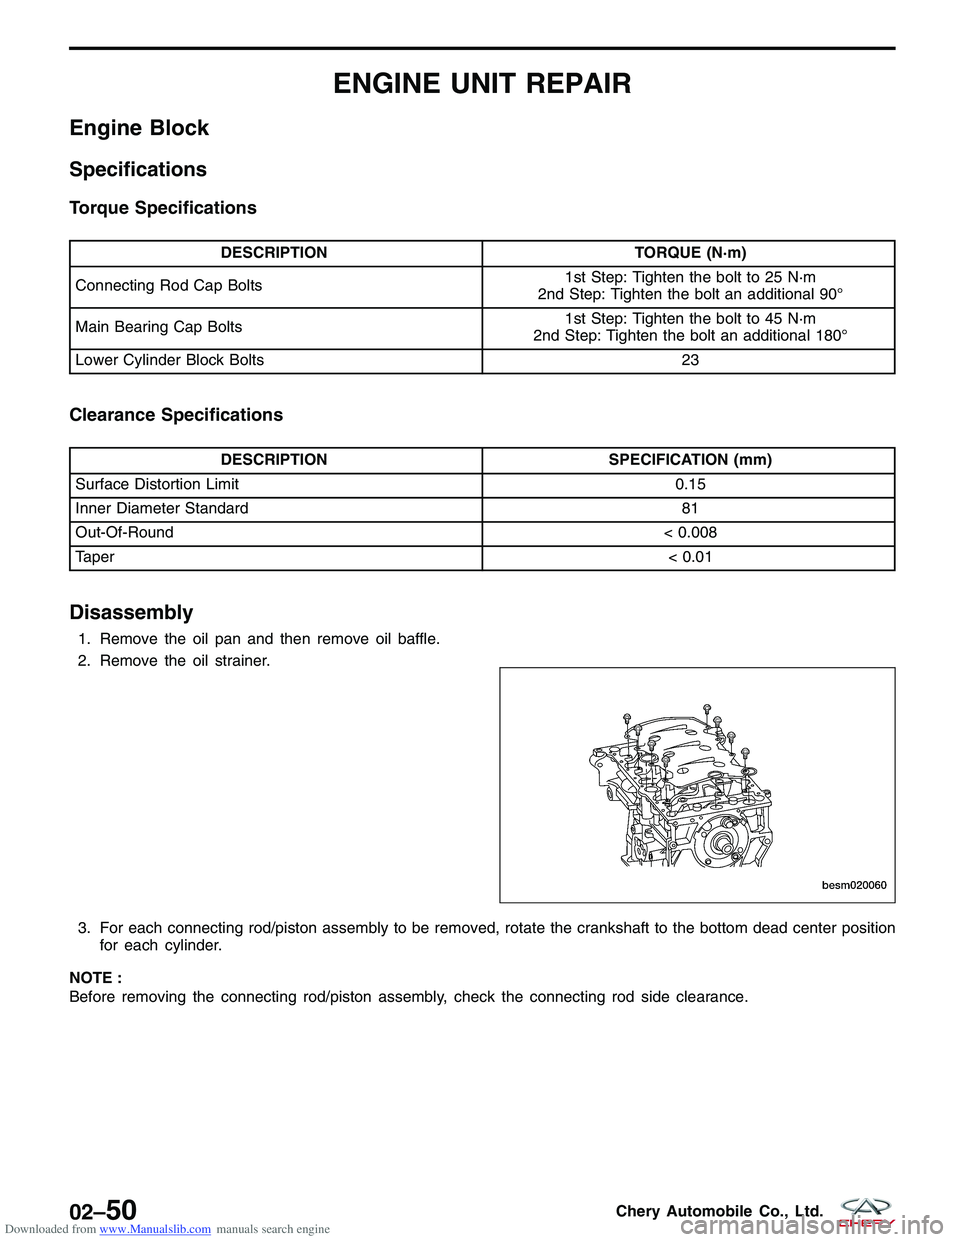
1. Remove the oil pan and then remove oil baffle.
2. Remove the oil strainer.
3. For each connecting rod/piston assembly to be removed, rotate the crankshaft to the bottom dead center position
for each cylinder.
NOTE :
Before removing the connecting rod/piston assembly, check the connecting rod side clearance.
BESM020060
02–50Chery Automobile Co., Ltd.
Page 80 of 1903
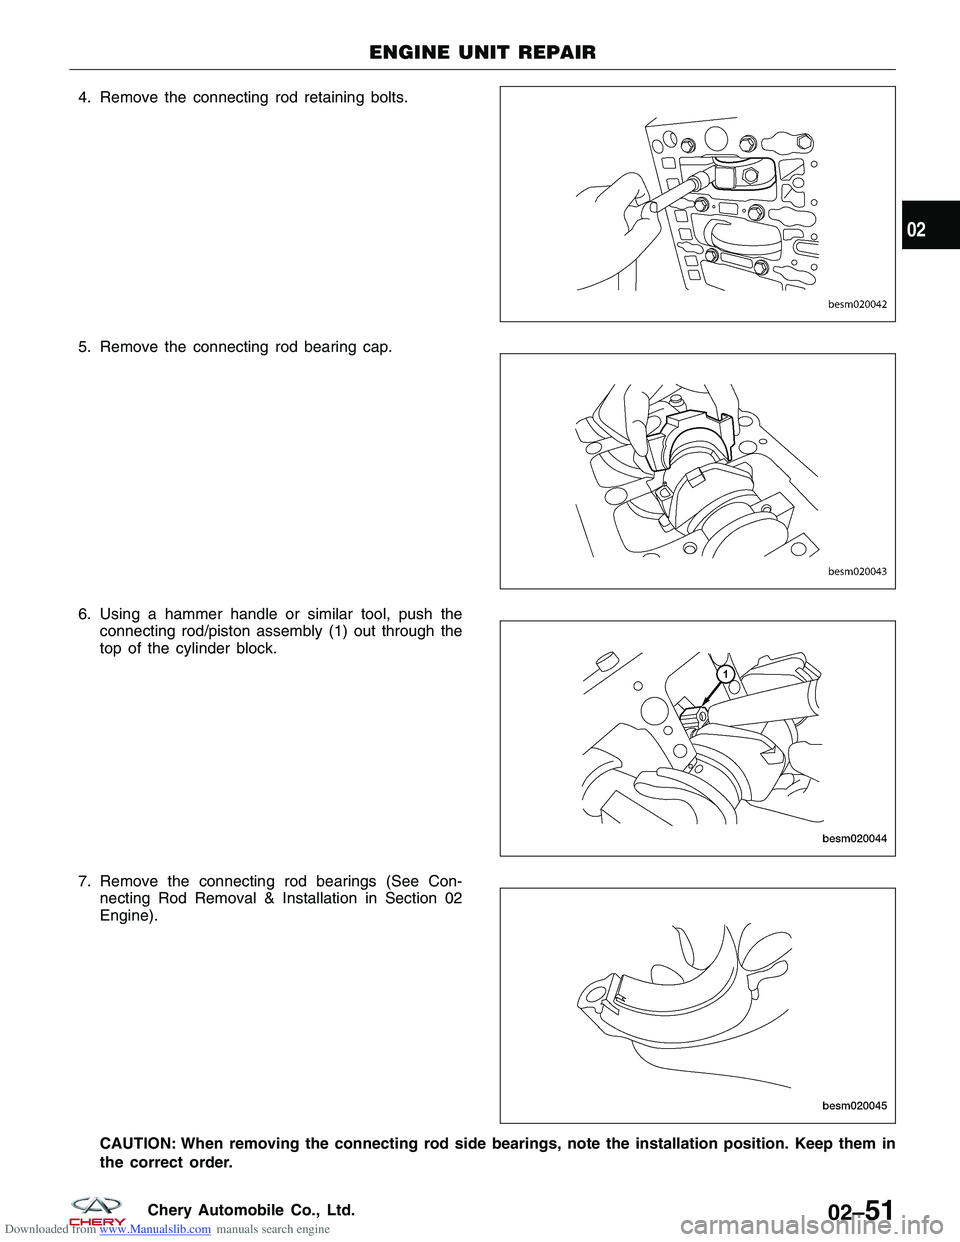
Downloaded from www.Manualslib.com manuals search engine 4. Remove the connecting rod retaining bolts.
5. Remove the connecting rod bearing cap.
6. Using a hammer handle or similar tool, push theconnecting rod/piston assembly (1) out through the
top of the cylinder block.
7. Remove the connecting rod bearings (See Con- necting Rod Removal & Installation in Section 02
Engine).
CAUTION: When removing the connecting rod side bearings, note the installation position. Keep them in
the correct order.
ENGINE UNIT REPAIR
BESM020042
BESM020043
BESM020044
BESM020045
02
02–51Chery Automobile Co., Ltd.