CHEVROLET AVEO 2002 Service Repair Manual
AVEO 2002
CHEVROLET
CHEVROLET
https://www.carmanualsonline.info/img/24/56853/w960_56853-0.png
CHEVROLET AVEO 2002 Service Repair Manual
Trending: towing capacity, tow, check oil, transmission fluid, sunroof, fuses, warning lights
Page 2631 of 5127
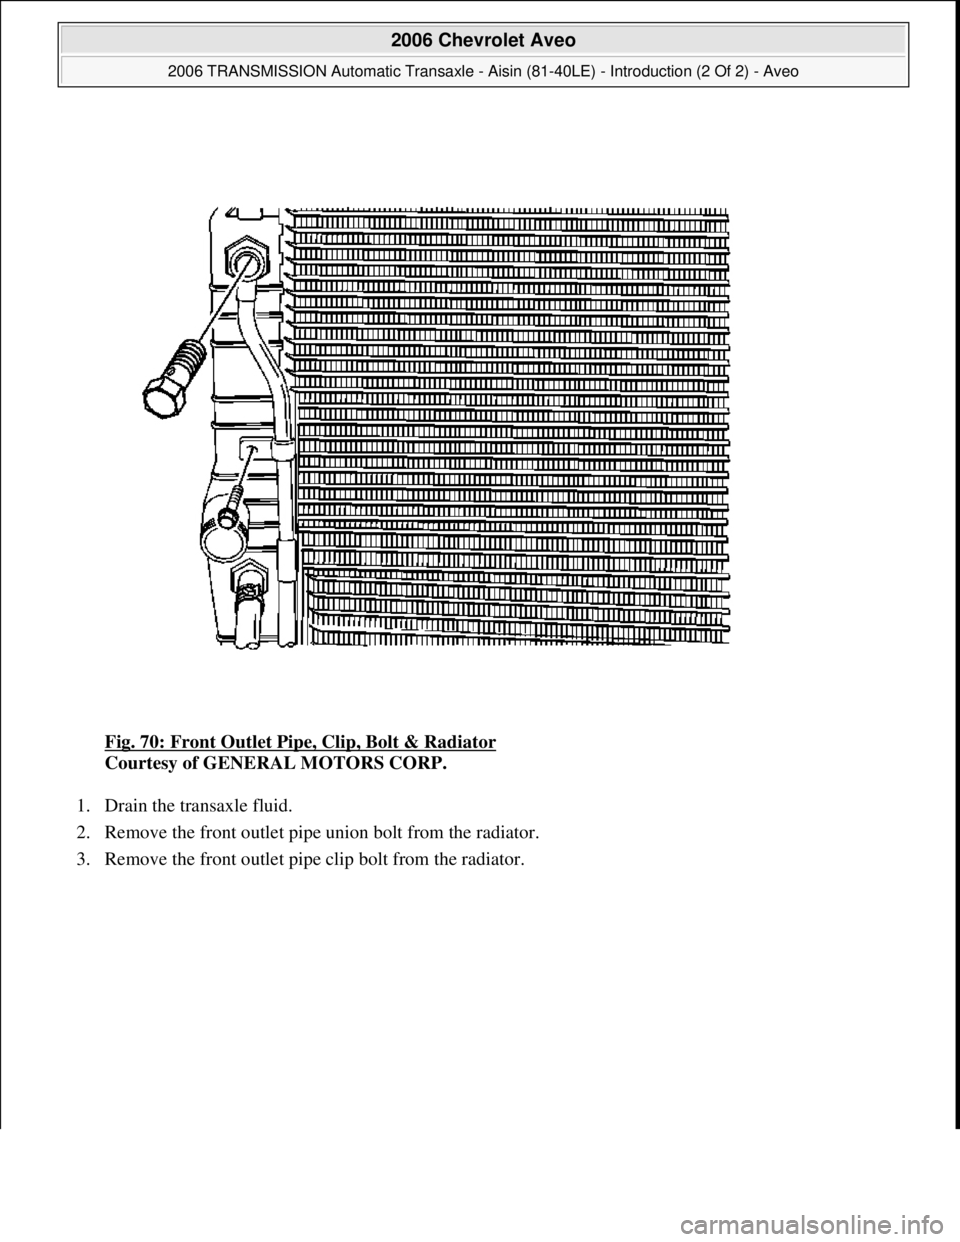
Fig. 70: Front Outlet Pipe, Clip, Bolt & Radiator
Courtesy of GENERAL MOTORS CORP.
1. Drain the transaxle fluid.
2. Remove the front outlet pipe union bolt from the radiator.
3. Remove the front outlet pipe clip bolt from the radiator.
2006 Chevrolet Aveo
2006 TRANSMISSION Automatic Transaxle - Aisin (81-40LE) - Introduction (2 Of 2) - Aveo
Microsoft
Thursday, July 16, 2009 1:17:20 PMPage 82 © 2005 Mitchell Repair Information Company, LLC.
Page 2632 of 5127
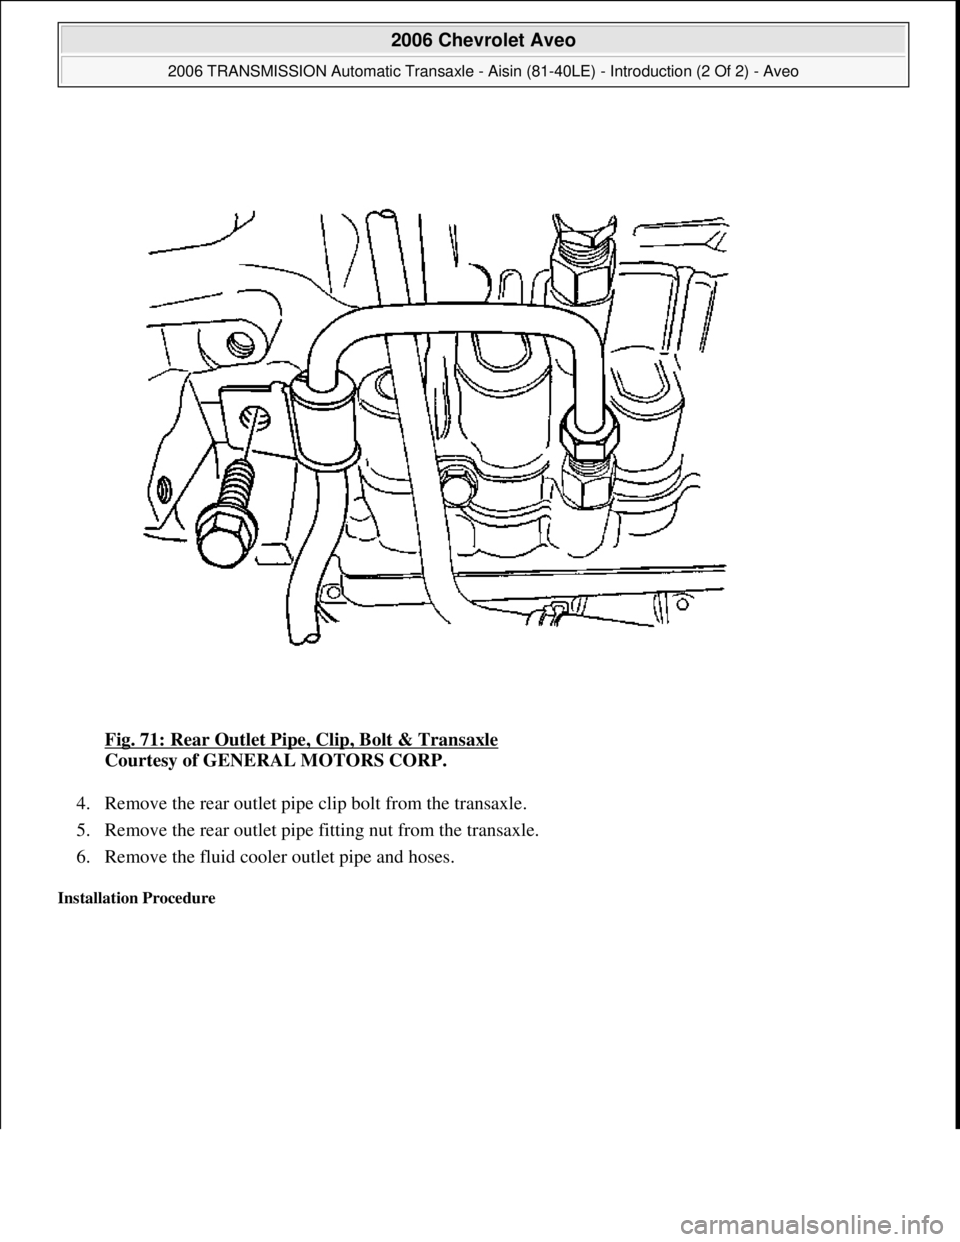
Fig. 71: Rear Outlet Pipe, Clip, Bolt & Transaxle
Courtesy of GENERAL MOTORS CORP.
4. Remove the rear outlet pipe clip bolt from the transaxle.
5. Remove the rear outlet pipe fitting nut from the transaxle.
6. Remove the fluid cooler outlet pipe and hoses.
Installation Procedure
2006 Chevrolet Aveo
2006 TRANSMISSION Automatic Transaxle - Aisin (81-40LE) - Introduction (2 Of 2) - Aveo
Microsoft
Thursday, July 16, 2009 1:17:20 PMPage 83 © 2005 Mitchell Repair Information Company, LLC.
Page 2633 of 5127
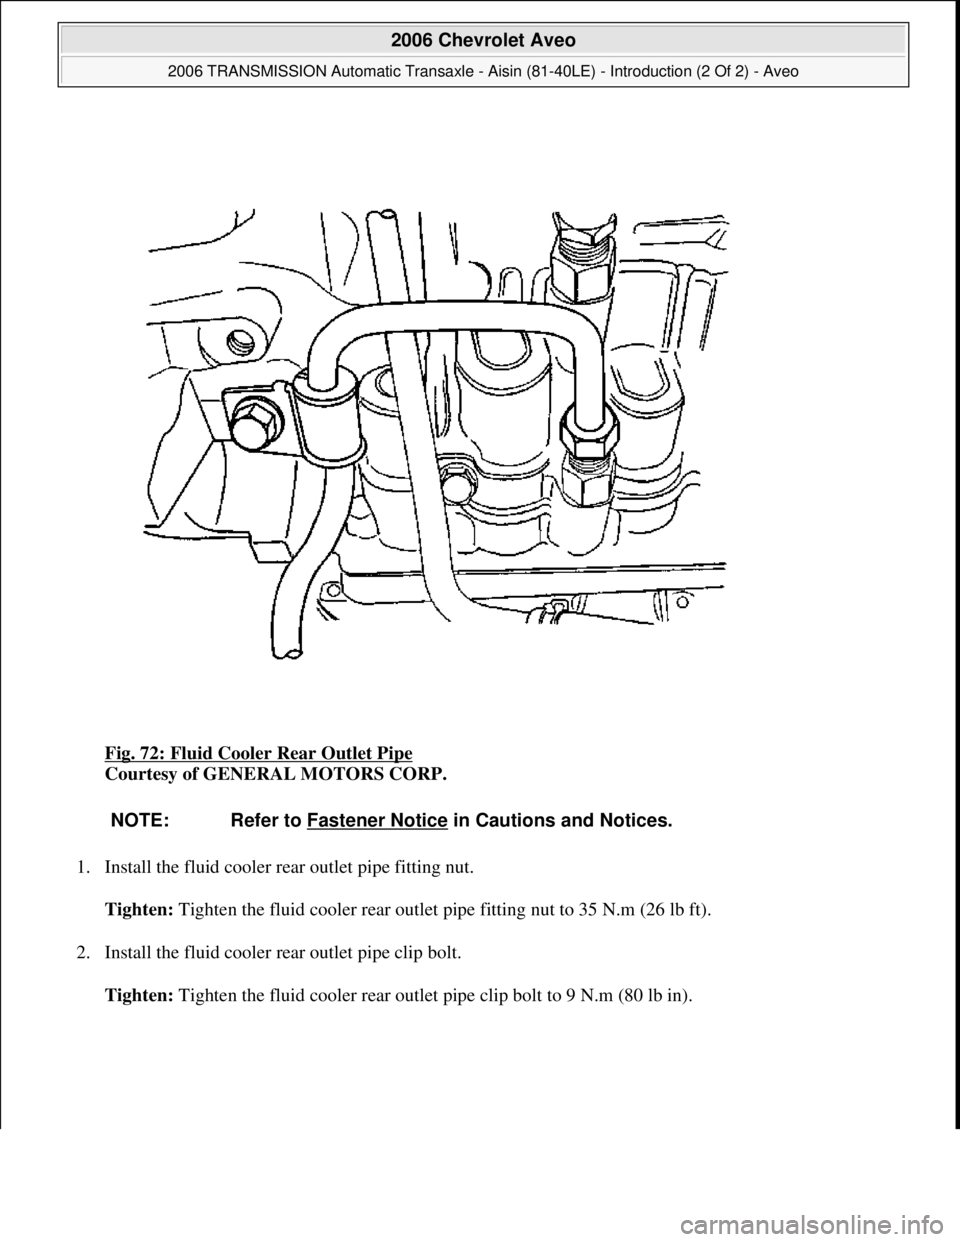
Fig. 72: Fluid Cooler Rear Outlet Pipe
Courtesy of GENERAL MOTORS CORP.
1. Install the fluid cooler rear outlet pipe fitting nut.
Tighten: Tighten the fluid cooler rear outlet pipe fitting nut to 35 N.m (26 lb ft).
2. Install the fluid cooler rear outlet pipe clip bolt.
Tighten: Ti
ghten the fluid cooler rear outlet pipe clip bolt to 9 N.m (80 lb in).
NOTE: Refer to Fastener Notice in Cautions and Notices.
2006 Chevrolet Aveo
2006 TRANSMISSION Automatic Transaxle - Aisin (81-40LE) - Introduction (2 Of 2) - Aveo
Microsoft
Thursday, July 16, 2009 1:17:20 PMPage 84 © 2005 Mitchell Repair Information Company, LLC.
Page 2634 of 5127
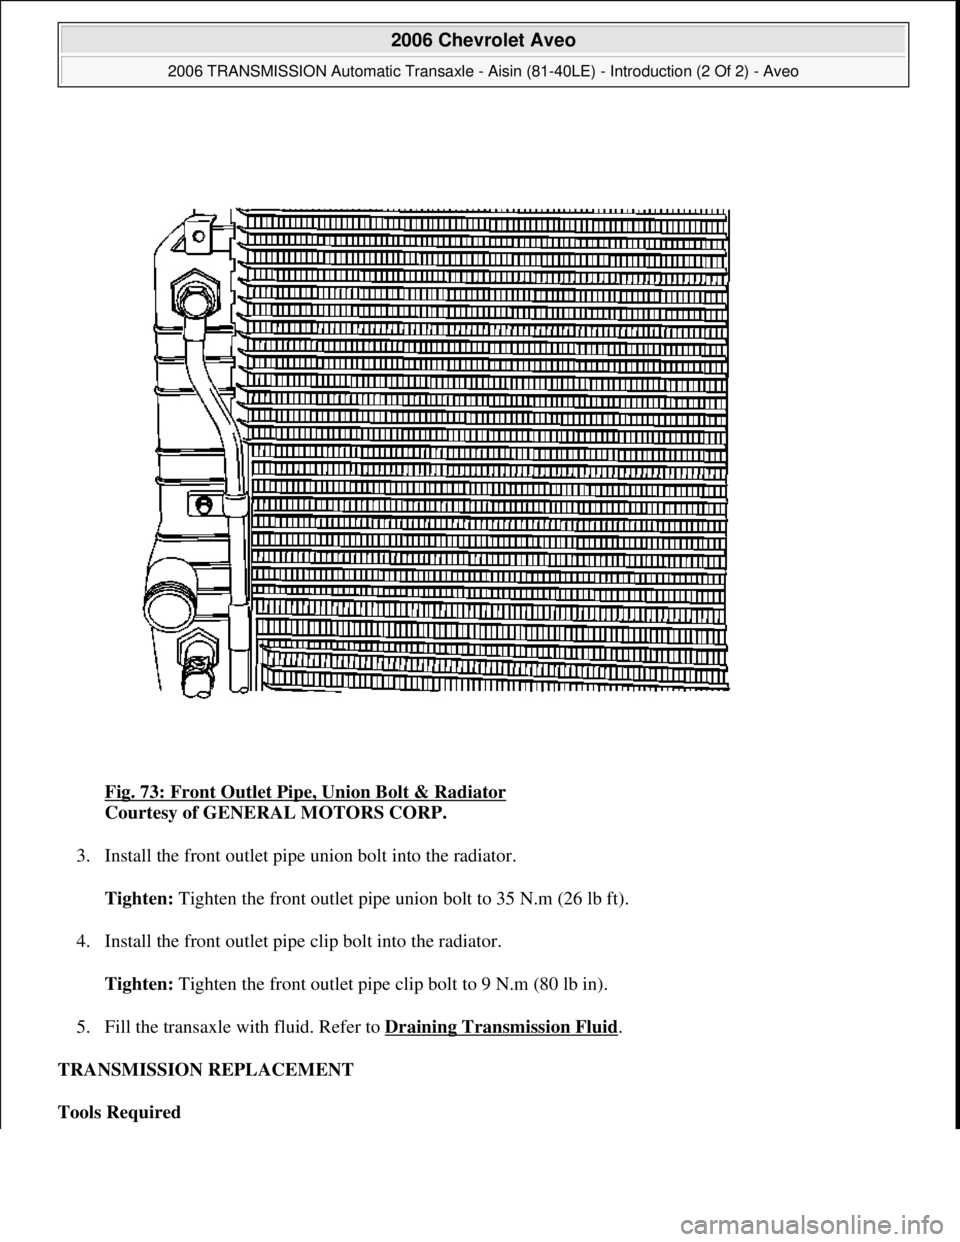
Fig. 73: Front Outlet Pipe, Union Bolt & Radiator
Courtesy of GENERAL MOTORS CORP.
3. Install the front outlet pipe union bolt into the radiator.
Tighten: Tighten the front outlet pipe union bolt to 35 N.m (26 lb ft).
4. Install the front outlet pipe clip bolt into the radiator.
Tighten: Tighten the front outlet pipe clip bolt to 9 N.m (80 lb in).
5. Fill the transaxle with fluid. Refer to Draining Transmission Fluid
.
TRANSMISSION REPLACEMENT
Tools Required
2006 Chevrolet Aveo
2006 TRANSMISSION Automatic Transaxle - Aisin (81-40LE) - Introduction (2 Of 2) - Aveo
Microsoft
Thursday, July 16, 2009 1:17:20 PMPage 85 © 2005 Mitchell Repair Information Company, LLC.
Page 2635 of 5127
J 28467-B (DW 110-060) Engine Support Fixture
DW 260-120 (DW 260-012) Transaxle Support Fixture. See Special Tools.
Removal Procedure
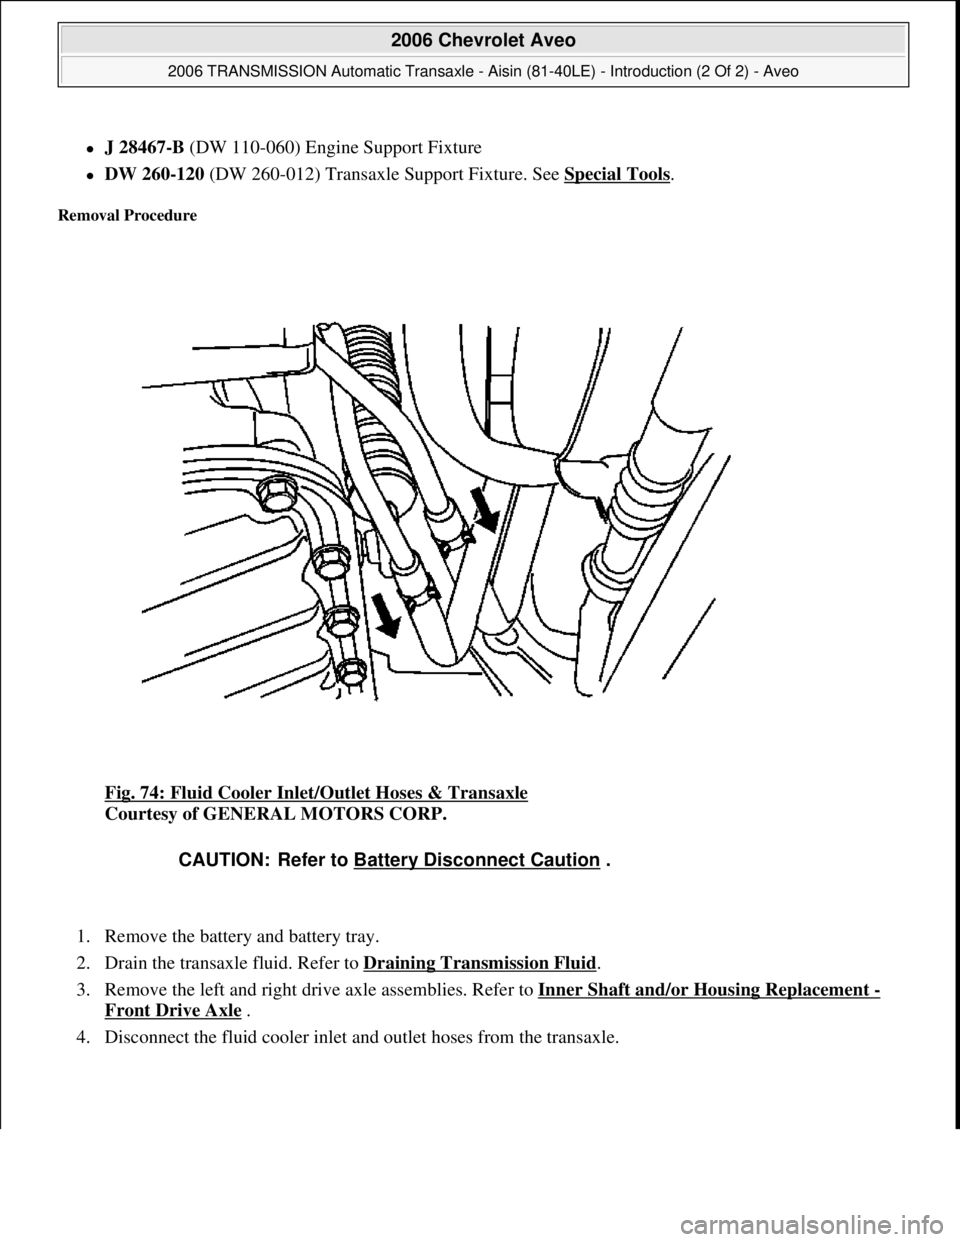
Fig. 74: Fluid Cooler Inlet/Outlet Hoses & Transaxle
Courtesy of GENERAL MOTORS CORP.
1. Remove the battery and battery tray.
2. Drain the transaxle fluid. Refer to Draining Transmission Fluid
.
3. Remove the left and right drive axle assemblies. Refer to Inner Shaft and/or Housing Replacement
-
Front Drive Axle
.
4. Disconnect the fluid cooler inlet and outlet hoses from the transaxle.
CAUTION: Refer to Battery Disconnect Caution .
2006 Chevrolet Aveo
2006 TRANSMISSION Automatic Transaxle - Aisin (81-40LE) - Introduction (2 Of 2) - Aveo
Microsoft
Thursday, July 16, 2009 1:17:20 PMPage 86 © 2005 Mitchell Repair Information Company, LLC.
Page 2636 of 5127
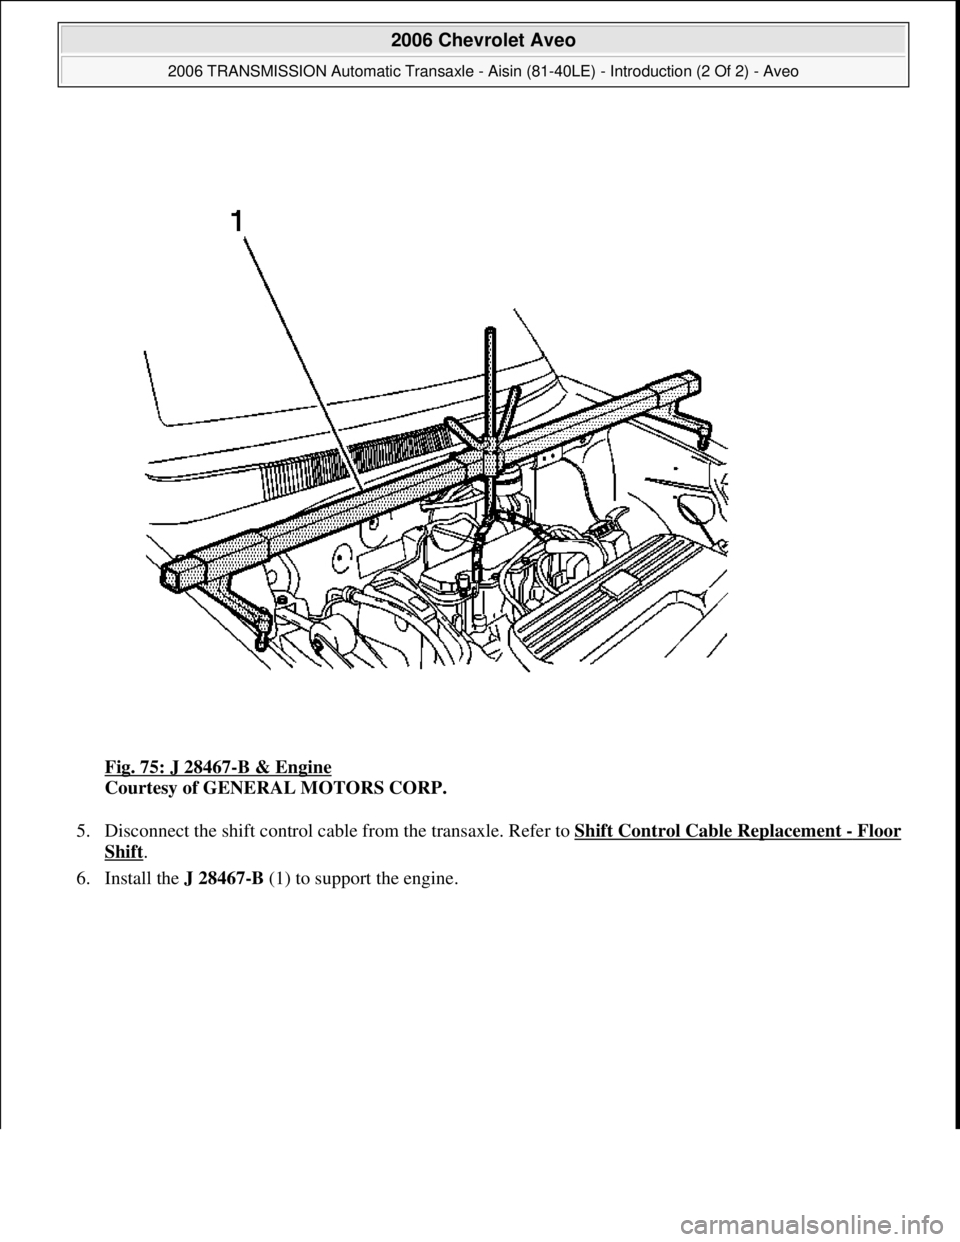
Fig. 75: J 28467-B & Engine
Courtesy of GENERAL MOTORS CORP.
5. Disconnect the shift control cable from the transaxle. Refer to Shift Control Cable Replacement
-Floor
Shift.
6. Install the J 28467-B (1) to support the engine.
2006 Chevrolet Aveo
2006 TRANSMISSION Automatic Transaxle - Aisin (81-40LE) - Introduction (2 Of 2) - Aveo
Microsoft
Thursday, July 16, 2009 1:17:20 PMPage 87 © 2005 Mitchell Repair Information Company, LLC.
Page 2637 of 5127
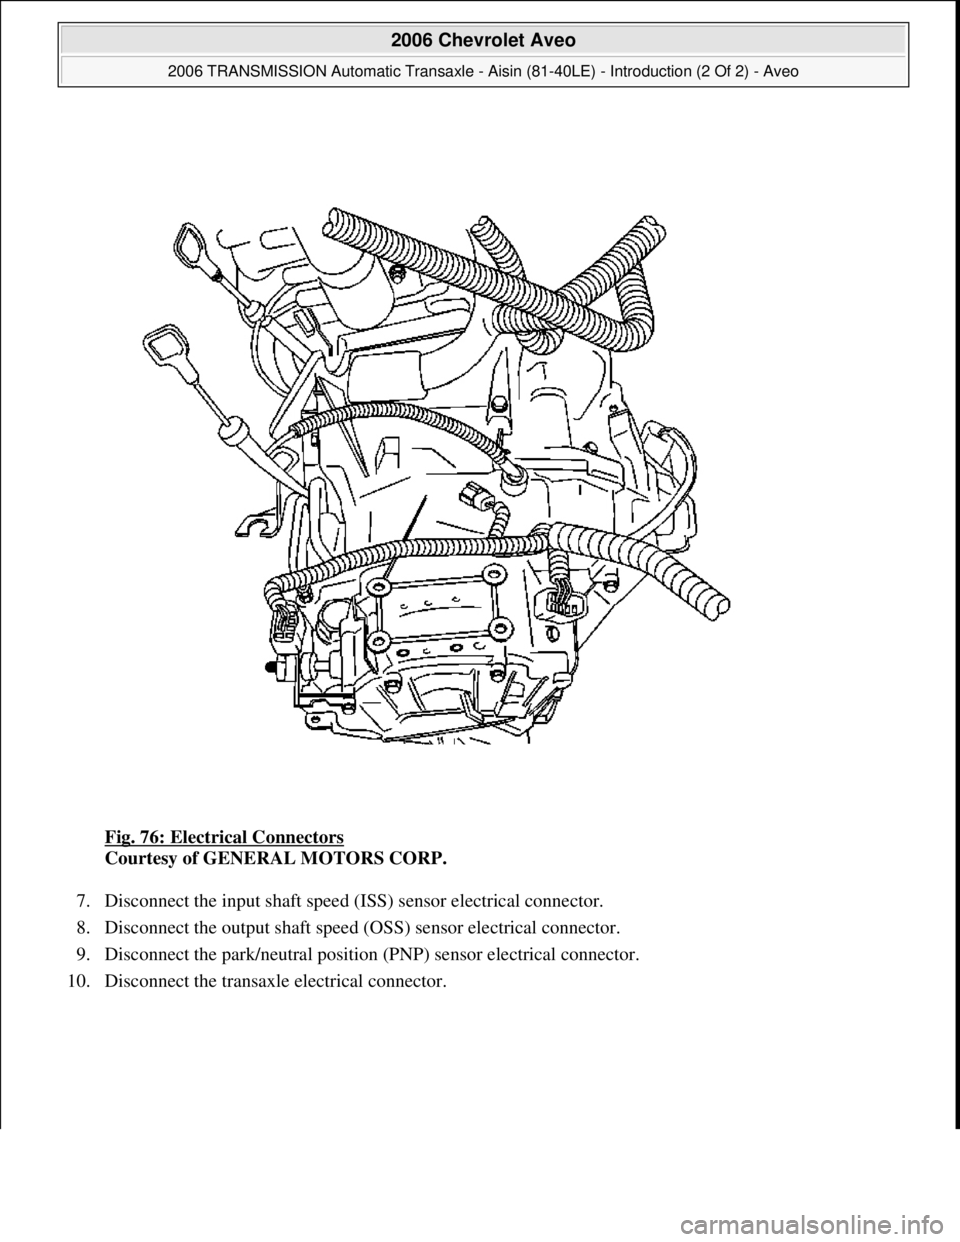
Fig. 76: Electrical Connectors
Courtesy of GENERAL MOTORS CORP.
7. Disconnect the input shaft speed (ISS) sensor electrical connector.
8. Disconnect the output shaft speed (OSS) sensor electrical connector.
9. Disconnect the park/neutral position (PNP) sensor electrical connector.
10. Disconnect the transaxle electrical connector.
2006 Chevrolet Aveo
2006 TRANSMISSION Automatic Transaxle - Aisin (81-40LE) - Introduction (2 Of 2) - Aveo
Microsoft
Thursday, July 16, 2009 1:17:20 PMPage 88 © 2005 Mitchell Repair Information Company, LLC.
Page 2638 of 5127
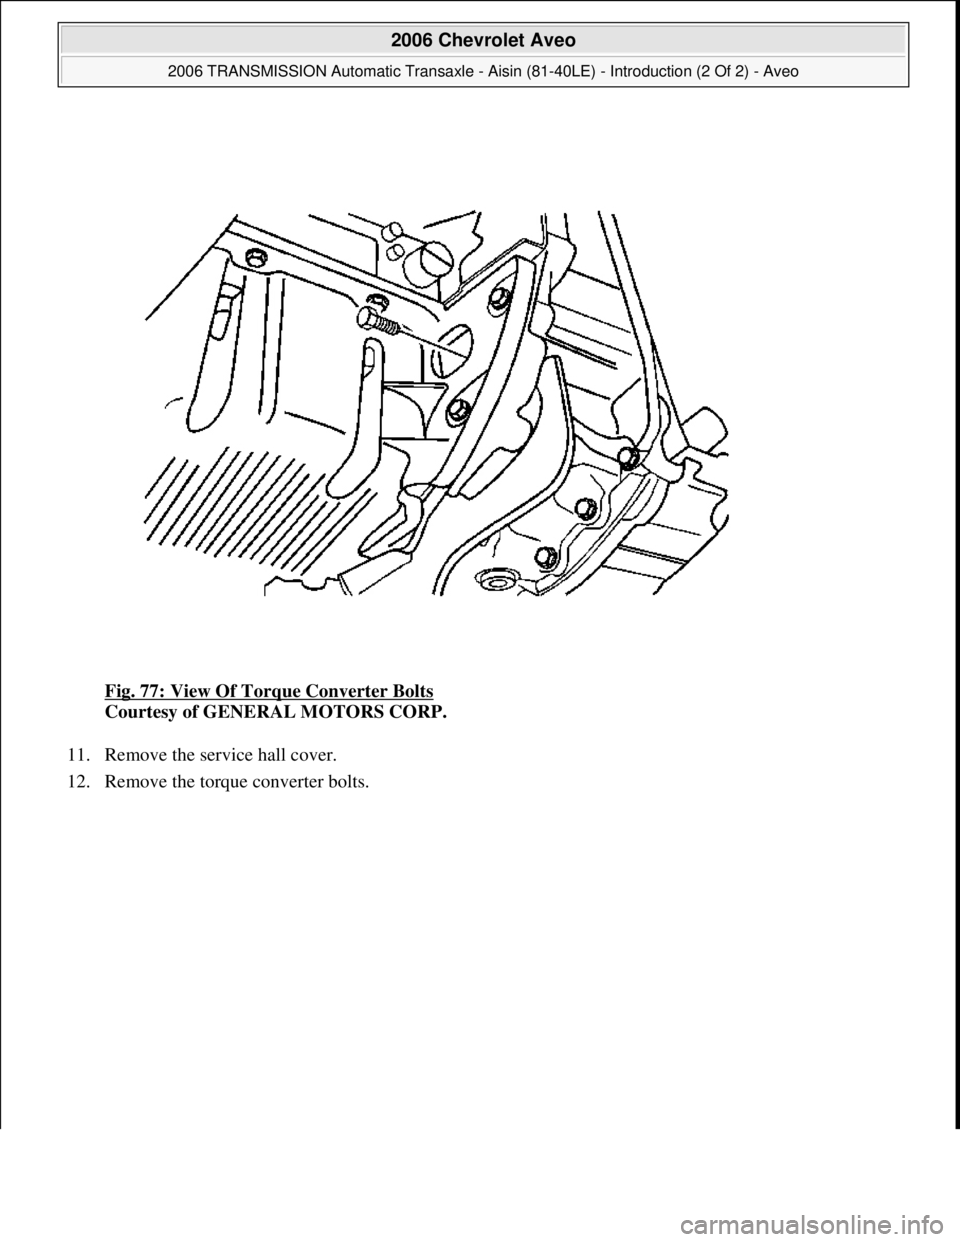
Fig. 77: View Of Torque Converter Bolts
Courtesy of GENERAL MOTORS CORP.
11. Remove the service hall cover.
12. Remove the torque converter bolts.
2006 Chevrolet Aveo
2006 TRANSMISSION Automatic Transaxle - Aisin (81-40LE) - Introduction (2 Of 2) - Aveo
Microsoft
Thursday, July 16, 2009 1:17:20 PMPage 89 © 2005 Mitchell Repair Information Company, LLC.
Page 2639 of 5127
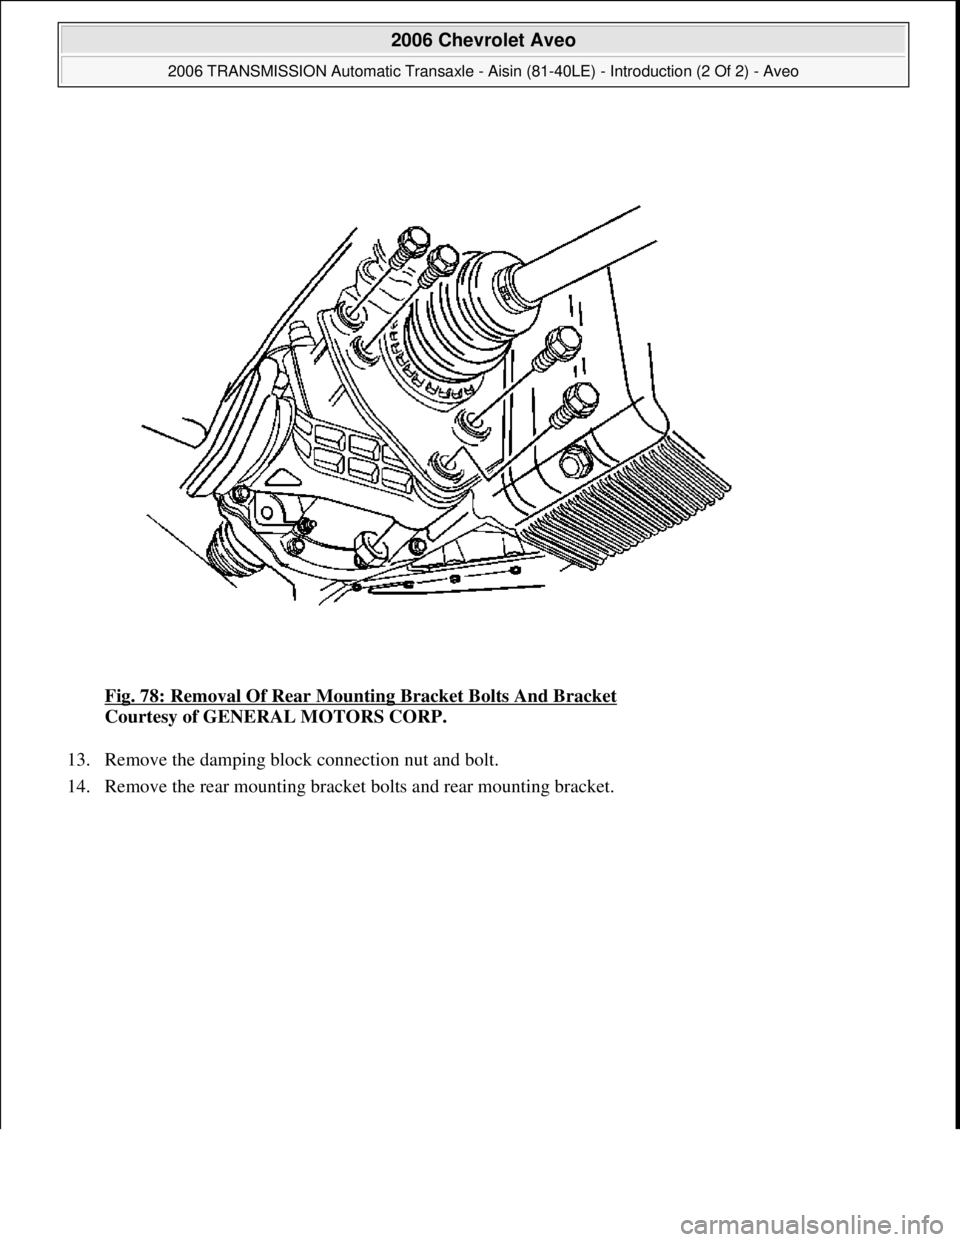
Fig. 78: Removal Of Rear Mounting Bracket Bolts And Bracket
Courtesy of GENERAL MOTORS CORP.
13. Remove the damping block connection nut and bolt.
14. Remove the rear mountin
g bracket bolts and rear mounting bracket.
2006 Chevrolet Aveo
2006 TRANSMISSION Automatic Transaxle - Aisin (81-40LE) - Introduction (2 Of 2) - Aveo
Microsoft
Thursday, July 16, 2009 1:17:20 PMPage 90 © 2005 Mitchell Repair Information Company, LLC.
Page 2640 of 5127
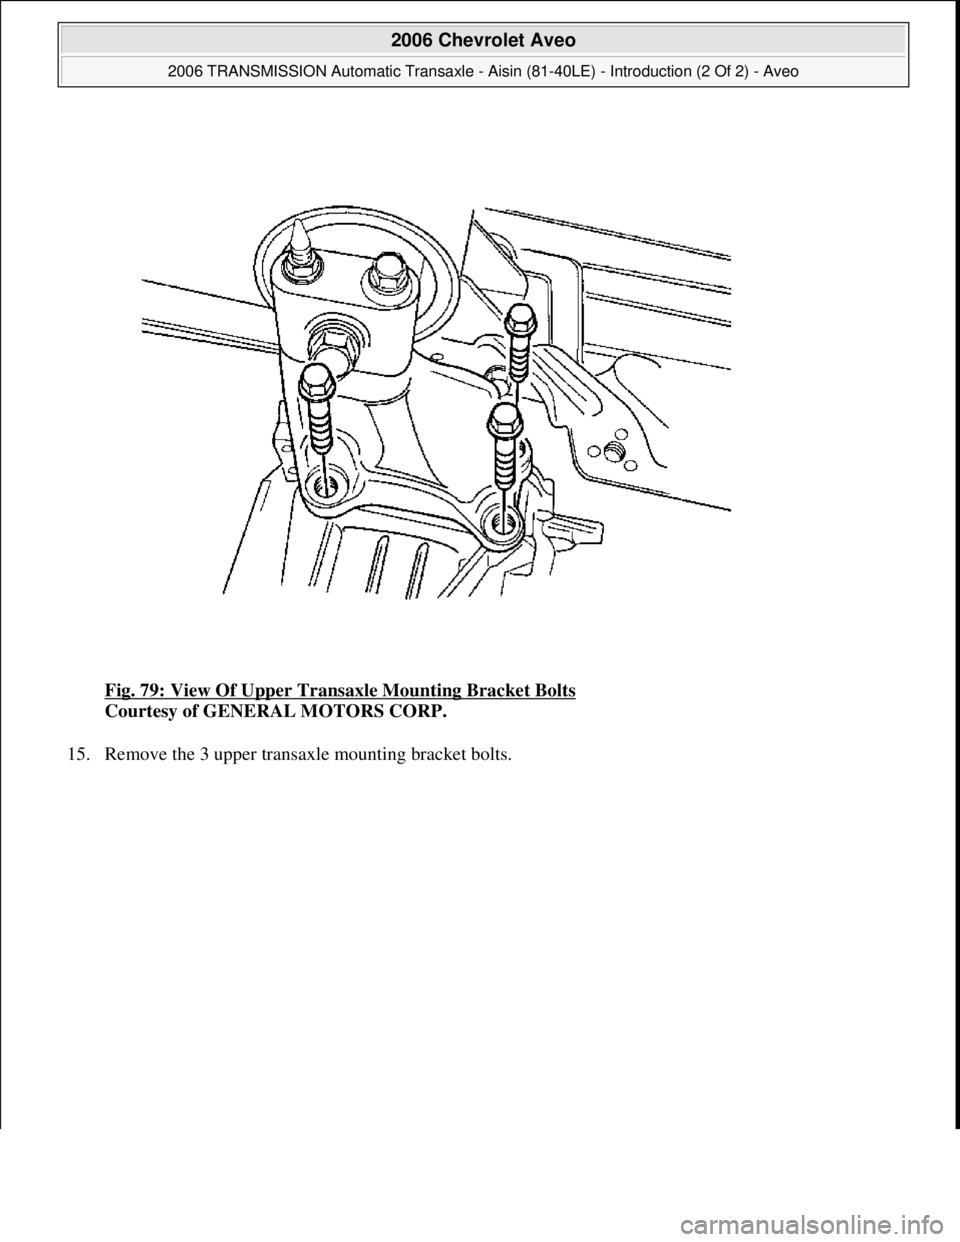
Fig. 79: View Of Upper Transaxle Mounting Bracket Bolts
Courtesy of GENERAL MOTORS CORP.
15. Remove the 3 upper transaxle mountin
g bracket bolts.
2006 Chevrolet Aveo
2006 TRANSMISSION Automatic Transaxle - Aisin (81-40LE) - Introduction (2 Of 2) - Aveo
Microsoft
Thursday, July 16, 2009 1:17:20 PMPage 91 © 2005 Mitchell Repair Information Company, LLC.
Trending: rear view mirror, oil temperature, checking oil, odometer, high beam, air suspension, sunroof
