CHEVROLET AVEO 2002 Service Repair Manual
AVEO 2002
CHEVROLET
CHEVROLET
https://www.carmanualsonline.info/img/24/56853/w960_56853-0.png
CHEVROLET AVEO 2002 Service Repair Manual
Trending: high beam, open hood, flat tire, battery location, light, load capacity, lights
Page 2741 of 5127
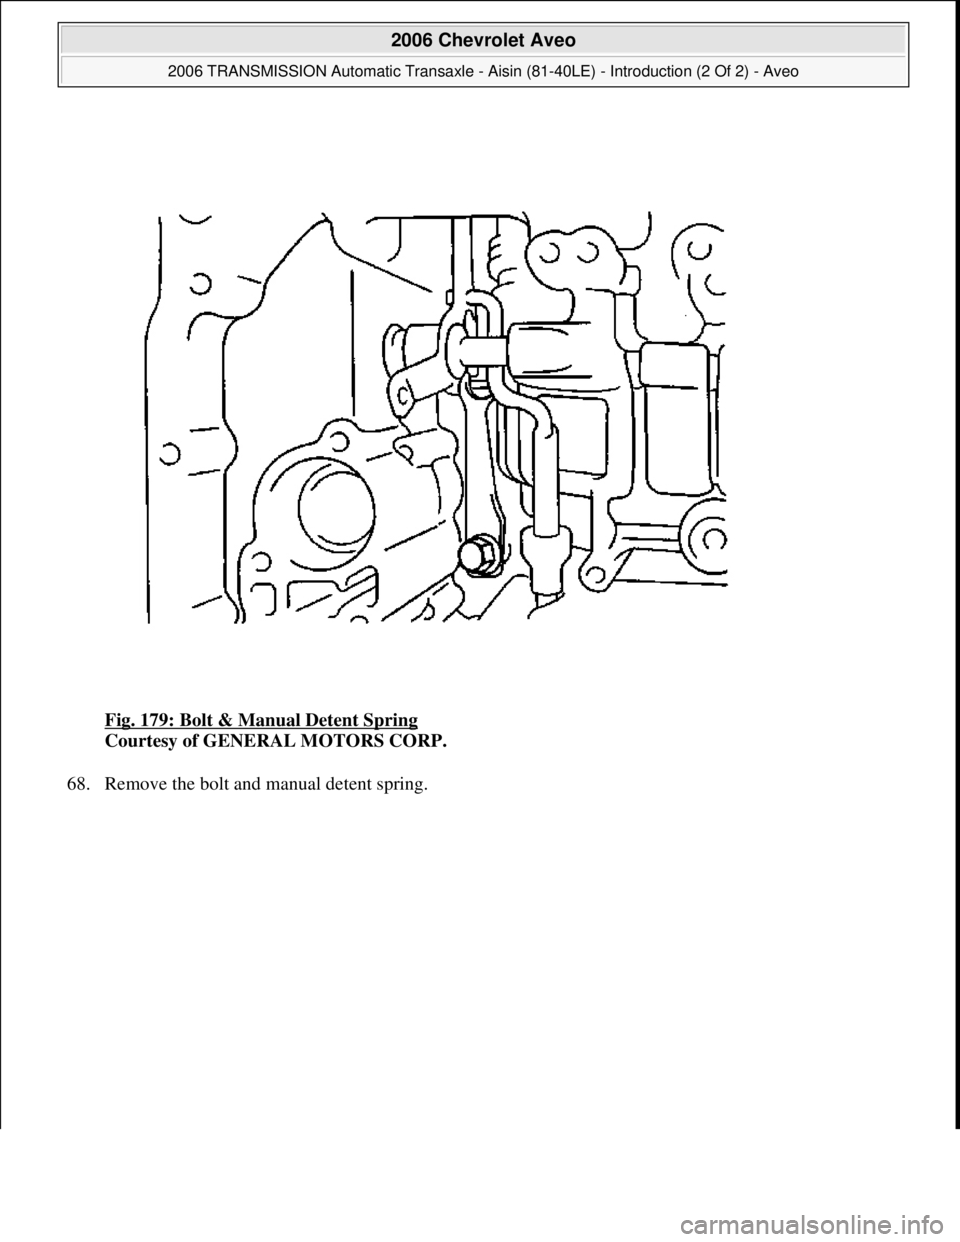
Fig. 179: Bolt & Manual Detent Spring
Courtesy of GENERAL MOTORS CORP.
68. Remove the bolt and manual detent spring.
2006 Chevrolet Aveo
2006 TRANSMISSION Automatic Transaxle - Aisin (81-40LE) - Introduction (2 Of 2) - Aveo
Microsoft
Thursday, July 16, 2009 1:17:23 PMPage 192 © 2005 Mitchell Repair Information Company, LLC.
Page 2742 of 5127
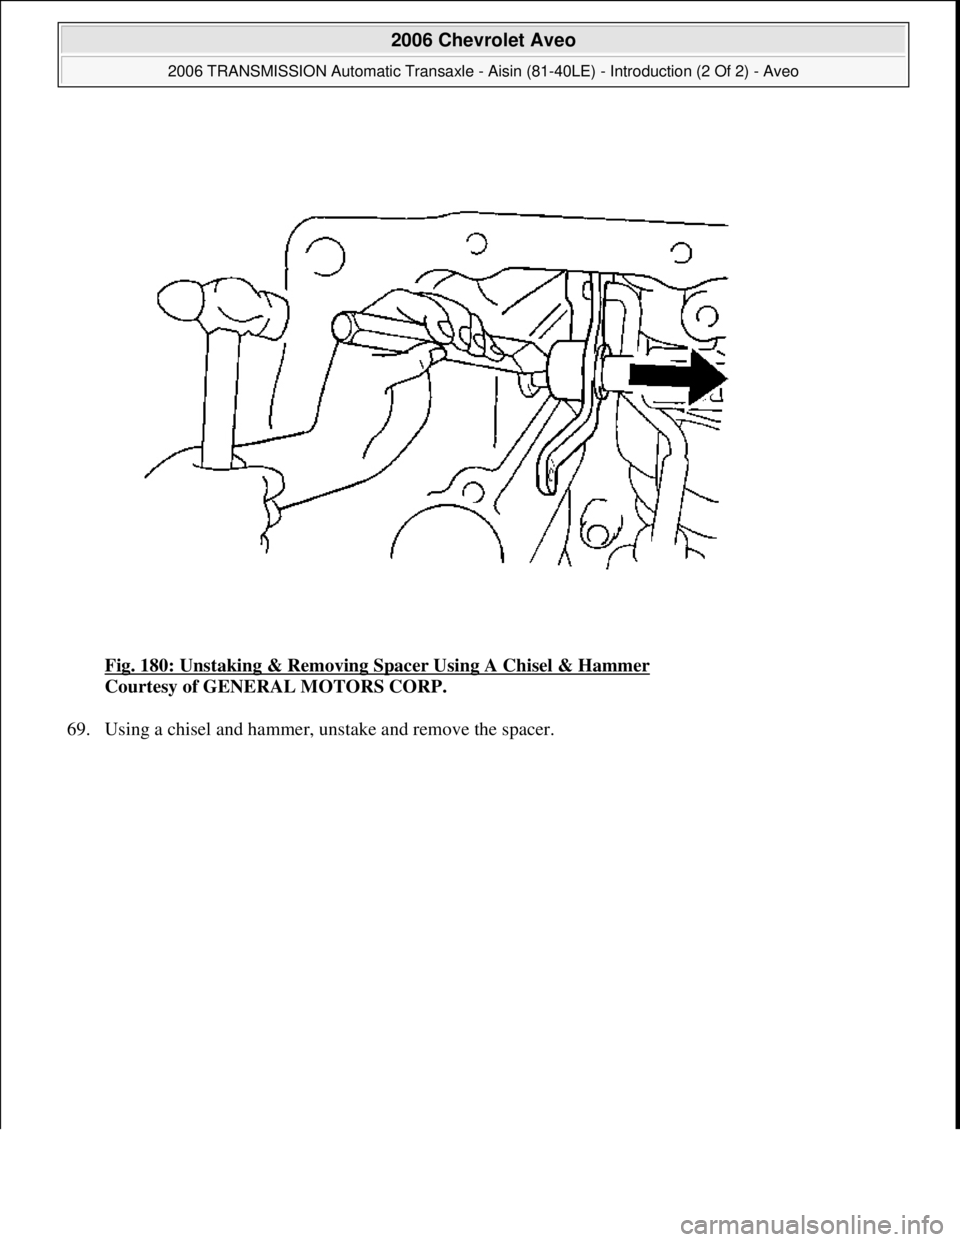
Fig. 180: Unstaking & Removing Spacer Using A Chisel & Hammer
Courtesy of GENERAL MOTORS CORP.
69. Usin
g a chisel and hammer, unstake and remove the spacer.
2006 Chevrolet Aveo
2006 TRANSMISSION Automatic Transaxle - Aisin (81-40LE) - Introduction (2 Of 2) - Aveo
Microsoft
Thursday, July 16, 2009 1:17:23 PMPage 193 © 2005 Mitchell Repair Information Company, LLC.
Page 2743 of 5127
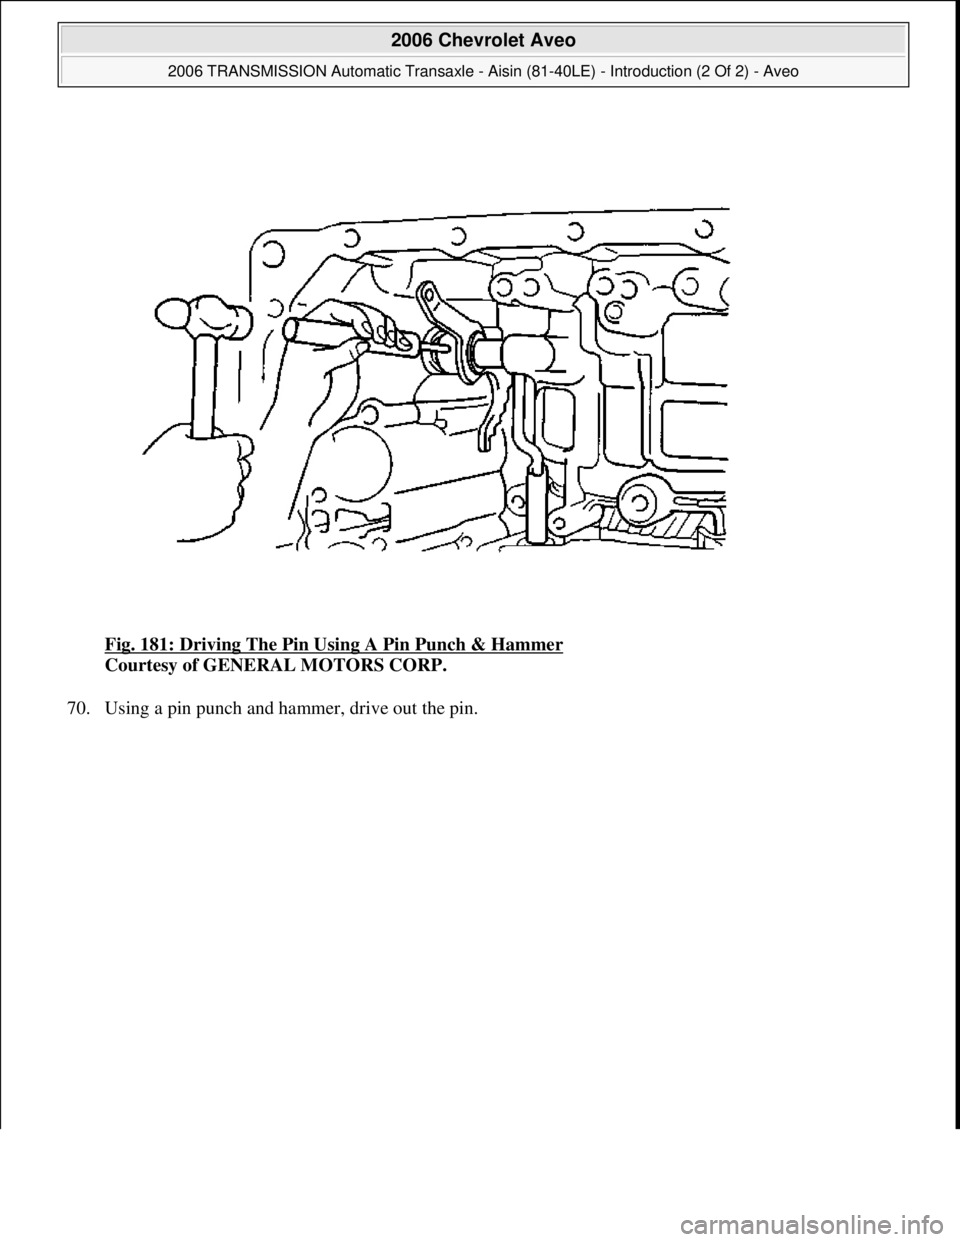
Fig. 181: Driving The Pin Using A Pin Punch & Hammer
Courtesy of GENERAL MOTORS CORP.
70. Using a pin punch and hammer, drive out the pin.
2006 Chevrolet Aveo
2006 TRANSMISSION Automatic Transaxle - Aisin (81-40LE) - Introduction (2 Of 2) - Aveo
Microsoft
Thursday, July 16, 2009 1:17:23 PMPage 194 © 2005 Mitchell Repair Information Company, LLC.
Page 2744 of 5127
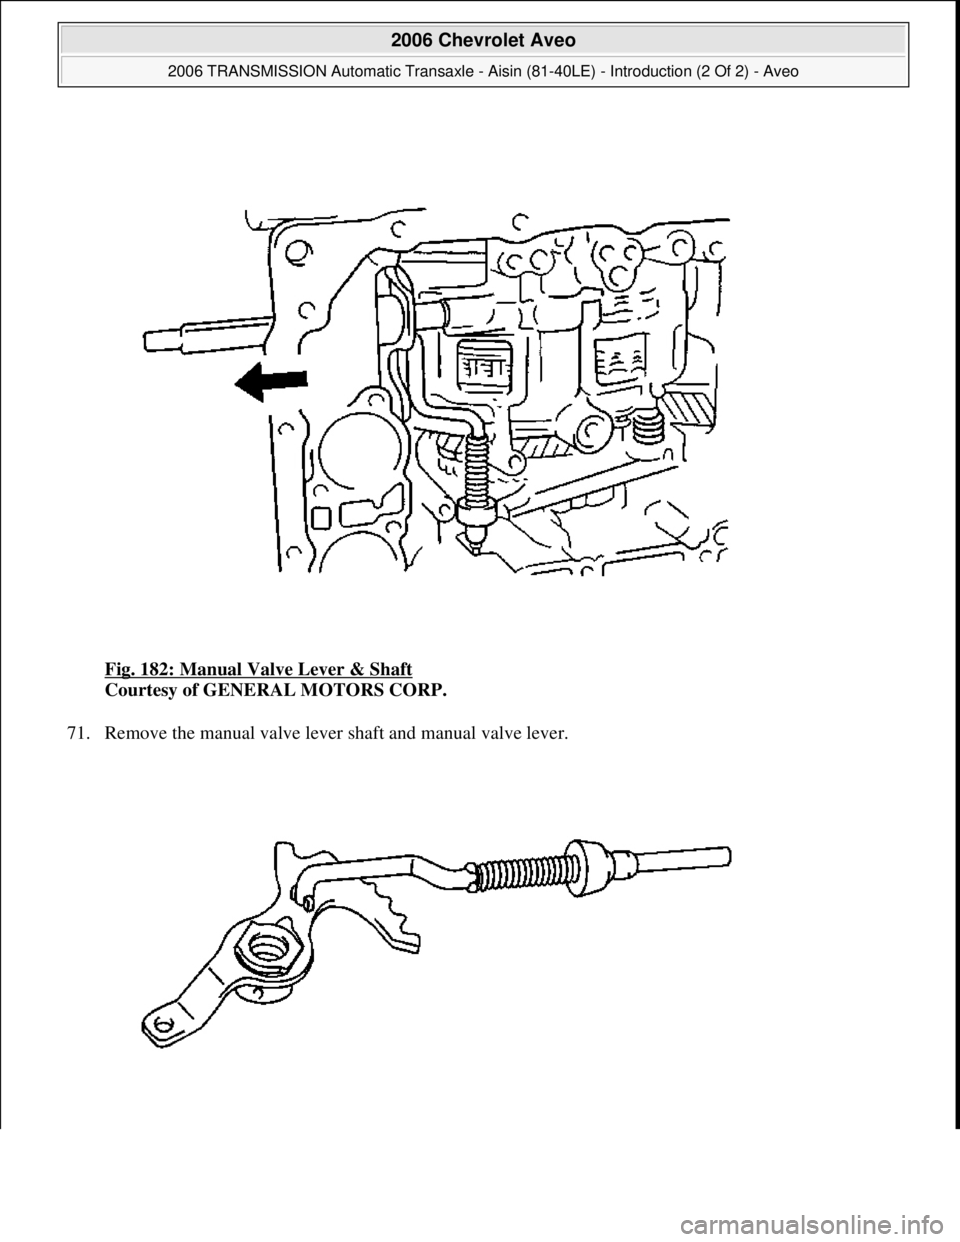
Fig. 182: Manual Valve Lever & Shaft
Courtesy of GENERAL MOTORS CORP.
71. Remove the manual valve lever shaft and manual valve lever.
2006 Chevrolet Aveo
2006 TRANSMISSION Automatic Transaxle - Aisin (81-40LE) - Introduction (2 Of 2) - Aveo
Microsoft
Thursday, July 16, 2009 1:17:23 PMPage 195 © 2005 Mitchell Repair Information Company, LLC.
Page 2745 of 5127
Fig. 183: Parking Lock Rod & Manual Valve Lever
Courtesy of GENERAL MOTORS CORP.
72. Remove the parking lock rod from the manual valve lever.
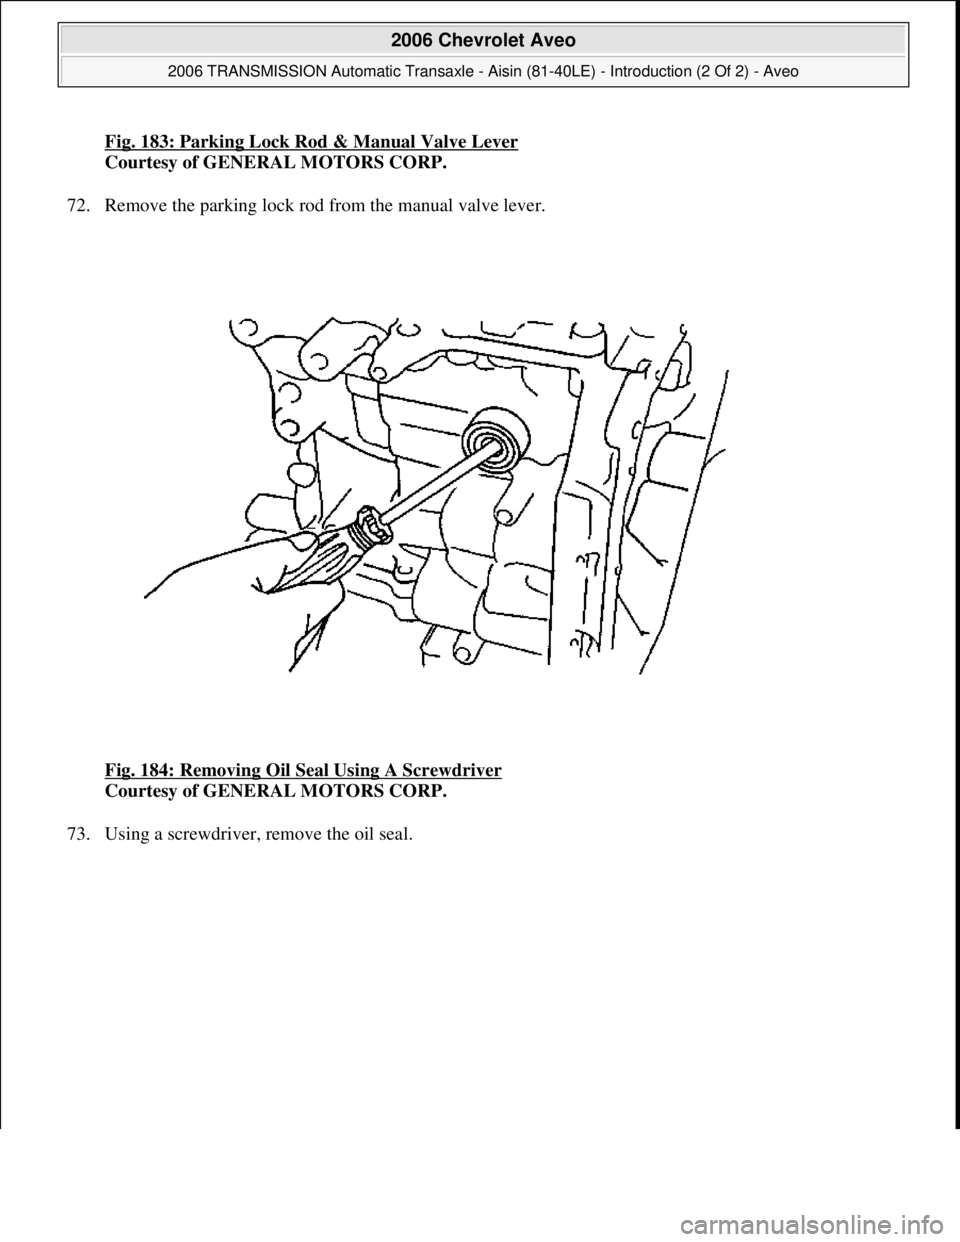
Fig. 184: Removing Oil Seal Using A Screwdriver
Courtesy of GENERAL MOTORS CORP.
73. Usin
g a screwdriver, remove the oil seal.
2006 Chevrolet Aveo
2006 TRANSMISSION Automatic Transaxle - Aisin (81-40LE) - Introduction (2 Of 2) - Aveo
Microsoft
Thursday, July 16, 2009 1:17:23 PMPage 196 © 2005 Mitchell Repair Information Company, LLC.
Page 2746 of 5127
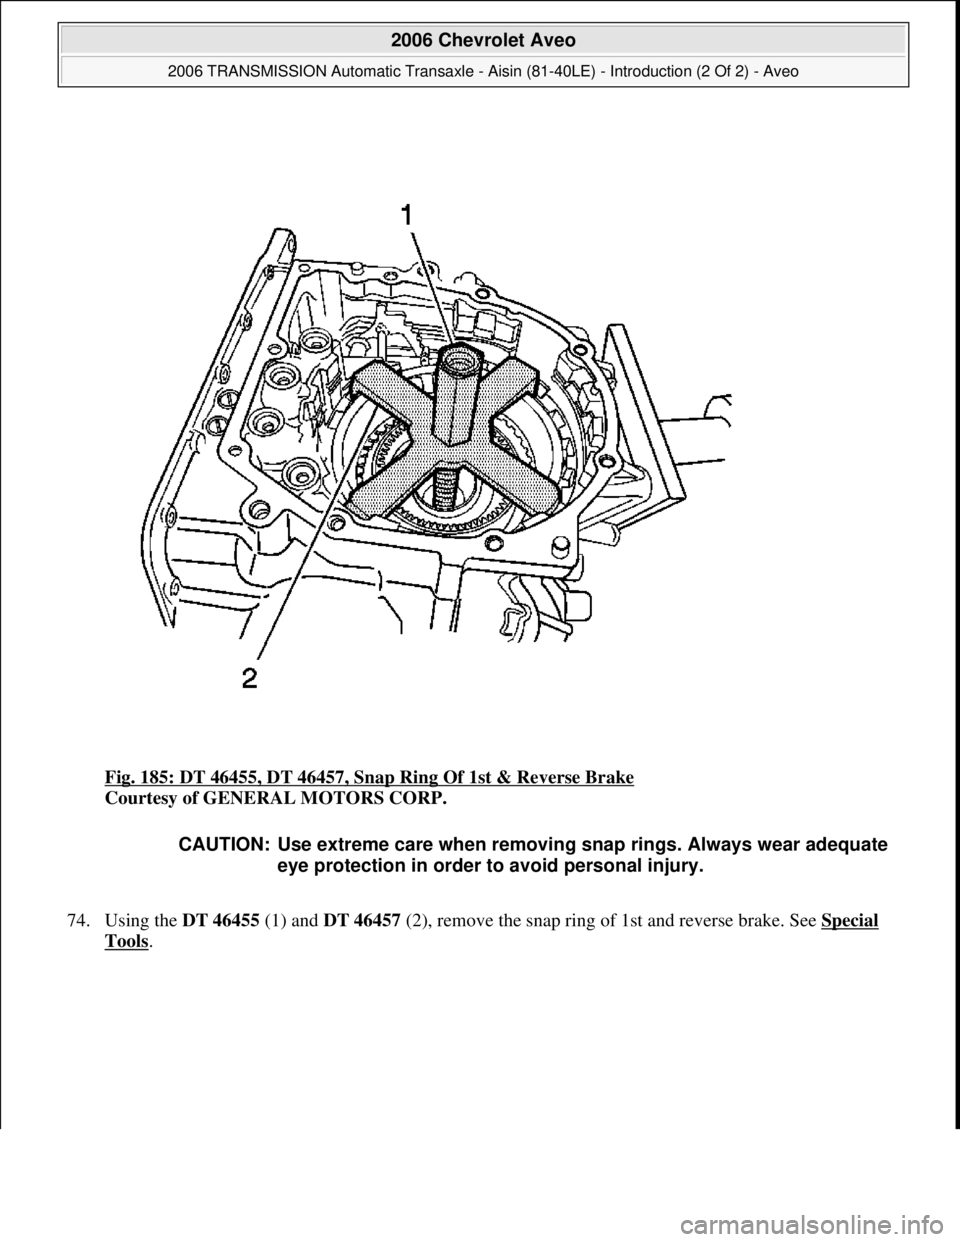
Fig. 185: DT 46455, DT 46457, Snap Ring Of 1st & Reverse Brake
Courtesy of GENERAL MOTORS CORP.
74. Using the DT 46455 (1) and DT 46457 (2), remove the snap ring of 1st and reverse brake. See Special
Tools.
CAUTION: Use extreme care when removing snap rings. Always wear adequate
eye protection in order to avoid personal injury.
2006 Chevrolet Aveo
2006 TRANSMISSION Automatic Transaxle - Aisin (81-40LE) - Introduction (2 Of 2) - Aveo
Microsoft
Thursday, July 16, 2009 1:17:23 PMPage 197 © 2005 Mitchell Repair Information Company, LLC.
Page 2747 of 5127
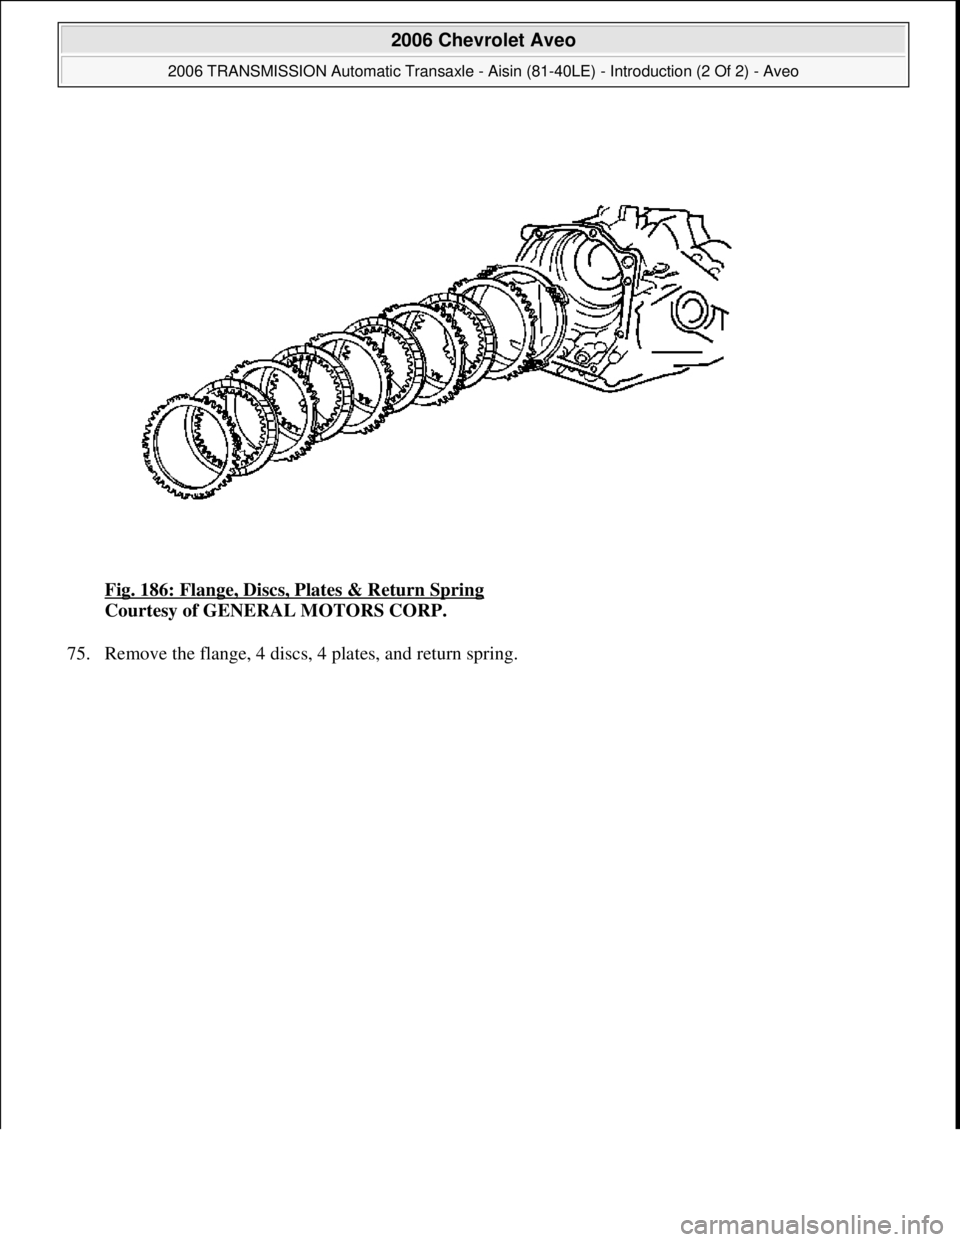
Fig. 186: Flange, Discs, Plates & Return Spring
Courtesy of GENERAL MOTORS CORP.
75. Remove the flan
ge, 4 discs, 4 plates, and return spring.
2006 Chevrolet Aveo
2006 TRANSMISSION Automatic Transaxle - Aisin (81-40LE) - Introduction (2 Of 2) - Aveo
Microsoft
Thursday, July 16, 2009 1:17:23 PMPage 198 © 2005 Mitchell Repair Information Company, LLC.
Page 2748 of 5127
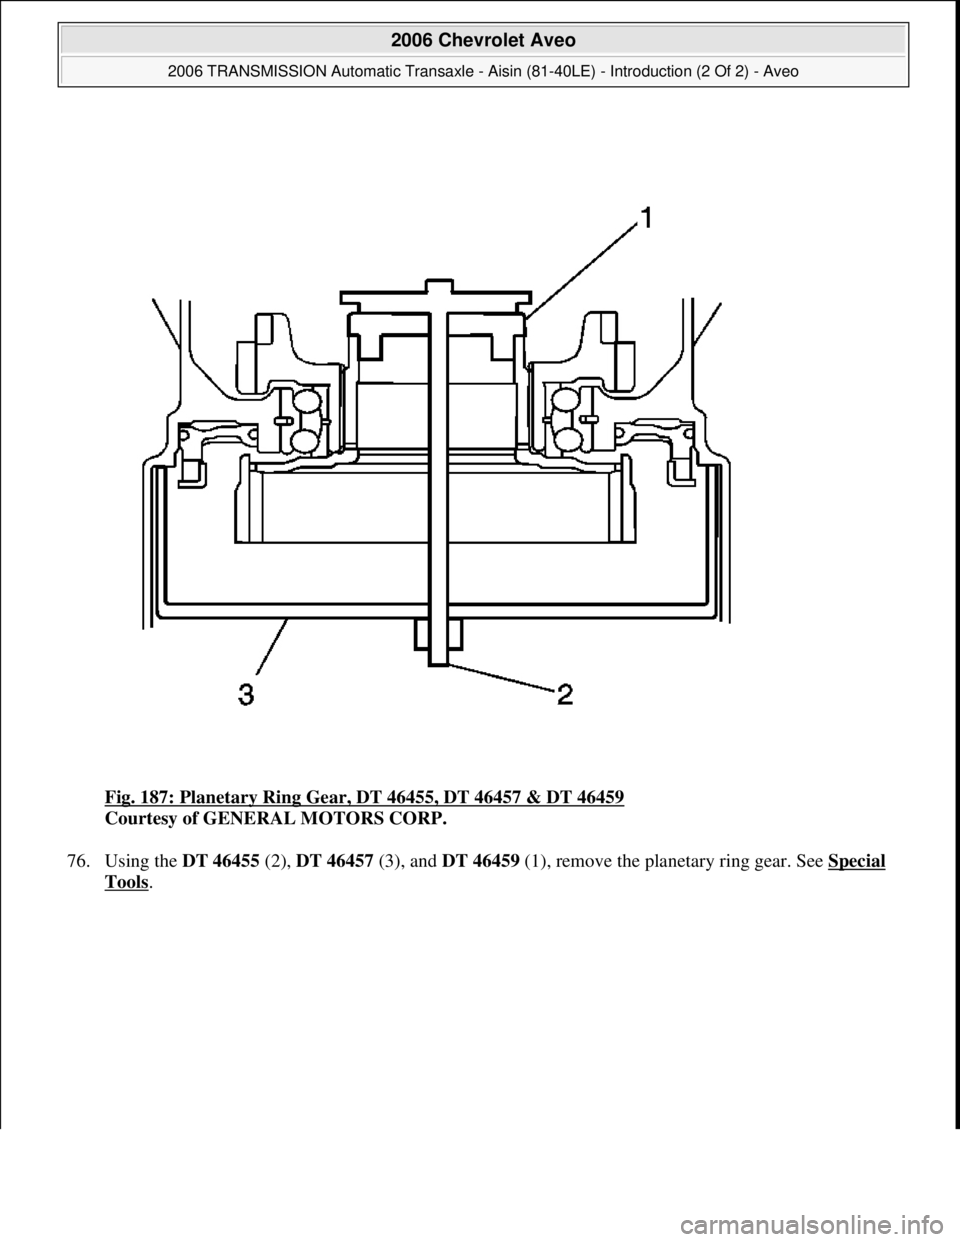
Fig. 187: Planetary Ring Gear, DT 46455, DT 46457 & DT 46459
Courtesy of GENERAL MOTORS CORP.
76. Using the DT 46455 (2), DT 46457 (3), and DT 46459 (1), remove the planetary ring gear. See Special
Tools.
2006 Chevrolet Aveo
2006 TRANSMISSION Automatic Transaxle - Aisin (81-40LE) - Introduction (2 Of 2) - Aveo
Microsoft
Thursday, July 16, 2009 1:17:23 PMPage 199 © 2005 Mitchell Repair Information Company, LLC.
Page 2749 of 5127
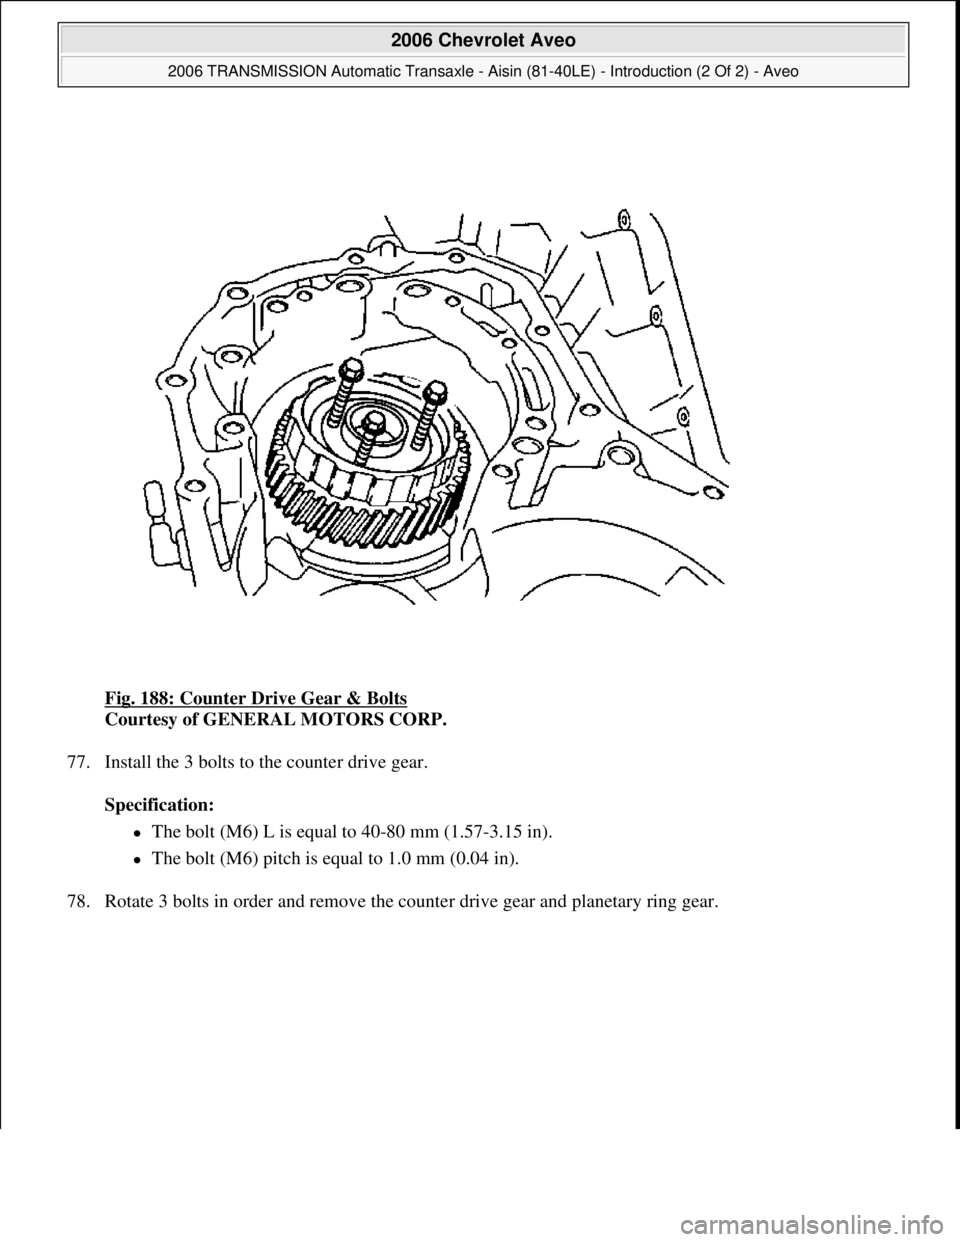
Fig. 188: Counter Drive Gear & Bolts
Courtesy of GENERAL MOTORS CORP.
77. Install the 3 bolts to the counter drive gear.
Specification:
The bolt (M6) L is equal to 40-80 mm (1.57-3.15 in).
The bolt (M6) pitch is equal to 1.0 mm (0.04 in).
78. Rotate 3 bolts in order and remove the counter drive
gear and planetary ring gear.
2006 Chevrolet Aveo
2006 TRANSMISSION Automatic Transaxle - Aisin (81-40LE) - Introduction (2 Of 2) - Aveo
Microsoft
Thursday, July 16, 2009 1:17:23 PMPage 200 © 2005 Mitchell Repair Information Company, LLC.
Page 2750 of 5127
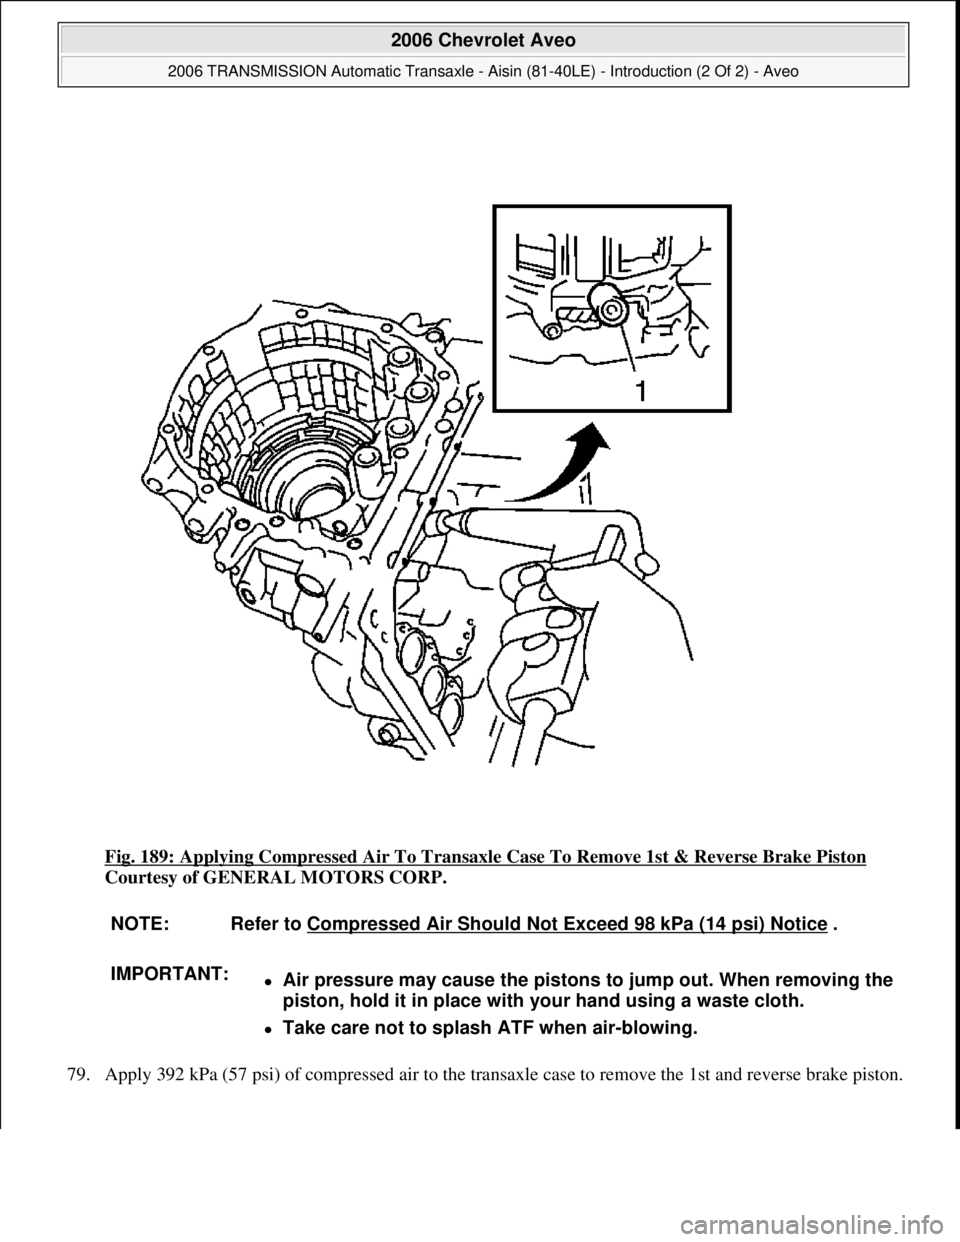
Fig. 189: Applying Compressed Air To Transaxle Case To Remove 1st & Reverse Brake Piston
Courtesy of GENERAL MOTORS CORP.
79. Appl
y 392 kPa (57 psi) of compressed air to the transaxle case to remove the 1st and reverse brake piston.
NOTE: Refer to Compressed Air Should Not Exceed 98 kPa (14 psi) Notice .
IMPORTANT:
Air pressure may cause the pistons to jump out. When removing the
piston, hold it in place with your hand using a waste cloth.
Take care not to splash ATF when air-blowing.
2006 Chevrolet Aveo
2006 TRANSMISSION Automatic Transaxle - Aisin (81-40LE) - Introduction (2 Of 2) - Aveo
Microsoft
Thursday, July 16, 2009 1:17:23 PMPage 201 © 2005 Mitchell Repair Information Company, LLC.
Trending: CD player, oil capacities, airbag, rear view mirror, climate control, child restraint, fuel fill door release
