relay CHEVROLET CAMARO 1967 1.G Chassis User Guide
[x] Cancel search | Manufacturer: CHEVROLET, Model Year: 1967, Model line: CAMARO, Model: CHEVROLET CAMARO 1967 1.GPages: 659, PDF Size: 114.24 MB
Page 93 of 659
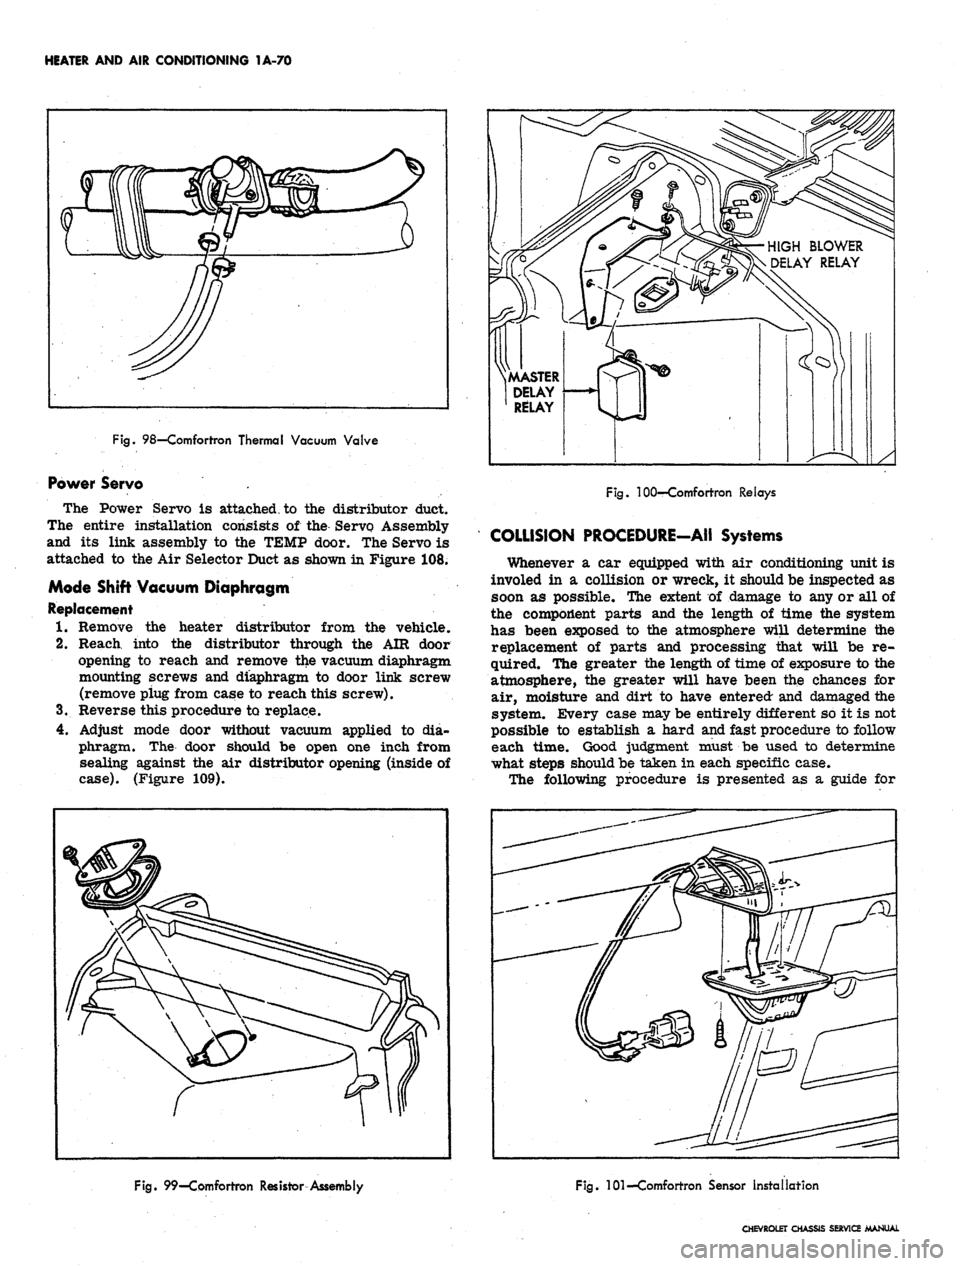
HEATER AND AIR CONDITIONING 1A-70
Fig.
98—Comfortron Thermal Vacuum Valve
Power Servo .
The Power Servo is attached, to the distributor duct.
The entire installation consists of the Servo Assembly
and its link assembly to the TEMP door. The Servo is
attached to the Air Selector Duct as shown in Figure 108.
Mode Shift Vacuum Diaphragm
Replacement
1.
Remove the heater distributor from the vehicle.
2.
Reach into the distributor through the AIR door
opening to reach and remove the vacuum diaphragm
mounting screws and diaphragm to door link screw
(remove piug from case to reach this screw).
3.
Reverse this procedure to replace.
4.
Adjust mode door without vacuum applied to dia-
phragm. The door should be open one inch from
sealing against the air distributor opening (inside of
case).
(Figure 109).
HIGH BLOWER
DELAY RELAY
.MASTER
DELAY
RELAY
Fig.
100—Comfortron Relays
COLLISION PROCEDURE-AII Systems
Whenever a car equipped with air conditioning unit is
involed in a collision or wreck, it should be inspected as
soon as possible. The extent of damage to any or all of
the component parts and the length of time the system
has been exposed to the atmosphere will determine the
replacement of parts and processing that will be re-
quired. The greater the length of time of exposure to the
atmosphere, the greater will have been the chances for
air, moisture and dirt to have entered and damaged the
system. Every case may be entirely different so it is not
possible to establish a hard and fast procedure to follow
each time. Good judgment must be used to determine
what steps should be taken in each specific case.
The following procedure is presented as a guide for
Fig.
99—Comfortron Resistor Assembly
Fig.
101—Comfortron Sensor Installation
CHEVROLET CHASSIS SERVICE MANUAL
Page 94 of 659
HEATER AND AIR CONDITIONING 1A-71
SUN-AMBIENT
SENSOR AND COMPRESSOR
CLUTCH SWITCH
HIGH BLOWER
DELAY RELAY
THERMAL
VACUUM
VALVE
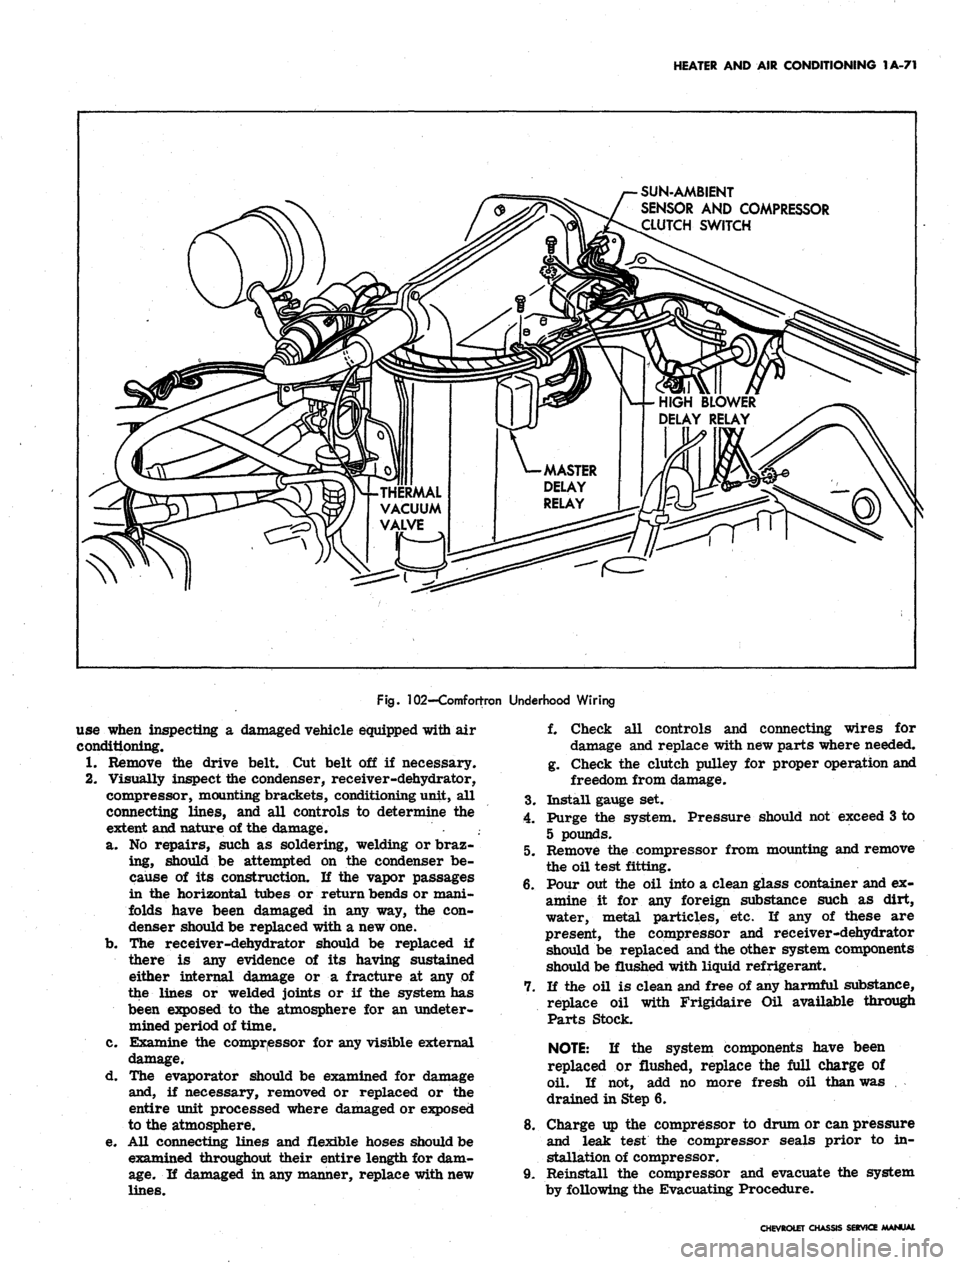
Fig.
102-Comfortron Underhood Wiring
use when inspecting a damaged vehicle equipped with air
conditioning.
1.
Remove the drive belt. Cut belt off if necessary.
2.
Visually inspect the condenser, receiver-dehydrator,
compressor, mounting brackets, conditioning unit, all
connecting lines, and all controls to determine the
extent and nature of the damage.
a. No repairs, such as soldering, welding or braz-
ing, should be attempted on the condenser be-
cause of its construction. If the vapor passages
in the horizontal tubes or return bends or mani-
folds have been damaged in any way, the con-
denser should be replaced with a new one.
b.
The receiver-dehydrator should be replaced if
there is any evidence of its having sustained
either internal damage or a fracture at any of
the lines or welded joints or if the system has
been exposed to the atmosphere for an undeter-
mined period of time.
c. Examine the compressor for any visible external
damage.
d. The evaporator should be examined for damage
and, if necessary, removed or replaced or the
entire unit processed where damaged or exposed
to the atmosphere.
e. All connecting lines and flexible hoses should be
examined throughout their entire length for dam-
age.
If damaged in any manner, replace with new
lines.
f. Check all controls and connecting wires for
damage and replace with new parts where needed.
g. Check the clutch pulley for proper operation and
freedom from damage.
3.
Install gauge set.
4.
Purge the system. Pressure should not exceed 3 to
5 pounds.
5. Remove the compressor from mounting and remove
the oil test fitting.
6. Pour out the oil into a clean glass container and ex-
amine it for any foreign substance such as dirt,
water, metal particles, etc. If any of these are
present, the compressor and receiver-dehydrator
should be replaced and the other system components
should be flushed with liquid refrigerant.
7. If the oil is clean and free of any harmful substance,
replace oil with Frigidaire Oil available through
Parts Stock.
NOTE:
If the system components have been
replaced or flushed, replace the full charge of
oil. If not, add no more fresh oil than was
drained in Step 6.
8. Charge up the compressor to drum or can pressure
and leak test the compressor seals prior to in-
stallation of compressor.
9. Reinstall the compressor and evacuate the system
by following the Evacuating Procedure.
CHEVROLET CHASSIS SERVICE MANUAL
Page 96 of 659
HEATER AND AIR CONDITIONING 1A-73
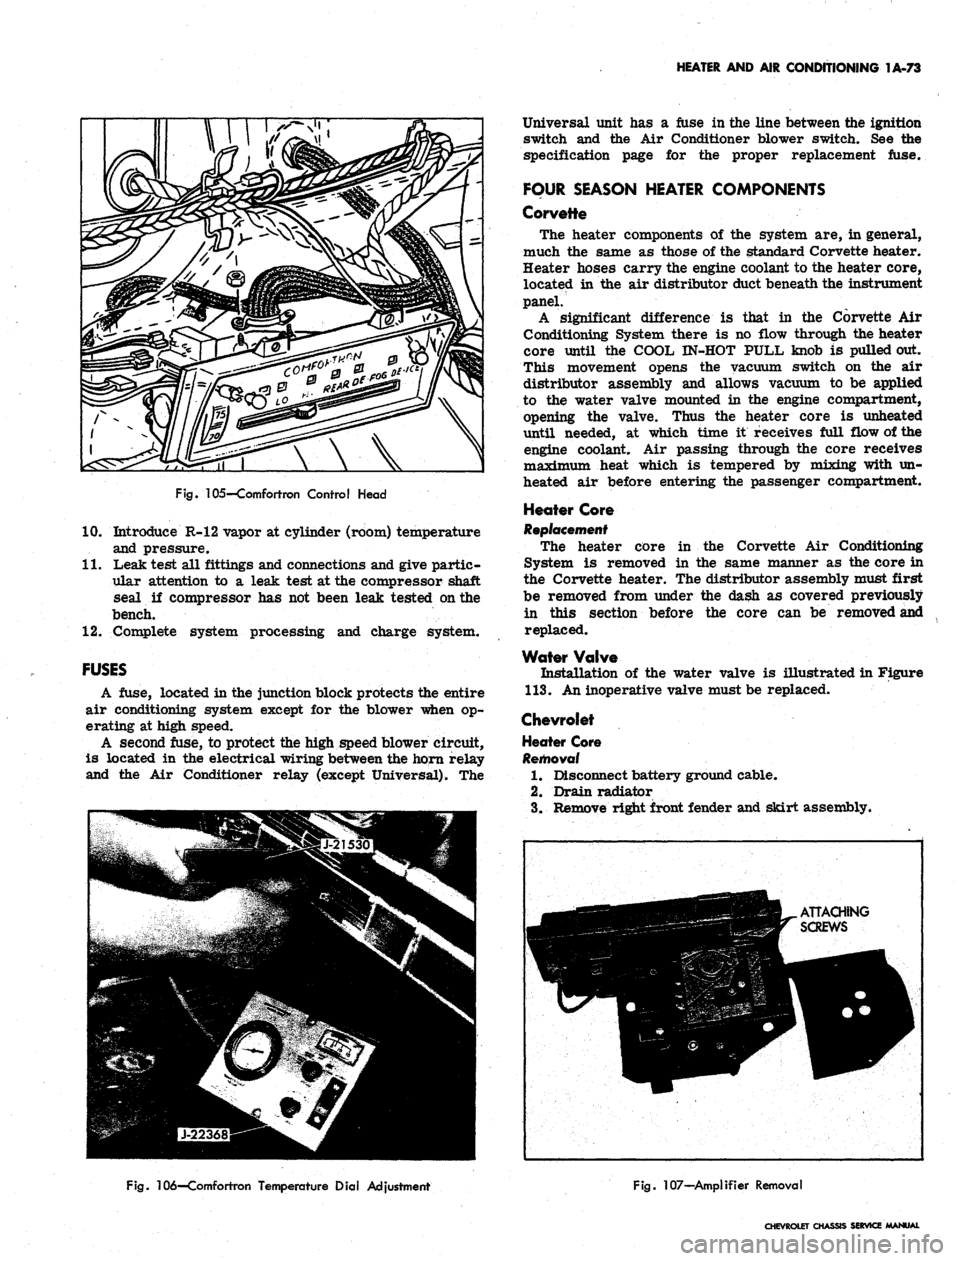
Fig.
105—Comfortron Control Head
10.
Introduce R-12 vapor at cylinder (room) temperature
and pressure.
11.
Leak test all fittings and connections and give partic-
ular attention to a leak test at the compressor shaft
seal if compressor has not been leak tested on the
bench.
12.
Complete system processing and charge system.
FUSES
A fuse, located in the junction block protects the entire
air conditioning system except for the blower when op-
erating at high speed.
A second fuse, to protect the high speed blower circuit,
is located in the electrical wiring between the horn relay
and the Air Conditioner relay (except Universal). The
Universal unit has a fuse in the line between the ignition
switch and the Air Conditioner blower switch. See the
specification page for the proper replacement fuse.
FOUR SEASON HEATER COMPONENTS
Corvette
The heater components of the system are, in general,
much the same as those of the standard Corvette heater.
Heater hoses carry the engine coolant to the heater core,
located in the air distributor duct beneath the instrument
panel.
A significant difference is that in the Corvette Air
Conditioning System there is no flow through the heater
core until the COOL IN-HOT PULL knob is pulled out.
This movement opens the vacuum switch on the air
distributor assembly and allows vacuum to be applied
to the water valve mounted in the engine compartment,
opening the valve. Thus the heater core is unheated
until needed, at which time it receives full flow of the
engine coolant. Air passing through the core receives
maximum heat which is tempered by mixing with un-
heated air before entering the passenger compartment.
Heater Core
Replacement
The heater core in the Corvette Air Conditioning
System is removed in the same manner as the core in
the Corvette heater. The distributor assembly must first
be removed from under the dash as covered previously
in this section before the core can be removed and
replaced.
Water Valve
Installation of the water valve is illustrated in Figure
113.
An inoperative valve must be replaced.
Chevrolet
Heater Core
Removal
1.
Disconnect battery ground cable.
2.
Drain radiator
3.
Remove right front fender and skirt assembly.
Fig.
106—Comfortron Temperature Dial Adjustment
Fig.
107—Amplifier Removal
CHEVROLET CHASSIS SERVICE MANUAL
Page 101 of 659

HEATER AND AIR CONDITIONING 1A-78
WIRING DIAGRAMS
Blower
Motor
Resistor
•
Asm
EVAPORATOR—v
ASM.
\
-Diode
(Arc I
suppressor)
^\
16B
—>
-COMPRESSOR
Clutch Coil
•To battery positive
(+) terminal
No vacuum
in hose
#3
Blower
intake
air
Outside
air entry
Valve
by vacuum
in
hose
#3
Valve
normally
closed (spring
held)
Inside
car
air
(Recirc.)
AIR INLET
VALVE
POSITION:
Outside
air
intake
Recirc. air'intake
CONTROL ASM
TEMP CONTROL LEVER
(Operates temp valve
cable
&
equipment
in
chart shown below)
Compressor
Sw.
(Normally closed
Temp valve
begins
to
open
valveV
cable
arm
•Fan Speed Selector Switch
Switch
lever
position
Off
Low
Med
High
Contacts
made
B
to
None
BtoL
B to L
&
M
B to
L
& H
Fan
speed
Low
Low
Med
High
Resistance
in series with
Bio Motor
Hi
Rl
(RiR2)/(Rl+R2)
None
•Blower switch contacts must
be
dosed
before
fan
switch will
be
operable.
COLD
(O.
A.)
COLD a.A.)
Blower
H
y—low
switch
M/
-med
(Norm,
closed
contacts)
Fan speed switch
(See chart
at
left)
To vacuum,
tank
EXTENSION—vy
Horn relay "Bat" WIRE
ASM
X
harness
terminal
V
.**-__.. ;_
1 I panel
Legend:
___. —
Production wiring
Wire
is
part
of
equip.
•—————* Air
conditioning
wrg.
| i
T Agn. sw.
accsy
I term.
I
Temp
Control
Lever
Position
OFF
VENT.
COLD(I.A.)
COLEKO.AJ
HOT
Blower
(Master)
switch
contacts
Open
Closed
Closed
Closed
Closed
Vac switch
connects
vac source
to hose
#
#2
#2
&
#3
None
#3
#2
&
#3
Compressor
switch
contacts:
Open
Open
Closed
Closed
Open
Blower
intake
air
Outside
car air
intake used
Inside
car air
recirculated
Outside
car air
intake used
.Outside
car air
intake used
Fig. 114—Chevrolet—Four-Season Wiring Diagram
CHEVROLET CHASSIS SERVICE MANUAL
Page 102 of 659
HEATER
AND AIR CONDITIONING IA-79
BAT.
CABLE
ASM
A/C
wrg fwd of
dash
exc
bat.
cables,
ext
wire
&
compressor
grd
wire
is
part
of engine wiring harness.
"COMPRESSOR"
SW:
"OFF" POSN
"ON"
POSN
RELAY
ASM
/-DASH
/
PANEL
RESISTOR
ASM
LUTCH
COIL
:OMI
GRD
WIRE
ASM
MPRESSOR
BAT.
TERM
ON START
MTR SOL
EXTENSION WIRE ASM
._
J
J
^-CONTROL
SW
CONTACTS
B TO NONE
BTOL
BTOL&M
BTOL6H
•IGN SW ACCSY TERM.
A/C wrg
to
rear
of
dash
of
inst pnl harness.
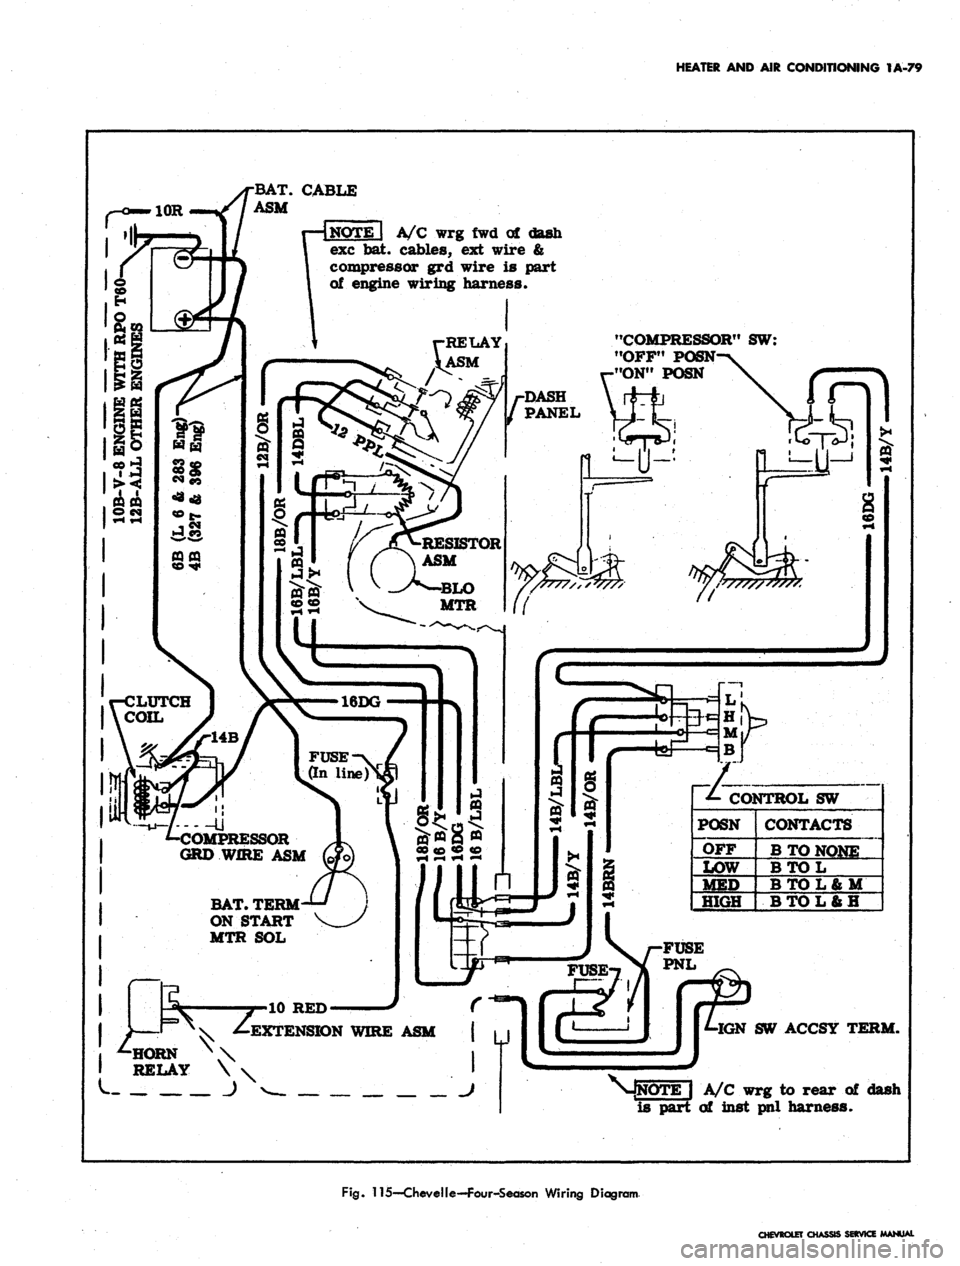
Fig.
115—CheveIle—Four-Season Wiring Diagram
CHEVROLET
CHASSIS SERVICE MANUAL
Page 103 of 659

HEATER
AND AIR
CONDITIONING
1A-80
EVAPORATOR ASM.
Blower
Motor
INSIDE VALVE
(Normally closed
-spring held)
PLENUM VALVE
(Normally open
-spring held)
Actuator
(Vacuum
operated)
Inside car air (Recirc*
CONTROL ASM
TEMP CONTROL LEVER
•(Operates temp valve
cable
&
equipment in
hart shown below)
Temp valve
begins to
16DG
Fuse (In-line^
COMPRESSOR
Clutch Coil DASH-
PANEL
•Fan Speed Selector Switch
Switch
lever
position
Off
Low
"HeST
High
Contacts
B to
None
BtoL
B to L b U
BtoL&H
Fan
speed
Low
Low
Med
High
Resistance
in series with
Bio Motor
Rl
Rl
RlR2)/(Rl+R2)
None
•Blower switch contacts must be closed
before fan switch will be operable.
-To battery positive
(-0 terminal
•
Horn relay
terminal"
"Batf
To vacuum
tank
EXTENSION
WIRE
ASM
(Normally closed
contacts-*vac
operated)
7
*- Fan speed switch
(See chart at left)
•/-Wire is
\ part of
I inst panel
harness
Legend:
— Production wiring
————
Wire Is part of equip.
•mmmmmmmmmmmmmm*
AIT
Conditioning
WTg*
Temp
Control
Lever
Position
OFF
VENT
COLD
a.A.)
COLD
(O.A.)
HOT
Blower
(Master)
switch
contacts
Open
Closed
Closed
Closed
Closed
Vac switch
connects
vac source
to hose #
#2
&
#3
#2
#3
None
#2
Compressor
switch
contacts^
Open
Open
Closed
Closed
Open
Blower
intake air
Outside car air
intake used
Inside car air
recir culated
Outside car air
intake used
Outside car air
intake used
Fig.
116—Camaro—Four-Season Wiring Diagram
CHEVROLET CHASSIS SERVICE
Page 104 of 659
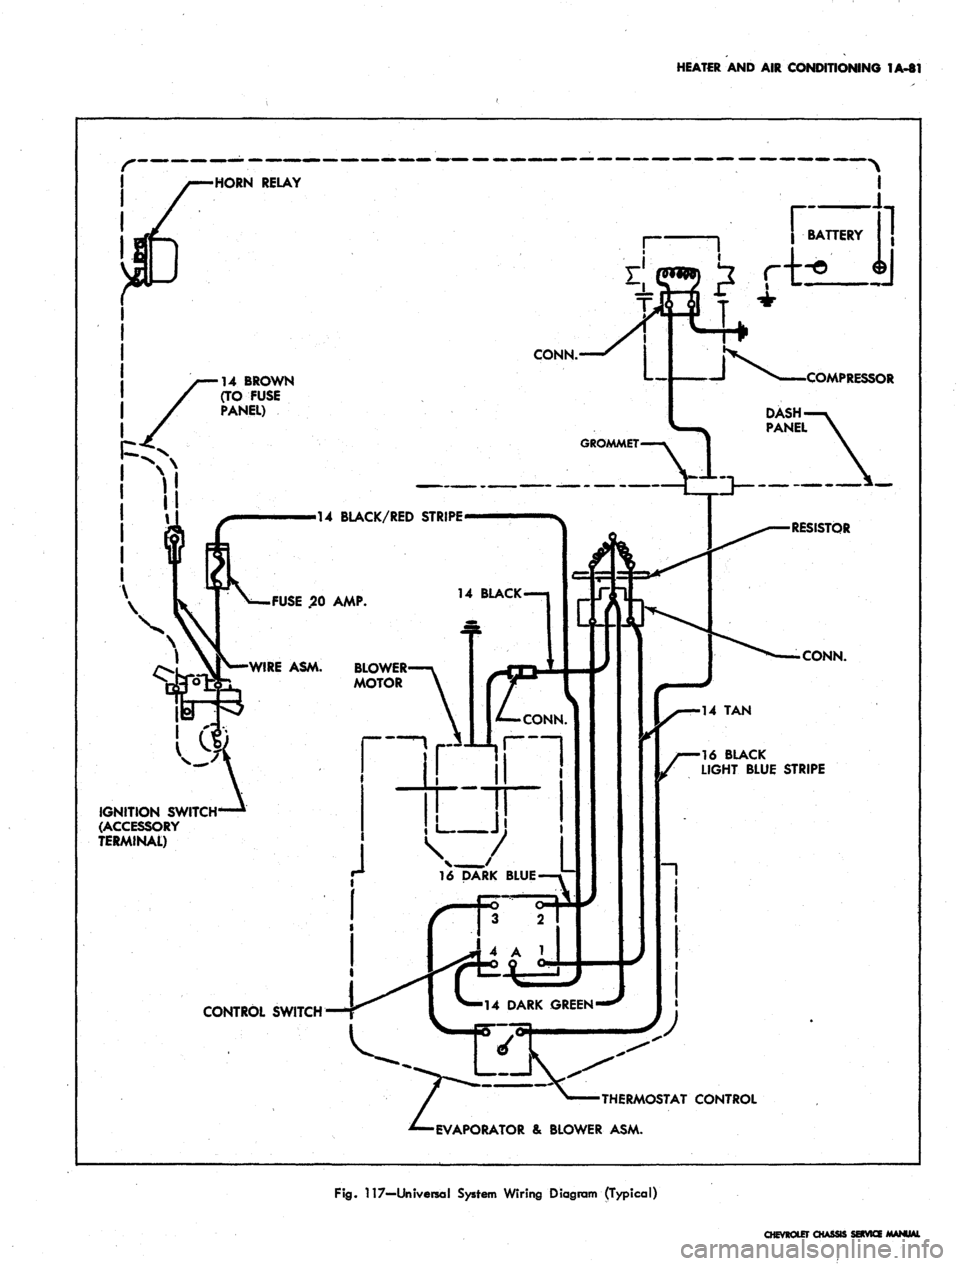
HEATER AND AIR CONDITIONING 1A-81
HORN RELAY
r
CONN.-
14 BROWN
(TO FUSE
PANEL)
BATTERY
1
—I ^ COMPR
ESSOR
DASH y
V-^ PANEL \
GROMMET—%
1 \
_ J~ ") "^
>14 BLACK/RED STRIPE-
FUSE .20 AMP.
•WIRE ASM. BLOWER-
MOTOR
14 BLACK 1
IGNITION SWITCH1
(ACCESSORY
TERMINAL)
CONTROL SWITCH
-RESISTOR
CONN.
•14 TAN
•16 BLACK
LIGHT BLUE STRIPE
•THERMOSTAT CONTROL
EVAPORATOR & BLOWER ASM.
Fig.
117—Universal System Wiring Diagram (Typical)
CHEVROLET CHASSI
Page 105 of 659
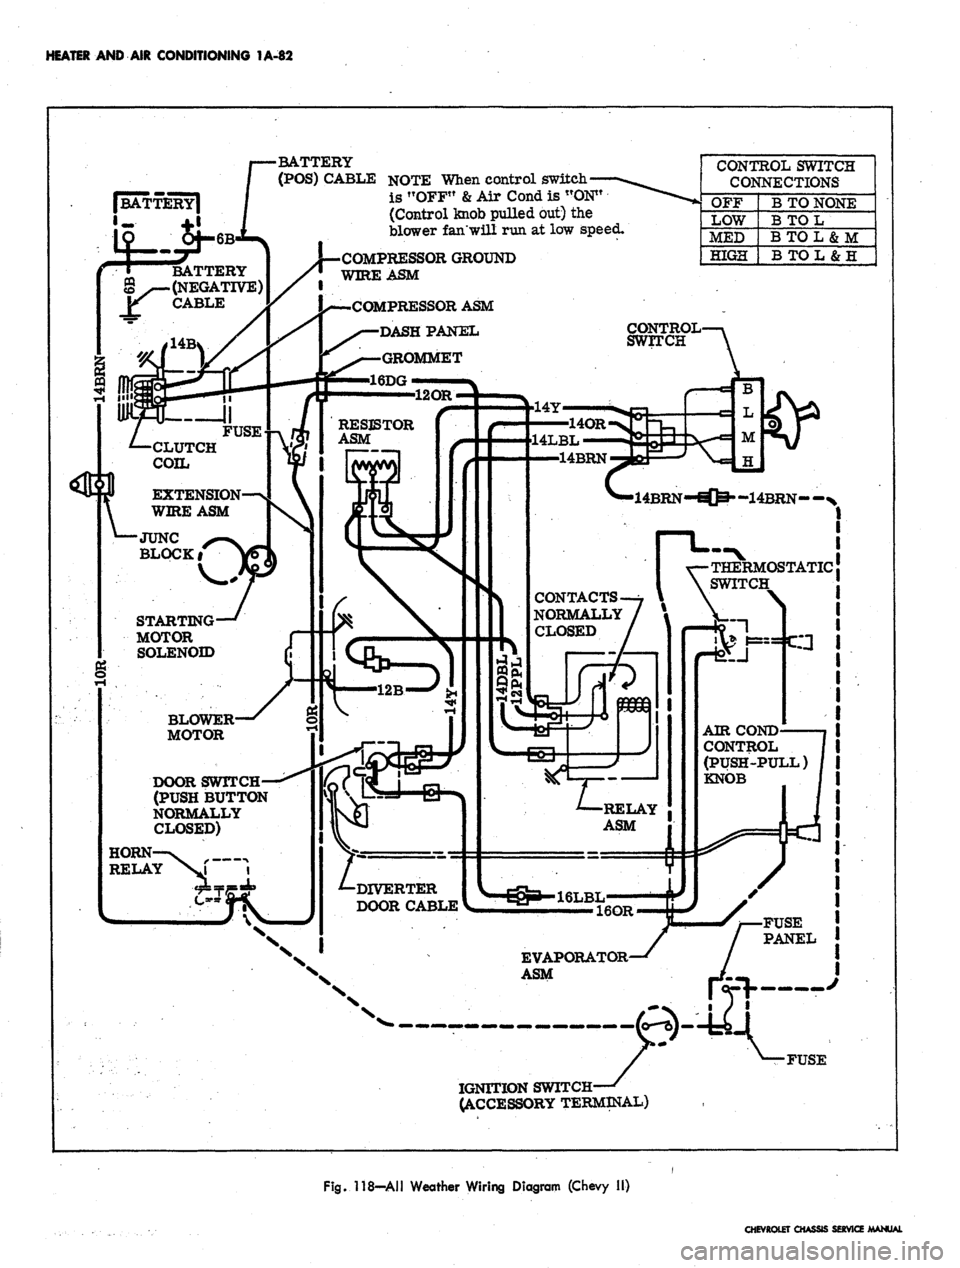
HEATER AND AIR CONDITIONING 1A-82
•BATTERY
(POS)
CABLE
NOTE
When
control
switch*
is !TOFF"
&
Air
Cond
is
"ON"
(Control
knob
pulled
but) the
blower
fan'will
run at low
speed.
CONTROL
SWITCH
CONNECTIONS
OFF
LOW
MED
HIGH
B
TO
NONE
B
TO L
BTOL&M
B
TO L
&
H
COMPRESSOR
GROUND
WIRE
ASM
BATTERY
(NEGATIVE)
CABLE
COMPRESSOR
ASM
DASHPAJSTEL
GROMMET
16DG
CONTROL
SWITCH
RESISTOR
ASM
14LBL
14BRN
CLUTCH
COIL
EXTENSION
WIRE
ASM
-14BRN--N
JUNC
BLOCKi
OSTATIC
SWITCH
CONTACTS
NORMALLY
CLOSED
STARTING
MOTOR
SOLENOID
BLOWER
MOTOR
AIR
COND
CONTROL
(PUSH-PULL)
KNOB
DOOR
SWITCH
(PUSH
BUTTON
NORMALLY
CLOSED)
RELAY
ASM
HORN
RELAY
DIVERTER
DOOR CABLE
FUSE
PANEL
EVAPORATOR
ASM
IGNITION SWITCH-
ACCESSORY TERMINAL)
Fig. 118—All Weather Wiring Diagram (Chevy II)
CHEVROLET CHASSIS SERVICE MANUAL
Page 106 of 659
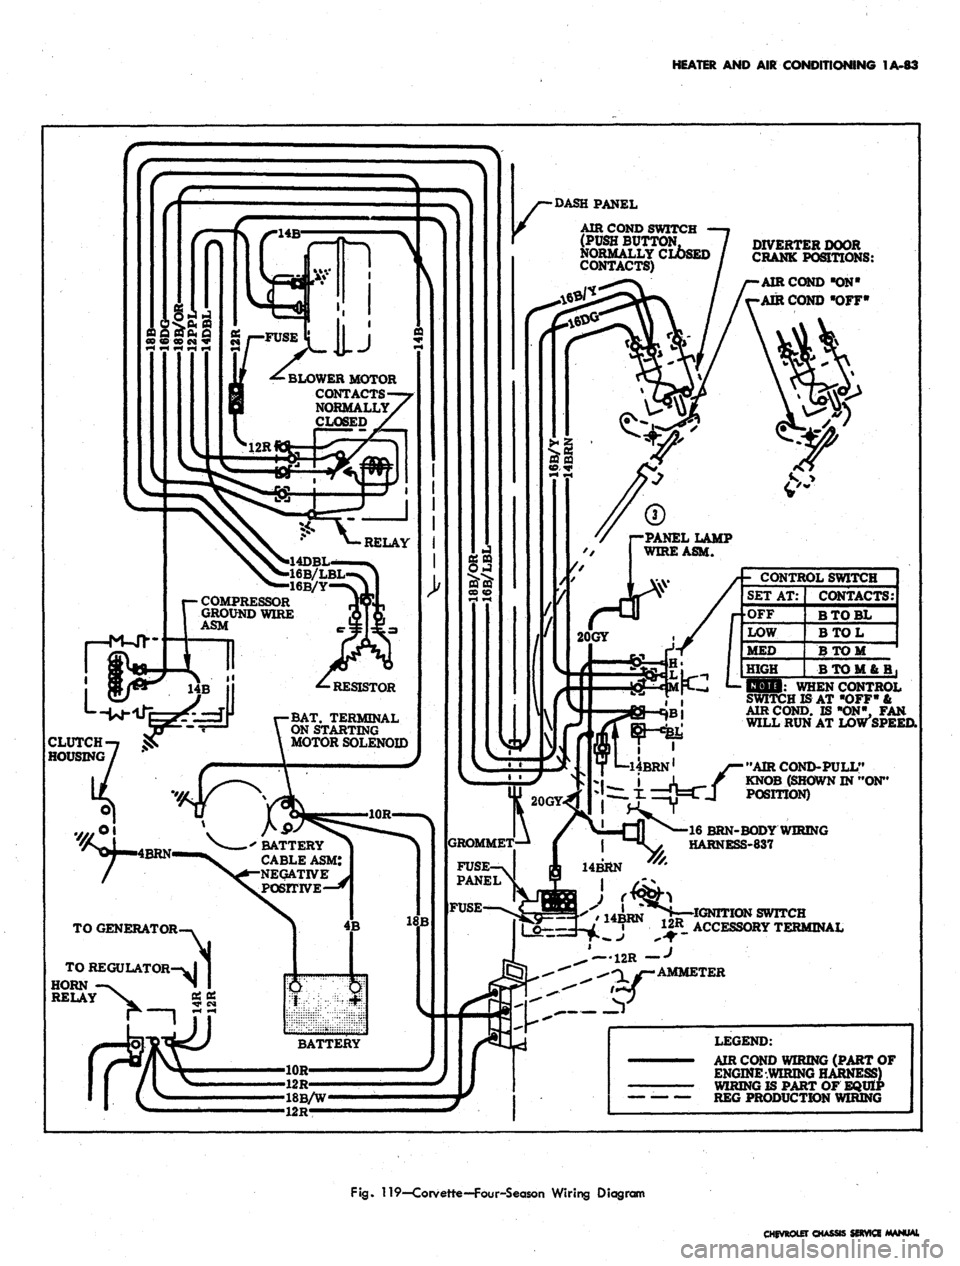
HEATER AND AIR CONDITIONING 1A-83
DIVERTER DOOR
CRANK POSITIONS:
AIR COND "ON"
AIR COND "OFF*
AIR COND SWITCH
(PUSH BUTTON,
NORMALLY CLOSED
CONTACTS)
BLOWER MOTOR
CONTACTS
NORMALLY
4D
16
16B/Y
COMPRESSOR
GROUND WIRE
ASM
BAT.
TERMINAL
ON STARTING
MOTOR SOLENOID
' BATTERY
CABLE ASM:
NEGATIVE
POSITIVE—*
- CONTROL SWITCH
SET AT:
•OFF
LOW
MED
HIGH
CONTACTS:
BTOBL
BTOL
BTOM
BT0M6B,
CLUTCH
HOUSING
liOli: WHEN CONTROL
SWITCH IS AT "OFF" &
AIR COND. IS "ON", FAN
WILL RUN AT LOW SPEED.
"AIR COND-PULL"
KNOB (SHOWN IN "ON"
POSITION)
TO REGULATOR
HORN
RELAY
16 BRN-BODY WIRING
HARNESS-837
14BRN
I
^
IA^RN
* IGNITION SWITCH
« 12R ACCESSORY TERMINAL
12R f
AMMETER
LEGEND:
AIR COND WIRING (PART OF
ENGINE WIRING HARNESS)
WIRING IS PART OF EQUIP
REG PRODUCTION WIRING
Fig.
119—Corvette—Four-Season Wiring Diagram
CHEVROLET CHASSIS SERVICE MANUAL
Page 332 of 659
ENGINE-ELECTRICAL 6Y-7
CHARGING SYSTEM
INDEX
Page
General Description . 6Y-7
Maintenance and Adjustments 6Y-9
Static Checks . 6Y-10
System Condition Check and Voltage
•Regular Adjustment. 6Y-10
General Output 6Y-11
Generator Diode and Field Test 6Y-12
Indicator Lamp-Initial Field Excitation
Circuit Tests . 6Y-12
Page
Field Circuit Resistance Wire Tests 6Y-13
Field Relay Test and Adjustment 6Y-14
Other Harness Checks 6Y-14
Service Operations 6Y-14
Generator 6Y-14
Removal and Installation 6Y-14
Pulley Replacement. 6Y-14
Brush Replacement (6" Delcotron). 6Y-15
Double Contact Regulator . . . . . . 6Y-16
GENERAL DESCRIPTION
The charging system includes the battery, generator,
regulator, telltale light, and necessary wiring to connect
these components. The Delcotron is offered as standard
equipment, although there are various capacities avail-
able on all models.
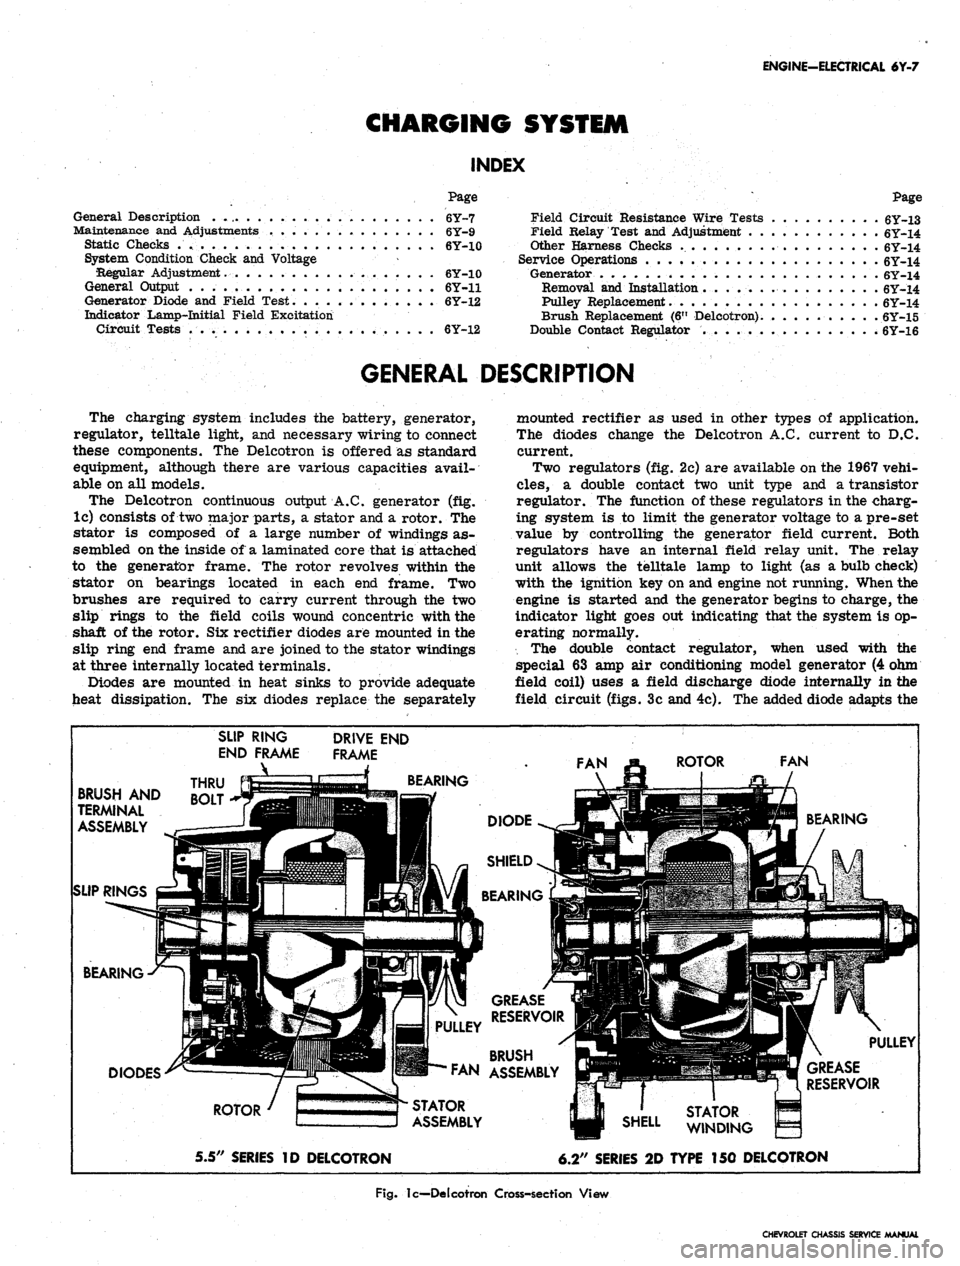
The Delcotron continuous output A.C. generator (fig.
lc) consists of two major parts, a stator and a rotor. The
stator is composed of a large number of windings as-
sembled on the inside of a laminated core that is attached
to the generator frame. The rotor revolves within the
stator on bearings located in each end frame. Two
brushes are required to carry current through the two
slip rings to the field coils wound concentric with the
shaft of the rotor. Six rectifier diodes are mounted in the
slip ring end frame and are joined to the stator windings
at three internally located terminals.
Diodes are mounted in heat sinks to provide adequate
heat dissipation. The six diodes replace the separately
mounted rectifier as used in other types of application.
The diodes change the Delcotron A.C. current to D.C.
current.
Two regulators (fig. 2c) are available on the 1967 vehi-
cles,
a double contact two unit type and a transistor
regulator. The function of these regulators in the charg-
ing system is to limit the generator voltage to a pre-set
value by controlling the generator field current. Both
regulators have an internal field relay unit. The relay
unit allows the telltale lamp to light (as a bulb check)
with the ignition key on and engine not running. When the
engine is started and the generator begins to charge, the
indicator light goes out indicating that the system is op-
erating normally.
The double contact regulator, when used with the
special 63 amp air conditioning model generator (4 ohm
field coil) uses a field discharge diode internally in the
field circuit (figs. 3c and 4c). The added diode adapts the
BRUSH AND
TERMINAL
ASSEMBLY
SLIP RINGS
SLIP RING
END FRAME
_\
THRU
BOLT
DRIVE END
FRAME
BEARING
BEARING
DIODES
ROTOR
5.5" SERIES ID DELCOTRON
STATOR
ASSEMBLY
GREASE
RESERVOIR
BRUSH
FAN ASSEMBLY
6.2" SERIES 2D TYPE 150 DELCOTRON
Fig.
lc—Delcotron Cross-section View
CHEVROLET CHASSIS SERVICE MANUAL