location CHRYSLER CARAVAN 2005 Repair Manual
[x] Cancel search | Manufacturer: CHRYSLER, Model Year: 2005, Model line: CARAVAN, Model: CHRYSLER CARAVAN 2005Pages: 2339, PDF Size: 59.69 MB
Page 415 of 2339
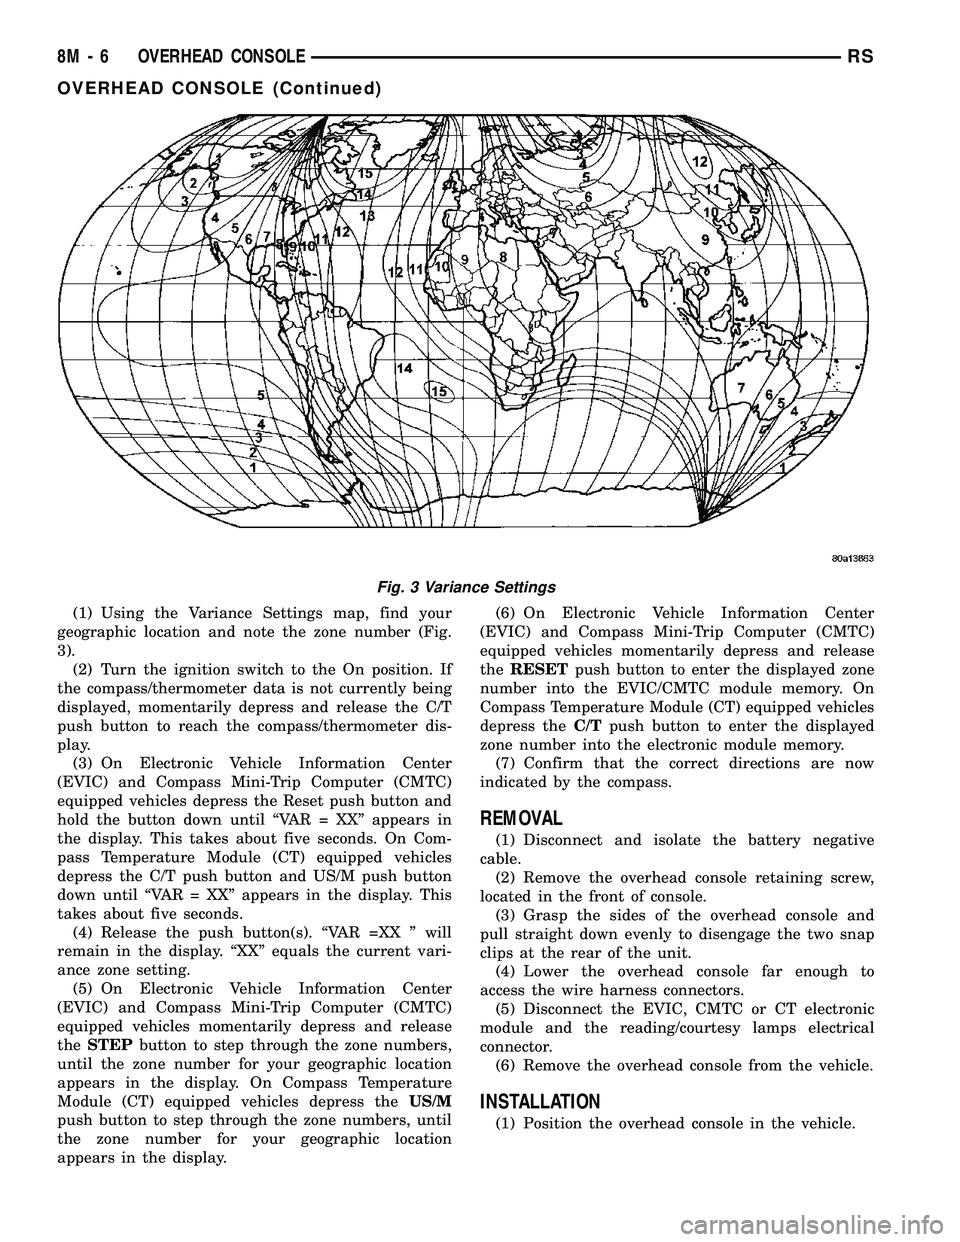
(1) Using the Variance Settings map, find your
geographic location and note the zone number (Fig.
3).
(2) Turn the ignition switch to the On position. If
the compass/thermometer data is not currently being
displayed, momentarily depress and release the C/T
push button to reach the compass/thermometer dis-
play.
(3) On Electronic Vehicle Information Center
(EVIC) and Compass Mini-Trip Computer (CMTC)
equipped vehicles depress the Reset push button and
hold the button down until ªVAR = XXº appears in
the display. This takes about five seconds. On Com-
pass Temperature Module (CT) equipped vehicles
depress the C/T push button and US/M push button
down until ªVAR = XXº appears in the display. This
takes about five seconds.
(4) Release the push button(s). ªVAR =XX º will
remain in the display. ªXXº equals the current vari-
ance zone setting.
(5) On Electronic Vehicle Information Center
(EVIC) and Compass Mini-Trip Computer (CMTC)
equipped vehicles momentarily depress and release
theSTEPbutton to step through the zone numbers,
until the zone number for your geographic location
appears in the display. On Compass Temperature
Module (CT) equipped vehicles depress theUS/M
push button to step through the zone numbers, until
the zone number for your geographic location
appears in the display.(6) On Electronic Vehicle Information Center
(EVIC) and Compass Mini-Trip Computer (CMTC)
equipped vehicles momentarily depress and release
theRESETpush button to enter the displayed zone
number into the EVIC/CMTC module memory. On
Compass Temperature Module (CT) equipped vehicles
depress theC/Tpush button to enter the displayed
zone number into the electronic module memory.
(7) Confirm that the correct directions are now
indicated by the compass.
REMOVAL
(1) Disconnect and isolate the battery negative
cable.
(2) Remove the overhead console retaining screw,
located in the front of console.
(3) Grasp the sides of the overhead console and
pull straight down evenly to disengage the two snap
clips at the rear of the unit.
(4) Lower the overhead console far enough to
access the wire harness connectors.
(5) Disconnect the EVIC, CMTC or CT electronic
module and the reading/courtesy lamps electrical
connector.
(6) Remove the overhead console from the vehicle.
INSTALLATION
(1) Position the overhead console in the vehicle.
Fig. 3 Variance Settings
8M - 6 OVERHEAD CONSOLERS
OVERHEAD CONSOLE (Continued)
Page 427 of 2339
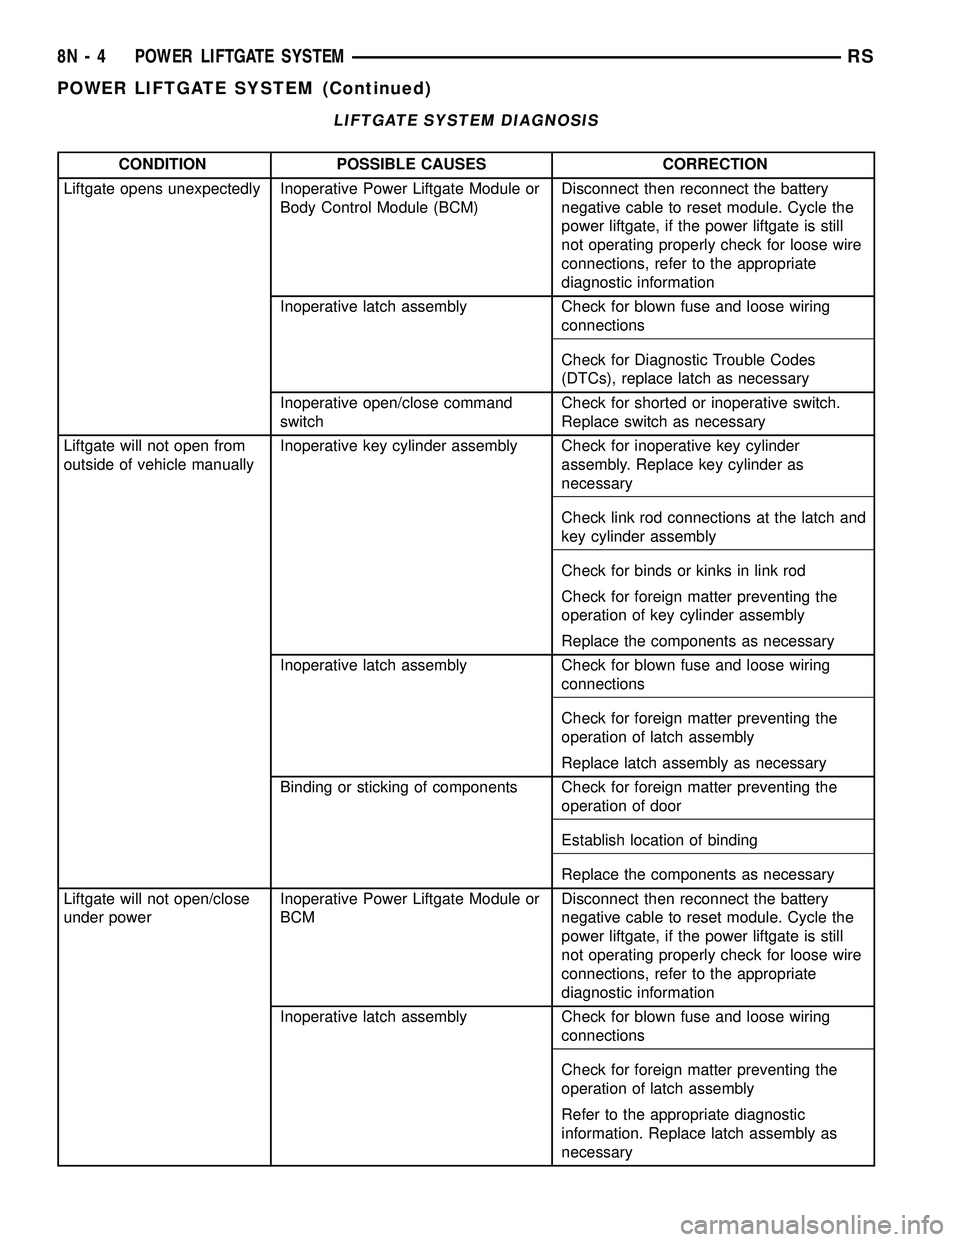
LIFTGATE SYSTEM DIAGNOSIS
CONDITION POSSIBLE CAUSES CORRECTION
Liftgate opens unexpectedly Inoperative Power Liftgate Module or
Body Control Module (BCM)Disconnect then reconnect the battery
negative cable to reset module. Cycle the
power liftgate, if the power liftgate is still
not operating properly check for loose wire
connections, refer to the appropriate
diagnostic information
Inoperative latch assembly Check for blown fuse and loose wiring
connections
Check for Diagnostic Trouble Codes
(DTCs), replace latch as necessary
Inoperative open/close command
switchCheck for shorted or inoperative switch.
Replace switch as necessary
Liftgate will not open from
outside of vehicle manuallyInoperative key cylinder assembly Check for inoperative key cylinder
assembly. Replace key cylinder as
necessary
Check link rod connections at the latch and
key cylinder assembly
Check for binds or kinks in link rod
Check for foreign matter preventing the
operation of key cylinder assembly
Replace the components as necessary
Inoperative latch assembly Check for blown fuse and loose wiring
connections
Check for foreign matter preventing the
operation of latch assembly
Replace latch assembly as necessary
Binding or sticking of components Check for foreign matter preventing the
operation of door
Establish location of binding
Replace the components as necessary
Liftgate will not open/close
under powerInoperative Power Liftgate Module or
BCMDisconnect then reconnect the battery
negative cable to reset module. Cycle the
power liftgate, if the power liftgate is still
not operating properly check for loose wire
connections, refer to the appropriate
diagnostic information
Inoperative latch assembly Check for blown fuse and loose wiring
connections
Check for foreign matter preventing the
operation of latch assembly
Refer to the appropriate diagnostic
information. Replace latch assembly as
necessary
8N - 4 POWER LIFTGATE SYSTEMRS
POWER LIFTGATE SYSTEM (Continued)
Page 428 of 2339
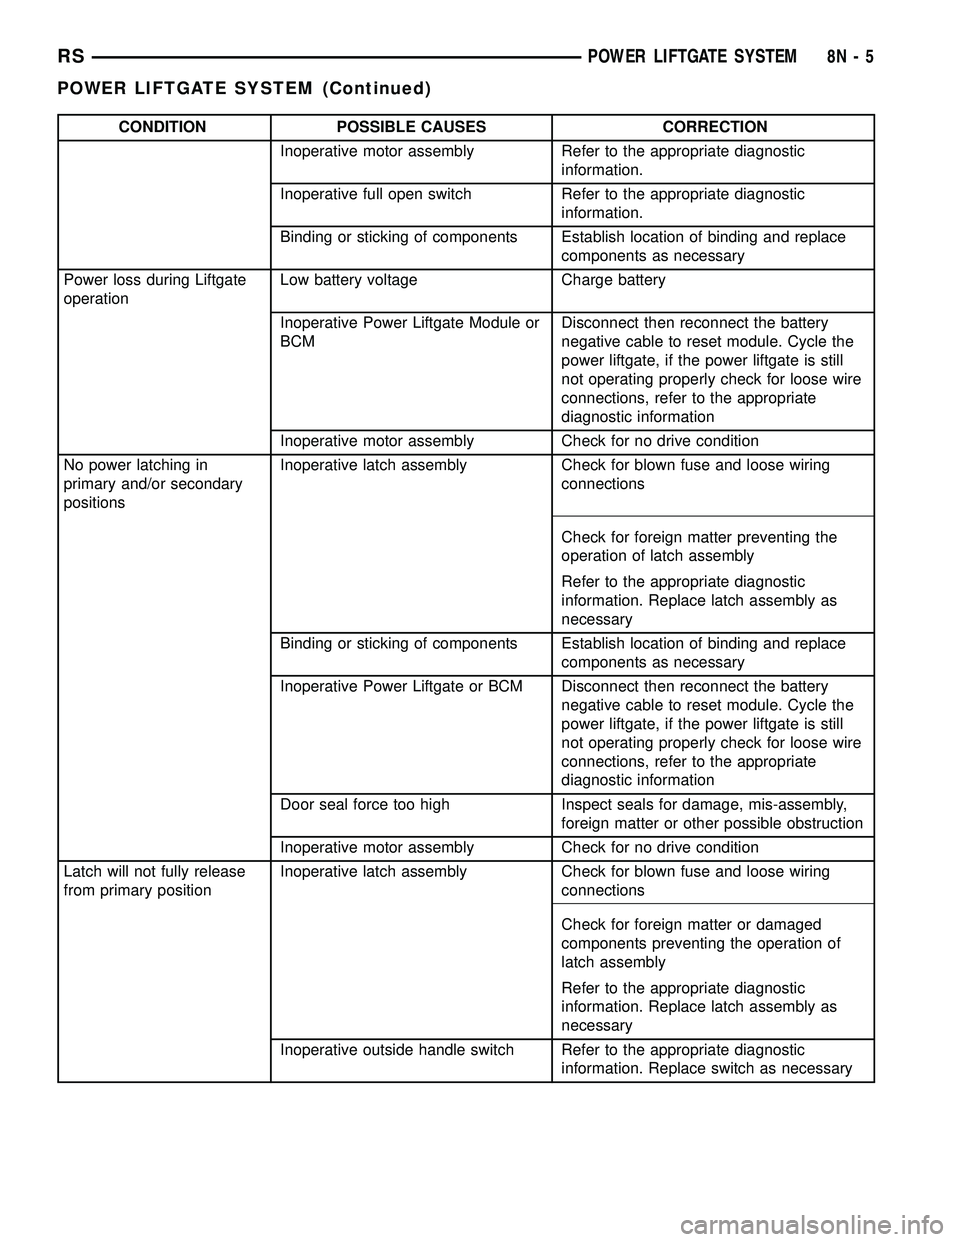
CONDITION POSSIBLE CAUSES CORRECTION
Inoperative motor assembly Refer to the appropriate diagnostic
information.
Inoperative full open switch Refer to the appropriate diagnostic
information.
Binding or sticking of components Establish location of binding and replace
components as necessary
Power loss during Liftgate
operationLow battery voltage Charge battery
Inoperative Power Liftgate Module or
BCMDisconnect then reconnect the battery
negative cable to reset module. Cycle the
power liftgate, if the power liftgate is still
not operating properly check for loose wire
connections, refer to the appropriate
diagnostic information
Inoperative motor assembly Check for no drive condition
No power latching in
primary and/or secondary
positionsInoperative latch assembly Check for blown fuse and loose wiring
connections
Check for foreign matter preventing the
operation of latch assembly
Refer to the appropriate diagnostic
information. Replace latch assembly as
necessary
Binding or sticking of components Establish location of binding and replace
components as necessary
Inoperative Power Liftgate or BCM Disconnect then reconnect the battery
negative cable to reset module. Cycle the
power liftgate, if the power liftgate is still
not operating properly check for loose wire
connections, refer to the appropriate
diagnostic information
Door seal force too high Inspect seals for damage, mis-assembly,
foreign matter or other possible obstruction
Inoperative motor assembly Check for no drive condition
Latch will not fully release
from primary positionInoperative latch assembly Check for blown fuse and loose wiring
connections
Check for foreign matter or damaged
components preventing the operation of
latch assembly
Refer to the appropriate diagnostic
information. Replace latch assembly as
necessary
Inoperative outside handle switch Refer to the appropriate diagnostic
information. Replace switch as necessary
RSPOWER LIFTGATE SYSTEM8N-5
POWER LIFTGATE SYSTEM (Continued)
Page 429 of 2339
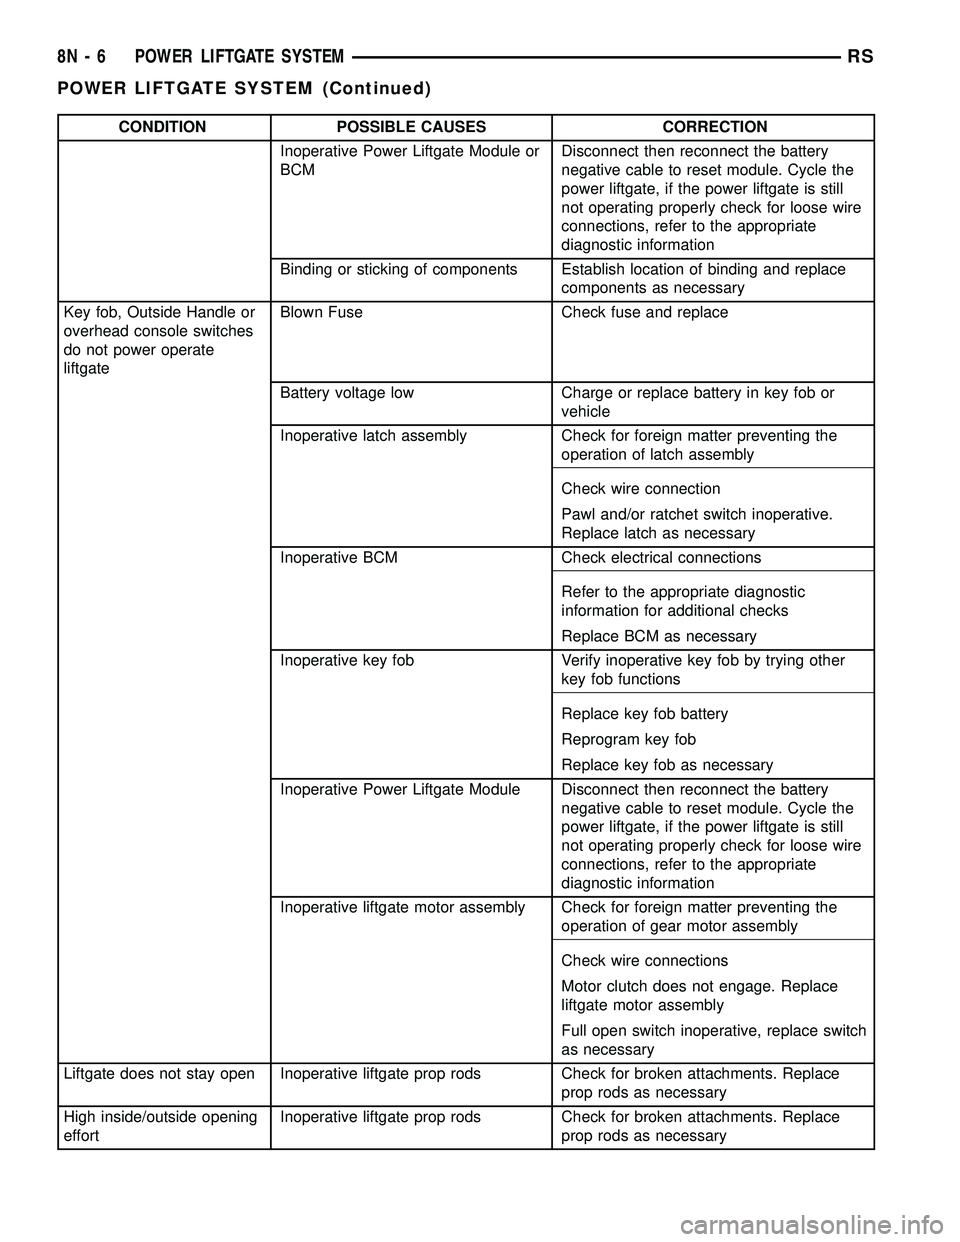
CONDITION POSSIBLE CAUSES CORRECTION
Inoperative Power Liftgate Module or
BCMDisconnect then reconnect the battery
negative cable to reset module. Cycle the
power liftgate, if the power liftgate is still
not operating properly check for loose wire
connections, refer to the appropriate
diagnostic information
Binding or sticking of components Establish location of binding and replace
components as necessary
Key fob, Outside Handle or
overhead console switches
do not power operate
liftgateBlown Fuse Check fuse and replace
Battery voltage low Charge or replace battery in key fob or
vehicle
Inoperative latch assembly Check for foreign matter preventing the
operation of latch assembly
Check wire connection
Pawl and/or ratchet switch inoperative.
Replace latch as necessary
Inoperative BCM Check electrical connections
Refer to the appropriate diagnostic
information for additional checks
Replace BCM as necessary
Inoperative key fob Verify inoperative key fob by trying other
key fob functions
Replace key fob battery
Reprogram key fob
Replace key fob as necessary
Inoperative Power Liftgate Module Disconnect then reconnect the battery
negative cable to reset module. Cycle the
power liftgate, if the power liftgate is still
not operating properly check for loose wire
connections, refer to the appropriate
diagnostic information
Inoperative liftgate motor assembly Check for foreign matter preventing the
operation of gear motor assembly
Check wire connections
Motor clutch does not engage. Replace
liftgate motor assembly
Full open switch inoperative, replace switch
as necessary
Liftgate does not stay open Inoperative liftgate prop rods Check for broken attachments. Replace
prop rods as necessary
High inside/outside opening
effortInoperative liftgate prop rods Check for broken attachments. Replace
prop rods as necessary
8N - 6 POWER LIFTGATE SYSTEMRS
POWER LIFTGATE SYSTEM (Continued)
Page 430 of 2339
CONDITION POSSIBLE CAUSES CORRECTION
Gear motor did not disengage Refer to the appropriate diagnostic
information. Replace components as
necessary
Binding or sticking of components Establish location of binding and replace
components as necessary
Liftgate continues to cinch
closed during power modeInoperative latch assembly Check for blown fuse and loose wiring
connections
Check for foreign matter preventing the
operation of latch assembly
Refer to the appropriate diagnostic
information. Replace components as
necessary
Inoperative Power Liftgate Module or
BCMDisconnect then reconnect battery to reset
module, function liftgate, if no function
exists check for loose wire connections,
see Body Diagnostic Manual for detailed
procedures
Liftgate continues to open
during power mode
(runaway motor)Inoperative Power Liftgate Module or
BCMDisconnect then reconnect the battery
negative cable to reset module. Cycle the
power liftgate, if the power liftgate is still
not operating properly check for loose wire
connections, refer to the appropriate
diagnostic information
Inoperative full open switch Check wire connections
Replace switch, if necessary
Inoperative motor assembly Check for continuous drive condition
Liftgate opens very slowly Inoperative liftgate motor assembly Check wire connections
Replace motor assembly as necessary
Inoperative liftgate prop rods Replace prop rods as necessary
Binding or sticking of components Establish location of binding and replace
components as necessary
Grade of vehicle too steep for power
operationOperate liftgate manually
Squeaks, Noises and rattles Foreign material in door
compartmentRemove foreign material
Loose components Check and tighten loose components as
necessary
RSPOWER LIFTGATE SYSTEM8N-7
POWER LIFTGATE SYSTEM (Continued)
Page 433 of 2339
INSTALLATION
(1) Position the engage actuator in the vehicle and
connect the engage actuator electrical connector.
(2) Install the two engage actuator retaining
screws.
(3) Manually disengage the actuator.
(4) Install the left rear D-pillar trim on the vehi-
cle, (Refer to 23 - BODY/INTERIOR/LEFT D-PILLAR
TRIM PANEL - INSTALLATION).
(5) Connect the battery negative cable.
(6) Using an appropriate scan tool, check and
erase any power liftgate control module diagnostic
trouble codes.
(7) Verify power liftgate system and engage actua-
tor operation. Cycle the power liftgate through one
complete open and close cycle.
EXTERIOR HANDLE SWITCH
DESCRIPTION
The exterior handle switch is an electronic release
switch mounted to the rear license plate lamp hous-
ing assembly, located just above the license plate.
This switch controls the power liftgate release func-
tion and is also capable of reversing the power lift-
gate when it is in motion. A full power open cycle
cannot be performed using this switch, only one of
the power open command switches (key fob and over-
head console mounted) can be used to perform a full
power open cycle. The exterior handle switch is a ser-
viceable component.
OPERATION
When the exterior handle switch is depressed, with
the liftgate in the closed position, a message is sent
to the Body Control Module (BCM). The BCM then
sends a signal to the power liftgate control module
via the Programmable Communication Interface
(PCI) data bus circuit. The power liftgate control
module then sends a signal to the power latch
mounted actuator, which moves the liftgate from the
primary closed and latched position to the open and
movable position. If the liftgate is not pulled open
once the latch releases within a few seconds, the
latch will cinch closed again.
REMOVAL
(1) Disconnect and isolate the battery negative
cable.
(2) Open the liftgate and remove the liftgate trim
panel, (Refer to 23 - BODY/DECKLID/HATCH/LIFT-
GATE/TAILGATE/TRIM PANEL - REMOVAL).
(3) Remove the rear lamp bar assembly from the
vehicle.(4) Locate the two wires going to the exterior han-
dle switch. Cut the tie strap and trace the wires to
the large electrical connector and back the wires out
of the large connector and through the grommet.
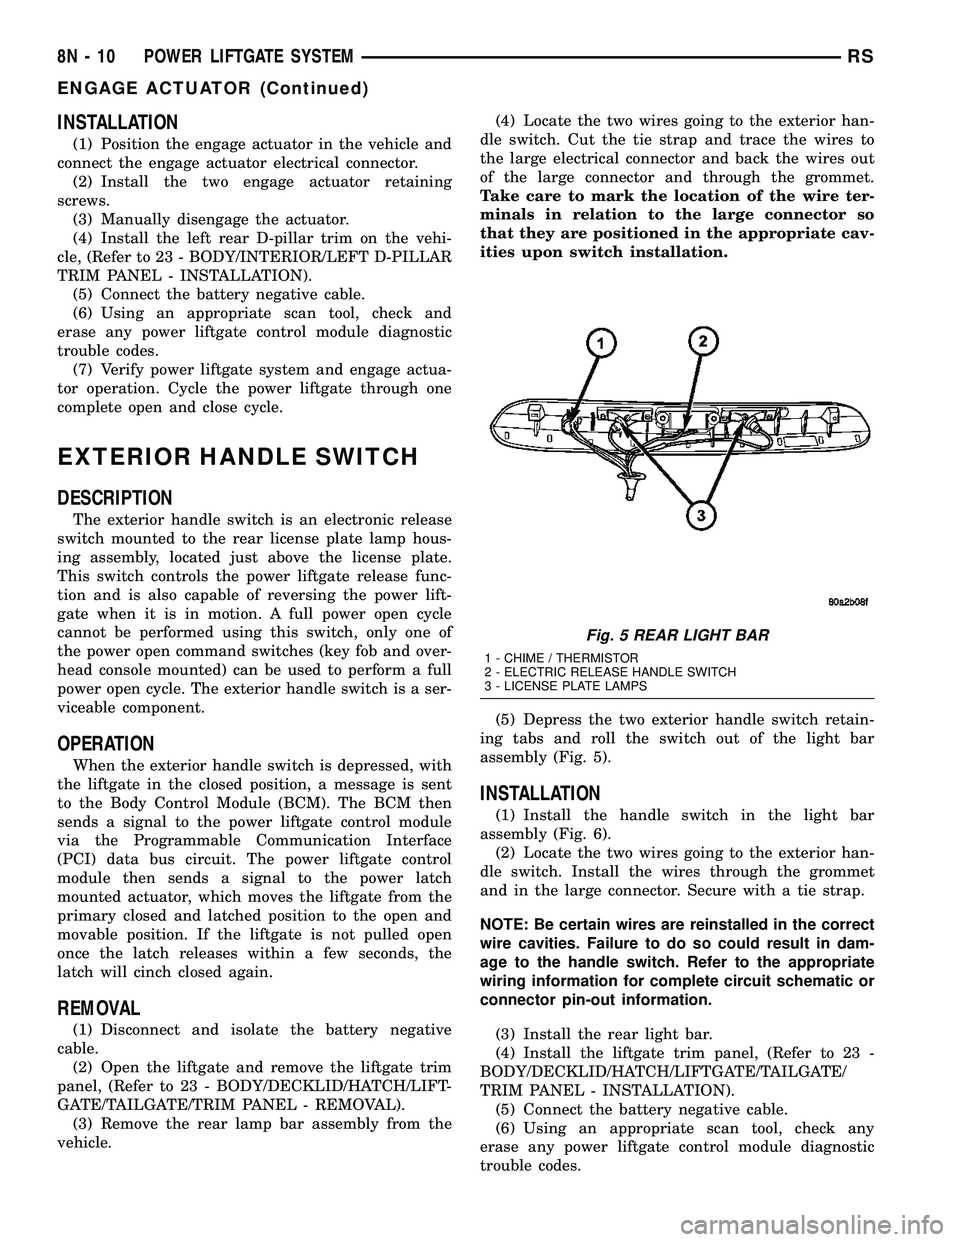
Take care to mark the location of the wire ter-
minals in relation to the large connector so
that they are positioned in the appropriate cav-
ities upon switch installation.
(5) Depress the two exterior handle switch retain-
ing tabs and roll the switch out of the light bar
assembly (Fig. 5).
INSTALLATION
(1) Install the handle switch in the light bar
assembly (Fig. 6).
(2) Locate the two wires going to the exterior han-
dle switch. Install the wires through the grommet
and in the large connector. Secure with a tie strap.
NOTE: Be certain wires are reinstalled in the correct
wire cavities. Failure to do so could result in dam-
age to the handle switch. Refer to the appropriate
wiring information for complete circuit schematic or
connector pin-out information.
(3) Install the rear light bar.
(4) Install the liftgate trim panel, (Refer to 23 -
BODY/DECKLID/HATCH/LIFTGATE/TAILGATE/
TRIM PANEL - INSTALLATION).
(5) Connect the battery negative cable.
(6) Using an appropriate scan tool, check any
erase any power liftgate control module diagnostic
trouble codes.
Fig. 5 REAR LIGHT BAR
1 - CHIME / THERMISTOR
2 - ELECTRIC RELEASE HANDLE SWITCH
3 - LICENSE PLATE LAMPS
8N - 10 POWER LIFTGATE SYSTEMRS
ENGAGE ACTUATOR (Continued)
Page 434 of 2339
(7) Verify power liftgate system and handle switch
operation. Cycle the power liftgate through one com-
plete open and close cycle, this will allow the power
liftgate control module to relearn its cycle with the
new components.
FULL OPEN SWITCH
DESCRIPTION
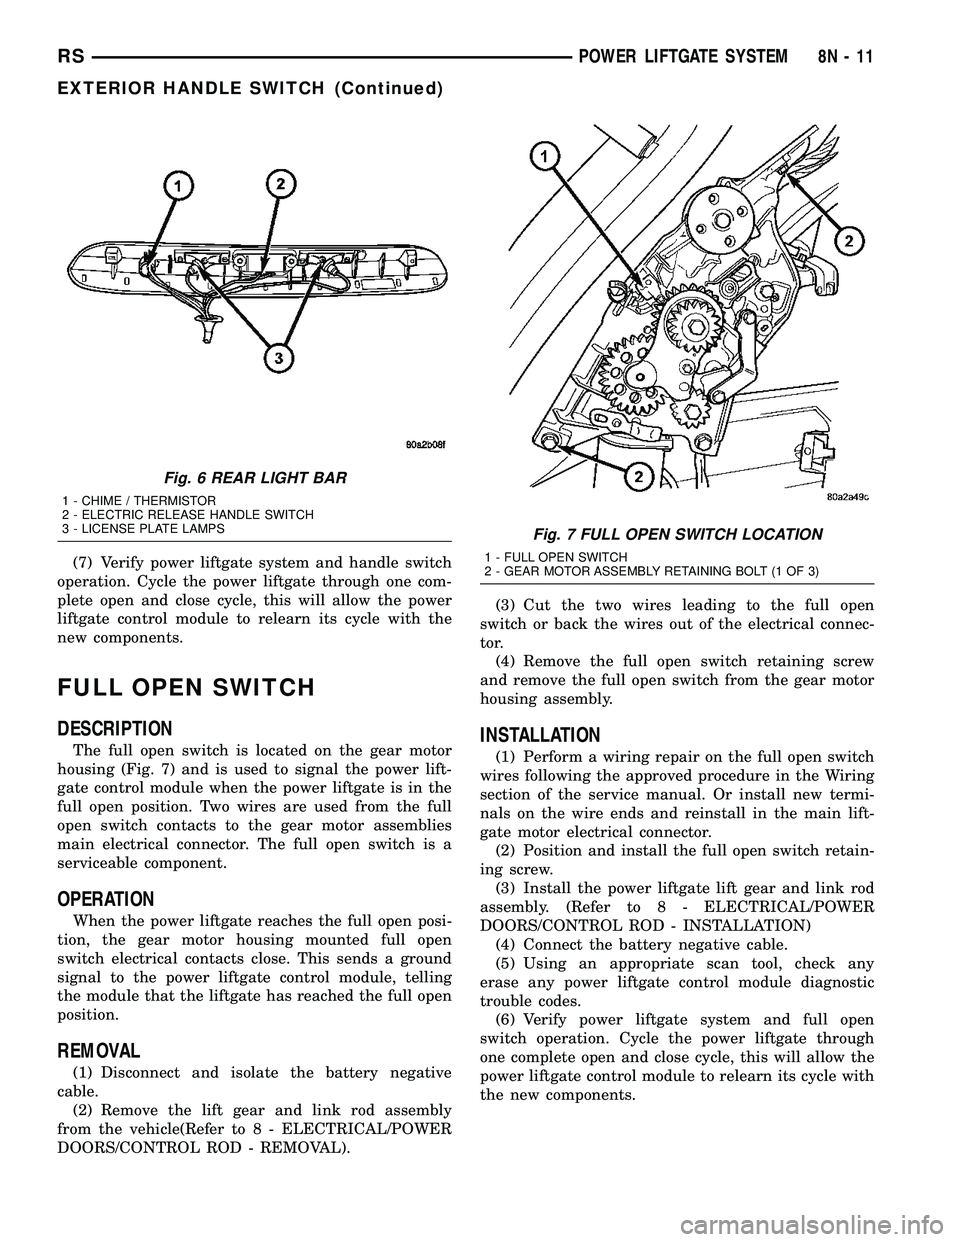
The full open switch is located on the gear motor
housing (Fig. 7) and is used to signal the power lift-
gate control module when the power liftgate is in the
full open position. Two wires are used from the full
open switch contacts to the gear motor assemblies
main electrical connector. The full open switch is a
serviceable component.
OPERATION
When the power liftgate reaches the full open posi-
tion, the gear motor housing mounted full open
switch electrical contacts close. This sends a ground
signal to the power liftgate control module, telling
the module that the liftgate has reached the full open
position.
REMOVAL
(1) Disconnect and isolate the battery negative
cable.
(2) Remove the lift gear and link rod assembly
from the vehicle(Refer to 8 - ELECTRICAL/POWER
DOORS/CONTROL ROD - REMOVAL).(3) Cut the two wires leading to the full open
switch or back the wires out of the electrical connec-
tor.
(4) Remove the full open switch retaining screw
and remove the full open switch from the gear motor
housing assembly.
INSTALLATION
(1) Perform a wiring repair on the full open switch
wires following the approved procedure in the Wiring
section of the service manual. Or install new termi-
nals on the wire ends and reinstall in the main lift-
gate motor electrical connector.
(2) Position and install the full open switch retain-
ing screw.
(3) Install the power liftgate lift gear and link rod
assembly. (Refer to 8 - ELECTRICAL/POWER
DOORS/CONTROL ROD - INSTALLATION)
(4) Connect the battery negative cable.
(5) Using an appropriate scan tool, check any
erase any power liftgate control module diagnostic
trouble codes.
(6) Verify power liftgate system and full open
switch operation. Cycle the power liftgate through
one complete open and close cycle, this will allow the
power liftgate control module to relearn its cycle with
the new components.
Fig. 6 REAR LIGHT BAR
1 - CHIME / THERMISTOR
2 - ELECTRIC RELEASE HANDLE SWITCH
3 - LICENSE PLATE LAMPS
Fig. 7 FULL OPEN SWITCH LOCATION
1 - FULL OPEN SWITCH
2 - GEAR MOTOR ASSEMBLY RETAINING BOLT (1 OF 3)
RSPOWER LIFTGATE SYSTEM8N-11
EXTERIOR HANDLE SWITCH (Continued)
Page 438 of 2339
LIFTGATE MOTOR
DESCRIPTION
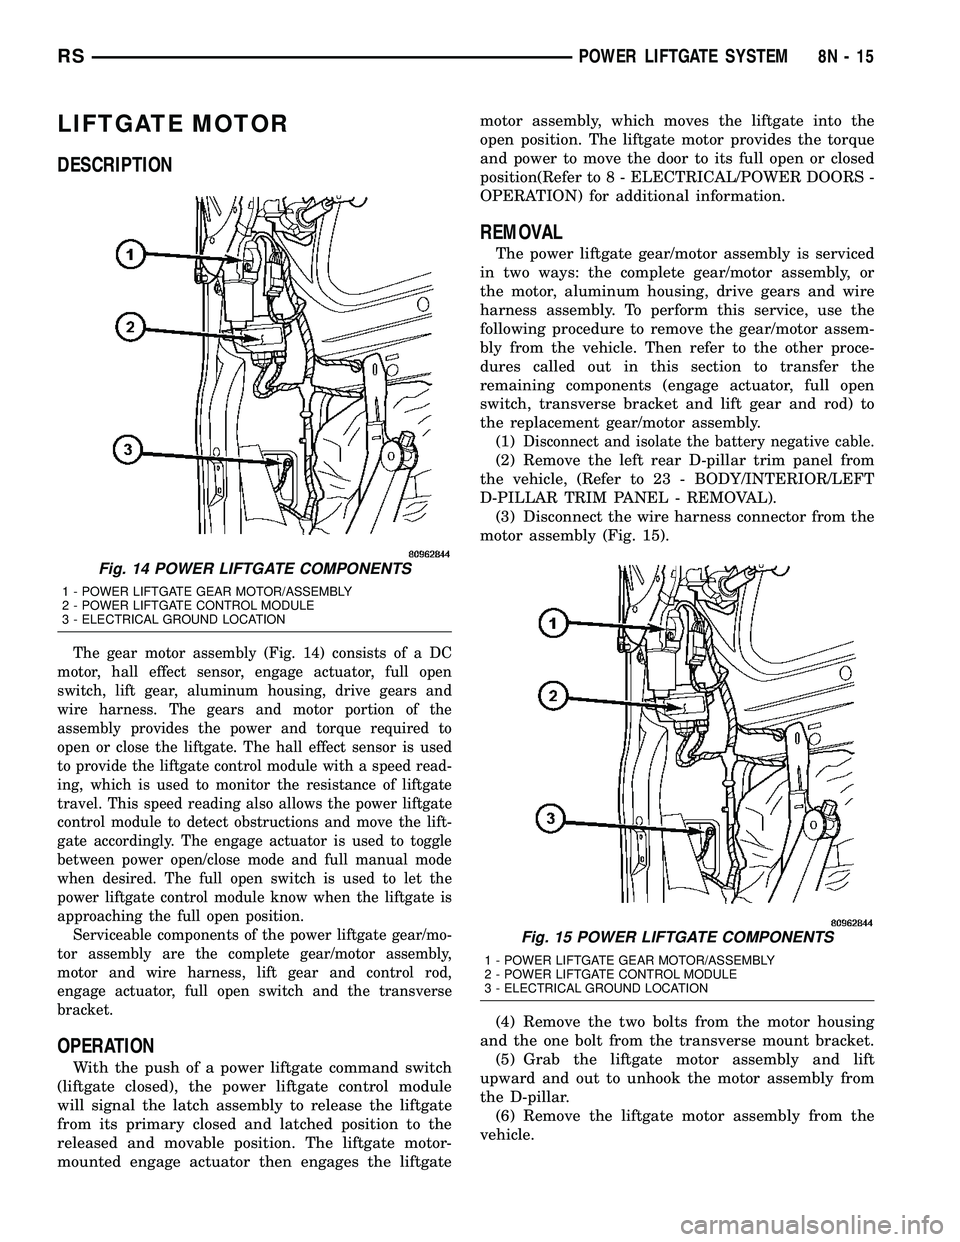
The gear motor assembly (Fig. 14) consists of a DC
motor, hall effect sensor, engage actuator, full open
switch, lift gear, aluminum housing, drive gears and
wire harness. The gears and motor portion of the
assembly provides the power and torque required to
open or close the liftgate. The hall effect sensor is used
to provide the liftgate control module with a speed read-
ing, which is used to monitor the resistance of liftgate
travel. This speed reading also allows the power liftgate
control module to detect obstructions and move the lift-
gate accordingly. The engage actuator is used to toggle
between power open/close mode and full manual mode
when desired. The full open switch is used to let the
power liftgate control module know when the liftgate is
approaching the full open position.
Serviceable components of the power liftgate gear/mo-
tor assembly are the complete gear/motor assembly,
motor and wire harness, lift gear and control rod,
engage actuator, full open switch and the transverse
bracket.
OPERATION
With the push of a power liftgate command switch
(liftgate closed), the power liftgate control module
will signal the latch assembly to release the liftgate
from its primary closed and latched position to the
released and movable position. The liftgate motor-
mounted engage actuator then engages the liftgatemotor assembly, which moves the liftgate into the
open position. The liftgate motor provides the torque
and power to move the door to its full open or closed
position(Refer to 8 - ELECTRICAL/POWER DOORS -
OPERATION) for additional information.
REMOVAL
The power liftgate gear/motor assembly is serviced
in two ways: the complete gear/motor assembly, or
the motor, aluminum housing, drive gears and wire
harness assembly. To perform this service, use the
following procedure to remove the gear/motor assem-
bly from the vehicle. Then refer to the other proce-
dures called out in this section to transfer the
remaining components (engage actuator, full open
switch, transverse bracket and lift gear and rod) to
the replacement gear/motor assembly.
(1)
Disconnect and isolate the battery negative cable.
(2) Remove the left rear D-pillar trim panel from
the vehicle, (Refer to 23 - BODY/INTERIOR/LEFT
D-PILLAR TRIM PANEL - REMOVAL).
(3) Disconnect the wire harness connector from the
motor assembly (Fig. 15).
(4) Remove the two bolts from the motor housing
and the one bolt from the transverse mount bracket.
(5) Grab the liftgate motor assembly and lift
upward and out to unhook the motor assembly from
the D-pillar.
(6) Remove the liftgate motor assembly from the
vehicle.
Fig. 14 POWER LIFTGATE COMPONENTS
1 - POWER LIFTGATE GEAR MOTOR/ASSEMBLY
2 - POWER LIFTGATE CONTROL MODULE
3 - ELECTRICAL GROUND LOCATION
Fig. 15 POWER LIFTGATE COMPONENTS
1 - POWER LIFTGATE GEAR MOTOR/ASSEMBLY
2 - POWER LIFTGATE CONTROL MODULE
3 - ELECTRICAL GROUND LOCATION
RSPOWER LIFTGATE SYSTEM8N-15
Page 440 of 2339
INSTALLATION
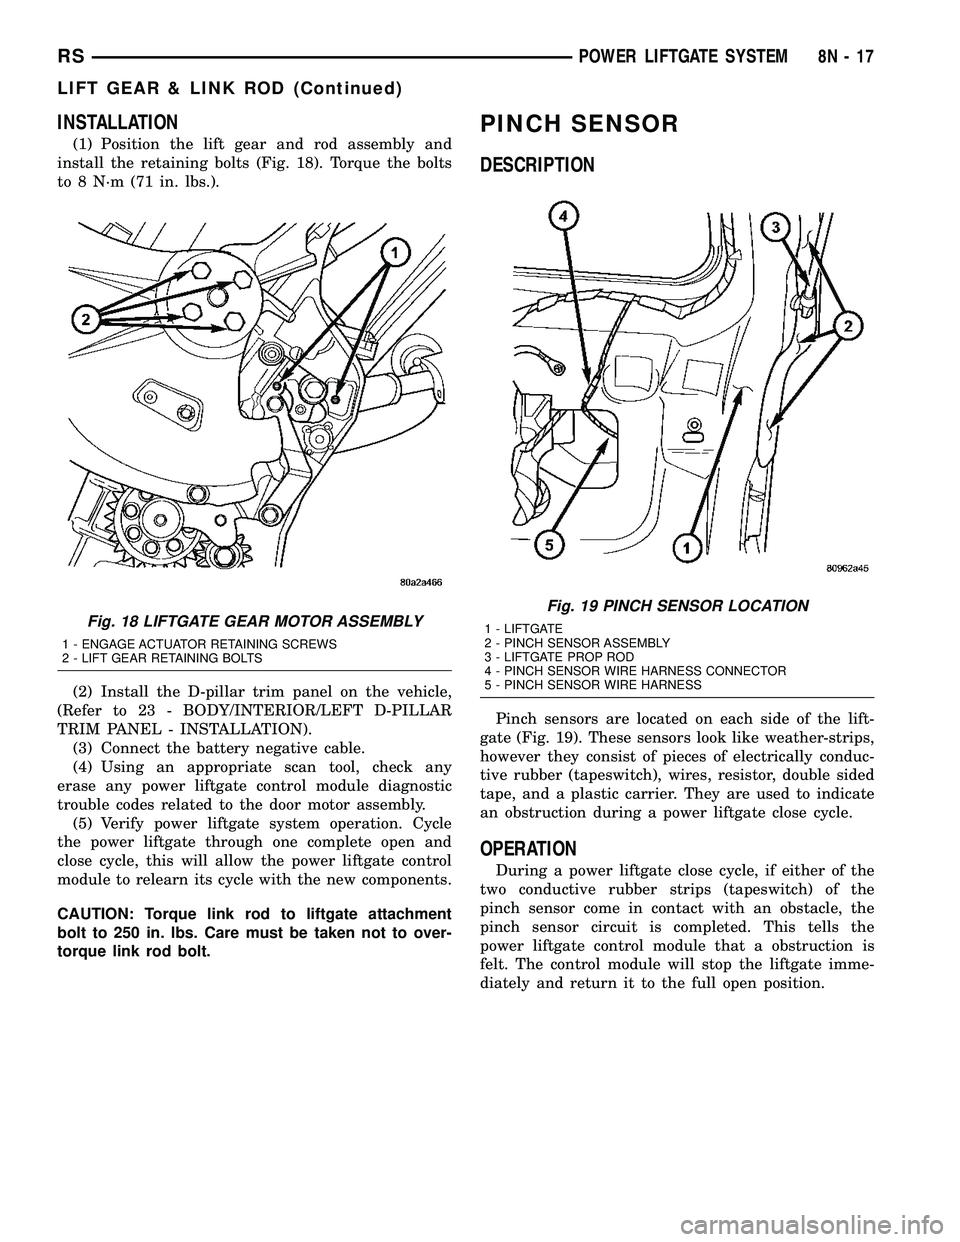
(1) Position the lift gear and rod assembly and
install the retaining bolts (Fig. 18). Torque the bolts
to 8 N´m (71 in. lbs.).
(2) Install the D-pillar trim panel on the vehicle,
(Refer to 23 - BODY/INTERIOR/LEFT D-PILLAR
TRIM PANEL - INSTALLATION).
(3) Connect the battery negative cable.
(4) Using an appropriate scan tool, check any
erase any power liftgate control module diagnostic
trouble codes related to the door motor assembly.
(5) Verify power liftgate system operation. Cycle
the power liftgate through one complete open and
close cycle, this will allow the power liftgate control
module to relearn its cycle with the new components.
CAUTION: Torque link rod to liftgate attachment
bolt to 250 in. lbs. Care must be taken not to over-
torque link rod bolt.
PINCH SENSOR
DESCRIPTION
Pinch sensors are located on each side of the lift-
gate (Fig. 19). These sensors look like weather-strips,
however they consist of pieces of electrically conduc-
tive rubber (tapeswitch), wires, resistor, double sided
tape, and a plastic carrier. They are used to indicate
an obstruction during a power liftgate close cycle.
OPERATION
During a power liftgate close cycle, if either of the
two conductive rubber strips (tapeswitch) of the
pinch sensor come in contact with an obstacle, the
pinch sensor circuit is completed. This tells the
power liftgate control module that a obstruction is
felt. The control module will stop the liftgate imme-
diately and return it to the full open position.
Fig. 18 LIFTGATE GEAR MOTOR ASSEMBLY
1 - ENGAGE ACTUATOR RETAINING SCREWS
2 - LIFT GEAR RETAINING BOLTS
Fig. 19 PINCH SENSOR LOCATION
1 - LIFTGATE
2 - PINCH SENSOR ASSEMBLY
3 - LIFTGATE PROP ROD
4 - PINCH SENSOR WIRE HARNESS CONNECTOR
5 - PINCH SENSOR WIRE HARNESS
RSPOWER LIFTGATE SYSTEM8N-17
LIFT GEAR & LINK ROD (Continued)
Page 441 of 2339
REMOVAL
(1) Disconnect and isolate the battery negative
cable.
(2) Remove trim panel from liftgate, (Refer to 23 -
BODY/DECKLID/HATCH/LIFTGATE/TAILGATE/
TRIM PANEL - REMOVAL).
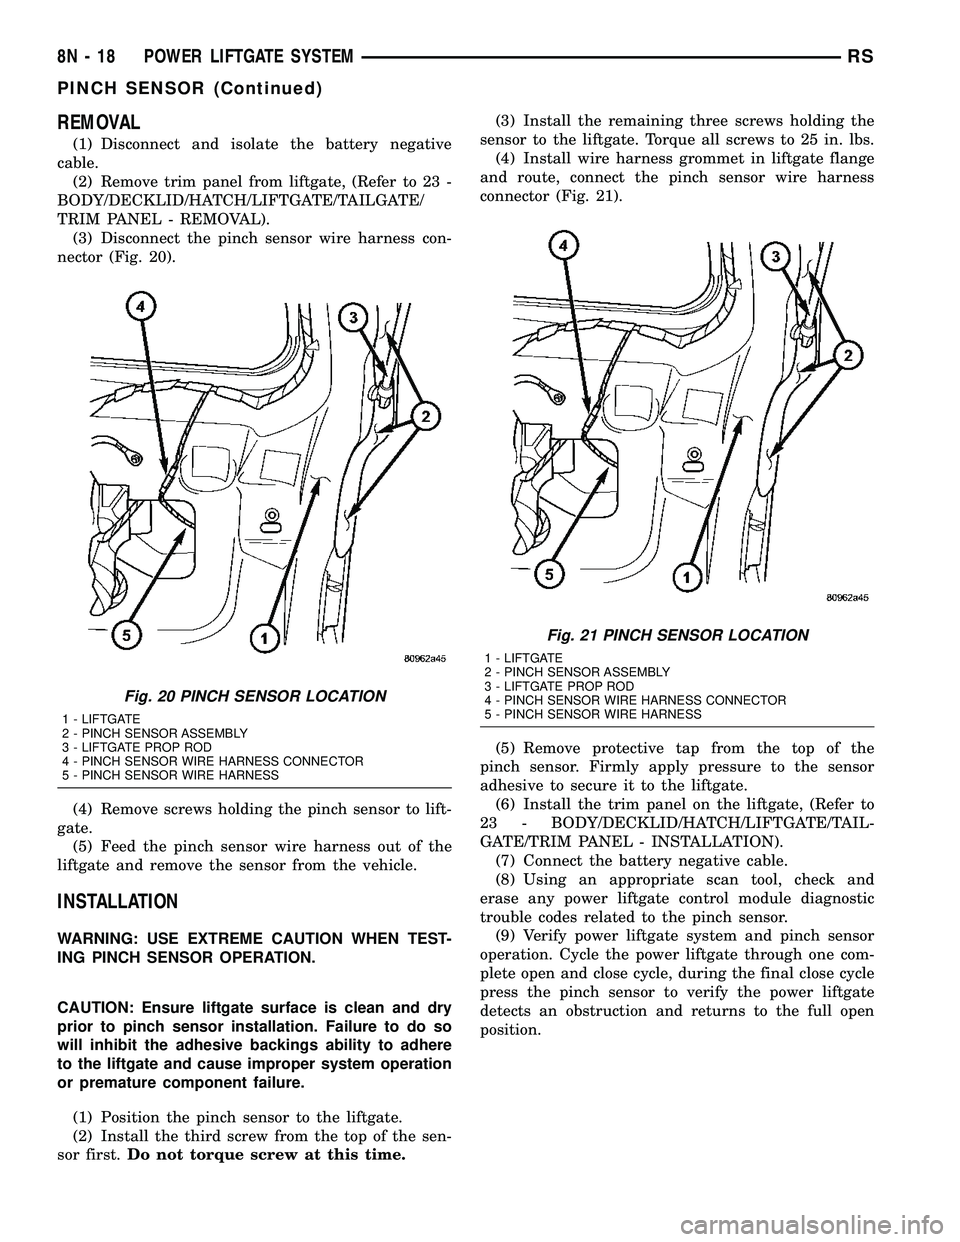
(3) Disconnect the pinch sensor wire harness con-
nector (Fig. 20).
(4) Remove screws holding the pinch sensor to lift-
gate.
(5) Feed the pinch sensor wire harness out of the
liftgate and remove the sensor from the vehicle.
INSTALLATION
WARNING: USE EXTREME CAUTION WHEN TEST-
ING PINCH SENSOR OPERATION.
CAUTION: Ensure liftgate surface is clean and dry
prior to pinch sensor installation. Failure to do so
will inhibit the adhesive backings ability to adhere
to the liftgate and cause improper system operation
or premature component failure.
(1) Position the pinch sensor to the liftgate.
(2) Install the third screw from the top of the sen-
sor first.Do not torque screw at this time.(3) Install the remaining three screws holding the
sensor to the liftgate. Torque all screws to 25 in. lbs.
(4) Install wire harness grommet in liftgate flange
and route, connect the pinch sensor wire harness
connector (Fig. 21).
(5) Remove protective tap from the top of the
pinch sensor. Firmly apply pressure to the sensor
adhesive to secure it to the liftgate.
(6) Install the trim panel on the liftgate, (Refer to
23 - BODY/DECKLID/HATCH/LIFTGATE/TAIL-
GATE/TRIM PANEL - INSTALLATION).
(7) Connect the battery negative cable.
(8) Using an appropriate scan tool, check and
erase any power liftgate control module diagnostic
trouble codes related to the pinch sensor.
(9) Verify power liftgate system and pinch sensor
operation. Cycle the power liftgate through one com-
plete open and close cycle, during the final close cycle
press the pinch sensor to verify the power liftgate
detects an obstruction and returns to the full open
position.
Fig. 20 PINCH SENSOR LOCATION
1 - LIFTGATE
2 - PINCH SENSOR ASSEMBLY
3 - LIFTGATE PROP ROD
4 - PINCH SENSOR WIRE HARNESS CONNECTOR
5 - PINCH SENSOR WIRE HARNESS
Fig. 21 PINCH SENSOR LOCATION
1 - LIFTGATE
2 - PINCH SENSOR ASSEMBLY
3 - LIFTGATE PROP ROD
4 - PINCH SENSOR WIRE HARNESS CONNECTOR
5 - PINCH SENSOR WIRE HARNESS
8N - 18 POWER LIFTGATE SYSTEMRS
PINCH SENSOR (Continued)