check engine CHRYSLER VOYAGER 1996 Workshop Manual
[x] Cancel search | Manufacturer: CHRYSLER, Model Year: 1996, Model line: VOYAGER, Model: CHRYSLER VOYAGER 1996Pages: 1938, PDF Size: 55.84 MB
Page 306 of 1938
NOTE: Over or under tightening effects knock sen-
sor performance, possibly causing improper spark
control.
DIAGNOSIS AND TESTING
TESTING FOR SPARK AT COILÐ2.4/3.3/3.8L
ENGINES
WARNING: THE DIRECT IGNITION SYSTEMS GEN-
ERATES APPROXIMATELY 40,000 VOLTS. PER-
SONAL INJURY COULD RESULT FROM CONTACT
WITH THIS SYSTEM.
The coil pack contains independent coils. Each coil
must be checked individually.
CAUTION: Spark plug wire damage may occur if
the spark plug is moved more than 1/4 inch away
from the engine ground.
CAUTION: Do not leave any one spark plug cable
disconnected any longer than 30 seconds or possi-
ble heat damage to catalytic converter will occur.
CAUTION: Test must be performed at idle and in
park only with the parking brake on.
Use a new spark plug and spark plug cable
for the following test.
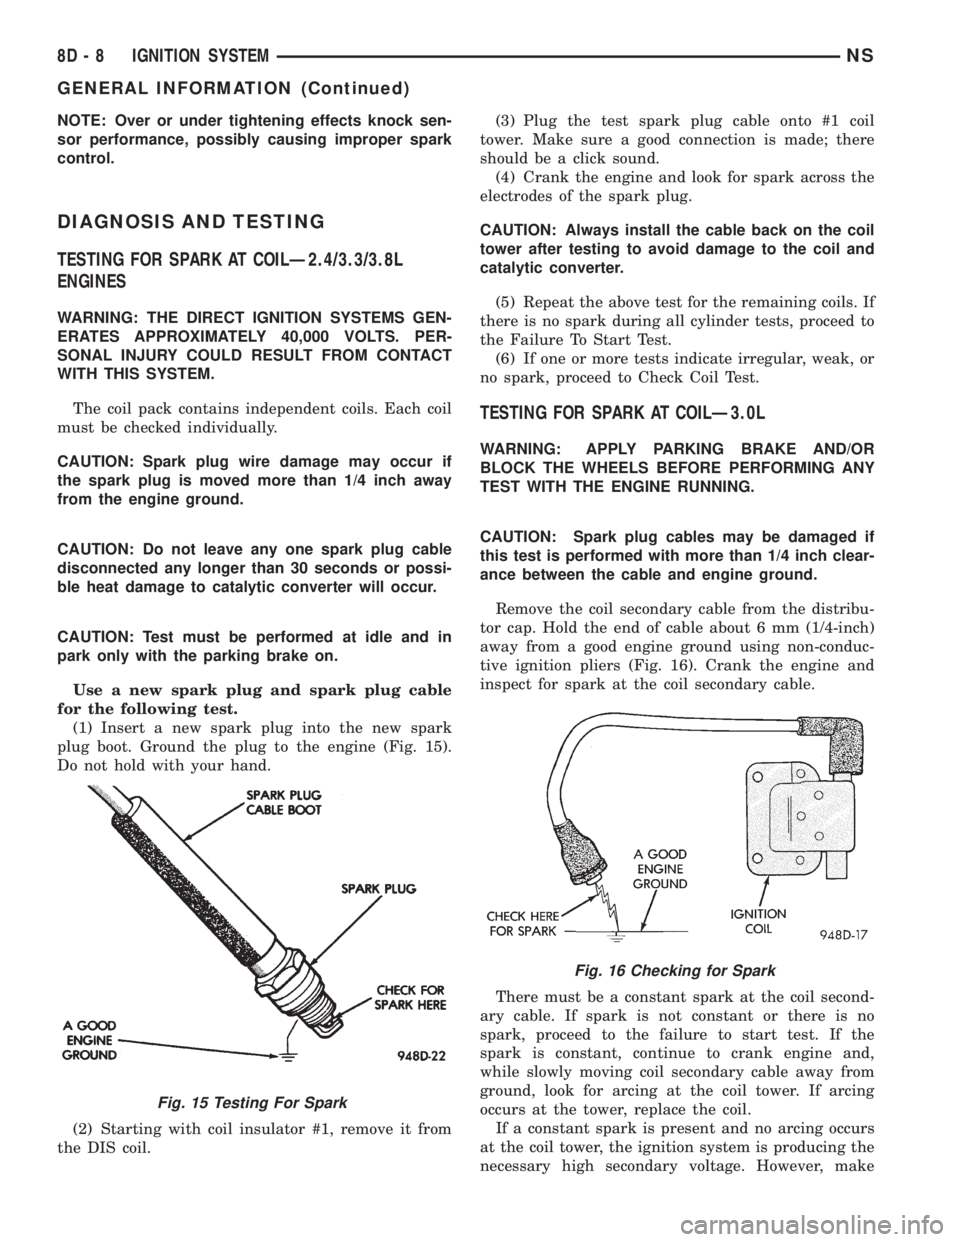
(1) Insert a new spark plug into the new spark
plug boot. Ground the plug to the engine (Fig. 15).
Do not hold with your hand.
(2) Starting with coil insulator #1, remove it from
the DIS coil.(3) Plug the test spark plug cable onto #1 coil
tower. Make sure a good connection is made; there
should be a click sound.
(4) Crank the engine and look for spark across the
electrodes of the spark plug.
CAUTION: Always install the cable back on the coil
tower after testing to avoid damage to the coil and
catalytic converter.
(5) Repeat the above test for the remaining coils. If
there is no spark during all cylinder tests, proceed to
the Failure To Start Test.
(6) If one or more tests indicate irregular, weak, or
no spark, proceed to Check Coil Test.
TESTING FOR SPARK AT COILÐ3.0L
WARNING: APPLY PARKING BRAKE AND/OR
BLOCK THE WHEELS BEFORE PERFORMING ANY
TEST WITH THE ENGINE RUNNING.
CAUTION: Spark plug cables may be damaged if
this test is performed with more than 1/4 inch clear-
ance between the cable and engine ground.
Remove the coil secondary cable from the distribu-
tor cap. Hold the end of cable about 6 mm (1/4-inch)
away from a good engine ground using non-conduc-
tive ignition pliers (Fig. 16). Crank the engine and
inspect for spark at the coil secondary cable.
There must be a constant spark at the coil second-
ary cable. If spark is not constant or there is no
spark, proceed to the failure to start test. If the
spark is constant, continue to crank engine and,
while slowly moving coil secondary cable away from
ground, look for arcing at the coil tower. If arcing
occurs at the tower, replace the coil.
If a constant spark is present and no arcing occurs
at the coil tower, the ignition system is producing the
necessary high secondary voltage. However, make
Fig. 15 Testing For Spark
Fig. 16 Checking for Spark
8D - 8 IGNITION SYSTEMNS
GENERAL INFORMATION (Continued)
Page 307 of 1938
sure that the spark plugs are firing. Inspect the dis-
tributor rotor, cap, spark plug cables, and spark
plugs. If they are in proper working order, the igni-
tion system is not the reason why the engine will not
start. Inspect the fuel system and engine for proper
operation.
CHECK COIL TESTÐ2.4L
Coil one fires cylinders 1 and 4, coil two fires
cylinders 2 and 3. Each coil tower is labeled
with the number of the corresponding cylinder.
(1) Remove ignition cables and measure the resis-
tance of the cables. Resistance must be within the
range shown in the Cable Resistance Chart in Spec-
ifications. Replace any cable not within tolerance.
(2) Disconnect the electrical connector from the
coil pack.
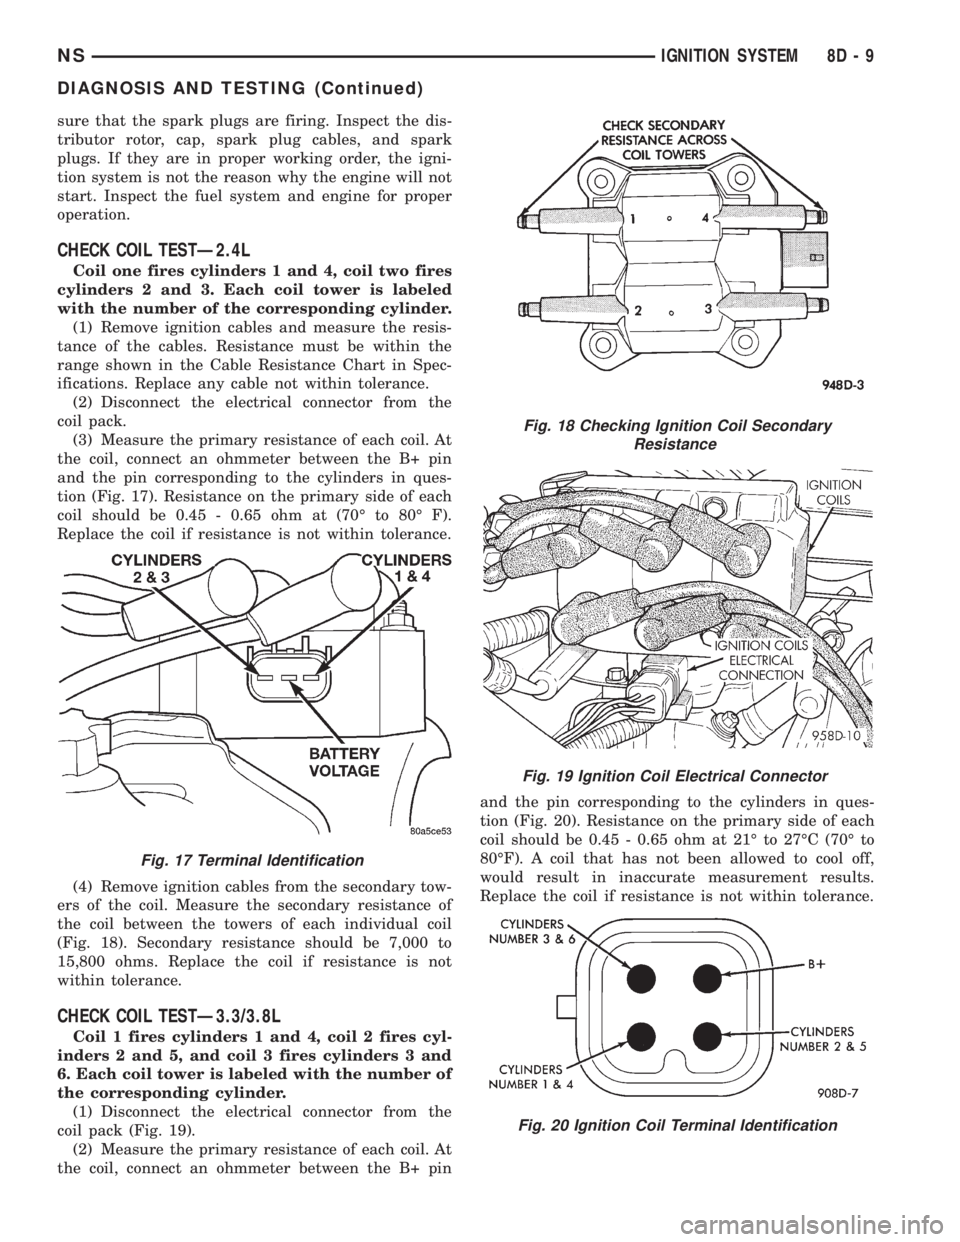
(3) Measure the primary resistance of each coil. At
the coil, connect an ohmmeter between the B+ pin
and the pin corresponding to the cylinders in ques-
tion (Fig. 17). Resistance on the primary side of each
coil should be 0.45 - 0.65 ohm at (70É to 80É F).
Replace the coil if resistance is not within tolerance.
(4) Remove ignition cables from the secondary tow-
ers of the coil. Measure the secondary resistance of
the coil between the towers of each individual coil
(Fig. 18). Secondary resistance should be 7,000 to
15,800 ohms. Replace the coil if resistance is not
within tolerance.
CHECK COIL TESTÐ3.3/3.8L
Coil 1 fires cylinders 1 and 4, coil 2 fires cyl-
inders 2 and 5, and coil 3 fires cylinders 3 and
6. Each coil tower is labeled with the number of
the corresponding cylinder.
(1) Disconnect the electrical connector from the
coil pack (Fig. 19).
(2) Measure the primary resistance of each coil. At
the coil, connect an ohmmeter between the B+ pinand the pin corresponding to the cylinders in ques-
tion (Fig. 20). Resistance on the primary side of each
coil should be 0.45 - 0.65 ohm at 21É to 27ÉC (70É to
80ÉF). A coil that has not been allowed to cool off,
would result in inaccurate measurement results.
Replace the coil if resistance is not within tolerance.
Fig. 17 Terminal Identification
Fig. 18 Checking Ignition Coil Secondary
Resistance
Fig. 19 Ignition Coil Electrical Connector
Fig. 20 Ignition Coil Terminal Identification
NSIGNITION SYSTEM 8D - 9
DIAGNOSIS AND TESTING (Continued)
Page 308 of 1938

(3) Remove ignition cables from the secondary tow-
ers of the coil. Measure the secondary resistance of
the coil between the towers of each individual coil
(Fig. 21). Secondary resistance should be 7,000 to
15,800 ohms. Replace the coil if resistance is not
within tolerance.
FAILURE TO START TEST
This no-start test checks the camshaft position sen-
sor and crankshaft position sensor.
The Powertrain Control Module (PCM) supplies 8
volts to the camshaft position sensor and crankshaft
position sensor through one circuit. If the 8 volt sup-
ply circuit shorts to ground, neither sensor will pro-
duce a signal (output voltage to the PCM).
When the ignition key is turned and left in the On
position, the PCM automatically energizes the Auto
Shutdown (ASD) relay. However, the controller de-en-
ergizes the relay within one second because it has
not received a camshaft position sensor signal indi-
cating engine rotation.
During cranking, the ASD relay will not energize
until the PCM receives a camshaft position sensor
signal. Secondly, the ASD relay remains energized
only if the controller senses a crankshaft position
sensor signal immediately after detecting the cam-
shaft position sensor signal.
(1) Check battery voltage. Voltage should be
approximately 12.66 volts or higher to perform fail-
ure to start test.
(2) Disconnect the harness connector from the coil
pack.
(3) Connect a test light to the B+ (battery voltage)
terminal of the coil electrical connector and ground
as shown in (Fig. 22). The B+ wire for the DIS coil is
dark green with an orange tracer.Do not spread
the terminal with the test light probe.(4) Turn the ignition key to theON position.The
test light should flash On and then Off.Do not turn
the Key to off position, leave it in the On posi-
tion.
(a) If the test light flashes momentarily, the
PCM grounded the Auto Shutdown (ASD) relay.
Proceed to step 5.
(b) If the test light did not flash, the ASD relay
did not energize. The cause is either the relay or
one of the relay circuits. Use the DRB scan tool to
test the ASD relay and circuits. Refer to the appro-
priate Powertrain Diagnostics Procedure Manual.
Refer to the wiring diagrams section for circuit
information.
(5) Crank the engine. (If the key was placed in the
off position after step 4, place the key in the On posi-
tion before cranking. Wait for the test light to flash
once, then crank the engine.)
(6) If the test light momentarily flashes during
cranking, the PCM is not receiving a crankshaft posi-
tion sensor signal. Use the DRB scan tool to test the
crankshaft position sensor and sensor circuits. Refer
to the appropriate Powertrain Diagnostics Procedure
Manual. Refer to the wiring diagrams section for cir-
cuit information.
(7) If the test light did not flash during cranking,
unplug the crankshaft position sensor connector.
Turn the ignition key to the off position. Turn the
key to the On position, wait for the test light to
momentarily flash once, then crank the engine. If the
test light momentarily flashes, the crankshaft posi-
tion sensor is shorted and must be replaced. If the
light did not flash, the cause of the no-start is in
Fig. 21 Checking Ignition Coil Secondary
ResistanceFig. 22 Ignition Coil Engine Harness Connector
8D - 10 IGNITION SYSTEMNS
DIAGNOSIS AND TESTING (Continued)
Page 324 of 1938
DISASSEMBLY AND ASSEMBLY
DISTRIBUTORÐ3.0L
REMOVAL
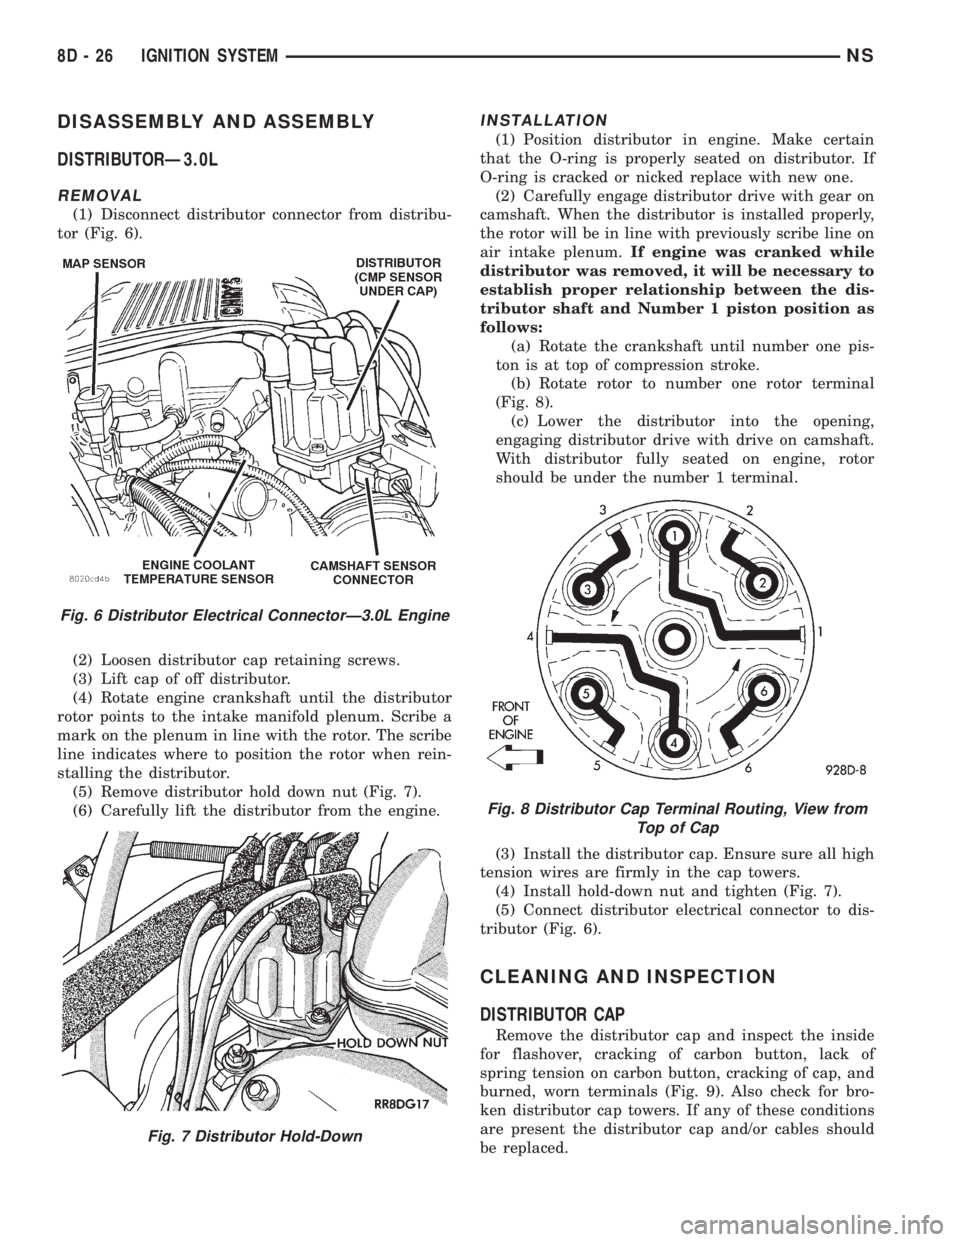
(1) Disconnect distributor connector from distribu-
tor (Fig. 6).
(2) Loosen distributor cap retaining screws.
(3) Lift cap of off distributor.
(4) Rotate engine crankshaft until the distributor
rotor points to the intake manifold plenum. Scribe a
mark on the plenum in line with the rotor. The scribe
line indicates where to position the rotor when rein-
stalling the distributor.
(5) Remove distributor hold down nut (Fig. 7).
(6) Carefully lift the distributor from the engine.
INSTALLATION
(1) Position distributor in engine. Make certain
that the O-ring is properly seated on distributor. If
O-ring is cracked or nicked replace with new one.
(2) Carefully engage distributor drive with gear on
camshaft. When the distributor is installed properly,
the rotor will be in line with previously scribe line on
air intake plenum.If engine was cranked while
distributor was removed, it will be necessary to
establish proper relationship between the dis-
tributor shaft and Number 1 piston position as
follows:
(a) Rotate the crankshaft until number one pis-
ton is at top of compression stroke.
(b) Rotate rotor to number one rotor terminal
(Fig. 8).
(c) Lower the distributor into the opening,
engaging distributor drive with drive on camshaft.
With distributor fully seated on engine, rotor
should be under the number 1 terminal.
(3) Install the distributor cap. Ensure sure all high
tension wires are firmly in the cap towers.
(4) Install hold-down nut and tighten (Fig. 7).
(5) Connect distributor electrical connector to dis-
tributor (Fig. 6).
CLEANING AND INSPECTION
DISTRIBUTOR CAP
Remove the distributor cap and inspect the inside
for flashover, cracking of carbon button, lack of
spring tension on carbon button, cracking of cap, and
burned, worn terminals (Fig. 9). Also check for bro-
ken distributor cap towers. If any of these conditions
are present the distributor cap and/or cables should
be replaced.
Fig. 6 Distributor Electrical ConnectorÐ3.0L Engine
Fig. 7 Distributor Hold-Down
Fig. 8 Distributor Cap Terminal Routing, View from
TopofCap
8D - 26 IGNITION SYSTEMNS
Page 341 of 1938
CONDITION POSSIBLE CAUSES CORRECTION
ERRATIC POINTER
MOVEMENT1. Erratic Message from
another Module.1. (a) Check the BCM using a scan tool If OK, go to
Step (b). If not OK, refer to the BCM section of the
service manual to repair the BCM.
(b) Check the PCM using a scan tool. If OK, go to Step
(c). If not OK, refer to the PCM section of the service
manual to repair the PCM.
(c) Check the speed signal input into the PCM. The
speed signal originates from one of the following
sources:
²A distance sensor for vehicles with 3 speed automatic
transmission. Check continuity from distance sensor to
PCM. If OK, replace distance sensor. If not OK, repair
wiring.
²The Electronic Transmission Control Module (TCM)
vehicles with the 4 speed electronic transmissions.
Check continuity from TCM to engine controller. If OK,
use a scan tool to check TCM. Refer to the electronic
section of the service manual to repair the TCM. If not
OK, repair wiring.
2. Internal Cluster Failure. 2. (a) Perform cluster self diagnostic test and check for
fault codes.
²If the pointer moves during test but still appears
erratic and fault codes 110 or 111 don't appear in the
odometer display, then go to Step (b).
²If fault code 110 is displayed in the odometer, go to
Step (e).
²If fault code 111 appears in the odometer display go
to Step (d).
²If fault codes 905, 920, or 940 are displayed in the
odometer display refer to the fault code chart to identify
which module is causing the fault and repair module.
(b) Replace cluster subdial assembly. To Step (c).
(c) Connect cluster into instrument panel wiring
harness. Place it back into the proper position in the
instrument panel. Put in the top two mounting screws to
hold the cluster in place. DO NOT COMPLETELY
INSTALL CLUSTER TO INSTRUMENT PANEL UNTIL
UNIT IS CALIBRATED AND TESTED. Go to Step (d).
(d) Use a scan tool to calibrate cluster and perform Self
Diagnostic Test. If OK, continue installation. If not OK,
go to Step (e).
Replace main cluster pc board and use a scan tool to
calibrate cluster. If not OK, look at another possible
cause for the speedometer failure.
NSINSTRUMENT PANEL AND SYSTEMS 8E - 5
DIAGNOSIS AND TESTING (Continued)
Page 343 of 1938
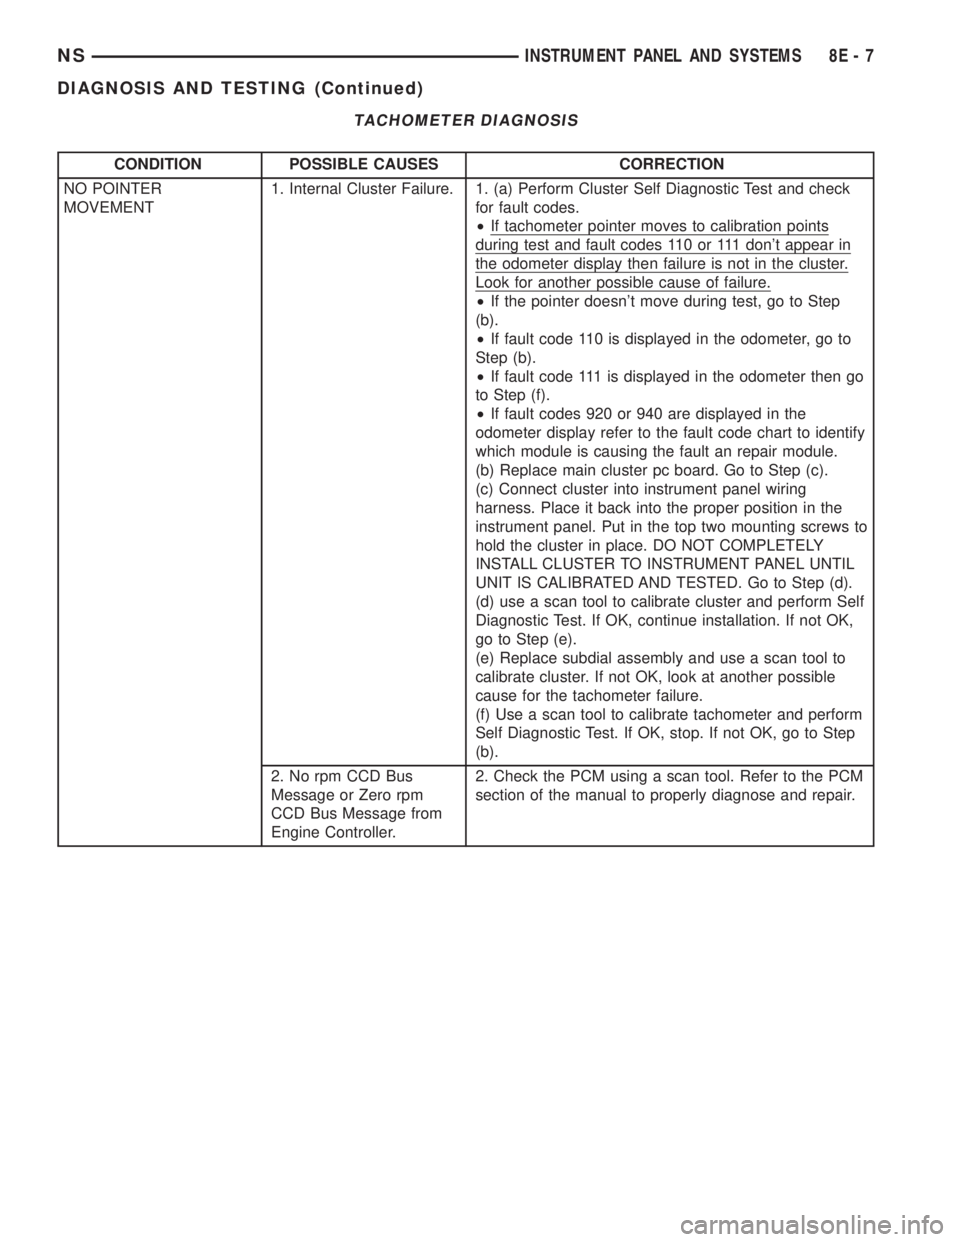
TACHOMETER DIAGNOSIS
CONDITION POSSIBLE CAUSES CORRECTION
NO POINTER
MOVEMENT1. Internal Cluster Failure. 1. (a) Perform Cluster Self Diagnostic Test and check
for fault codes.
²If tachometer pointer moves to calibration points
during test and fault codes 110 or 111 don't appear in
the odometer display then failure is not in the cluster.
Look for another possible cause of failure.
²If the pointer doesn't move during test, go to Step
(b).
²If fault code 110 is displayed in the odometer, go to
Step (b).
²If fault code 111 is displayed in the odometer then go
to Step (f).
²If fault codes 920 or 940 are displayed in the
odometer display refer to the fault code chart to identify
which module is causing the fault an repair module.
(b) Replace main cluster pc board. Go to Step (c).
(c) Connect cluster into instrument panel wiring
harness. Place it back into the proper position in the
instrument panel. Put in the top two mounting screws to
hold the cluster in place. DO NOT COMPLETELY
INSTALL CLUSTER TO INSTRUMENT PANEL UNTIL
UNIT IS CALIBRATED AND TESTED. Go to Step (d).
(d) use a scan tool to calibrate cluster and perform Self
Diagnostic Test. If OK, continue installation. If not OK,
go to Step (e).
(e) Replace subdial assembly and use a scan tool to
calibrate cluster. If not OK, look at another possible
cause for the tachometer failure.
(f) Use a scan tool to calibrate tachometer and perform
Self Diagnostic Test. If OK, stop. If not OK, go to Step
(b).
2. No rpm CCD Bus
Message or Zero rpm
CCD Bus Message from
Engine Controller.2. Check the PCM using a scan tool. Refer to the PCM
section of the manual to properly diagnose and repair.
NSINSTRUMENT PANEL AND SYSTEMS 8E - 7
DIAGNOSIS AND TESTING (Continued)
Page 344 of 1938
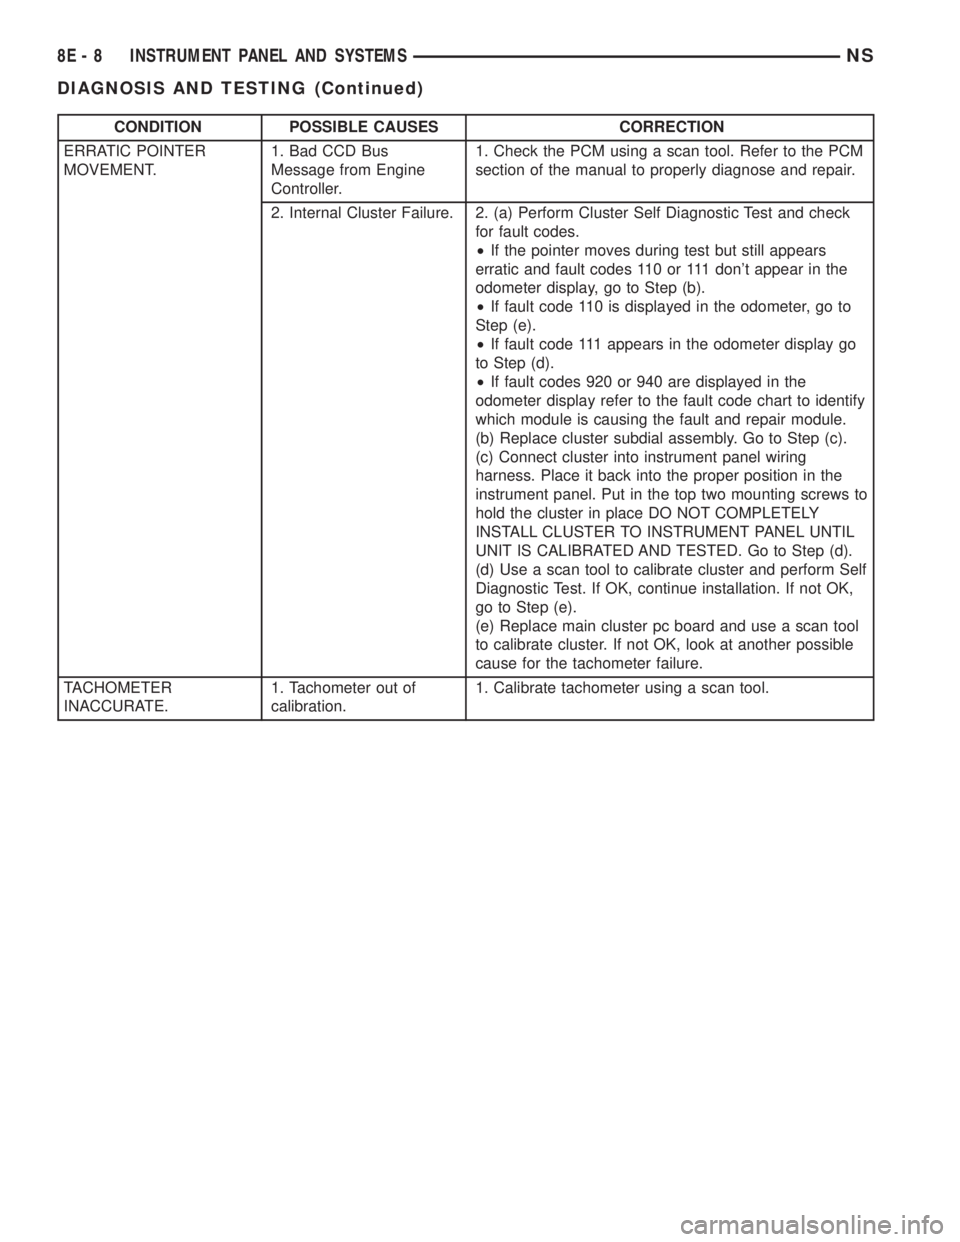
CONDITION POSSIBLE CAUSES CORRECTION
ERRATIC POINTER
MOVEMENT.1. Bad CCD Bus
Message from Engine
Controller.1. Check the PCM using a scan tool. Refer to the PCM
section of the manual to properly diagnose and repair.
2. Internal Cluster Failure. 2. (a) Perform Cluster Self Diagnostic Test and check
for fault codes.
²If the pointer moves during test but still appears
erratic and fault codes 110 or 111 don't appear in the
odometer display, go to Step (b).
²If fault code 110 is displayed in the odometer, go to
Step (e).
²If fault code 111 appears in the odometer display go
to Step (d).
²If fault codes 920 or 940 are displayed in the
odometer display refer to the fault code chart to identify
which module is causing the fault and repair module.
(b) Replace cluster subdial assembly. Go to Step (c).
(c) Connect cluster into instrument panel wiring
harness. Place it back into the proper position in the
instrument panel. Put in the top two mounting screws to
hold the cluster in place DO NOT COMPLETELY
INSTALL CLUSTER TO INSTRUMENT PANEL UNTIL
UNIT IS CALIBRATED AND TESTED. Go to Step (d).
(d) Use a scan tool to calibrate cluster and perform Self
Diagnostic Test. If OK, continue installation. If not OK,
go to Step (e).
(e) Replace main cluster pc board and use a scan tool
to calibrate cluster. If not OK, look at another possible
cause for the tachometer failure.
TACHOMETER
INACCURATE.1. Tachometer out of
calibration.1. Calibrate tachometer using a scan tool.
8E - 8 INSTRUMENT PANEL AND SYSTEMSNS
DIAGNOSIS AND TESTING (Continued)
Page 404 of 1938

CD/3-band graphic equalizer (RBR sales code), or an
AM/FM/CD/cassette/3-band graphic equalizer (RAZ
sales code).
All factory-installed radio receivers are stereo Elec-
tronically Tuned Radios (ETR) and include an elec-
tronic digital clock function.
All factory-installed radio receivers, except the
RAS model, communicate on the Chrysler Collision
Detection (CCD) data bus network through a sepa-
rate two-way wire harness connector. The CCD data
bus network allows the sharing of sensor informa-
tion. This helps to reduce wire harness complexity,
internal controller hardware, and component sensor
current loads. At the same time, this system provides
increased reliability, enhanced diagnostics, and
allows the addition of many new feature capabilities.
In addition, radios connected to the CCD data bus
have several audio system functions that can be diag-
nosed using a DRB scan tool. Refer to the proper
Diagnostic Procedures manual for more information
on DRB testing of the audio systems.
The radio can only be serviced by an authorized
radio repair station. Refer to the latest Warranty Pol-
icies and Procedures manual for a current listing of
authorized radio repair stations.
For more information on radio features, setting
procedures, and control functions refer to the owner's
manual in the vehicle glove box.
RADIO IGNITION INTERFERENCE
If receiving ignition/engine interference noise on
the radio stations, check and clean all engine and
body ground connections. Tighten properly after
cleaning. Example (Fig. 1), (Fig. 2), (Fig. 3) and (Fig.
4).
Ensure all ground connections are without corro-
sion.
CHOKEÐINFINITY SPEAKERS
If the audio system is lacking bass response, check
for continuity across the choke connector. If no conti-
nuity Replace choke. The choke is located on the
Fig. 1 Motor Mount to Frame Rail Ground
Fig. 2 2.4L Engine Block Ground
Fig. 3 3.0L Engine Block Ground
Fig. 4 3.3/3.8L Engine Block Ground
8F - 2 AUDIO SYSTEMSNS
DESCRIPTION AND OPERATION (Continued)
Page 406 of 1938
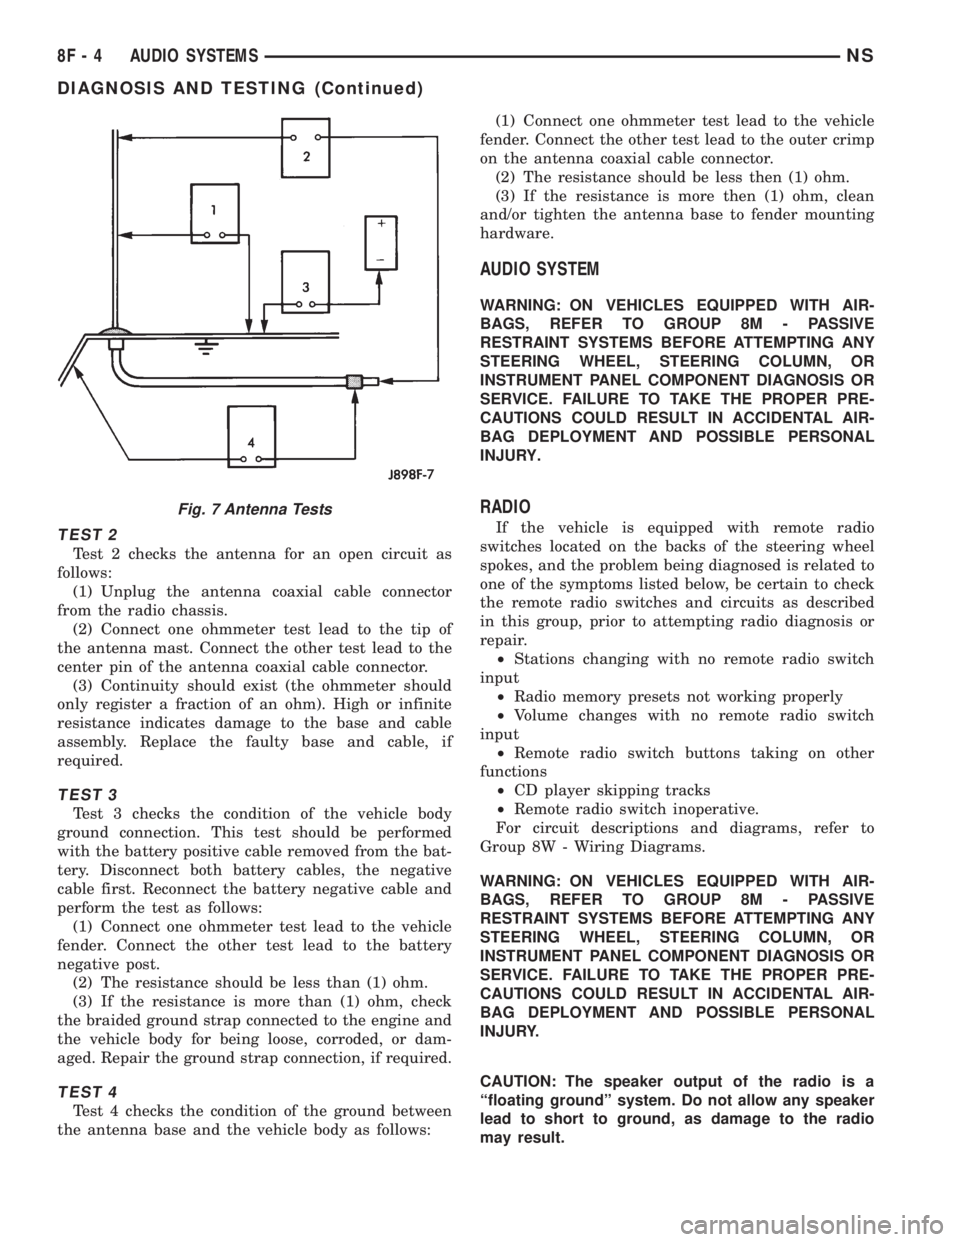
TEST 2
Test 2 checks the antenna for an open circuit as
follows:
(1) Unplug the antenna coaxial cable connector
from the radio chassis.
(2) Connect one ohmmeter test lead to the tip of
the antenna mast. Connect the other test lead to the
center pin of the antenna coaxial cable connector.
(3) Continuity should exist (the ohmmeter should
only register a fraction of an ohm). High or infinite
resistance indicates damage to the base and cable
assembly. Replace the faulty base and cable, if
required.
TEST 3
Test 3 checks the condition of the vehicle body
ground connection. This test should be performed
with the battery positive cable removed from the bat-
tery. Disconnect both battery cables, the negative
cable first. Reconnect the battery negative cable and
perform the test as follows:
(1) Connect one ohmmeter test lead to the vehicle
fender. Connect the other test lead to the battery
negative post.
(2) The resistance should be less than (1) ohm.
(3) If the resistance is more than (1) ohm, check
the braided ground strap connected to the engine and
the vehicle body for being loose, corroded, or dam-
aged. Repair the ground strap connection, if required.
TEST 4
Test 4 checks the condition of the ground between
the antenna base and the vehicle body as follows:(1) Connect one ohmmeter test lead to the vehicle
fender. Connect the other test lead to the outer crimp
on the antenna coaxial cable connector.
(2) The resistance should be less then (1) ohm.
(3) If the resistance is more then (1) ohm, clean
and/or tighten the antenna base to fender mounting
hardware.
AUDIO SYSTEM
WARNING: ON VEHICLES EQUIPPED WITH AIR-
BAGS, REFER TO GROUP 8M - PASSIVE
RESTRAINT SYSTEMS BEFORE ATTEMPTING ANY
STEERING WHEEL, STEERING COLUMN, OR
INSTRUMENT PANEL COMPONENT DIAGNOSIS OR
SERVICE. FAILURE TO TAKE THE PROPER PRE-
CAUTIONS COULD RESULT IN ACCIDENTAL AIR-
BAG DEPLOYMENT AND POSSIBLE PERSONAL
INJURY.
RADIO
If the vehicle is equipped with remote radio
switches located on the backs of the steering wheel
spokes, and the problem being diagnosed is related to
one of the symptoms listed below, be certain to check
the remote radio switches and circuits as described
in this group, prior to attempting radio diagnosis or
repair.
²Stations changing with no remote radio switch
input
²Radio memory presets not working properly
²Volume changes with no remote radio switch
input
²Remote radio switch buttons taking on other
functions
²CD player skipping tracks
²Remote radio switch inoperative.
For circuit descriptions and diagrams, refer to
Group 8W - Wiring Diagrams.
WARNING: ON VEHICLES EQUIPPED WITH AIR-
BAGS, REFER TO GROUP 8M - PASSIVE
RESTRAINT SYSTEMS BEFORE ATTEMPTING ANY
STEERING WHEEL, STEERING COLUMN, OR
INSTRUMENT PANEL COMPONENT DIAGNOSIS OR
SERVICE. FAILURE TO TAKE THE PROPER PRE-
CAUTIONS COULD RESULT IN ACCIDENTAL AIR-
BAG DEPLOYMENT AND POSSIBLE PERSONAL
INJURY.
CAUTION: The speaker output of the radio is a
ªfloating groundº system. Do not allow any speaker
lead to short to ground, as damage to the radio
may result.
Fig. 7 Antenna Tests
8F - 4 AUDIO SYSTEMSNS
DIAGNOSIS AND TESTING (Continued)
Page 419 of 1938

STEP IS NOT DONE A DIAGONSTIC TROUBLE
CODE (DTC) MAY BE SET.
VACUUM RESERVOIR
The reservoir contains a one-way check valve to
trap engine vacuum in the reservoir. When engine
vacuum drops, as in climbing a grade while driving,
the reservoir supplies the vacuum needed to main-
tain proper speed control operation. The vacuum res-
ervoir cannot be repaired and must be replaced if
faulty.
VEHICLE SPEED AND DISTANCE
The 4 speed automatic Transmission Control Mod-
ule (TCM) supplies the speed input to the PCM. The
PCM determines acceleration rates. The speed con-
trol software in the PCM uses vehicle speed and
acceleration to control to the set speed.
Vehicles with a 3 speed automatic or manual trans-
mission have a vehicle speed sensor (VSS) mounted
to an adapter near the transmission output shaft.
The sensor is driven through the adapter by a speed-
ometer pinion gear. The VSS pulse signal is moni-
tored by the PCM to determine vehicle speed and to
maintain speed control set speed. Refer to the appro-
priate Powertrain Diagnostic Procedures manual for
diagnosis and testing of this component. Refer to
group 14, Fuel System for Removal/Installation
DIAGNOSIS AND TESTING
ROAD TEST
Perform a vehicle road test to verify reports of
speed control system malfunction. The road test
should include attention to the speedometer. Speed-
ometer operation should be smooth and without flut-
ter at all speeds.
Flutter in the speedometer indicates a problem
which might cause surging in the speed control sys-
tem. The cause of any speedometer problems should
be corrected before proceeding. Refer to Group 8E,
Instrument Panel and Gauges for speedometer diag-
nosis.
If a road test verifies a surge following a set and
the speedometer operates properly see ªOvershoot/
Undershoot on speed control setº.
If a road test verifies an inoperative system, and
the speedometer operates properly, check for:
²A Diagnostic Trouble Code (DTC). If a DTC
exists, conduct tests per the Powertrain Diagnostic
Procedures service manual.
²A misadjusted brake (stop) lamp switch. This
could also cause an intermittent problem.
²Loose or corroded electrical connections at the
servo. Corrosion should be removed from electricalterminals and a light coating of Mopar Multipurpose
Grease, or equivalent, applied.
²Leaking vacuum reservoir.
²Loose or leaking vacuum hoses or connections.
²Defective one-way vacuum check valve.
²Secure attachment at both ends of the speed
control servo cable.
²Smooth operation of throttle linkage and throttle
body air valve.
²Conduct electrical test at PCM.
²Failed speed control servo. Do the servo vacuum
test.
CAUTION: When test probing for voltage or conti-
nuity at electrical connectors, care must be taken
not to damage connector, terminals or seals. If
these components are damaged, intermittent or
complete system failure may occur.
OVERSHOOT/UNDERSHOOT FOLLOWING SPEED
CONTROL SET
If the operator repeatedly presses and releases the
set button with their foot off of the accelerator (a ªlift
foot setº to begin speed control operation), the vehicle
may accelerate and exceed the desired set speed by
up to 5 MPH (8 km/h) and then decelerate to less
than the desired set speed before finally achieving
the desired set speed.
The Speed Control has an adaptive strategy that
compensates for vehicle-to-vehicle variations in speed
control cable lengths. When the speed control is set
with the vehicle operators foot off of the accelerator
pedal, the speed control thinks there is excessive
speed control cable slack and adapts. If the lift foot
sets are continually used, the speed control over-
shoot/undershoot condition will develop.
To ªunlearnº the overshoot/undershoot condition,
the vehicle operator has to press and release the set
button while maintaining the desired set speed with
the accelerator pedal (not decelerating or accelerat-
ing), and then turn the cruise control switch to the
OFF position (or press the CANCEL button if
equipped) after waiting 10 seconds. This procedure
must be performed approximately 10±15 times to
completely unlearn the overshoot/undershoot condi-
tion.
CHECKING FOR DIAGNOSTIC CODES
When trying to verify a speed control system elec-
tronic malfunction: Connect a DRB scan tool if avail-
able to the data link connector. The connector is
located at left side of the steering column, and at
lower edge of the panel.
(1) A speed control malfunction may occur without
a diagnostic code being indicated.
NSVEHICLE SPEED CONTROL SYSTEM 8H - 3
DESCRIPTION AND OPERATION (Continued)