engine CITROEN BERLINGO FIRST 2011 Handbook (in English)
[x] Cancel search | Manufacturer: CITROEN, Model Year: 2011, Model line: BERLINGO FIRST, Model: CITROEN BERLINGO FIRST 2011Pages: 132, PDF Size: 5.67 MB
Page 77 of 132

75 PRACTICAL INFORMATION
-
CHECKING THE LEVELS
Dipstick
Oil change
According to the information given in
the servicing booklet.
Note:
avoid used oil coming into
prolonged contact with the skin.
Empty the used oil into the contain-
ers intended for this purpose in the
CITROËN network.
Viscosity selection
In all cases, the oil selected must meet
the manufacturer's requirements.
Note:
the coolant does not need to
be changed.
For vehicles equipped with a parti-
cle fi lter, the engine fan may operate
after the ignition has been switched
off, even when the engine is cold.
There are two marks
on the dipstick:
A
= maximum
Never fi ll past this
mark.
B
= minimum
To maintain the reliability
of engines and emission
control systems, the use
of additives in engine oil
is prohibited.
Brake fluid level:
The brake fl uid must be changed according
to the manufacturer's servicing schedule.
Use fl uids recommended by the
manufacturer, which fulfi l DOT4 stan-
dards.
Note:
brake fl uid is harmful to health
and very corrosive. Avoid all contact
with the skin.
Cooling system
Use the fl uid recommended by the
manufacturer.
When the engine is warm, the tem-
perature of the coolant is controlled
by the engine fan. As this fan can op-
erate with the ignition key removed
and because the cooling system is
pressurised, wait for at least one hour
after the engine has stopped before
carrying out any work.
Slacken the cap by two turns to release
the pressure to prevent any risk of scald-
ing. When the pressure has dropped, re-
move the cap and top up the level.
Used oil
Do not dispose of used oil, brake fl uid or
coolant into drains or onto the ground.
Power steering reservoir
�)
Open the reservoir, with the en-
gine at ambient temperature. The
level should always be above the
MIN. mark and close to the MAX.
mark.
Windscreen and headlamp
wash level
For best quality cleaning and for
your safety, we would advise that
you use products recommended by
CITROËN.
For optimum cleaning and to prevent
freezing, this fl uid must not be topped
up or replaced with water.
Oil level
�)
Check the level regularly and top up
between changes. The maximum
consumption is 0.5 l per 600 miles
(1 000 km).
Check the level with the vehicle level,
engine cold, using the oil level gauge
on the instrument panel or the dipstick.
Page 78 of 132

PRACTICAL INFORMATION
76 -
CHECKS
Oil filter
Change the fi lter regularly, in accord-
ance with the servicing schedule.
Only use products recom-
mended by CITROËN or
products of equivalent quality
and specifi cations.
To ensure best performance from
components as important as the
power steering and the braking sys-
tem, CITROËN selects and offers
quite specifi c products.
To prevent damage to the electrical
units, avoid washing the engine.
RUNNING OUT OF FUEL (DIESEL)
If you should run out of fuel, it is nec-
essary to re-prime the circuit:
- fi ll the fuel tank with at least fi ve litres
of diesel,
- squeeze and release the manual
re-priming pump, under the bonnet
under the protective cover, until fuel
appears in the transparent pipe,
- operate the starter until the engine
starts.
FUEL SUPPLY CUT-OFF(PETROL)
In a serious collision, a mechanism prevents
fuel from reaching the engine.
To re-establish the fuel supply, press
the switch on the corner of the front
right-hand suspension assembly, under
the bonnet.
Air filter and passenger
compartment filter
Have the fi lter elements replaced regu-
larly. If you drive in dusty conditions,
change them twice as often.
Brake pads
Brake pad wear depends on the style
of driving, in particular for vehicles
which are used in town, over short
distances.
It may be necessary to check the
thickness of the pads, even between
services.
Disc and drum wear status
For any information relating to check-
ing the disc and drum wear status,
contact a CITROËN dealer.
Manual gearbox
This does not require an oil change.
Check the level in accordance with the
manufacturer's servicing schedule.
To check the main levels and cer-
tain components, in accordance
with the manufacturer's servicing
schedule, refer to the pages of
the servicing booklet which corre-
spond to your vehicle's engine.
Handbrake
Where the handbrake travel is too
great or there is a reduction in the
performance of the system, the
handbrake should be adjusted, even
between services.
Have the system checked by a
CITROËN dealer.
Battery
At the start of winter, have your battery
checked by a CITROËN dealer.
Page 88 of 132

PRACTICAL INFORMATION
86 -
Removing and fi tting a fuse
Before changing a fuse, the cause
of the fault must be found and reme-
died. The fuse numbers are indicated
on the fusebox.
Use the tweezer B
.
CHANGING A FUSE
The fuse boxes are located under the
dashboard and in the engine com-
partment.
Dashboard fusebox
Unclip the cover to gain access to the
fuses.
The spare fuses and the tweezer B
are
fi tted to the inside of the cover A
.
Good
Failed
Tweezer B
Always replace a faulty fuse with a fuse
of the same rating (two fuse types ac-
cording to manufacturer - see images).
Page 89 of 132

87 PRACTICAL INFORMATION
-
Fuse
Rating
Functions
1
15A
Rear wiper.
4
20A
Multi-function scren - Instrument panel -
Audio system - Steering mounted controls.
5
-
Not used.
6
10A
Diagnostic socket.
7
-
Not used.
9
30A
Heated seats.
10
40A
Rear window and door mirrors demisting.
11
15A
Rear wiper (tailgate).
12
30A
Front electric windows.
14
10A
Engine fusebox - Steering mounted controls.
15
15A
Instrument panel - Multi-function screen -
Audio system.
16
30A
Locking/unlocking controls for doors,
bonnet and boot.
20
10A
Right-hand brake lamp.
21
15A
Left-hand brake lamp.
22
20A
Front courtesy lamp - Map reading lamp -
Cigarette lighter - Electric mirror.
Page 91 of 132

89 PRACTICAL INFORMATION
-
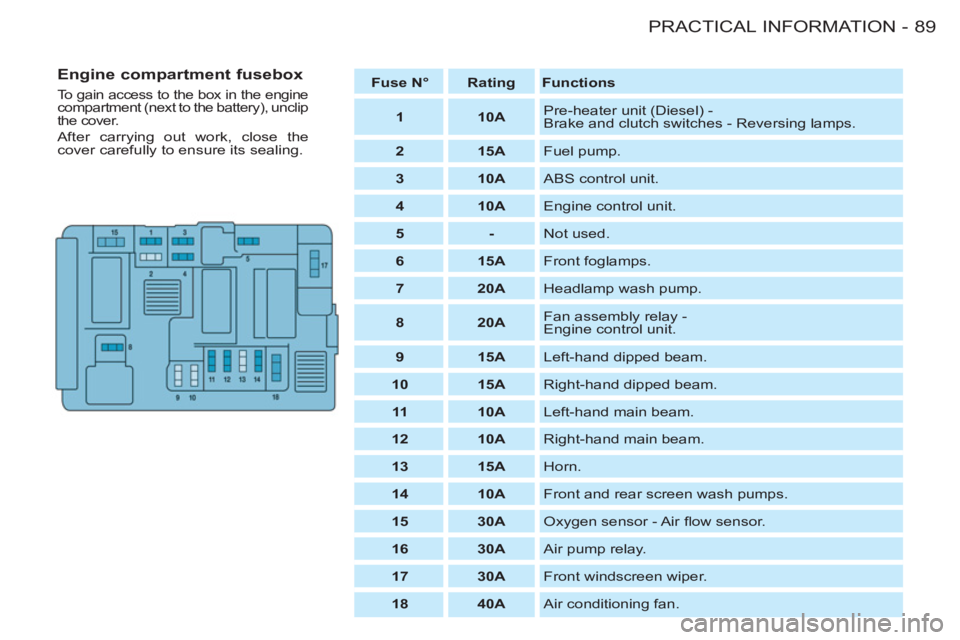
Fuse N°
Rating
Functions
1
10A
Pre-heater unit (Diesel) -
Brake and clutch switches - Reversing lamps.
2
15A
Fuel pump.
3
10A
ABS control unit.
4
10A
Engine control unit.
5
-
Not used.
6
15A
Front foglamps.
7
20A
Headlamp wash pump.
8
20A
Fan assembly relay -
Engine control unit.
9
15A
Left-hand dipped beam.
10
15A
Right-hand dipped beam.
11
10A
Left-hand main beam.
12
10A
Right-hand main beam.
13
15A
Horn.
14
10A
Front and rear screen wash pumps.
15
30A
Oxygen sensor - Air
fl ow sensor.
16
30A
Air pump relay.
17
30A
Front windscreen wiper.
18
40A
Air conditioning fan.
Engine compartment fusebox
To gain access to the box in the engine
compartment (next to the battery), unclip
the cover.
After carrying out work, close the
cover carefully to ensure its sealing.
Page 92 of 132

PRACTICAL INFORMATION
90 -
ECONOMY MODE FUNCTION
After the engine has stopped, with
the key in the "accessories" position,
certain functions (windscreen wiper,
electric windows, courtesy lights,
audio equipment, etc.) can only be
used for a combined duration of ap-
proximately thirty minutes, to prevent
discharging the battery.
Once the thirty minutes are over, a
switching to economy mode mes-
sage appears on the multi-function
display and the active functions are
put on standby.
These functions are reactivated au-
tomatically next time the vehicle is
driven.
In order to resume the use of these
functions immediately, the engine
must be started and left to run for a
few minutes.
The time available to you will then
be double the duration for which the
engine is left running. However, this
period will always be between fi ve
and thirty minutes.
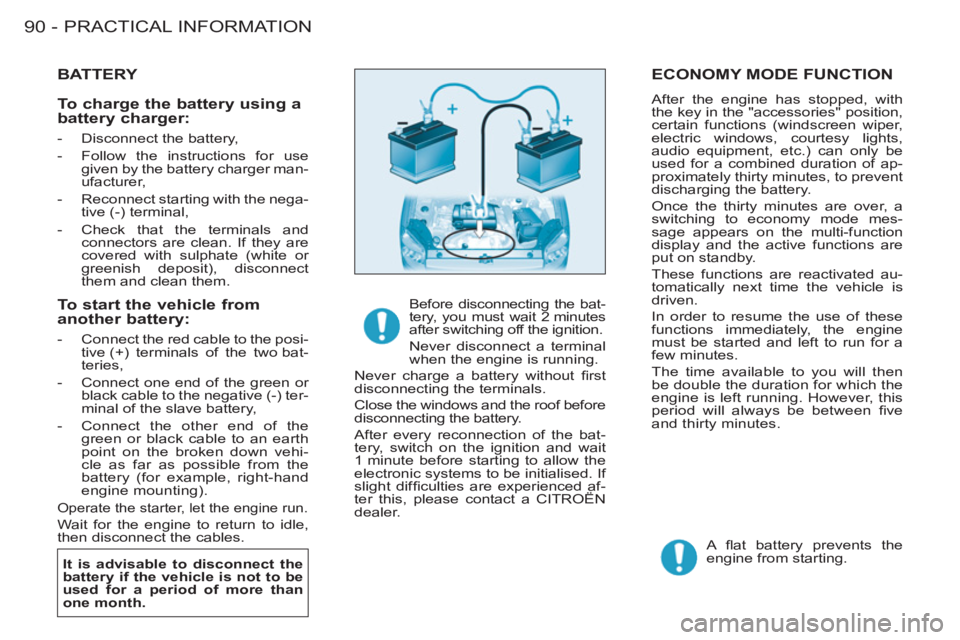
BATTERY
It is advisable to disconnect the
battery if the vehicle is not to be
used for a period of more than
one month.
Before disconnecting the bat-
tery, you must wait 2 minutes
after switching off the ignition.
Never disconnect a terminal
when the engine is running.
Never charge a battery without fi rst
disconnecting the terminals.
Close the windows and the roof before
disconnecting the battery.
After every reconnection of the bat-
tery, switch on the ignition and wait
1 minute before starting to allow the
electronic systems to be initialised. If
slight diffi culties are experienced af-
ter this, please contact a CITROËN
dealer.
A fl at battery prevents the
engine from starting.
To start the vehicle from
another battery:
- Connect the red cable to the posi-
tive (+) terminals of the two bat-
teries,
- Connect one end of the green or
black cable to the negative (-) ter-
minal of the slave battery,
- Connect the other end of the
green or black cable to an earth
point on the broken down vehi-
cle as far as possible from the
battery (for example, right-hand
engine mounting).
Operate the starter, let the engine run.
Wait for the engine to return to idle,
then disconnect the cables.
To charge the battery using a
battery charger:
- Disconnect the battery,
- Follow the instructions for use
given by the battery charger man-
ufacturer,
- Reconnect starting with the nega-
tive (-) terminal,
- Check that the terminals and
connectors are clean. If they are
covered with sulphate (white or
greenish deposit), disconnect
them and clean them.
Page 95 of 132

93 PRACTICAL INFORMATION
-
Without lifting
(four wheels on the ground)
You must always use a towbar.
By lifting
(two wheels only on the ground)
It is preferable to lift the vehicle by
the wheels.
TOWING YOUR VEHICLE
From the front or the rear
Attach the towbar to the towing eye.
Never use the radiator cross-
member.
When towing another vehi-
cle, it must freewheel.
Place the gearbox in "neutral".
Failure to observe this instruction
may result in damage to certain brak-
ing components and the absence of
braking assistance when the engine
is started again.
Page 96 of 132

PRACTICAL INFORMATION
94 -
TOWING A TRAILER,CARAVAN, BOAT, ETC.
We recommend the use of original
CITROËN towbars and their har-
nesses that have been tested and
approved from the design stage of
your vehicle and that the fi tting of the
towbar is entrusted to a CITROËN
dealer.
If the towbar is not fi tted by a
CITROËN dealer, it is imperative that
it is fi tted using the electrical pre-
equipment installed at the rear of the
vehicle, in accordance with the man-
ufacturer's instructions.
Your vehicle is primarily designed
for transporting people and luggage
but it may also be used for towing a
trailer.
Driving with a trailer subjects the tow-
ing vehicle to more signifi cant stress
and its driver must be particularly
careful.
Air density decreases with altitude,
thus reducing engine performance.
Above 1 000 metres, the maximum
towing load must be reduced by 10 %
and so on for every 1 000 metres of
altitude.
Driving advice
Tyres:
Check the tyre pressures of
the towing vehicle and of the trailer,
observing the recommended pres-
sures.
Braking:
Towing increases the braking
distance.
Lights:
Check the electrical signalling
on the trailer.
Side wind:
Take into account the
increased sensitivity to side wind.
Cooling:
Towing a trailer on a slope
increases the temperature of the
coolant.
As the fan is electrically controlled,
its cooling capacity is not dependent
on the engine speed.
On the contrary, use a high gear to
lower the engine speed and reduce
your speed.
The maximum towing load on a long
slope depends on the gradient and
the outside temperature.
In all cases, pay attention to the coolant
temperature.
In certain cases of particularly ardu-
ous use (towing the maximum load on
a steep gradient in high temperatures),
switching off the air conditioning permits
the recovery of engine power and there-
fore an increase in the towing capacity.
If the warning light comes on, stop
the vehicle and switch off the engine
as soon as possible.
Distribution of loads:
Distribute the
load in the trailer so that the heaviest
items are as close as possible to the
axle and the nose weight approach-
es the maximum permitted without
exceeding it.
Page 102 of 132

TECHNICAL DATA
100 -
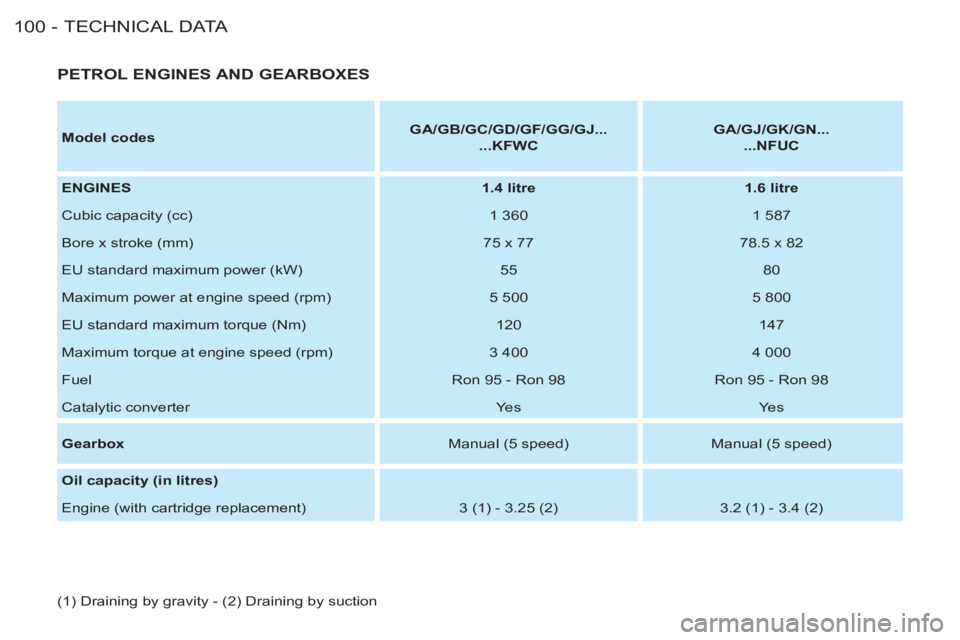
PETROL ENGINES AND GEARBOXES
Model codes
GA/GB/GC/GD/GF/GG/GJ...
...KFWC
GA/GJ/GK/GN...
...NFUC
ENGINES
1.4 litre
1.6 litre
Cubic capacity (cc)
1 360
1 587
Bore x stroke (mm)
75 x 77
78.5 x 82
EU standard maximum power (kW)
55
80
Maximum power at engine speed (rpm)
5 500
5 800
EU standard maximum torque (Nm)
120
147
Maximum torque at engine speed (rpm)
3 400
4 000
Fuel
Ron 95 - Ron 98
Ron 95 - Ron 98
Catalytic converter
Yes
Yes
Gearbox
Manual (5 speed)
Manual (5 speed)
Oil capacity (in litres)
Engine (with cartridge replacement)
3 (1) - 3.25 (2)
3.2 (1) - 3.4 (2)
(1) Draining by gravity - (2) Draining by suction
Page 103 of 132

101 TECHNICAL DATA
-
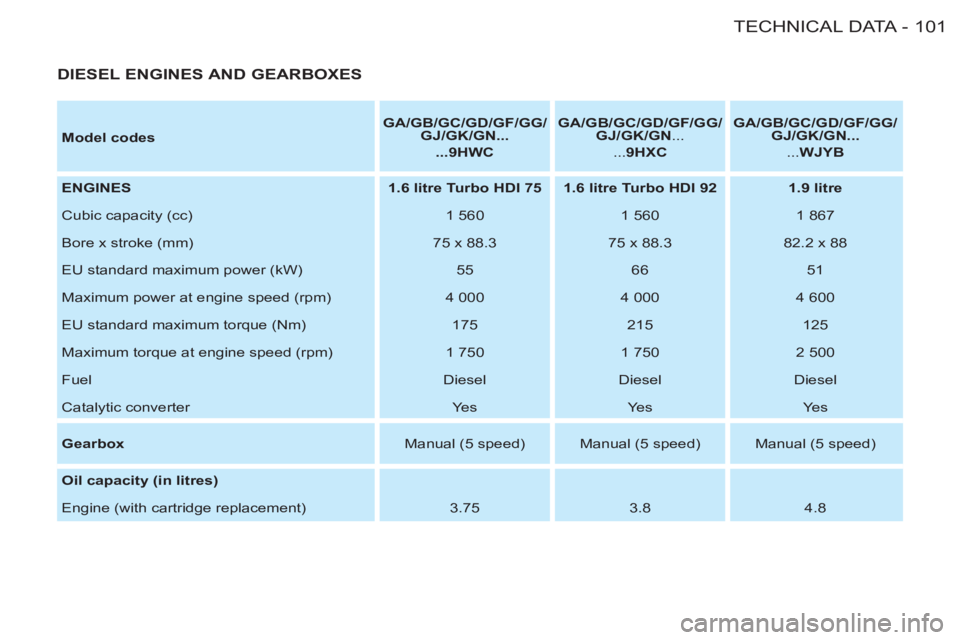
Model codes
GA/GB/GC/GD/GF/GG/
GJ/GK/GN...
...9HWC
GA/GB/GC/GD/GF/GG/
GJ/GK/GN
...
... 9HXC
GA/GB/GC/GD/GF/GG/
GJ/GK/GN...
... WJYB
ENGINES
1.6 litre Turbo HDI 75
1.6 litre Turbo HDI 92
1.9 litre
Cubic capacity (cc)
1 560
1 560
1 867
Bore x stroke (mm)
75 x 88.3
75 x 88.3
82.2 x 88
EU standard maximum power (kW)
55
66
51
Maximum power at engine speed (rpm)
4 000
4 000
4 600
EU standard maximum torque (Nm)
175
215
125
Maximum torque at engine speed (rpm)
1 750
1 750
2 500
Fuel
Diesel
Diesel
Diesel
Catalytic converter
Yes
Ye s
Yes
Gearbox
Manual (5 speed)
Manual (5 speed)
Manual (5 speed)
Oil capacity (in litres)
Engine (with cartridge replacement)
3.75
3.8
4.8
DIESEL ENGINES AND GEARBOXES