engine DATSUN 210 1979 Service Manual
[x] Cancel search | Manufacturer: DATSUN, Model Year: 1979, Model line: 210, Model: DATSUN 210 1979Pages: 548, PDF Size: 28.66 MB
Page 152 of 548

e
In
o
L
1
Ignition
switch
2
Vacuum
switching
v3
lve
3
Top
detecting
switch
4
Function
check
connector
EC330A
i
Fig
EC
99
Checking
Top
Detecting
l
Switch
Vacuum
dela
valve
Remove
vacUum
delay
valve
2
Blow
air
from
th
port
of
the
distributor
side
The
vacuum
delay
valve
is
in
go
ij
condition
if
the
air
flows
through
the
valve
3
Try
again
from
the
opposit
side
of
the
valve
Th
valve
is
in
goo
condition
if
th
a
flow
resistance
is
greater
than
the
step
2
abov
Distributor
side
Carburetor
side
Distribu
tor
side
Carburetor
side
EC346
Fig
EC
100
Checking
Vocuum
Dewy
Valve
Emission
Control
Syst
m
4
If
the
condition
of
spark
delay
valve
is
questionable
dip
port
into
a
cup
filled
with
water
Blow
air
from
brown
face
side
Small
air
bubbles
should
appear
CAUTION
Be
c
areful
to
avoid
entry
of
oil
or
dirt
into
valve
7
E
C279
Fig
EC
101
Checking
Vacuum
D
lDy
Valve
CATALYTIC
CONVERTER
California
dels
DESCRIPTION
1
The
catalytic
converter
accelerates
the
chemical
reaction
of
hydrocarbons
CD
0
He
and
carbon
monoxide
O
in
the
exhaust
gas
and
changes
them
into
non
harmful
carbon
dioxide
C02
and
water
H20
This
chemical
reac
tiOD
process
requires
the
proper
a
mount
of
air
which
is
supplied
by
the
air
pump
Refer
to
the
item
AJ
S
This
air
is
called
secondary
air
The
Catalytic
converter
is
mounted
0
the
models
destinbd
for
California
OPERATION
Exhaust
gas
emitted
from
the
en
gine
contains
some
harmful
substances
due
to
incomplete
combustion
in
the
combustion
chamber
The
air
injection
stem
i
designed
to
reduce
the
con
tent
of
such
substances
in
the
exhaust
gas
In
this
system
the
secondary
air
is
led
from
the
ch
ck
valve
and
injected
in
o
the
exhaust
manifold
With
this
injection
of
the
secondary
air
hydro
carbons
He
and
carbon
monoxide
CO
in
the
exhaust
gas
are
gradually
oxidized
with
oxygen
02
in
the
secondary
air
and
converted
into
nOD
harmful
carbon
dioxide
C02
and
water
HP
The
catalytic
converter
further
cleans
engine
exhaust
gas
Through
catalytic
action
it
changes
residual
hydrocarbons
and
carbon
monoxide
contained
in
exhaust
gas
into
carbon
dioxide
and
water
before
exhaust
gas
is
discharged
to
the
atmosphere
0
Secondary
air
Carbon
monoxide
hydrocarbon
Carbon
dioxide
gas
Nater
EC
i
A
I
Front
tube
2
Catalytic
converter
3
Center
tube
4
Main
murner
EC
33
EC215
Fig
EC
I02
Function
of
Catalytic
Converter
Page 153 of 548

REMOVAL
AND
INSTALLATION
I
Jack
up
the
car
Note
Apply
parking
brake
and
place
wheel
chocks
2
Remove
screws
securing
lower
shelter
of
catalytic
converter
Loosen
flange
bolt
connecting
catalytic
converter
to
front
and
rear
exhaust
tube
Catalytic
converter
assembly
can
then
be
taken
out
3
Installation
i
in
the
reverse
se
quence
of
removal
CAUTION
a
Be
careful
not
to
damage
catalytic
co
when
handliilg
b
Never
wet
catalyzer
with
water
oil
etc
t
J
Tightening
torque
Catalyti
converter
bolts
2
6
to
3
4
kg
m
19
to
25
ft
lb
Emission
Control
System
EC075A
EC076A
Fig
EC
103
Removing
Catalytic
Converter
INSPECTION
PrelimInary
In
pectlon
Vi
ually
check
condition
of
all
component
parts
including
hose
tubes
and
wires
replace
if
necessary
Refer
to
Air
Injection
System
for
inspection
EC
34
Catalytic
converter
Whether
catalytic
converter
is
nor
mal
or
not
can
e
checked
by
ob
serving
variation
in
CO
percentage
The
checking
procedure
is
as
follows
Apply
parking
brake
Shift
gears
into
Neutral
for
manual
transmis
sion
and
N
or
P
for
automatic
transmission
position
I
Adjust
engine
idling
speed
and
CO
percentage
Refer
to
Adjusting
Carburetor
Idle
RPM
and
Mixture
Ratio
for
adjustment
2
Race
engine
1
500
to
2
000
rpm
two
or
three
times
under
no
load
and
make
sure
that
specified
CO
percent
age
obtained
3
Remove
cap
and
connect
air
hose
to
air
check
valve
If
idling
speed
increases
readjust
it
to
specified
speed
with
throttle
adjusting
screw
4
Warm
up
engine
for
about
four
minutes
at
2
000
pm
under
no
load
S
Measure
Ci
percentage
at
idling
speed
After
stepAhas
been
complet
ed
wait
for
one
minute
before
making
CO
percentage
measurement
6
If
CO
percentage
measured
in
step
5
is
less
than
0
3
the
catalytic
converter
is
normaL
7
If
CO
percentage
measured
in
step
5
is
over
0
3
recheck
AJ
S
and
1
replace
air
check
valVe
The
perform
inspection
steps
4
and
S
8
If
CO
percentage
is
still
over
0
3
in
step
7
catalyt
iC
converter
i
mal
functioning
Replace
catalytic
con
verter
Page 155 of 548

OPERATION
Fuel
vapors
from
the
sealed
fuel
tank
are
led
into
the
carbon
canister
The
canister
is
filled
with
activated
charcoals
to
absorb
the
fuel
vapors
when
the
engine
is
at
rest
or
at
idling
t
Fuel
tank
2
Fuel
filler
cap
with
vacuum
re1ief
va1ve
3
Fuel
check
vslve
4
Vapor
t
line
5
Vacuum
signal
line
6
Canister
purge
line
Emission
Control
System
As
the
throttle
Valve
opens
and
car
speed
increases
vacuum
pressure
in
the
vacuum
signajline
forces
the
purge
control
valve
to
open
and
admits
an
orifice
to
intake
manifold
and
fuel
vapor
is
then
drawn
into
the
intake
manifold
through
the
canister
purge
line
Fuel
vapor
7
Throttle
valve
IZ
Filter
8
Engine
13
Purge
control
valve
9
Carbon
cani5t
14
DiaphraP
spring
10
Activated
carbon
IS
Diaphngm
II
Screen
16
Fixed
orifice
EC785
Fig
EC
JOS
Evaporative
Emiuion
Control
System
Fuel
vapor
flow
when
ngine
is
at
rest
or
running
REMOVAL
AND
INSTALLAtiON
CARBON
CANISTER
FILTER
Check
for
a
contantinated
element
Elemenl
can
be
removed
at
the
bottom
of
canister
installed
on
car
body
EF201
Fig
EC
I06
Replacing
Carbon
Canilttr
Filter
CHECK
VALVE
The
check
valve
is
located
behind
the
luggage
compartment
board
on
the
fuel
tank
Remove
the
luggage
compartment
board
and
disconnect
the
vapor
tube
The
check
valve
can
then
be
taken
out
EC315A
Fig
EC
I07
Removing
Check
Volve
EC
36
INSPECTION
FUEL
TANK
AND
VAPOR
VENT
LINE
1
Check
all
hoses
and
fuel
tank
filler
cap
2
Disconnect
the
vapor
vent
line
connecting
carbon
canister
to
check
valve
3
Connect
a
3
w
y
connector
a
manometer
and
a
cock
or
an
equi
valent
3
way
charge
cock
to
the
end
of
the
vent
line
EC183A
Fig
EC
IOB
Vent
Line
4
Supply
fresh
air
into
the
vapor
vent
line
through
the
cock
little
by
little
until
pressure
becomes
368
mmHZO
14
5
inHZO
S
Shut
the
cock
completely
and
leave
it
unattended
6
After
2
5
minutes
measure
the
height
of
the
liquid
in
the
manometer
7
Variation
in
height
should
remain
with
25
mmHZO
0
98
inH20
8
When
filler
cap
does
not
close
completely
the
height
should
drop
to
zero
in
a
short
time
9
If
the
height
does
not
drop
to
zero
in
a
short
time
when
ruler
cap
is
d
it
is
the
cause
of
a
stuffy
hose
Note
In
case
the
vent
line
is
stuffy
the
breathing
in
fuel
tank
is
not
thoroughly
IIIIIde
thus
causing
in
sufficient
delivery
of
feul
to
engine
or
vapor
lock
It
must
therefore
be
repaired
or
replaced
Page 156 of 548

3
way
connector
ck
Air
@
Manometer
Carbon
canister
Emission
Control
System
400
mmH20
15
75
inH20
Check
valve
Fuel
filler
cap
r
EC091A
Fig
EC
I09
Checking
Evaporative
Emiuion
Control
Syatem
FUEL
CHECK
VALVE
I
Blow
air
through
connector
on
fuel
tank
side
A
considerable
resistance
should
be
felt
at
the
mouth
and
a
portion
of
air
flow
be
directed
toward
the
engine
2
Blow
air
through
connector
on
engine
side
Air
flow
should
be
smoothly
direct
ed
toward
fuel
tank
3
If
fuel
check
valve
is
suspected
of
not
being
properly
functioning
in
steps
I
and
2
above
replace
Engine
side
Fuel
tank
side
Q
Evaporative
fuel
flow
Fresh
air
flow
EC090A
Fig
EC
110
Checking
Fuel
Check
Valve
CARBON
CANISTER
PURGE
CONTROL
VALVE
Check
for
fuel
vapor
leakage
in
the
distributor
vacuum
line
at
diaphragm
of
carbon
canister
purge
control
valve
To
check
for
leakage
proceed
as
follows
I
Disconnect
rubber
hose
in
the
line
between
T
connector
and
carbon
canister
at
T
connector
2
Inhale
air
into
the
opening
of
rubber
hose
running
to
vacuum
hole
in
carbon
canister
and
ensure
that
there
is
no
leak
ET349
Fig
EC
lll
Checking
Carbon
Canister
Purge
Control
Valve
EC37
3
If
there
is
a
leak
remove
top
cover
from
purge
control
valve
and
check
for
dislocated
or
cracked
dia
phragm
If
necessary
replace
dia
phragrrt
kit
which
is
made
up
of
a
retainer
diaphragm
and
spring
i
ii
1
Cover
2
Diaphragm
3
Retainer
4
Diaphragm
spring
ET350
Fig
EC
112
Carbon
Canister
Purge
Control
Valve
FUEL
TANK
VACUUM
RELIEF
VALVE
Remove
fuel
filler
cap
and
see
it
functions
properly
I
Wipe
clean
valve
housing
and
have
it
in
your
mouth
2
Inhale
air
A
slight
resistance
ac
companied
by
valve
indicates
that
valve
is
in
good
mechanical
condition
Note
also
that
by
further
inhaling
air
the
resistance
should
be
disappeared
with
valve
clicks
3
If
valve
is
clogged
or
if
no
resist
ance
is
felt
replace
cap
as
an
assem
bled
unit
O
ET500
Fig
EC
1l3
Fuel
Filler
Cap
Page 157 of 548

Emission
Control
System
SERVICE
DATA
AND
SPECIRCATIONS
INSPECTION
AND
ADJUSTMENT
AIR
PUMP
Air
pressure
With
engine
speed
at
2
600
pm
mrriHg
inHg
More
than
100
3
94
E
G
R
SYSTEM
Thermal
vacuum
valve
opening
temperature
U
S
A
models
except
FU
model
FU
and
Canada
models
Oc
OF
oC
F
SO
to
63
122
to
145
40
to
63
104
to
145
T
C
S
SYSTEM
Thermal
vacuum
valve
Except
Canada
and
FU
models
Closing
temperature
oC
F
Opening
temperature
OC
F
Above
SO
to
63
122
to
145
Below
5
to
18
41
to
64
5
to
18
and
SO
to
63
41
to
64
and
122
to
145
TIGHTENING
TORQUE
Air
pump
Bea
ring
cover
securing
bolt
Rotor
ring
screw
End
cover
bolt
Pulley
securing
bolt
Thermal
vacuum
valVe
BP
T
valve
mounting
sere
Top
detecting
switch
Catalytic
converter
bolt
kg
m
ft4b
kg
m
ft
lb
kg
m
ft
Ib
kg
m
ft
b
kg
m
ft
lb
kg
m
ft
Ib
kg
m
ft
Ib
kg
m
ft
lb
0
1
to
0
2
0
7
to
1
4
0
5
to
0
7
3
6
to
5
1
0
7
to
0
9
5
1
to
6
5
0
75
to
0
90
5
4
to
6
5
Less
than
2
2
16
0
38
to
0
51
2
7
to
3
7
2
0
to
3
0
14
to
22
2
6
to
3
4
19
to
25
EC
38
Page 159 of 548
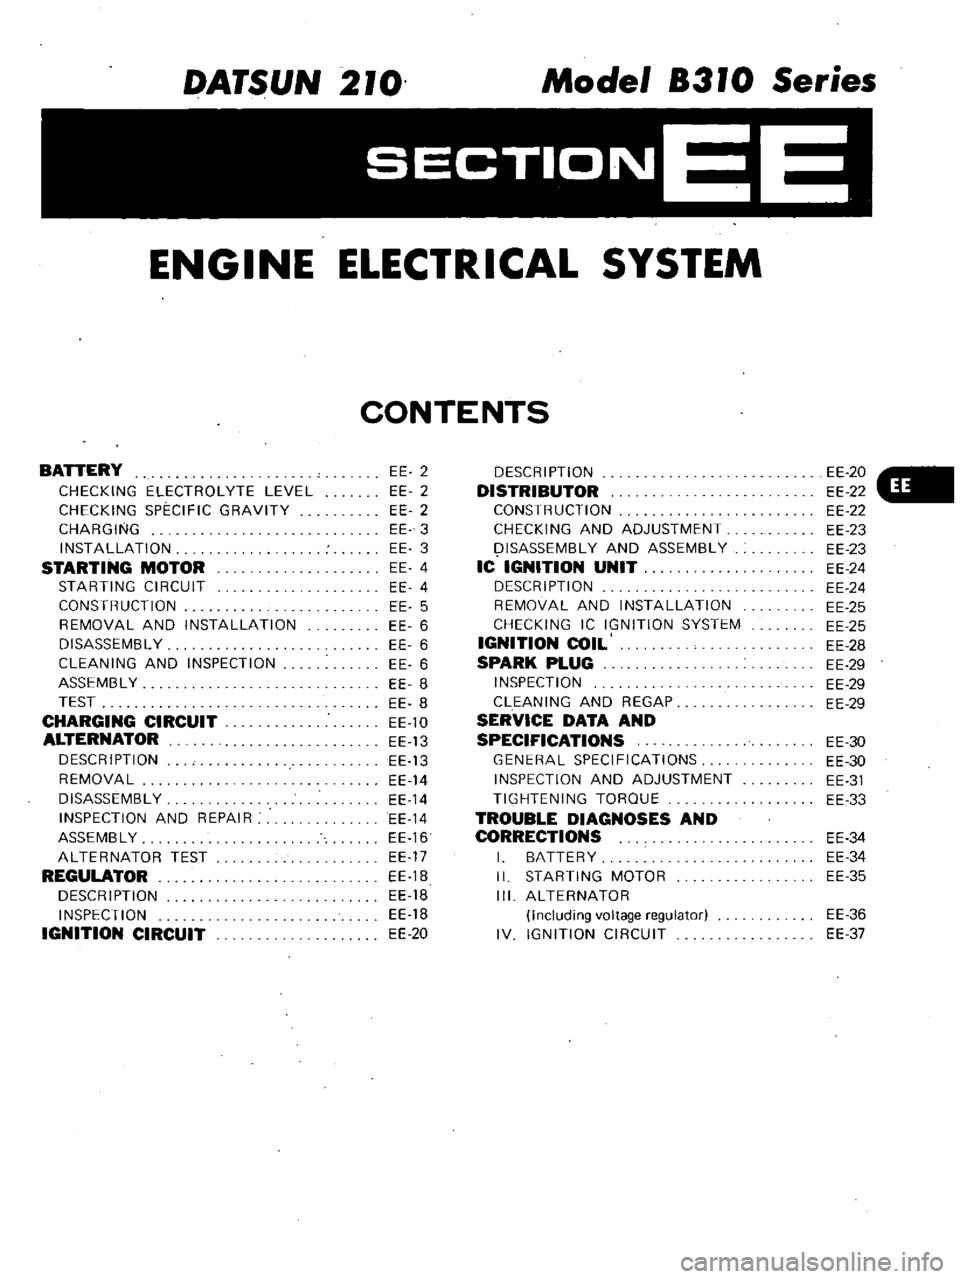
DATSUN
210
Model
8310
Series
SECTIONEE
ENGINE
ELECTRICAL
SYSTEM
CONTENTS
BATTERY
CHECKING
ELECTROLYTE
LEVEL
CHECKING
SPECIFIC
GRAVITY
CHARGING
INSTALLATION
STARTING
MOTOR
STARTING
CIRCUIT
CONSTRUCTION
REMOVAL
AND
INSTALLATION
DISASSEMBL
Y
CLEANING
AND
INSPECTION
ASSEMBL
Y
TEST
CHARGING
CIRCUIT
ALTERNATOR
DESCRIPTION
REMOVAL
DISASSEMBLY
INSPECTION
AND
REPAIR
ASSEMBLY
ALTERNATOR
TEST
REGULATOR
DESCRIPTION
INSPECTION
IGNITION
CIRCUIT
EE
2
EE
2
EE
2
EE
3
EE
3
EE
4
EE
4
EE
5
EE
6
EE
6
EE
6
EE
8
EE
8
EE
10
EE
13
EE
13
EE
14
EE
14
EE
14
EE
16
EE
17
EE
1B
EE
18
EE
18
EE
20
DESCRIPTION
DISTRIBUTOR
CONSTRUCTION
CHECKING
AND
ADJUSTMENT
I
ISASSEMBL
Y
AND
ASSEMBLY
IC
IGNITION
UNIT
DESCRIPTION
REMOVAL
AND
INSTALLATION
CHECKING
IC
IGNITION
SYSTEM
IGNITION
COIL
SPARK
PLUG
INSPECTION
CLEANING
AND
REGAP
SERVICE
DATA
AND
SPECIFICATIONS
GENERAL
SPECIFICATIONS
INSPECTION
AND
ADJUSTMENT
TIGHTENING
TORQUE
TROUBLE
DIAGNOSES
AND
CORRECTIONS
I
BATTERY
II
STARTING
MOTOR
III
ALTERNATOR
Including
voltage
regulator
IV
IGNITION
CIRCUIT
EE
20
EE
22
EE
22
EE
23
EE
23
EE
24
EE
24
EE
25
EE
25
EE
28
EE
29
EE
29
EE
29
EE
30
EE
30
EE
31
EE
33
EE
34
EE
34
EE
35
EE
36
EE
37
Page 160 of 548
WARNING
Never
touch
positive
and
negative
terminals
at
the
same
time
with
are
hands
Th
l
Il
d
result
in
injury
CHECKING
ELECTROLYTE
LEVEL
Remove
six
vent
plugs
and
check
for
electrolyte
level
in
each
cell
If
necessary
pour
distilled
water
CHECKING
SPECIFIC
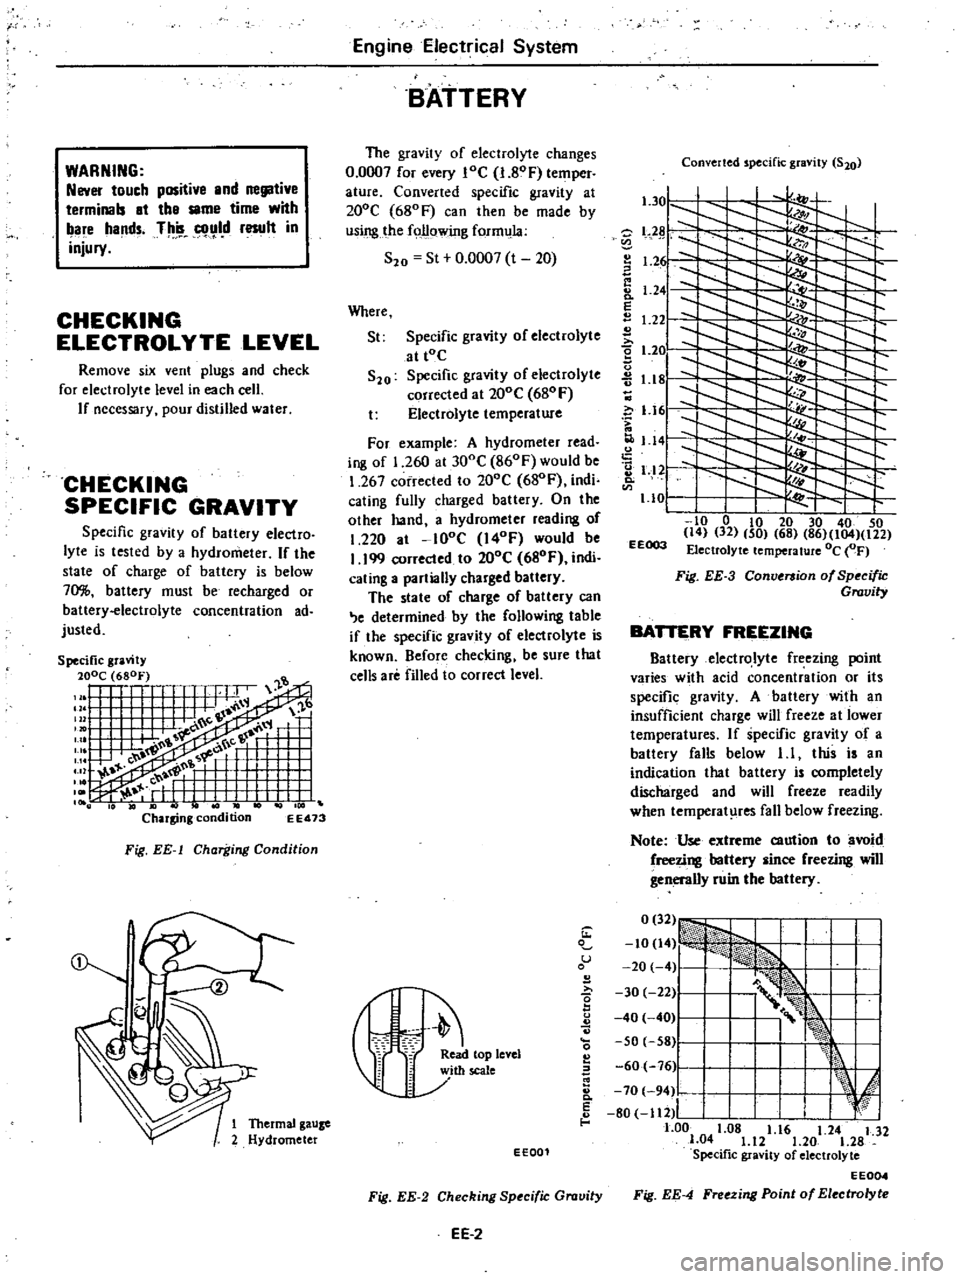
GRAVITY
Specific
gravity
of
battery
electro
lyte
is
tested
by
a
hydrometer
If
the
state
of
charge
of
battery
is
below
70
battery
must
be
recharged
or
battery
electrolyte
concentration
ad
justed
EE473
Fig
EE
l
Charging
Condition
Engine
Electrical
System
BATTERY
The
gravity
of
electrolyte
changes
0
0007
for
every
loe
I
80F
temper
ature
Converted
specific
gravity
at
200e
680F
can
then
be
made
by
using
the
following
form
la
S20
St
0
0007
t
20
Where
St
Specific
gravity
of
electrolyte
at
tOe
S20
Specific
gravity
of
electrolyte
corrected
al
200e
680
F
t
Electrolyte
temperature
For
example
A
hydrometer
read
ing
of
1
260
at
300e
860F
would
be
1
267
corrected
to
200e
680F
indi
cating
fully
charged
battery
On
the
olher
hand
a
hydrometer
reading
of
1
220
at
lOoe
I40F
would
be
I
199
corrected
to
200e
680F
indi
cating
a
partially
charged
battery
The
state
of
charge
of
battery
can
e
determined
by
the
following
table
if
the
specific
gravity
of
electrolyte
is
known
Before
checking
be
sure
that
cells
are
filled
to
correct
level
Converted
specific
gravity
S20
l
301
l
Z
L2
I
1
2
I
Ii
8
1
24
E
1
22
2
t
2e
u
1
18
c
i
1
161
1
141
2
1
12
Q
1
10
I
to
0
to
20
30
40
50
14
32
50
68
86
104
122
EEOO3
Electrolyte
temperature
Oc
OF
Fig
EE
3
Conversion
of
Specific
Gravity
BATTERY
FREEZING
Battery
electrolyte
freezing
point
varies
with
acid
concentration
or
its
specific
gravity
A
battery
with
an
insufficient
charge
will
freeze
al
lower
temperatures
If
specific
gravity
of
a
battery
falls
below
1
I
this
is
an
indication
that
battery
is
completely
discharged
and
will
freeze
readily
when
temperat
res
fall
below
freezing
Note
Use
extreme
caution
to
avoid
freezing
battery
since
freezing
will
generally
ruin
the
battery
1
u
B
I
r
eleYel
60
76
Ji
I
k
E
I
I
d
8
70
94
80
112
I
I
f
1
Thermal
gauze
1
00
1
08
1
16
1
24
1
32
2
Hydrometer
1
04
1
12
1
20
1
28
EE001
Specific
gravity
of
electrolyte
EE004
Fig
EE
2
Checking
Specific
Gravity
Fig
EE
4
Freezing
Point
of
Electrolyte
EE
2
Page 161 of 548
CHARGING
If
electrolyte
level
is
satisfactory
battery
must
be
charged
when
electro
lyte
gravity
reading
falls
below
1
20
or
1
22
NS70
If
battery
on
car
is
quick
charged
to
bring
it
up
to
full
charge
the
operation
should
be
carried
out
with
negative
cable
removed
Prior
to
charging
corroded
termi
nals
should
be
cleaned
with
a
brush
and
common
baking
soda
solution
In
addition
the
following
items
should
be
observed
while
battery
is
being
Engine
Electrical
System
charged
I
Be
sure
that
electrolyte
level
is
above
top
of
each
plate
2
Keep
removed
plugs
in
a
safe
place
3
Do
not
allow
electrolyte
tempera
ture
to
go
over
4SoC
1130F
4
After
charging
check
to
be
cer
tain
that
specific
gravity
does
not
exceed
maximum
charging
specific
gravity
at
20
C
680F
Correction
can
be
made
by
adding
distilled
water
into
cells
as
necessary
5
Keep
battery
away
from
open
EE
3
flame
while
it
is
being
charged
6
After
all
vent
plugs
have
been
tightened
clean
all
sprayed
electrolyte
off
upper
face
of
battery
INSTALLATION
1
InstaU
and
tighten
clamps
secure
ly
2
After
clamps
have
been
tightened
clean
battery
cable
terminals
and
apply
grease
to
retard
formation
of
corrosion
Page 162 of 548
Engine
Electrical
System
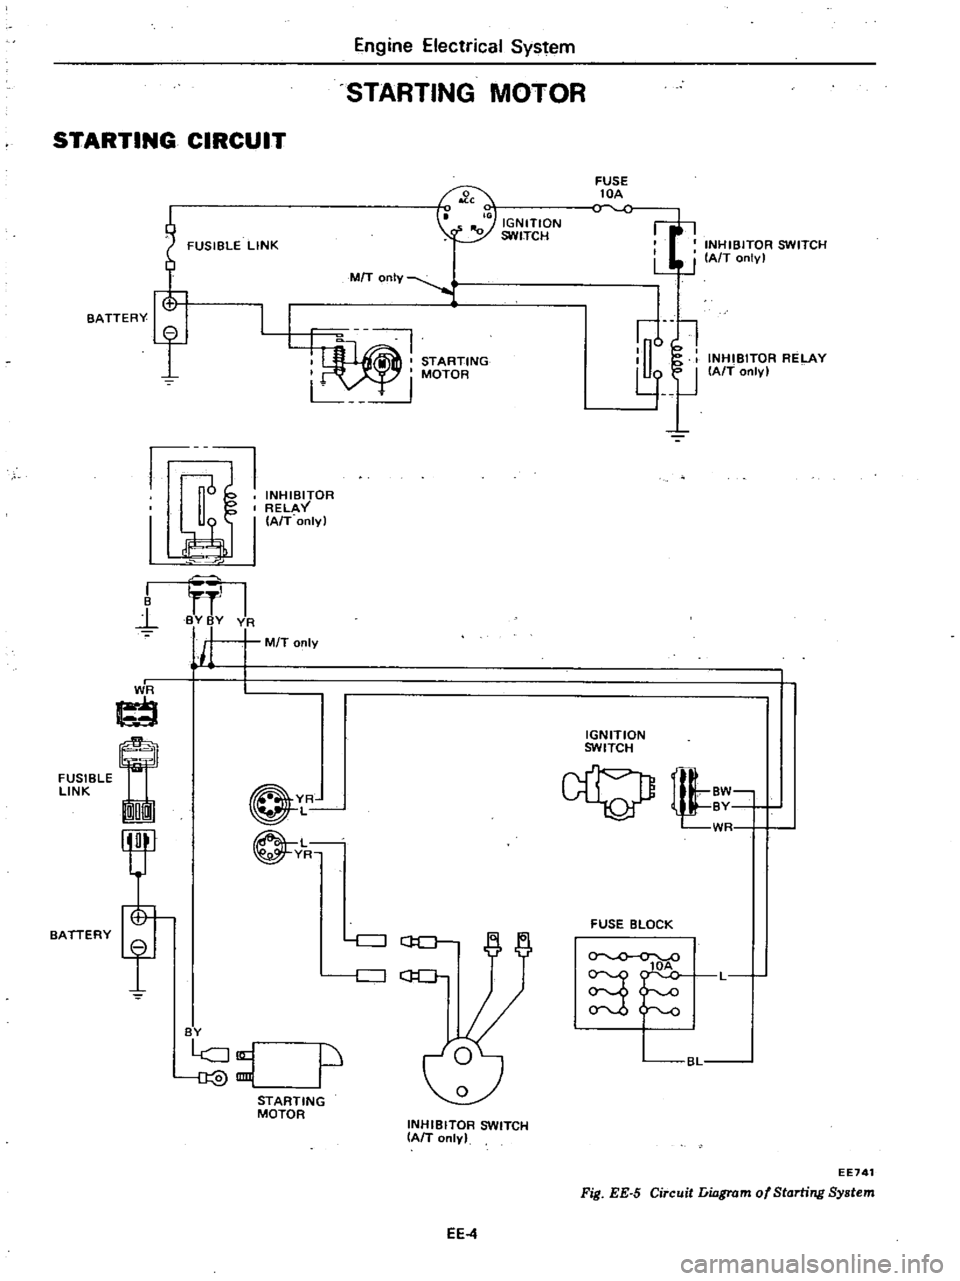
STARTING
MOTOR
STARTING
CIRCUIT
FUSIBLE
LINK
FUSE
lOA
INHIBITOR
SWITCH
LJ
J
IAfT
onlv
I
IGNITION
SWITCH
7
MIT
OnIY
STARTING
I
MOTOR
L
u
l
l
lJ
INHIBITOR
RELAY
IAfT
only
BATTERY
f
1J
INHIBITOR
RELAY
I
I
A
T
onlyl
I
B
l
I
BY
BY
VA
j
M
T
only
I
J
ti
FUSIBLE
LINK
On
IGNITION
SWITCH
BATTERY
YR
L
L
YR
tl
WR
FUSE
BLOCK
c
J
GO
c
J
C
lOA
S
L
BY
p
BL
STARTING
MOTOR
INHIBITOR
SWITCH
IAIT
only
EE741
Fig
EE
5
Circuit
Liagrom
of
Starting
System
EE4
Page 163 of 548
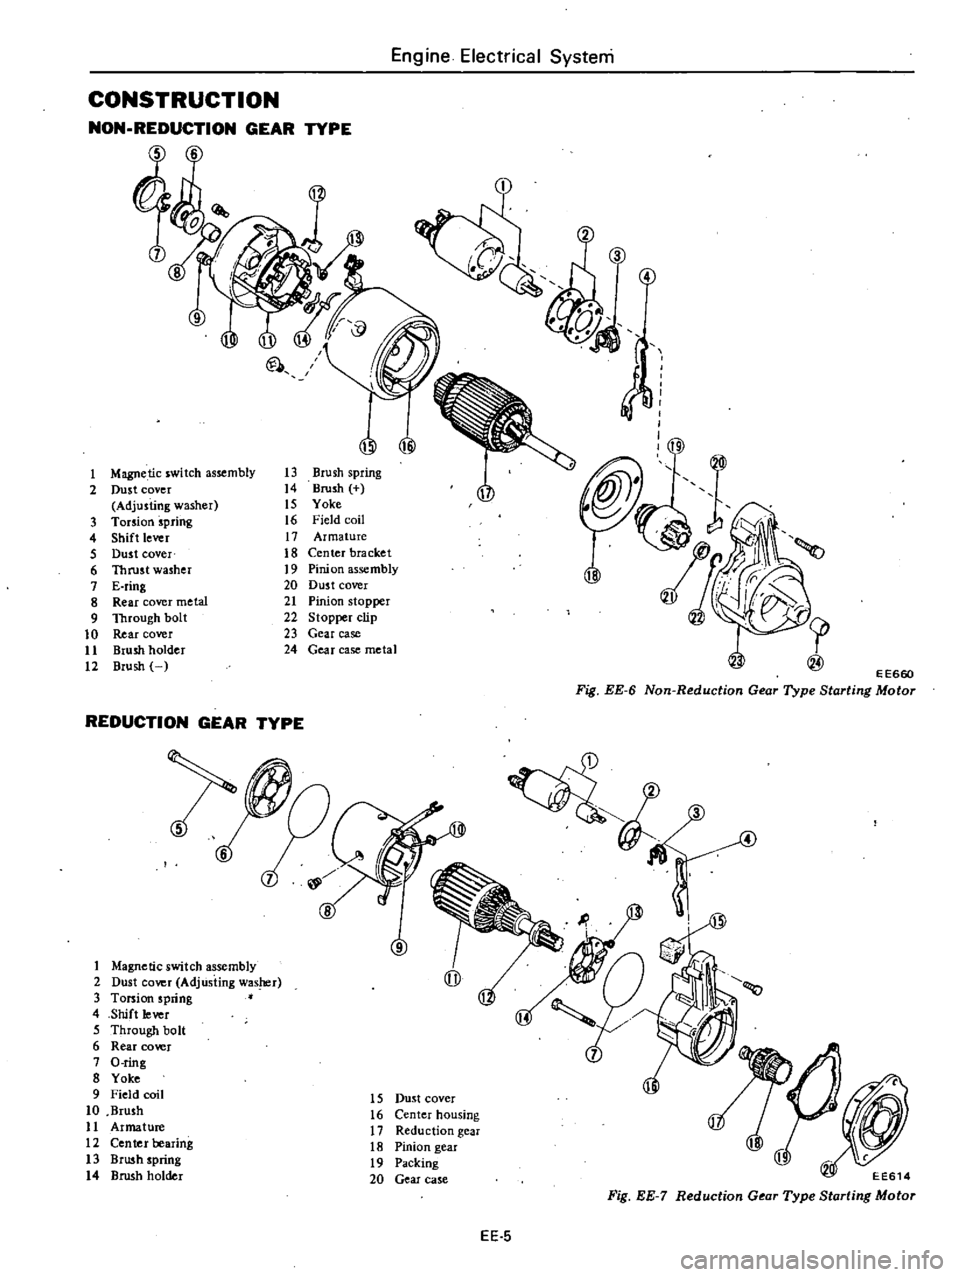
CONSTRUCTION
NON
REDUCTION
GEAR
TYPE
6
00
1
Magnetic
switch
assembly
2
Dust
cover
Adjusting
washer
3
Torsion
spring
4
Shift
lever
5
Dust
cover
6
Thrust
washer
7
E
ring
8
Rear
cover
metal
9
Through
bolt
10
Rear
cover
11
Brush
holder
12
Brush
U
Ul
@
13
Brush
spring
14
Brush
IS
Yoke
16
Field
coil
17
Armature
18
Center
bracket
19
Pinion
assembly
20
Dus
t
cover
21
Pinion
stopper
22
Stopper
clip
23
Gear
case
24
Gear
case
metal
REDUCTION
GEAR
TYPE
1
Magnetic
switch
assembly
2
Dust
cover
AdjUsting
was
r
3
Torsion
spring
4
Shift
lever
5
Through
bolt
6
Rear
cover
7
O
ring
8
Yoke
9
Field
coil
10
Brush
11
Armature
12
Ceo
tel
bearing
13
Brush
spring
14
Brush
holder
6
8
Engine
Electrical
Systeni
3
@
1
E
E660
Fig
EE
6
Non
Reduction
Gear
Type
Starting
Motor
4
4
15
Dust
cover
16
Center
housing
17
Reduction
gear
18
Pinion
gear
19
Packing
20
Gear
case
EE614
Fig
EE
7
Reduction
Gear
Type
Starting
Motor
EE
5