ignition DATSUN 210 1979 Owner's Manual
[x] Cancel search | Manufacturer: DATSUN, Model Year: 1979, Model line: 210, Model: DATSUN 210 1979Pages: 548, PDF Size: 28.66 MB
Page 101 of 548
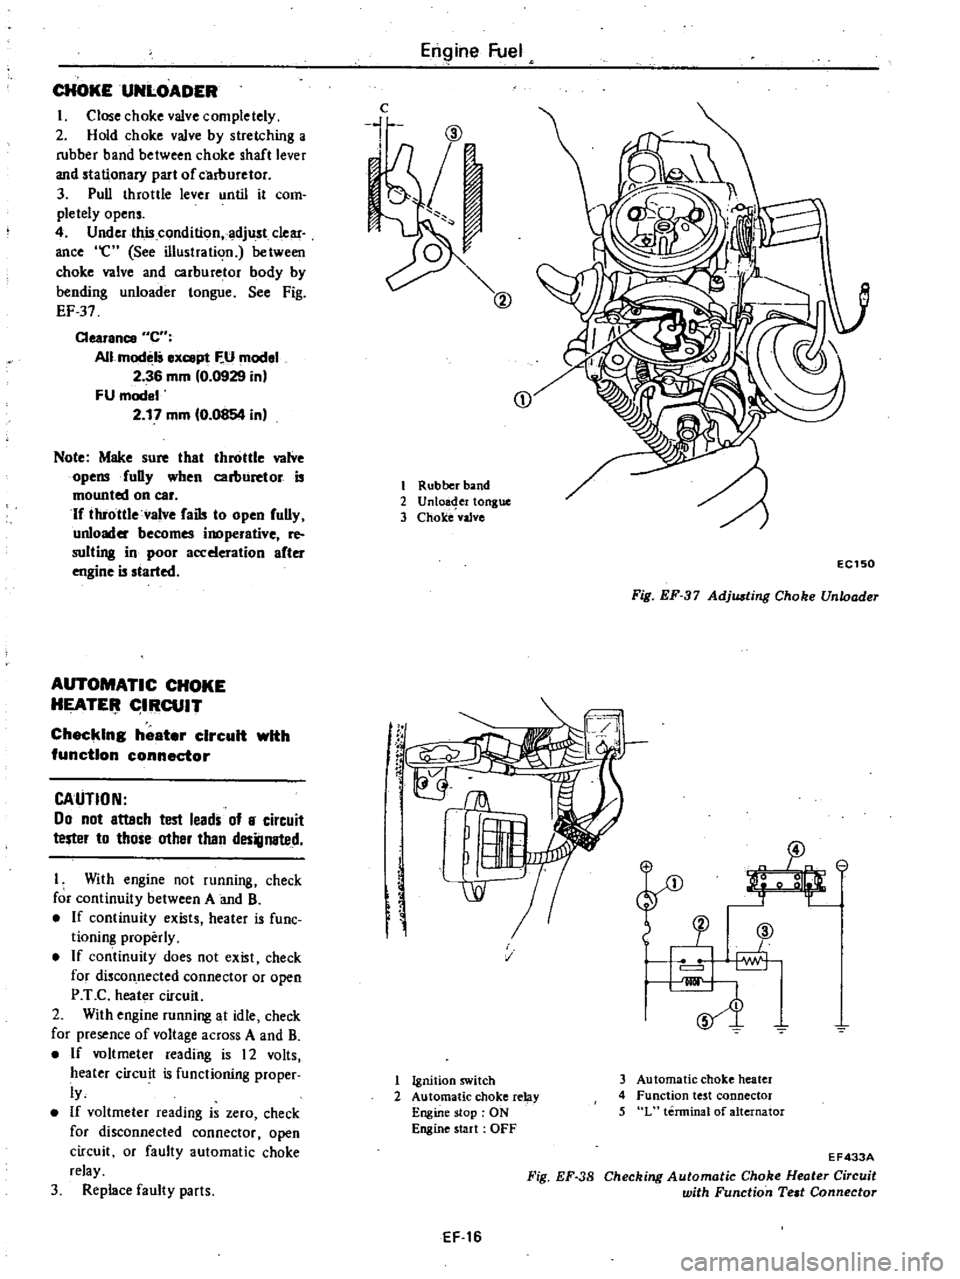
CHOKEUNLOADER
I
Close
choke
valve
completely
2
Hold
choke
valve
by
stretching
a
rubber
band
between
choke
shaft
lever
and
stationary
part
of
carllUretor
3
Pull
throttle
lever
until
it
com
pletely
opens
4
Under
this
condition
adjust
clear
ance
e
See
illustration
between
choke
valve
and
carburetor
body
by
bending
unloader
tongue
See
Fig
EF
37
Clearance
C
All
modelS
ex
pt
F
U
model
2
36
mm
0
0929
in
FU
model
2
17
mm
0
0854
in
Note
Make
sure
that
throttle
valve
opensfuDy
when
carburetor
is
mounted
on
car
If
throttle
valve
fails
to
open
fully
unloader
becomes
inoperative
re
suiting
in
poor
acceleration
after
engine
is
started
AUTOMATIC
CHOKE
HEATE
IRCUIT
Checking
heater
circuit
with
function
connector
CAUTION
00
not
attach
test
leads
of
8
circuit
tester
to
those
other
than
designated
I
With
engine
not
running
check
for
continuity
between
A
and
B
If
continuity
exists
heater
is
fune
tioning
properly
If
continuity
does
not
exist
check
for
discon
nected
connector
or
open
P
T
C
heater
circuit
2
With
engine
running
at
idle
check
for
presence
of
voltage
across
A
and
B
If
voltmeter
reading
is
12
volts
heater
circuit
is
functioning
proper
ly
If
voltmeter
reading
is
zero
check
for
disconnected
connector
open
circuit
or
faulty
automatic
choke
relay
3
Replace
faulty
parts
Engine
Fuel
c
i
CD
1
Rubber
band
2
Unloa
er
tongue
3
Choke
vaJve
f
rC
EC150
Fig
EF
37
Adjusting
Choke
Unloader
SJ
v
1
Ignition
switch
2
Automatic
choke
relay
Engine
stop
ON
Engine
start
OFF
3
Automatic
choke
heater
4
Function
test
connector
5
L
terminal
of
alternator
EF
16
Fig
EF
38
EF433A
Checking
Automatic
Choke
Heater
Circuit
with
Function
Teat
Connector
Page 103 of 548
Engine
Fuel
Upon
completion
of
adjustment
make
sure
that
link
system
opera
tes
smoothly
It
is
necessary
to
remove
Carburetor
from
engine
in
adjusting
this
accelera
tor
pump
stroke
limiter
1
Remove
carburetor
from
engine
2
Insert
a
l
l
to
I
S
mm
0
043
to
0
059
in
feeler
gauge
a
piece
of
round
stock
of
proper
thickness
is
best
betwee
l
primary
ca
buretor
throat
and
throtile
valve
ACCELERATOR
PUMP
STROKE
LIMITER
In
rmal
service
operation
this
limiter
should
not
be
removed
or
bent
In
J
0
ID
@
l
1IJl
J
J
00
I
f
oj
G
1
3
IO
2
mm
0
051
IO
004
in
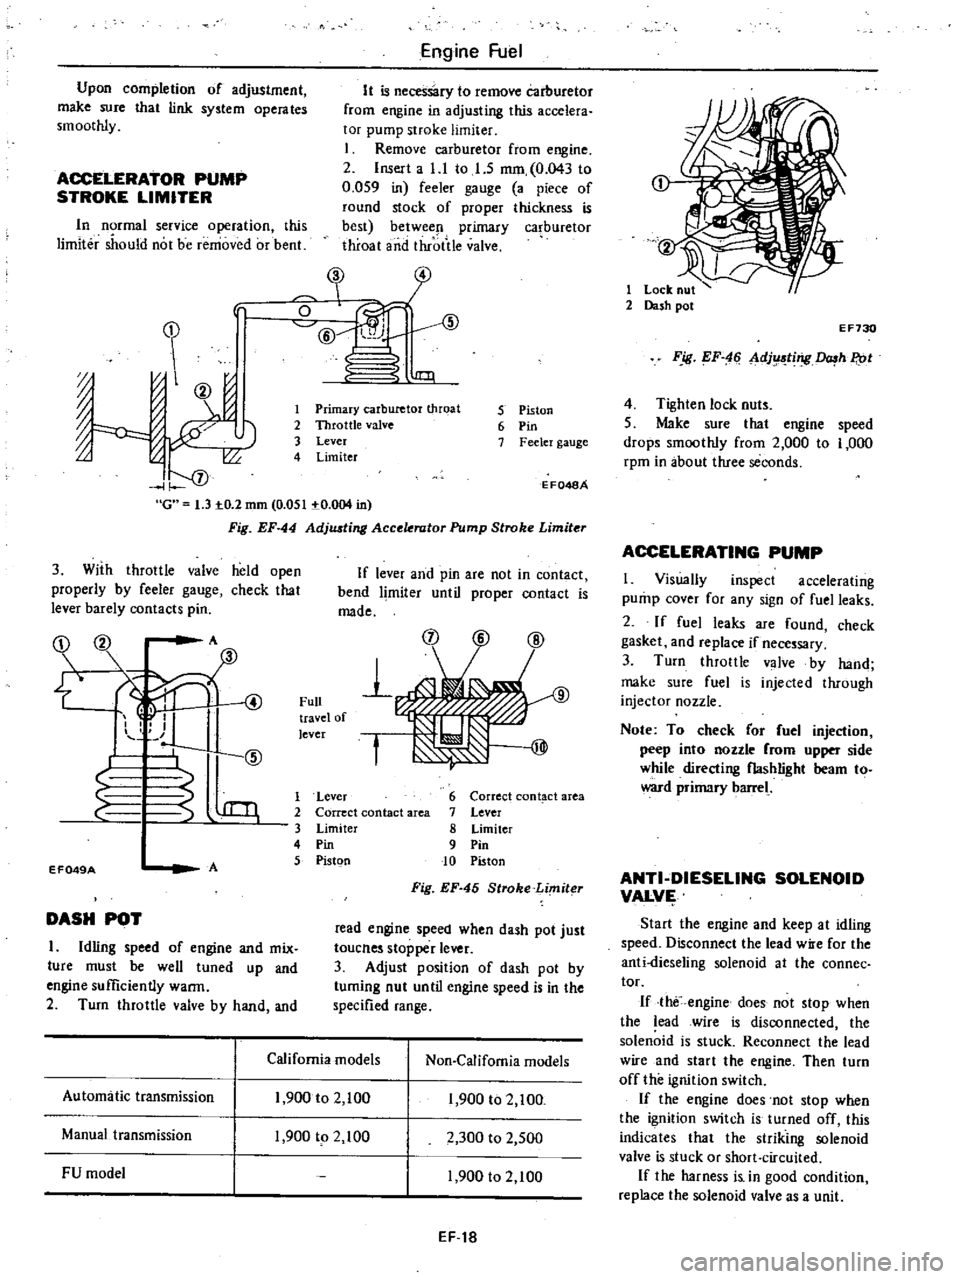
Fig
EF
44
AdjlUting
Acce
rator
Pump
Stroke
Limiter
1
Primary
carburetor
throat
2
Throttle
valve
3
Lever
4
Limiter
5
Piston
6
Pin
7
Feeler
gauge
E
F048A
3
With
throttle
valve
held
open
properly
by
feeler
gauge
check
that
lever
barely
contacts
pin
If
lever
and
pin
are
not
in
contact
bend
limiter
until
proper
contact
is
made
OZ
00
A
fID
1
S
@
4
1
Full
travel
of
lever
f
EF049A
A
1
Lever
2
Correct
contact
area
3
Limiter
4
Pin
5
Pistgn
6
Correct
cont
ct
area
7
Lever
8
Limiter
9
Pin
10
Piston
Fig
EF
45
Stroke
Limiter
DASH
POT
I
Idling
speed
of
engine
and
mix
ture
must
be
well
tuned
up
and
engine
sufficiently
warm
2
Turn
throttle
valve
by
hand
and
read
engine
speed
when
dash
pot
just
toucnes
stopper
lever
3
Adjust
position
of
dash
pot
by
tuming
nut
until
engine
speed
is
in
the
specified
range
California
models
Non
Califomia
models
Automatic
transmission
1
900
to
2
100
1
900
to
2
100
Manual
transmission
1
900
tp
2
100
2
300
to
2
500
FU
model
1
900
to
2
100
EF
t8
1
Lock
nut
2
Dash
pot
E
F730
F
ig
EF
4
Ll
dj
ting
h
P
ot
4
Tighten
lock
nuts
5
Make
sure
that
engine
speed
drops
smoothly
from
2
000
to
1
000
rpm
in
about
three
seconds
ACCELERATING
PUMP
I
Visually
inspect
accelerating
pump
cover
for
any
sign
of
fuel
leaks
2
If
fuel
leaks
are
found
check
gasket
and
replace
if
necessary
3
Turn
throttle
valve
by
hand
make
sure
fuel
is
injected
through
injector
nozzle
Note
To
check
or
fuel
injection
peep
into
nozzle
rom
upper
side
while
directing
flashlight
beam
to
ward
primary
barrel
ANTI
DIESELING
SOLENOID
VALVI
Start
the
engine
and
keep
at
idling
speed
Disconnect
the
lead
w
e
for
the
anti
dieseling
solenoid
at
the
connec
tor
If
the
engine
does
not
stop
when
the
lead
wire
is
disconnected
the
solenoid
is
stuck
Reconnect
the
lead
wire
and
start
the
engine
Then
turn
off
the
ignition
switch
If
the
engine
does
not
stop
when
the
ignition
switch
is
turned
off
this
indicates
that
the
striking
solenoid
valve
is
stuck
or
short
circuited
If
the
harness
i
in
good
condition
replace
the
solenoid
valve
as
a
unit
Page 104 of 548
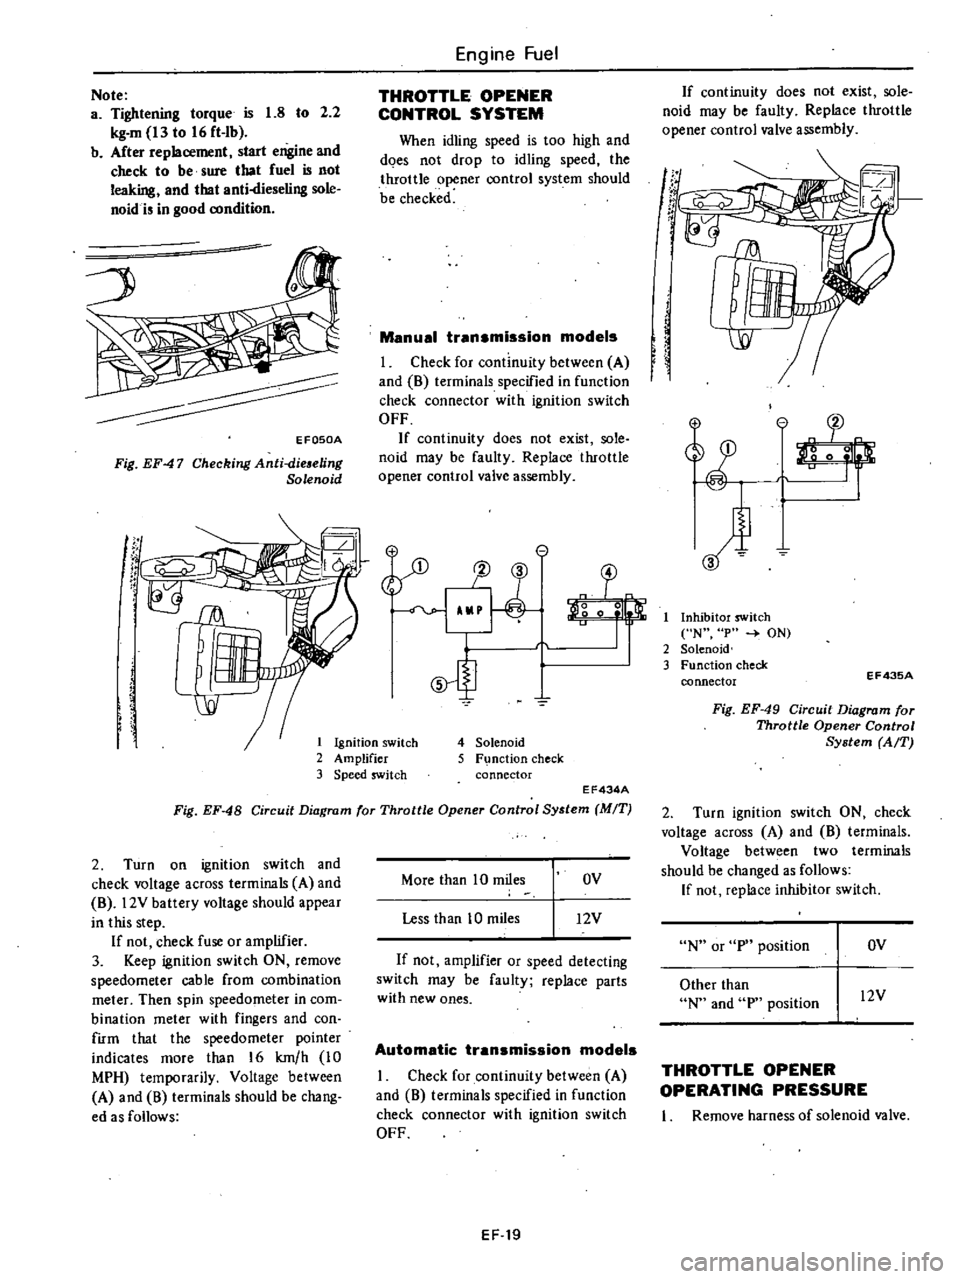
1
Ignition
switch
2
Amplifier
3
Speed
switch
Note
a
Tightening
torque
is
1
8
to
2
2
kg
m
13
to
16
ft
Ib
b
After
replacement
start
engine
and
check
to
be
sure
that
fuel
is
not
leaking
and
that
anti
dieseling
sole
noid
i
in
good
condition
EFOSOA
Fig
EF47
Checking
Anti
dieaeling
Solenoid
l
SJ
Engine
Fuel
THROTTLE
OPENER
CONTROL
SYSTEM
When
idling
speed
is
too
high
and
does
not
drop
to
idling
speed
the
throttle
opener
control
system
should
be
checked
Manual
transmission
models
I
Check
for
continuity
between
A
and
8
terminals
specified
in
function
check
connector
with
ignition
switch
OFF
If
continuity
does
not
exist
sole
noid
may
be
faulty
Replace
throttle
opener
control
valve
assembly
e
1J
3
o
0
5
4
Solenoid
5
F
nction
check
connector
EF434A
Fig
EF
48
Circuit
Diagram
for
Throttle
Opener
Control
System
MIT
2
Turn
on
ignition
switch
and
check
voltage
across
terminals
A
and
8
l2V
battery
voltage
should
appear
in
this
step
If
not
check
fuse
or
amplifier
3
Keep
ignition
switch
ON
remove
speedometer
cable
from
combination
meter
Then
spin
speedometer
in
com
bination
meter
with
fingers
and
con
firm
that
the
speedometer
pointer
indicates
more
than
16
km
h
10
MPH
temporarily
Voltage
between
A
and
8
terminals
should
be
chang
ed
as
follows
More
than
10
miles
OV
Less
than
10
miles
12V
If
not
amplifier
or
speed
detecting
switch
may
be
faulty
replace
parts
with
new
ones
Automatic
transmission
models
I
Check
for
continuity
between
A
and
8
terminals
specified
in
function
check
connector
with
ignition
switch
OFF
EF
19
If
continuity
does
not
exist
sole
noid
may
be
faulty
Replace
throttle
opener
control
valve
assembly
If
t
r
If
I
Inhibitor
switch
N
p
ON
2
Solenoid
3
Function
check
connector
EF43SA
Fig
EF
49
Circuit
Diagram
for
Throttle
Opener
Control
System
AfT
2
Turn
ignition
switch
ON
check
voltage
across
A
and
8
terminals
Voltage
between
two
terminals
should
be
changed
as
follows
If
not
replace
inhibitor
switch
N
or
p
position
OV
Other
than
N
and
p
position
l2V
THROTTLE
OPENER
OPERATING
PRESSURE
I
Remove
harness
of
solenoid
valve
Page 107 of 548
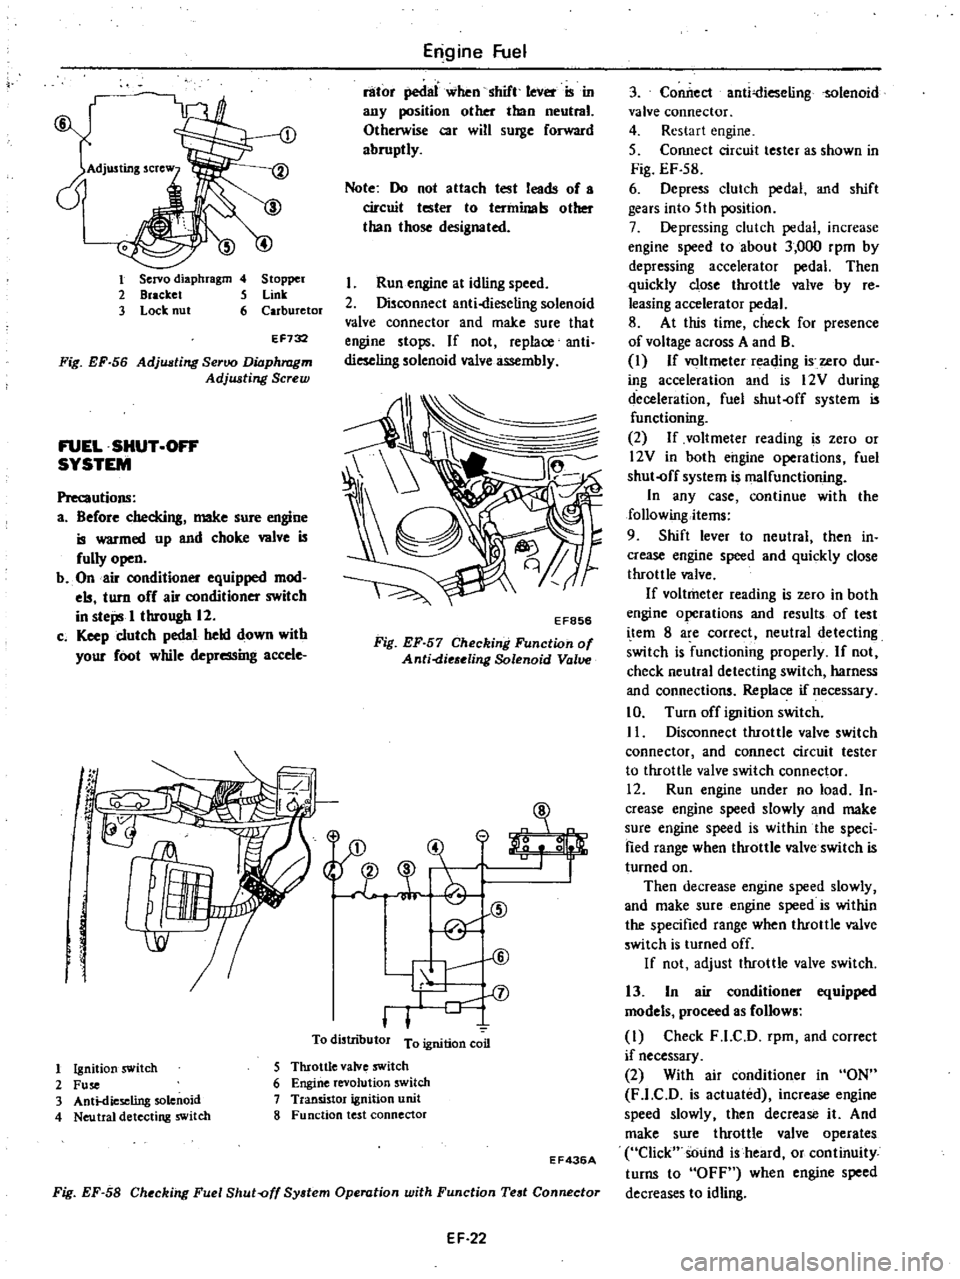
1
Servo
diaphragm
4
Stopper
2
Bracket
5
Link
3
Lock
nut
6
Carburetor
EF732
Fig
EF
56
Adjusting
Seroo
Diaphragm
Adjwting
Screw
FUEL
SHUT
OFF
SYSTEM
Precautions
a
Before
checking
make
sure
engine
is
warmed
up
and
choke
wive
is
fully
open
b
On
air
conditioner
equipped
mod
els
turn
off
air
conditioner
switch
in
steps
I
through
12
c
Keep
clutch
pedal
held
down
with
your
foot
while
depressing
accele
g
f
J
1
Engine
Fuel
rator
pedllI
when
shift
leVer
ISm
any
position
other
than
neutral
Otherwise
car
will
surge
forward
abruptly
Note
Do
not
attach
test
leads
of
a
circuit
tester
to
terminals
other
than
those
designated
Run
engine
at
idling
speed
2
Disconnect
anti
dieseling
solenoid
valve
connector
and
make
sure
that
engine
stops
If
not
replace
anti
dieseling
solenoid
valve
assembly
EF856
Fig
EF
57
Checking
Function
of
Anti
die
eling
Solenoid
Valve
31
A
t
CID
@
V
II
l
To
distributor
T
n
l1on
coon
o
1
Ignition
switch
2
Fuse
3
Anti
dieseling
solenoid
4
Neu
tral
detecting
switch
5
Throttle
valve
swltch
6
Engine
revolution
switch
7
Transistor
ignition
unit
8
Function
test
connector
Fig
EF
58
Checking
Fuel
Shut
off
System
Operation
with
Function
Test
Connector
EF436A
EF
22
3
Conilect
anti
ieselingsolenoid
valve
connector
4
Restart
engine
5
Connect
circuit
tester
as
shown
in
Fig
EF
S8
6
Depress
clutch
pedal
and
shift
gears
into
5th
position
7
Depressing
clutch
pedal
increase
engine
speed
to
about
3
000
rpm
by
depressing
accelerator
pedal
Then
quickly
close
throttle
wIve
by
re
leasing
accelerator
pedal
8
At
this
time
check
for
presence
of
voltage
across
A
and
B
I
If
voltmeter
reading
i
ero
dur
ing
acceleration
and
is
12V
during
deceleration
fuel
shut
off
system
is
functioning
2
If
voltmeter
reading
is
zero
or
l2V
in
both
engine
operations
fuel
shut
off
system
is
malfunctioning
In
any
case
continue
with
the
following
items
9
Shift
lever
to
neutral
then
in
crease
engine
speed
and
quickly
close
throttle
valve
If
voltmeter
reading
is
zero
in
both
engine
operations
and
results
of
test
i
tern
8
are
correct
neutral
detecting
switch
is
functioning
properly
If
not
check
neutral
detecting
switch
harness
and
connections
Replace
if
necessary
10
Turn
off
ignition
switch
II
Disconnect
throttle
valve
switch
connector
and
connect
circuit
tester
to
throttle
valve
switch
connector
12
Run
engine
under
no
load
In
crease
engine
speed
slowly
and
make
sure
engine
speed
is
within
the
speci
fied
range
when
throttle
valve
switch
is
turned
on
Then
decrease
engine
speed
slowly
and
make
sure
engine
speed
is
within
the
specified
range
when
throttle
valve
switch
is
turned
off
If
not
adjust
throttle
valve
switch
13
In
air
conditioner
equipped
models
proceed
as
follows
I
Check
F
l
C
D
rpm
and
correct
if
necessary
2
With
air
conditioner
in
ON
F
l
C
D
is
actuated
increase
engine
speed
slowly
then
decrease
it
And
make
sure
throttle
valve
operates
Click
sOund
is
heard
or
continuity
turns
to
OFF
when
engine
speed
decreases
to
idling
Page 145 of 548
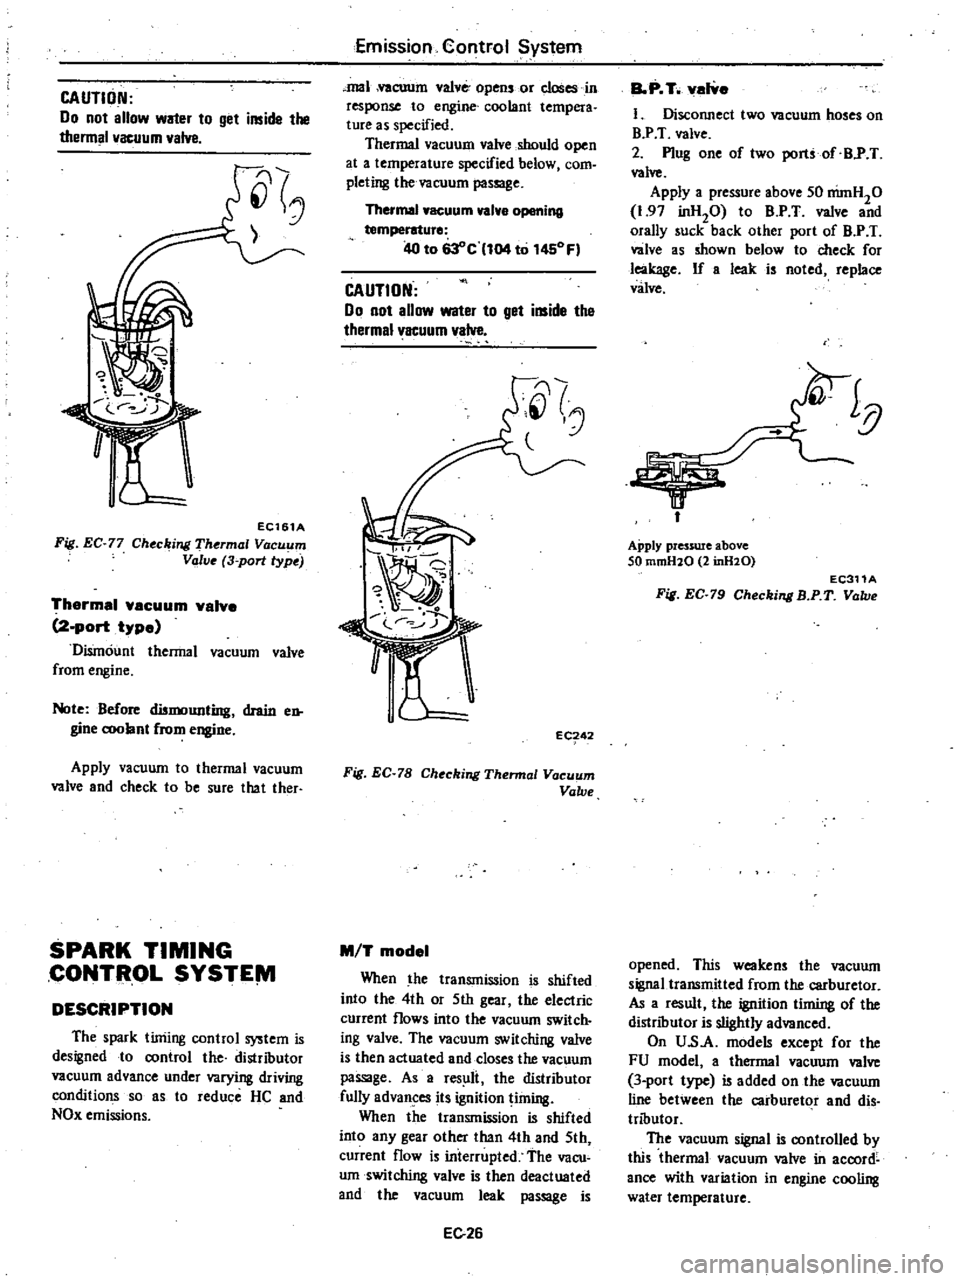
CAUTION
Do
not
allow
water
to
get
inside
the
thermal
vacuum
valve
EC161A
Fig
EC
77
Ch
c
jng
Th
rmal
Vacuum
Valve
3
port
type
Thermal
vacuum
valve
2
port
type
Dismount
thermal
vacuum
valve
from
engine
Note
Before
dismounting
drain
en
gine
c
oolant
from
engine
Apply
vacuum
to
thermal
vacuum
valve
and
check
to
be
sure
that
ther
SPARK
TIMING
CONTflOL
SYSTE
VI
DESCRIPTION
The
spark
timing
control
system
is
designed
to
control
the
distributor
vacuum
advance
under
varying
driving
conditions
so
as
to
reduce
He
and
NOx
emissions
Emission
Control
System
mal
vacuum
valve
opens
or
closes
in
response
to
engine
coolant
tempera
ture
as
specified
Thermal
vacuum
valve
should
open
at
a
temperature
specified
below
com
pleting
the
vacuum
passage
Thermal
vacuum
valve
opening
temperature
40
to
63
c
104
to
1450
Fl
CAUTION
00
not
allow
water
to
get
inside
the
thermal1
acuum
valve
Jl
i
g
J
eC
42
Fig
EC
78
Ch
ckjng
Thermal
Vacuum
Valve
M
T
model
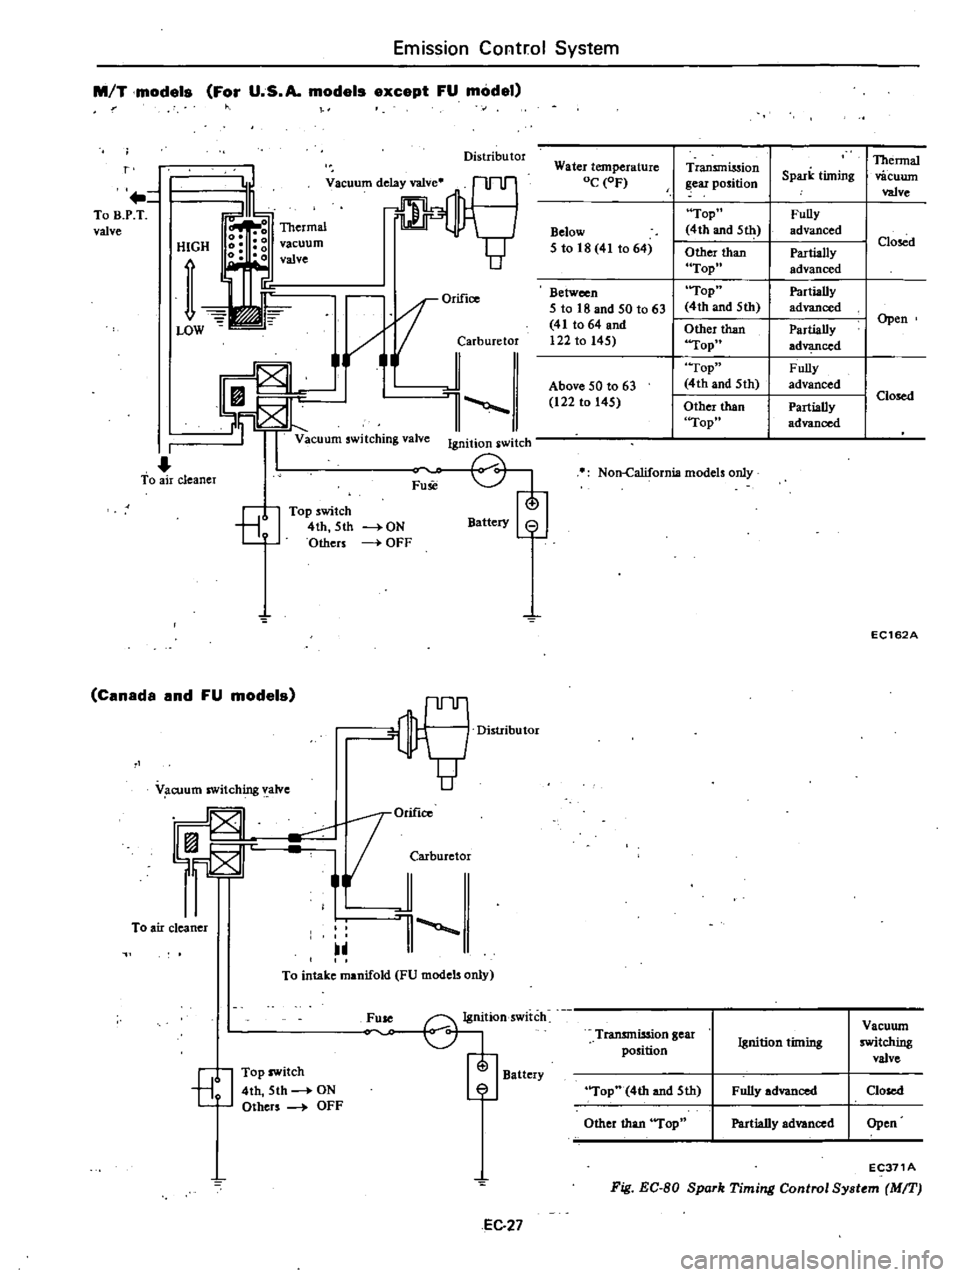
When
the
transmission
is
shifted
into
the
4th
or
5th
gear
the
electric
current
flows
into
the
vacuum
switch
ing
valve
The
vacuum
switching
valve
is
then
actuated
and
close
the
vacuum
passage
As
a
res
li
the
distributor
fully
advances
its
ignition
liming
When
the
transmission
is
shifted
into
any
gear
other
than
4th
and
5th
current
flow
is
interrupted
The
vacu
umswitclting
valve
is
then
deactuated
and
the
vacuum
leak
passage
is
E026
BoP
T
valve
1
DiSCOIUlect
two
vacuum
hoses
on
BY
T
valve
2
Plug
one
of
two
port
of
BY
T
valve
Apply
a
pressure
above
SO
nimH20
1
97
inHP
to
B
P
T
valve
and
orally
suck
back
other
port
of
B
P
T
valve
as
shown
below
to
check
for
leakage
If
a
leak
is
noted
replace
valve
Apply
pressure
above
SO
mmH10
2
inH10
EC311A
Fig
EC
79
Checking
B
P
T
Valve
opened
This
weakens
the
vacuum
signaUransmitted
from
the
carburetor
As
a
result
the
ignition
timing
of
the
distributor
is
slightly
advanced
On
U
s
A
models
except
for
the
FU
model
a
thermal
vacuum
valve
3
port
type
is
added
on
the
vacuum
line
between
the
carburetor
and
dis
tributor
The
vacuum
signal
is
controlled
by
this
thermal
vacuum
valve
in
accord
ance
with
variation
in
engine
cooling
water
temperature
Page 146 of 548
Emission
Control
System
M
T
models
For
U
S
A
models
except
FU
model
Distributor
r
To
B
P
T
valve
HIGH
vacuum
valve
OrifiCO
i
jarburetor
l
Vacuum
switching
valve
Ignition
switch
I
To
air
cleaner
Fuse
8
Top
switch
4th
5th
Others
Battery
8
ON
OFF
Canada
and
FU
models
OM
1orifico
F
JCMburetor
To
air
cleaner
1
V
cuum
switching
valve
To
intake
manifold
FU
models
only
Fuse
G1j
Ignition
switch
Battery
7
EJ
Top
switch
4th
5th
ON
Others
OFF
EC
27
Water
temperature
OC
OF
Below
5
to
18
41
to
64
Between
I
5
to
18
and
50
t063
41
to
64
and
I
122
to
145
I
I
Above
50
to
63
122
to
145
Transmission
ear
position
Top
4th
and
5111
Other
than
Top
Top
4th
and
5th
Other
than
Top
Top
4th
and
5th
Other
than
Top
Non
California
models
only
Thermal
Spark
timing
vacuwn
valve
Fully
advanced
I
Closed
Partially
advanced
Partially
I
advanced
Partially
I
Open
ad
ced
Fully
I
advanced
I
Closed
Partially
advanced
EC162A
Transmission
gear
Vacuwn
Ignition
timing
switching
position
valve
Top
4th
and
5th
Fully
advanced
Closed
Other
than
Top
Partially
advanced
Open
EC371A
Fig
EC
BO
Spork
Timing
Control
Sy
tem
MIT
Page 147 of 548
Emission
Control
System
AfT
models
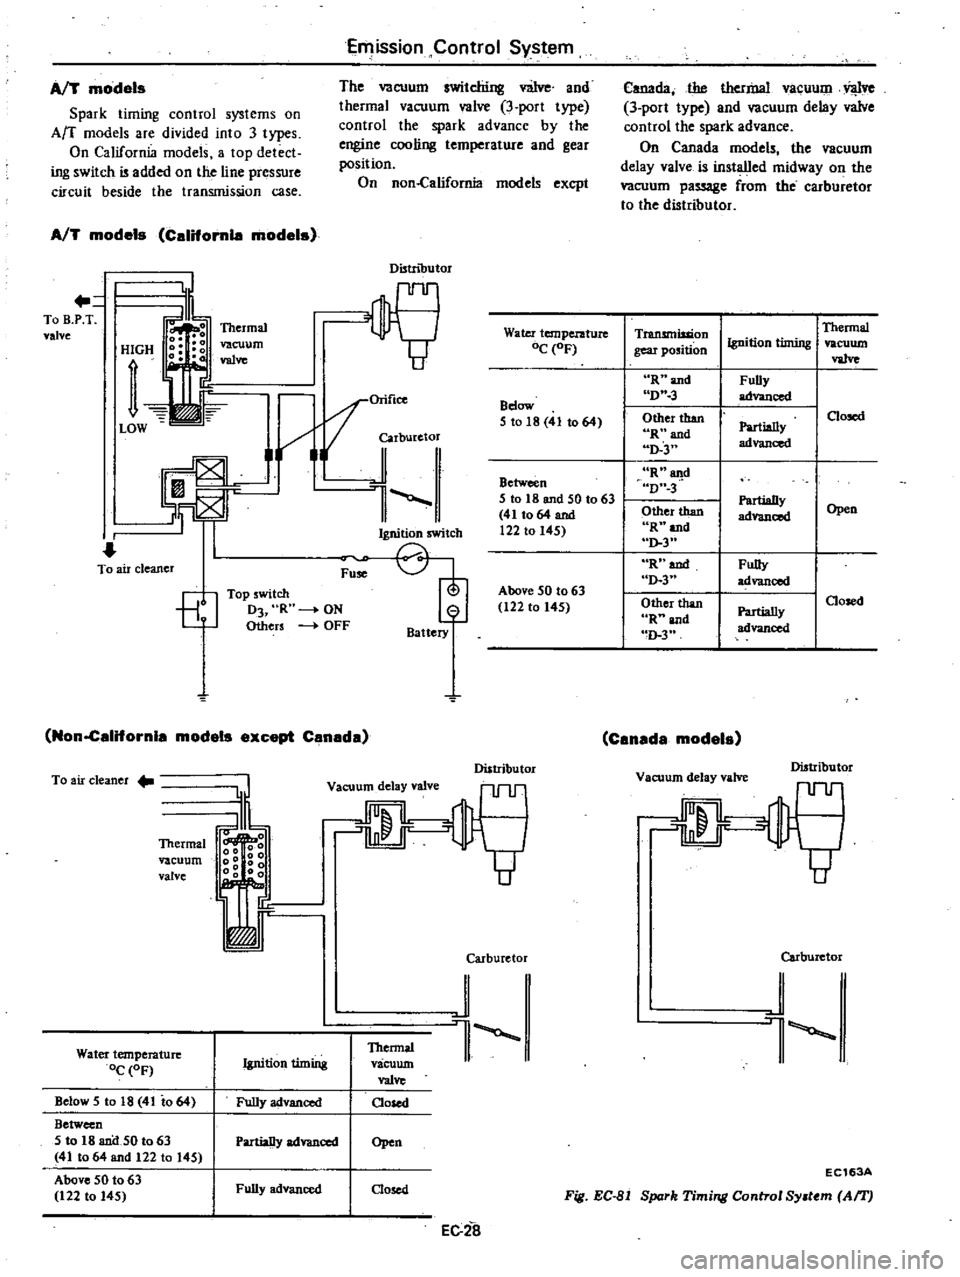
Spark
timing
control
systems
on
Arc
models
are
divided
into
3
types
On
California
models
a
top
detect
ing
switch
i3
added
on
the
line
pressure
circuit
beside
the
transmission
case
The
vacuum
switching
v
iJve
and
thermal
vacuum
valve
3
port
type
control
the
spark
advance
by
the
engine
cooling
temperature
and
gear
position
On
non
California
models
excpt
AfT
models
Califomle
models
Distributor
To
B
P
T
valve
1
Orifice
i1J
1
ICh
OJ
L
J
To
air
cleaner
Fu
EJ
Top
5witch
D3
R
ON
Others
4
OFF
Battery
Non
californla
models
except
Canada
To
air
cleaner
l
o
o
0
Ig
o
g
00
00
00
r
Vacuum
delay
valve
Thermal
vacuum
valve
Water
temperature
OC
OF
Thennal
vacuum
valve
Oosed
Ignition
timing
Below
5
10
18
41
io
64
Between
5
to
IB
and
50
to
63
411064
and
122
10
145
Above
50
to
63
122
to
145
Fully
advanced
PartiaDy
advanced
Open
Fully
advanced
Oosed
EC2a
Water
temperature
OC
oF
Bdow
51018
41
to
64
Between
5
to
18
and
50
10
63
411064
and
12210145
Above
50
to
63
122
to
145
Distributor
Carburetor
J
l
Canada
the
thermal
vaCUUDl
Vl
lve
3
port
type
and
vacuum
delay
valve
control
the
spark
advance
On
Canada
models
the
vacuum
delay
valve
is
installed
midway
on
the
vacuum
passage
from
the
carburetor
to
the
distributor
Transmission
gear
position
Thermal
vacuum
va1ve
Ignition
timing
R
and
D
3
FuBy
advanced
Other
than
Rnand
D
3
Oosed
Partially
advanced
R
a
gd
D
3
Other
than
R
and
0
3
Partially
advanced
Open
R
aud
D
3
Fully
advanced
Other
than
R
and
m
3
Oosed
Partially
advanced
Canada
models
Vacuum
delay
valve
Distributor
Carburetor
J
l
EC163A
Fig
EC
81
Spark
Timing
Control
Sy
tem
Af1
J
Page 151 of 548
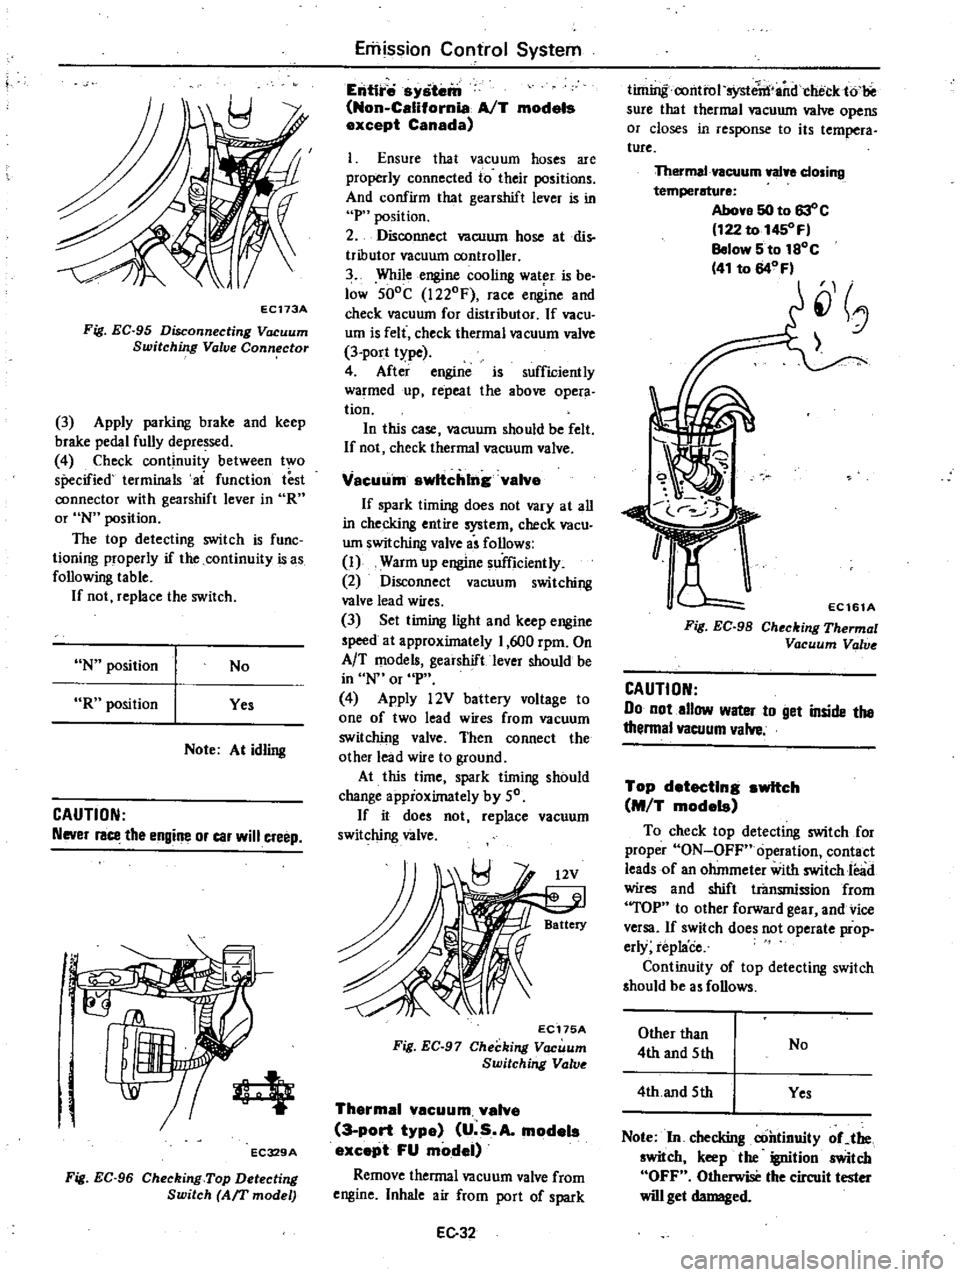
EC173A
Fig
EC
95
Disconnecting
Vacuum
Switching
Valve
Connector
3
Apply
parking
brake
and
keep
brake
pedal
fully
depressed
4
Check
continuity
between
two
specified
terminals
ai
function
test
connector
with
gearshift
lever
in
R
or
N
position
The
top
detecting
switch
is
func
tioning
properly
if
the
continuity
is
as
following
table
If
not
replace
the
switch
N
position
No
R
position
Yes
Note
At
idling
CAUTION
Never
race
the
engine
or
car
will
creep
r
q
EC329A
Fig
EC
96
Checking
Top
Detecting
Switch
Arr
model
Emission
Control
System
Entire
system
Non
California
AfT
models
except
Canada
1
Ensure
that
vacuum
hoses
are
properly
connected
to
their
positions
And
confirm
that
gearshift
lever
is
in
P
position
2
Disconnect
vacuum
hose
atdis
tributor
vacuum
controller
3
While
engine
cooling
wat
r
is
be
low
SOoC
1220F
race
engine
and
check
vacuum
for
distributor
If
vacu
um
is
felt
check
thermal
vacuum
valve
3
port
type
4
After
engine
is
sufficiently
warmed
up
repeat
the
above
opera
tion
In
this
case
vacuum
should
be
felt
If
not
check
thermal
vacuum
valve
Vacuu
m
switching
valve
If
spark
timing
does
not
vary
at
all
in
checking
entire
system
check
vacu
um
switching
valve
i
follows
I
Warm
up
engine
sufficiently
2
Disconnect
vacuum
switching
valve
lead
wires
3
Set
timing
light
and
keep
engine
speed
at
approximately
1
600
rpm
On
AfT
models
geaishiftlever
should
be
in
N
or
P
4
Apply
l2V
battery
voltage
to
one
of
two
lead
wires
from
vacuum
switching
valve
Then
connect
the
other
lead
wire
to
ground
At
this
time
spark
timing
should
change
appioximately
by
50
If
it
does
not
replace
vacuum
switching
valve
EC175A
Fig
EC
97
Checking
Vacuum
Switching
Valv
Thermal
vacuum
valve
3
port
type
U
s
A
models
except
FU
model
Remove
thermal
vacuum
valve
from
engine
Inhale
air
from
port
of
spark
EC32
timing
amttol
systetn
andcheck
to
sure
that
thermal
vacuum
valve
opens
or
closes
in
response
to
its
tempera
ture
Thermal
vacuum
walye
closing
temperature
Above
50
to
63
c
122
to
1450
F
Below
5
to
1SoC
41
to
64
Fl
J
EC161A
Fig
EC
98
Checking
Thermal
Vacuum
Valv
CAUTION
Do
not
allow
water
to
get
inside
the
thenna
vacuum
valve
Top
detecting
switch
M
T
models
To
check
top
detecting
switch
for
proper
ON
OFF
operation
contact
leads
of
an
ohmmeter
with
swiich
lead
wires
and
shift
transmiosion
from
TOP
to
other
forward
gear
and
vice
versa
If
switch
does
not
operate
prop
erly
replace
Continuity
of
top
detecting
switch
should
be
a
follows
Other
than
4th
and
5th
No
4th
and
5th
Yes
Note
In
checking
continuity
oCthe
switch
keep
the
ignition
switch
OFF
Otherwise
the
circuit
tester
will
get
damaged
Page 152 of 548

e
In
o
L
1
Ignition
switch
2
Vacuum
switching
v3
lve
3
Top
detecting
switch
4
Function
check
connector
EC330A
i
Fig
EC
99
Checking
Top
Detecting
l
Switch
Vacuum
dela
valve
Remove
vacUum
delay
valve
2
Blow
air
from
th
port
of
the
distributor
side
The
vacuum
delay
valve
is
in
go
ij
condition
if
the
air
flows
through
the
valve
3
Try
again
from
the
opposit
side
of
the
valve
Th
valve
is
in
goo
condition
if
th
a
flow
resistance
is
greater
than
the
step
2
abov
Distributor
side
Carburetor
side
Distribu
tor
side
Carburetor
side
EC346
Fig
EC
100
Checking
Vocuum
Dewy
Valve
Emission
Control
Syst
m
4
If
the
condition
of
spark
delay
valve
is
questionable
dip
port
into
a
cup
filled
with
water
Blow
air
from
brown
face
side
Small
air
bubbles
should
appear
CAUTION
Be
c
areful
to
avoid
entry
of
oil
or
dirt
into
valve
7
E
C279
Fig
EC
101
Checking
Vacuum
D
lDy
Valve
CATALYTIC
CONVERTER
California
dels
DESCRIPTION
1
The
catalytic
converter
accelerates
the
chemical
reaction
of
hydrocarbons
CD
0
He
and
carbon
monoxide
O
in
the
exhaust
gas
and
changes
them
into
non
harmful
carbon
dioxide
C02
and
water
H20
This
chemical
reac
tiOD
process
requires
the
proper
a
mount
of
air
which
is
supplied
by
the
air
pump
Refer
to
the
item
AJ
S
This
air
is
called
secondary
air
The
Catalytic
converter
is
mounted
0
the
models
destinbd
for
California
OPERATION
Exhaust
gas
emitted
from
the
en
gine
contains
some
harmful
substances
due
to
incomplete
combustion
in
the
combustion
chamber
The
air
injection
stem
i
designed
to
reduce
the
con
tent
of
such
substances
in
the
exhaust
gas
In
this
system
the
secondary
air
is
led
from
the
ch
ck
valve
and
injected
in
o
the
exhaust
manifold
With
this
injection
of
the
secondary
air
hydro
carbons
He
and
carbon
monoxide
CO
in
the
exhaust
gas
are
gradually
oxidized
with
oxygen
02
in
the
secondary
air
and
converted
into
nOD
harmful
carbon
dioxide
C02
and
water
HP
The
catalytic
converter
further
cleans
engine
exhaust
gas
Through
catalytic
action
it
changes
residual
hydrocarbons
and
carbon
monoxide
contained
in
exhaust
gas
into
carbon
dioxide
and
water
before
exhaust
gas
is
discharged
to
the
atmosphere
0
Secondary
air
Carbon
monoxide
hydrocarbon
Carbon
dioxide
gas
Nater
EC
i
A
I
Front
tube
2
Catalytic
converter
3
Center
tube
4
Main
murner
EC
33
EC215
Fig
EC
I02
Function
of
Catalytic
Converter
Page 159 of 548
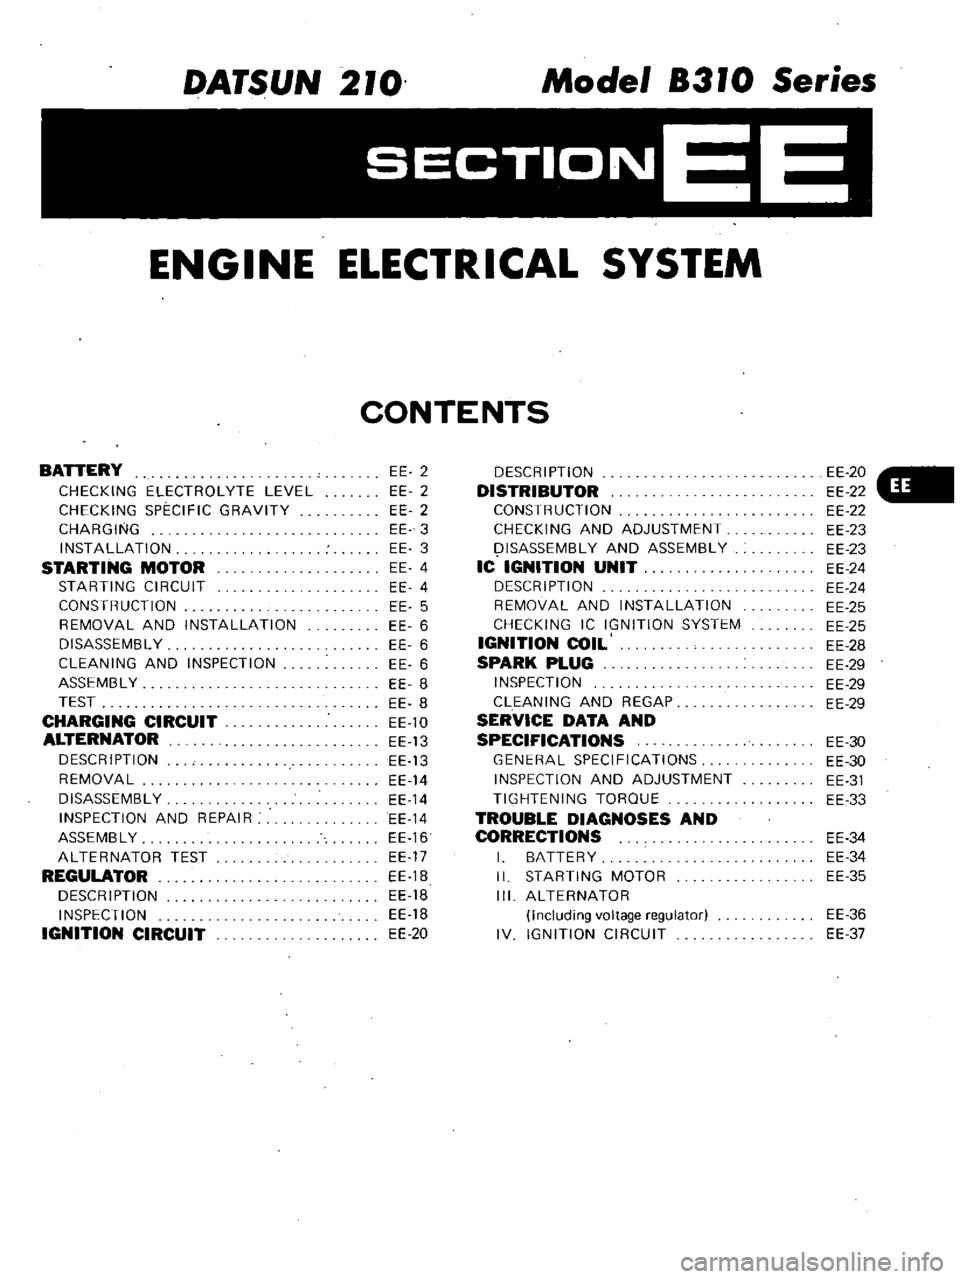
DATSUN
210
Model
8310
Series
SECTIONEE
ENGINE
ELECTRICAL
SYSTEM
CONTENTS
BATTERY
CHECKING
ELECTROLYTE
LEVEL
CHECKING
SPECIFIC
GRAVITY
CHARGING
INSTALLATION
STARTING
MOTOR
STARTING
CIRCUIT
CONSTRUCTION
REMOVAL
AND
INSTALLATION
DISASSEMBL
Y
CLEANING
AND
INSPECTION
ASSEMBL
Y
TEST
CHARGING
CIRCUIT
ALTERNATOR
DESCRIPTION
REMOVAL
DISASSEMBLY
INSPECTION
AND
REPAIR
ASSEMBLY
ALTERNATOR
TEST
REGULATOR
DESCRIPTION
INSPECTION
IGNITION
CIRCUIT
EE
2
EE
2
EE
2
EE
3
EE
3
EE
4
EE
4
EE
5
EE
6
EE
6
EE
6
EE
8
EE
8
EE
10
EE
13
EE
13
EE
14
EE
14
EE
14
EE
16
EE
17
EE
1B
EE
18
EE
18
EE
20
DESCRIPTION
DISTRIBUTOR
CONSTRUCTION
CHECKING
AND
ADJUSTMENT
I
ISASSEMBL
Y
AND
ASSEMBLY
IC
IGNITION
UNIT
DESCRIPTION
REMOVAL
AND
INSTALLATION
CHECKING
IC
IGNITION
SYSTEM
IGNITION
COIL
SPARK
PLUG
INSPECTION
CLEANING
AND
REGAP
SERVICE
DATA
AND
SPECIFICATIONS
GENERAL
SPECIFICATIONS
INSPECTION
AND
ADJUSTMENT
TIGHTENING
TORQUE
TROUBLE
DIAGNOSES
AND
CORRECTIONS
I
BATTERY
II
STARTING
MOTOR
III
ALTERNATOR
Including
voltage
regulator
IV
IGNITION
CIRCUIT
EE
20
EE
22
EE
22
EE
23
EE
23
EE
24
EE
24
EE
25
EE
25
EE
28
EE
29
EE
29
EE
29
EE
30
EE
30
EE
31
EE
33
EE
34
EE
34
EE
35
EE
36
EE
37