light DATSUN 210 1979 Workshop Manual
[x] Cancel search | Manufacturer: DATSUN, Model Year: 1979, Model line: 210, Model: DATSUN 210 1979Pages: 548, PDF Size: 28.66 MB
Page 286 of 548
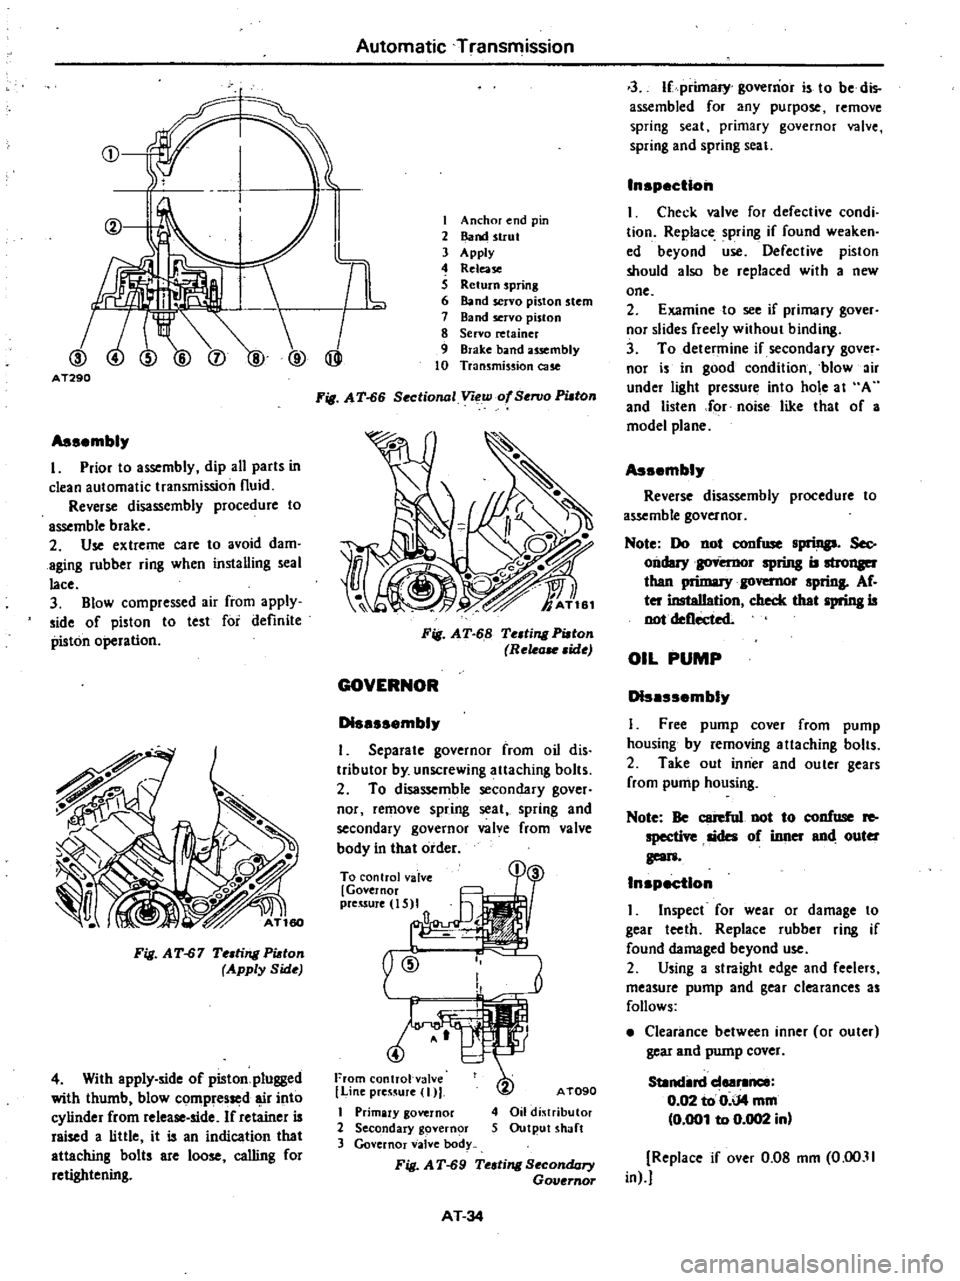
CD
@
I
I
TL
@
@
AT290
Assembl
I
Prior
to
assembly
dip
all
parts
in
clean
automatic
transmission
fluid
Reverse
disassembly
procedure
to
assemble
brake
2
Use
extreme
care
to
avoid
dam
aging
rubber
ring
when
installing
seal
lace
3
Blow
compressed
air
from
apply
side
of
piston
to
test
for
definite
piston
operation
Fig
AT
67
Te
ling
Pi
ton
Apply
Side
4
With
apply
side
of
piston
plugged
with
thumb
blow
compressed
r
into
cylinder
from
release
side
If
retainer
is
raised
a
little
it
is
an
indication
that
attaching
bolts
are
loose
calling
for
retightening
Automatic
Transmission
I
Anchor
end
pin
2
Band
strut
3
Apply
4
Release
S
Return
spring
6
Band
servo
piston
stem
7
Band
servo
piston
8
Servo
retainer
9
Brake
band
usembly
10
Transmission
cue
Fig
A
T
66
Sectional
Voew
of
SenJo
PUlOn
Fig
AT
68
Te
ting
Pi
ton
Rele
ide
GOVERNOR
D1sessembl
I
Separate
governor
from
oil
dis
tributor
by
unscrewing
attaching
bolts
2
To
disassemble
secondary
gover
nor
remove
spring
seat
spring
and
secondary
governor
valve
from
valve
body
in
that
order
To
control
valve
Governor
preuure
IS
I
a
@
From
control
val
e
I
Line
preS
UJe
I
I
Primary
governor
2
Secondary
govern
r
3
Governor
valve
body
Fig
AT
69
Te
ling
SecondQry
Governor
AT090
4
Oil
dj
tributor
5
Output
shaft
AT
34
3
If
primary
governor
is
to
be
dis
assembled
for
any
purpose
remove
spring
seat
primary
governor
valve
spring
and
spring
seal
Inspection
I
Check
valve
for
defective
condi
tion
Replace
spring
if
found
weaken
ed
beyond
use
Defective
piston
should
also
be
replaced
with
a
new
one
2
Examine
to
see
if
primary
gover
nor
slides
freely
without
binding
3
To
determine
if
secondary
gover
nor
is
in
good
condition
blow
ir
under
light
pressure
into
hole
at
A
and
listen
for
noise
like
thaI
of
a
model
plane
Assembl
Reverse
disassembly
procedure
to
assemble
governor
Note
Do
not
confuse
spriDp
Sec
ondary
spring
is
than
1
governor
sprinS
Af
ter
insteIIation
check
thet
spring
is
not
deflected
OIL
PUMP
D1sessembl
I
Free
pump
cover
from
pump
housing
by
removing
allaching
bolts
2
Take
out
inner
and
ouler
gears
from
pump
housing
Note
Be
cerefnl
not
to
confuse
Ie
specti
sides
of
inner
end
outer
geon
Inspection
I
Inspect
for
wear
or
damage
to
gear
teeth
Replace
rub
bel
ring
if
found
damaged
beyond
use
2
Using
a
straight
edge
and
feelers
measure
pump
and
gear
clearances
as
follows
Clearance
between
inner
or
outer
gear
and
pump
cover
SUndin
deer1lnee
0
02
to
0
iJ4
mm
0
001
to
0
002
in
Replace
if
over
0
08
mm
0
00
11
in
Page 292 of 548
Place
the
vehicle
in
a
pit
and
by
sampling
the
lealeed
oil
deiermine
if
it
is
the
torque
converter
oil
The
torque
converter
oil
has
a
color
like
red
wine
so
it
is
easily
distinguished
from
engine
oil
or
gear
oil
Wipe
off
the
lealeing
oil
and
dust
and
detect
the
spot
of
ill
lell8e
nonflammable
organic
solvent
such
as
carbon
tetrachloride
for
wiping
Raise
the
oil
tcmperature
by
op
erating
the
engine
and
shift
the
lever
to
D
to
increase
the
oil
pressure
The
sp
Q
of
o
1
1I8
u
J1en
be
found
more
easily
Note
As
oil
leakage
from
the
breath
er
does
not
talee
place
except
when
running
at
high
peed
it
iSimpos
sible
to
ate
this
lealcage
with
vehicle
stationary
CHECKING
ENGINE
IDLING
REVOLunON
The
engine
idling
revolution
should
be
properly
adjusted
If
the
engine
revolution
is
too
low
the
e
gine
does
not
operate
smoothly
and
if
too
high
a
strong
shocle
or
creep
develops
when
changing
over
from
ON
to
Dn
or
R
CHECKING
AND
ADJUSTING
KICK
WN
SWITCH
AND
DOWNSH
FT
SOLENOID
When
the
Ieickdown
operation
is
not
made
properly
or
the
speed
chang
ingpoint
is
too
high
check
the
kick
down
switch
downshift
solenoid
and
wiring
between
them
When
the
igni
tion
Ieey
is
po
iti
ned
at
the
1st
stage
and
the
accelerator
pedal
is
depressed
deeply
the
switch
contact
hould
be
closed
and
the
solenoid
should
clicle
If
it
does
not
click
it
indicates
a
defect
Then
check
each
part
with
the
testing
inatrumen15
Auto
lT1atic
Transmissiqn
Fi
J
A
T
84
Down
ltift
Sole
id
Note
Watch
for
oil
leekage
from
tnnsmission
case
INSPECTION
AND
ADJUSTMENT
OF
MANUAL
LINKAGE
The
adjustmcnt
of
manual
linkage
i
equany
important
as
Inspection
of
Oil
Level
for
the
automatic
transmis
sion
Therefore
great
care
should
be
cxercised
oecause
incorrect
adjustment
will
result
in
the
breakdown
of
the
transmission
Inspection
pun
the
selector
lever
toward
you
and
turn
it
as
far
as
p
to
range
where
clicks
will
be
ell
by
the
hand
This
is
the
detent
of
manual
valve
in
the
valve
body
and
indicates
the
corrett
position
of
the
lever
Inspect
whether
the
pointer
of
selector
dial
corresponds
to
this
point
and
also
whether
the
lever
comes
in
alignment
with
the
stepping
of
posi
iion
plate
when
itis
released
CHECKING
AND
ADJUSTING
INHIBITOR
SWITCH
The
inhibitor
switch
lights
the
re
verse
lamp
in
the
range
R
of
the
transmission
operation
and
also
rotates
the
starter
motor
in
the
ranges
N
and
P
AT
40
i
j
tI
IlV
@
@
AT
I
Inhibitor
switch
2
Manual
shaft
3
Washer
4
Nut
5
Manual
plate
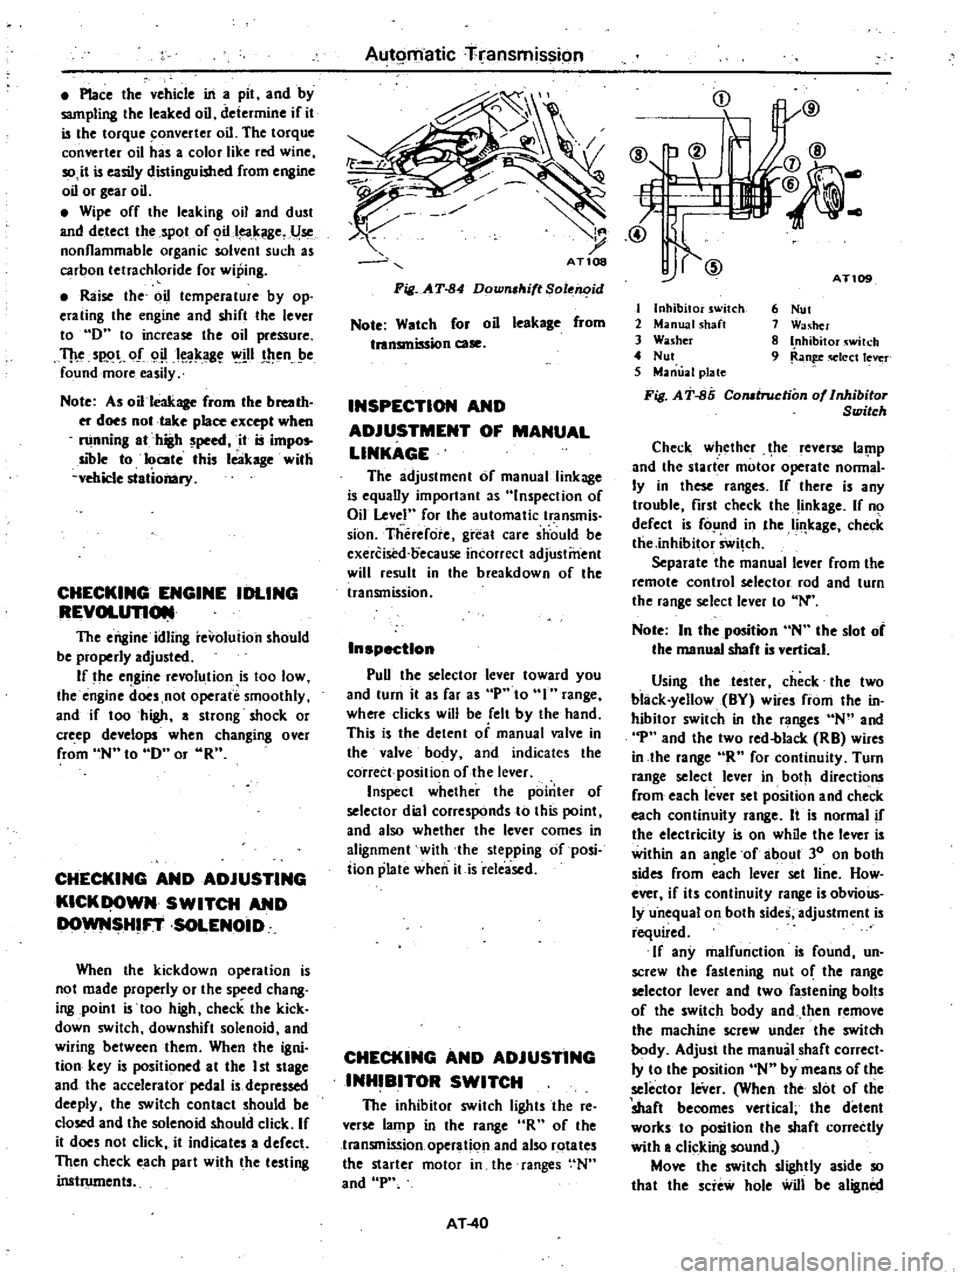
Fi
J
AT
85
Comtruction
of
Inhibitor
Switch
6
Nut
1
Washer
8
Inhibitor
wilch
9
Ran
q
Iect
lever
Check
w
ethcr
he
leverse
lal
1p
and
the
starter
motor
operate
nonnal
Iy
in
these
ranges
If
there
is
any
trouble
first
check
the
inkage
If
no
defect
is
fo
nd
in
the
Ii
leage
check
tlie
inhibitor
Swi
ch
Separate
the
manual
lever
from
the
remote
control
selector
rod
and
turn
the
range
select
lever
to
N
Note
In
the
position
N
the
slot
of
the
manual
shaft
is
vertical
Using
the
tester
check
the
two
black
yellow
BY
wire
from
the
in
hibitor
switch
in
the
ranges
N
and
p
and
the
two
red
blacle
RB
wires
in
the
lange
R
for
continuity
Turn
range
select
lever
in
both
directions
from
each
lever
set
position
and
check
each
continuity
range
It
is
normal
if
the
electricity
is
on
while
the
lever
is
within
an
angle
of
about
30
on
both
sides
from
each
lever
set
line
How
ever
if
its
continuity
range
is
obvioUs
ly
u
nequal
on
both
sides
adjustment
is
required
If
any
malfunction
is
found
un
screw
the
fastening
nut
o
the
range
selector
lever
and
two
fastening
bolts
of
the
switch
body
and
then
remove
the
machine
screw
under
the
switch
body
Adjust
the
manual
shaft
correct
Iy
to
the
position
N
by
means
of
the
selector
leVer
When
the
slot
of
the
shaft
becomes
vertical
the
detent
worles
to
position
the
shaft
correctly
with
a
clicking
sound
Move
the
switch
slightly
aside
so
that
the
scie
hole
will
be
aligned
Page 311 of 548
they
are
worn
damaged
or
otherwise
faulty
and
how
they
are
affected
Re
pair
or
replace
all
faulty
parts
which
ever
is
necessary
1
Check
gear
teeth
for
scoring
cracking
or
chipping
and
make
sure
that
tooth
contact
pattern
indicates
correct
meshing
depth
If
any
fault
is
evident
replace
parts
as
required
Note
Drive
pinion
and
ring
gear
are
supplied
for
replacement
as
a
set
therefore
should
either
part
be
damaged
replece
as
a
set
2
Check
pinion
shaft
and
pinion
mates
for
scores
and
signs
of
wear
and
replace
as
required
F
oUow
the
same
procedure
for
side
gear
and
their
seats
on
differential
case
3
Inspect
all
bearing
races
and
roU
ers
for
scoring
chipping
or
evidence
of
excessive
wear
They
should
be
in
tiptop
condition
such
as
not
worn
and
with
mirror
like
surfaces
Replace
if
there
is
a
shadow
of
doubt
on
their
efficiency
as
an
incorrect
bearing
op
eration
may
result
in
noises
and
gear
seizure
4
Inspect
thrust
washer
faces
SmaU
faults
can
be
corrected
with
sand
paper
If
pinion
mate
to
de
gear
backlash
exceeds
specified
value
re
place
thrust
washers
Pinion
mate
to
side
gear
backlash
0
10
to
0
20
mm
0
0039
to
0
0079
in
5
Inspect
gear
carrier
and
differ
ential
case
for
cracks
or
distortion
If
either
condition
is
evident
replace
Jaulty
parts
6
As
a
general
rule
oil
seal
should
be
replaced
at
each
disassembly
ASSEMBLY
AND
ADJUSTMENT
Assembly
can
be
done
in
the
reverse
order
of
disassembly
The
foUowing
directions
for
adjustment
and
usage
of
special
tools
enable
to
obtain
a
perfect
differential
operation
Propeller
Shaft
Differential
Carrier
PRECAUTIONS
IN
REASSEMBLY
I
Arrange
shims
washers
and
the
like
to
install
them
correctly
2
Thoroughly
clean
the
surfaces
on
which
shims
washers
bearings
and
bearing
caps
are
installed
3
Apply
gear
oil
when
installing
bearings
4
Pack
grease
cavity
between
lips
when
fitting
oil
seal
ASSEMBLY
OF
DIFFERENTIAL
CASE
1
Assemble
pinion
mates
side
gears
and
thrust
washers
in
differential
case
2
Fit
pinion
shaft
to
differential
case
so
that
it
meets
lock
pin
hole
3
Adjust
pinion
mate
to
ide
gear
backlash
or
the
clearance
between
the
rear
face
of
side
gear
and
thrust
washer
to
the
specified
value
by
selecting
side
gear
thrust
washer
Pinion
mate
to
side
gear
backlash
0
10
to
0
20
mm
10
0039
to
0
0079
in
PD023
Fig
PD
l1
Measuring
Clearance
Side
gear
thrust
washer
Thickness
mm
in
0
785
0
0309
0
835
0
0329
0
885
0
0348
4
Lock
pinion
shaft
lock
pin
using
a
punch
after
it
is
secured
into
place
5
Apply
oil
to
gear
tooth
surfaces
and
thrust
surfaces
and
check
if
they
turn
properly
6
Place
ring
gear
on
differential
case
and
install
bolts
and
lock
straps
Tor
que
bolts
to
specification
and
bend
up
lock
straps
PO
5
tiJ
Tightening
torque
Ring
gear
bolt
6
0
to
7
0
kg
m
43
to
51
ft
Ib
CAUTION
e
Use
only
genuine
ring
gear
bolts
end
new
lock
straps
b
Tighten
bolts
in
criss
crilss
fashion
lightly
tapping
around
bolt
heads
with
a
hammer
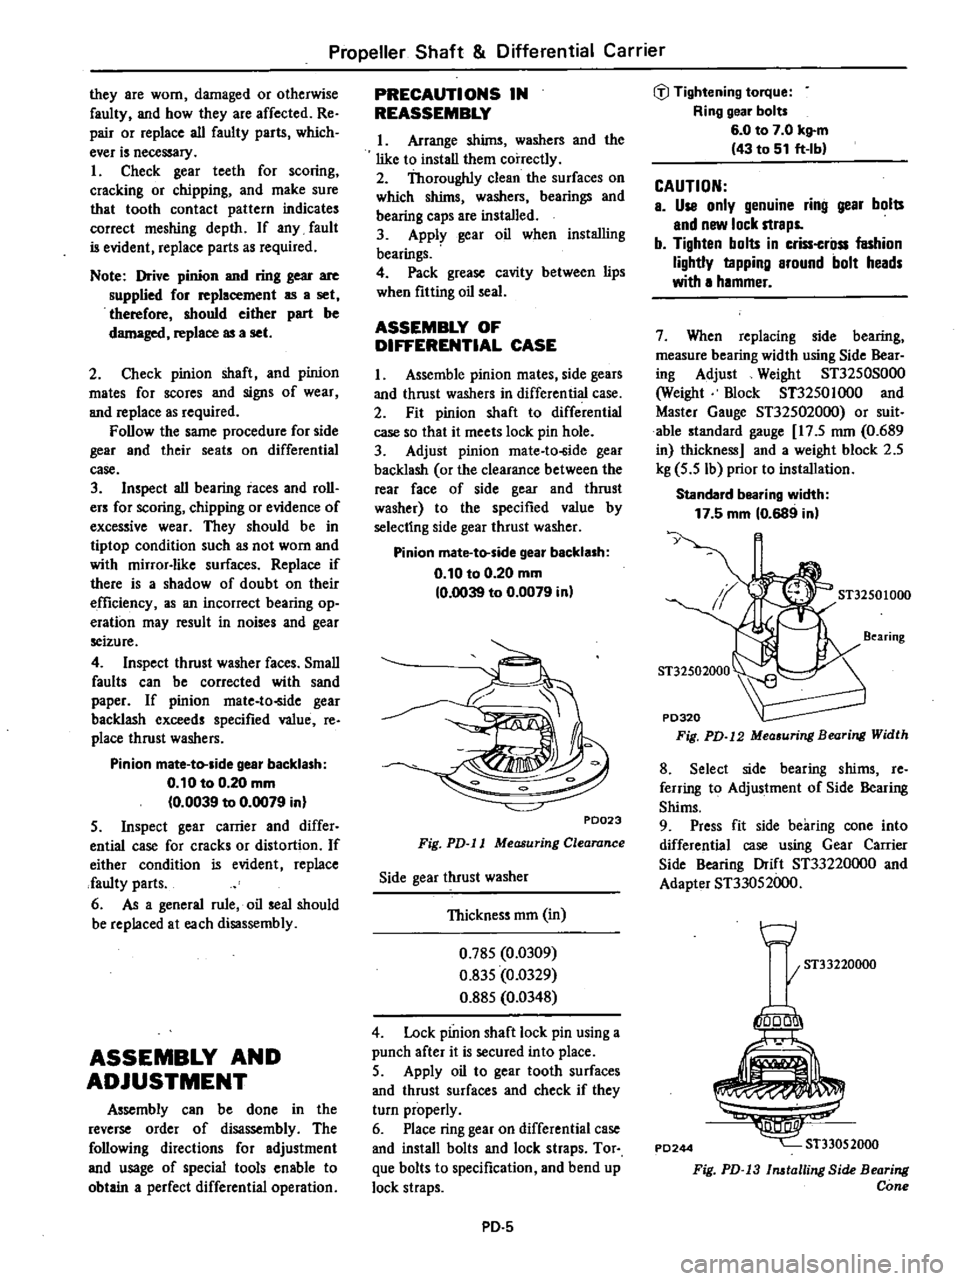
7
When
replacing
side
bearing
measure
bearing
width
using
Side
Bear
ing
Adjust
Weight
ST3250S000
Weight
mock
ST3250
I
000
and
Master
Gauge
ST325020oo
or
suit
able
standard
gauge
17
5
nun
0
689
in
thickness
and
a
weight
block
2
5
kg
5
5
Ib
prior
to
installation
Standald
bearing
width
17
5
mm
10
689
in
y
ST32501000
8
Select
side
bearing
shims
re
ferring
to
Adjustment
of
Side
Bearing
Shims
9
Press
fit
side
bearing
cone
into
differential
case
using
Gear
Carrier
Side
Bearing
Drift
ST33220oo0
and
Adapter
ST33052000
w
I
ST33220000
PD244
1000
ST33052000
Fig
PD
13
lnatalling
Side
Bearing
Cone
Page 314 of 548

EX
2
A
0
B
3
C
I
D
2
E
O
I
F
0
08
H
I
Left
side
T
A
C
D
H
xO
OI
0
20
E
0
H
2
1
x
0
01
0
20
0
11
0
0
20
0
1
0
31
The
correct
shims
are
0
10
plus
lI
re
e
pi
ce
s
of
9
Q7
I
Il1I
thick
Right
side
T2
B
D
H
xO
OI
020
F
3
2
I
xO
01
0
20
0
08
0
02
0
20
0
08
0
30
The
correct
shims
are
0
10
plus
0
20
mm
thick
Note
If
w1ues
sigoifying
A
B
C
D
and
H
are
not
giVen
regard
them
as
zero
end
compote
After
essembly
clteek
to
see
that
preload
and
backlesb
ere
correct
If
not
readjust
Side
bearing
adjusting
shim
Thickness
mm
in
0
05
0
0020
0
07
0
0028
0
1
0
0
0039
0
20
0
0079
0
50
0
0197
2
Fit
determined
side
bearing
ad
justing
shim
on
differential
case
and
press
fit
left
and
right
side
bearing
inner
races
on
it
using
Side
Bearing
Drift
ST3322OO00
and
Adapter
ST33052000
3
Install
differential
case
assembly
into
gear
carrier
tapping
with
a
rubber
mallet
4
Align
mark
on
bearing
cap
with
that
on
gear
carrier
and
install
bearing
cap
on
carrier
And
tighten
bolts
to
specified
torque
Propeller
Shaft
Differential
Carrier
@Tightenirig
tOrque
Side
bealingcap
bolts
5
0
to
6
0
kg
m
36
to
43
ft
b
5
M
easure
L
dimension
between
left
and
right
bearing
cap
edges
with
a
micrometer
e
cljmension
153
40
to
153
45
mm
6
0394
to
6
0413
inl
PD271
Fig
PD
20
Measuring
L
Dimension
6
Measure
ring
gear
to
drive
pinion
backlash
If
backlash
is
too
smaU
decrease
thickness
of
left
shim
and
increase
thickness
of
right
shim
by
the
same
amount
If
backlash
is
too
great
reverse
the
above
procedure
Ring
gear
to
drive
pinion
backlash
0
10
to
0
15
mm
0
0039
to
0
0059
in
PD272
Fig
PD
21
Mea
uring
Backlash
7
At
the
same
time
check
side
bearing
preload
Bearing
preload
should
be
specified
torque
If
preload
does
not
accord
with
tJiis
specification
adjust
it
with
side
bear
ing
shims
PD
B
Side
bealing
preload
8
to
10
kg
cm
6
9
to
8
7
in
bl
At
ring
geer
bolt
1
5
to
1
9
kg
3
3
to
4
2
Ibl
8
Check
and
adjust
the
tooth
con
t
c
pattern
of
ring
gear
and
drive
pinion
I
Thoroughly
clean
ring
and
drive
pinion
gear
teeth
2
Paint
ring
gear
teeth
lightly
and
evenly
with
a
mixture
of
recommend
ed
powder
and
oil
of
a
suitable
consist
ency
to
produce
a
contactpaUern
3
Rotate
pinion
through
several
revolutions
in
the
forward
and
reverse
direction
until
a
definite
contact
pat
tern
i
developed
on
ring
gear
4
When
contact
pattern
is
in
correct
readjust
thickness
oLadjust
ing
shim
Be
sure
to
wipe
off
powder
com
pletely
upon
completion
of
adjust
ment
5
Incorrect
contact
pattern
of
teeth
can
be
adjusted
in
the
foUowing
manner
Contact
pettern
a
Heel
contact
To
correct
increase
thickness
of
drive
pinion
adjusting
washer
in
order
to
bring
drive
pinion
close
to
ring
gear
P0193
Fig
PD
22
Heel
Contact
b
Toe
contact
To
correct
reduce
thickness
of
drive
pinion
adjusting
washer
in
order
to
make
drive
pinion
go
away
from
ring
gear
t
PD194
Fig
PD
23
Toe
Contact
Page 324 of 548
Front
Axle
Front
Suspension
INSPECTION
AND
ADJUSTIVIENT
INSPECTION
Inspect
in
accordance
with
periodic
maintenance
schedule
Block
rear
wheels
with
chocks
2
Jack
up
the
front
of
car
and
support
it
with
safety
stands
Refer
to
Section
GI
for
lifting
points
and
towing
3
Shaking
each
fiont
wheel
by
grasping
the
upper
and
lower
surfaces
of
the
tires
check
suspension
parts
for
looseness
wear
or
damage
Tighten
aU
loose
bolts
and
nuts
to
the
specified
torque
Replace
all
worn
parts
as
described
under
Front
Suspension
4
Check
wheel
bearings
If
there
is
any
axial
end
play
adjust
bearings
to
specifications
Replace
worn
or
damaged
bearings
as
described
under
Front
Axle
S
Check
strut
for
oil
leakage
or
damage
ADJUSTMENT
WHEEL
BEARING
Block
rear
wheels
with
chocks
2
Jack
up
the
front
of
car
and
support
it
with
safety
stands
3
Remove
brake
pads
Refer
to
Section
BR
for
pad
replacement
4
Remove
hub
cap
cotter
pin
ad
justing
cap
and
wheel
bearing
nut
S
Sparingly
apply
recommended
multi
purpose
grease
to
threaded
por
tion
of
spindle
and
contact
surface
between
wheel
bearing
washer
and
outer
wheel
bearing
6
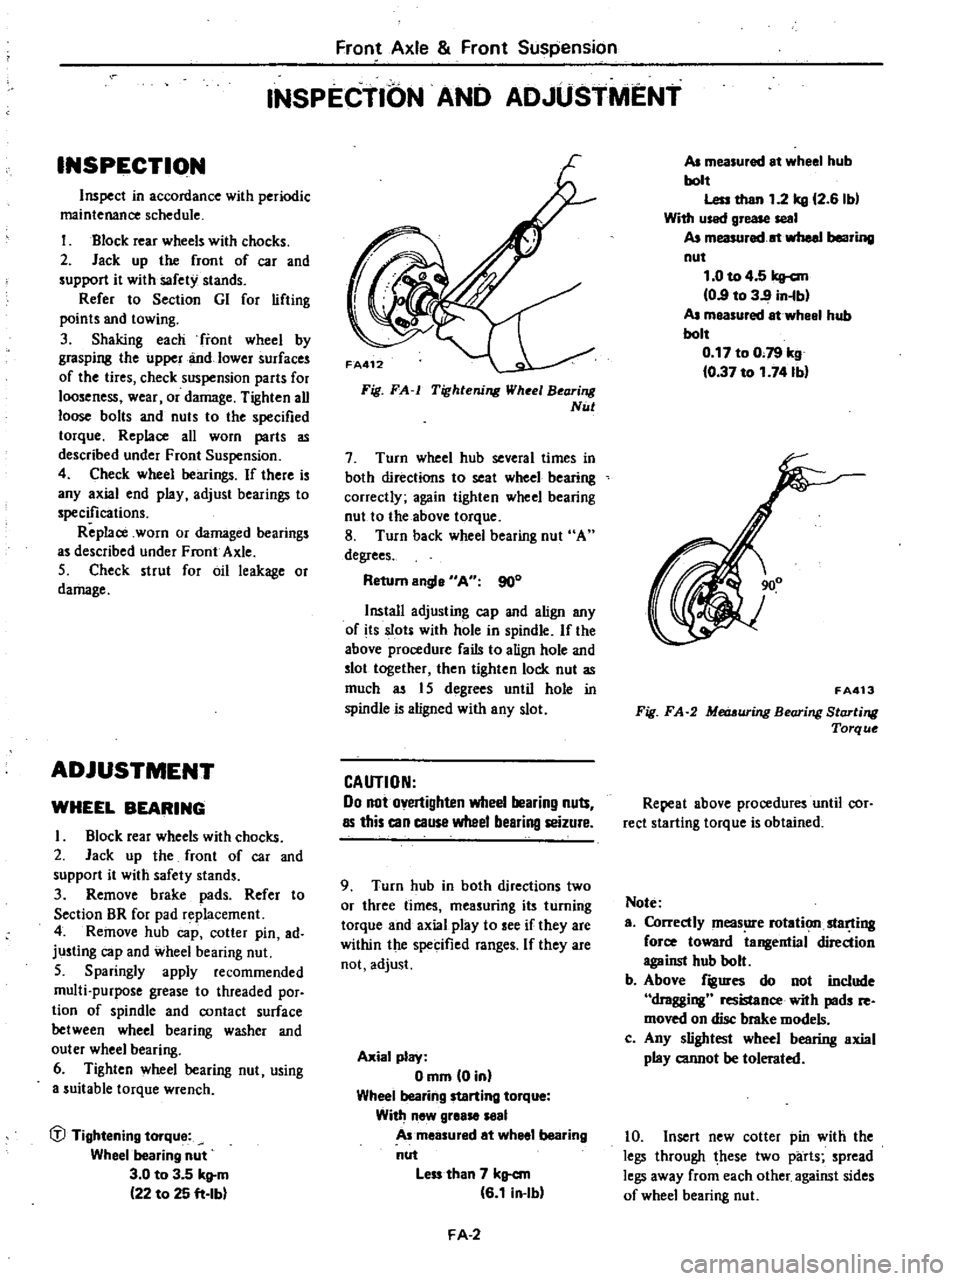
Tighten
wheel
bearing
nut
using
a
suitable
torque
wrench
P
Tightening
torque
Wheel
bearing
nut
3
0
to
3
5
kll
m
22
to
25
ft
Ibl
Fig
FA
Tighlening
Wheel
Bearing
Nul
7
Turn
wheel
hub
several
times
in
both
directions
to
seat
wheel
bearing
correctly
again
tighten
wheel
bearing
nut
to
the
above
torque
8
Turn
back
wheel
bearing
nut
A
degrees
Return
engle
AU
900
Install
adjusting
cap
and
align
any
of
its
slots
with
hole
in
spindle
If
the
above
procedure
fails
to
align
hole
and
slot
together
then
tighten
lock
nut
as
much
as
I
S
degrees
until
hole
in
spindle
is
aligned
with
eny
slot
CAUTION
00
not
overtighten
wheel
bearing
nuts
as
this
can
cause
wheel
bearing
seizure
9
Turn
hub
in
both
directions
two
or
three
times
measuring
its
turning
torque
and
axial
play
to
ee
if
they
are
within
the
specified
range
If
they
are
not
adjust
Axial
play
Omm
Din
Wheel
bealing
starting
torque
With
new
gleaS8
l8al
A
measured
et
wheel
bearing
nut
less
than
7
kg
cm
G
1
in
Ibl
FA
2
AJ
measuled
et
wheel
hub
bolt
Less
then
1
2
kg
12
G
Ibl
With
u
ed
gr
seal
AJ
measured
at
wheel
bealing
nut
1
0
to
4
5
kg
cm
0
9
to
3
9
in
b
AJ
measuled
at
wheel
hub
bolt
0
17
to
0
79
kg
0
37
to
1
741bl
FA413
Fig
FA
2
Metr
uring
Bearing
Starting
Torq
ue
Repeat
above
procedures
until
cor
rect
starting
torque
is
obtained
Note
a
Correctly
meas
e
rotation
slar
ting
force
toward
tangential
direction
against
hub
bolt
b
Above
figures
do
not
include
dragging
resistance
with
pads
re
moved
on
disc
brake
models
c
Any
slightest
wheel
bearing
axial
play
cannot
be
tolerated
10
Insert
new
cotter
pin
with
the
legs
through
hese
two
parts
spread
legs
away
from
each
other
against
sides
of
wheel
bearing
nut
Page 339 of 548
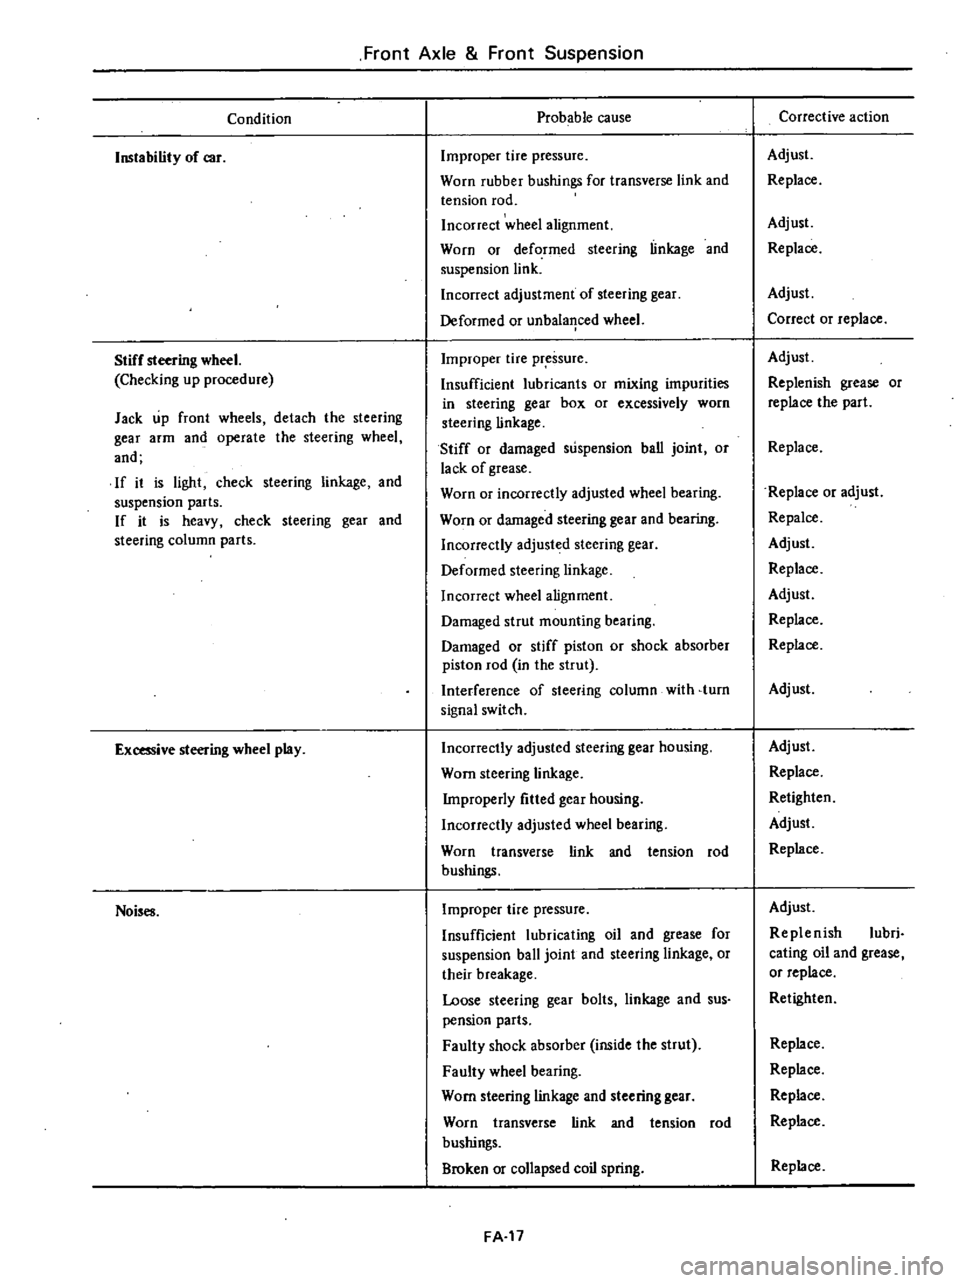
Front
Axle
Front
Suspension
Condition
Instability
of
car
Stiff
steering
wheel
Checking
up
procedure
Jack
up
front
wheels
detach
the
steering
gear
arm
and
operate
the
steering
wheel
and
If
it
is
light
check
steering
linkage
and
suspension
parts
If
it
is
heavy
check
steering
gear
and
steering
column
parts
Excessive
steering
wheel
play
Noises
Probable
cause
Improper
tire
pressure
Worn
rubber
bushings
for
transverse
link
and
tension
rod
Incorrect
wheel
alignment
Worn
or
deformed
steering
linkage
and
suspension
link
Incorrect
adjustment
of
steering
gear
Deformed
or
unbala
1ced
wheel
Improper
tire
pressure
Insufficient
lubricants
or
mixing
impurities
in
steering
gear
box
or
excessively
worn
steering
linkage
Stiff
or
damaged
suspension
ban
joint
or
lack
of
grease
Worn
or
incorrectly
adjusted
wheel
bearing
Worn
or
damaged
steering
gear
and
bearing
Incorrectly
adjusted
steering
gear
Deformed
steering
linkage
Incorrect
wheel
alignment
Damaged
strut
mounting
bearing
Damaged
or
stiff
piston
or
shock
absorber
piston
rod
in
the
strut
Interference
of
steering
column
with
turn
signal
switch
Incorrectly
adjusted
steering
gear
housing
Worn
steering
linkage
Improperly
fitted
gear
housing
Incorrectly
adjusted
wheel
bearing
Worn
transverse
link
and
tension
rod
bushings
Improper
tire
pressure
Insufficient
lubricating
oil
and
grease
for
suspension
ball
joint
and
steering
linkage
or
their
breakage
Loose
steering
gear
bolts
linkage
and
sus
pension
parts
Faulty
shock
absorber
inside
the
strut
Faulty
wheel
bearing
Worn
steering
linkage
and
steering
gear
Worn
transverse
link
and
tension
rod
bushings
Broken
or
collapsed
coil
spring
FA
17
Corrective
action
Adjust
Replace
Adjust
Replace
Adjust
Correct
or
replace
Adjust
Replenish
grease
or
replace
the
part
Replace
Replace
or
adjust
Repalce
Adjust
Replace
Adjust
Replace
Replace
Adjust
Adjust
Replace
Retighten
Adjust
Replace
Adjust
Replenish
lubri
cating
oil
and
grease
or
replace
Retighten
Replace
Replace
Replace
Replace
Replace
Page 354 of 548
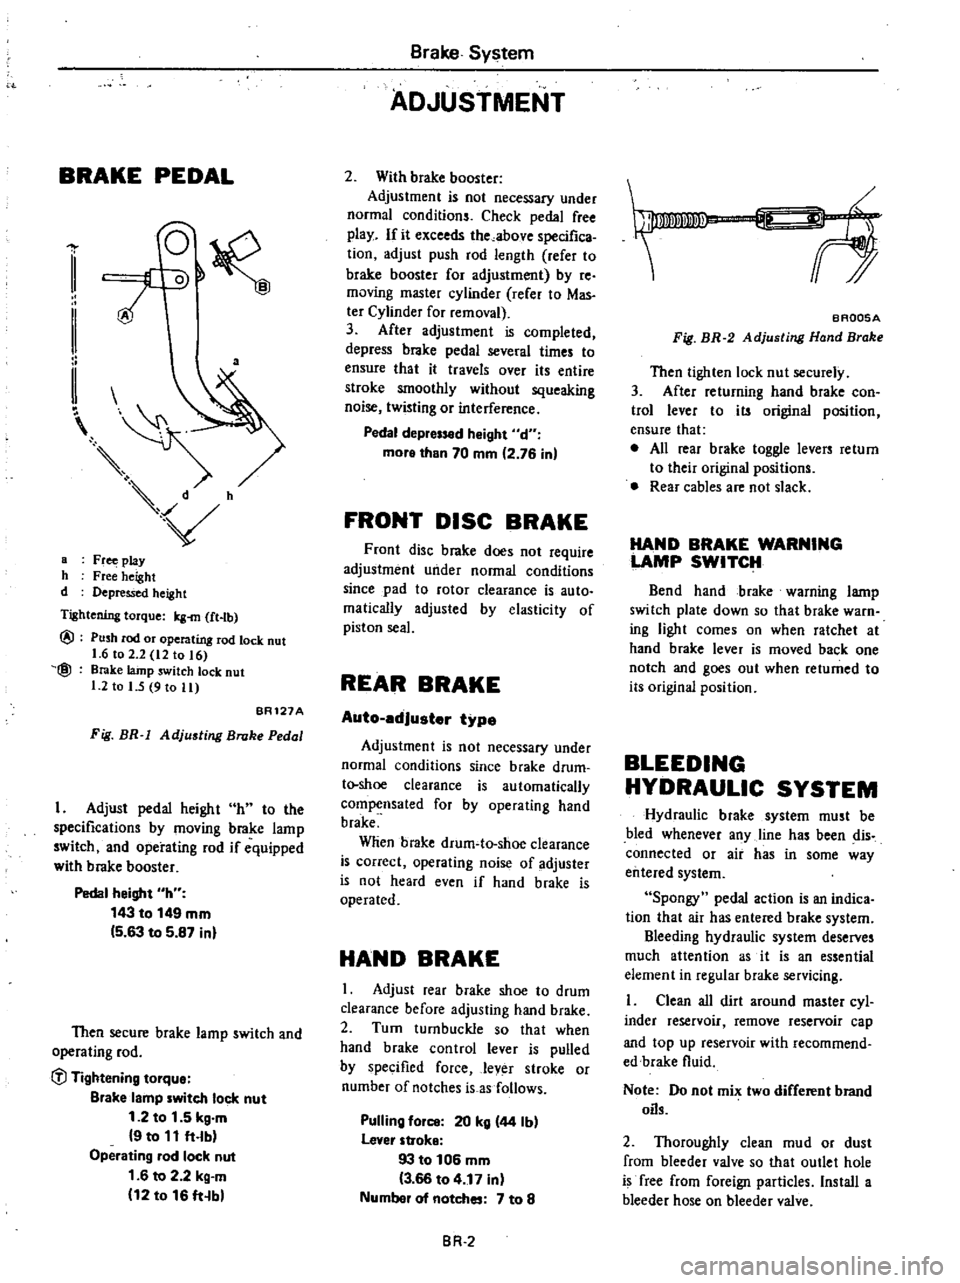
BRAKE
PEDAL
a
a
Fr
play
h
Free
height
d
Depressed
height
Tightening
torque
Icg
m
ft
tb
@
@
Push
rod
or
operating
rod
lock
nut
1
6
to
2
2
12
to
16
Brake
lainp
switch
lock
nut
1
2
to
I
5
9
to
11
BR121A
Fig
BR
1
Adjusting
Broke
Pedal
I
Adjust
pedal
height
h
to
the
specifications
by
moving
brake
lamp
switch
and
operating
rod
if
equipped
with
brake
booster
Pedal
height
h
143
to
149
mm
5
63
to
5
87
inl
Then
secure
brake
lamp
switch
and
operating
rod
C
l
Tightening
tOlque
Blake
lamp
witch
lock
nut
1
2
to
1
5
kg
m
9
to
11
ft
lb
Operating
lad
lock
nut
1
6
to
2
2
kg
m
12
to
16
ft
b
Brake
System
ADJUSTMENT
2
With
brake
booster
Adjustment
is
not
necessary
under
normal
conditions
Check
pedal
free
play
If
it
exceeds
the
above
specifica
tion
adjust
push
rod
length
refer
to
brake
booster
for
adjustment
by
re
moving
master
cylinder
rerer
to
Mas
ter
Cylinder
for
removal
3
After
adjustment
is
completed
depress
brake
pedal
several
times
to
ensure
that
it
travels
over
its
entire
stroke
smoothly
without
squeaking
noise
twisting
or
interference
Pedal
depr
d
Might
d
more
than
70
mm
2
76
in
FRONT
DISC
BRAKE
Front
disc
brake
does
not
require
adjustment
under
normal
conditions
since
pad
to
rotor
clearance
is
auto
malically
adjusted
by
elasticity
of
piston
seal
REAR
BRAKE
Auto
edJuster
type
Adjustment
is
not
necessary
under
normal
conditions
since
brake
drum
t
shoe
clearance
is
automatically
compensated
for
by
operating
hand
brake
Wlien
brake
drum
to
shoe
clearance
is
correct
operating
noise
of
adjuster
is
not
heard
even
if
hand
brake
is
operated
HAND
BRAKE
I
Adjust
rear
brake
shoe
to
drum
clearance
before
adjusting
hand
brake
2
Turn
turnbuckle
so
that
when
hand
brake
control
lever
is
pulled
by
specified
force
lever
stroke
or
number
of
notches
is
as
follows
Pulling
fOil
20
kg
44
Ib
lever
stroke
93
to
106
mm
3
66
to
4
17
in
Numbel
of
notches
7
to
8
BR
2
f
BAQ05A
Fig
BR
2
Adjusting
Hand
Brake
Then
tighten
lock
nut
securely
3
After
returning
hand
brake
con
trol
lever
to
its
original
position
ensure
that
e
All
rear
brake
toggle
levers
return
to
their
original
positions
Rear
cables
are
not
slack
HAND
BRAKE
WARNING
LAMP
SWITCH
Bend
hand
brake
warning
lamp
switch
plate
down
so
that
brake
warn
ing
light
comes
on
when
ratchet
at
hand
brake
lever
is
moved
back
one
notch
and
goes
out
when
returned
to
its
original
position
BLEEDING
HYDRAULIC
SYSTEM
Hydraulic
brake
system
must
be
bled
whenever
any
line
has
been
dis
connected
or
air
has
in
some
way
entered
system
Spongy
pedal
action
is
an
indica
tion
that
air
has
entered
brake
system
Bleeding
hydraulic
system
deserves
much
attention
as
it
is
an
essential
element
in
regular
brake
servicing
Clean
all
dirt
around
master
cyl
inder
reservoir
remove
reservoir
cap
and
top
up
reservoir
with
recommend
edbrake
fluid
Note
Do
not
mix
two
different
brand
oils
2
Thoroughly
clean
mud
or
dust
from
bleeder
valve
so
that
outlet
hole
is
free
from
foreign
particles
Install
a
bleeder
hose
on
bleeder
valve
Page 360 of 548
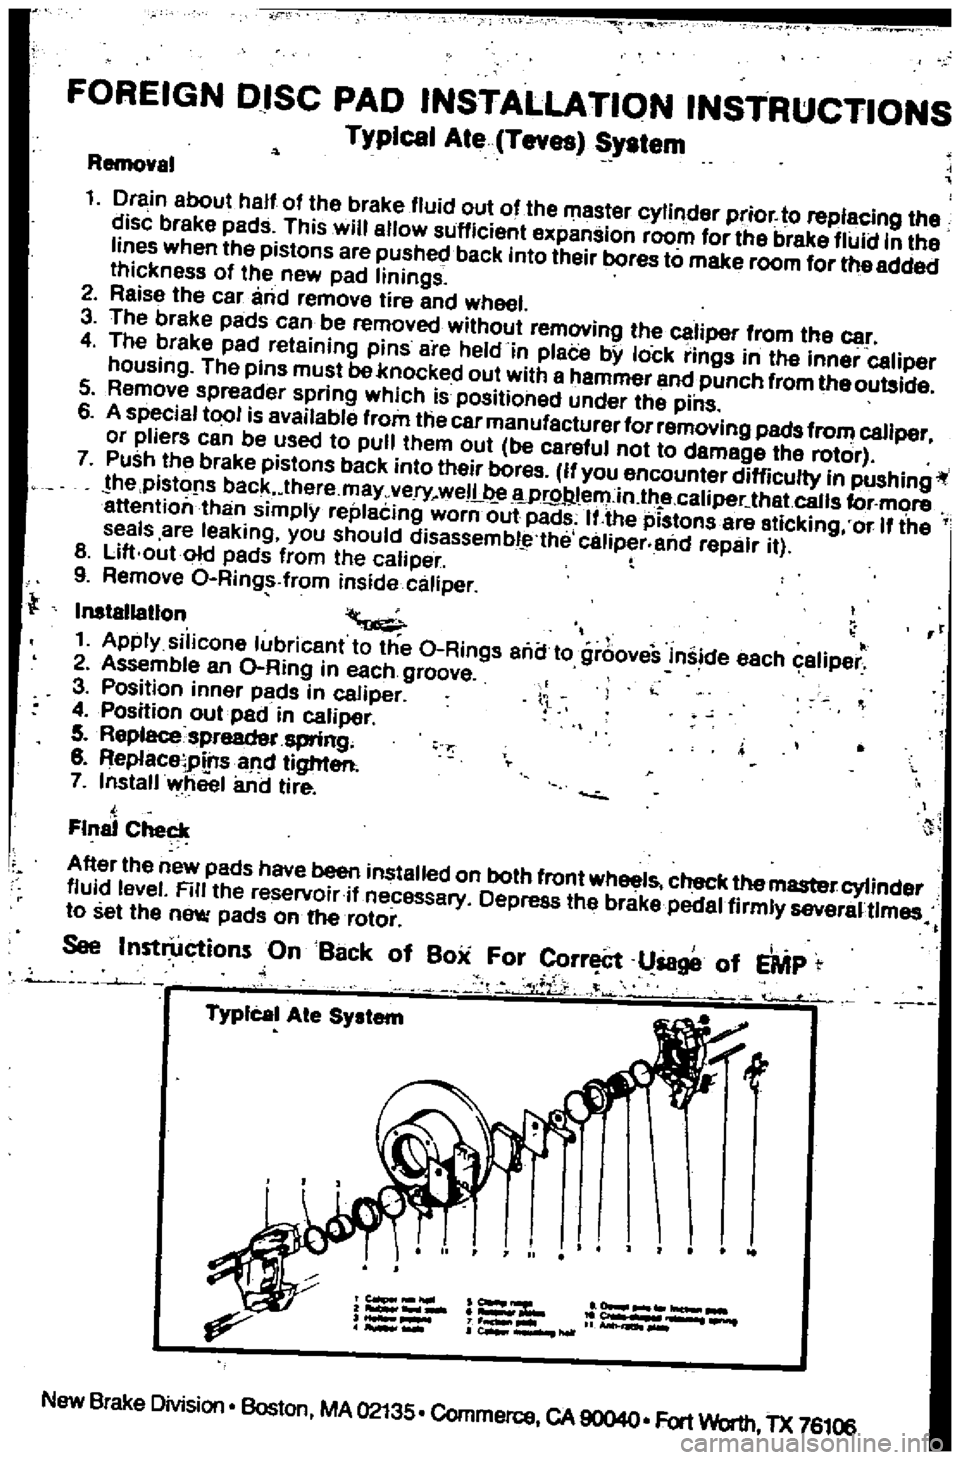
FOREIGN
DISC
PAD
INSTALLATION
INSTRUCTIONS
Typical
Ate
Teves
System
Removel
1
Drain
about
half
of
the
brake
fluid
out
of
the
master
cylinder
prior
to
replacing
the
disc
brake
pads
This
will
allow
sufficient
expansion
room
for
the
brake
fluid
in
the
lines
when
the
pistons
are
pushed
back
into
their
bores
to
make
room
for
the
added
Ihickness
of
the
new
pad
linings
2
Reise
the
car
and
lemove
tire
and
wheel
3
The
breke
pads
can
be
removed
without
lemovinll
the
caliper
from
the
car
4
The
brake
pad
reteining
pins
are
held
in
plaCe
bY
lock
rinlls
in
Ihe
inner
caliper
housing
The
pins
must
be
knocked
out
with
e
hammel
end
punch
from
theoulllide
5
Remove
spreader
spring
which
is
positioned
under
the
pins
6
A
special
tool
is
available
flom
the
car
manufacturer
forremoving
pads
from
caliper
or
pliers
can
be
used
to
pull
them
oul
be
careful
not
to
damage
the
rotor
7
Push
Ihe
brake
pistons
back
into
their
boros
If
you
encounter
difficulty
in
pushingil
he
pistofls
back
lhere
may
very
weIL
Wr9Jl
l
ern
in
lh
e
caliper
that
calls
for
more
attention
than
simplY
replecing
worn
out
pads
IUhe
pistons
are
eticking
or
If
the
seals
are
leaking
you
should
disassembl
the
caliper
and
repair
il
8
Lift
out
old
pads
from
Ihe
caliper
9
Remove
O
Ring
from
inside
caliper
Inslallatlon
II
1
Apply
silicone
lubricanl
to
Ihe
O
Rings
ana
to
grooveS
inside
each
caliper
2
Assemble
an
O
Ring
in
each
groove
3
Position
innor
pads
in
caliper
4
Position
oulpad
in
caliper
5
Replacespreadet
spring
8
ReplaceiPtnsaM
lighter
7
Install
wheel
and
lire
l
Final
Checl
A
Iter
Ihe
new
padS
have
been
installed
on
bolh
front
wheel
check
the
master
cylinder
fluid
level
Rlllhe
reservoiril
necessary
Depress
Ihe
brake
pedal
firmly
severaUlmes
to
sellhe
new
pads
on
he
rotor
i
See
Inst
ctionsOnBat
k
of
Box
For
rr
l8ge
of
EMP
l
iL
1
f
J
TypIcal
Ale
System
New
Brake
Division
Boston
MA
02135
Commerce
CA
90040
Fort
Worth
TX
76106
Page 361 of 548

BR563
Fig
BR
10
Removing
Pad
Inspection
Clean
pads
with
cleaning
solvent
CAUTION
Use
brake
fluid
to
clean
Never
use
mineral
oil
2
When
pads
are
heavily
fouled
with
oil
or
grease
or
when
pad
is
deteriorated
or
deformed
replace
it
3
If
pad
is
worn
to
less
than
the
specified
value
replace
Pad
wear
limit
Minimum
thickness
t
6
mm
0
063
in
Note
Always
replace
pads
in
pad
kit
four
pads
two
clips
four
pad
pins
and
four
pad
springs
4
Check
rotor
referring
to
Rotor
for
inspection
Installetlon
I
Clean
and
apply
P
RC
grease
on
yoke
guide
groove
of
cylinder
body
sliding
contact
portions
of
yoke
and
end
surface
of
piston
Note
a
Do
not
use
common
brake
grease
b
Be
careful
not
to
get
brake
grease
on
rotor
and
pads
2
Loosen
air
bleeder
and
push
pis
ton
B
outer
piston
in
cylinder
until
end
surface
of
piston
B
coincides
with
end
surface
of
retaining
ring
on
boot
Then
inner
pad
can
be
installed
Brake
System
BR564
Fig
BR
11
Pushing
Piston
CAUTION
Piston
can
be
easily
pushed
in
by
hand
but
if
pushed
too
far
groove
of
piston
will
go
inside
of
piston
seal
as
shown
in
Fig
BR
12
At
this
point
if
piston
is
pressured
or
moved
piston
seal
will
be
damaged
If
piston
has
been
pushed
in
too
far
remove
brake
assembly
and
disassemble
it
Then
push
piston
out
in
the
direction
shown
by
arrow
Assemble
it
again
referring
to
follow
ing
section
00
I
Normal
I
position
L
BR409
Fig
BR
12
Position
for
Pushing
Piston
3
Push
piston
A
inner
piston
in
cylinder
by
pulling
yoke
as
shown
The
outer
pad
can
then
be
installed
BRS6S
Fig
BR
13
Pulling
in
Piston
A
BR
7
4
After
installing
pads
depress
brake
pedal
several
times
and
pads
will
settle
into
proper
position
Note
When
worn
out
pads
are
re
placed
with
new
ones
brake
fluid
may
overflow
reservoir
While
re
placing
pads
keep
loosening
bleeder
to
release
brake
fluid
5
Install
wheels
and
lower
car
to
ground
REMOVAL
I
Remove
pads
Refer
to
Pad
Re
placement
2
Remove
brake
tube
from
caliper
assembly
CAUTION
When
removing
brake
tube
use
suit
able
tube
wrench
Never
use
open
end
or
adjustable
wrench
Note
Plug
up
hole
in
caliper
so
that
brake
fluid
does
not
flow
out
from
cylinder
body
3
Loosen
bolts
securing
cylinder
body
to
knuckle
spindle
and
remove
caliper
assembly
from
strut
DISASSEMBLY
I
Drain
brake
fluid
from
top
hole
of
cylinder
body
2
Push
both
pistons
A
and
B
into
cylinder
Refer
to
Pad
Replacement
3
Tap
cylinder
body
lightly
with
a
plastic
hammer
Cylinder
will
then
separate
from
yoke
BR115A
Fig
BR
14
Tapping
Cylinder
Block
Page 362 of 548
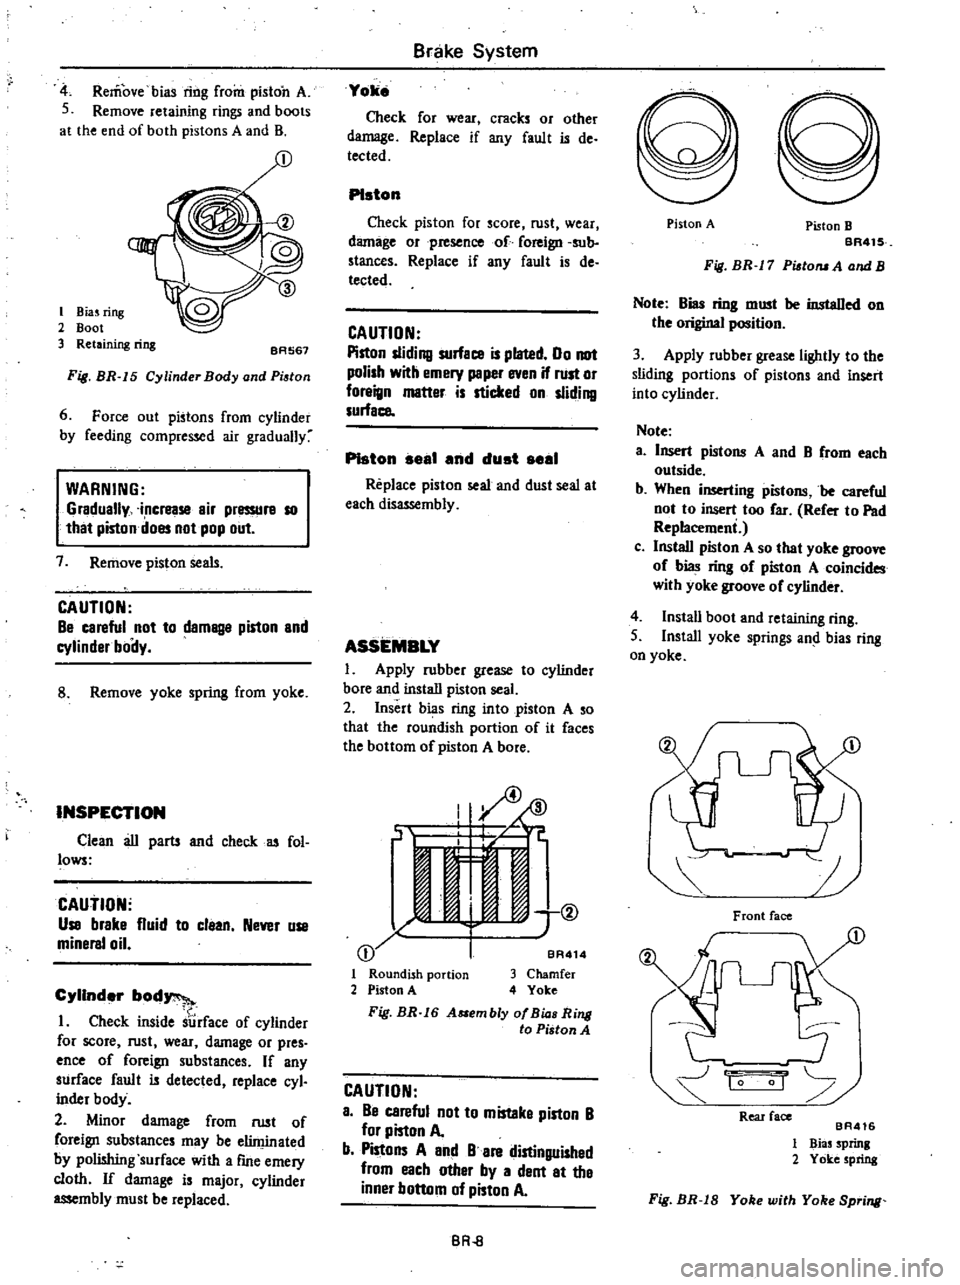
Remove
bias
ring
from
piston
A
S
Remove
retaining
rings
and
boots
at
the
end
of
both
pistons
A
and
B
I
Biuring
2
Boot
3
Retaining
ring
BA567
Fig
BR
15
Cylinder
Body
and
Pi
tan
6
Force
out
pistons
from
cylinder
by
feeding
compressed
air
gradually
WARNING
Gradually
increase
air
pressurs
10
that
piston
does
not
pop
out
7
Remove
piston
seals
CAUTION
Be
careful
not
to
damBlle
piston
and
cylinder
boily
8
Remove
yoke
spring
from
yoke
INSPECTION
Clean
au
parts
and
check
u
fol
lows
CAutiON
Use
brake
fluid
to
claan
Never
use
minersl
oil
Cylinder
bod
1
Check
inside
surface
of
cylinder
for
score
rust
wear
damage
or
pres
ence
of
foreign
substances
If
any
surface
fault
is
detected
replace
cyl
inder
body
2
Minor
damage
from
rust
of
foreign
substances
may
be
eliminated
by
polishing
surface
with
a
fme
emery
cloth
If
damage
is
major
cylinder
assembly
must
be
replaced
Brake
System
Yoke
Check
for
wear
cracks
or
other
damage
Replace
if
any
fault
is
de
tected
PIston
Check
piston
for
score
rust
wear
damage
orpresenco
of
foreign
sub
stances
Replace
if
any
fault
is
de
tected
CAUTION
Piston
sliding
surface
is
plated
00
not
polish
with
emery
peper
even
if
rust
or
foreign
matter
is
sticked
on
sliding
surface
PIston
seal
end
dust
seel
Replace
piston
seal
and
dust
seal
at
each
dis
mbly
ASSEMBLY
1
Apply
rubber
grease
to
cylinder
bore
and
install
piston
seal
2
Insert
bias
ring
into
piston
A
so
that
the
roundish
portion
of
it
faces
the
bottom
of
piston
A
bore
I
ID
J
if
C
jt
11
e
1
@
I
j
BA
I
Roundish
portion
3
Chamfer
2
Piston
A
4
Yoke
Fig
BR
16
A
embly
af
Bia
Ring
to
Piston
A
CAUTION
a
Be
careful
not
to
mistaka
piston
B
for
piston
A
b
Pistons
A
and
B
are
distinguished
from
each
other
by
a
dent
at
the
inner
bottom
of
piston
A
BR
8
Piston
A
Piston
B
BR41S
Fig
BR
17
Pisto
A
and
B
Note
Bias
ring
must
be
instaDed
on
the
original
position
3
Apply
rubber
grease
lightly
to
the
sliding
portions
of
pistons
and
insert
into
cylinder
Note
a
Insert
pistons
A
and
B
from
each
outside
b
When
inserting
pistons
be
careful
not
to
insert
too
far
Refer
to
Pad
Replacemeni
c
Install
piston
A
so
that
yoke
groove
of
bias
ring
of
piston
A
coincides
with
yoke
groove
of
cylinder
4
Instau
boot
and
retaining
ring
S
Install
yoke
springs
an
bias
ring
on
yoke
Front
face
1
1
0
Rear
face
BA416
1
Bias
Sprinl
2
Yoke
spring
Fig
BR
18
Yoke
with
Yoke
Spring