heater DATSUN PICK-UP 1977 User Guide
[x] Cancel search | Manufacturer: DATSUN, Model Year: 1977, Model line: PICK-UP, Model: DATSUN PICK-UP 1977Pages: 537, PDF Size: 35.48 MB
Page 428 of 537
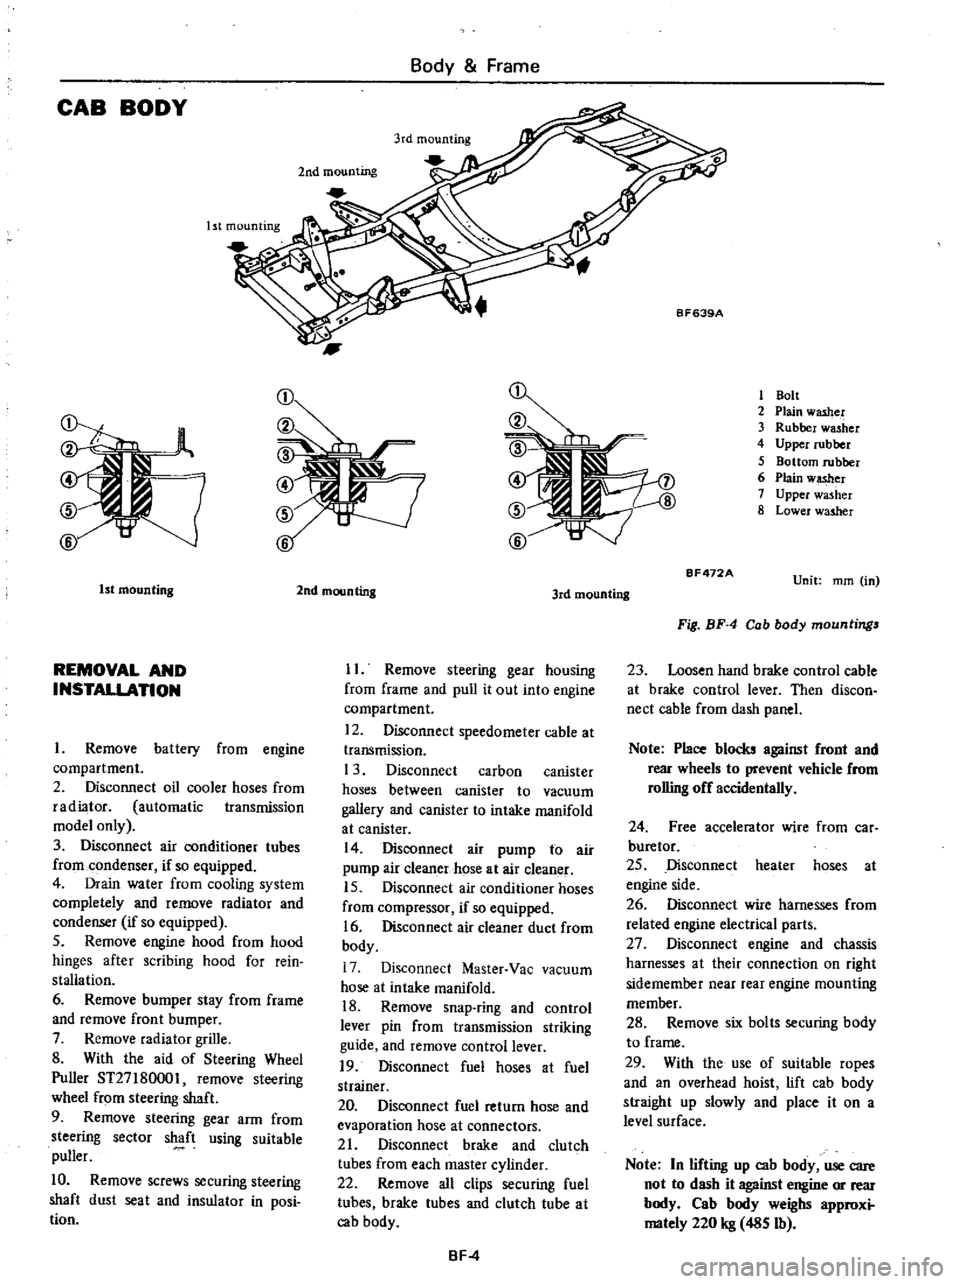
CAB
BODY
Body
Frame
Ist
mounting
2nd
mounting
1
Bolt
2
Plain
washer
3
Rubber
washer
4
Upper
rubber
5
Bottom
rubber
6
Plain
w
er
7
Upper
washer
8
Lower
washer
1st
mounting
REMOVAL
AND
INSTALLATION
Remove
battery
from
engine
compartment
2
Disconnect
oil
cooler
hoses
from
radiator
automatic
transmission
model
only
3
Disconnect
air
conditioner
tubes
from
condenser
if
so
equipped
4
Drain
water
from
cooling
system
completely
and
remove
radiator
and
condenser
if
so
equipped
5
Remove
engine
hood
from
hood
hinges
after
scribing
hood
for
rein
stallation
6
Remove
bumper
stay
from
frame
and
remove
front
bumper
7
Remove
radiator
grille
8
With
the
aid
of
Steering
Wheel
Puller
ST27
180001
remove
steering
wheel
from
steering
shaft
9
Remove
steering
gear
arm
from
steering
sector
shaft
using
suitable
puller
10
Remove
screws
securing
steering
shaft
dust
seat
and
insulator
in
posi
tion
2nd
mounting
3rd
mounting
II
Remove
steering
gear
housing
from
frame
and
pull
it
out
into
engine
compartment
12
Disconnect
speedometer
cable
at
transmission
1
3
Disconnect
carbon
canister
hoses
between
canister
to
vacuum
gallery
and
canister
to
intake
manifold
at
canister
14
Disconnect
air
pump
to
air
pump
air
cleaner
hose
at
air
cleaner
15
Disconnect
air
conditioner
hoses
from
compressor
if
so
equipped
16
Disconnect
air
cleaner
duct
from
body
17
Disconnect
Master
Vac
vacuum
hose
at
intake
manifold
18
Remove
snap
ring
and
control
lever
pin
from
transmission
striking
guide
and
remove
control
lever
19
Disconnect
fuel
hoses
at
fuel
strainer
20
Disconnect
fuel
return
hose
and
evaporation
hose
at
connectors
21
Disconnect
brake
and
clutch
tubes
from
each
master
cylinder
22
Remove
all
clips
securing
fuel
tubes
brake
tubes
and
clutch
tube
at
cab
body
BF
4
BF472A
Unit
mm
in
Fig
BF
4
Cab
body
mountings
23
Loosen
hand
brake
control
cable
at
brake
control
lever
Then
discon
nect
cable
from
dash
panel
Note
Place
blocks
against
front
and
rear
wheels
to
prevent
vehicle
from
rolling
off
accidentally
24
Free
accelerator
wire
from
car
buretor
25
Disconnect
heater
hoses
at
engine
side
26
Disconnect
wire
harnesses
from
related
engine
electrical
parts
27
Disconnect
engine
and
chassis
harnesses
at
their
connection
on
right
sidemember
near
rear
engine
mounting
member
28
Remove
six
bolts
securing
body
to
frame
29
With
the
use
of
suitable
ropes
and
an
overhead
hoist
lift
cab
body
straight
up
slowly
and
place
it
on
a
level
surface
Note
In
lifting
up
cab
body
use
care
not
to
dash
it
against
engine
or
rear
body
Cab
body
weighs
approxi
mately
220
kg
485
Ib
Page 441 of 537
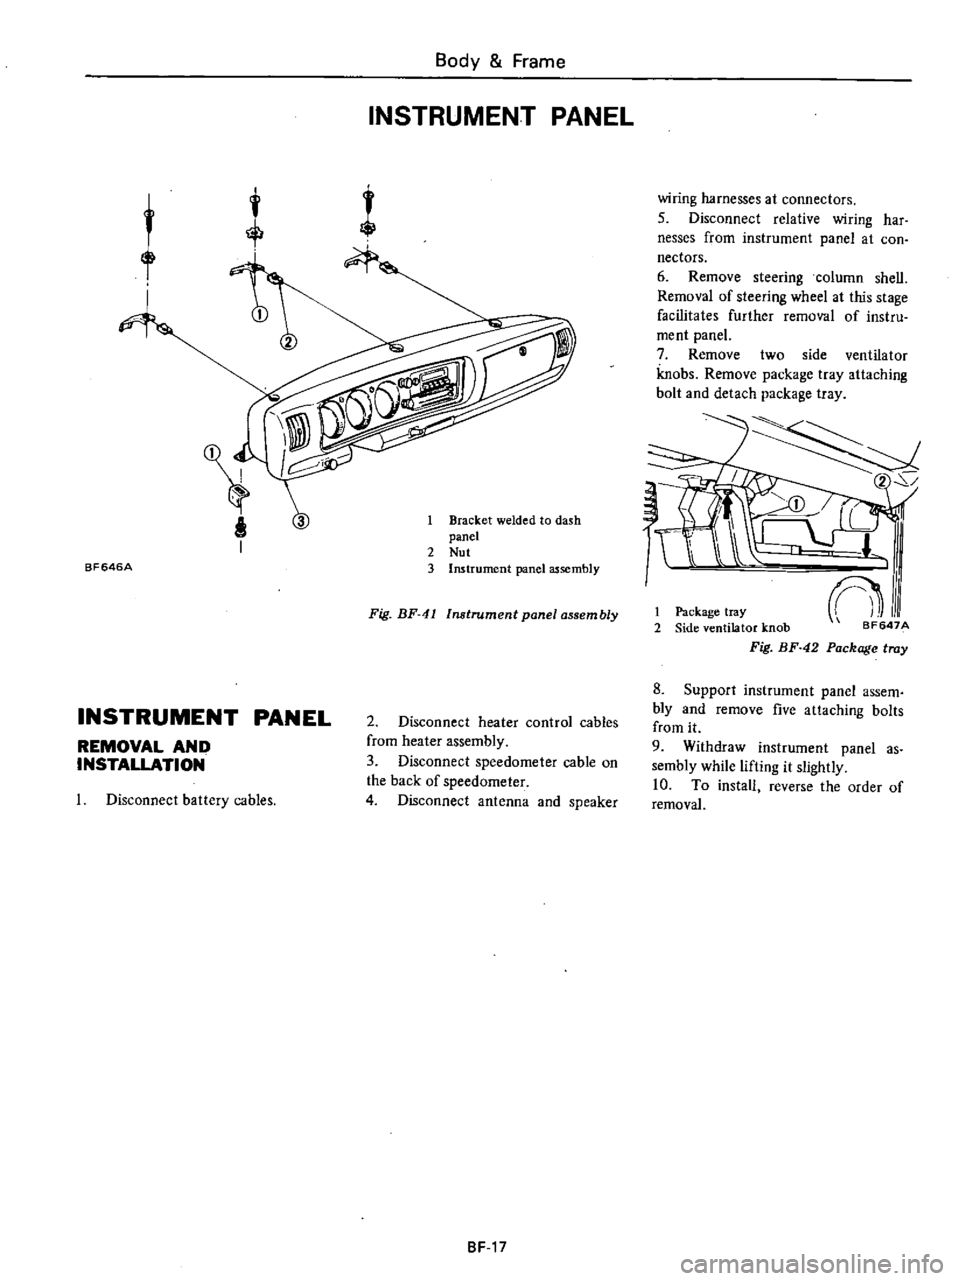
BF646A
Body
Frame
INSTRUMENT
PANEL
1
Bracket
welded
to
dash
panel
2
Nut
3
Instrument
panel
assembly
Fig
BF
41
Instrument
panel
assembly
INSTRUMENT
PANEL
REMOVAL
AND
INSTALLATION
2
Disconnect
heater
control
cables
from
heater
assembly
3
Disconnect
speedometer
cable
on
the
back
of
speedometer
4
Disconnect
antenna
and
speaker
Disconnect
battery
cables
8F
17
wiring
harnesses
at
connectors
5
Disconnect
relative
wiring
har
nesses
from
instrument
panel
at
con
nectors
6
Remove
steering
column
shell
Removal
of
steering
wheel
at
this
stage
facilitates
further
removal
of
instru
ment
panel
7
Remove
two
side
ventilator
knobs
Remove
package
tray
attaching
bolt
and
detach
package
tray
2
I
Package
tray
2
Side
ventilator
knob
Fig
BF
42
Package
tray
8
Support
instrument
panel
assem
bly
and
remove
five
attaching
bolts
from
it
9
Withdraw
instrument
panel
as
sembly
while
lifting
it
slightly
10
To
install
reverse
the
order
of
removal
Page 454 of 537
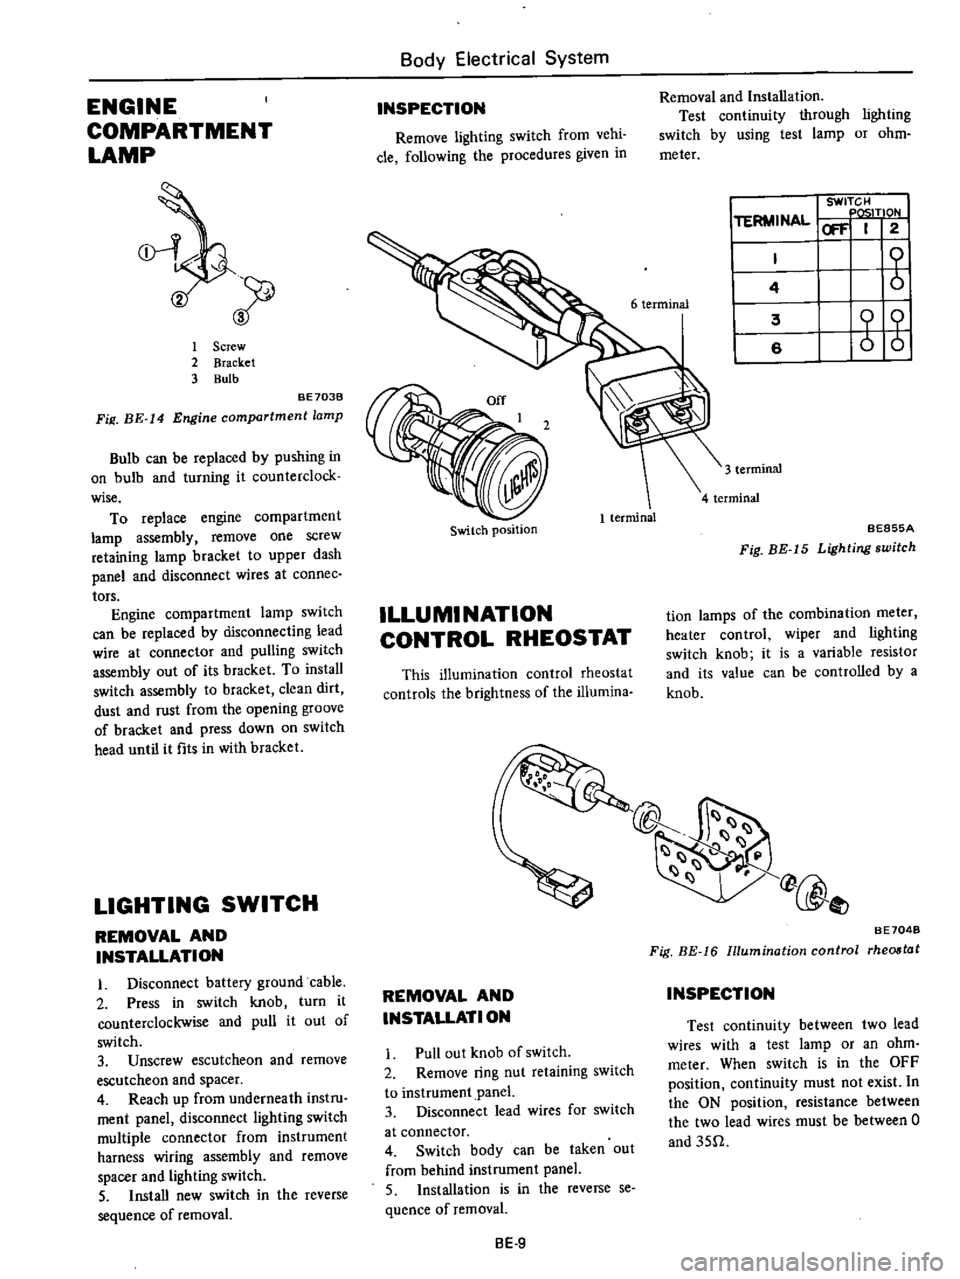
ENGINE
COMPARTMENT
LAMP
2
1
Screw
2
Bracket
3
Bulb
BE
7038
Fill
BE
14
Engine
compartment
lamp
Bulb
can
be
replaced
by
pushing
in
on
bulb
and
turning
it
counterclock
wise
To
replace
engine
compartment
lamp
assembly
remove
one
SCrew
retaining
lamp
bracket
to
upper
dash
panel
and
disconnect
wires
at
connee
tors
Engine
compartment
lamp
switch
can
be
replaced
by
disconnecting
lead
wire
at
connector
and
pulling
switch
assembly
out
of
its
bracket
To
install
switch
assembly
to
bracket
clean
dirt
dust
and
rust
from
the
opening
groove
of
bracket
and
press
down
on
switch
head
until
it
fits
in
with
bracket
LIGHTING
SWITCH
REMOVAL
AND
INSTALLATION
I
Disconnect
battery
ground
cable
2
Press
in
switch
knob
turn
it
counterclockwise
and
pull
it
out
of
switch
3
Unscrew
escutcheon
and
remove
escutcheon
and
spacer
4
Reach
up
from
underneath
instru
ment
panel
disconnect
lighting
switch
multiple
connector
from
instrument
harness
wiring
assembly
and
remove
spacer
and
lighting
switch
5
Install
new
switch
in
the
reverse
sequence
of
removal
Body
Electrical
System
INSPECTION
Remove
lighting
switch
from
vehi
cle
following
the
procedures
given
in
Switch
position
1
terminal
ILLUMINATION
CONTROL
RHEOSTAT
This
illumination
control
rheostat
controls
the
brightness
of
the
iliumina
Removal
and
Installation
Test
continuity
through
lighting
switch
by
using
test
lamp
or
ohm
meter
I
I
SWITCH
TERMINAL
P
T10N
ICI
F
2
I
I
b
I
4
I
I
6
terminal
I
3
I
6
3
terminal
4
terminal
BE855A
Fig
BE
15
Lighting
switch
tion
lamps
of
the
combination
meter
heater
control
wiper
and
lighting
switch
knob
it
is
a
variable
resistor
and
its
value
can
be
controlled
by
a
knob
REMOVAL
AND
INSTALLATION
I
Pull
out
knob
of
switch
2
Remove
ring
nut
retaining
switch
to
instrument
panel
3
Disconnect
lead
wires
for
switch
at
connector
4
Switch
body
can
be
taken
out
from
behind
instrument
panel
5
Installation
is
in
the
reverse
se
quence
of
removal
BE
9
0@
BE
7048
Fig
BE
16
Illumination
control
rhe08tat
INSPECTION
Test
continuity
between
two
lead
wires
with
a
test
lamp
or
an
ohm
meter
When
switch
is
in
the
OFF
position
continuity
must
not
exist
In
the
ON
position
resistance
between
the
two
lead
wires
must
be
between
0
and
3512
Page 457 of 537

Body
Electrical
System
BULB
SPECIFICATIONS
Item
Wattage
Candlepower
Headlamp
Inner
Outer
37
5W
37
5
S0W
Front
combination
lamp
Turn
signal
and
parking
lamp
23
8W
32
3C
Side
marker
lamp
Front
Rear
8W
4C
8W
4C
Rear
combination
lamp
Turn
signal
lamp
A
B
Tail
lamp
B
C
Stop
lamp
A
B
Back
up
lamp
D
A
23W
32C
B
23j8W
32j3C
C
8W
4C
D
23W
32C
7
SW
6C
License
plate
lamp
Engine
compartment
lamp
6W
Room
lamp
5W
Combination
meter
illurnina
tion
17W
iC
x3
Knob
illumination
lamp
3
4W
2C
Heater
control
illumination
lamp
3
4W
2C
TROUBLEDIAGNOSE
AND
CORRECTIONS
HEADLAMP
Condition
Headlarnps
do
not
light
for
both
high
and
low
beams
High
beam
cannot
be
switched
to
low
beam
or
vice
versa
Probable
cause
Burnt
fuse
Loose
connection
or
open
circuit
Faulty
lighting
switch
Faulty
dimmer
switch
Faulty
light
relay
No
ground
Faulty
dimmer
switch
Faulty
light
relay
BE12
Bulb
SAE
trade
number
4001
4002
1034
67
67
1073
1034
67
1073
89
161
158
158
Corrective
action
Correct
cause
and
replace
fuse
Check
wiring
and
or
repair
connection
Conduct
continuity
test
and
replace
if
neces
sary
Check
light
relay
for
proper
operation
and
replace
if
necessary
Clean
and
tighten
ground
terminal
Conduct
continuity
test
and
replace
if
neces
sary
Check
light
relay
for
proper
operation
and
replace
if
necessary
Page 461 of 537
REMOVAL
AND
INSTALLATION
I
Disconnect
battery
ground
cable
2
Working
through
meter
openings
of
cluster
lid
remove
three
screws
retaining
cluster
lid
to
instrument
panel
3
From
underneath
instrument
panel
remove
one
screw
retaining
me
ter
assembly
to
lower
panel
of
instru
ment
4
Withdraw
cluster
lid
slightly
For
ccess
to
switches
knobs
etc
follow
the
procedures
given
in
each
section
5
From
behind
combination
meter
disconnect
speedometer
cable
at
speedometer
head
and
multiple
con
nector
instrume
nt
wire
assembly
from
printed
circuit
6
On
vehicle
with
clock
disconnect
wires
at
each
connection
on
meter
printed
circuit
7
Remove
four
screws
retaining
me
ter
assembly
to
cluster
lid
8
Remov
combination
meter
as
sembly
9
When
installing
combination
me
ter
assembly
follow
the
reverse
se
quence
of
removal
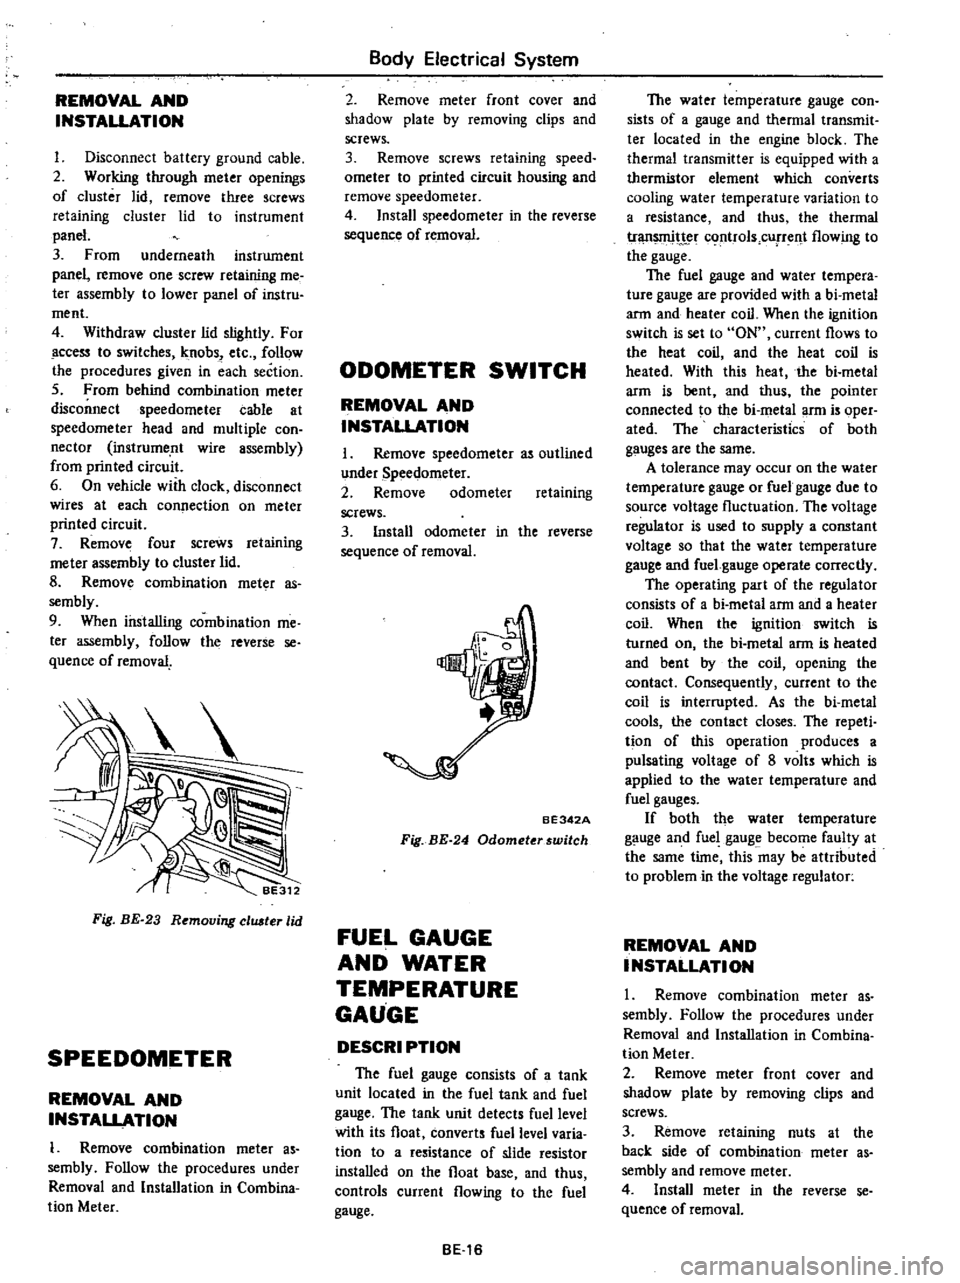
Fig
BE
23
Removing
eluster
lid
SPEEDOMETER
REMOVAL
AND
INSTALLATION
1
Remove
combination
meter
as
sembly
Follow
the
procedures
under
Removal
and
Installation
in
Combina
tion
Meter
Body
Electrical
System
2
Remove
meter
front
cover
and
shadow
plate
by
removing
clips
and
screws
3
Remove
screws
retaining
speed
ometer
to
printed
circuit
housing
and
remove
speedometer
4
Install
speedometer
in
the
reverse
sequence
of
removal
ODOMETER
SWITCH
REMOVAL
AND
INSTALLATION
I
Remove
speedometer
as
outlined
under
Speedometer
2
Remove
odometer
retaining
screws
3
Install
odometer
in
the
reverse
sequence
of
removal
BE342A
Fig
BE
24
Odometerswitch
FUEL
GAUGE
AND
WATER
TEMPERATURE
GAUGE
DESCRI
PTION
The
fuel
gauge
consists
of
a
tank
unit
located
in
the
fuel
tank
and
fuel
gauge
The
tank
unit
detects
fuel
level
with
its
float
converts
fuel
level
varia
tion
to
a
resistance
of
slide
resistor
installed
on
the
float
base
and
thus
controls
current
flowing
to
the
fuel
gauge
BE16
The
water
temperature
gauge
con
sists
of
a
gauge
and
thermal
transmit
ter
located
in
the
engine
block
The
thermal
transmitter
is
equipped
with
a
thermistor
element
which
converts
cooling
water
temperature
variation
to
a
resistance
and
thus
the
thermal
tr
t
c
rtrols
cUfTent
flowing
to
the
gauge
The
fuel
gauge
and
water
tempera
ture
gauge
are
provided
with
a
bi
metal
arm
and
heater
coil
When
the
ignition
switch
is
set
to
ON
current
flows
to
the
heat
coil
and
the
heat
coil
is
heated
With
this
heat
the
bi
metal
arm
is
bent
and
thus
the
pointer
connected
to
the
bi
metal
arm
is
oper
ated
The
characteristics
of
both
gauges
are
the
same
A
tolerance
may
occur
on
the
water
temperature
gauge
or
fuel
gauge
due
to
source
voltage
fluctuation
The
voltage
regulator
is
used
to
supply
a
constant
voltage
so
that
the
water
temperature
gauge
and
fuel
gauge
operate
correctly
The
operating
part
of
the
regulator
consists
of
a
bi
metal
arm
and
a
heater
coil
When
the
ignition
switch
is
turned
on
the
bi
metal
arm
is
heated
and
bent
by
the
coil
opening
the
contact
Consequently
current
to
the
coil
is
interrupted
As
the
bi
metal
cools
the
contact
closes
The
repeti
tion
of
this
operation
produces
a
pulsating
voltage
of
8
volts
which
is
applied
to
the
water
temperature
and
fuel
gauges
If
both
the
water
temperature
gauge
and
fuel
gauge
become
faulty
at
the
same
time
this
may
be
attributed
to
problem
in
the
voltage
regulator
REMOVAL
AND
INSTALLATION
1
Remove
combination
meter
as
sembly
Follow
the
procedures
under
Removal
and
Installation
in
Combina
tion
Meter
2
Remove
meter
front
cover
and
shadow
plate
by
removing
clips
and
screws
3
Remove
retaining
nuts
at
the
back
side
of
combination
meter
as
sembly
and
remove
meter
4
Install
meter
in
the
reverse
se
quence
of
removal
Page 466 of 537
Body
Electrical
System
ELECTRICAL
ACCESSORIES
CONTENTS
HORN
DESCRIPTION
REMOVAL
AND
INSTALLATION
IGNITION
SWITCH
REMOVAL
AND
INSTALLATION
INSPECTION
WINDSHIELD
WIPER
AND
WASHER
REMOVAL
AND
INSTALLATION
INSPECTION
RADIO
REMOVAL
AND
INSTALLATION
ADJUSTMENT
CLOCK
REMOVAL
I
NST
ALLA
TION
HEATER
DESCRIPTION
AIRFLOW
HEATER
UNIT
ASSEMBLY
BE
21
BE
21
BE
21
8E
n
BE
22
BE
22
BE
23
BE
23
BE
23
BE
25
BE
25
BE
25
BE
25
BE
25
BE
26
BE
26
BE
26
BE
28
BE
29
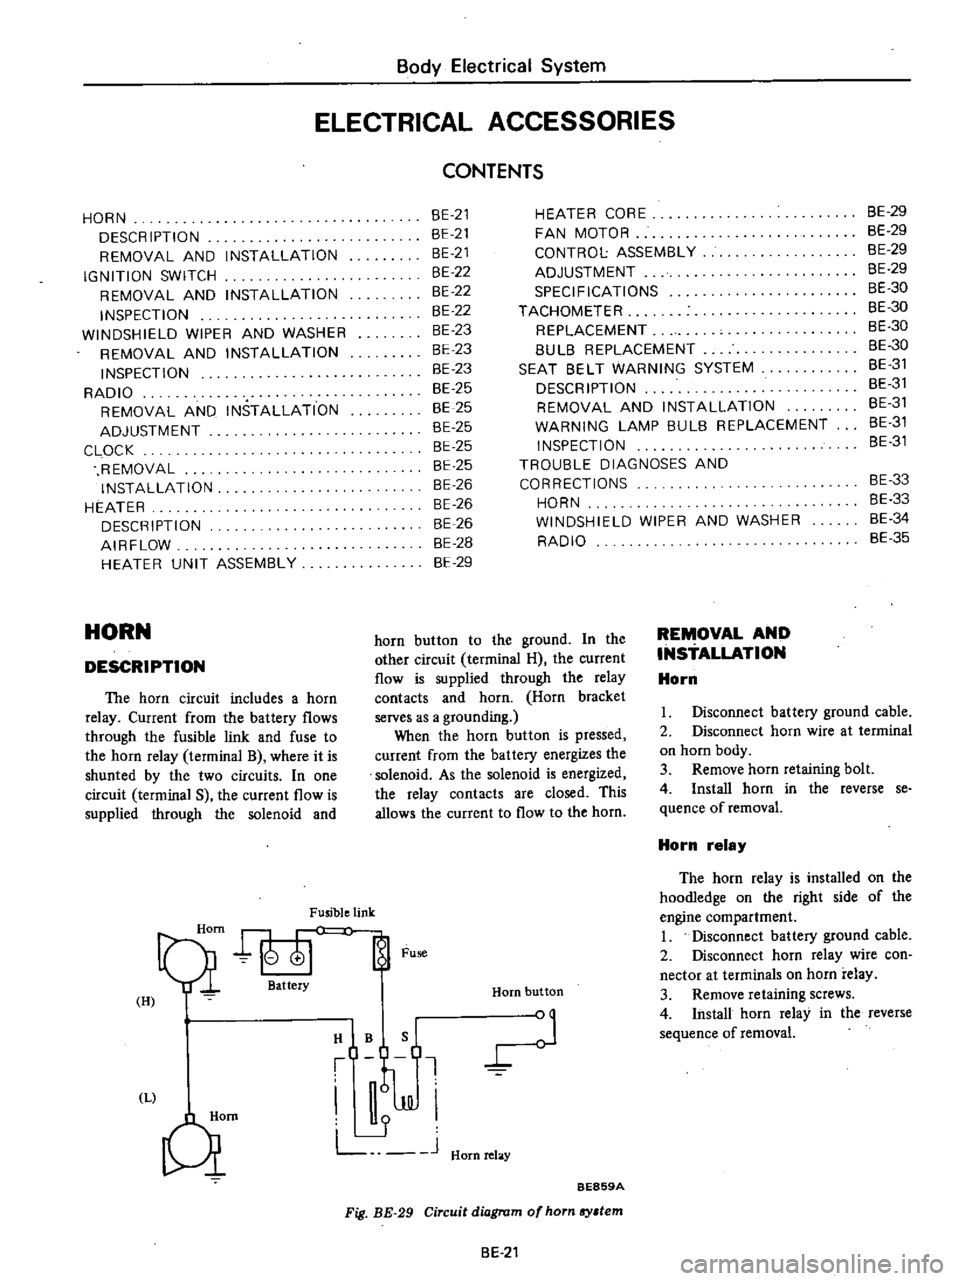
HORN
DESCRIPTION
The
horn
circuit
includes
a
horn
relay
Current
from
the
battery
flows
through
the
fusible
link
and
fuse
to
the
horn
relay
terminal
B
where
it
is
shunted
by
the
two
circuits
In
one
circuit
terminal
S
the
current
flow
is
supplied
through
the
solenoid
and
Fusible
link
Qi
att
Fu
H
I
HIBQ
t
J
JJI
L
J
Hornrelay
Qm
HEATER
CORE
FAN
MOTOR
CONTROL
ASSEMBLY
ADJUSTMENT
SPECIFICATIONS
TACHOMETER
REPLACEMENT
8UL8
REPLACEMENT
SEAT
8ELT
WARNING
SYSTEM
DESCRIPTION
REMOVAL
AND
INSTALLATION
WARNING
LAMP
BULB
REPLACEMENT
INSPECTION
TROUBLE
DIAGNOSES
AND
CORRECTIONS
HORN
WINDSHIELD
WIPER
AND
WASHER
RADIO
Horn
button
BE859A
Fig
BE
29
Circuit
diagram
of
horn
sy
tem
horn
button
to
the
ground
In
the
other
circuit
terminal
H
the
current
flow
is
supplied
through
the
relay
contacts
and
horn
Horn
bracket
serves
as
a
grounding
When
the
horn
button
is
pressed
current
from
the
battery
energizes
the
solenoid
As
the
solenoid
is
energized
the
relay
contacts
are
closed
This
allows
the
current
to
flow
to
the
horn
BE
21
REMOVAL
AND
INSTALLATION
Horn
8E
29
BE
29
BE
29
8E
29
BE
30
BE
30
BE
30
8E
30
8E
31
BE
31
BE
31
8E
31
8E
31
BE
33
8E
33
8E
34
BE
35
I
Disconnect
battery
ground
cable
2
Disconnect
horn
wire
at
terminal
on
horn
body
3
Remove
horn
retaining
bolt
4
Install
horn
in
the
reverse
se
quence
of
removal
Horn
relay
The
horn
relay
is
installed
on
the
hoodIedge
on
the
right
side
of
the
engine
compartment
I
Disconnect
battery
ground
cable
2
Disconnect
horn
relay
wire
con
nector
at
terminals
on
horn
relay
3
Remove
retaining
screws
4
Install
horn
relay
in
the
reverse
sequence
of
removal
Page 467 of 537
Body
Electrical
System
Horn
switch
The
horn
switch
is
integral
with
the
turn
signal
and
dimmer
switch
as
sembly
Remove
switch
assembly
as
outlined
in
Turn
Signal
and
Dimmer
Switch
IGNITION
SWITCH
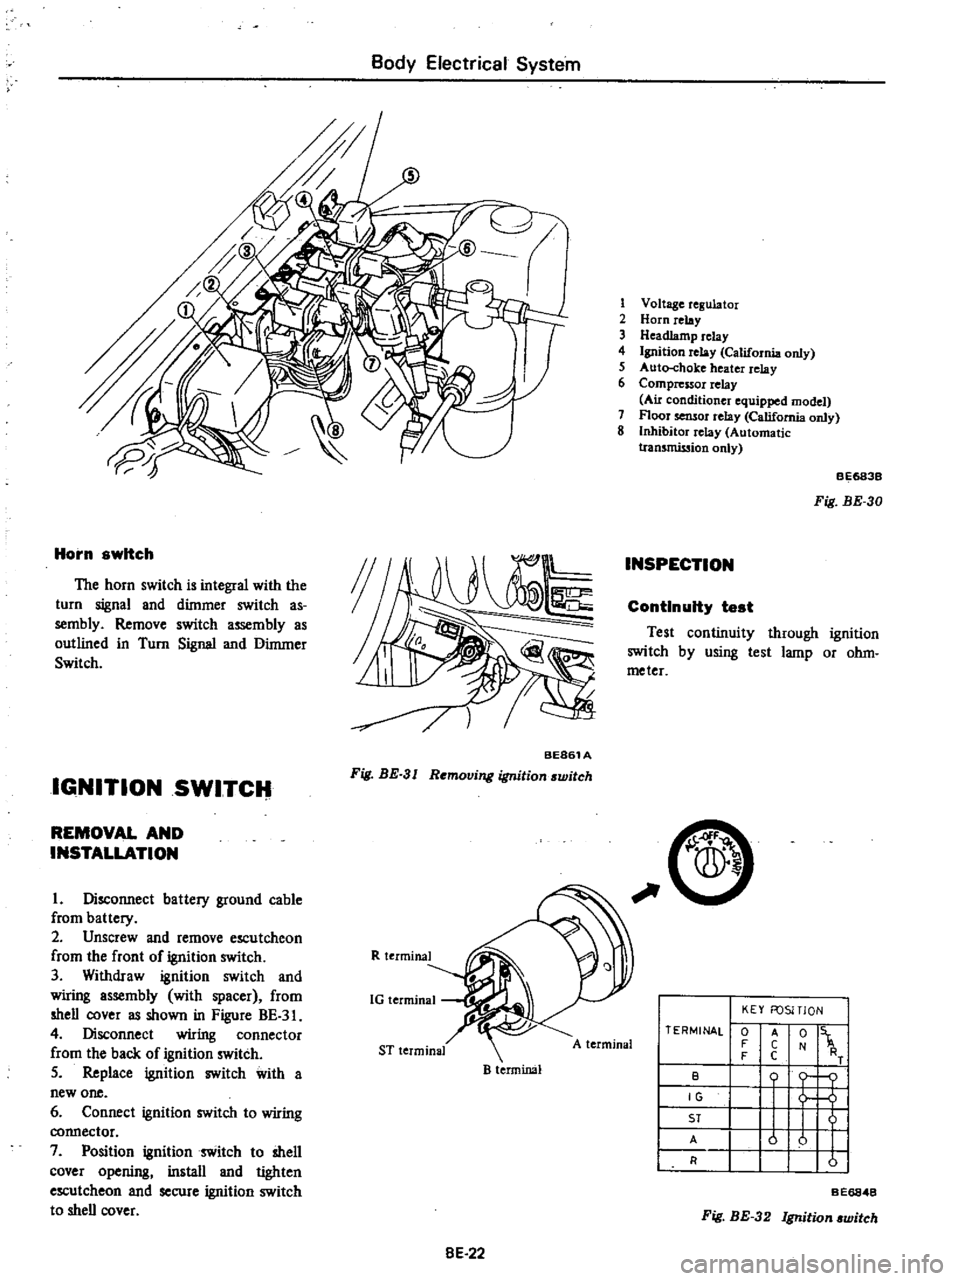
BE861A
Fig
BE
3
I
Removing
ignition
switch
REMOVAL
AND
INSTALLATION
I
Disconnect
battery
ground
cable
from
battery
2
Unscrew
and
remove
escutcheon
from
the
front
of
ignition
switch
3
Withdraw
ignition
switch
and
wiring
assembly
with
spacer
from
shell
cover
as
shown
in
Figure
BE
3
4
Disconnect
wiring
connector
from
the
back
of
ignition
switch
5
Replace
ignition
switch
with
a
new
one
6
Connect
ignition
switch
to
wiring
connector
7
Position
ignition
switch
to
shell
cover
opening
install
and
tighten
escutcheon
and
secure
ignition
switch
to
shell
cover
R
terminal
1G
terminal
ST
terminal
B
terminal
8E
22
1
Voltage
regulator
2
Horn
relay
3
Headlamp
relay
4
Ignition
relay
California
only
5
Auto
choke
heater
relay
6
Compressor
relay
Au
conditioner
equipped
model
7
Floor
sensor
relay
California
only
8
Inhibitor
relay
Automatic
tran5mission
only
INSPECTION
BE683B
Fig
BE
30
ContInuity
test
Test
continuity
through
ignition
switch
by
using
test
lamp
or
ohm
meter
C
A
terminal
TERMINAL
0
F
F
B
IG
ST
A
R
KEY
FOSITlON
t
1
o
j
u
u
I
I
A
C
C
Fig
BE
32
Ignition
witch
BE6848
Page 471 of 537

INSTALLATION
I
Position
clock
to
cluster
lid
and
install
three
screws
2
Connect
three
wire
connectors
of
clock
to
each
connection
two
to
combination
meter
printed
circuit
one
to
instrument
h
ness
wiring
3
Install
cluster
lid
to
instrument
panel
4
Connect
battery
ground
cable
HEATER
DESCRIPTION
@
Body
Electrical
System
Fig
BE
44
Clock
1
Defroster
nozzle
L
U
2
Deflor
tcr
duct
L
R
3
Heater
control
4
Resistor
5
Heater
motor
6
Heater
case
7
Ventilator
knob
8
Heater
core
9
Conuol
cable
clip
10
Heater
cock
11
Defroster
duct
R
H
12
Defroster
nozzle
R
H
BE687B
Fig
BE
45
Heater
comtruction
BE
26
Page 472 of 537
Operation
of
the
heater
is
control
led
by
two
control
levers
located
on
the
instrument
panel
and
a
hand
op
erated
knob
on
the
center
of
the
heater
unit
The
AIR
LEVER
controls
the
air
intake
valve
and
or
room
valve
by
its
lever
positions
OFF
DEFROST
and
ROOM
through
the
control
cables
The
air
intake
valve
draws
the
fresh
outside
air
from
the
cowl
top
grille
and
supplies
the
air
into
the
heater
unit
The
room
valve
is
located
at
the
bottom
of
the
heater
unit
The
air
coming
through
the
air
intake
valve
opening
is
forced
through
the
heater
core
to
the
room
valve
where
the
air
is
distributed
to
the
floor
outlet
and
or
defroster
outlets
depending
on
the
position
of
the
room
valve
The
VENT
KNOB
is
directly
linked
to
the
vent
valve
which
provides
fresh
air
for
the
passenger
Push
the
knob
all
the
way
in
to
open
the
valve
The
fresh
ventilating
air
comes
out
of
the
heater
center
outlet
The
TEMP
lever
is
a
dual
pur
pose
control
one
is
for
regulating
the
flow
of
engine
coolant
flowing
into
Body
Electrical
System
the
heater
unit
and
the
other
for
the
operation
of
the
fan
motor
When
the
lever
is
in
the
OFF
position
the
water
cock
is
closed
and
the
circulation
of
engine
coolant
through
the
heater
core
stops
When
the
lever
is
slided
to
any
other
position
than
OFF
the
water
cock
opens
in
proportion
to
the
lever
setting
and
allow
engine
coolant
to
flow
into
heater
core
To
control
the
fan
motor
opera
tion
push
or
pull
the
lever
knob
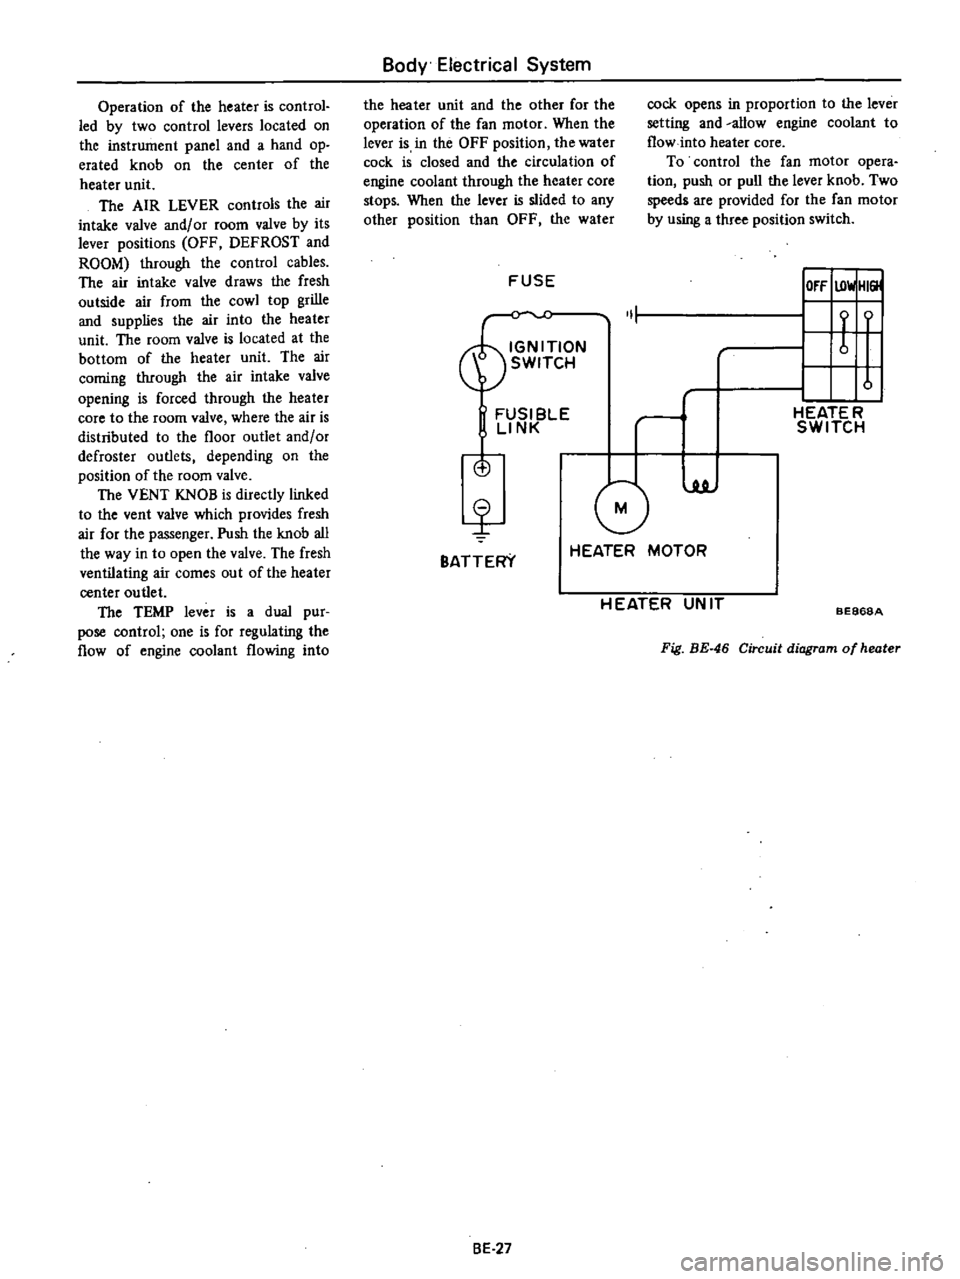
Two
speeds
are
provided
for
the
fan
motor
by
using
a
three
position
switch
FUSE
IOfF
UlwlHI
ON
1
t
f
SWITCH
u
FUSI
BlE
rl
HEATE
R
LINK
SWITCH
is
G
luJ
BATTERY
HEATER
MOTOR
H
EATER
UN
IT
BE868A
Fig
BE
46
Circuit
diagram
of
heater
8E
27
Page 473 of 537

Body
Electrical
System
AIRFLOW
OFF
VENTILATING
Push
Vent
valve
Heater
core
c
n
e
NlL
fAl
u
c
J
u
IUl
g
Push
Pull
DEFROSTING
VENTILATING
HEATING
0
tTIlsl
IU
lI
D
WI
Push
Pull
g
IIt
J
L
I
I
Pull
Pull
DEFROSTING
HEATING
n
C
IU
n
HU
I
ff
UIUI
C
J
CIl
JIlT
Ill
Pull
J
11
Pull
BE397
Fig
BE
47
Airflow
8E
28