DATSUN PICK-UP 1977 Service Manual
Manufacturer: DATSUN, Model Year: 1977, Model line: PICK-UP, Model: DATSUN PICK-UP 1977Pages: 537, PDF Size: 35.48 MB
Page 321 of 537

Automatic
Transmission
TROUBLE
SHOOTING
GUIDE
FOR
3N71B
AUTOMATIC
TRANSMISSION
Order
Test
item
Checking
Oil
level
gauge
2
Downshift
solenoid
3
Manuallinkage
L
4
Inhibitor
switch
5
Engine
idling
rpm
6
Vacuum
pressure
of
vacuum
pipe
7
Operation
in
each
range
8
Creep
of
vehicle
Stall
test
I
Oil
pressure
before
tesling
1
2
Stall
test
3
Oil
pressure
after
testing
Road
test
Slow
acceleration
I
st
2nd
2nd
3rd
2
Quick
acceleration
lst
2nd
2nd
3rd
3
Kick
down
operation
3rd
2nd
or
2nd
1st
Procedure
Check
gauge
for
oil
level
and
leakage
before
and
after
each
test
Check
for
sound
of
operating
solenoid
when
depressing
accelerator
pedal
fully
with
ignition
key
ON
Check
by
shifting
into
P
lR
IN
D
2
and
I
ranges
with
selector
lever
Check
whether
starter
operates
in
N
and
p
ranges
only
and
whether
reverse
lamp
operates
in
R
range
only
Check
whelher
idling
rpm
meet
standard
Check
whether
vacuum
pressure
is
more
than
450
mmHg
in
idling
and
whether
it
decreases
with
increasing
rpm
Check
whether
transmission
engages
positively
by
shifting
N
0
N
2
N
l
I
and
N
R
range
while
idling
with
brake
applied
Check
whether
there
is
any
creep
in
D
2
R
ranges
and
Measure
line
pressures
in
D
2
I
and
R
range
while
idling
Measure
engine
rpm
and
line
pressure
in
D
2
I
and
R
ranges
during
full
throttle
operati
n
Notes
a
Temperature
of
torque
converter
oil
used
in
test
should
be
from
600
to
1000C
1400
to
2120F
i
e
sufficiently
warmed
up
but
not
overheated
b
To
cool
oil
between
each
stall
test
for
D
2
I
and
R
ranges
idle
engine
i
e
rpm
at
about
1
200
rpm
for
more
than
1
minute
in
P
range
Measurement
time
must
not
be
more
than
5
seconds
Same
as
item
I
Check
vehide
speeds
and
engine
cpm
in
shifting
up
Ist
2nd
range
and
2nd
Jo3rd
range
while
running
with
lever
in
D
range
and
engine
vacuum
pressure
of
about
200
I11I1lHg
Same
as
item
1
above
except
with
engine
vacuum
pressure
of
0
mmHg
i
e
in
position
just
before
kickdown
Check
whether
the
kickdown
operates
and
measure
the
time
delays
while
running
at
30
40
50
60
70
km
h
18
25
30
37
43
MPH
in
D3
range
AT
57
Page 322 of 537
Automatic
Transmission
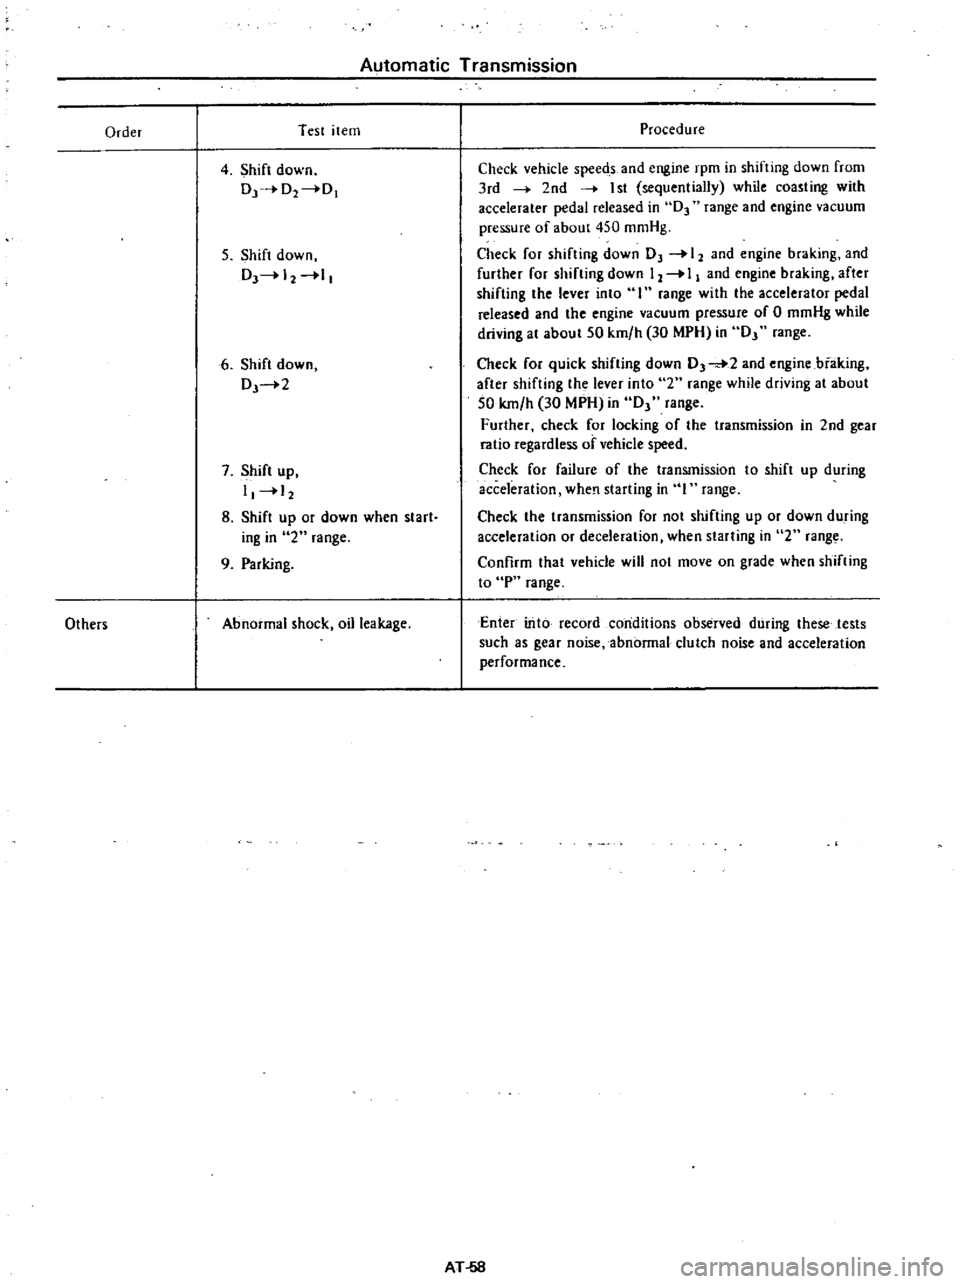
Order
Test
item
4
Shift
down
Dr
O2
0
5
Shift
down
DJ
12
1
6
Shift
down
DJ
2
7
Shift
up
I
12
8
Shift
up
or
down
when
start
iog
in
2
range
9
Parking
Others
Abnormal
shock
oil
leakage
Procedure
Check
vehicle
speeds
and
engine
rpm
in
shifting
down
from
3rd
2nd
I
st
sequentially
while
coasting
with
accelerater
pedal
released
in
D3
range
and
engine
vacuum
pressure
of
about
450
mmHg
Check
for
shifting
down
OJ
12
and
engine
braking
and
further
for
shifting
down
12
I
and
engine
braking
after
shifting
the
lever
into
I
range
with
the
accelerator
pedal
released
and
the
engine
vacuum
pressure
of
0
mmHg
while
driving
at
about
50
km
h
30
MPH
in
OJ
range
Check
for
quick
shifting
down
0
2
and
engine
biaking
after
shifting
the
lever
into
2
range
while
driving
at
about
50
km
h
30
MPH
in
OJ
range
Further
check
for
locking
of
the
transmission
in
2nd
gear
ratio
regardless
of
vehicle
speed
Check
for
failure
of
the
transmission
to
shift
up
during
acceleration
when
starting
in
I
range
Check
the
transmission
for
not
shifting
up
or
down
during
acceleration
or
deceleration
when
starting
in
2
rang
Confirm
that
vehicle
will
not
move
on
grade
when
shifting
to
P
range
Enter
into
record
conditions
observed
during
these
tests
such
as
gear
noise
abnormal
clutch
noise
and
acceleration
performance
AT
58
Page 323 of 537
Automatic
Transmission
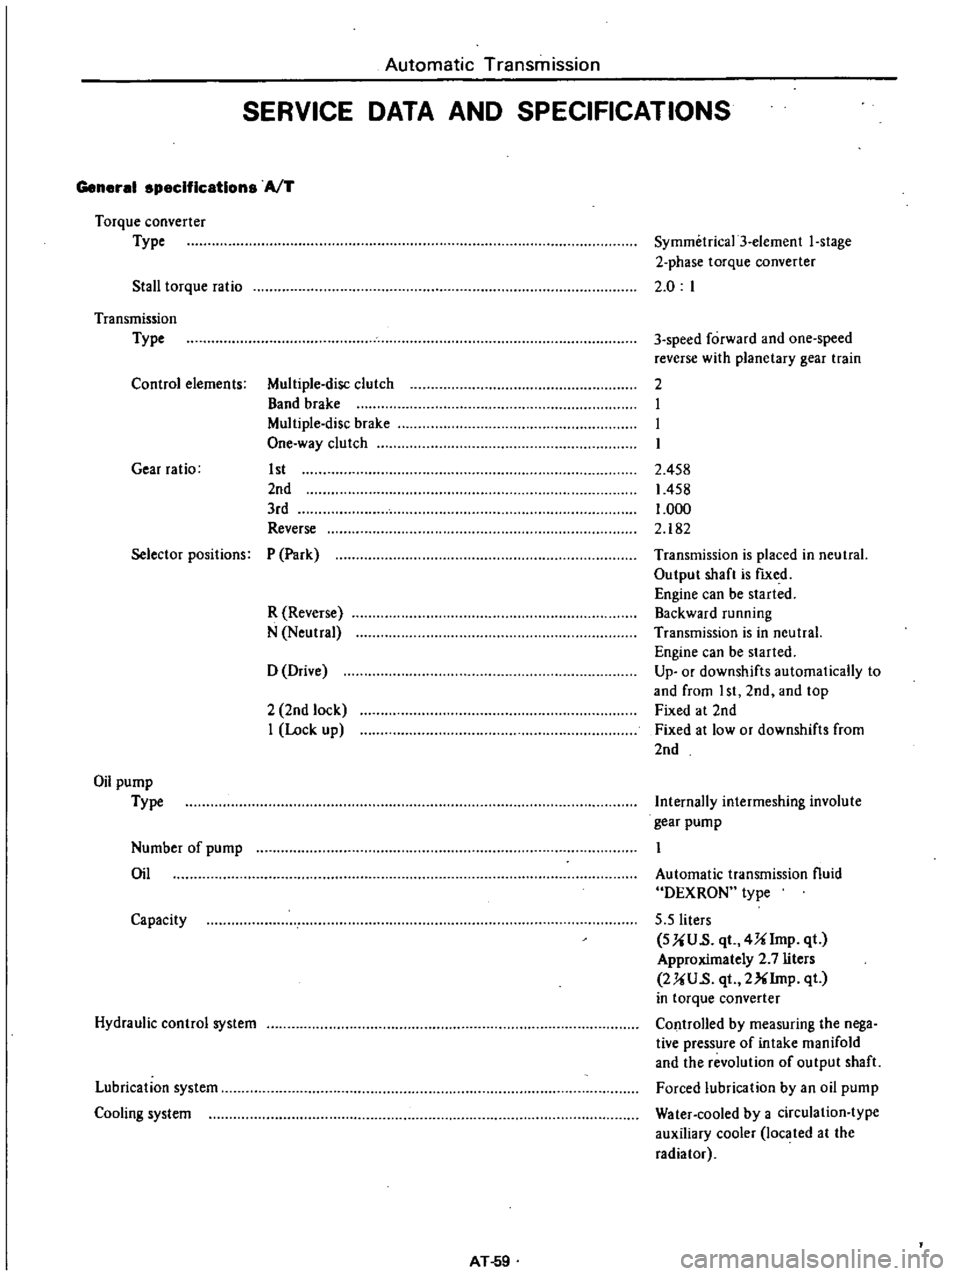
SERVICE
DATA
AND
SPECIFICATIONS
General
specifications
AfT
Torque
converter
Type
Stall
torque
ratio
Symmetrica13
element
I
stage
2
phase
torque
converter
2
0
I
Transmission
Type
Control
elements
Multiple
disc
clutch
Band
brake
Multiple
disc
brake
One
way
clutch
Gear
ratio
1st
2nd
3rd
Reverse
3
speed
forward
and
one
speed
reverse
with
planetary
gear
train
2
I
I
I
2
458
1458
1
000
2
182
Selector
positions
P
Park
R
Reverse
N
Neutral
Transmission
is
placed
in
neutral
Output
shaft
is
fIXed
Engine
can
be
started
Backward
running
Transmission
is
in
neutral
Engine
can
be
started
Up
or
downshifts
automatically
to
and
from
I
st
2nd
and
top
Fixed
at
2nd
Fixed
at
low
or
downshifts
from
2nd
o
Drive
2
2nd
lock
I
Lock
up
Oil
pump
Type
Internally
intermeshing
involute
gear
pump
Number
of
pump
Oil
Automatic
transmission
fluid
DEXRON
type
5
5
liters
SUU
s
qt
4Ulmp
qt
Approximately
2
7
liters
2UU
s
qt
2XIrnp
qt
in
torque
converter
Controlled
by
measuring
the
nega
tive
pressure
of
intake
manifold
and
the
revolution
of
output
shaft
Forced
lubrication
by
an
oil
pump
Water
cooled
by
a
circulation
type
auxiliary
cooler
located
at
the
radiator
Capacity
Hydraulic
control
system
Lubrication
system
Cooling
system
AT
59
Page 324 of 537

Specifications
and
adjustment
AfT
Automatic
transmission
assembly
Model
code
number
Torque
converter
assembly
Stamped
mark
on
th
e
TiC
Front
clutch
Number
of
drive
plate
Number
of
driven
plates
Clearance
Thickness
of
retainin
g
plate
Rear
clutch
Number
of
drive
plates
Number
of
driven
plates
Clearance
Thickness
of
retaining
plate
Low
reverse
brake
Number
of
drive
plates
Number
f
driven
pla
es
Clearance
Thickness
of
retaining
plaie
Brake
band
Piston
size
Big
dia
S
all
dia
Control
valve
assembly
Stamped
mark
on
slraine
Governor
assembly
Stamped
mark
on
governor
body
Automatic
Transmission
mOl
in
mm
in
mOl
inJ
mOl
in
mOl
in
mOl
in
mOl
in
AT
60
X2402
16
B
3
3
1
6
to
1
8
0
063
to
0
071
10
6
0
417
10
8
0
42S
11
0
0
433
11
2
0
441
11
4
0
449
11
6
0
4S7
4
4
1
0
to
1
5
0
039
to
0
OS9
4
8
0
189
4
4
0
80
to
1
0S
0
0315
to
0
0413
11
8
0
46S
12
0
0
472
12
2
0
480
12
4
0
488
12
6
0
496
12
8
O
S04
64
2
S2
40
1
57
E
35
Page 325 of 537
Automatic
Transmission
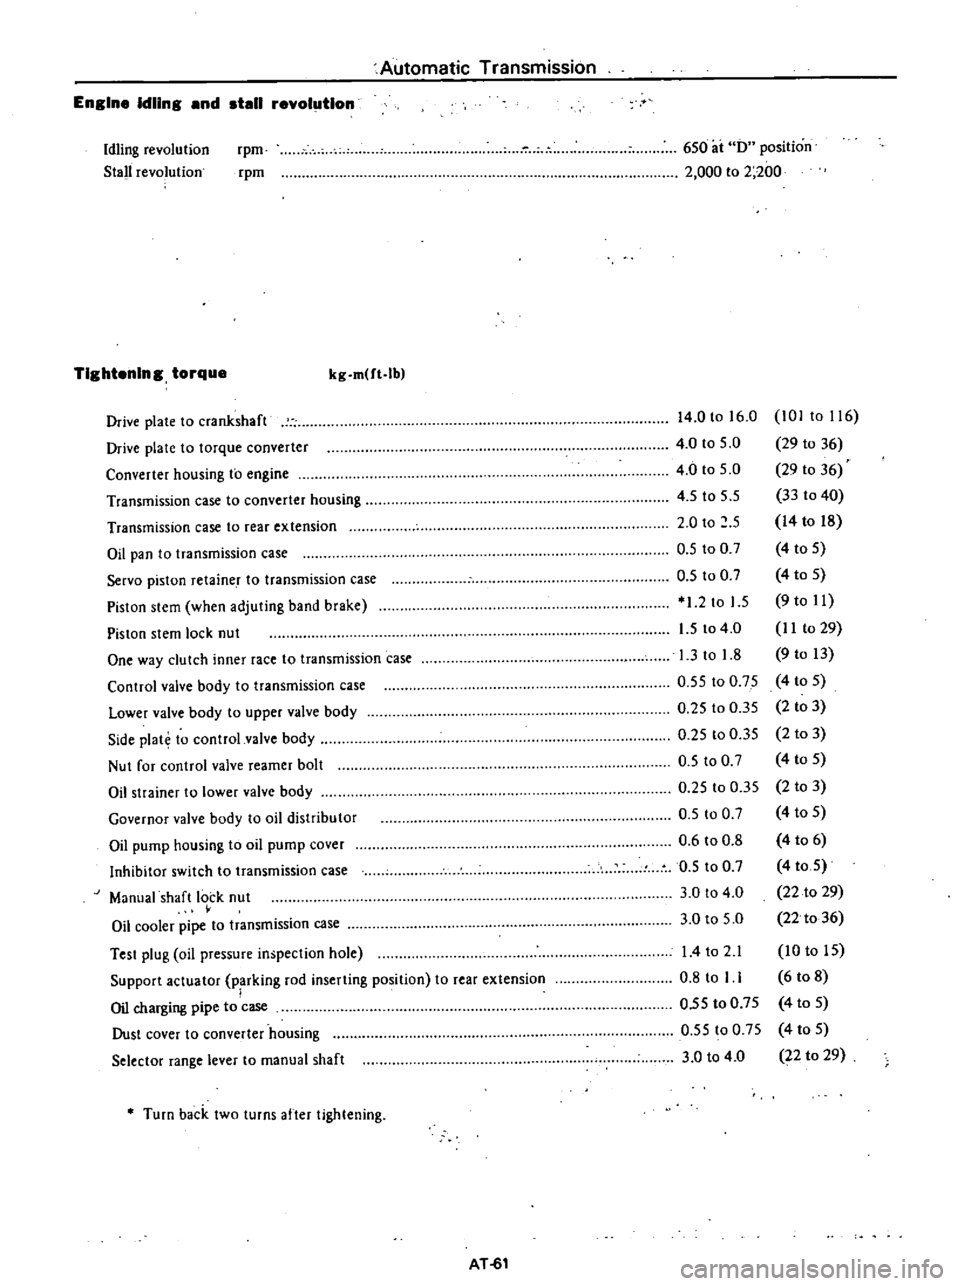
Engine
Idling
and
stall
revolution
Idling
revolution
Stall
revolution
rpm
rpm
6S0
ai
0
position
2
000
to
2
200
TIghtening
torque
kg
m
ft
lb
Drive
plate
to
crankshaft
Drive
plate
to
torque
converter
Converter
housing
to
engine
Transmission
case
to
converter
housing
Transmission
case
to
rear
extension
Oil
pan
to
transmission
case
Servo
piston
retaine
T
to
transmission
case
Pislon
slem
when
adjuting
band
brake
Piston
stem
lock
nut
One
way
clutch
inner
race
to
transmission
case
Control
valve
body
to
transmission
case
Lower
valve
body
to
upper
valve
body
Side
plat
to
control
valve
body
Nut
for
control
valve
reamer
bolt
Oil
strainer
to
lower
valve
body
Governor
valve
body
to
oil
distribu
tor
Oil
pump
housing
to
oil
pump
cover
Inhibitor
switch
to
transmission
case
Manual
shaft
lock
nut
Oil
cooler
pipe
to
transmission
case
Test
plug
oil
pressure
inspection
hole
Support
actuator
parking
rod
inserting
position
to
rear
extension
I
Oil
charging
pipe
to
case
Dust
cover
to
converter
housing
Selector
range
lever
to
manual
shaft
14
0
to
16
0
101
to
116
4
0
to
5
0
29
to
36
4
0
to
S
O
29
10
36
4
S
to
5
5
33
to
40
2
0
to
S
14
to
18
O
S
to
0
7
4
to
S
O
S
to
0
7
4
to
S
1
2
to
1
5
9
to
11
1
5
to
4
0
I
I
to
29
1
3
to
1
8
9
to
13
0
5S
to
0
75
4
to
S
0
25
to
O
3S
2
to
3
0
25
to
0
35
2
to
3
O
S
to
0
7
4
to
S
0
25
to
0
35
2
to
3
D
S
100
7
4
to
5
0
6
to
0
8
4
to
6
0
5
to
0
7
4
toS
3
0
to
4
0
22
to
29
3
0
to
S
O
22
to
36
I
4to
2
1
10
to
IS
0
8
to
I
1
6
to
8
O
5S
to
0
7S
4
to
S
O
5S
to
0
75
4
to
S
3
0
to
4
0
22
to
29
Turn
back
two
turns
after
tightening
AT
61
Page 326 of 537
Automatic
Transmission
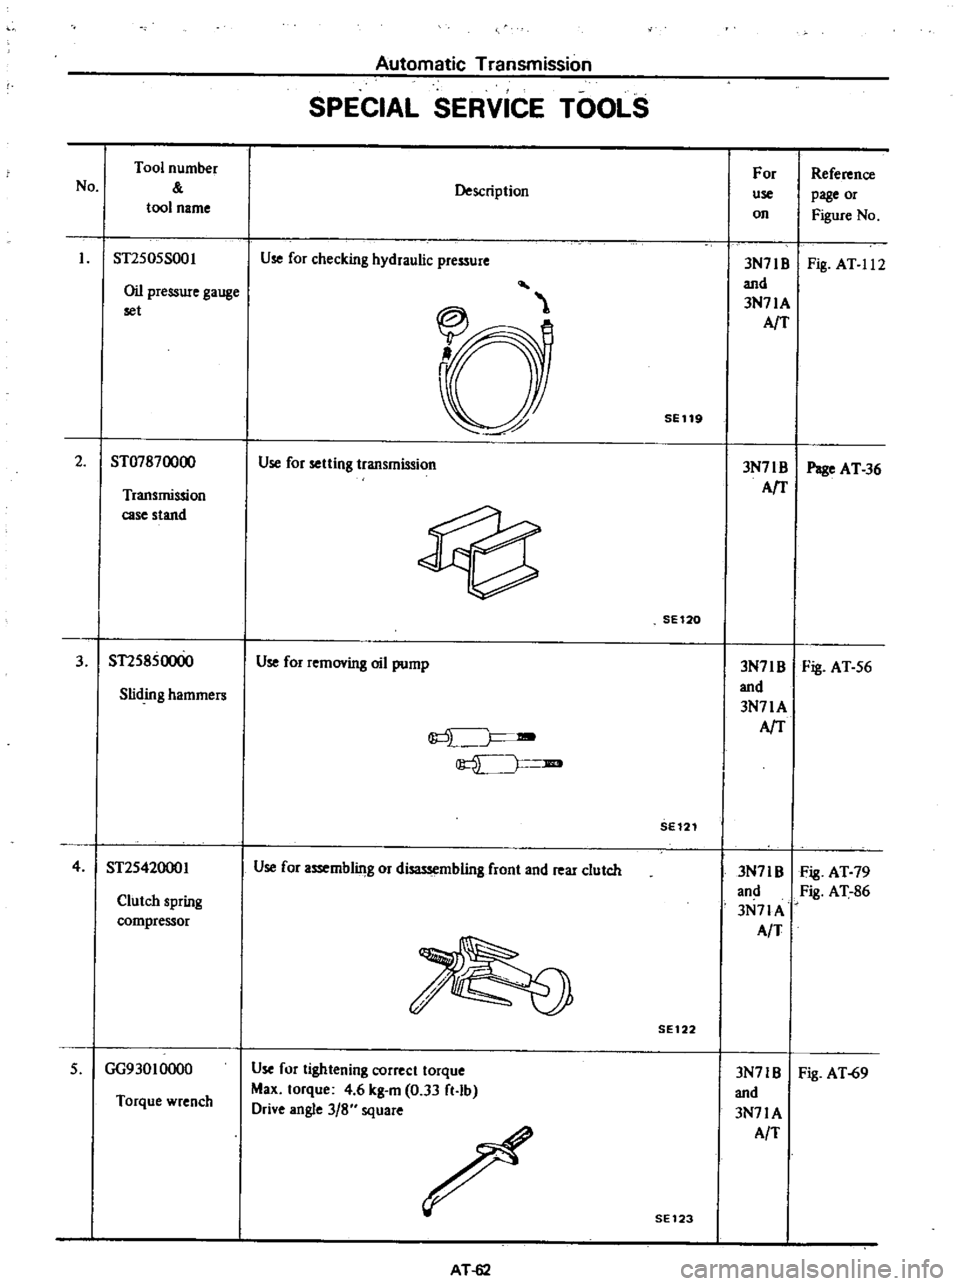
SPECIAL
SERVICE
TOOLS
No
Tool
number
tool
name
Description
For
use
on
Reference
page
or
Figure
No
Oil
pressure
gauge
set
3N71B
Fig
AT
11
2
and
3N71A
AfT
ST2S0SS001
Use
for
checking
hydraulic
pressure
SE119
2
ST07870000
Use
for
setting
transmission
3N71
B
Page
AT
36
AfT
Transmission
case
stand
SE120
3
ST2S850000
Use
for
removing
oil
pump
3N7IB
Fig
AT
S6
and
Sliding
hammers
3N71A
J
AfT
JIB
SE121
4
ST2S42000I
Use
for
assemblilJg
or
disassembling
front
and
rear
clutch
3N71B
Fig
AT
79
and
Fig
AT
86
Clutch
spring
3N7lA
compressor
AIT
SE
122
3N71B
Fig
AT
69
and
3N71A
AlT
Torque
wrench
Use
for
tightening
correct
torque
Max
torque
4
6
kg
m
0
33
ft
lb
Drive
angle
3
8
square
S
GG93010000
SE123
AT
62
Page 327 of 537
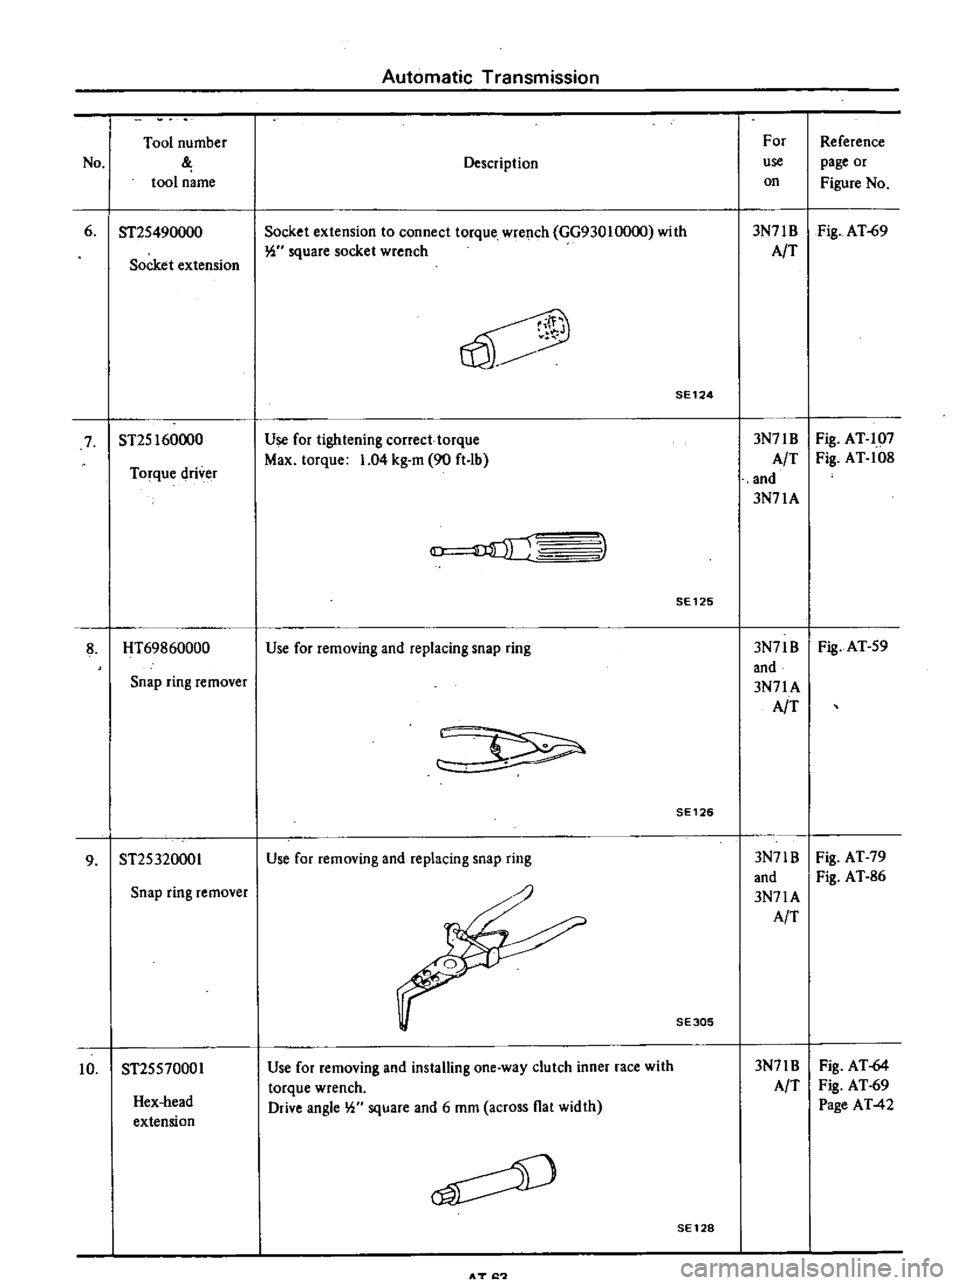
Automatic
Transmission
Tool
number
For
Reference
No
Description
use
page
or
tool
name
on
Figure
No
6
ST2S490000
Socket
extension
to
connect
torque
wrench
GG93010000
with
3N71B
Fig
AT
69
Socket
extension
W
square
socket
wrench
AIT
V
SE124
7
ST2S160000
Use
for
tightening
correct
torque
3N71B
Fig
AT
107
Torque
driver
Max
torque
1
04
kg
m
90
ft
lb
A
T
Fig
AT
108
and
3N71A
3
SE125
8
HT69860000
Use
for
removing
and
replacing
snap
ring
3N71B
Fig
AT
S9
and
Snap
ring
remover
3N71A
AIT
SE126
9
ST2S320001
Use
for
removing
and
replacing
snap
ring
3N71B
Fig
AT
79
and
Fig
AT
86
Snap
ring
remover
3N71A
AIT
SE305
Hex
head
extension
Use
for
removing
and
installing
one
way
clutch
inner
race
with
torque
wrench
Drive
angle
W
square
and
6
mOl
across
flat
width
3N71B
AIT
Fig
AT
64
Fig
AT
69
Page
AT
42
10
ST2SS70001
SE128
AT
I
Page 328 of 537
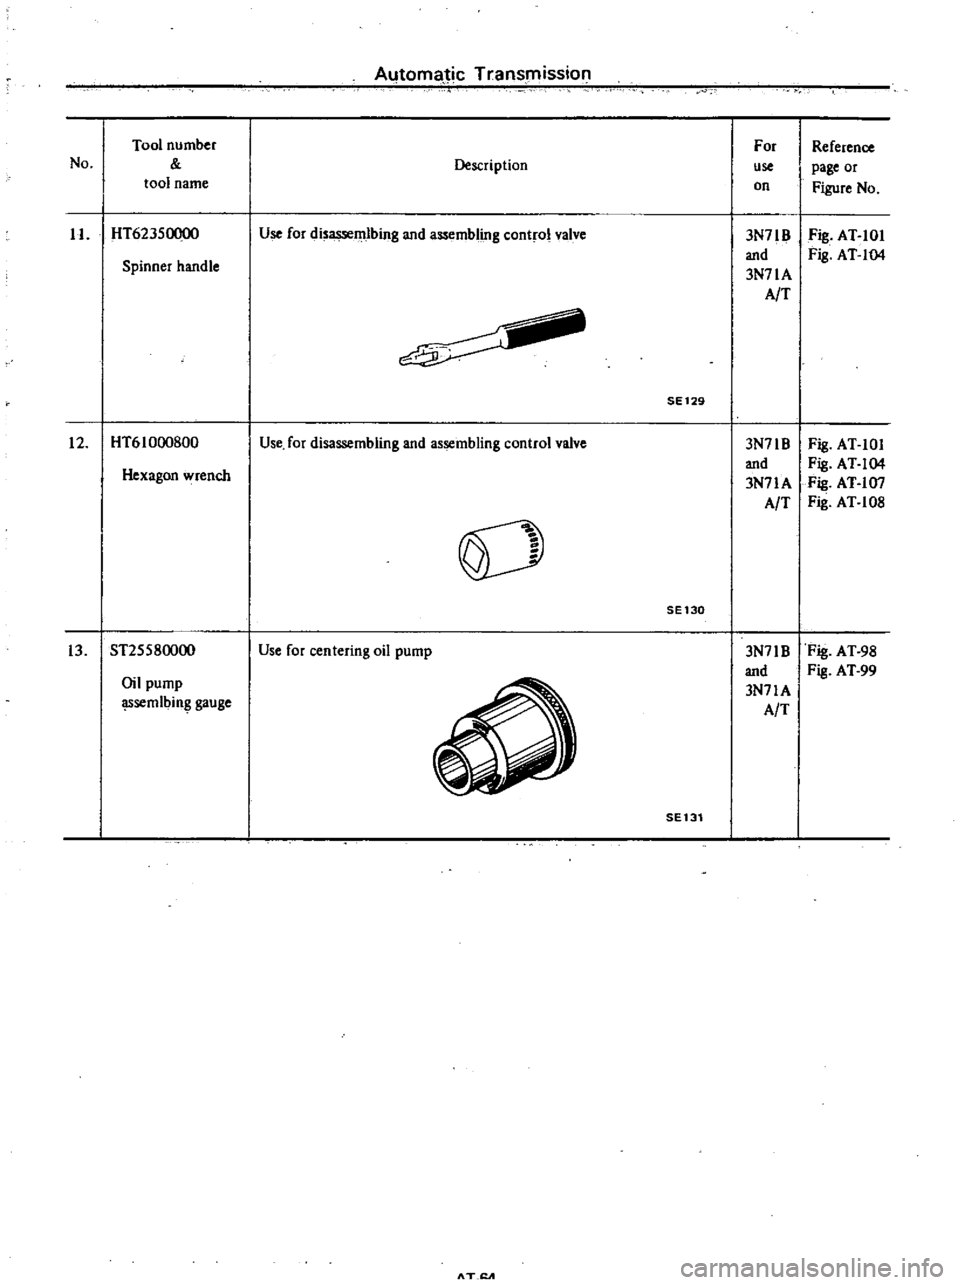
AutomaJic
Transmission
No
Tool
number
tool
name
Description
For
use
on
Reference
page
or
Figure
No
II
HT623S0Q00
Use
for
disassemlbing
and
assembling
control
valve
3N71B
and
3N71A
AIT
Fig
AT
IOI
Fig
AT
I04
Spinner
handle
SE129
12
HT61000800
Use
for
disassembling
and
assembling
control
valve
3N71B
Fig
AT
IOI
and
Fig
AT
104
Hexagon
wrench
3N71A
Fig
AT
I07
AIT
Fili
AT
108
0
SE130
13
ST2SS80000
Use
for
centering
oil
pump
3N71B
Fig
AT
98
and
Fig
A
T
99
Oil
pump
3N71A
l
Ssemlbing
gauge
AIT
SE131
AT
1l
A
Page 329 of 537
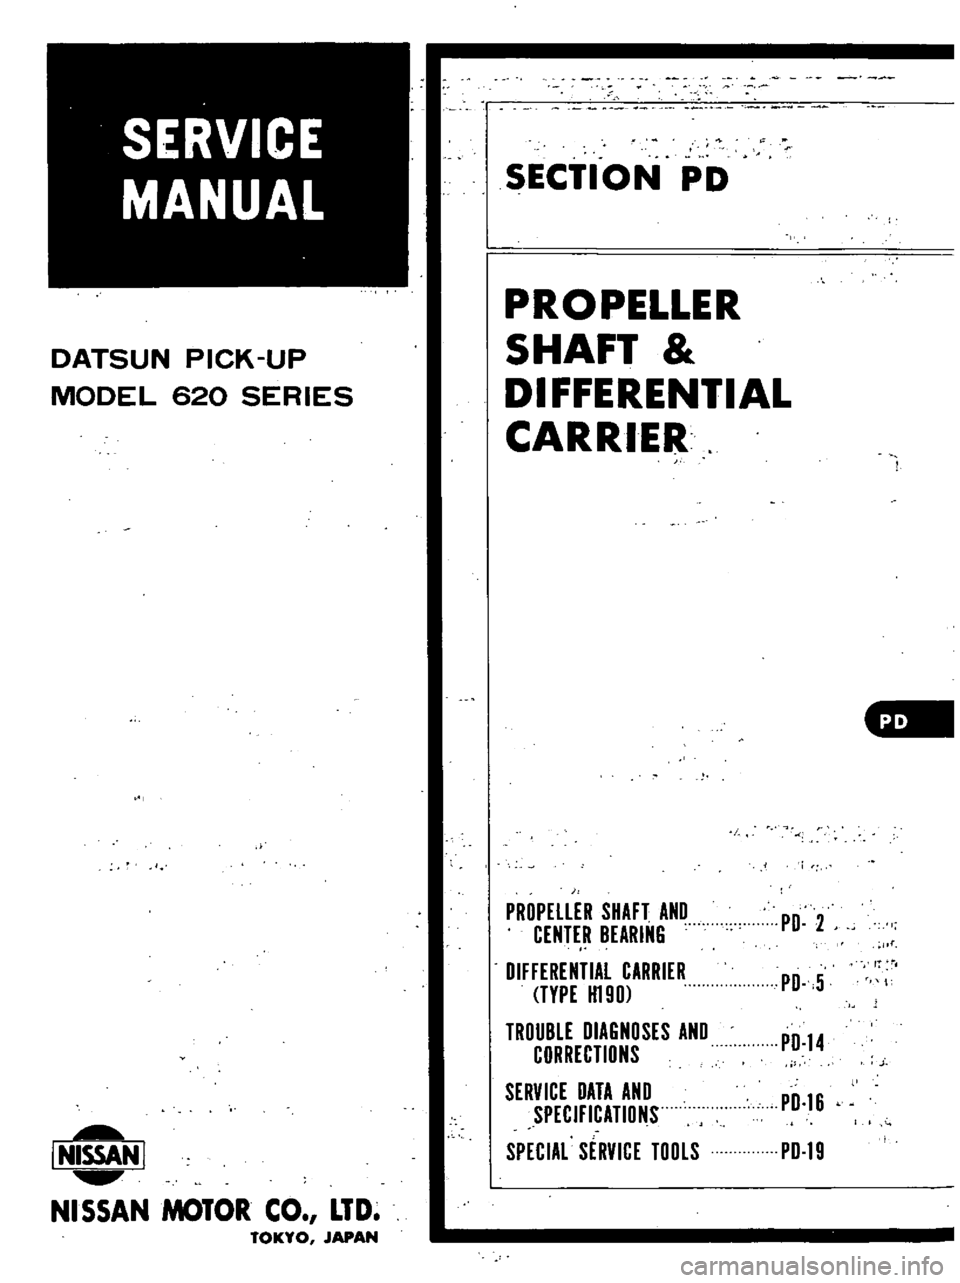
DATSUN
PICK
UP
MODEL
620
SERIES
I
NISSAN
I
NISSAN
MOTOR
CO
LTD
TOKYO
JAPAN
0
SECTION
PD
PROPELLER
SHAFT
DIFFERENTIAL
CARRIER
PROPELLER
SHAFT
AND
CENTER
BEARING
DIFFERENTIAL
CARRIER
TYPE
H19D
TROUBLE
DIAGNOSES
AND
CORRECTIONS
SERVICE
DATA
AND
I
SPECiFiCATIONS
PD
16
SPECIAL
SERVICE
TOOLS
PD
19
PD
2
f
PD
5
PD
14
Page 330 of 537
PROPElLER
SHAFT
DIFFERENTIAL
CARRIER
PROPELLER
SHAFT
AND
CENTER
BEARING
CONTENTS
DESCRIPTION
REMOVAL
AND
INSTALLATION
DISASSEMBLY
AND
ASSEMBLY
INSPECTION
i
t
I
tl
J
I
O
148
5
5
85
PD
2
PD
2
PD
3
PD
3
CHECKING
AND
CORRECTING
UNBALANCED
PROPELLER
SHAFT
SERVICE
DATA
TROUBLE
DIAGNOSES
AND
CORRECTIONS
PD
4
PD
3
PD
4
2
483
19
02
750
29
53
987
38
86
Long
wheelbase
and
Deluxe
cab
models
Unit
mm
in
35
1
38
Front
5
Companion
flange
6
Plain
washer
7
Self
locking
nut
8
Flange
yoke
Rea
1
Sleeve
yoke
assembly
2
Center
bearing
3
Center
bearing
insulator
4
Center
bearing
bracket
DESCRIP
TION
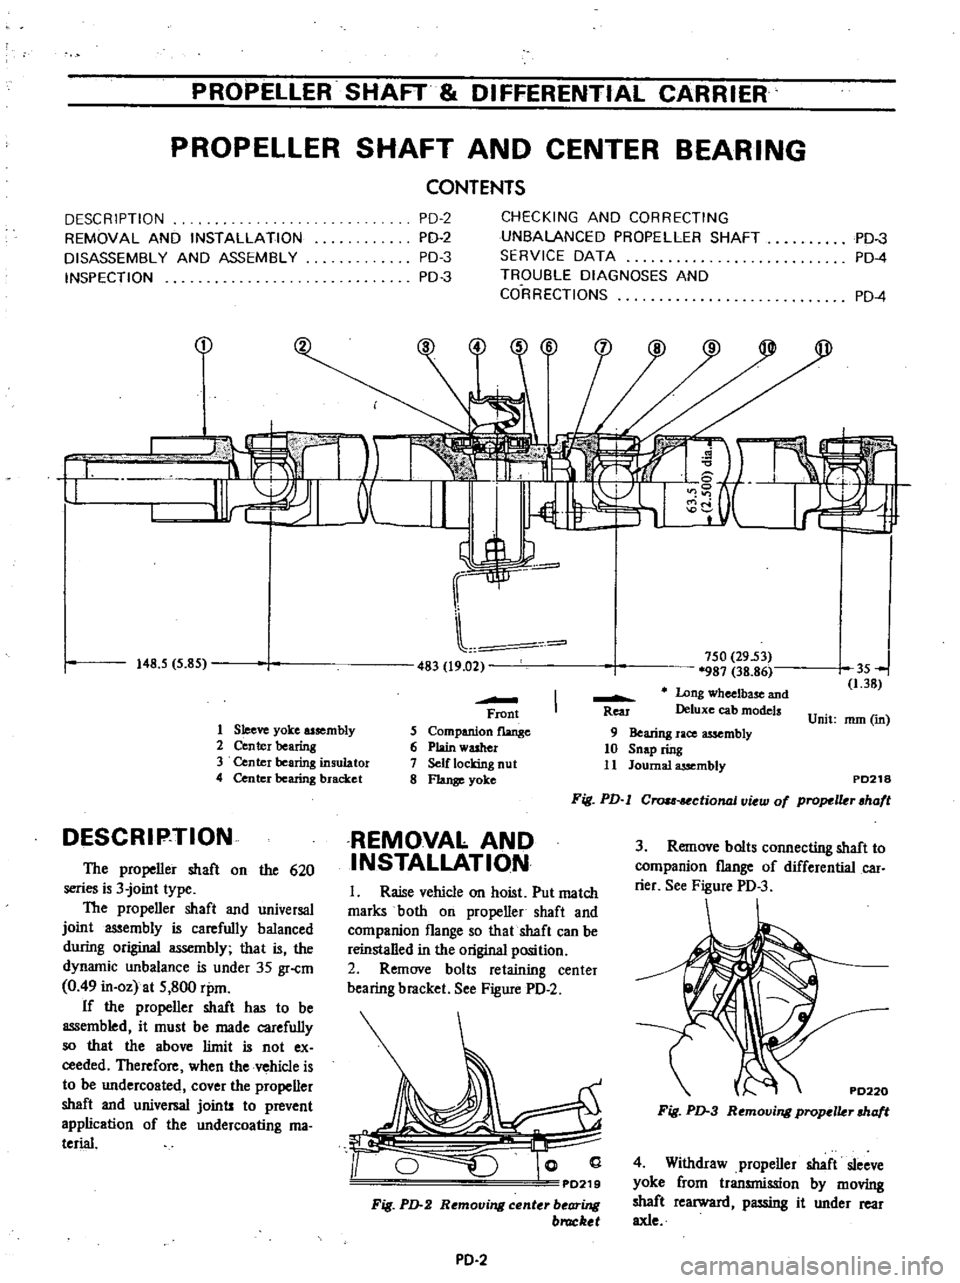
The
propeller
shaft
on
the
620
series
is
3
joint
type
The
propeller
shaft
and
universal
joint
assembly
is
carefully
balanced
during
original
assembly
that
is
the
dynamic
unbalance
is
under
35
gr
cm
0
49
in
oz
at
S
800
rpm
If
the
propeller
shaft
has
to
be
assembled
it
must
be
made
carefully
so
that
the
above
limit
is
not
ex
ceeded
Therefore
when
the
vehicle
is
to
be
undercoated
cover
the
propeller
shaft
and
universal
joints
to
prevent
application
of
the
undercoating
ma
terial
9
Bearing
race
assembly
10
Snap
ring
11
Journal
assembly
PD218
Fig
PD
l
Crou
ctional
v
w
of
propelkr
hafl
REMOVAL
AND
INSTALLATION
3
Remove
bolts
connecting
shaft
to
companion
flange
of
differential
car
rier
See
Figure
PD
3
I
Raise
vehicle
on
hoist
Put
match
marks
both
on
propeller
shaft
and
companion
flange
so
that
shaft
can
be
reinstalled
in
the
original
position
2
Remove
bolts
retaining
center
bearing
bracket
See
Figure
PD
2
PD220
Fig
PD
3
Removing
propclkr
cha
t
PD219
Fig
PD
2
Removing
center
bearing
bruckel
4
Withdraw
propeller
shaft
sleeve
yoke
from
transmission
by
moving
shaft
rearward
passing
it
under
rear
axle
PD
2