display DODGE JOURNEY 2020 Owners Manual
[x] Cancel search | Manufacturer: DODGE, Model Year: 2020, Model line: JOURNEY, Model: DODGE JOURNEY 2020Pages: 396, PDF Size: 25.53 MB
Page 349 of 396
MULTIMEDIA 347
About The Map Pages
Viewing The Map While Navigating
NOTICE
In no event shall Garmin® be liable for any
in
cidental, special, indirect, or consequential
damages, including, without limitation,
damages for any traffic fines or citations,
whether resulting from the use, misuse, or
inability to use the product or from defects in
the product. Some states do not allow the
exclusion of incidental or consequential
damages, so the above limitations may not
apply to you.
Your route is marked with a magenta line.
A checkered flag marks your destination.
As you travel, your navigation system guides you
t o
your destination with voice prompts, arrows
on the map, and directions at the top of the
map. If you depart from the original route, your
navigation system recalculates the route and
provides new directions.
A speed limit icon displaying the current speed
l i
mit may appear as you travel on major
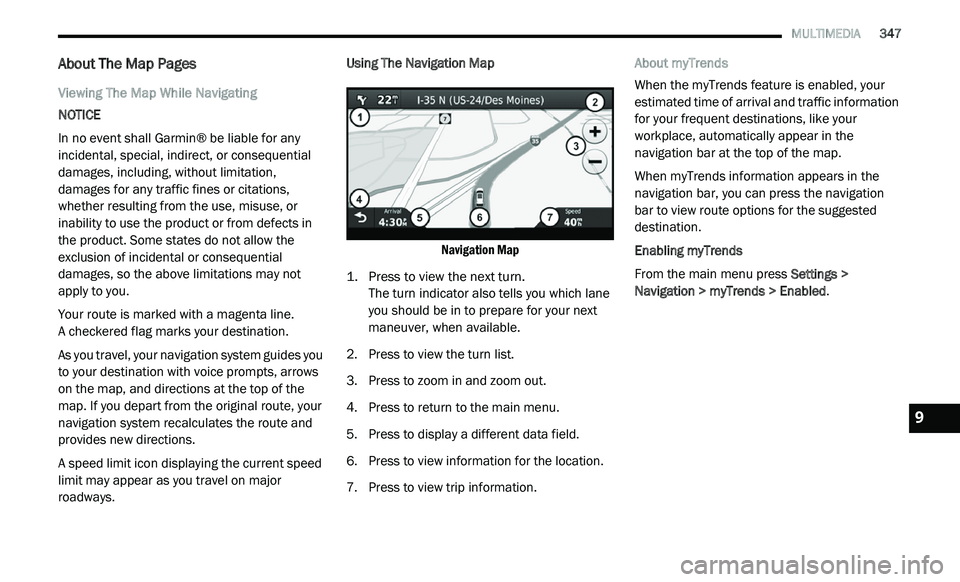
roadways. Using The Navigation Map
Navigation Map
1. P ress to view the next turn.
T
he turn indicator also tells you which lane
y o
u should be in to prepare for your next
maneuver, when available.
2. P ress to view the turn list.
3
. P ress to zoom in and zoom out.
4
. P ress to return to the main menu.
5
. P ress to display a different data field.
6
. P ress to view information for the location.
7
. P ress to view trip information. A
bout myTrends
When the myTrends feature is enabled, your
e s
timated time of arrival and traffic information
for your frequent destinations, like your
workplace, automatically appear in the
navigation bar at the top of the map.
When myTrends information appears in the
na
vigation bar, you can press the navigation
bar to view route options for the suggested
d e
stination.
Enabling myTrends
From the main menu press Se
ttings >
Navigation > myTrends > Enabled .
9
Page 350 of 396
348 MULTIMEDIA
Viewing Trip Information
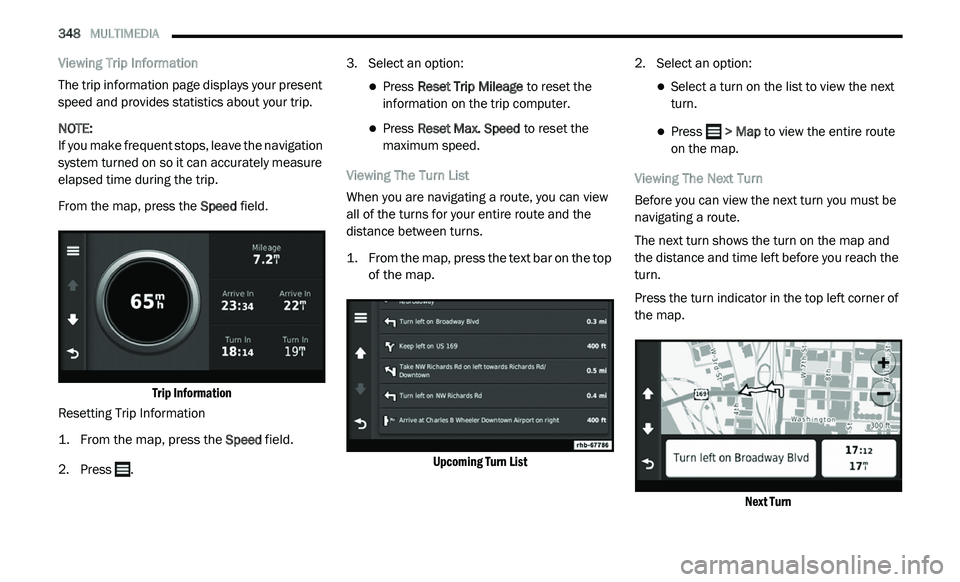
The trip information page displays your present
sp
eed and provides statistics about your trip.
NOTE:
If you make frequent stops, leave the navigation
s y
stem turned on so it can accurately measure
elapsed time during the trip.
From the map, press the Sp
eed field.
Trip Information
Resetting Trip Information
1. Fr om the map, press the
S
peed
field.
2. Press . 3
. S
elect an option:
Press Reset Trip Mileage to reset the
information on the trip computer.
Press Reset Max. Speed to reset the
maximum speed.
Viewing The Turn List
When you are navigating a route, you can view
al
l of the turns for your entire route and the
distance between turns.
1. Fr om the map, press the text bar on the top
o
f the map.
Upcoming Turn List
2. S
elect an option:
Select a turn on the list to view the next
turn.
Press > Map to view the entire route
o
n the map.
Viewing The Next Turn
Before you can view the next turn you must be
n a
vigating a route.
The next turn shows the turn on the map and
t h
e distance and time left before you reach the
turn.
Press the turn indicator in the top left corner of
t h
e map.
Next Turn
Page 351 of 396
MULTIMEDIA 349
Viewing The Junction View
Before you can view the junction view, you must
be
navigating a route.
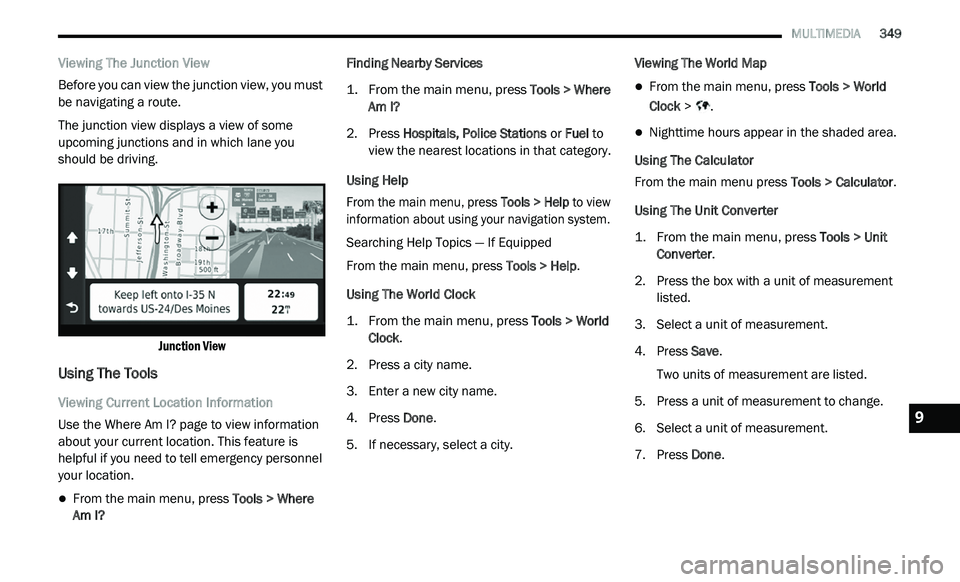
The junction view displays a view of some
u p
coming junctions and in which lane you
should be driving.
Junction View
Using The Tools
Viewing Current Location Information
Use the Where Am I? page to view information
ab
out your current location. This feature is
helpful if you need to tell emergency personnel
your location.
From the main menu, press Tools > Where
Am I? Finding Nearby Services
1. Fr
om the main menu, press
T
ools > Where
Am I?
2. P ress Hospitals, Police Stations
or Fuel to
view the nearest locations in that category.
Using Help
From the main menu, press To
ols > Help to view
information about using your navigation system.
Searching Help Topics — If Equipped
From the main menu, press To
ols > Help.
Using The World Clock
1. From the main menu, press
T
ools > World
Clock
.
2. P ress a city name.
3
. E nter a new city name.
4
. P ress Done .
5
. I f necessary, select a city. V
iewing The World Map
From the main menu, press
Tools > World
Clock > .
Nighttime hours appear in the shaded area.
Using The Calculator
From the main menu press T
o
ols > Calculator.
Using The Unit Converter
1. From the main menu, press
T
ools > Unit
Converter
.
2. P ress the box with a unit of measurement
l
isted.
3. S elect a unit of measurement.
4
. P ress Save .
T
wo units of measurement are listed.
5. Press a unit of measurement to change.
6
. S elect a unit of measurement.
7
. P ress Done .9
Page 353 of 396
MULTIMEDIA 351
Searching For Traffic Delays
1. From the map page press .
2
. P ress Traffic Search to view a list of roads
w
ith traffic delays.
3. P ress an item in the list to view delays on
t
he road.
4. I f there is more than one delay, press the
a
rrows to view additional delays.
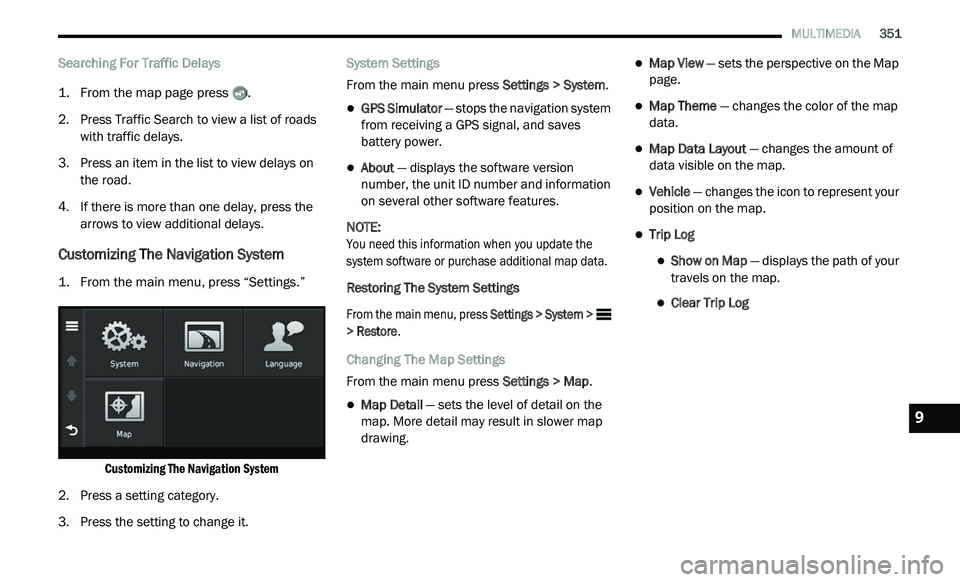
Customizing The Navigation System
1. From the main menu, press “Settings.”
Customizing The Navigation System
2. P ress a setting category.
3
. P ress the setting to change it. S
ystem Settings
From the main menu press Se
ttings > System.
GPS Simulator — stops the navigation system
from receiving a GPS signal, and saves
battery power.
About — displays the software version
number, the unit ID number and information
on several other software features.
NOTE:
You need this information when you update the
s y
stem software or purchase additional map data.
Restoring The System Settings
From the main menu, press Se
ttings > System >
> Restore .
Changing The Map Settings
From the main menu press Se
ttings > Map.
Map Detail — sets the level of detail on the
map. More detail may result in slower map
drawing.
Map View — sets the perspective on the Map
page.
Map Theme — changes the color of the map
data.
Map Data Layout — changes the amount of
data visible on the map.
Vehicle — changes the icon to represent your
position on the map.
Trip Log
Show on Map — displays the path of your
travels on the map.
Clear Trip Log
9
Page 354 of 396
352 MULTIMEDIA
Changing The Map Perspective
1. From the main menu press
S
ettings > Map
> Map View
.
2. S elect an option:
Press Track Up to display the map in two
dimensions (2-D), with your direction of
travel at the top.
Press North Up to display the map in 2-D
with North at the top.
Press 3D to display the map in three
dimensions.
Route Preferences
From the main menu, press Se
ttings >
Navigation > Route Preference .
The route calculation is based on road speeds
a n
d vehicle acceleration data for a given route.
Faster Time — Calculates routes that are
faster to drive but can be longer in distance.
Shorter Distance — Calculates routes that are
shorter in distance but can take more time to
drive.
Prompted — Select the faster time and
shorter distance for your route. Avoiding Road Features
1. Fr
om the main menu press
S
ettings >
Navigation > Avoidances
.
2. S elect the road features to avoid on your
r
outes.
3. P ress “Save.”
A
bout trafficTrends
When the trafficTrends feature is enabled,
your navigation system uses historic traffic
i n
formation to calculate more-efficient routes.
Different routes may be calculated based on
traffic trends for the day of the week or based
on the time of day.
Enabling trafficTrends
1. Fr om the main menu press
S
ettings >
Navigation > trafficTrends
.
2. S elect E
nabled.
Restoring The Original Navigation Settings
From the main menu press Se
ttings >
Navigation > > Restore. Language Settings
From the main menu press
S
e
ttings >
Language .
Voice Personality — sets the language for
voice prompts.
Keyboard — sets the language for your
keyboard.
Keyboard Layout — sets the keyboard layout.
Restoring The Original Language Settings
From the main menu press Settings >
Language > > Restore.
Restoring Original Traffic Settings
From the main menu, press Se
ttings > Traffic >
> Restore .
Restoring All Original Settings
From the main menu, press Se
ttings > >
Restore > Yes .
Page 361 of 396
MULTIMEDIA 359
OR DAMAGES, DIRECT OR INDIRECT, WHICH MAY
RESULT FROM THE USE OR POSSESSION OF THE
GARMIN PRODUCTS; OR FOR ANY LOSS OF PROFIT,
REVENUE, CONTRACTS OR SAVINGS, OR ANY
OTHER DIRECT, INDIRECT, INCIDENTAL, SPECIAL
OR CONSEQUENTIAL DAMAGES ARISING OUT OF
YOUR USE OF OR INABILITY TO USE THE GARMIN
PRODUCTS, ANY DEFECT IN THE CONTENT OR
INFORMATION, OR THE BREACH OF THESE TERMS
OR CONDITIONS, WHETHER IN AN ACTION IN
CONTRACT OR TORT OR BASED ON A WARRANTY
AND WHETHER RESULTING FROM THE USE,
MISUSE, OR INABILITY TO USE THE GARMIN
PRODUCTS OR FROM DEFECTS OR ERRORS IN THE
APPLICATION, EVEN IF GARMIN OR ITS LICENSORS
HAVE BEEN ADVISED OF THE POSSIBILITY OF SUCH
DAMAGES. GARMIN’S AND ITS LICENSORS’ TOTAL
AGGREGATE LIABILITY WITH RESPECT TO ITS
OBLIGATIONS UNDER THIS LICENSE AGREEMENT
OR OTHERWISE WITH RESPECT TO THE
APPLICATION OR THE CONTENT SHALL NOT EXCEED
$1.00. Some States, Territories and Countries do
not allow certain liability exclusions or damages
limitations, so to that extent the above may not
apply to you. If you purchased your Application from
a third party application vendor, THE SOLE AND
MAXIMUM RESPONSIBILITY OF THE APPLICATION VENDOR IN THE EVENT OF A WARRANTY FAILURE IS
A REFUND OF THE APPLICATION PURCHASE PRICE.
ANY CONTENT OR MATERIAL DOWNLOADED OR
U
P
LOADED OR OTHERWISE OBTAINED
THROUGH THE SOFTWARE IS DONE AT YOUR
OWN DISCRETION AND RISK. YOU WILL BE
SOLELY RESPONSIBLE FOR ANY DAMAGE TO
YOUR ELECTRONIC COMMUNICATION DEVICE
OR ANY LOSS OF DATA THAT MAY RESULT
FROM THE DOWNLOAD OR UPLOAD OF ANY
SUCH CONTENT OR MATERIAL OR THE USE OF
THE SOFTWARE.
Predictive Routing
Your device may have a “predictive routing”
f e
ature called myTrends that identifies your
driving routines. If it does have this feature,
when your device predicts a route, it will display
your estimated time to destination and relevant
traffic information regarding the predicted
route. Information related to your driving
routines would be accessible to any other
person who uses your device. If you do not want
your device to predict your routes or display
information related to predicted routes, you
may turn off myTrends by accessing your
device’s Settings menu. Collection of Information
We may collect information relating to how
o f
ten you use the Garmin® Product or the
frequency with which certain applications and
features of the Garmin® Product are used.
This information would be collected
a n
onymously, in a way that does not personally
identify you. We may use this information to
detect broad user trends and to otherwise
enhance our products or applications. The use
of location-based services on the Garmin®
Product, which may include weather, movie
times, traffic information, fuel prices, or
information regarding local events, will cause
the physical location of your device to be
collected in order to provide you with such
location-based services. This location data is
collected anonymously in a form that does not
personally identify you. If you provide your
consent then Garmin® will collect and upload
information such as your location, speed, and
direction (known as “traffic probe data” or
“floating car data”) in order to enhance the
quality of the traffic data and other content
provided by Garmin® or other Content
providers. If you provide your consent, then
Garmin® may also share this data with or sell
this data to third parties. This data is shared
9
Page 365 of 396
MULTIMEDIA 363
Garmin® is a trademark of Garmin® Ltd. or its
subsidiaries, registered in the USA and other
countries. This trademark may not be used
without the express permission of Garmin®.
All other company names and trademarks
m e
ntioned or referenced in this documentation
are the properties of their respective owners. All
rights reserved.
MORE MODE
“More” Main Menu
The More Main Menu consists of the following
options:
Settings
SiriusXM® Travel Link (if equipped)
Refer to the “Navigation Mode” in this
s e
ction for more information.
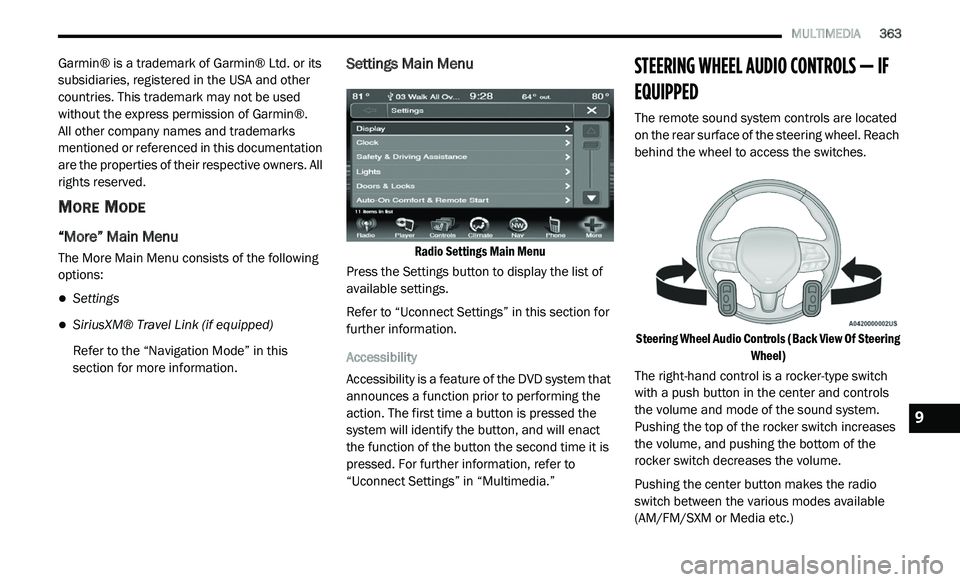
Settings Main Menu
Radio Settings Main Menu
Press the Settings button to display the list of
a v
ailable settings.
Refer to “Uconnect Settings” in this section for
f u
rther information.
Accessibility
Accessibility is a feature of the DVD system that
a n
nounces a function prior to performing the
action. The first time a button is pressed the
system will identify the button, and will enact
the function of the button the second time it is
pressed. For further information, refer to
“Uconnect Settings” in “Multimedia.”
STEERING WHEEL AUDIO CONTROLS — IF
EQUIPPED
The remote sound system controls are located
on the rear surface of the steering wheel. Reach
behind the wheel to access the switches.
Steering Wheel Audio Controls (Back View Of Steering Wh
eel)
The right-hand control is a rocker-type switch
w i
th a push button in the center and controls
the volume and mode of the sound system.
Pushing the top of the rocker switch increases
the volume, and pushing the bottom of the
rocker switch decreases the volume.
Pushing the center button makes the radio
s w
itch between the various modes available
(AM/FM/SXM or Media etc.)
9
Page 367 of 396
MULTIMEDIA 365
UCONNECT MULTIMEDIA — VIDEO
ENTERTAINMENT SYSTEM (VES)
(IF EQUIPPED)
Your rear seat Video Entertainment System
(VES) is designed to give your family years of
enjoyment. You can play your favorite CDs or
DVDs, listen to audio over the wireless
headphones, or plug and play a variety of
standard video games or audio devices. Please
review this Owner's Manual to become familiar
with its features and operation.
NOTE:
The screen is located in the 2nd row overhead
c o
nsole.
GETTING STARTED
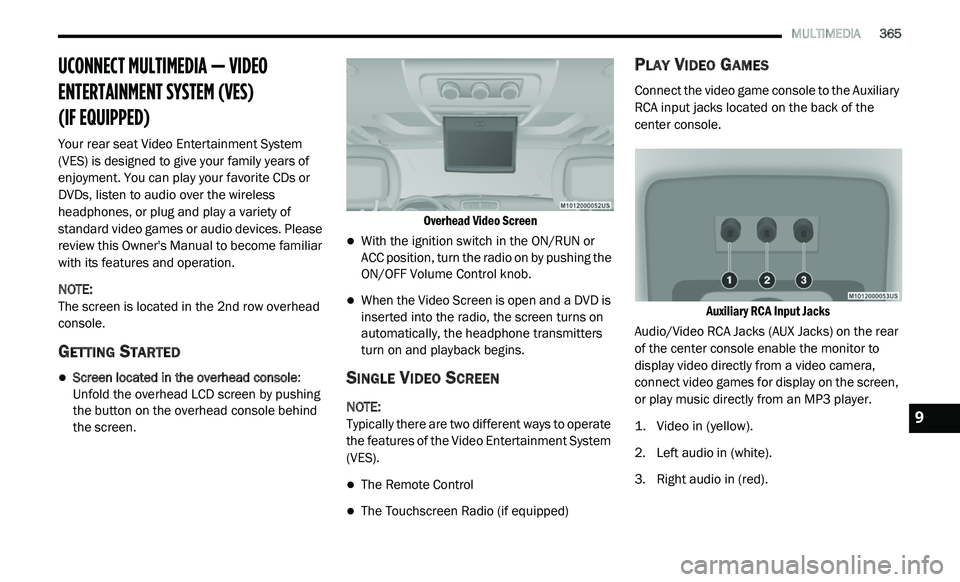
Screen located in the overhead console :
Unfold the overhead LCD screen by pushing
the button on the overhead console behind
the screen.
Overhead Video Screen
With the ignition switch in the ON/RUN or
ACC position, turn the radio on by pushing the
ON/OFF Volume Control knob.
When the Video Screen is open and a DVD is
inserted into the radio, the screen turns on
automatically, the headphone transmitters
turn on and playback begins.
SINGLE VIDEO SCREEN
NOTE:
Typically there are two different ways to operate
t h
e features of the Video Entertainment System
(VES).
The Remote Control
The Touchscreen Radio (if equipped)
PLAY VIDEO GAMES
Connect the video game console to the Auxiliary
RCA input jacks located on the back of the
center console.
Auxiliary RCA Input Jacks
Audio/Video RCA Jacks (AUX Jacks) on the rear
o f
the center console enable the monitor to
display video directly from a video camera,
connect video games for display on the screen,
or play music directly from an MP3 player.
1. V ideo in (yellow).
2
. Le ft audio in (white).
3
. R ight audio in (red).
9
Page 368 of 396
366 MULTIMEDIA
When connecting an external source to the AUX
input, be sure to follow the standard color
coding for the VES jacks:
NOTE:
Certain high-end video games consoles will
ex
ceed the power limit of the vehicle's power
inverter. Refer to the Power Inverter section
within “Internal Equipment” in “Getting To Know
Your Vehicle”.
Ensure the remote control channel selector
s w
itch and headphone switch (IR channel) are
the same number.
Using The Remote Control
1. Push the MODE button on the Remote Control.
2. W hile looking at the video screen, highlight
V
ES AUX 2, by either pushing Up/Down/
Left/Right buttons or by repeatedly pushing
the MODE button, then push ENTER on the
Remote Control.
Using The Touchscreen Radio Controls
1. Press the MORE button on the touchscreen.
2. P ress the Rear Entertainment button on the
t
ouchscreen to display the Rear
Entertainment Controls.
3. I f the Rear Entertainment is turned off,
p
ress the Power button on the touchscreen.
4. P ress the 1 or 2 button on the touchscreen
f
or the channel desired and press the
Source button on the touchscreen to select
the desired mode.
LISTEN TO AN AUDIO SOURCE ON
C
HANNEL 2 WHILE A VIDEO IS PLAYING
O
N CHANNEL 1
Ensure the Remote Control and Headphone
switch is on Channel 2.
Using The Remote Control
1. Push the MODE button on the Remote
Control and the Mode Select Screen will
display, unless a video is playing, then only
a small banner will appear on the bottom
of the screen.
2. W
hile looking at the video screen, either
p
ress Up/Down/Left/Right on the Remote
Control to highlight the desired audio
source or repeatedly push the MODE button
on the remote until the desired audio
source appears on the screen.
Using The Touchscreen Radio Controls
1. Press the MORE button on the touchscreen.
2. P ress the Rear Entertainment button on
t
he touchscreen to display the Rear
E n
tertainment Controls.
3. I f the Rear Entertainment is turned off,
p
ress the Power button on the touchscreen.
4. P ress the 1 or 2 button on the touchscreen
f
or the channel desired and press the
Source button on the touchscreen to select
the desired mode.
Page 369 of 396
MULTIMEDIA 367
PLAY A DVD USING THE TOUCHSCREEN
R
ADIO
Insert the DVD with the label facing up.
The radio automatically selects the appropriate
m o
de after the disc is recognized and displays
the menu screen or starts playing the first track.
Using The Remote Control
1. Push the MODE button on the Remote Control.
2. W hile looking at the Video Screen, highlight
D
ISC by either pushing Up/Down/Left/Right
buttons or by repeatedly pushing the MODE
button, then push ENTER.
NOTE:
The VES system will retain the last setting
when turned off.
Viewing a DVD on the Touchscreen radio
screen is not available in some regions or
locations, the vehicle must be stopped, and
the gear selector must be in the PARK posi -
tion. Refer to local and state laws.
Using The Touchscreen Radio Controls
1. Press the MORE button on the
touchscreen.
2. P ress the Rear Entertainment button on the
t
ouchscreen to display the Rear
Entertainment Controls.
3. I f the Rear Entertainment is turned off,
p
ress the Power button on the touchscreen.
4. P ress the 1 or 2 button on the touchscreen
f
or the channel desired and press the
Source button on the touchscreen to select
the desired mode.
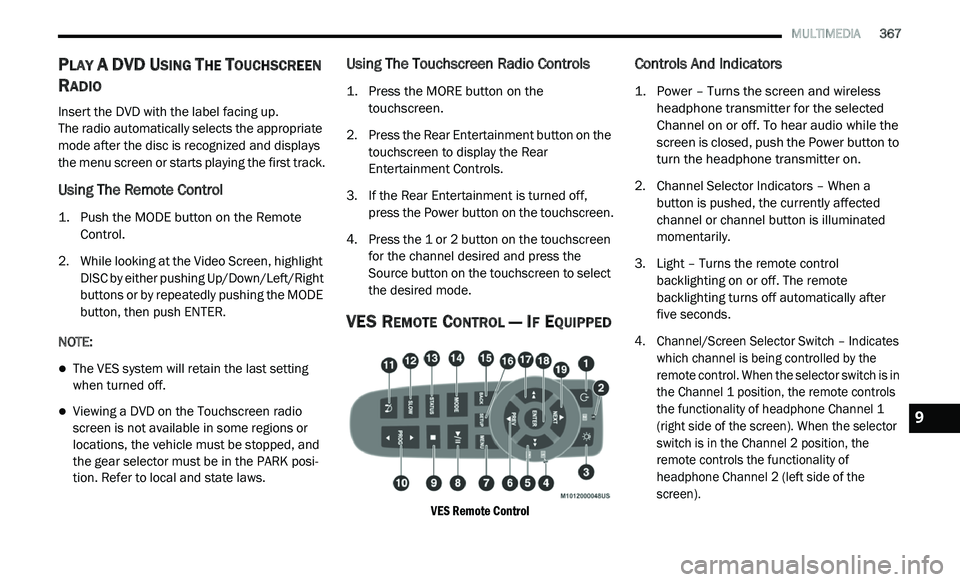
VES REMOTE CONTROL — IF EQUIPPED
VES Remote Control
Controls And Indicators
1. Power – Turns the screen and wireless headphone transmitter for the selected
Channel on or off. To hear audio while the
screen is closed, push the Power button to
turn the headphone transmitter on.
2. C hannel Selector Indicators – When a
b
utton is pushed, the currently affected
channel or channel button is illuminated
momentarily.
3. Light – Turns the remote control b
acklighting on or off. The remote
backlighting turns off automatically after
five seconds.
4. Channel/Screen Selector Switch – Indicates w
hich channel is being controlled by the
remote control. When the selector switch is in
the Channel 1 position, the remote controls
the functionality of headphone Channel 1
(right side of the screen). When the selector
switch is in the Channel 2 position, the
remote controls the functionality of
headphone Channel 2 (left side of the
screen).
9