display DODGE JOURNEY 2020 Workshop Manual
[x] Cancel search | Manufacturer: DODGE, Model Year: 2020, Model line: JOURNEY, Model: DODGE JOURNEY 2020Pages: 396, PDF Size: 25.53 MB
Page 274 of 396
272 MULTIMEDIA
Audio
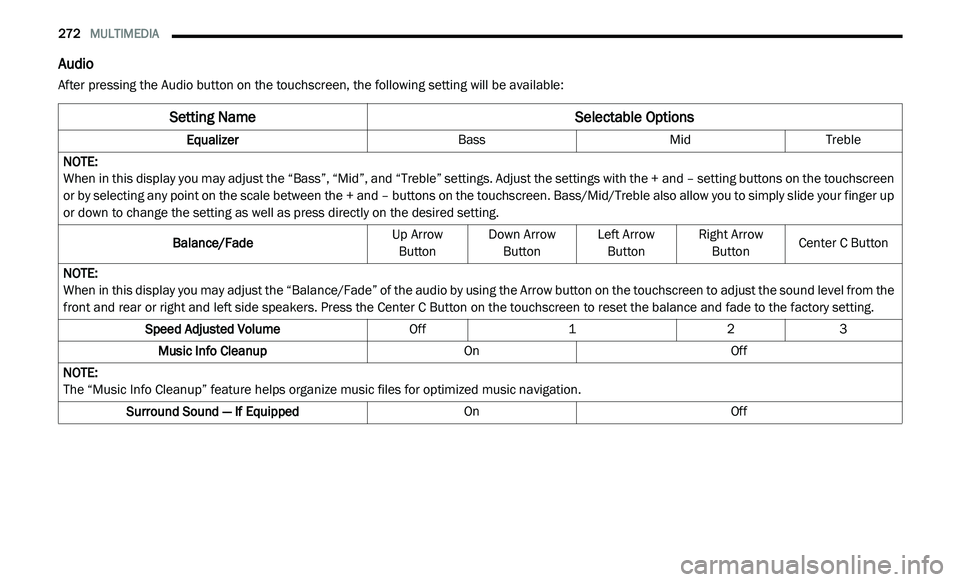
After pressing the Audio button on the touchscreen, the following setting will be available:
Setting Name Selectable Options
EqualizerBassMidTreble
NOTE:
When in this display you may adjust the “Bass”, “Mid”, and “Treble” settings. Adjust the settings with the + and – setting buttons on the touchscreen
o r
by selecting any point on the scale between the + and – buttons on the touchscreen. Bass/Mid/Treble also allow you to simply slide your finger up
or down to change the setting as well as press directly on the desired setting.
Balance/Fade Up Arrow
B u
tton Down Arrow
Bu tton Left Arrow
Bu tton Right Arrow
Bu tton Center C Button
NOTE:
When in this display you may adjust the “Balance/Fade” of the audio by using the Arrow button on the touchscreen to adjust the sound level from the
f r
ont and rear or right and left side speakers. Press the Center C Button on the touchscreen to reset the balance and fade to the factory setting.
Speed Adjusted Volume Off123
Music Info Cleanup OnOff
NOTE:
The “Music Info Cleanup” feature helps organize music files for optimized music navigation.
Surround Sound — If Equipped OnOff
Page 276 of 396
274 MULTIMEDIA
CUSTOMER PROGRAMMABLE FEATURES —
U
CONNECT 3/ 3 NAV SETTINGS
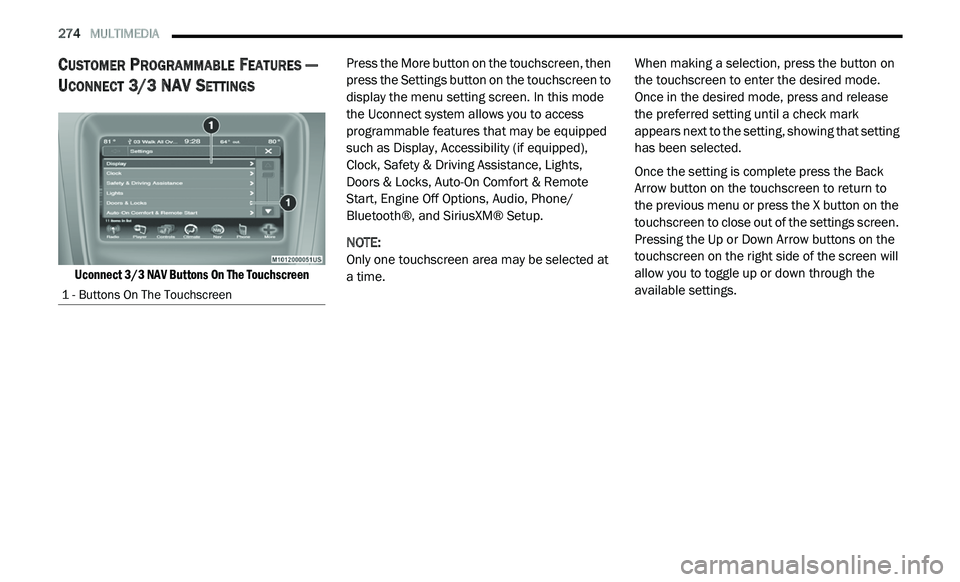
Uconnect 3/3 NAV Buttons On The Touchscreen
Press the More button on the touchscreen, then
p
r
ess the Settings button on the touchscreen to
display the menu setting screen. In this mode
the Uconnect system allows you to access
programmable features that may be equipped
such as Display, Accessibility (if equipped),
Clock, Safety & Driving Assistance, Lights,
Doors & Locks, Auto-On Comfort & Remote
Start, Engine Off Options, Audio, Phone/
Bluetooth®, and SiriusXM® Setup.
NOTE:
Only one touchscreen area may be selected at
a
time. When making a selection, press the button on
t
h
e touchscreen to enter the desired mode.
Once in the desired mode, press and release
the preferred setting until a check mark
appears next to the setting, showing that setting
has been selected.
Once the setting is complete press the Back
A r
row button on the touchscreen to return to
the previous menu or press the X button on the
touchscreen to close out of the settings screen.
Pressing the Up or Down Arrow buttons on the
touchscreen on the right side of the screen will
allow you to toggle up or down through the
available settings.
1 - Buttons On The Touchscreen
Page 277 of 396
MULTIMEDIA 275
Display
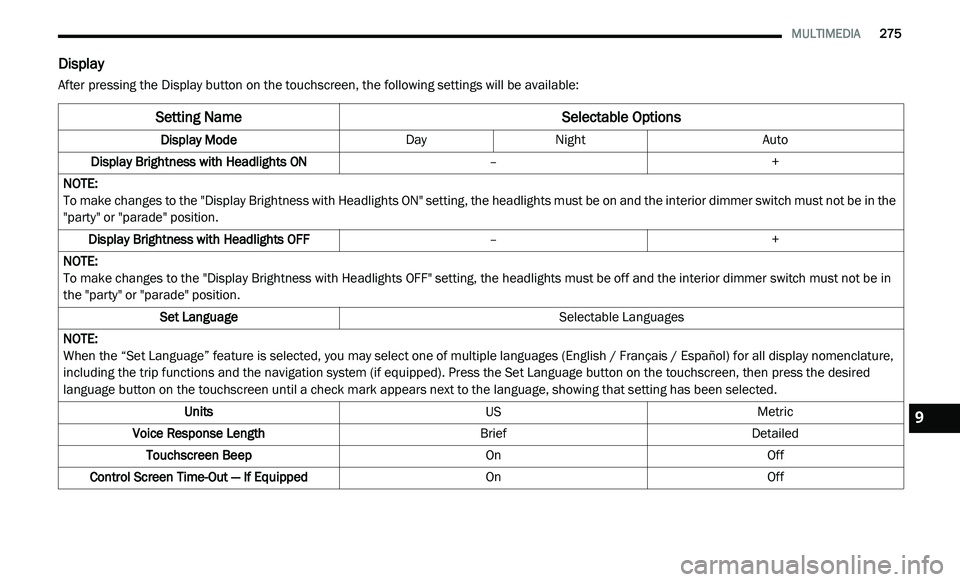
After pressing the Display button on the touchscreen, the following settings will be available:
Setting Name Selectable Options
Display ModeDayNight Auto
Display Brightness with Headlights ON –+
NOTE:
To make changes to the "Display Brightness with Headlights ON" setting, the headlights must be on and the interior dimmer switch must not be in the
" p
arty" or "parade" position.
Display Brightness with Headlights OFF –+
NOTE:
To make changes to the "Display Brightness with Headlights OFF" setting, the headlights must be off and the interior dimmer switch must not be in
th
e "party" or "parade" position.
Set Language Selectable Languages
NOTE:
When the “Set Language” feature is selected, you may select one of multiple languages (English / Français / Español) for all display nomenclature,
in
cluding the trip functions and the navigation system (if equipped). Press the Set Language button on the touchscreen, then press the desired
language button on the touchscreen until a check mark appears next to the language, showing that setting has been selected.
Units USMetric
Voice Response Length BriefDetailed
Touchscreen Beep OnOff
Control Screen Time-Out — If Equipped OnOff
9
Page 278 of 396
276 MULTIMEDIA
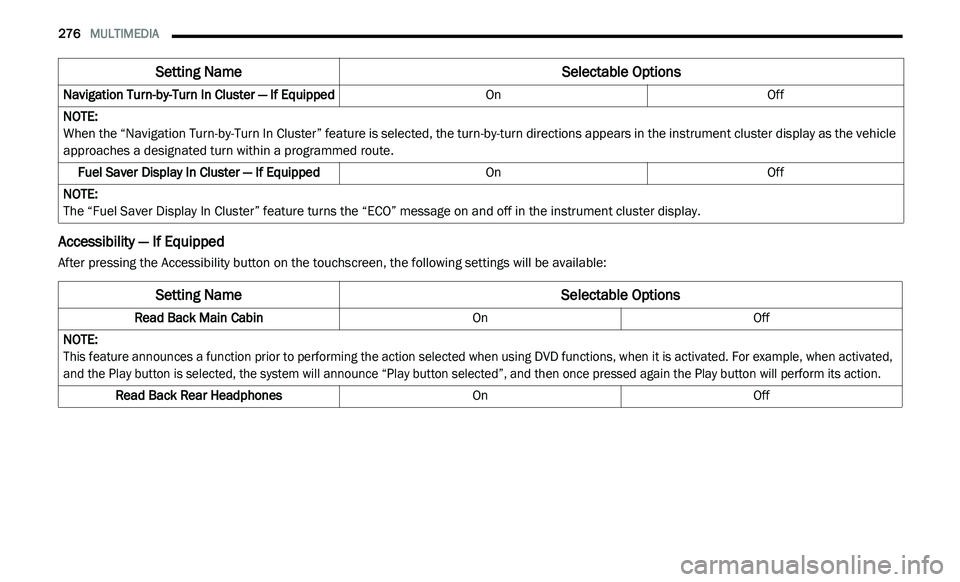
Accessibility — If Equipped
After pressing the Accessibility button on the touchscreen, the following settings will be available:Navigation Turn-by-Turn In Cluster — If Equipped
OnOff
NOTE:
When the “Navigation Turn-by-Turn In Cluster” feature is selected, the turn-by-turn directions appears in the instrument cluster display as the vehicle
a p
proaches a designated turn within a programmed route.
Fuel Saver Display In Cluster — If Equipped OnOff
NOTE:
The “Fuel Saver Display In Cluster” feature turns the “ECO” message on and off in the instrument cluster display.
Setting Name Selectable Options
Setting NameSelectable Options
Read Back Main CabinOnOff
NOTE:
This feature announces a function prior to performing the action selected when using DVD functions, when it is activated. For example, when activated,
a n
d the Play button is selected, the system will announce “Play button selected”, and then once pressed again the Play button will perform its action.
Read Back Rear Headphones OnOff
Page 279 of 396
MULTIMEDIA 277
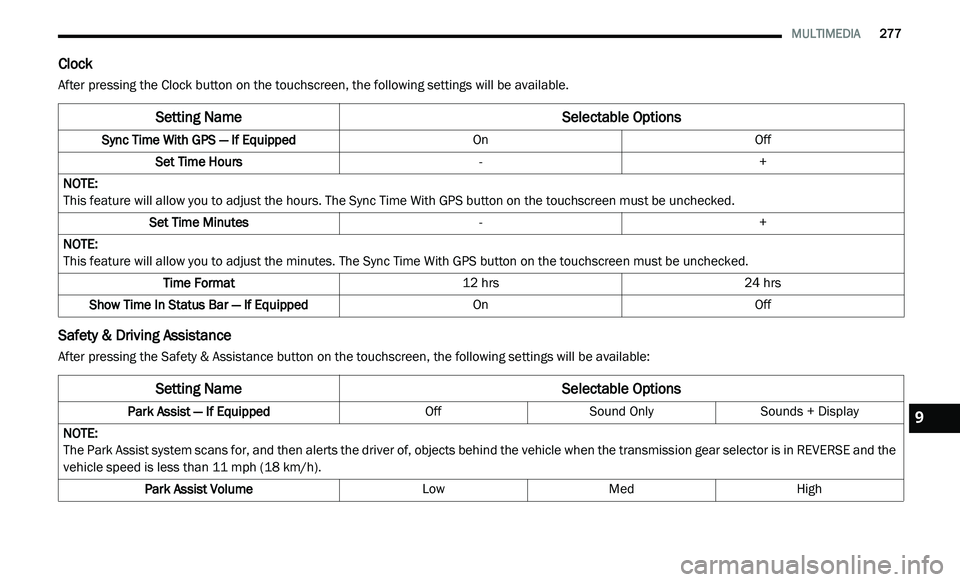
Clock
After pressing the Clock button on the touchscreen, the following settings will be available.
Safety & Driving Assistance
After pressing the Safety & Assistance button on the touchscreen, the following settings will be available:
Setting Name Selectable Options
Sync Time With GPS — If Equipped OnOff
Set Time Hours -+
NOTE:
This feature will allow you to adjust the hours. The Sync Time With GPS button on the touchscreen must be unchecked.
Set Time Minutes -+
NOTE:
This feature will allow you to adjust the minutes. The Sync Time With GPS button on the touchscreen must be unchecked.
Time Format 12 hrs24 hrs
Show Time In Status Bar — If Equipped OnOff
Setting NameSelectable Options
Park Assist — If Equipped OffSound Only Sounds + Display
NOTE:
The Park Assist system scans for, and then alerts the driver of, objects behind the vehicle when the transmission gear selector is in REVERSE and the
v e
hicle speed is less than 11 mph (18 km/h).
Park Assist Volume LowMed High
9
Page 280 of 396
278 MULTIMEDIA
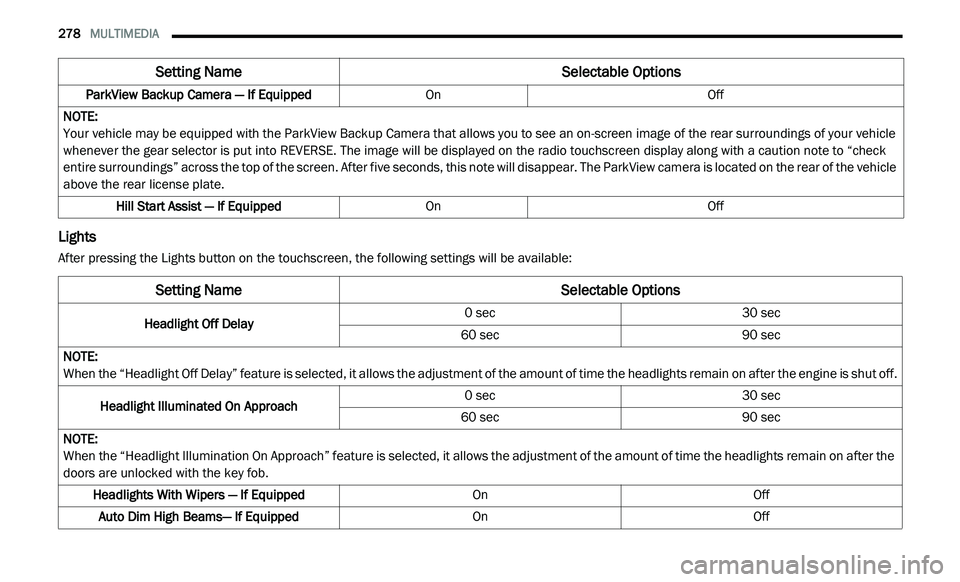
Lights
After pressing the Lights button on the touchscreen, the following settings will be available:ParkView Backup Camera — If Equipped
OnOff
NOTE:
Your vehicle may be equipped with the ParkView Backup Camera that allows you to see an on-screen image of the rear surroundings of your vehicle
w h
enever the gear selector is put into REVERSE. The image will be displayed on the radio touchscreen display along with a caution note to “check
entire surroundings” across the top of the screen. After five seconds, this note will disappear. The ParkView camera is located on the rear of the vehicle
above the rear license plate.
Hill Start Assist — If Equipped OnOff
Setting Name Selectable Options
Setting NameSelectable Options
Headlight Off Delay0 sec
30 sec
60 sec 90 sec
NOTE:
When the “Headlight Off Delay” feature is selected, it allows the adjustment of the amount of time the headlights remain on after the engine is shut off.
Headlight Illuminated On Approach 0 sec
30 sec
60 sec 90 sec
NOTE:
When the “Headlight Illumination On Approach” feature is selected, it allows the adjustment of the amount of time the headlights remain on after the
d o
ors are unlocked with the key fob.
Headlights With Wipers — If Equipped OnOff
Auto Dim High Beams— If Equipped OnOff
Page 284 of 396
282 MULTIMEDIA
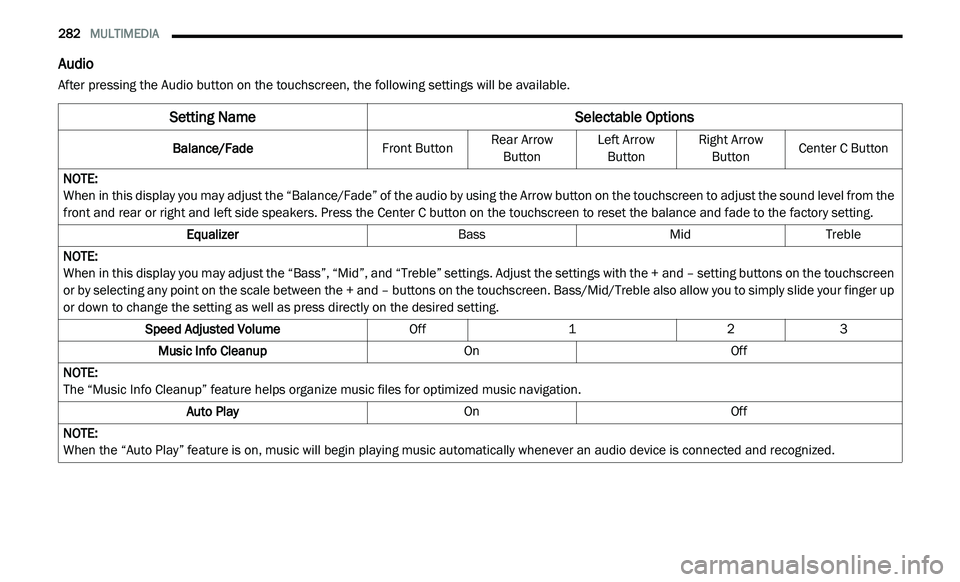
Audio
After pressing the Audio button on the touchscreen, the following settings will be available.
Setting Name Selectable Options
Balance/FadeFront ButtonRear Arrow
Bu
tton Left Arrow
Bu tton Right Arrow
Bu tton Center C Button
NOTE:
When in this display you may adjust the “Balance/Fade” of the audio by using the Arrow button on the touchscreen to adjust the sound level from the
f r
ont and rear or right and left side speakers. Press the Center C button on the touchscreen to reset the balance and fade to the factory setting.
Equalizer BassMidTreble
NOTE:
When in this display you may adjust the “Bass”, “Mid”, and “Treble” settings. Adjust the settings with the + and – setting buttons on the touchscreen
or
by selecting any point on the scale between the + and – buttons on the touchscreen. Bass/Mid/Treble also allow you to simply slide your finger up
or down to change the setting as well as press directly on the desired setting.
Speed Adjusted Volume Off123
Music Info Cleanup OnOff
NOTE:
The “Music Info Cleanup” feature helps organize music files for optimized music navigation.
Auto Play OnOff
NOTE:
When the “Auto Play” feature is on, music will begin playing music automatically whenever an audio device is connected and recognized.
Page 288 of 396
286 MULTIMEDIA
Care And Maintenance
Touchscreen
Do not press the touchscreen with any hard
or sharp objects (pen, USB stick, jewelry,
etc.), which could scratch the touchscreen
surface!
Do not spray any liquid or caustic chemicals
directly on the screen! Use a clean and dry
microfiber lens cleaning cloth in order to
clean the touchscreen.
If necessary, use a lint-free cloth dampened
with a cleaning solution, such as isopropyl
alcohol or an isopropyl alcohol and water
solution ratio of 50:50. Be sure to follow the
solvent manufacturer's precautions and
directions.
RADIO 4.3
INTRODUCTION
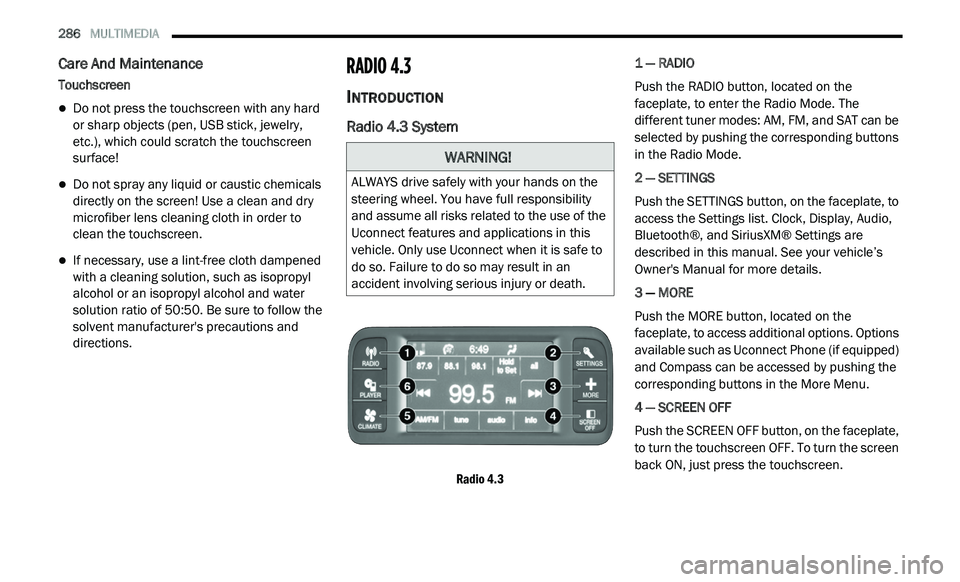
Radio 4.3 System
Radio 4.3
1 — RADIO
Push the RADIO button, located on the
f
a
ceplate, to enter the Radio Mode. The
different tuner modes: AM, FM, and SAT can be
selected by pushing the corresponding buttons
in the Radio Mode.
2 — SETTINGS
Push the SETTINGS button, on the faceplate, to
a c
cess the Settings list. Clock, Display, Audio,
Bluetooth®, and SiriusXM® Settings are
described in this manual. See your vehicle’s
Owner's Manual for more details.
3 — MORE
Push the MORE button, located on the
f a
ceplate, to access additional options. Options
available such as Uconnect Phone (if equipped)
and Compass can be accessed by pushing the
corresponding buttons in the More Menu.
4 — SCREEN OFF
Push the SCREEN OFF button, on the faceplate,
t o
turn the touchscreen OFF. To turn the screen
back ON, just press the touchscreen.
WARNING!
ALWAYS drive safely with your hands on the
steering wheel. You have full responsibility
and assume all risks related to the use of the
Uconnect features and applications in this
vehicle. Only use Uconnect when it is safe to
do so. Failure to do so may result in an
accident involving serious injury or death.
Page 289 of 396
MULTIMEDIA 287
5 — CLIMATE
Push the CLIMATE Control button on the
fa
ceplate to access climate controls. Refer to
“Climate Controls” in “Getting To Know Your
Vehicle” for more information.
6 — PLAYER
Push the PLAYER button, located on the
f a
ceplate, to access media sources such as
Disc, USB Device, and AUX as long as the
requested media is present.
RADIO MODE
Overview
The radio is equipped with the following modes:
FM
AM
SAT SiriusXM® Satellite Radio (if equipped)
Press the RADIO button, upper left corner, to
e n
ter the Radio Mode. The different tuner
modes; AM, FM, and SAT, can then be selected
by pressing the corresponding buttons on the
touchscreen.
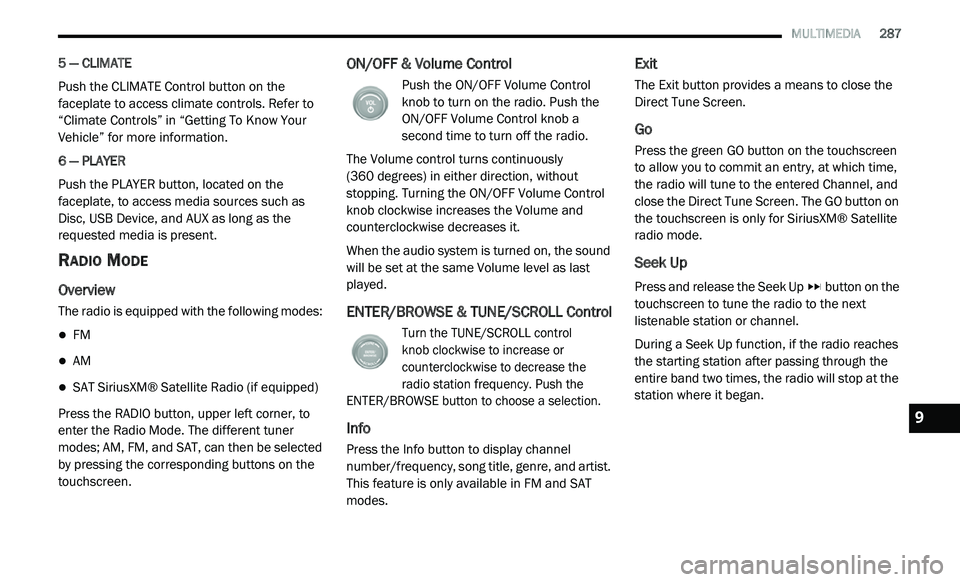
ON/OFF & Volume Control
Push the ON/OFF Volume Control
knob to turn on the radio. Push the
O N
/OFF Volume Control knob a
second time to turn off the radio.
The Volume control turns continuously
(360 degrees) in either direction, without
s t
opping. Turning the ON/OFF Volume Control
knob clockwise increases the Volume and
counterclockwise decreases it.
When the audio system is turned on, the sound
w i
ll be set at the same Volume level as last
played.
ENTER/BROWSE & TUNE/SCROLL Control
Turn the TUNE/SCROLL control
knob clockwise to increase or
c o
unterclockwise to decrease the
radio station frequency. Push the
ENTER/BROWSE button to choose a selection.
Info
Press the Info button to display channel
number/frequency, song title, genre, and artist.
This feature is only available in FM and SAT
modes.
Exit
The Exit button provides a means to close the
Direct Tune Screen.
Go
Press the green GO button on the touchscreen
to allow you to commit an entry, at which time,
the radio will tune to the entered Channel, and
close the Direct Tune Screen. The GO button on
the touchscreen is only for SiriusXM® Satellite
radio mode.
Seek Up
Press and release the Seek Up button on the
touchscreen to tune the radio to the next
l i
stenable station or channel.
During a Seek Up function, if the radio reaches
t h
e starting station after passing through the
entire band two times, the radio will stop at the
station where it began.
9
Page 292 of 396
290 MULTIMEDIA
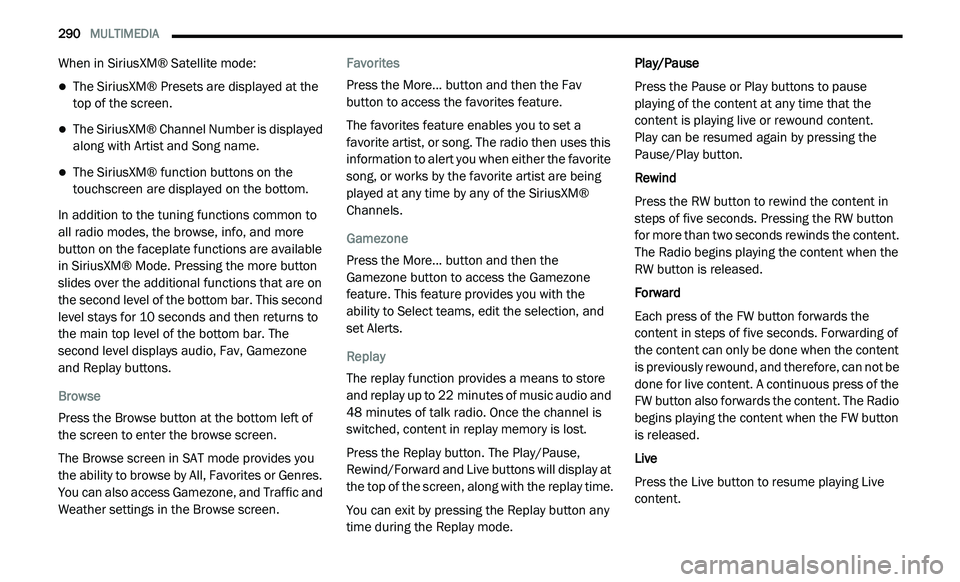
When in SiriusXM® Satellite mode:
The SiriusXM® Presets are displayed at the
top of the screen.
The SiriusXM® Channel Number is displayed
along with Artist and Song name.
The SiriusXM® function buttons on the
touchscreen are displayed on the bottom.
In addition to the tuning functions common to
a l
l radio modes, the browse, info, and more
button on the faceplate functions are available
in SiriusXM® Mode. Pressing the more button
slides over the additional functions that are on
the second level of the bottom bar. This second
level stays for 10 seconds and then returns to
the main top level of the bottom bar. The
second level displays audio, Fav, Gamezone
and Replay buttons.
Browse
Press the Browse button at the bottom left of
t h
e screen to enter the browse screen.
The Browse screen in SAT mode provides you
t h
e ability to browse by All, Favorites or Genres.
You can also access Gamezone, and Traffic and
Weather settings in the Browse screen. Favorites
Press the More... button and then the Fav
b
u
tton to access the favorites feature.
The favorites feature enables you to set a
f a
vorite artist, or song. The radio then uses this
information to alert you when either the favorite
song, or works by the favorite artist are being
played at any time by any of the SiriusXM®
Channels.
Gamezone
Press the More... button and then the
G a
mezone button to access the Gamezone
feature. This feature provides you with the
ability to Select teams, edit the selection, and
set Alerts.
Replay
The replay function provides a means to store
a n
d replay up to 22 minutes of music audio and
4 8
minutes of talk radio. Once the channel is
s w
itched, content in replay memory is lost.
Press the Replay button. The Play/Pause,
R e
wind/Forward and Live buttons will display at
the top of the screen, along with the replay time.
You can exit by pressing the Replay button any
t i
me during the Replay mode. Play/Pause
Press the Pause or Play buttons to pause
p
l
aying of the content at any time that the
content is playing live or rewound content.
Play can be resumed again by pressing the
P a
use/Play button.
Rewind
Press the RW button to rewind the content in
st
eps of five seconds. Pressing the RW button
for more than two seconds rewinds the content.
The Radio begins playing the content when the
RW button is released.
Forward
Each press of the FW button forwards the
c o
ntent in steps of five seconds. Forwarding of
the content can only be done when the content
is previously rewound, and therefore, can not be
done for live content. A continuous press of the
FW button also forwards the content. The Radio
begins playing the content when the FW button
is released.
Live
Press the Live button to resume playing Live
c o
ntent.