DODGE RAM 2001 Service Repair Manual
Manufacturer: DODGE, Model Year: 2001, Model line: RAM, Model: DODGE RAM 2001Pages: 2889, PDF Size: 68.07 MB
Page 2641 of 2889
(15) Install outer belt weatherstrip (Refer to 23 -
BODY/WEATHERSTRIP/SEALS/FDR OUTER BELT
WEATHERSTRIP - INSTALLATION).
(16) Install glass run weatherstrip (Refer to 23 -
BODY/WEATHERSTRIP/SEALS/FDR GLASS RUN
WEATHERSTRIP - INSTALLATION).
DOOR
REMOVAL
(1) Remove cowl trim panel (Refer to 23 - BODY/
INTERIOR/COWL TRIM COVER - REMOVAL).
(2) Disengage door wire harness connector of
instrument panel harness and push door harness
through access hole in pillar.
(3) Remove hidden bolts attaching door hinge to
hinge pillar from behind cowl panel (Fig. 2).
(4) Using a grease pencil or equivalent, mark the
outline of the door hinges on the hinge pillar to aid
installation.
(5) Support door on a suitable lifting device.
(6) Remove bolts attaching lower door hinge to
hinge pillar (Fig. 3).
(7) While holding door steady on lift, remove bolts
attaching upper door hinge to hinge pillar.
(8) Separate door from vehicle.
INSTALLATION
(1) While holding door steady on lift, position door
at A-pillar.(2) Align hinges using reference marks.
(3) Install bolts attaching upper door hinge to
hinge pillar.
(4) Install bolts attaching lower door hinge to
hinge pillar (Fig. 3).
(5) Install hidden bolts attaching door hinge to
hinge pillar from behind cowl panel (Fig. 2).
(6) Align door to achieve equal spacing on all sides
and flush across the gaps.
(7) Tighten hinge bolts to 28 N´m (21 ft. lbs.)
torque.
(8) Route harness through door and engage door
wire harness connector.
(9) Install cowl trim panel (Refer to 23 - BODY/IN-
TERIOR/COWL TRIM COVER - INSTALLATION).
ADJUSTMENT ± FRONT DOOR FORE/AFT
Fore/aft (lateral) door adjustment is done by loos-
ening the hinge to cowl screws one hinge at a time.
Then move the door to the correct position.
(1) Support the door with a padded floor jack.
(2) Loosen the hinge to cowl screws, if necessary,
refer to the front door hinge removal/installation pro-
cedure for hinge fastener location. Move the door to
the correct fore/aft position.
(3) Tighten the hinge to cowl screws.
(4) Remove the floor jack from the door.
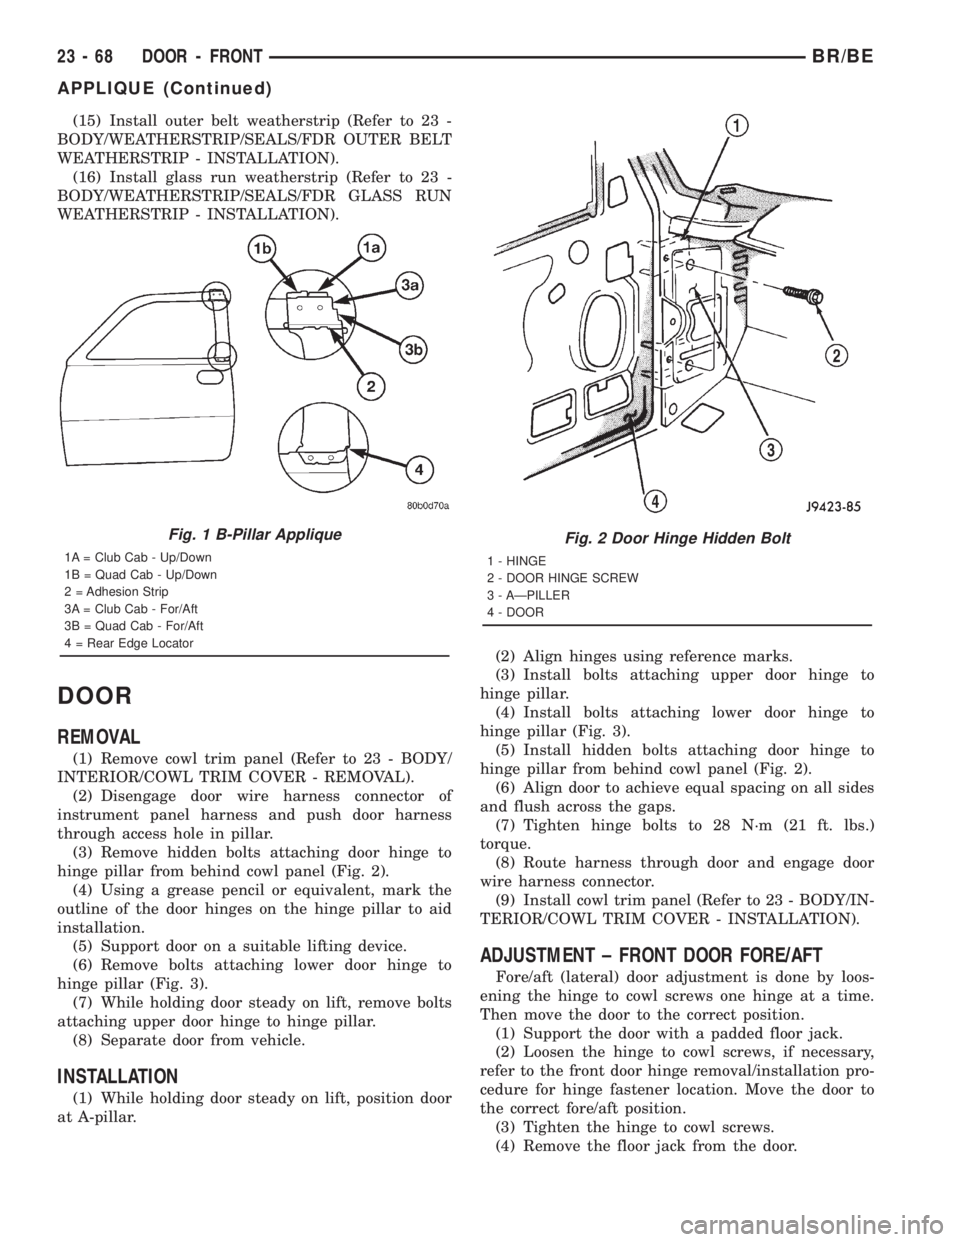
Fig. 1 B-Pillar Applique
1A = Club Cab - Up/Down
1B = Quad Cab - Up/Down
2 = Adhesion Strip
3A = Club Cab - For/Aft
3B = Quad Cab - For/Aft
4 = Rear Edge Locator
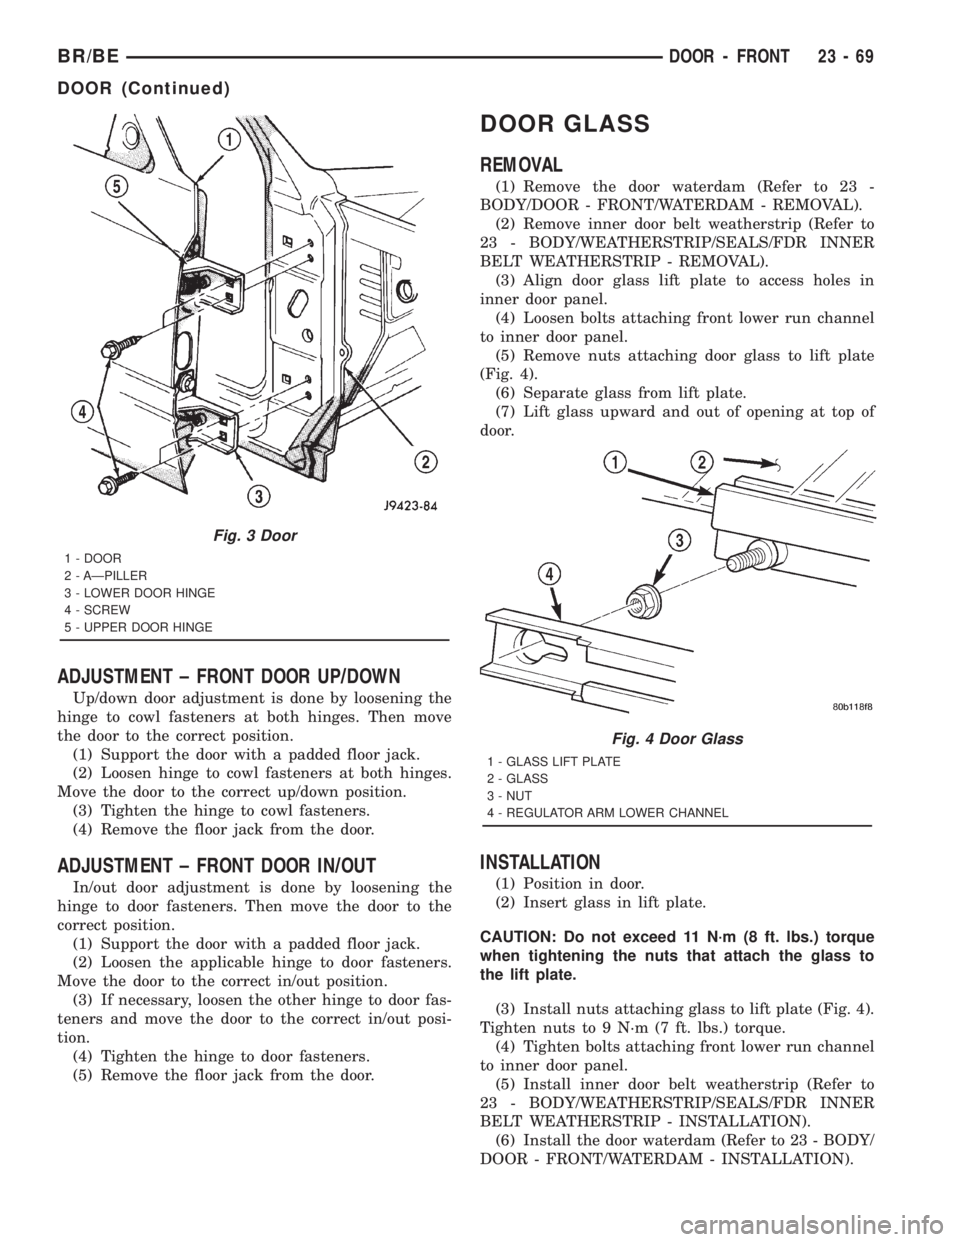
Fig. 2 Door Hinge Hidden Bolt
1 - HINGE
2 - DOOR HINGE SCREW
3 - AÐPILLER
4 - DOOR
23 - 68 DOOR - FRONTBR/BE
APPLIQUE (Continued)
Page 2642 of 2889
ADJUSTMENT ± FRONT DOOR UP/DOWN
Up/down door adjustment is done by loosening the
hinge to cowl fasteners at both hinges. Then move
the door to the correct position.
(1) Support the door with a padded floor jack.
(2) Loosen hinge to cowl fasteners at both hinges.
Move the door to the correct up/down position.
(3) Tighten the hinge to cowl fasteners.
(4) Remove the floor jack from the door.
ADJUSTMENT ± FRONT DOOR IN/OUT
In/out door adjustment is done by loosening the
hinge to door fasteners. Then move the door to the
correct position.
(1) Support the door with a padded floor jack.
(2) Loosen the applicable hinge to door fasteners.
Move the door to the correct in/out position.
(3) If necessary, loosen the other hinge to door fas-
teners and move the door to the correct in/out posi-
tion.
(4) Tighten the hinge to door fasteners.
(5) Remove the floor jack from the door.
DOOR GLASS
REMOVAL
(1) Remove the door waterdam (Refer to 23 -
BODY/DOOR - FRONT/WATERDAM - REMOVAL).
(2) Remove inner door belt weatherstrip (Refer to
23 - BODY/WEATHERSTRIP/SEALS/FDR INNER
BELT WEATHERSTRIP - REMOVAL).
(3) Align door glass lift plate to access holes in
inner door panel.
(4) Loosen bolts attaching front lower run channel
to inner door panel.
(5) Remove nuts attaching door glass to lift plate
(Fig. 4).
(6) Separate glass from lift plate.
(7) Lift glass upward and out of opening at top of
door.
INSTALLATION
(1) Position in door.
(2) Insert glass in lift plate.
CAUTION: Do not exceed 11 N´m (8 ft. lbs.) torque
when tightening the nuts that attach the glass to
the lift plate.
(3) Install nuts attaching glass to lift plate (Fig. 4).
Tighten nuts to 9 N´m (7 ft. lbs.) torque.
(4) Tighten bolts attaching front lower run channel
to inner door panel.
(5) Install inner door belt weatherstrip (Refer to
23 - BODY/WEATHERSTRIP/SEALS/FDR INNER
BELT WEATHERSTRIP - INSTALLATION).
(6) Install the door waterdam (Refer to 23 - BODY/
DOOR - FRONT/WATERDAM - INSTALLATION).
Fig. 3 Door
1 - DOOR
2 - AÐPILLER
3 - LOWER DOOR HINGE
4 - SCREW
5 - UPPER DOOR HINGE
Fig. 4 Door Glass
1 - GLASS LIFT PLATE
2 - GLASS
3 - NUT
4 - REGULATOR ARM LOWER CHANNEL
BR/BEDOOR - FRONT 23 - 69
DOOR (Continued)
Page 2643 of 2889
EXTERIOR HANDLE
REMOVAL
(1) Remove the waterdam (Refer to 23 - BODY/
DOOR - FRONT/WATERDAM - REMOVAL).
(2) Raise the window to the closed position.
(3) Remove fastener access plug from door end
panel.
(4) Disengage clips holding latch and lock rods to
door latch.
(5) Separate latch and lock rods from door latch.
(6) Remove nuts attaching outside door handle to
door (Fig. 5).
(7) Separate outside door handle from door.
INSTALLATION
(1) Position outside door handle in door.
(2) Install nuts attaching outside door handle to
door.
(3) Engage latch and lock rods to door latch.
(4) install access plug to door end panel.
(5) Install the door waterdam (Refer to 23 - BODY/
DOOR - FRONT/WATERDAM - INSTALLATION).
GLASS RUN CHANNEL
REMOVAL
(1) Remove the door waterdam (Refer to 23 -
BODY/DOOR - FRONT/WATERDAM - REMOVAL).
(2) Raise the window to the closed position..
(3) Remove bolts holding run channel to inner door
panel (Fig. 6) and (Fig. 7).
(4) Slide channel downward to disengage it from
the upper glass frame.
(5) Separate door glass run channel from door.
INSTALLATION
(1) Position door glass run channels on inner door
panel.
(2) Slide channel upward to engage it in the upper
glass frame.
(3) Install bolts attaching run channels to inner
door panel (Fig. 6) and (Fig. 7).
(4) Install the door waterdam (Refer to 23 - BODY/
DOOR - FRONT/WATERDAM - INSTALLATION).
HINGE
REMOVAL
(1) Remove cowl trim panel (Refer to 23 - BODY/
INTERIOR/COWL TRIM COVER - REMOVAL).
(2) Remove hidden bolt attaching door hinge to
hinge pillar (Fig. 2).
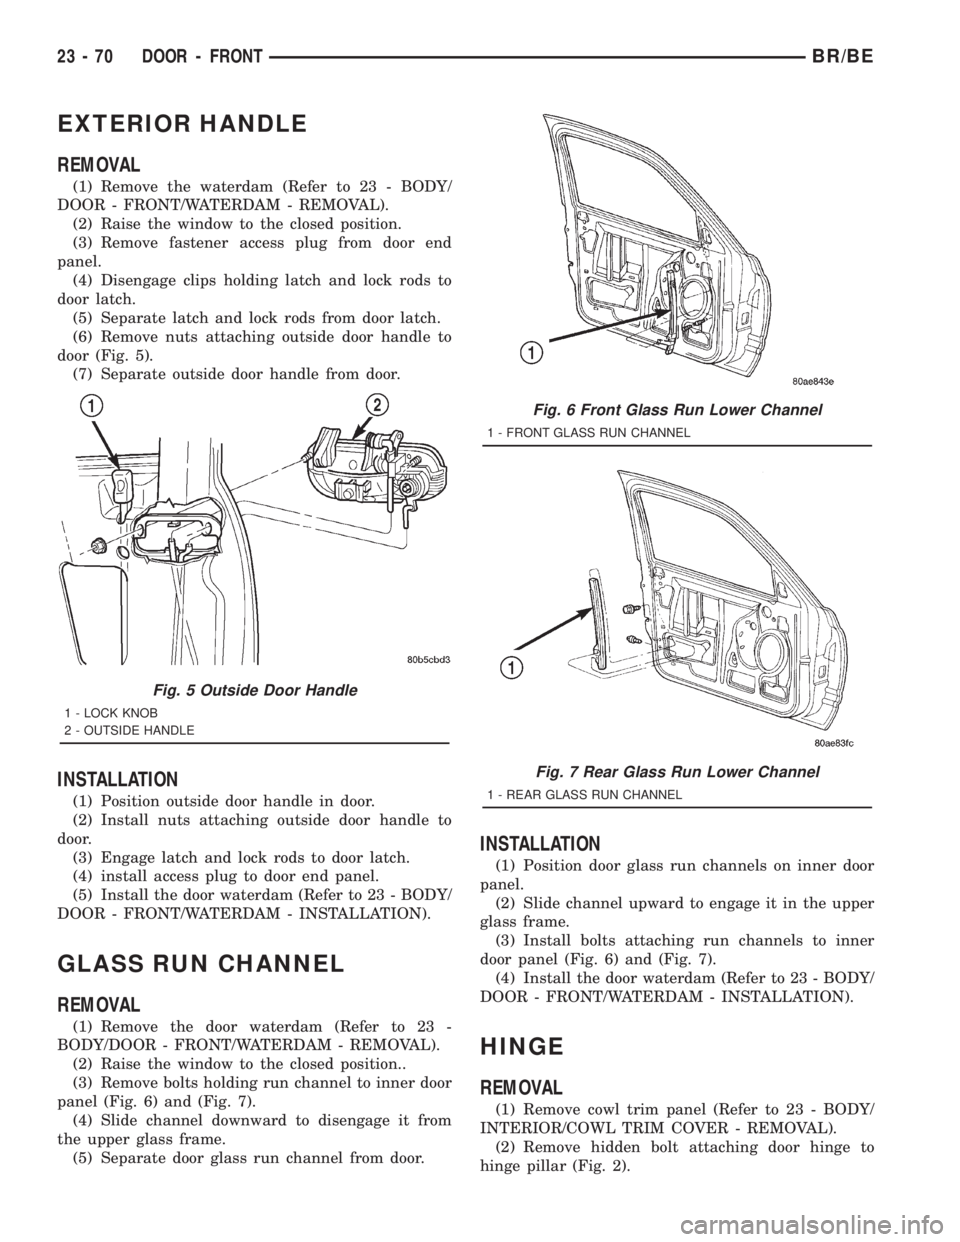
Fig. 5 Outside Door Handle
1 - LOCK KNOB
2 - OUTSIDE HANDLE
Fig. 6 Front Glass Run Lower Channel
1 - FRONT GLASS RUN CHANNEL
Fig. 7 Rear Glass Run Lower Channel
1 - REAR GLASS RUN CHANNEL
23 - 70 DOOR - FRONTBR/BE
Page 2644 of 2889
(3) Support door on a suitable lifting device.
(4) Using a grease pencil or equivalent, mark the
outline of the door hinge on the hinge pillar to aid
installation.
(5) Remove bolts attaching door hinge to hinge pil-
lar (Fig. 3).
(6) Remove nut and bolt attaching door hinge to
door end frame (Fig. 8).
(7) Separate door hinge from vehicle.
INSTALLATION
(1) If necessary, paint replacement door hinge
before installation.
(2) Position hinge on door end frame.
(3) Align hinge using reference marks.(4) Install nuts and bolts attaching door hinge to
door end frame. Tighten nuts and bolts to 28 N´m (21
ft. lbs.) torque.
(5) Install bolts attaching door hinge to hinge pil-
lar. Tighten bolts to 28 N´m (21 ft. lbs.) torque.
(6) Install hidden bolt attaching door hinge to
hinge pillar. Tighten bolt to 28 N´m (21 ft. lbs.)
torque.
(7) Remove support.
(8) Install cowl trim panel (Refer to 23 - BODY/IN-
TERIOR/COWL TRIM COVER - INSTALLATION).
INSIDE HANDLE ACTUATOR
REMOVAL
(1) Remove the door waterdam (Refer to 23 -
BODY/DOOR - FRONT/WATERDAM - REMOVAL).
(2) Raise the window to the closed position.
(3) Remove the screws attaching the actuator to
the door (Fig. 9).
INSTALLATION
(1) Install the screws attaching the actuator to the
door.
(2) Test handle for proper operation.
(3) Install the door waterdam (Refer to 23 - BODY/
DOOR - FRONT/WATERDAM - INSTALLATION).
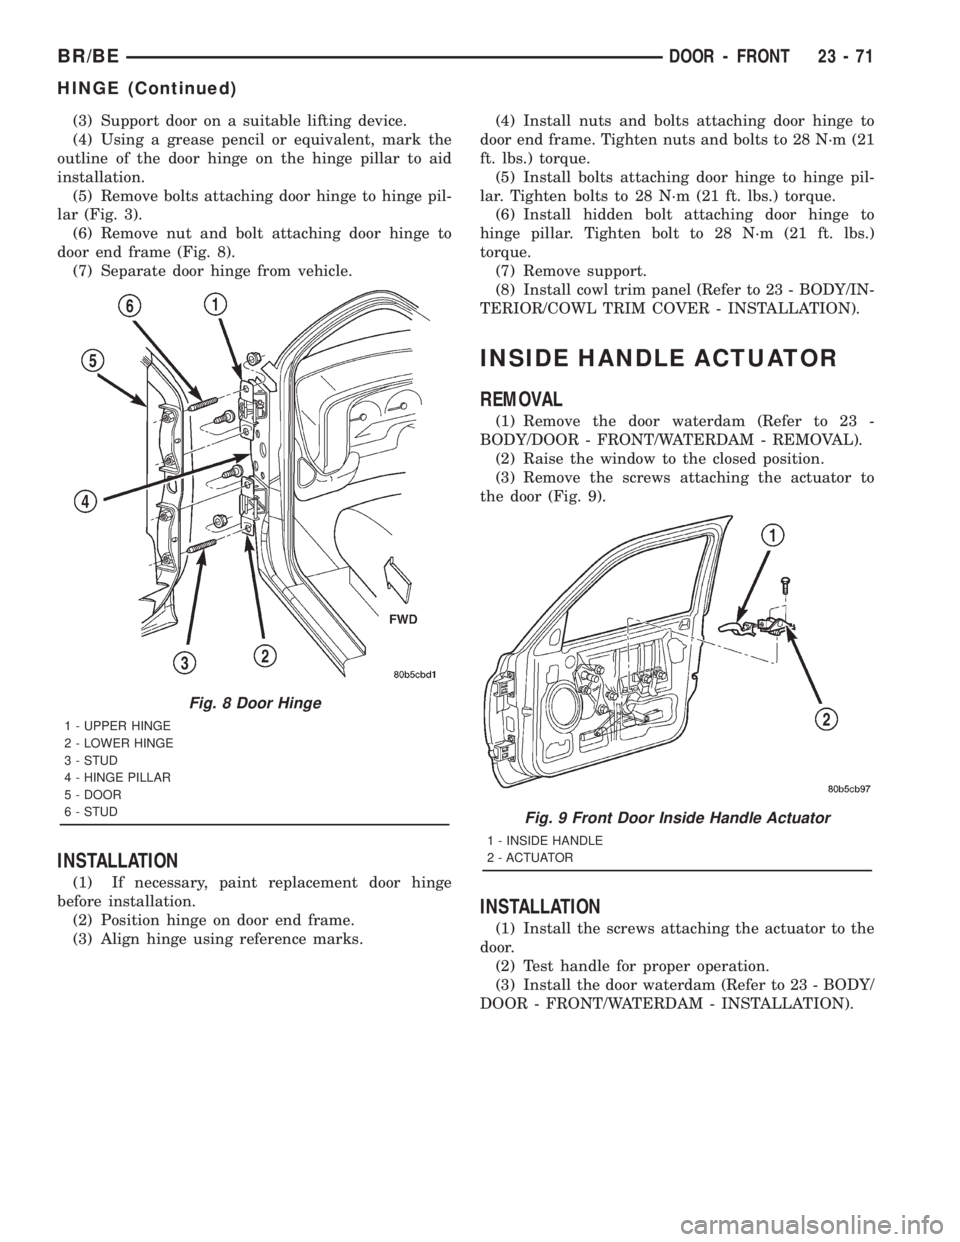
Fig. 8 Door Hinge
1 - UPPER HINGE
2 - LOWER HINGE
3 - STUD
4 - HINGE PILLAR
5 - DOOR
6 - STUD
Fig. 9 Front Door Inside Handle Actuator
1 - INSIDE HANDLE
2 - ACTUATOR
BR/BEDOOR - FRONT 23 - 71
HINGE (Continued)
Page 2645 of 2889
LATCH
REMOVAL
(1) Remove the door waterdam (Refer to 23 -
BODY/DOOR - FRONT/WATERDAM - REMOVAL).
(2) Disengage clips attaching lock and latch rods to
door latch.
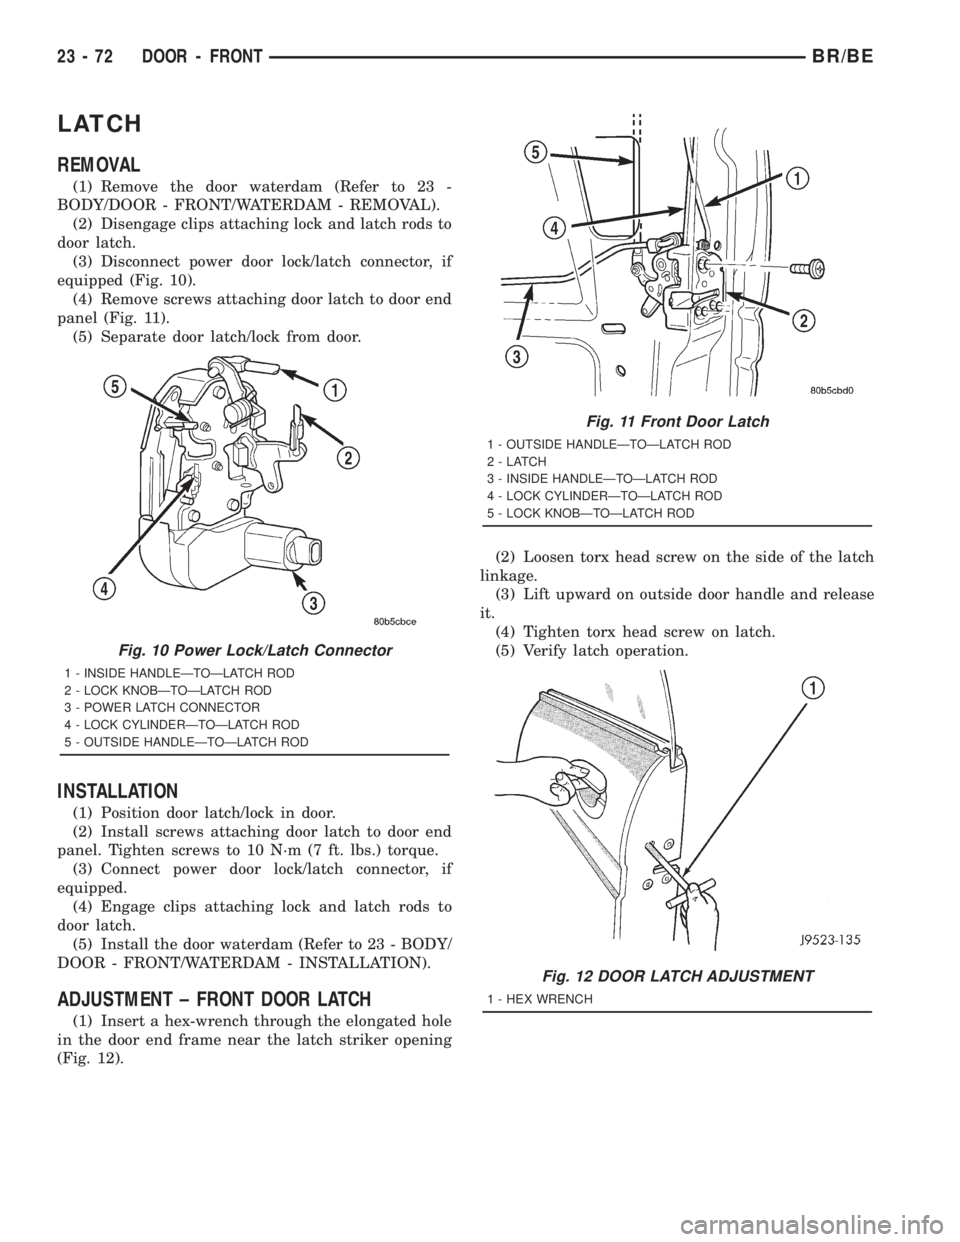
(3) Disconnect power door lock/latch connector, if
equipped (Fig. 10).
(4) Remove screws attaching door latch to door end
panel (Fig. 11).
(5) Separate door latch/lock from door.
INSTALLATION
(1) Position door latch/lock in door.
(2) Install screws attaching door latch to door end
panel. Tighten screws to 10 N´m (7 ft. lbs.) torque.
(3) Connect power door lock/latch connector, if
equipped.
(4) Engage clips attaching lock and latch rods to
door latch.
(5) Install the door waterdam (Refer to 23 - BODY/
DOOR - FRONT/WATERDAM - INSTALLATION).
ADJUSTMENT ± FRONT DOOR LATCH
(1) Insert a hex-wrench through the elongated hole
in the door end frame near the latch striker opening
(Fig. 12).(2) Loosen torx head screw on the side of the latch
linkage.
(3) Lift upward on outside door handle and release
it.
(4) Tighten torx head screw on latch.
(5) Verify latch operation.
Fig. 10 Power Lock/Latch Connector
1 - INSIDE HANDLEÐTOÐLATCH ROD
2 - LOCK KNOBÐTOÐLATCH ROD
3 - POWER LATCH CONNECTOR
4 - LOCK CYLINDERÐTOÐLATCH ROD
5 - OUTSIDE HANDLEÐTOÐLATCH ROD
Fig. 11 Front Door Latch
1 - OUTSIDE HANDLEÐTOÐLATCH ROD
2-LATCH
3 - INSIDE HANDLEÐTOÐLATCH ROD
4 - LOCK CYLINDERÐTOÐLATCH ROD
5 - LOCK KNOBÐTOÐLATCH ROD
Fig. 12 DOOR LATCH ADJUSTMENT
1 - HEX WRENCH
23 - 72 DOOR - FRONTBR/BE
Page 2646 of 2889
LATCH STRIKER
REMOVAL
(1) Mark outline of striker base on B-pillar with a
grease pencil or equivalent to aid installation.
(2) Remove screws attaching striker to B-pillar
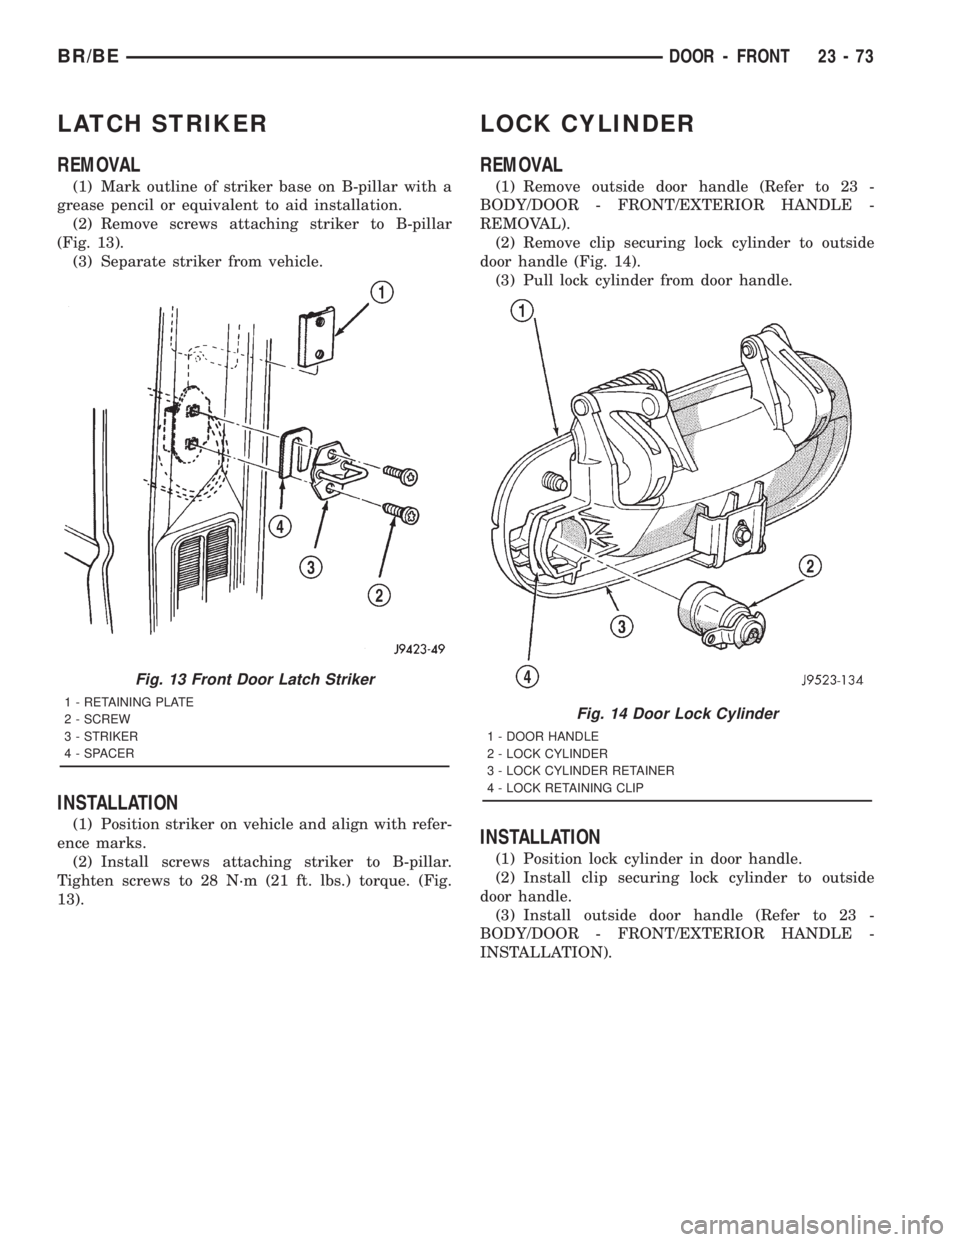
(Fig. 13).
(3) Separate striker from vehicle.
INSTALLATION
(1) Position striker on vehicle and align with refer-
ence marks.
(2) Install screws attaching striker to B-pillar.
Tighten screws to 28 N´m (21 ft. lbs.) torque. (Fig.
13).
LOCK CYLINDER
REMOVAL
(1) Remove outside door handle (Refer to 23 -
BODY/DOOR - FRONT/EXTERIOR HANDLE -
REMOVAL).
(2) Remove clip securing lock cylinder to outside
door handle (Fig. 14).
(3) Pull lock cylinder from door handle.
INSTALLATION
(1) Position lock cylinder in door handle.
(2) Install clip securing lock cylinder to outside
door handle.
(3) Install outside door handle (Refer to 23 -
BODY/DOOR - FRONT/EXTERIOR HANDLE -
INSTALLATION).
Fig. 13 Front Door Latch Striker
1 - RETAINING PLATE
2 - SCREW
3 - STRIKER
4 - SPACERFig. 14 Door Lock Cylinder
1 - DOOR HANDLE
2 - LOCK CYLINDER
3 - LOCK CYLINDER RETAINER
4 - LOCK RETAINING CLIP
BR/BEDOOR - FRONT 23 - 73
Page 2647 of 2889
SIDE VIEW MIRROR FLAG
REMOVAL
(1) Remove door trim panel.
(2) Remove flag door seal.
(3) Remove nuts attaching mirror flag cover to
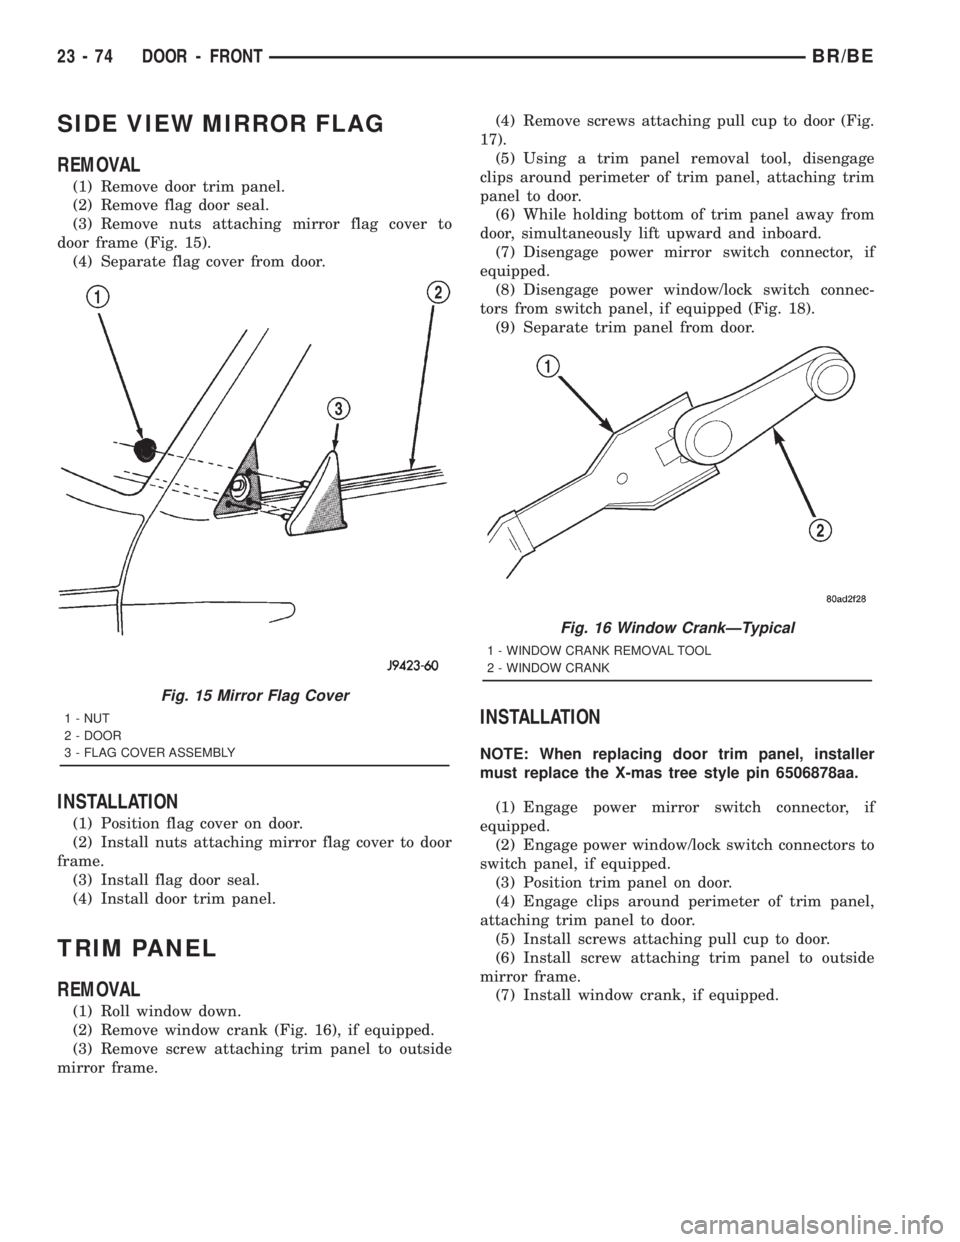
door frame (Fig. 15).
(4) Separate flag cover from door.
INSTALLATION
(1) Position flag cover on door.
(2) Install nuts attaching mirror flag cover to door
frame.
(3) Install flag door seal.
(4) Install door trim panel.
TRIM PANEL
REMOVAL
(1) Roll window down.
(2) Remove window crank (Fig. 16), if equipped.
(3) Remove screw attaching trim panel to outside
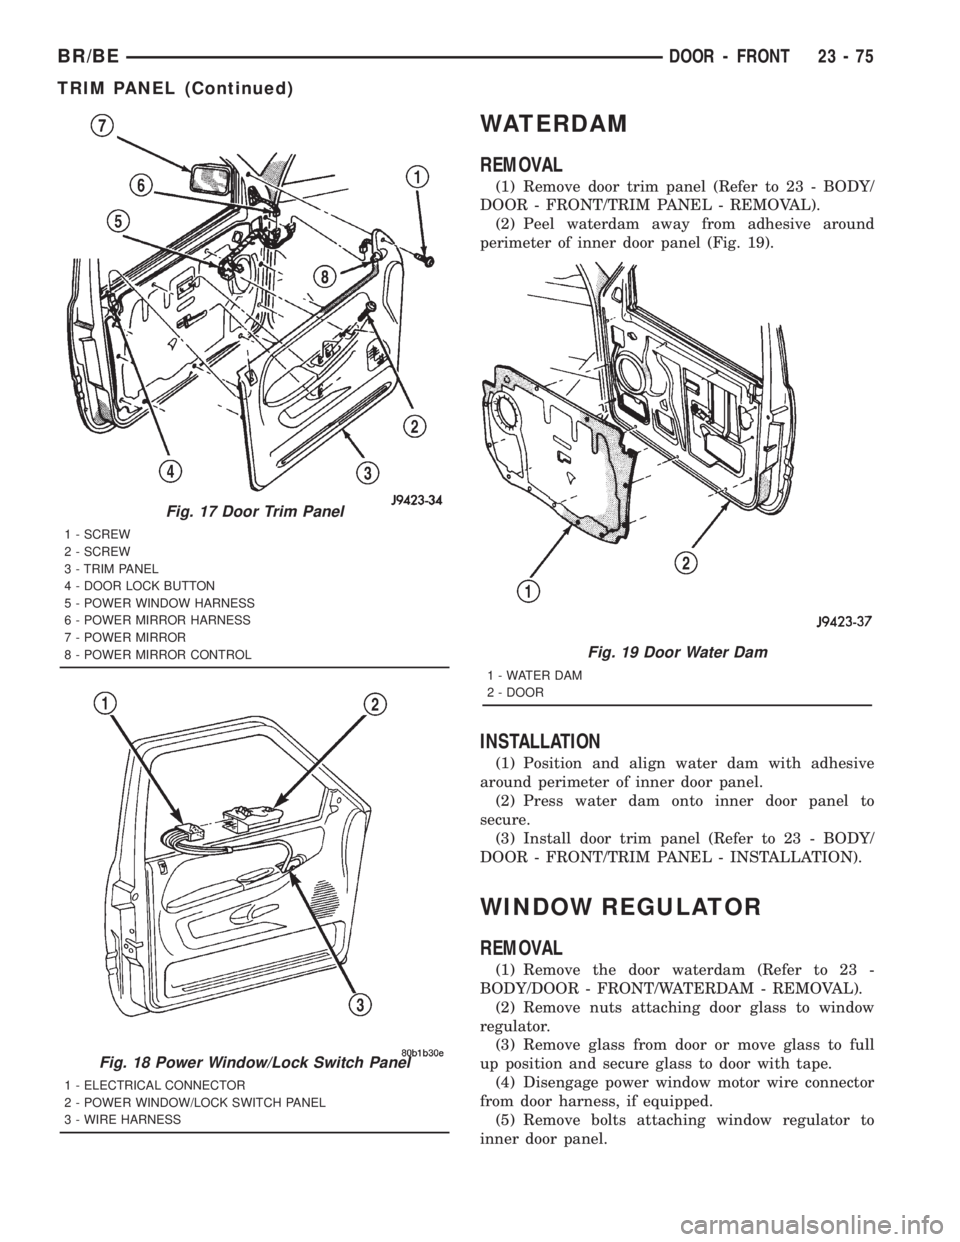
mirror frame.(4) Remove screws attaching pull cup to door (Fig.
17).
(5) Using a trim panel removal tool, disengage
clips around perimeter of trim panel, attaching trim
panel to door.
(6) While holding bottom of trim panel away from
door, simultaneously lift upward and inboard.
(7) Disengage power mirror switch connector, if
equipped.
(8) Disengage power window/lock switch connec-
tors from switch panel, if equipped (Fig. 18).
(9) Separate trim panel from door.
INSTALLATION
NOTE: When replacing door trim panel, installer
must replace the X-mas tree style pin 6506878aa.
(1) Engage power mirror switch connector, if
equipped.
(2) Engage power window/lock switch connectors to
switch panel, if equipped.
(3) Position trim panel on door.
(4) Engage clips around perimeter of trim panel,
attaching trim panel to door.
(5) Install screws attaching pull cup to door.
(6) Install screw attaching trim panel to outside
mirror frame.
(7) Install window crank, if equipped.
Fig. 15 Mirror Flag Cover
1 - NUT
2 - DOOR
3 - FLAG COVER ASSEMBLY
Fig. 16 Window CrankÐTypical
1 - WINDOW CRANK REMOVAL TOOL
2 - WINDOW CRANK
23 - 74 DOOR - FRONTBR/BE
Page 2648 of 2889
WATERDAM
REMOVAL
(1) Remove door trim panel (Refer to 23 - BODY/
DOOR - FRONT/TRIM PANEL - REMOVAL).
(2) Peel waterdam away from adhesive around
perimeter of inner door panel (Fig. 19).
INSTALLATION
(1) Position and align water dam with adhesive
around perimeter of inner door panel.
(2) Press water dam onto inner door panel to
secure.
(3) Install door trim panel (Refer to 23 - BODY/
DOOR - FRONT/TRIM PANEL - INSTALLATION).
WINDOW REGULATOR
REMOVAL
(1) Remove the door waterdam (Refer to 23 -
BODY/DOOR - FRONT/WATERDAM - REMOVAL).
(2) Remove nuts attaching door glass to window
regulator.
(3) Remove glass from door or move glass to full
up position and secure glass to door with tape.
(4) Disengage power window motor wire connector
from door harness, if equipped.
(5) Remove bolts attaching window regulator to
inner door panel.
Fig. 17 Door Trim Panel
1 - SCREW
2 - SCREW
3 - TRIM PANEL
4 - DOOR LOCK BUTTON
5 - POWER WINDOW HARNESS
6 - POWER MIRROR HARNESS
7 - POWER MIRROR
8 - POWER MIRROR CONTROL
Fig. 18 Power Window/Lock Switch Panel
1 - ELECTRICAL CONNECTOR
2 - POWER WINDOW/LOCK SWITCH PANEL
3 - WIRE HARNESS
Fig. 19 Door Water Dam
1 - WATER DAM
2 - DOOR
BR/BEDOOR - FRONT 23 - 75
TRIM PANEL (Continued)
Page 2649 of 2889
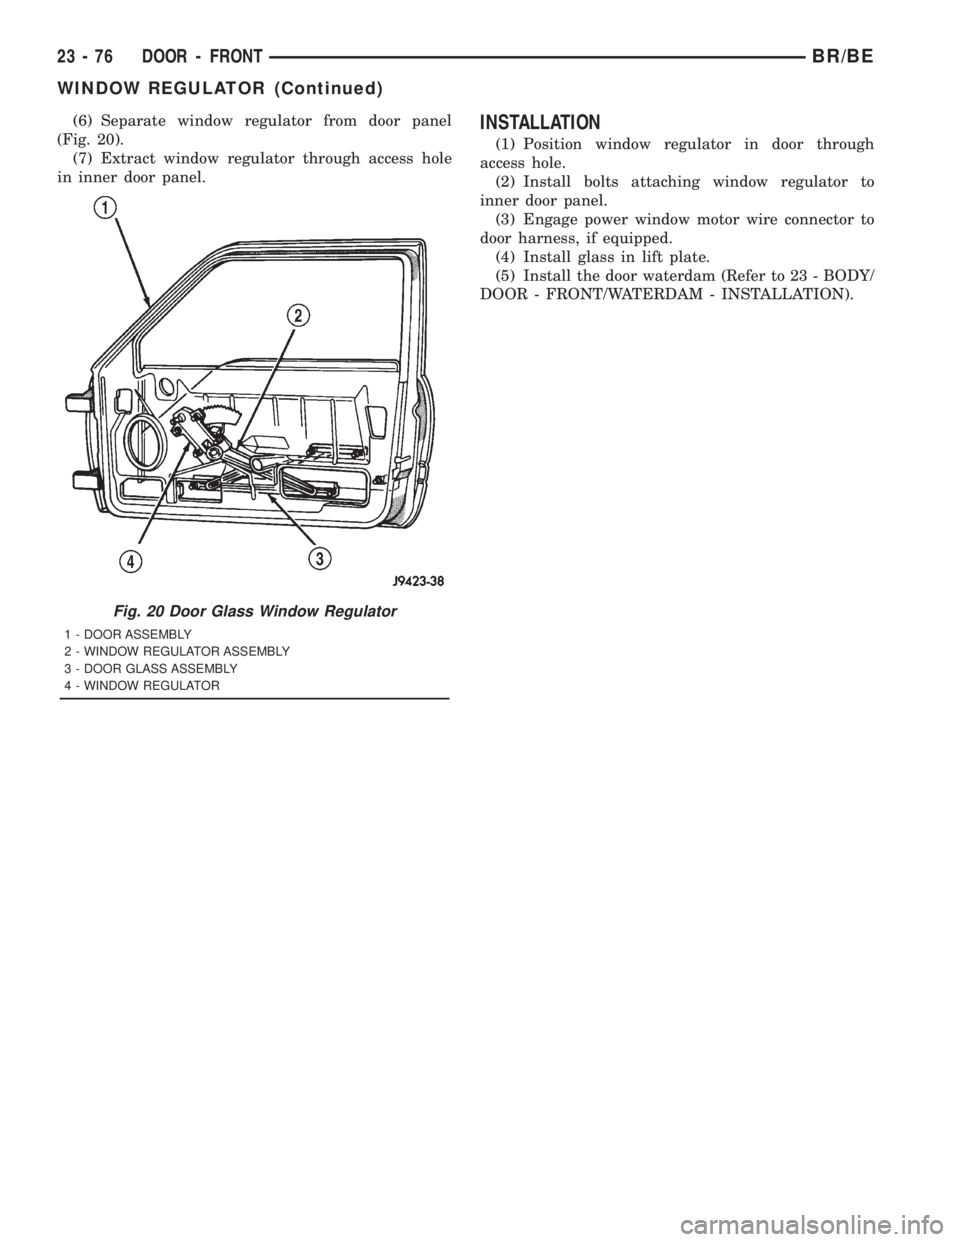
(6) Separate window regulator from door panel
(Fig. 20).
(7) Extract window regulator through access hole
in inner door panel.INSTALLATION
(1) Position window regulator in door through
access hole.
(2) Install bolts attaching window regulator to
inner door panel.
(3) Engage power window motor wire connector to
door harness, if equipped.
(4) Install glass in lift plate.
(5) Install the door waterdam (Refer to 23 - BODY/
DOOR - FRONT/WATERDAM - INSTALLATION).
Fig. 20 Door Glass Window Regulator
1 - DOOR ASSEMBLY
2 - WINDOW REGULATOR ASSEMBLY
3 - DOOR GLASS ASSEMBLY
4 - WINDOW REGULATOR
23 - 76 DOOR - FRONTBR/BE
WINDOW REGULATOR (Continued)
Page 2650 of 2889
DOOR - CARGO
TABLE OF CONTENTS
page page
AIR EXHAUSTER
REMOVAL..............................77
INSTALLATION...........................77
CHECK
REMOVAL..............................78
INSTALLATION...........................78
DOOR
REMOVAL..............................78
INSTALLATION...........................78
ADJUSTMENTS..........................78
EXHAUST VENT
REMOVAL..............................79
INSTALLATION...........................79
HINGE
REMOVAL..............................79
INSTALLATION...........................79
INSIDE HANDLE ACTUATOR
REMOVAL..............................80
INSTALLATION...........................80
LATCH - LOWER
REMOVAL..............................80
INSTALLATION...........................80
LATCH - UPPER
REMOVAL..............................81INSTALLATION...........................81
LATCH STRIKER - LOWER
REMOVAL..............................82
INSTALLATION...........................82
LATCH STRIKER - UPPER
REMOVAL..............................82
INSTALLATION...........................82
RELEASE CABLE
REMOVAL..............................82
INSTALLATION...........................83
SHUTFACE HANDLE
REMOVAL..............................83
INSTALLATION...........................83
TRIM PANEL
REMOVAL..............................84
INSTALLATION...........................84
VENT WINDOW
REMOVAL..............................85
INSTALLATION...........................85
WATERDAM
REMOVAL..............................85
INSTALLATION...........................85
AIR EXHAUSTER
REMOVAL
(1) Remove cargo door trim panel (Refer to 23 -
BODY/DOOR - CARGO/TRIM PANEL - REMOVAL).
(2) Peel back waterdam.
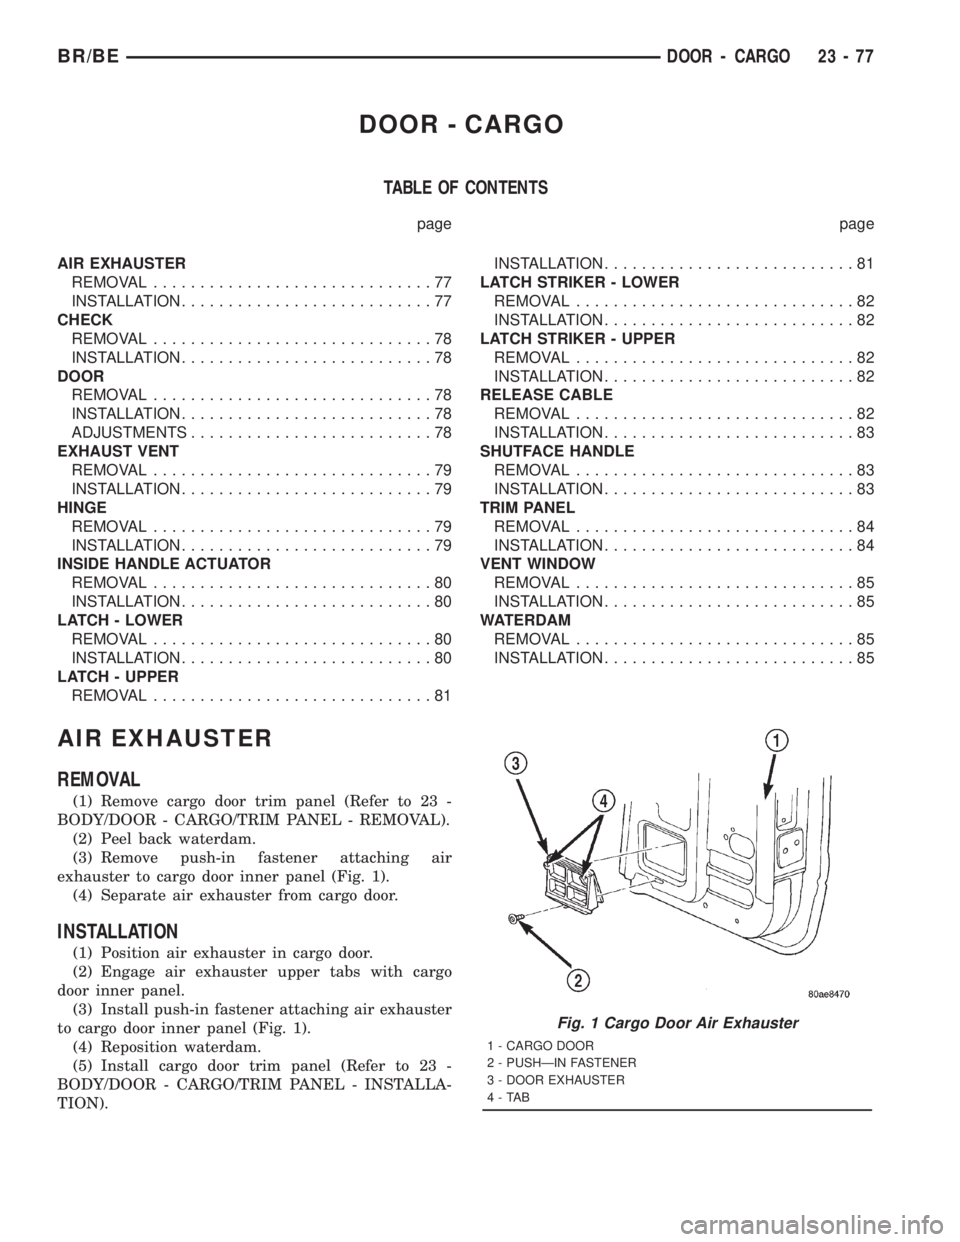
(3) Remove push-in fastener attaching air
exhauster to cargo door inner panel (Fig. 1).
(4) Separate air exhauster from cargo door.
INSTALLATION
(1) Position air exhauster in cargo door.
(2) Engage air exhauster upper tabs with cargo
door inner panel.
(3) Install push-in fastener attaching air exhauster
to cargo door inner panel (Fig. 1).
(4) Reposition waterdam.
(5) Install cargo door trim panel (Refer to 23 -
BODY/DOOR - CARGO/TRIM PANEL - INSTALLA-
TION).
Fig. 1 Cargo Door Air Exhauster
1 - CARGO DOOR
2 - PUSHÐIN FASTENER
3 - DOOR EXHAUSTER
4-TAB
BR/BEDOOR - CARGO 23 - 77