DODGE RAM 2002 Service Repair Manual
Manufacturer: DODGE, Model Year: 2002, Model line: RAM, Model: DODGE RAM 2002Pages: 2255, PDF Size: 62.07 MB
Page 181 of 2255
(14) Remove the case from housing. Tag bearing
cups to indicate their location.
DISASSEMBLY
(1) Remove roll-pin holding mate shaft in housing.
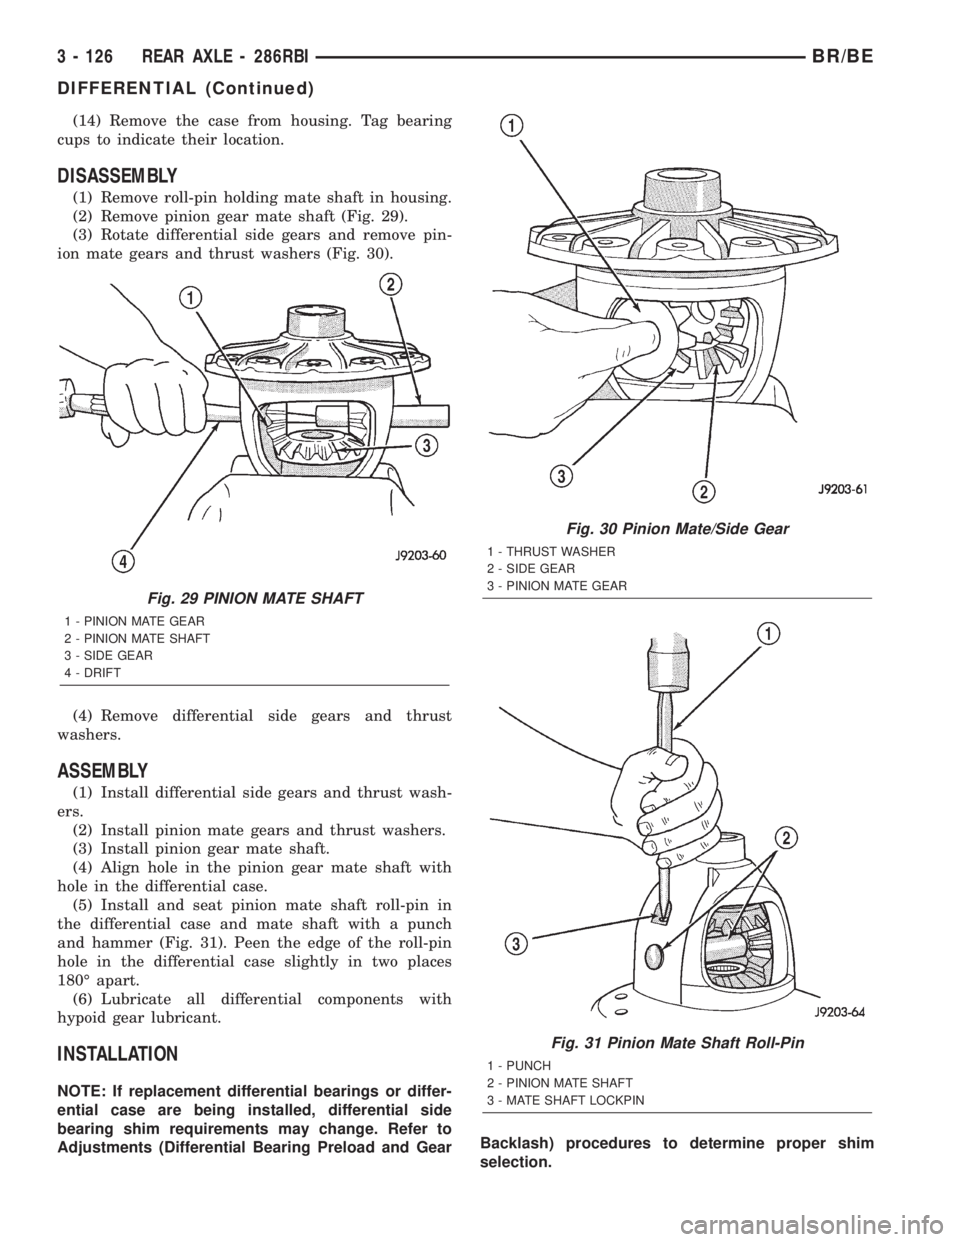
(2) Remove pinion gear mate shaft (Fig. 29).
(3) Rotate differential side gears and remove pin-
ion mate gears and thrust washers (Fig. 30).
(4) Remove differential side gears and thrust
washers.
ASSEMBLY
(1) Install differential side gears and thrust wash-
ers.
(2) Install pinion mate gears and thrust washers.
(3) Install pinion gear mate shaft.
(4) Align hole in the pinion gear mate shaft with
hole in the differential case.
(5) Install and seat pinion mate shaft roll-pin in
the differential case and mate shaft with a punch
and hammer (Fig. 31). Peen the edge of the roll-pin
hole in the differential case slightly in two places
180É apart.
(6) Lubricate all differential components with
hypoid gear lubricant.
INSTALLATION
NOTE: If replacement differential bearings or differ-
ential case are being installed, differential side
bearing shim requirements may change. Refer to
Adjustments (Differential Bearing Preload and GearBacklash) procedures to determine proper shim
selection.
Fig. 29 PINION MATE SHAFT
1 - PINION MATE GEAR
2 - PINION MATE SHAFT
3 - SIDE GEAR
4 - DRIFT
Fig. 30 Pinion Mate/Side Gear
1 - THRUST WASHER
2 - SIDE GEAR
3 - PINION MATE GEAR
Fig. 31 Pinion Mate Shaft Roll-Pin
1 - PUNCH
2 - PINION MATE SHAFT
3 - MATE SHAFT LOCKPIN
3 - 126 REAR AXLE - 286RBIBR/BE
DIFFERENTIAL (Continued)
Page 182 of 2255
(1) Position Spreader W-129-B with the tool dowel
pins seated in the locating holes. Install the hold
down clamps and tighten the tool turnbuckle finger-
tight.
(2) Install a Pilot Stud C-3288-B at the left side of
the differential housing and attach dial indicator to
the pilot stud. Load the indicator plunger against the
opposite side of the housing and zero the dial indica-
tor.
(3) Spread the housing enough to install the case
in the housing. Measure the distance with the dial
indicator.
CAUTION: Never spread the housing over 0.50 mm
(0.020 in). If housing is over-spread, it could be dis-
torted or damaged.
(4) Remove the dial indicator.
(5) Install differential into the housing. Tap the
differential case with a rawhide/rubber hammer to
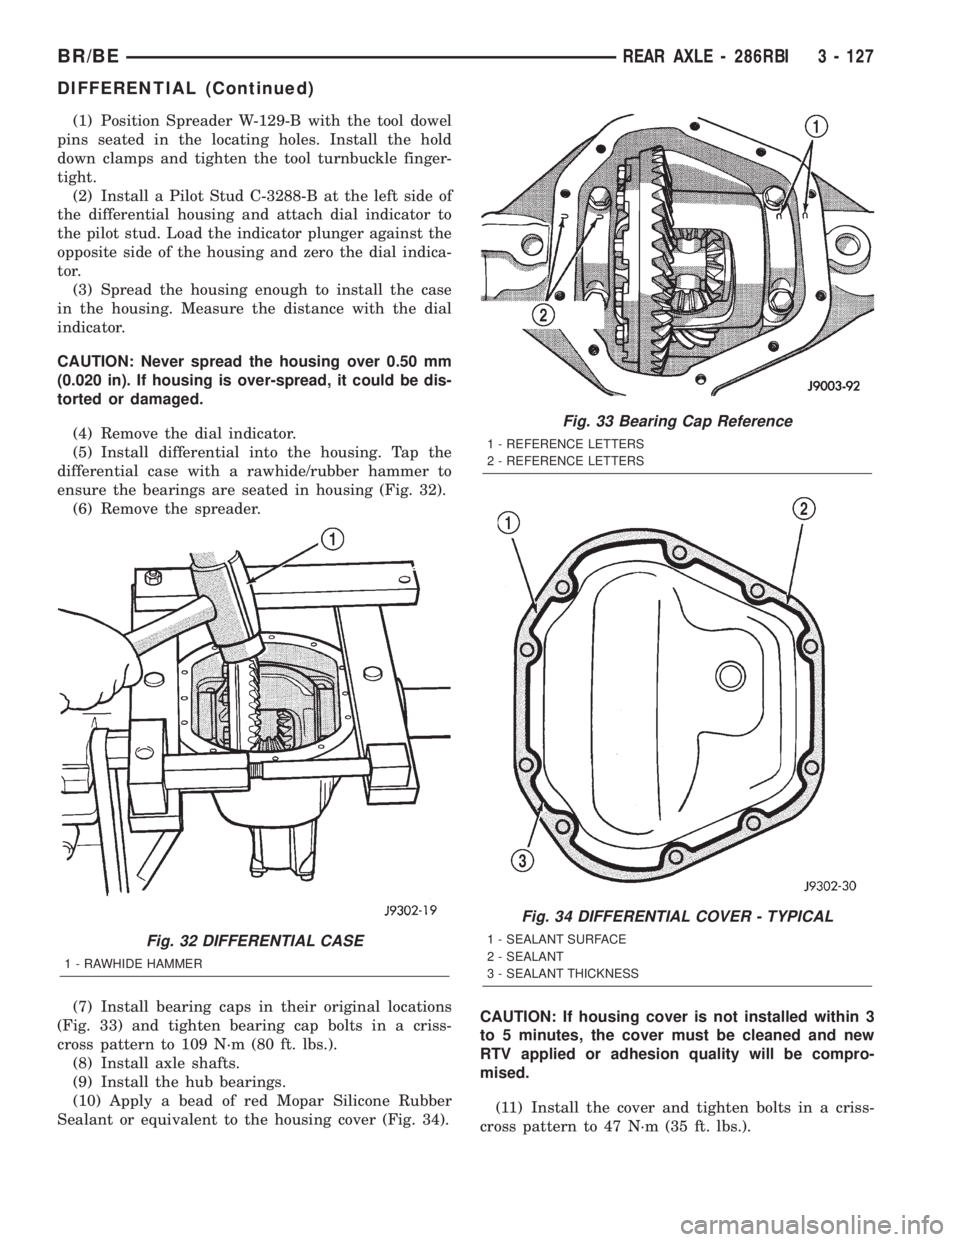
ensure the bearings are seated in housing (Fig. 32).
(6) Remove the spreader.
(7) Install bearing caps in their original locations
(Fig. 33) and tighten bearing cap bolts in a criss-
cross pattern to 109 N´m (80 ft. lbs.).
(8) Install axle shafts.
(9) Install the hub bearings.
(10) Apply a bead of red Mopar Silicone Rubber
Sealant or equivalent to the housing cover (Fig. 34).CAUTION: If housing cover is not installed within 3
to 5 minutes, the cover must be cleaned and new
RTV applied or adhesion quality will be compro-
mised.
(11) Install the cover and tighten bolts in a criss-
cross pattern to 47 N´m (35 ft. lbs.).
Fig. 32 DIFFERENTIAL CASE
1 - RAWHIDE HAMMER
Fig. 33 Bearing Cap Reference
1 - REFERENCE LETTERS
2 - REFERENCE LETTERS
Fig. 34 DIFFERENTIAL COVER - TYPICAL
1 - SEALANT SURFACE
2 - SEALANT
3 - SEALANT THICKNESS
BR/BEREAR AXLE - 286RBI 3 - 127
DIFFERENTIAL (Continued)
Page 183 of 2255
(12) Fill the differential with Mopar Hypoid Gear
Lubricant or equivalent to bottom of the fill plug
hole.
(13) Install fill hole plug and tighten to 34 N´m (25
ft. lbs.).
(14) Remove support and lower vehicle.
DIFFERENTIAL - TRAC-LOK
DIAGNOSIS AND TESTING - TRAC-LOKT
The most common problem is a chatter noise when
turning corners. Before removing a Trac-lokŸ unit
for repair, drain, flush and refill the axle with the
specified lubricant. A container of Mopar Trac-lokŸ
Lubricant (friction modifier) should be added after
repair service or during a lubricant change.
After changing the lubricant, drive the vehicle and
make 10 to 12 slow, figure-eight turns. This maneu-
ver will pump lubricant through the clutches. This
will correct the condition in most instances. If the
chatter persists, clutch damage could have occurred.
DIFFERENTIAL TEST
The differential can be tested without removing the
differential case by measuring rotating torque. Make
sure brakes are not dragging during this measure-
ment.
(1) Place blocks in front and rear of both front
wheels.
(2) Raise one rear wheel until it is completely off
the ground.
(3) Engine off, transmission in neutral, and park-
ing brake off.
(4) Remove wheel and bolt Special Tool 6790 or
equivalent tool to studs.
(5) Use torque wrench on special tool to rotate
wheel and read rotating torque.
(6) If rotating torque is less than 22 N´m (30 ft.
lbs.) or more than 271 N´m (200 ft. lbs.) on either
wheel the unit should be serviced.
DISASSEMBLY
The Trac-Loktdifferential on this axle has a one-
piece cross shaft and uses one dished disc, regular 5
disc and 7 plates.
NOTE: Pay attention to the clutch pack arrangement
during disassembly. Note the direction of the con-
cave and convex side of the plates and discs.
(1) Mark the ring gear half and cover half for
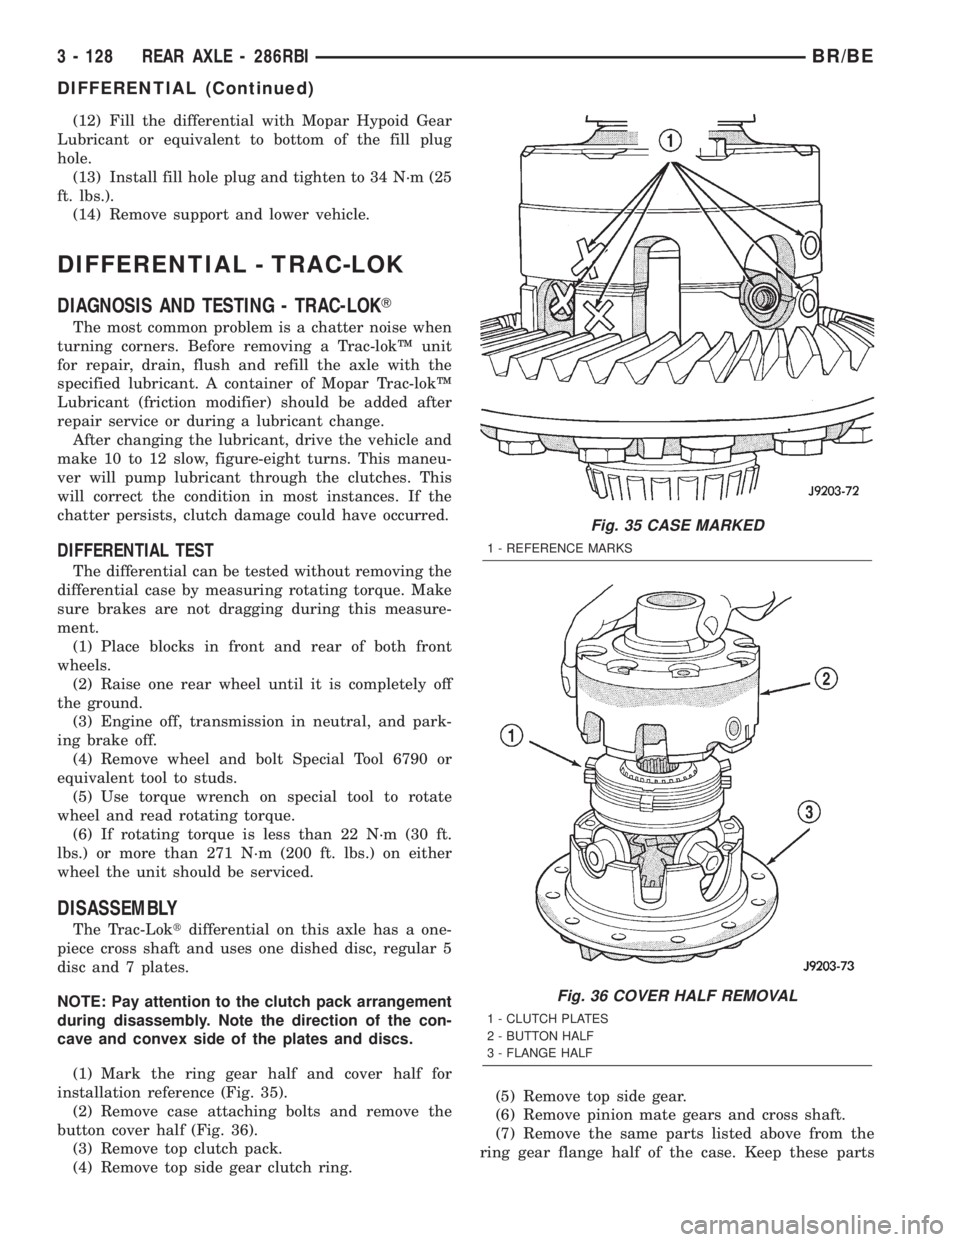
installation reference (Fig. 35).
(2) Remove case attaching bolts and remove the
button cover half (Fig. 36).
(3) Remove top clutch pack.
(4) Remove top side gear clutch ring.(5) Remove top side gear.
(6) Remove pinion mate gears and cross shaft.
(7) Remove the same parts listed above from the
ring gear flange half of the case. Keep these parts
Fig. 35 CASE MARKED
1 - REFERENCE MARKS
Fig. 36 COVER HALF REMOVAL
1 - CLUTCH PLATES
2 - BUTTON HALF
3 - FLANGE HALF
3 - 128 REAR AXLE - 286RBIBR/BE
DIFFERENTIAL (Continued)
Page 184 of 2255
with the flange cover half for installation in their
original positions.
ASSEMBLY
The Trac-Loktdifferential for this axle has a one-
piece cross shaft and uses one dished disc, 5 regular
disc and 7 plates for each clutch pack.
NOTE: The clutch discs are replaceable as com-
plete sets only. If one clutch disc pack is damaged,
both packs must be replaced.
Lubricate each component with gear lube before
assembly and installation.
(1) Saturate the clutch plates with Mopar Hypoid
Gear Lubricant or Additive.
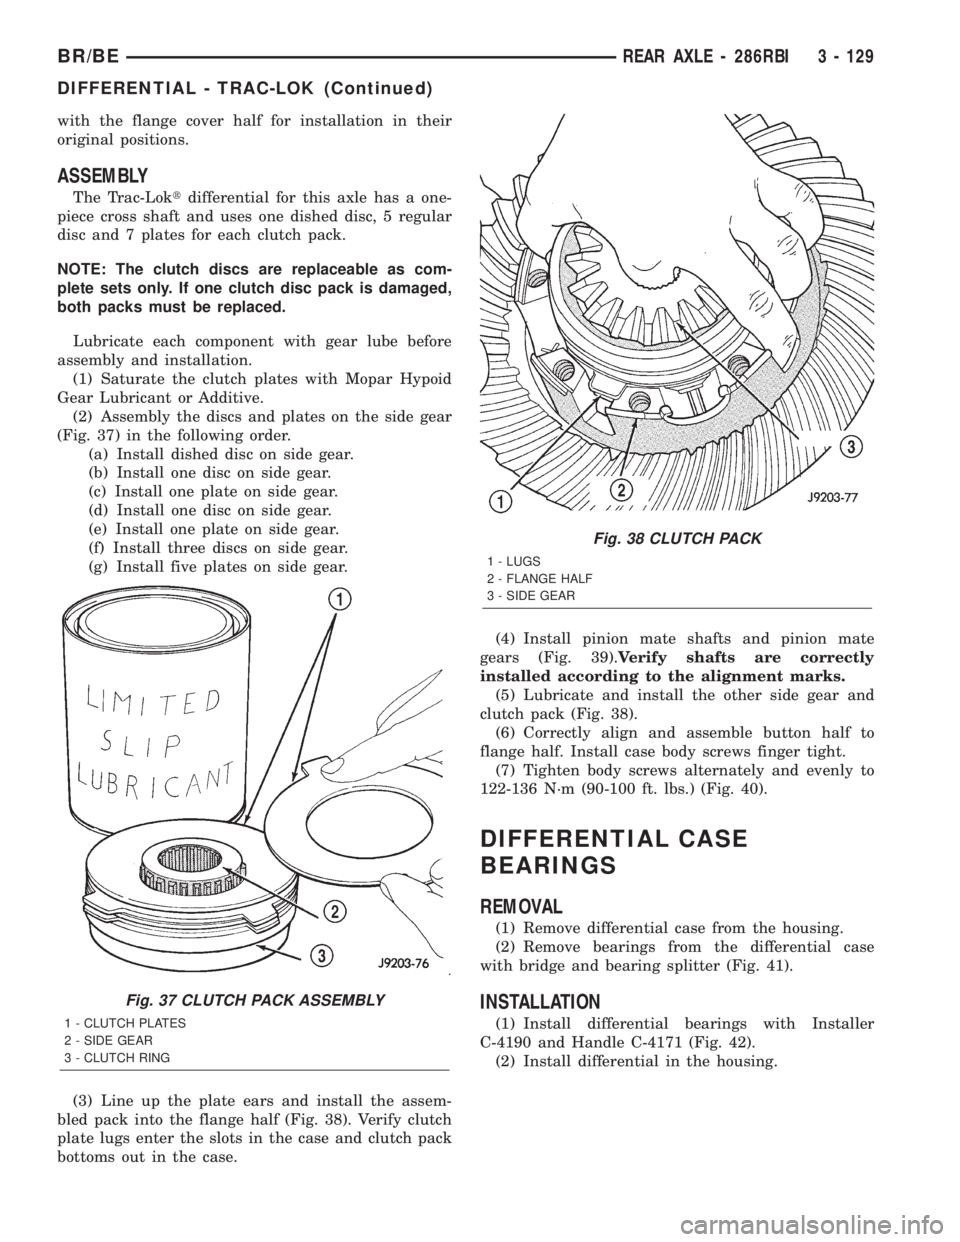
(2) Assembly the discs and plates on the side gear
(Fig. 37) in the following order.
(a) Install dished disc on side gear.
(b) Install one disc on side gear.
(c) Install one plate on side gear.
(d) Install one disc on side gear.
(e) Install one plate on side gear.
(f) Install three discs on side gear.
(g) Install five plates on side gear.
(3) Line up the plate ears and install the assem-
bled pack into the flange half (Fig. 38). Verify clutch
plate lugs enter the slots in the case and clutch pack
bottoms out in the case.(4) Install pinion mate shafts and pinion mate
gears (Fig. 39).Verify shafts are correctly
installed according to the alignment marks.
(5) Lubricate and install the other side gear and
clutch pack (Fig. 38).
(6) Correctly align and assemble button half to
flange half. Install case body screws finger tight.
(7) Tighten body screws alternately and evenly to
122-136 N´m (90-100 ft. lbs.) (Fig. 40).
DIFFERENTIAL CASE
BEARINGS
REMOVAL
(1) Remove differential case from the housing.
(2) Remove bearings from the differential case
with bridge and bearing splitter (Fig. 41).
INSTALLATION
(1) Install differential bearings with Installer
C-4190 and Handle C-4171 (Fig. 42).
(2) Install differential in the housing.
Fig. 37 CLUTCH PACK ASSEMBLY
1 - CLUTCH PLATES
2 - SIDE GEAR
3 - CLUTCH RING
Fig. 38 CLUTCH PACK
1 - LUGS
2 - FLANGE HALF
3 - SIDE GEAR
BR/BEREAR AXLE - 286RBI 3 - 129
DIFFERENTIAL - TRAC-LOK (Continued)
Page 185 of 2255
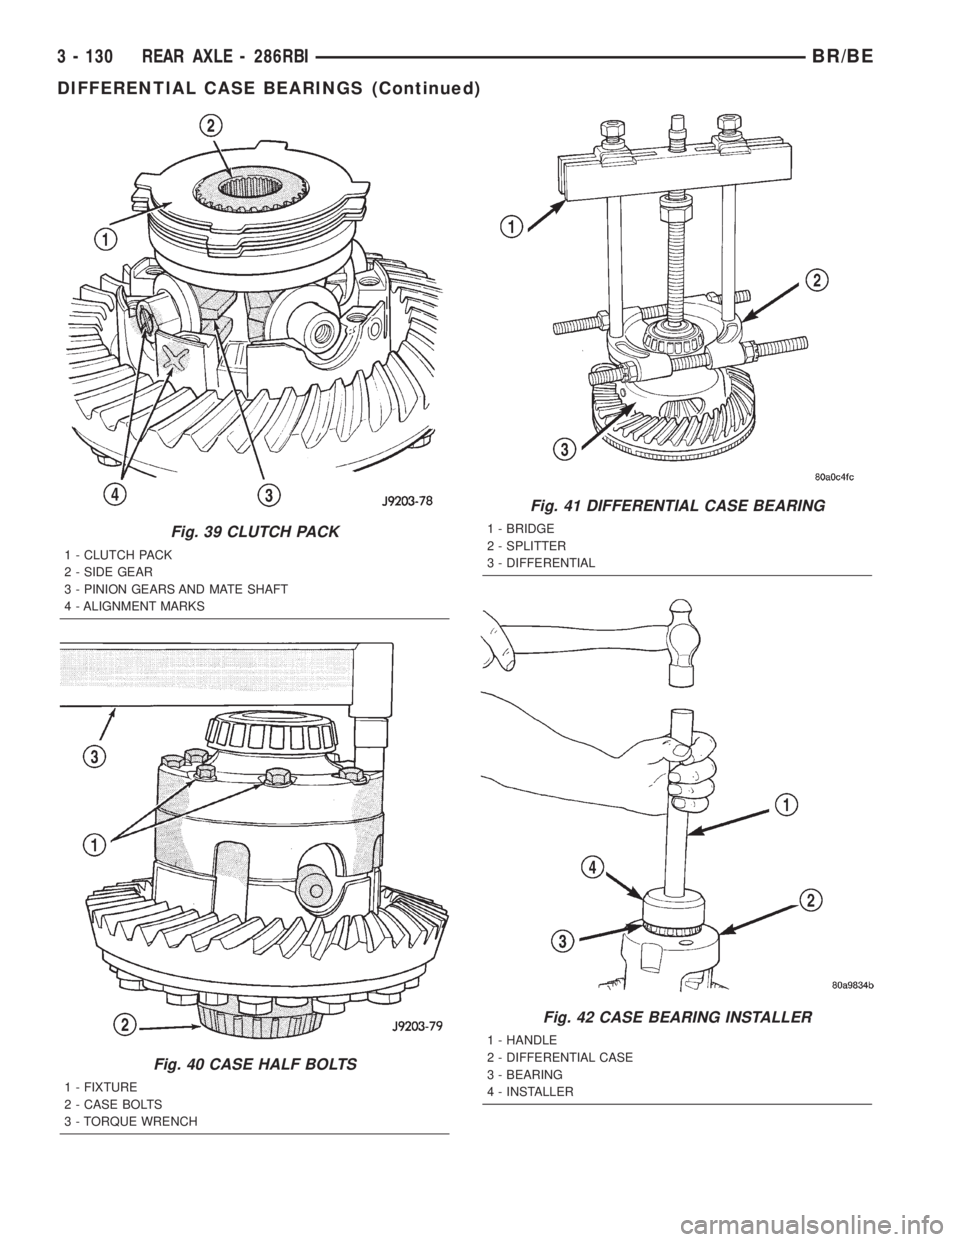
Fig. 39 CLUTCH PACK
1 - CLUTCH PACK
2 - SIDE GEAR
3 - PINION GEARS AND MATE SHAFT
4 - ALIGNMENT MARKS
Fig. 40 CASE HALF BOLTS
1 - FIXTURE
2 - CASE BOLTS
3 - TORQUE WRENCH
Fig. 41 DIFFERENTIAL CASE BEARING
1 - BRIDGE
2 - SPLITTER
3 - DIFFERENTIAL
Fig. 42 CASE BEARING INSTALLER
1 - HANDLE
2 - DIFFERENTIAL CASE
3 - BEARING
4 - INSTALLER
3 - 130 REAR AXLE - 286RBIBR/BE
DIFFERENTIAL CASE BEARINGS (Continued)
Page 186 of 2255
PINION GEAR/RING GEAR/
TONE RING
REMOVAL
NOTE: The ring and pinion gears are service as a
matched set. Never replace the ring gear without
replacing the matched pinion gear.
(1) Remove differential from the housing.
(2) Place differential case in a vise with soft metal
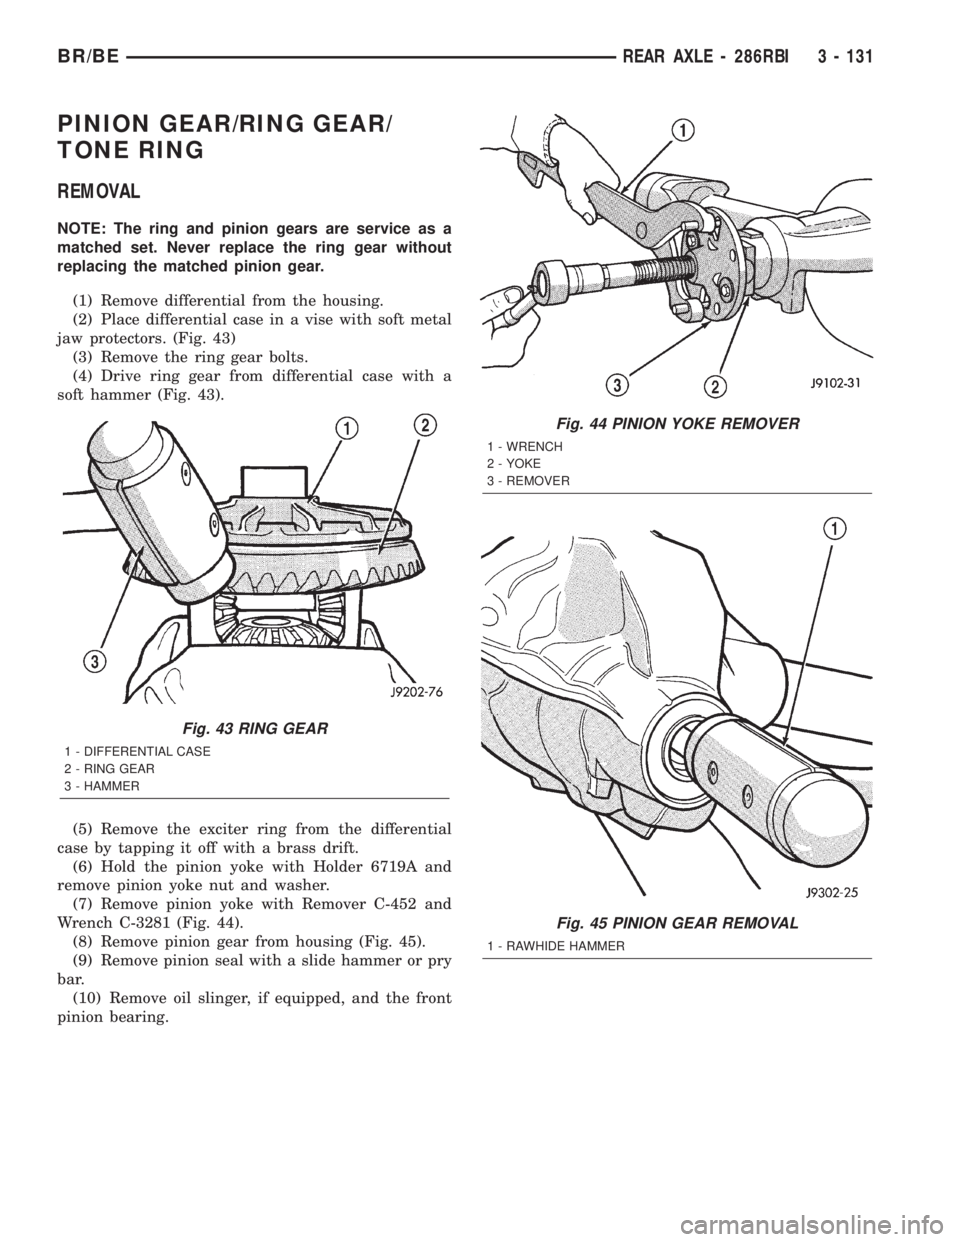
jaw protectors. (Fig. 43)
(3) Remove the ring gear bolts.
(4) Drive ring gear from differential case with a
soft hammer (Fig. 43).
(5) Remove the exciter ring from the differential
case by tapping it off with a brass drift.
(6) Hold the pinion yoke with Holder 6719A and
remove pinion yoke nut and washer.
(7) Remove pinion yoke with Remover C-452 and
Wrench C-3281 (Fig. 44).
(8) Remove pinion gear from housing (Fig. 45).
(9) Remove pinion seal with a slide hammer or pry
bar.
(10) Remove oil slinger, if equipped, and the front
pinion bearing.
Fig. 43 RING GEAR
1 - DIFFERENTIAL CASE
2 - RING GEAR
3 - HAMMER
Fig. 44 PINION YOKE REMOVER
1 - WRENCH
2 - YOKE
3 - REMOVER
Fig. 45 PINION GEAR REMOVAL
1 - RAWHIDE HAMMER
BR/BEREAR AXLE - 286RBI 3 - 131
Page 187 of 2255
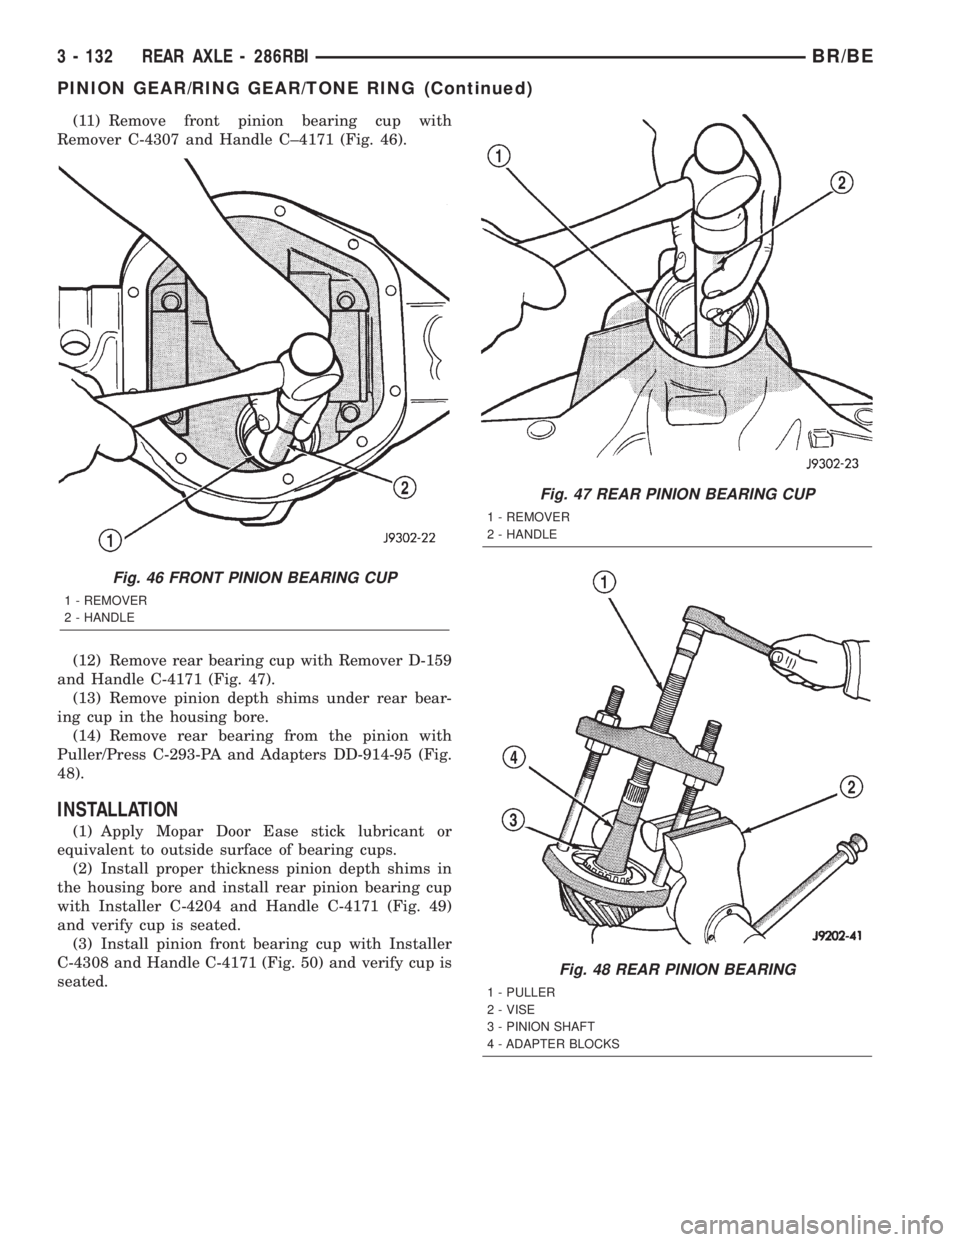
(11) Remove front pinion bearing cup with
Remover C-4307 and Handle C±4171 (Fig. 46).
(12) Remove rear bearing cup with Remover D-159
and Handle C-4171 (Fig. 47).
(13) Remove pinion depth shims under rear bear-
ing cup in the housing bore.
(14) Remove rear bearing from the pinion with
Puller/Press C-293-PA and Adapters DD-914-95 (Fig.
48).
INSTALLATION
(1) Apply Mopar Door Ease stick lubricant or
equivalent to outside surface of bearing cups.
(2) Install proper thickness pinion depth shims in
the housing bore and install rear pinion bearing cup
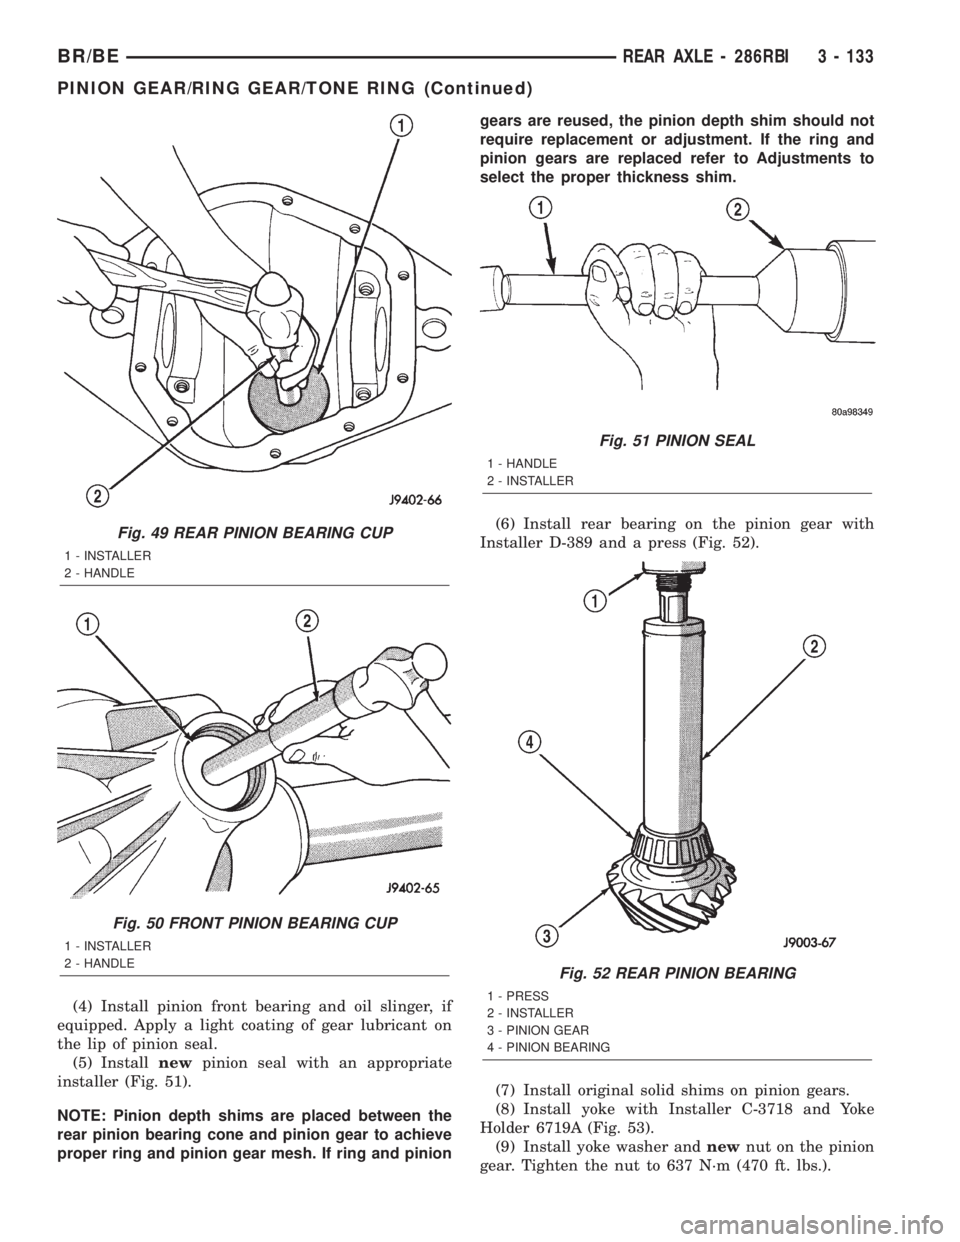
with Installer C-4204 and Handle C-4171 (Fig. 49)
and verify cup is seated.
(3) Install pinion front bearing cup with Installer
C-4308 and Handle C-4171 (Fig. 50) and verify cup is
seated.
Fig. 46 FRONT PINION BEARING CUP
1 - REMOVER
2 - HANDLE
Fig. 47 REAR PINION BEARING CUP
1 - REMOVER
2 - HANDLE
Fig. 48 REAR PINION BEARING
1 - PULLER
2 - VISE
3 - PINION SHAFT
4 - ADAPTER BLOCKS
3 - 132 REAR AXLE - 286RBIBR/BE
PINION GEAR/RING GEAR/TONE RING (Continued)
Page 188 of 2255
(4) Install pinion front bearing and oil slinger, if
equipped. Apply a light coating of gear lubricant on
the lip of pinion seal.
(5) Installnewpinion seal with an appropriate
installer (Fig. 51).
NOTE: Pinion depth shims are placed between the
rear pinion bearing cone and pinion gear to achieve
proper ring and pinion gear mesh. If ring and piniongears are reused, the pinion depth shim should not
require replacement or adjustment. If the ring and
pinion gears are replaced refer to Adjustments to
select the proper thickness shim.
(6) Install rear bearing on the pinion gear with
Installer D-389 and a press (Fig. 52).
(7) Install original solid shims on pinion gears.
(8) Install yoke with Installer C-3718 and Yoke
Holder 6719A (Fig. 53).
(9) Install yoke washer andnewnut on the pinion
gear. Tighten the nut to 637 N´m (470 ft. lbs.).
Fig. 49 REAR PINION BEARING CUP
1 - INSTALLER
2 - HANDLE
Fig. 50 FRONT PINION BEARING CUP
1 - INSTALLER
2 - HANDLE
Fig. 51 PINION SEAL
1 - HANDLE
2 - INSTALLER
Fig. 52 REAR PINION BEARING
1 - PRESS
2 - INSTALLER
3 - PINION GEAR
4 - PINION BEARING
BR/BEREAR AXLE - 286RBI 3 - 133
PINION GEAR/RING GEAR/TONE RING (Continued)
Page 189 of 2255
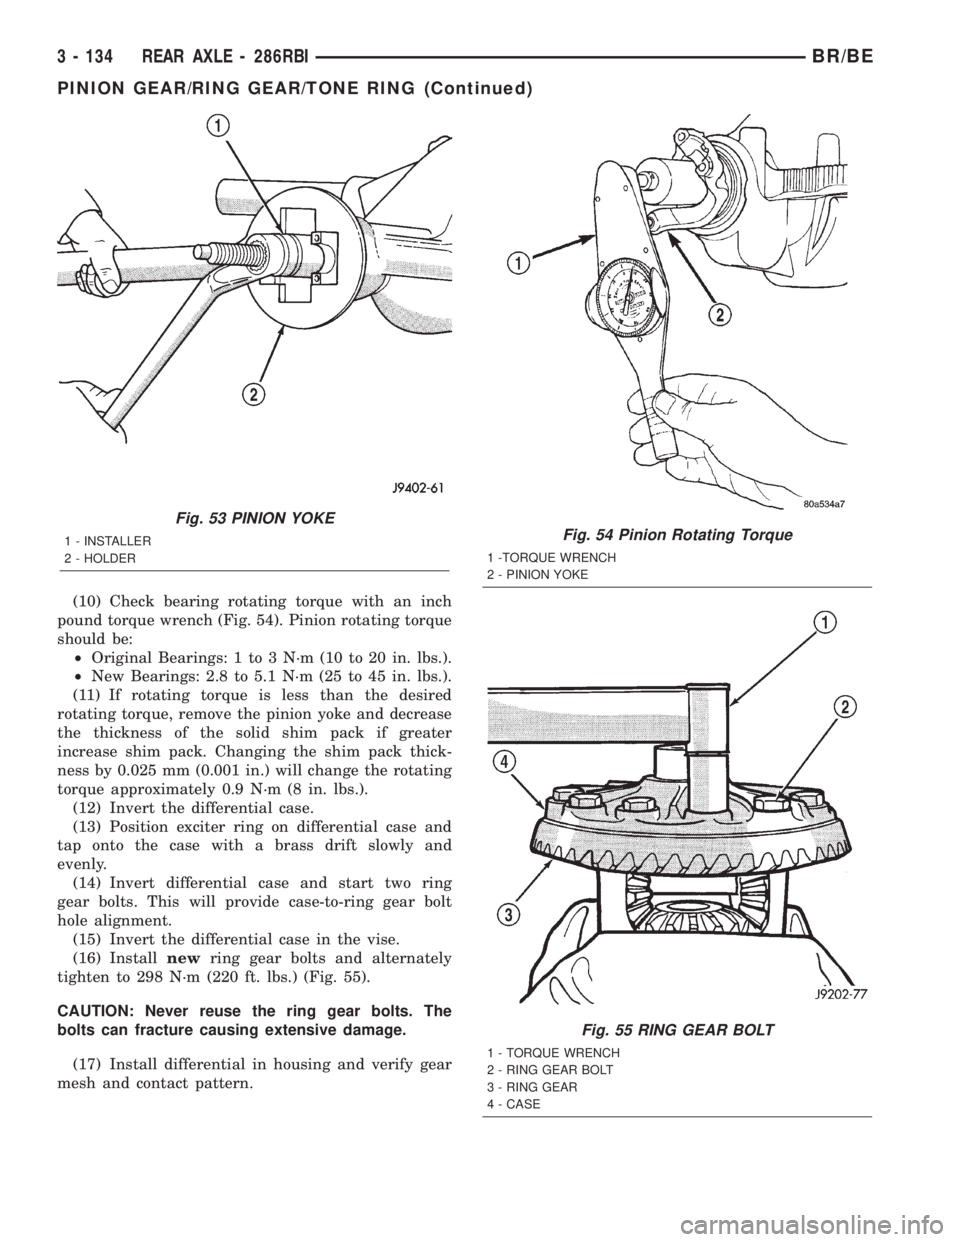
(10) Check bearing rotating torque with an inch
pound torque wrench (Fig. 54). Pinion rotating torque
should be:
²Original Bearings: 1 to 3 N´m (10 to 20 in. lbs.).
²New Bearings: 2.8 to 5.1 N´m (25 to 45 in. lbs.).
(11) If rotating torque is less than the desired
rotating torque, remove the pinion yoke and decrease
the thickness of the solid shim pack if greater
increase shim pack. Changing the shim pack thick-
ness by 0.025 mm (0.001 in.) will change the rotating
torque approximately 0.9 N´m (8 in. lbs.).
(12) Invert the differential case.
(13) Position exciter ring on differential case and
tap onto the case with a brass drift slowly and
evenly.
(14) Invert differential case and start two ring
gear bolts. This will provide case-to-ring gear bolt
hole alignment.
(15) Invert the differential case in the vise.
(16) Installnewring gear bolts and alternately
tighten to 298 N´m (220 ft. lbs.) (Fig. 55).
CAUTION: Never reuse the ring gear bolts. The
bolts can fracture causing extensive damage.
(17) Install differential in housing and verify gear
mesh and contact pattern.
Fig. 53 PINION YOKE
1 - INSTALLER
2 - HOLDERFig. 54 Pinion Rotating Torque
1 -TORQUE WRENCH
2 - PINION YOKE
Fig. 55 RING GEAR BOLT
1 - TORQUE WRENCH
2 - RING GEAR BOLT
3 - RING GEAR
4 - CASE
3 - 134 REAR AXLE - 286RBIBR/BE
PINION GEAR/RING GEAR/TONE RING (Continued)
Page 190 of 2255
BRAKES
TABLE OF CONTENTS
page page
BRAKES - BASE........................... 1BRAKES - ABS........................... 35
BRAKES - BASE
TABLE OF CONTENTS
page page
BRAKES - BASE
SPECIFICATIONS
BASE BRAKE.........................2
TORQUE CHART......................3
SPECIAL TOOLS
BASE BRAKES........................4
HYDRAULIC/MECHANICAL
DESCRIPTION..........................4
WARNING.............................4
DIAGNOSIS AND TESTING - BASE BRAKE
SYSTEM.............................5
STANDARD PROCEDURE
STANDARD PROCEDURE - MANUAL
BLEEDING............................7
STANDARD PROCEDURE - PRESSURE
BLEEDING............................8
BRAKE LINES
STANDARD PROCEDURE
STANDARD PROCEDURE - DOUBLE
INVERTED FLARING....................8
STANDARD PROCEDURE - ISO FLARING . . . 8
COMBINATION VALVE
DESCRIPTION..........................8
OPERATION............................9
DIAGNOSIS AND TESTING - COMBINATION
VALVE ...............................9
REMOVAL.............................9
INSTALLATION..........................9
DISC BRAKE CALIPERS
DESCRIPTION.........................10
OPERATION...........................10
REMOVAL
REMOVAL - REAR.....................10
REMOVAL - FRONT....................11
DISASSEMBLY.........................11
CLEANING............................12
INSPECTION..........................12ASSEMBLY............................13
INSTALLATION
INSTALLATION - REAR.................14
INSTALLATION - FRONT................14
FLUID
DIAGNOSIS AND TESTING - BRAKE FLUID
CONTAMINATION.....................15
STANDARD PROCEDURE - BRAKE FLUID
LEVEL..............................15
SPECIFICATIONS
BRAKE FLUID........................15
FLUID RESERVOIR
REMOVAL.............................15
INSTALLATION.........................15
PEDAL
DESCRIPTION.........................17
OPERATION...........................17
REMOVAL.............................17
INSTALLATION.........................17
POWER BRAKE BOOSTER
DIAGNOSIS AND TESTING - HYDRAULIC
BOOSTER...........................18
STANDARD PROCEDURE - BLEEDING......19
REMOVAL.............................19
INSTALLATION.........................19
ROTORS
DIAGNOSIS AND TESTING
DISC BRAKE ROTOR..................20
REMOVAL
REMOVAL - REAR.....................21
REMOVAL - FRONT ± 2500..............22
REMOVAL - FRONT - 3500..............22
INSTALLATION
INSTALLATION - REAR.................22
INSTALLATION - FRONT ± 2500..........23
INSTALLATION - FRONT - 3500...........23
BR/BEBRAKES 5 - 1