FIAT DUCATO 2006 Owner handbook (in English)
Manufacturer: FIAT, Model Year: 2006, Model line: DUCATO, Model: FIAT DUCATO 2006Pages: 238, PDF Size: 3.29 MB
Page 51 of 238
50
SAFETY
DEVICES
CORRECT USE
OF THE
VEHICLE
WARNING
LIGHTS AND
MESSAGES
IN AN
EMERGENCY
VEHICLE
MAINTENANCE
TECHNICAL
SPECIFICATIONS
INDEX
DASHBOARD
AND CONTROLS
AIR RECIRCULATION
Turn knob Dto
Ò.
This function is particularly useful when
the outside air is heavily polluted (in a traf-
fic jam, tunnel etc.). However, it is better
not to use it for long periods, especially
if there several people in the vehicle.
IMPORTANT The inside air recirculation
system makes it possible (according to the
selected operating modes) to reach the
required “heating” or “cooling” conditions
faster.
Do not use the air recirculation function
on rainy/cold days as it would consider-
ably increase the possibility of the win-
dows misting inside. Window demisting
In the event of considerable outside mois-
ture and/or rain and/or considerable dif-
ferences in temperature inside and outside
the passenger compartment, perform the
following preventive demisting procedure:
❒turn slider Ato red section;
❒turn air recirculation off by turning
knob Dto
Ú;
❒turn slider Cto -or to ®if the
windows do not demist;
❒turn knob Bto 2nd speed.
IMPORTANT The climate control system
is very useful to prevent window misting
up in presence of high humidity since it de-
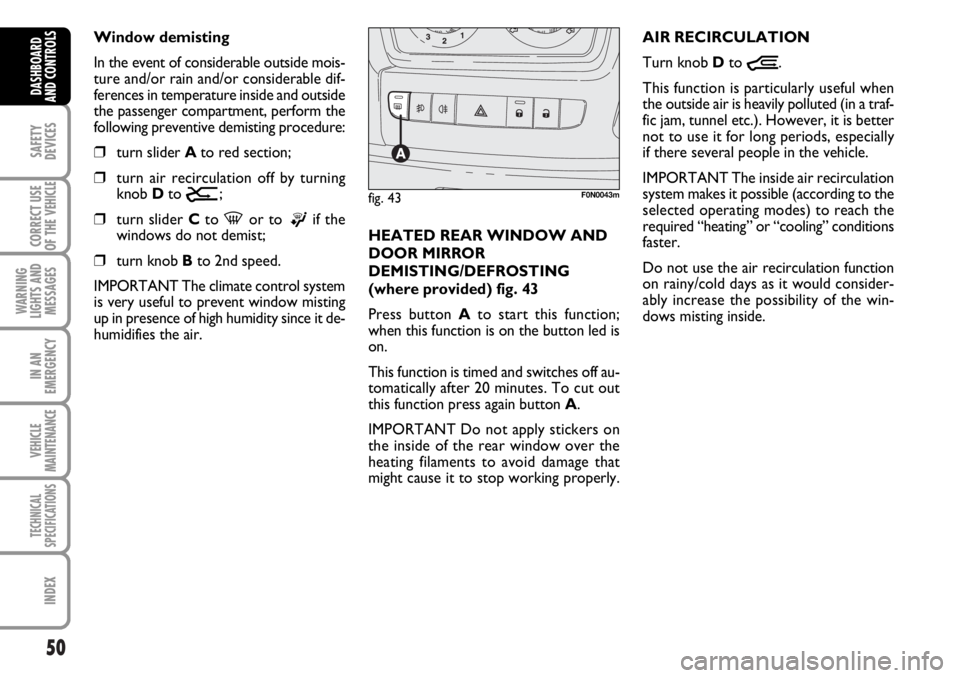
humidifies the air.HEATED REAR WINDOW AND
DOOR MIRROR
DEMISTING/DEFROSTING
(where provided) fig. 43
Press button Ato start this function;
when this function is on the button led is
on.
This function is timed and switches off au-
tomatically after 20 minutes. To cut out
this function press again button A.
IMPORTANT Do not apply stickers on
the inside of the rear window over the
heating filaments to avoid damage that
might cause it to stop working properly.
fig. 43F0N0043m
Page 52 of 238
51
SAFETY
DEVICES
CORRECT USE
OF THE
VEHICLE
WARNING
LIGHTS AND
MESSAGES
IN AN
EMERGENCY
VEHICLE
MAINTENANCE
TECHNICAL
SPECIFICATIONS
INDEX
DASHBOARD
AND CONTROLS
LOOKING AFTER THE SYSTEM
During winter, the climate control system
must be turned on at least once a month
for about 10 minutes. Before summer,
have the system checked at a Fiat Deal-
ership.
The system is filled with
R134a refrigerant which will
not pollute the environment
in the event of leakage. Un-
der no circumstances should R12 fluid
be used as it is incompatible with the
system components.SUPPLEMENTARY
HEATER
(where provided)
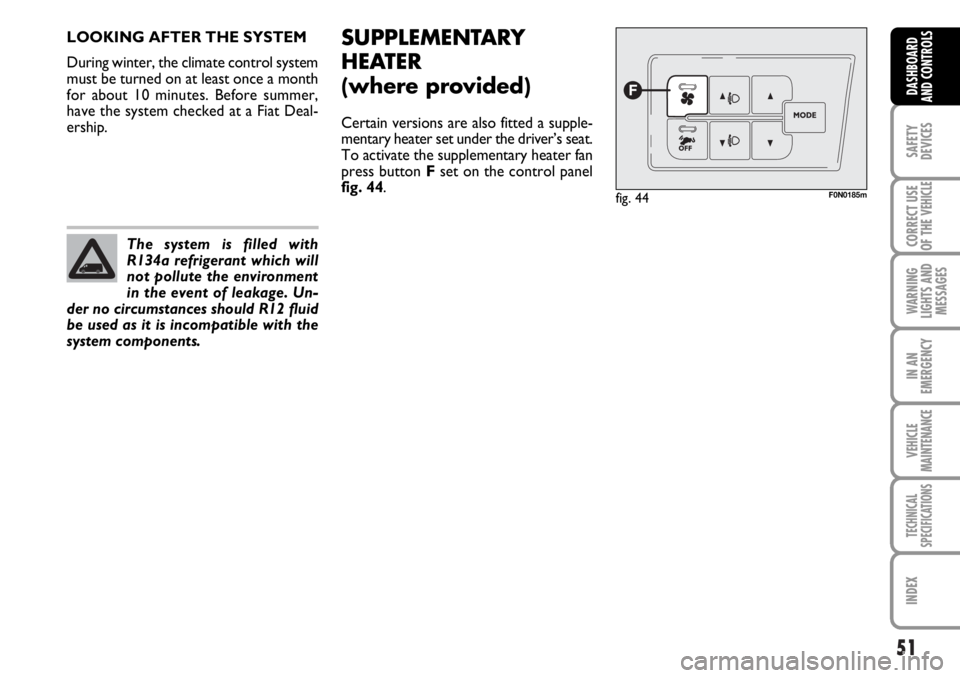
Certain versions are also fitted a supple-
mentary heater set under the driver’s seat.
To activate the supplementary heater fan
press button Fset on the control panel
fig. 44.
fig. 44F0N0185m
Page 53 of 238
52
SAFETY
DEVICES
CORRECT USE
OF THE
VEHICLE
WARNING
LIGHTS AND
MESSAGES
IN AN
EMERGENCY
VEHICLE
MAINTENANCE
TECHNICAL
SPECIFICATIONS
INDEX
DASHBOARD
AND CONTROLS
SELF-STANDING
SUPPLEMENTARY
HEATER
(where provided)
Fiat Ducato can be equipped, upon re-
quest, with two different self-standing
heaters: one is totally automatic whereas
the other is programmable.
AUTOMATIC VERSION
The supplementary heater will activate au-
tomatically with engine turned on and
proper engine coolant and outside tem-
perature conditions. Deactivation is always
automatic.PROGRAMMABLE VERSION
The supplementary heater is totally inde-
pendent from the engine and can be used
to:
❒heat the passenger compartment
when the engine is off;
❒defrost the windows;
❒heat the engine coolant and conse-
quently the engine before starting.The system consists of:
❒diesel burner to heat coolant with ex-
haust fume muffler;
❒metering pump connected to the ve-
hicle fuel pipes to feed the burner;
❒heat exchanger connected to the en-
gine cooling system pipes;
The heater burns fuel in the
same way as the engine,
though, of course, to a lesser degree
and therefore to avoid intoxication
and suffocation, never use the sup-
plementary heater in closed areas,
garages or workshops not equipped
with specific exhaust evacuation de-
vices even for short periods of time.
WARNING
Page 54 of 238
53
SAFETY
DEVICES
CORRECT USE
OF THE
VEHICLE
WARNING
LIGHTS AND
MESSAGES
IN AN
EMERGENCY
VEHICLE
MAINTENANCE
TECHNICAL
SPECIFICATIONS
INDEX
DASHBOARD
AND CONTROLS
In cold weather, the supplementary heater
warms and circulates constant tempera-
ture fluid in the engine cooling system for
the time required to ensure optimal en-
gine ignition and passenger compartment
temperature conditions.
The heater can be started automatically
(programmed by means of the digital
timer) or manually by pressing the “heat
now” button on the timer.
When the heater is turned on (automat-
ically or manually), the electronic control
unit operates the fluid circulation pump
and safely ignites the burner according to
preset and controlled modes.
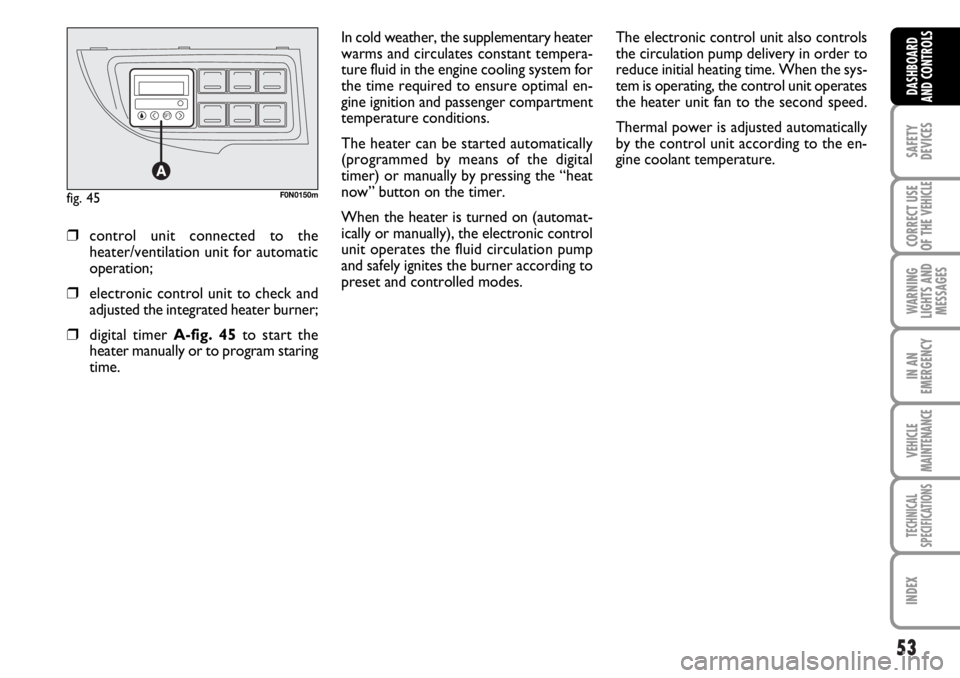
❒control unit connected to the
heater/ventilation unit for automatic
operation;
❒electronic control unit to check and
adjusted the integrated heater burner;
❒digital timer A-fig. 45to start the
heater manually or to program staring
time.The electronic control unit also controls
the circulation pump delivery in order to
reduce initial heating time. When the sys-
tem is operating, the control unit operates
the heater unit fan to the second speed.
Thermal power is adjusted automatically
by the control unit according to the en-
gine coolant temperature.
fig. 45F0N0150m
Page 55 of 238

54
SAFETY
DEVICES
CORRECT USE
OF THE
VEHICLE
WARNING
LIGHTS AND
MESSAGES
IN AN
EMERGENCY
VEHICLE
MAINTENANCE
TECHNICAL
SPECIFICATIONS
INDEX
DASHBOARD
AND CONTROLS
IMPORTANT The heater is equipped with
a thermal switch which cuts off the heater
in the event of overheating caused by low
or leaking coolant. In this case, press the
program selection button to start the
heater again after repairing the cooling sys-
tem fault and/or topping up the fluid.
The heater can turn itself off after engine
ignition or if the flame goes out. In this
case, turn the heater off manually and at-
tempt to turn it back on again. If you can-
not turn the heater on, contact a Fiat
Dealership.Turning the heater on
To obtain max. performance from the
heater unit check that he heating/ventila-
tion unit knob is turned to “warm air”.
Digital timer fig. 46
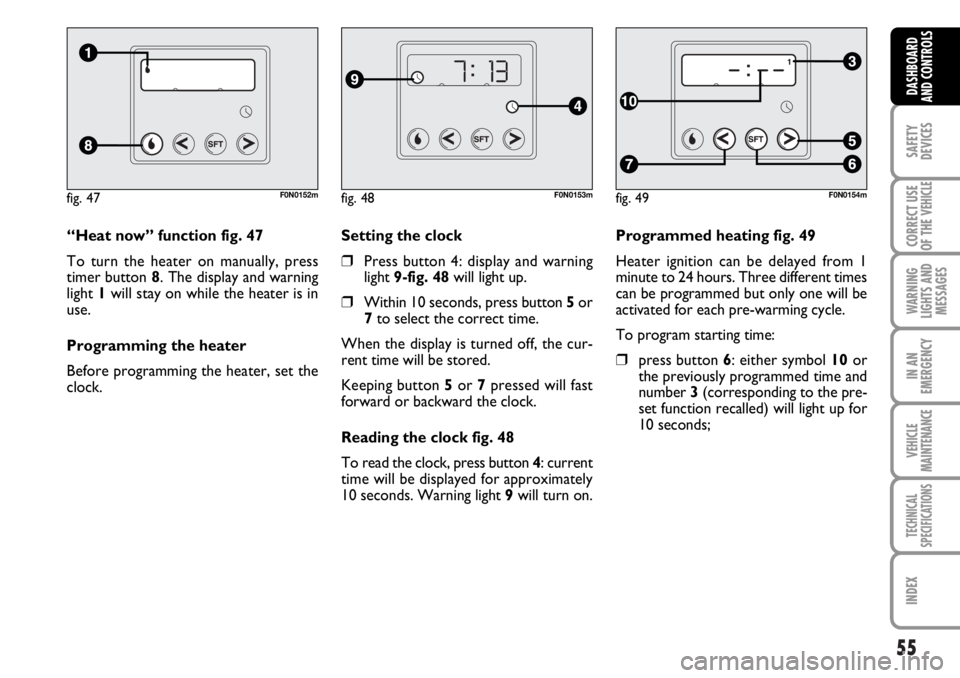
1) Heater cycle warning light
2) Display light
3) Clock pre-set recall number
4) Clock button
5) Hour “forward” button
6) Program selection button
7) Hour “back” button
8) Heat now button
9) Display/adjust time warning light
fig. 46F0N0151m
Page 56 of 238
55
SAFETY
DEVICES
CORRECT USE
OF THE
VEHICLE
WARNING
LIGHTS AND
MESSAGES
IN AN
EMERGENCY
VEHICLE
MAINTENANCE
TECHNICAL
SPECIFICATIONS
INDEX
DASHBOARD
AND CONTROLS
Programmed heating fig. 49
Heater ignition can be delayed from 1
minute to 24 hours. Three different times
can be programmed but only one will be
activated for each pre-warming cycle.
To program starting time:
❒press button 6: either symbol 10 or
the previously programmed time and
number 3 (corresponding to the pre-
set function recalled) will light up for
10 seconds; Setting the clock
❒Press button 4: display and warning
light 9-fig. 48will light up.
❒Within 10 seconds, press button 5or
7to select the correct time.
When the display is turned off, the cur-
rent time will be stored.
Keeping button 5or 7pressed will fast
forward or backward the clock.
Reading the clock fig. 48
To read the clock, press button 4: current
time will be displayed for approximately
10 seconds. Warning light 9will turn on. “Heat now” function fig. 47
To turn the heater on manually, press
timer button 8. The display and warning
light 1will stay on while the heater is in
use.
Programming the heater
Before programming the heater, set the
clock.
fig. 47F0N0152mfig. 48F0N0153mfig. 49F0N0154m
Page 57 of 238
56
SAFETY
DEVICES
CORRECT USE
OF THE
VEHICLE
WARNING
LIGHTS AND
MESSAGES
IN AN
EMERGENCY
VEHICLE
MAINTENANCE
TECHNICAL
SPECIFICATIONS
INDEX
DASHBOARD
AND CONTROLS
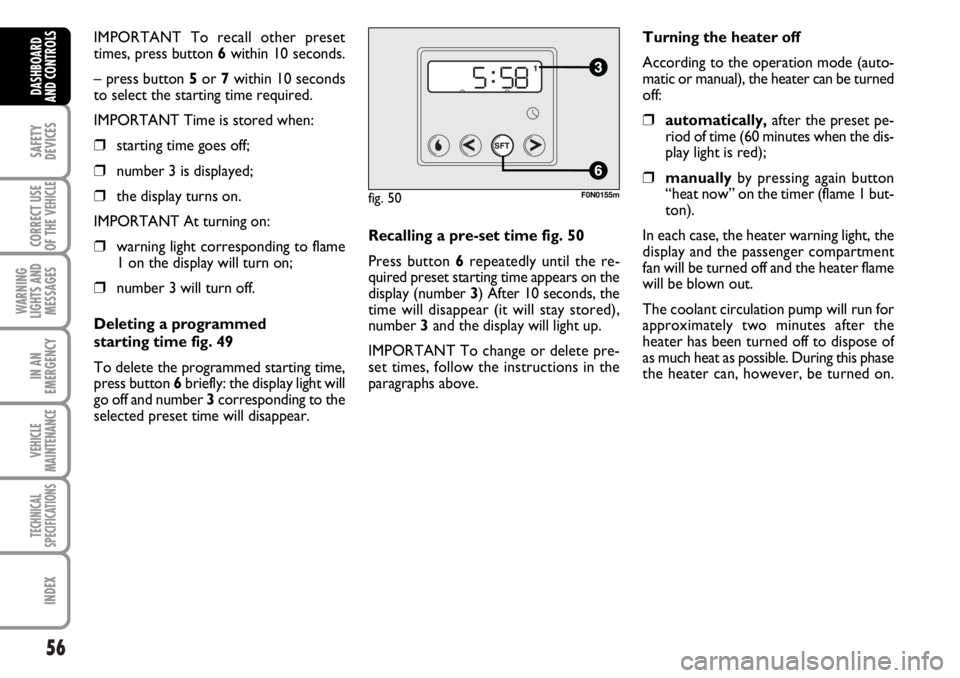
IMPORTANT To recall other preset
times, press button 6within 10 seconds.
– press button 5or 7within 10 seconds
to select the starting time required.
IMPORTANT Time is stored when:
❒starting time goes off;
❒number 3 is displayed;
❒the display turns on.
IMPORTANT At turning on:
❒warning light corresponding to flame
1 on the display will turn on;
❒number 3 will turn off.
Deleting a programmed
starting time fig. 49
To delete the programmed starting time,
press button 6briefly: the display light will
go off and number 3corresponding to the
selected preset time will disappear.Recalling a pre-set time fig. 50
Press button 6repeatedly until the re-
quired preset starting time appears on the
display (number 3) After 10 seconds, the
time will disappear (it will stay stored),
number 3 and the display will light up.
IMPORTANT To change or delete pre-
set times, follow the instructions in the
paragraphs above.Turning the heater off
According to the operation mode (auto-
matic or manual), the heater can be turned
off:
❒automatically,after the preset pe-
riod of time (60 minutes when the dis-
play light is red);
❒manuallyby pressing again button
“heat now” on the timer (flame 1 but-
ton).
In each case, the heater warning light, the
display and the passenger compartment
fan will be turned off and the heater flame
will be blown out.
The coolant circulation pump will run for
approximately two minutes after the
heater has been turned off to dispose of
as much heat as possible. During this phase
the heater can, however, be turned on.
fig. 50F0N0155m
Page 58 of 238
57
SAFETY
DEVICES
CORRECT USE
OF THE
VEHICLE
WARNING
LIGHTS AND
MESSAGES
IN AN
EMERGENCY
VEHICLE
MAINTENANCE
TECHNICAL
SPECIFICATIONS
INDEX
DASHBOARD
AND CONTROLS
❒Always remember to turn the heater
off when refuelling or standing in ser-
vice stations to avoid fires and explo-
sions.
❒Do not park the vehicle over inflam-
mable material such as paper, dry grass
or leaves: fire risk!
❒The temperature near the heater must
never exceed 120°C (e.g. during paint-
ing operations in a workshop oven).
Higher temperatures could damage
the electronic control unit compo-
nents.
❒When the engine is off, the heater takes
power from the battery: it is conse-
quently important to run the engine for
a certain period of time in order to re-
store the battery charge.
❒Follow the prescriptions in section
“Vehicle maintenance” at paragraph
“Engine coolant level” to check the
coolant level. The coolant in the cir-
cuit must contain at least 10% an-
tifreeze fluid.
❒Maintenance and repairs must always
be carried out by a Fiat Dealership and
only genuine spare parts must be used.
MAINTENANCE
Have the heater checked at a Fiat Deal-
ership periodically (always before winter).
This will ensure safe and cheap running
and long appliance life.
The heater burns fuel in the
same way as the engine,
though, of course, to a lesser degree
and therefore to avoid intoxication
and suffocation, never use the sup-
plementary heater in closed areas,
garages or workshops not equipped
with specific exhaust evacuation de-
vices even for short periods of time.
WARNING
Page 59 of 238
58
SAFETY
DEVICES
CORRECT USE
OF THE
VEHICLE
WARNING
LIGHTS AND
MESSAGES
IN AN
EMERGENCY
VEHICLE
MAINTENANCE
TECHNICAL
SPECIFICATIONS
INDEX
DASHBOARD
AND CONTROLS
EXTERNAL LIGHTS
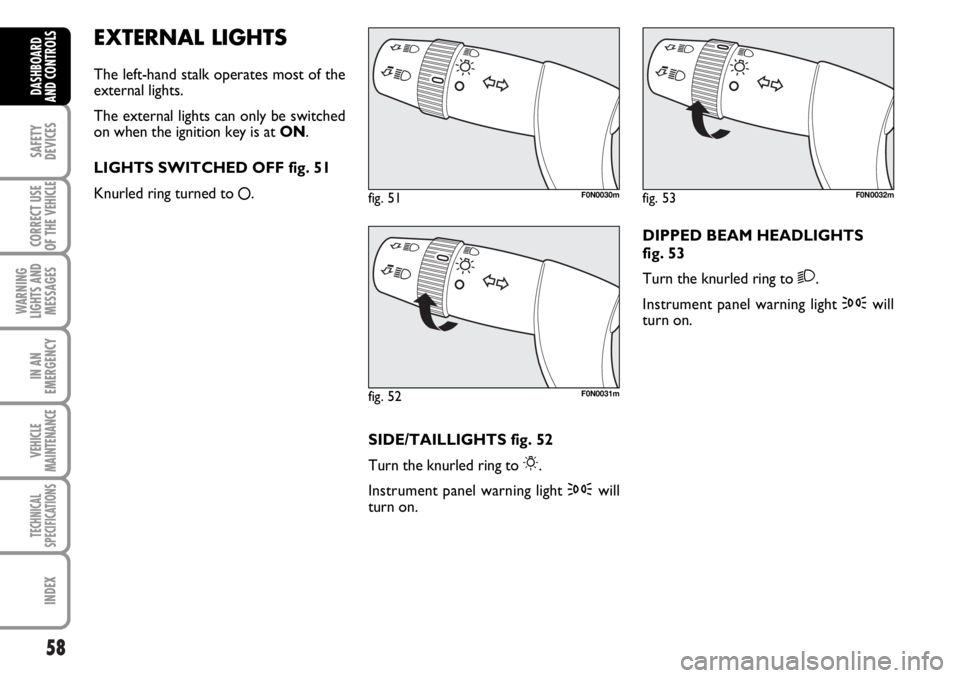
The left-hand stalk operates most of the
external lights.
The external lights can only be switched
on when the ignition key is at ON.
LIGHTS SWITCHED OFF fig. 51
Knurled ring turned to
å.
fig. 51F0N0030m
fig. 52F0N0031m
fig. 53F0N0032m
SIDE/TAILLIGHTS fig. 52
Turn the knurled ring to
6.
Instrument panel warning light 3will
turn on.DIPPED BEAM HEADLIGHTS
fig. 53
Turn the knurled ring to
2.
Instrument panel warning light 3will
turn on.
Page 60 of 238
59
SAFETY
DEVICES
CORRECT USE
OF THE
VEHICLE
WARNING
LIGHTS AND
MESSAGES
IN AN
EMERGENCY
VEHICLE
MAINTENANCE
TECHNICAL
SPECIFICATIONS
INDEX
DASHBOARD
AND CONTROLS
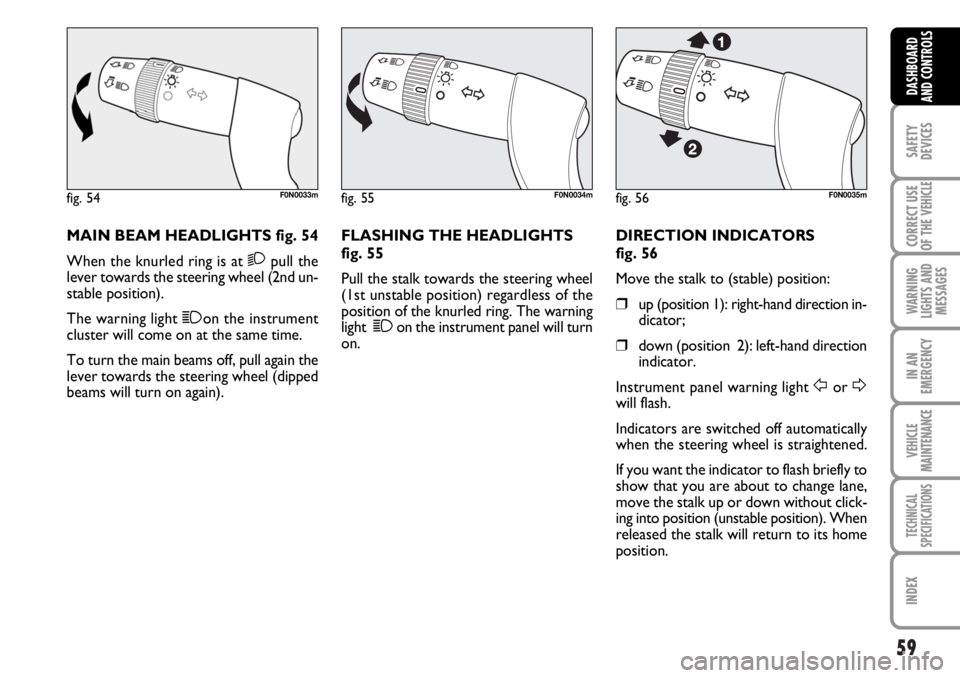
MAIN BEAM HEADLIGHTS fig. 54
When the knurled ring is at
2pull the
lever towards the steering wheel (2nd un-
stable position).
The warning light 1on the instrument
cluster will come on at the same time.
To turn the main beams off, pull again the
lever towards the steering wheel (dipped
beams will turn on again).FLASHING THE HEADLIGHTS
fig. 55
Pull the stalk towards the steering wheel
(1st unstable position) regardless of the
position of the knurled ring. The warning
light 1on the instrument panel will turn
on.DIRECTION INDICATORS
fig. 56
Move the stalk to (stable) position:
❒up (position 1): right-hand direction in-
dicator;
❒down (position 2): left-hand direction
indicator.
Instrument panel warning light
ForDwill flash.
Indicators are switched off automatically
when the steering wheel is straightened.
If you want the indicator to flash briefly to
show that you are about to change lane,
move the stalk up or down without click-
ing into position (unstable position). When
released the stalk will return to its home
position.
fig. 54F0N0033mfig. 55F0N0034mfig. 56F0N0035m