FIAT DUCATO 244 2002 3.G Connect NavPlus Manual
Manufacturer: FIAT, Model Year: 2002, Model line: DUCATO 244, Model: FIAT DUCATO 244 2002 3.GPages: 246, PDF Size: 3.39 MB
Page 171 of 246
CONNECT Nav+
170
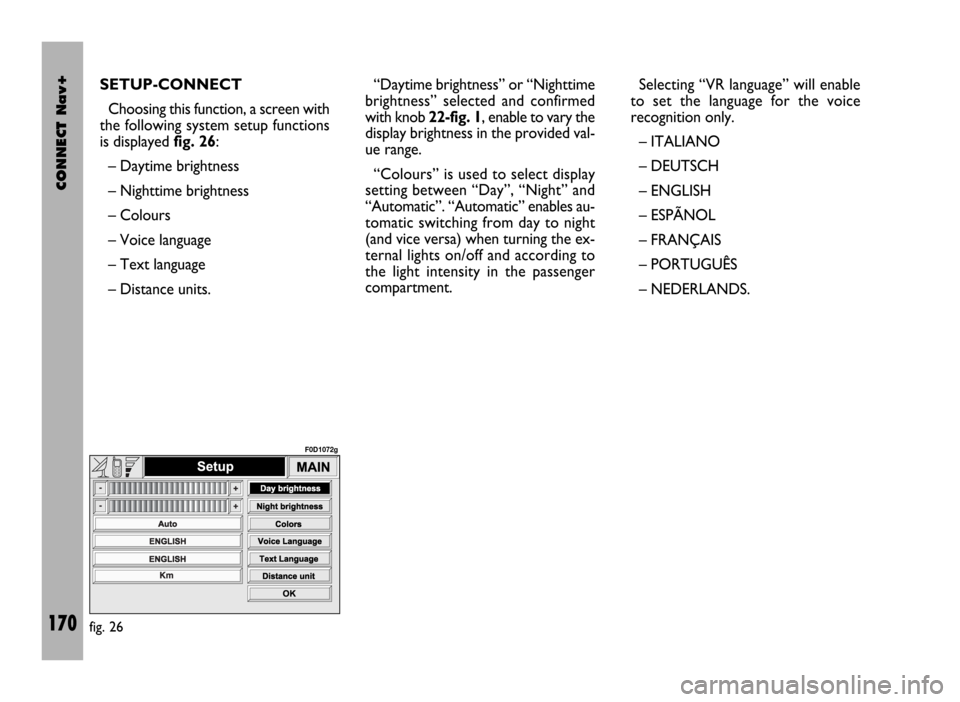
SETUP-CONNECT
Choosing this function, a screen with
the following system setup functions
is displayed fig. 26:
– Daytime brightness
– Nighttime brightness
– Colours
– Voice language
– Text language
– Distance units.“Daytime brightness” or “Nighttime
brightness” selected and confirmed
with knob 22-fig. 1, enable to vary the
display brightness in the provided val-
ue range.
“Colours” is used to select display
setting between “Day”, “Night” and
“Automatic”. “Automatic” enables au-
tomatic switching from day to night
(and vice versa) when turning the ex-
ternal lights on/off and according to
the light intensity in the passenger
compartment.Selecting “VR language” will enable
to set the language for the voice
recognition only.
– ITALIANO
– DEUTSCH
– ENGLISH
– ESPÃNOL
– FRANÇAIS
– PORTUGUÊS
– NEDERLANDS.
fig. 26
F0D1072g
Page 172 of 246

CONNECT Nav+
171
To change the CONNECT Nav+
language, set the required language and
the press “OK” to confirm.
A special message will then be dis-
played, asking the user to insert the
provided SETUP CD or to wait if the
SETUP CD is already inserted. A se-
ries of messages will inform the user
about procedure progress and end:
it is essential to not “disturb” the sys-
tem during this operation.
Do not start the engine or discon-
nect the battery during the language
change operation. Should this take place, the first time
you turn the CONNECT NAV+ on,
a special message will be displayed
communicating that the language
change operation shall be concluded
inserting the SETUP CD:
“WARNING: Language change failed.
Repeat procedure”.Distance units: this selection enables
to set the required unit (see “On-
board computer” - TRIP). Two selec-
tions are possible: km or mi, that can
be activated by turning knob
22-fig. 1; then press to confirm. Per-
formed selection will be immediately
displayed.
To quit the “Setup” screen and save
the chosen settings, select and confirm
“OK” with the knob 22-fig. 1.
Page 173 of 246
CONNECT Nav+
172
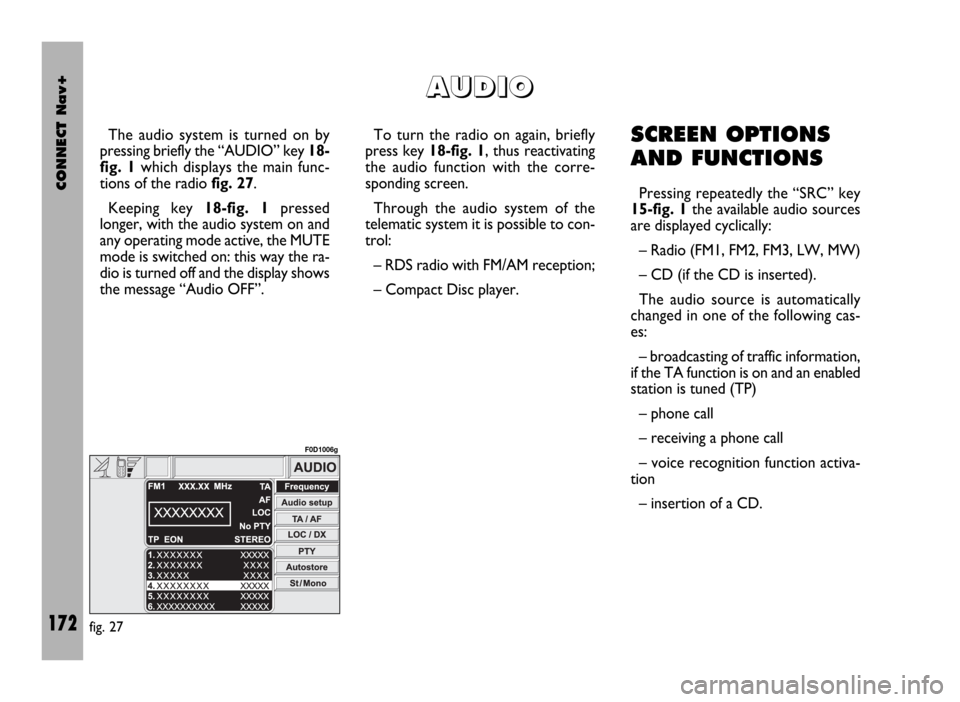
The audio system is turned on by
pressing briefly the “AUDIO” key 18-
fig. 1which displays the main func-
tions of the radio fig. 27.
Keeping key 18-fig. 1pressed
longer, with the audio system on and
any operating mode active, the MUTE
mode is switched on: this way the ra-
dio is turned off and the display shows
the message “Audio OFF”. To turn the radio on again, briefly
press key 18-fig. 1, thus reactivating
the audio function with the corre-
sponding screen.
Through the audio system of the
telematic system it is possible to con-
trol:
– RDS radio with FM/AM reception;
– Compact Disc player.SCREEN OPTIONS
AND FUNCTIONS
Pressing repeatedly the “SRC” key
15-fig. 1the available audio sources
are displayed cyclically:
– Radio (FM1, FM2, FM3, LW, MW)
– CD (if the CD is inserted).
The audio source is automatically
changed in one of the following cas-
es:
– broadcasting of traffic information,
if the TA function is on and an enabled
station is tuned (TP)
– phone call
– receiving a phone call
– voice recognition function activa-
tion
– insertion of a CD.
A A
U U
D D
I I
O O
fig. 27
F0D1006g
Page 174 of 246
CONNECT Nav+
173
“AUDIO SETUP”
FUNCTION
(AUDIO ADJUSTMENTS)
The audio parameters described in
this paragraph can be activated and
adjusted with all the audio sources
(Radio, CD).
Select and confirm “Audio setup”
from the main menu of one of the au-
dio sources, turning and pressing the
knob 22-fig. 1.
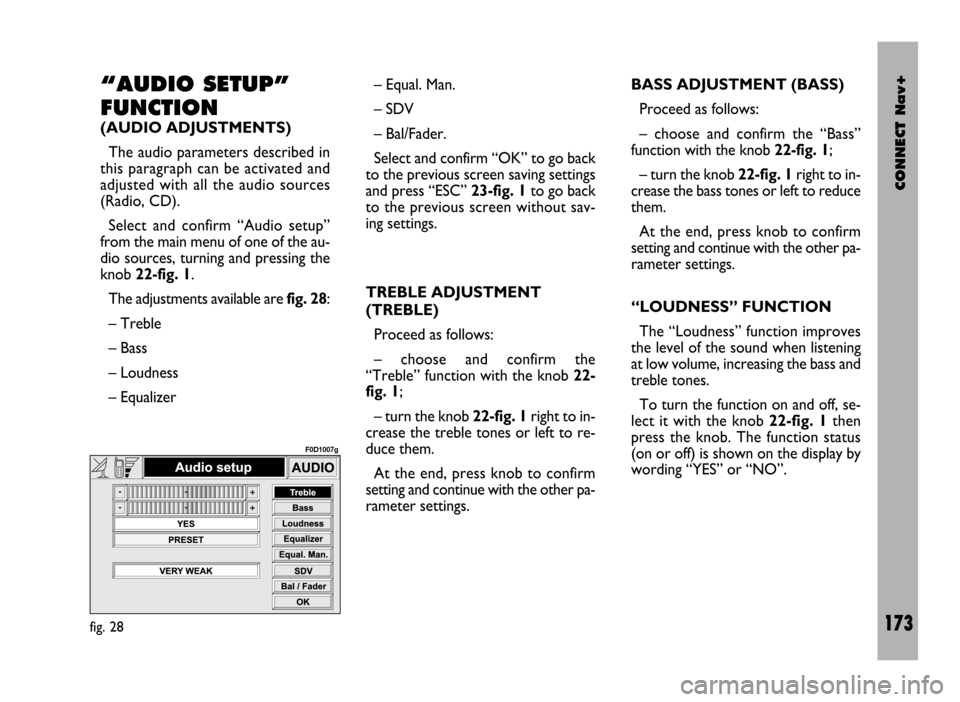
The adjustments available are fig. 28:
– Treble
– Bass
– Loudness
– Equalizer– Equal. Man.
– SDV
– Bal/Fader.
Select and confirm “OK” to go back
to the previous screen saving settings
and press “ESC” 23-fig. 1to go back
to the previous screen without sav-
ing settings.
TREBLE ADJUSTMENT
(TREBLE)
Proceed as follows:
– choose and confirm the
“Treble” function with the knob 22-
fig. 1;
– turn the knob 22-fig. 1right to in-
crease the treble tones or left to re-
duce them.
At the end, press knob to confirm
setting and continue with the other pa-
rameter settings. BASS ADJUSTMENT (BASS)
Proceed as follows:
– choose and confirm the “Bass”
function with the knob 22-fig. 1;
– turn the knob 22-fig. 1right to in-
crease the bass tones or left to reduce
them.
At the end, press knob to confirm
setting and continue with the other pa-
rameter settings.
“LOUDNESS” FUNCTION
The “Loudness” function improves
the level of the sound when listening
at low volume, increasing the bass and
treble tones.
To turn the function on and off, se-
lect it with the knob 22-fig. 1then
press the knob. The function status
(on or off) is shown on the display by
wording “YES” or “NO”.
fig. 28
F0D1007g
Page 175 of 246
CONNECT Nav+
174
“EQUALIZER” FUNCTION
With this function it is possible to
choose, among the predefined equal-
izer settings, the most appropriate one
for the music being listened to.
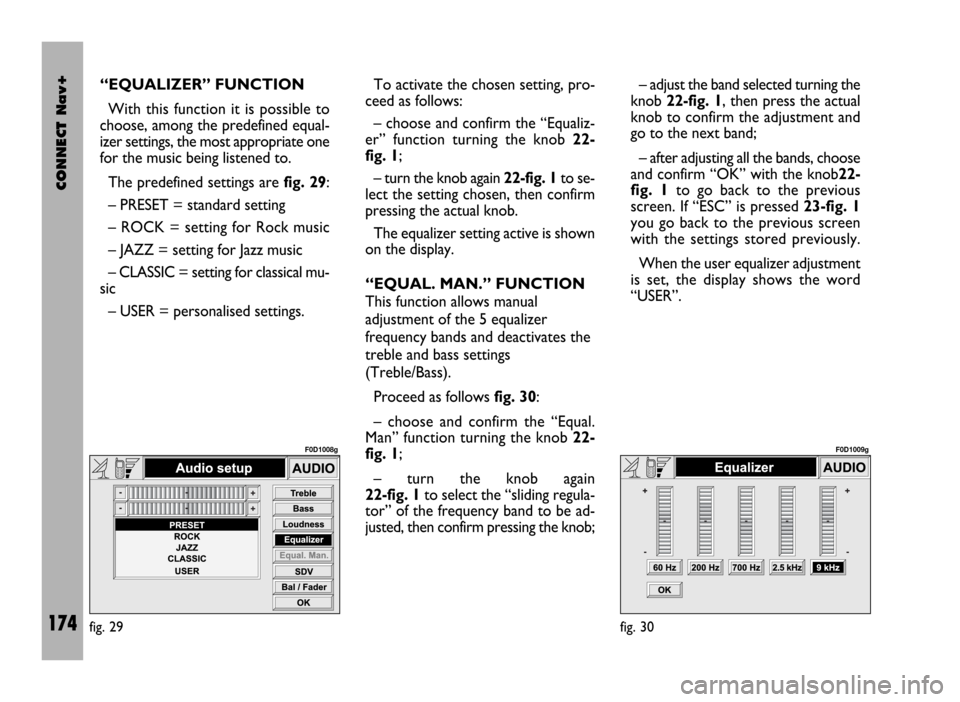
The predefined settings are fig. 29:
– PRESET = standard setting
– ROCK = setting for Rock music
– JAZZ = setting for Jazz music
– CLASSIC = setting for classical mu-
sic
– USER = personalised settings.To activate the chosen setting, pro-
ceed as follows:
– choose and confirm the “Equaliz-
er” function turning the knob 22-
fig. 1;
– turn the knob again 22-fig. 1to se-
lect the setting chosen, then confirm
pressing the actual knob.
The equalizer setting active is shown
on the display.
“EQUAL. MAN.” FUNCTION
This function allows manual
adjustment of the 5 equalizer
frequency bands and deactivates the
treble and bass settings
(Treble/Bass).
Proceed as follows fig. 30:
– choose and confirm the “Equal.
Man” function turning the knob 22-
fig. 1;
– turn the knob again
22-fig. 1to select the “sliding regula-
tor” of the frequency band to be ad-
justed, then confirm pressing the knob;– adjust the band selected turning the
knob 22-fig. 1, then press the actual
knob to confirm the adjustment and
go to the next band;
– after adjusting all the bands, choose
and confirm “OK” with the knob22-
fig. 1to go back to the previous
screen. If “ESC” is pressed 23-fig. 1
you go back to the previous screen
with the settings stored previously.
When the user equalizer adjustment
is set, the display shows the word
“USER”.
fig. 29
F0D1008g
fig. 30
F0D1009g
Page 176 of 246
CONNECT Nav+
175
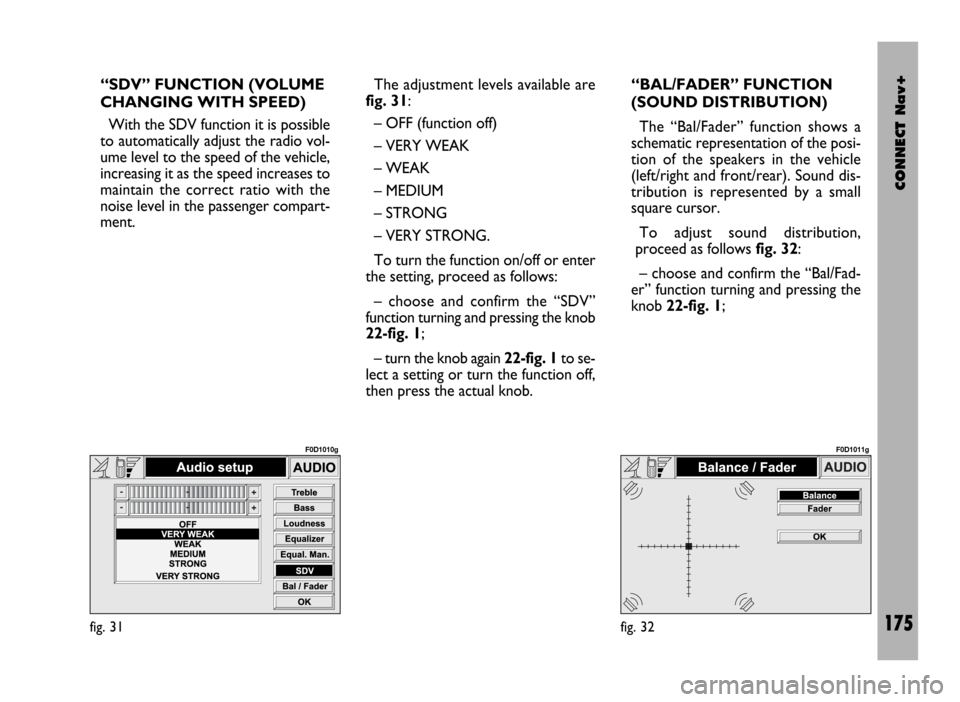
“SDV” FUNCTION (VOLUME
CHANGING WITH SPEED)
With the SDV function it is possible
to automatically adjust the radio vol-
ume level to the speed of the vehicle,
increasing it as the speed increases to
maintain the correct ratio with the
noise level in the passenger compart-
ment.The adjustment levels available are
fig. 31:
– OFF (function off)
– VERY WEAK
– WEAK
– MEDIUM
– STRONG
– VERY STRONG.
To turn the function on/off or enter
the setting, proceed as follows:
– choose and confirm the “SDV”
function turning and pressing the knob
22-fig. 1;
– turn the knob again 22-fig. 1to se-
lect a setting or turn the function off,
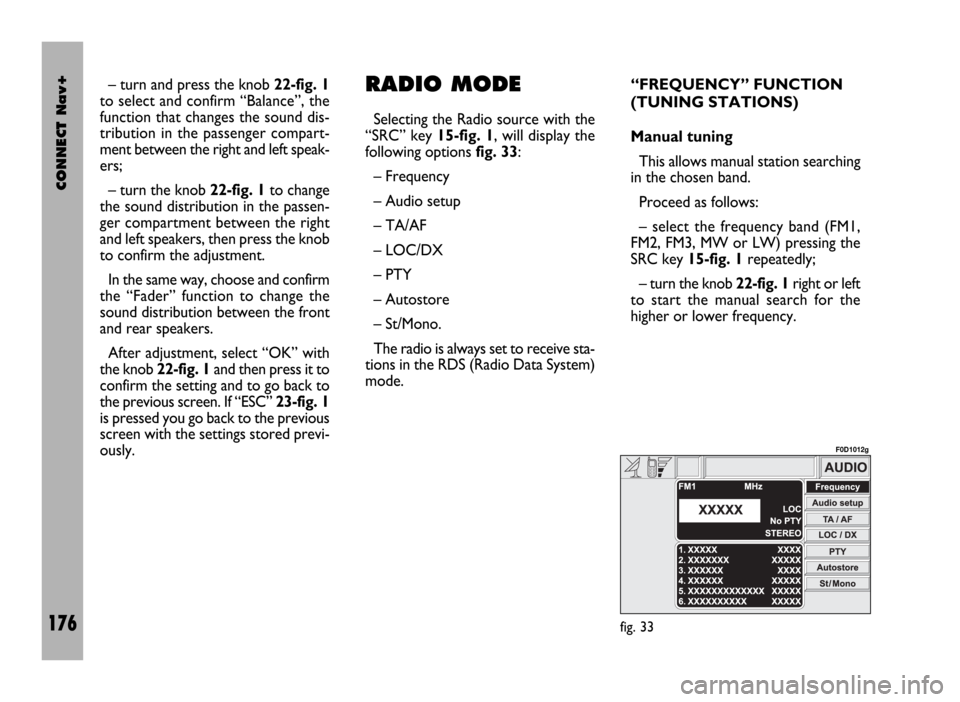
then press the actual knob.“BAL/FADER” FUNCTION
(SOUND DISTRIBUTION)
The “Bal/Fader” function shows a
schematic representation of the posi-
tion of the speakers in the vehicle
(left/right and front/rear). Sound dis-
tribution is represented by a small
square cursor.
To adjust sound distribution,
proceed as follows fig. 32:
– choose and confirm the “Bal/Fad-
er” function turning and pressing the
knob 22-fig. 1;
fig. 31
F0D1010g
fig. 32
F0D1011g
Page 177 of 246
CONNECT Nav+
176
– turn and press the knob 22-fig. 1
to select and confirm “Balance”, the
function that changes the sound dis-
tribution in the passenger compart-
ment between the right and left speak-
ers;
– turn the knob 22-fig. 1to change
the sound distribution in the passen-
ger compartment between the right
and left speakers, then press the knob
to confirm the adjustment.
In the same way, choose and confirm
the “Fader” function to change the
sound distribution between the front
and rear speakers.
After adjustment, select “OK” with
the knob 22-fig. 1and then press it to
confirm the setting and to go back to
the previous screen. If “ESC” 23-fig. 1
is pressed you go back to the previous
screen with the settings stored previ-
ously.RADIO MODE
Selecting the Radio source with the
“SRC” key 15-fig. 1, will display the
following options fig. 33:
– Frequency
– Audio setup
– TA/AF
– LOC/DX
– PTY
– Autostore
– St/Mono.
The radio is always set to receive sta-
tions in the RDS (Radio Data System)
mode.“FREQUENCY” FUNCTION
(TUNING STATIONS)
Manual tuning
This allows manual station searching
in the chosen band.
Proceed as follows:
– select the frequency band (FM1,
FM2, FM3, MW or LW) pressing the
SRC key 15-fig. 1repeatedly;
– turn the knob 22-fig. 1right or left
to start the manual search for the
higher or lower frequency.
fig. 33
F0D1012g
Page 178 of 246

CONNECT Nav+
177
Automatic tuning
This function seeks automatically sta-
tions in the chosen band.
Proceed as follows:
– select the frequency band (FM1,
FM2, FM3, LW or MW) pressing re-
peatedly the SRC key 15-fig. 1;
– Press key 11-fig. 1o 12-fig. 1to
start the automatic search for tuning
the next station that can be received
in the direction chosen, respectively
lowering or highering the frequency;
the display will show “SEEK”.
If the “TA” function is on (traffic in-
formation), the tuner only seeks sta-
tions that broadcast traffic bulletins.
If the “PTY” function is on, the tuner
only seeks PTY stations. Manual station
storage
The station being heard can be
stored in the range chosen with keys
1 ÷ 6-fig. 1.
Keep one of these keys pressed un-
til the display shows the number of the
key with which the station has been
stored.
Listening to stored stations
Proceed as follows:
– choose the required frequency
band
(FM1, FM2, FM3, LW or MW) press-
ing repeatedly the “SRC” key 15-
fig. 1;
– press briefly one of the keys 1÷6-
fig. 1.
In the FM1, FM2 and FM3 bands, if
reception is poor and the AF alterna-
tive frequency seek function is on, a
station with the strongest signal that
is broadcasting the same programme
is automatically sought. “AUDIO SETUP” FUNCTION
(AUDIO ADJUSTMENTS)
The audio parameters can be acti-
vated and adjusted in the same way
with all the audio sources (Radio, CD).
The adjustment procedures are de-
scribed in the related paragraph of the
previous chapter.
“TA” FUNCTION (TRAFFIC
INFORMATION)
Certain stations in the FM band
(FM1, FM2 and FM3) are also enabled
to broadcast information about the
conditions of the traffic. In this case
the displays shows the abbreviation
“TP”.
To turn the TA function (Traffic An-
nouncement) on/off for traffic bul-
letins, repeatedly press the knob 22-
fig. 1after selecting the TA/AF func-
tion.
The cyclic activation of the TA/AF
functions, which is obtained by brief
presses on the knob 22-fig. 1, is the
following: AF – TA – TA and AF –
both functions off – AF …etc.
Page 179 of 246

CONNECT Nav+
178
When the TA function is on the dis-
play shows “TA”.
The listening conditions and infor-
mation shown on the display may be
the following:
– TA and TP: you are tuned to a sta-
tion that broadcasts traffic information
and the traffic information function is on
– TP: you are tuned to a station that
broadcasts traffic information but the
traffic information function is off
– TA: the traffic information function
is on but you are tuned to a station
that does not broadcast traffic infor-
mation
– TA and TP not shown on the display:
you are tuned to a station that does not
broadcast traffic information and the
traffic information function is off.
With the TA function on it is possible:
1) to seek only RDS stations that
broadcast in the FM band, enabled to
broadcast traffic information;
2) to receive traffic information al-
so if the CD player is working;3) to receive traffic information at a
preset minimum level also with the ra-
dio volume down completely or in
stand-by.
The operations to be carried out for
each of the three above conditions are
listed below.
1) To receive stations enabled to
broadcast traffic information:
– choose band FM1, FM2 or FM3;
– turn on the TA function so that the
display shows “TA”;
– start seeking the frequencies.
2) If you wish to receive traffic in-
formation while listening to a CD, be-
fore inserting the CD, tune to a sta-
tion enabled to broadcast traffic in-
formation (TP) and turn the TA func-
tion on. If, while playing the CD, this
station broadcasts traffic information,
CD playing will be temporarily
stopped and resumed automatically at
the end of the message.
If the CD player is already working
and at the same time you wish to re-
ceive traffic information, turning on
the TA function, the radio tunes to thelast station heard in the FM band and
the traffic announcements are trans-
mitted. If the station selected does not
broadcast traffic information, an en-
abled station is sought automatically.
If you wish to interrupt a traffic an-
nouncement, turn off the TA function
while the announcement itself is being
broadcast.
3) To receive traffic information
though not listening to the radio:
– turn on the TA function, so that
the display shows the abbreviation
“TA”;
– tune to a station enabled to broad-
cast traffic information so that “TP”
is shown on the display;
– set the system in stand-by by press-
ing the “MAIN” key 17-fig. 1.
This way, if that station broadcasts
traffic information, this will be heard
at a minimum predefined volume.
IMPORTANTIn certain countries,
radio stations exist which though the
TP function is active (the display shows
“TP”), do not broadcast traffic infor-
mation.
Page 180 of 246

CONNECT Nav+
179
If the radio is working in the AM band,
choosing the FM band tunes to the last
station heard. If the chosen station does
not broadcast traffic information (“TP”
not shown on the display), an automatic
search is started for an enabled station.
If the volume is changed during a traf-
fic bulletin the value is not shown on
the display and the new value is kept
only for the bulletin in progress.
IMPORTANTIf the TA function is
on and the station tuned is not enabled
to provide traffic information or is no
longer able to broadcast this informa-
tion (the display does not show “TP”),
after about 1 minute in which the ra-
dio is in these conditions:
– if a CD is being played another sta-
tion enabled to broadcast traffic in-
formation is sought automatically
– if the radio is in use a warning s
sounding to alert that it is not possi-
ble to receive traffic information; to in-
terrupt it, it is necessary to tune to a
broadcaster enabled to give traffic in-
formation or switch off the TA func-
tion. “AF” FUNCTION
(SEEKING ALTERNATIVE
FREQUENCIES)
Within the RDS system the radio can
work in two different modes:
– AF ON: alternative frequency
search on;
– AF OFF: alternative frequency
search off.
When the signal of the RDS station
tuned weakens, the following two cas-
es may occur:
– With AF ON the RDS system ac-
tivates automatic tuning of the opti-
mum frequency of the station chosen,
with the stations enabled, therefore
the radio is automatically tuned to the
station with the strongest signal that
is broadcasting the same programme.
During the journey it will thus be pos-
sible to continue listening to the sta-
tion chosen without having to change
the frequency when changing area. Of
course, the station being listened to
must be receivable in the area the ve-
hicle is crossing.– With AF OFF the radio will not
tune the strongest station automati-
cally and it will have to be found man-
ually using the tuner buttons.
to turn the AF function on/off, re-
peatedly press the knob 22-fig. 1af-
ter selecting the TA/AF function.
The cyclic activation of the TA/AF
functions, which is obtained by brief
presses on the knob 22-
fig. 1, is the following: AF – TA – TA
and AF – both functions off – AF
…etc.
When the AF function is on the dis-
play shows “AF”.
The RDS channel name (if available)
is still shown on the display.
If the radio is working in the AM
band, when the “SRC” key 15-fig. 1
is pressed, it moves the FM band on
the last station chosen.