check FIAT FREEMONT 2016 1.G Repair Manual
[x] Cancel search | Manufacturer: FIAT, Model Year: 2016, Model line: FREEMONT, Model: FIAT FREEMONT 2016 1.GPages: 412, PDF Size: 3.36 MB
Page 331 of 412
Every3,000 km, check and top up, if required, the
engine oil level and automatic transmission fluid level
(four-speed automatic only).
Heavy-Duty Use Of The Car
If the car is used mainly under one of the following
conditions:
• towing a trailer or caravan;
• dusty roads;
• short, repeated journeys (less than 7-8 km) at sub- zero outside temperatures;
• engine often idling or driving long distances at low speeds or long periods of idleness.
You should perform the following inspections more
frequently than shown on the Scheduled Servicing Plan:
• check front disc brake pad conditions and wear;
• check cleanliness of hood and trunk locks, cleanli- ness and lubrication of linkage;
• visually inspect conditions of: engine, transmission, pipes and hoses (exhaust - fuel system - brakes) and
rubber elements (boots - sleeves - bushes - etc.);
• check battery charge and battery fluid level (electro- lyte); • visually inspect condition of the accessory drive
belts;
• check and, if necessary, change engine oil and replace oil filter;
• check and, if necessary, replace pollen filter;
• check and, if necessary, replace air cleaner.
MAINTENANCE SCHEDULE — DIESEL
ENGINE
To help you have the best driving experience possible,
the manufacturer has identified the specific vehicle
maintenance service intervals that are required to keep
your vehicle operating properly and safely.
The manufacturer recommends that these mainte-
nance intervals be performed at your selling dealer. The
technicians at your dealership know your vehicle best,
and have access to factory trained information, genuine
FIAT parts, and specially designed electronic and me-
chanical tools that can help prevent future costly re-
pairs.
The maintenance intervals shown should be performed
as indicated in this section.
325
KNOWING
YOUR
VEHICLE
SAFETY
STARTING
AND
DRIVING
WARNING
LIGHTS
AND
MESSAGES
IN AN
EMERGENCY
SERVICING
AND C ARE
TECHNICAL
SPECIFICATIONS
CONTENTS
Page 333 of 412
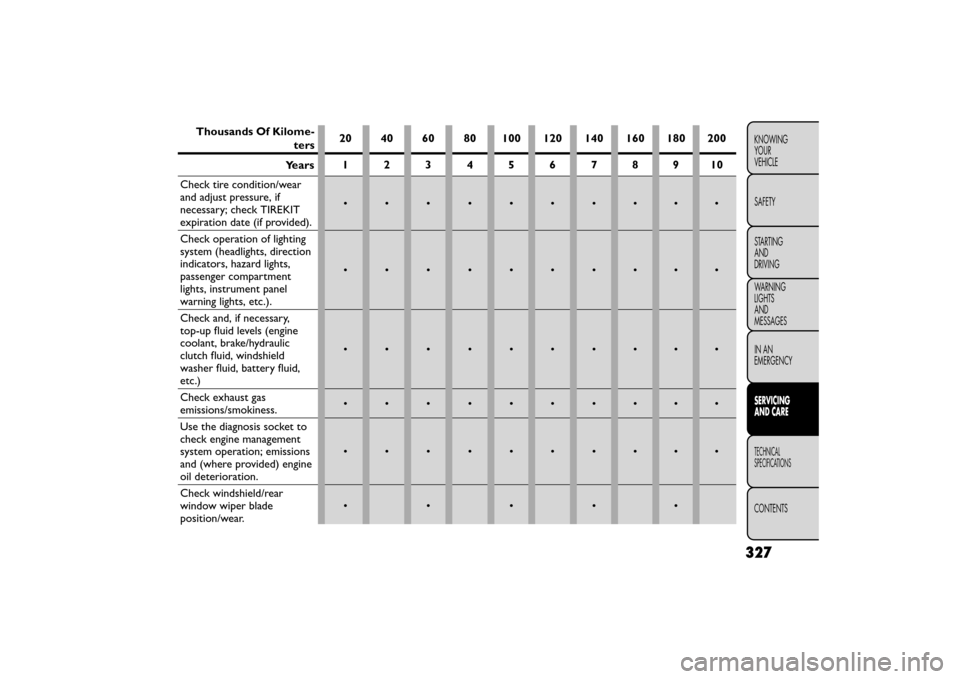
Thousands Of Kilome-
ters20 40 60 80 100 120 140 160 180 200
12345678910
Check tire condition/wear
and adjust pressure, if
necessary; check TIREKIT
expiration date (if provided).
••••••••••
Check operation of lighting
system (headlights, direction
indicators, hazard lights,
passenger compartment
lights, instrument panel
warning lights, etc.).
••••••••••
Check and, if necessary,
top-up fluid levels (engine
coolant, brake/hydraulic
clutch fluid, windshield
washer fluid, battery fluid,
etc.)
••••••••••
Check exhaust gas
emissions/smokiness.••••••••••
Use the diagnosis socket to
check engine management
system operation; emissions
and (where provided) engine
oil deterioration.
••••••••••
Check windshield/rear
window wiper blade
position/wear.
•••••
327
KNOWING YOURVEHICLE
SAFETY
STARTING ANDDRIVING
WARNING LIGHTSANDMESSAGES
IN AN EMERGENCY
SERVICING AND CARE
TECHNICALSPECIFICATIONS
CONTENTS
Years
Page 334 of 412
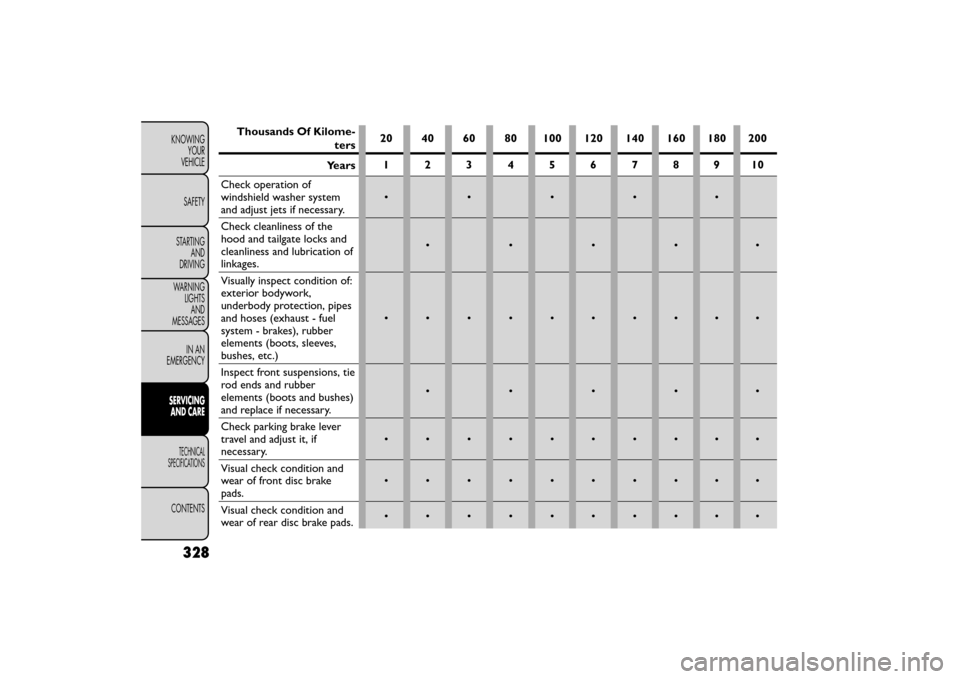
Thousands Of Kilome-
ters20 40 60 80 100 120 140 160 180 200
12345678910
Check operation of
windshield washer system
and adjust jets if necessary.
•••••
Check cleanliness of the
hood and tailgate locks and
cleanliness and lubrication of
linkages.
•••••
Visually inspect condition of:
exterior bodywork,
underbody protection, pipes
and hoses (exhaust - fuel
system - brakes), rubber
elements (boots, sleeves,
bushes, etc.)
••••••••••
Inspect front suspensions, tie
rod ends and rubber
elements (boots and bushes)
and replace if necessary.
•••••
Check parking brake lever
travel and adjust it, if
necessary.
••••••••••
Visual check condition and
wear of front disc brake
pads.
••••••••••
Visual check condition and
wear of rear disc brake pads.••••••••••
328
KNOWINGYOURVEHICLE
SAFETY
STARTINGANDDRIVING
WARNINGLIGHTSANDMESSAGES
IN ANEMERGENCY
SERVICINGAND CARE
TECHNICALSPECIFICATIONS
CONTENTS
Years
Page 337 of 412
Failure to perform the required mainte-
nance items may result in damage to the
vehicle.
Periodic Checks
Every 1,000 km or before long journeys, check and, if
necessary, restore:
• engine coolant;
• brake fluid;
• power steering fluid;
• windshield washer fluid level;
• tire inflation pressure and condition;
• operation of lighting system (headlights, direction indicators, hazard warning lights, etc.);
• operation of windshield washer/wiper system and positioning/wear of windshield/rear window wiper
blades.
Every 3,000 km, check and top up, if required, the
engine oil level.
Heavy-Duty Use Of The Car
If the car is used mainly under one of the following
conditions:
• towing a trailer or caravan; • dusty roads;
• short, repeated journeys (less than 7-8 km) at sub-
zero outside temperatures;
• engine often idling or driving long distances at low speeds or long periods of idleness.
You should perform the following inspections more
frequently than shown on the Scheduled Servicing Plan:
• check front disc brake pad conditions and wear;
• check cleanliness of hood and trunk locks, cleanli- ness and lubrication of linkage;
• visually inspect conditions of: engine, transmission, pipes and hoses (exhaust - fuel system - brakes) and
rubber elements (boots - sleeves - bushes - etc.);
• check battery charge and battery fluid level (electro- lyte);
• visually inspect condition of the accessory drive belts;
• check and, if necessary, change engine oil and replace oil filter;
• check and, if necessary, replace pollen filter;
• check and, if necessary, replace air cleaner.
331
KNOWING
YOUR
VEHICLE
SAFETY
STARTING
AND
DRIVING
WARNING
LIGHTS
AND
MESSAGES
IN AN
EMERGENCY
SERVICING
AND C ARE
TECHNICAL
SPECIFICATIONS
CONTENTS
Page 342 of 412

ENGINE OIL
Checking Oil Level — Gasoline Engine
To assure proper engine lubrication, the engine oil
must be maintained at the correct level. Check the oil
level at regular intervals, such as every fuel stop.
The best time to check the engine oil level is about five
minutes after a fully warmed engine is shut off. Do not
check oil level before starting the engine after it has sat
overnight. Checking engine oil level when the engine is
cold will give you an incorrect reading.
Checking the oil while the vehicle is on level ground
and only when the engine is hot, will improve the
accuracy of the oil level readings. Maintain the oil level
between the range markings on the dipstick. Either the
range markings consist of a crosshatch zone marked
SAFE or a crosshatch zone marked with MIN at the low
end of the range and MAX at the high end of the range.
Adding 1 Liter of oil when the reading is at the low end
of the range marking will raise the oil level to the high
end of the range marking.Do not overfill the engine. Overfilling the
engine will cause oil aeration, which can
lead to loss of oil pressure and an in-
crease in oil temperature.This could damage your
engine.Also, be sure the oil fill cap is replaced and
tightened after adding oil.
Checking Oil Level — Diesel Engine
To assure proper engine lubrication, the engine oil
must be maintained at the correct level. Check the oil
level at regular intervals, such as every fuel stop.
The best time to check the engine oil level is about five
minutes after a fully warmed engine is shut off or
before starting the engine after it has sat overnight.
Checking the oil while the vehicle is on level ground will
improve the accuracy of the oil level readings. Maintain
the oil level between the MIN and MAX markings on
the dipstick. Adding 1 Liter of oil when the reading is at
the MIN mark will result in a MAX reading on these
engines.
336
KNOWING YOUR
VEHICLE
SAFETY
STARTING AND
DRIVING
WARNING LIGHTSAND
MESSAGES
IN AN
EMERGENCY
SERVICINGAND C ARE
TECHNICAL
SPECIFICATIONS
CONTENTS
Page 345 of 412
WARNING! (Continued)
• Battery gas is flammable and explosive. Keep
flame or sparks away from the battery. Do not
use a booster battery or any other booster source
with an output greater than 12 Volts. Do not
allow cable clamps to touch each other.
• Battery posts, terminals, and related accesso-
ries contain lead and lead compounds. Wash
hands after handling.
• It is essential when replacing the cables
on the battery that the positive cable is
attached to the positive post and the
negative cable is attached to the negative post .
Battery posts are marked positive (+) and nega-
tive (-) and identified on the battery case. Cable
clamps should be tight on the terminal posts and
free of corrosion.
• If a “fast charger ” is used while the battery is in
the vehicle, disconnect both vehicle battery cables
before connecting the charger to the battery. Do
not use a “fast charger ” to provide star ting volt-
age as battery damage can result . AIR CONDITIONER MAINTENANCE
For best possible performance, your air conditioner
should be checked and serviced by an authorized
dealer at the start of each warm season. This service
should include cleaning of the condenser fins and a
performance test. Drive belt tension should also be
checked at this time.
Do not use chemical flushes in your air
conditioning system as the chemicals can
damage your air conditioning compo-
nents. Such damage is not covered by the New
Vehicle Limited Warranty.
WARNING!
• Use only refrigerants and compressor
lubr i
cants approved by the manufac-
turer for your air conditioning system. Some un-
approved refrigerants are flammable and can
explode, injuring you. Other unapproved refrig-
erants or lubricants can cause the system to fail,
requiring costly repairs.
•
The air conditioning system contains refrigerant
under high pressure. To avoid risk of personal
injury or damage to the system, adding refrigerant
or any repair requiring lines to be disconnected
should be done by an experienced technician.
339
KNOWING
YOUR
VEHICLE
SAFETY
STARTING
AND
DRIVING
WARNING
LIGHTS
AND
MESSAGES
IN AN
EMERGENCY
SERVICING
AND C ARE
TECHNICAL
SPECIFICATIONS
CONTENTS
Page 349 of 412
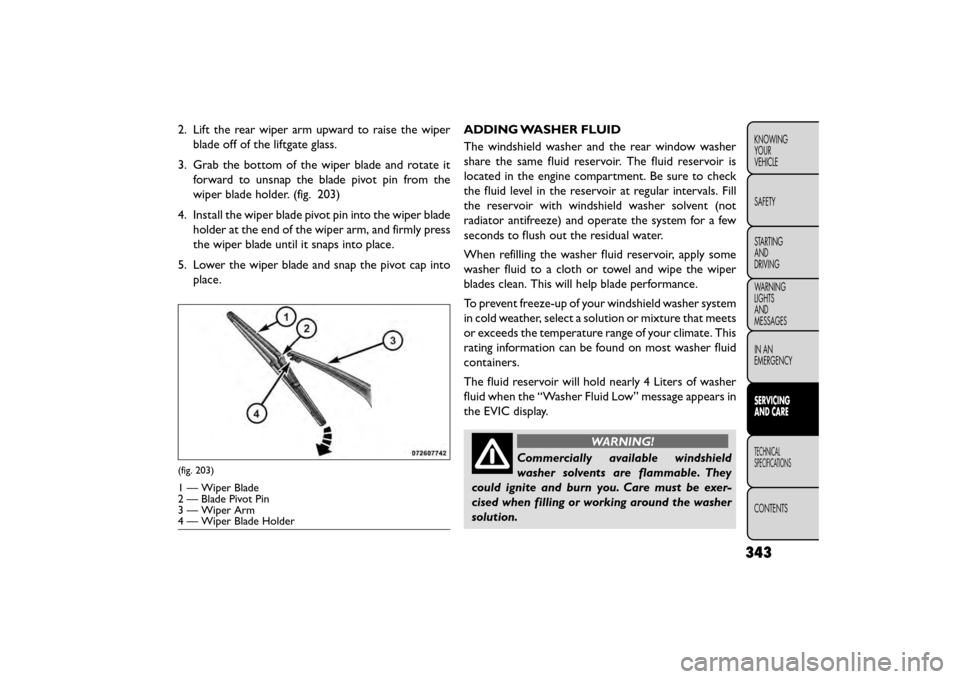
2. Lift the rear wiper arm upward to raise the wiperblade off of the liftgate glass.
3. Grab the bottom of the wiper blade and rotate it forward to unsnap the blade pivot pin from the
wiper blade holder. (fig. 203)
4. Install the wiper blade pivot pin into the wiper blade holder at the end of the wiper arm, and firmly press
the wiper blade until it snaps into place.
5. Lower the wiper blade and snap the pivot cap into place. ADDING WASHER FLUID
The windshield washer and the rear window washer
share the same fluid reservoir. The fluid reservoir is
located in the engine compartment. Be sure to check
the fluid level in the reservoir at regular intervals. Fill
the reservoir with windshield washer solvent (not
radiator antifreeze) and operate the system for a few
seconds to flush out the residual water.
When refilling the washer fluid reservoir, apply some
washer fluid to a cloth or towel and wipe the wiper
blades clean. This will help blade performance.
To prevent freeze-up of your windshield washer system
in cold weather, select a solution or mixture that meets
or exceeds the temperature range of your climate. This
rating information can be found on most washer fluid
containers.
The fluid reservoir will hold nearly 4 Liters of washer
fluid when the “Washer Fluid Low” message appears in
the EVIC display.
WARNING!
Commercially available windshield
wash er
solvents are flammable. They
could ignite and burn you. Care must be exer-
cised when filling or working around the washer
solution.
(fig. 203)
1 — Wiper Blade
2 — Blade Pivot Pin
3 — Wiper Arm
4 — Wiper Blade Holder
343
KNOWING
YOUR
VEHICLE
SAFETY
STARTING
AND
DRIVING
WARNING
LIGHTS
AND
MESSAGES
IN AN
EMERGENCY
SERVICING
AND C ARE
TECHNICAL
SPECIFICATIONS
CONTENTS
Page 352 of 412
Coolant Checks
Check engine coolant (antifreeze) protection every 1
year (before the onset of freezing weather, where
applicable). If coolant is dirty or rusty in appearance,
the system should be drained, flushed, and refilled with
fresh coolant. Check the front of the A/C condenser
for any accumulation of bugs, leaves, etc. If dirty, clean
by gently spraying water from a garden hose vertically
down the face of the condenser.
Check the coolant recovery bottle tubing for brittle
rubber, cracking, tears, cuts, and tightness of the con-
nection at the bottle and radiator. Inspect the entire
system for leaks.
Cooling System — Drain, Flush, And Refill
Refer to the “Maintenance Schedule” for the proper
maintenance intervals.
If the solution is dirty or contains a considerable
amount of sediment, clean and flush with a reliable
cooling system cleaner. Follow with a thorough rinsing
to remove all deposits and chemicals. Properly dispose
of the old engine coolant (antifreeze) solution.Selection Of Coolant — Gasoline Engine
Use only the manufacturer's recommended coolant.
Refer to “Fluids, Lubricants, and Genuine Parts” in
“Technical Specifications” for further information.
•
Mixing of engine coolant (antifreeze)
other than specified engine coolant (an-
tifreeze), may result in engine damage
and may decrease corrosion protection. If a non-
specified engine coolant (antifreeze) is intro-
duced into the cooling system in an emergency, it
should be replaced with the specified engine cool-
ant (antifreeze) as soon as possible.
• Do not use plain water alone or alcohol-based
engine coolant (antifreeze) products. Do not use
additional rust inhibitors or antirust products, as
they may not be compatible with the radiator
engine coolant (antifreeze) and may plug the
radiator.
• This vehicle has not been designed for use with
Propylene Glycol based engine coolant (anti-
freeze). Use of Propylene Glycol based engine
coolant (antifreeze) is not recommended.
346
KNOWING YOUR
VEHICLE
SAFETY
STARTING AND
DRIVING
WARNING LIGHTSAND
MESSAGES
IN AN
EMERGENCY
SERVICINGAND C ARE
TECHNICAL
SPECIFICATIONS
CONTENTS
Page 354 of 412
NOTE:Mixing coolant types will decrease the life of
the engine coolant (antifreeze) and will require more
frequent coolant changes.
Cooling System Pressure Cap
The cap must be fully tightened to prevent loss of
engine coolant (antifreeze), and to ensure that engine
coolant (antifreeze) will return to the radiator from the
coolant recovery tank.
The cap should be inspected and cleaned if there is any
accumulation of foreign material on the sealing sur-
faces.
WARNING!
• Do not open hot engine cooling sys-
tem. N
ever add engine coolant (anti-
freeze) when the engine is overheated. Do not
loosen or remove the cap to cool an overheated
engine. Heat causes pressure to build up in the
cooling system. To prevent scalding or injury, do
not remove the pressure cap while the system is
hot or under pressure.
• Do not use a pressure cap other than the one
specified for your vehicle. Personal injury or en-
gine damage may result . Disposal Of Used Coolant
Used ethylene glycol-based engine coolant is a regu-
lated substance requiring proper disposal. Check with
your local authorities to determine the disposal rules
for your community. To prevent ingestion by animals or
children, do not store ethylene glycol-based engine
coolant in open containers or allow it to remain in
puddles on the ground. If ingested by a child, contact a
physician immediately. Clean up any ground spills im-
mediately.
Coolant Level
The radiator normally remains completely full, so there
is no need to remove the radiator cap unless checking
for coolant freeze point or replacing coolant. Advise
your service attendant of this. As long as the engine
operating temperature is satisfactory, the coolant
bottle need only be checked once a month. When
additional coolant is needed to maintain the proper
level, it should be added to the coolant bottle. Do not
overfill.
348
KNOWING
YOUR
VEHICLE
SAFETY
STARTING AND
DRIVING
WARNING LIGHTSAND
MESSAGES
IN AN
EMERGENCY
SERVICINGAND C ARE
TECHNICAL
SPECIFICATIONS
CONTENTS
Page 355 of 412
Points To Remember
NOTE:When the vehicle is stopped after a few
kilometers of operation, you may observe vapor com-
ing from the front of the engine compartment. This is
normally a result of moisture from rain, snow, or high
humidity accumulating on the radiator and being vapor-
ized when the thermostat opens, allowing hot coolant
to enter the radiator.
If an examination of your engine compartment shows
no evidence of radiator or hose leaks, the vehicle may
be safely driven. The vapor will soon dissipate.
• Do not overfill the coolant recovery bottle.
• Check coolant freeze point in the radiator and in the coolant recovery bottle. If antifreeze needs to be
added, contents of coolant recovery bottle must also
be protected against freezing.
• If frequent coolant additions are required, or if the level in the coolant recovery bottle does not drop
when the engine cools, the cooling system should be
pressure tested for leaks.
• Make sure that the radiator and coolant recovery bottle overflow hoses are not kinked or obstructed.
• Keep the front of the radiator clean. If your vehicle is equipped with air conditioning, keep the front of the
condenser clean. • Do not change the thermostat for Summer or Win-
ter operation. If replacement is ever necessary, install
ONLY the correct type thermostat. Other designs
may result in unsatisfactory coolant performance,
poor gas mileage, and increased emissions.
BRAKE SYSTEM
In order to assure brake system performance, all brake
system components should be inspected periodically.
Refer to the “Maintenance Schedule” for the proper
maintenance intervals.
WARNING!
Riding the brakes can lead to brake fail-
ure an d
possibly an accident . Driving
with your foot resting or riding on the brake
pedal can result in abnormally high brake tem-
peratures, excessive lining wear, and possible
brake damage.You would not have your full brak-
ing capacity in an emergency.
Car maintenance should be done at a
FIAT Dealership. For routine and minor
maintenance operations you wish to
carry out yourself, we do recommend you have
the proper equipment , genuine FIAT spare parts
and the necessary fluids; do not however carry out
these operations if you have no experience.
349
KNOWING
YOUR
VEHICLE
SAFETY
STARTING
AND
DRIVING
WARNING
LIGHTS
AND
MESSAGES
IN AN
EMERGENCY
SERVICING
AND C ARE
TECHNICAL
SPECIFICATIONS
CONTENTS