FORD C MAX 2011 2.G Workshop Manual
Manufacturer: FORD, Model Year: 2011, Model line: C MAX, Model: FORD C MAX 2011 2.GPages: 296, PDF Size: 7.87 MB
Page 51 of 296
Downloaded from www.Manualslib.com manuals search engine Note:
False alarms can also be triggered
by the auxiliary heater See Auxiliary Heater
(page 106). If you are using the auxiliary
heater, direct the air flow towards the
footwell.
Reduced guard
In reduced guard, the interior sensors are
deactivated when you arm the alarm.
Note: You can set the alarm to reduced
guard for the current ignition cycle only. The
next time you switch on the ignition, the
alarm will be reset to full guard.
Ask on Exit
You can set the information display to ask
you each time which level of guard you
wish to set.
If you select Ask on Exit, the message
Reduced guard? appears in the
instrument cluster display each time you
switch the ignition off.
If you wish to arm the alarm with reduced
guard, press the OK button when this
message appears.
If you wish to arm the alarm with full guard,
leave the vehicle without pressing the OK
button.
Selecting full or reduced guard
Note: Selecting Reduced does not set the
alarm permanently to reduced guard. It sets
it to reduced guard only for the current
ignition cycle. If you regularly set the alarm
to reduced guard, select Ask on Exit.
You can select full or reduced guard using
the information display. See General
Information (page 83).
Information messages
See Information Messages (page 90). ARMING THE ALARM
To arm the alarm, lock the vehicle. See
Locks (page 39).
DISARMING THE ALARM
Vehicles without keyless entry
Perimeter alarm
Disarm and silence the alarm by unlocking
the doors with the key and switching the
ignition on with a correctly coded key, or
unlocking the doors or the luggage
compartment lid with the remote control.
Category one alarm
Disarm and silence the alarm by unlocking
the doors with the key and switching the
ignition on with a correctly coded key
within 12 seconds, or unlocking the doors
or the luggage compartment lid with the
remote control.
Vehicles with keyless entry
Note:
A valid passive key must be located
within the detection range of that door for
keyless entry. See Keyless Entry (page 43).
Perimeter alarm
Disarm and silence the alarm by unlocking
the doors and switching the ignition on, or
unlocking the doors or the luggage
compartment lid with the remote control.
Category one alarm
Disarm and silence the alarm by unlocking
the doors and switching the ignition on
within 12 seconds, or unlocking the doors
or the luggage compartment lid with the
remote control.
49
Alarm
Page 52 of 296
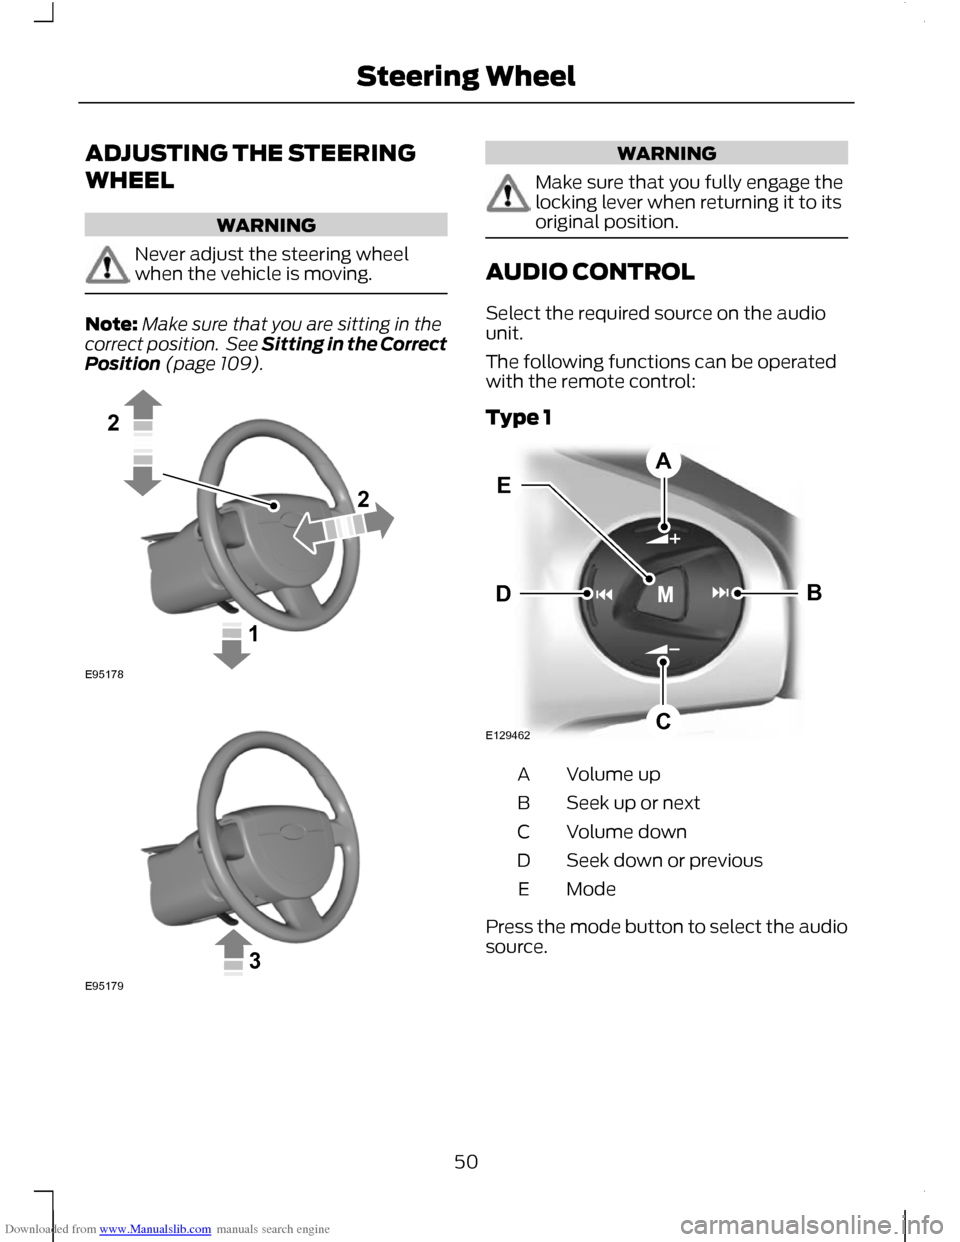
Downloaded from www.Manualslib.com manuals search engine ADJUSTING THE STEERING
WHEEL
WARNING
Never adjust the steering wheel
when the vehicle is moving.
Note:
Make sure that you are sitting in the
correct position. See Sitting in the Correct
Position (page 109). WARNING
Make sure that you fully engage the
locking lever when returning it to its
original position.
AUDIO CONTROL
Select the required source on the audio
unit.
The following functions can be operated
with the remote control:
Type 1
Volume up
A
Seek up or next
B
Volume down
C
Seek down or previous
D
Mode
E
Press the mode button to select the audio
source.
50
Steering Wheel122E95178 3E95179 E129462BDCAE
Page 53 of 296
Downloaded from www.Manualslib.com manuals search engine Type 2
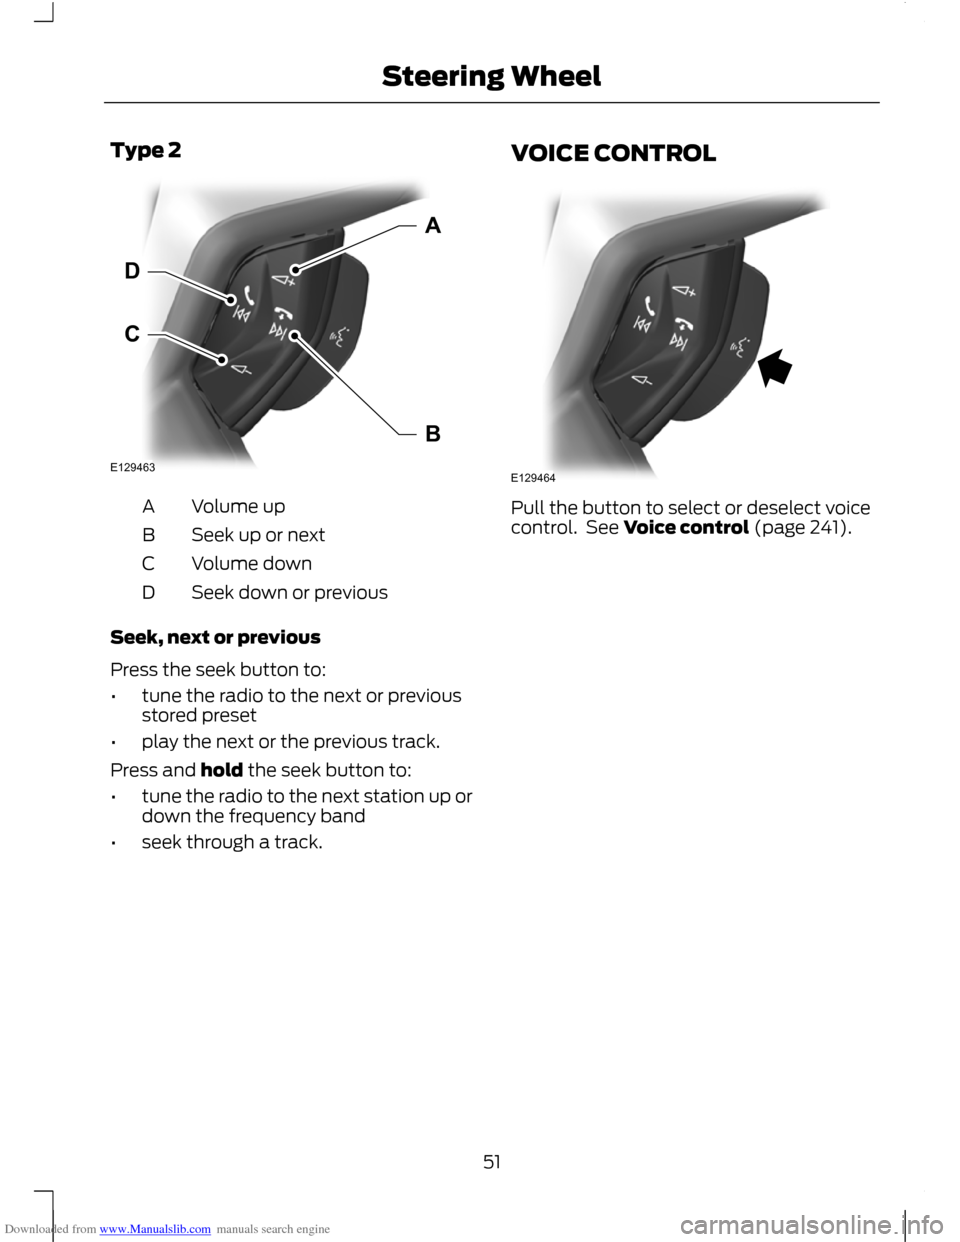
Volume up
A
Seek up or next
B
Volume down
C
Seek down or previous
D
Seek, next or previous
Press the seek button to:
• tune the radio to the next or previous
stored preset
• play the next or the previous track.
Press and hold the seek button to:
• tune the radio to the next station up or
down the frequency band
• seek through a track. VOICE CONTROL
Pull the button to select or deselect voice
control. See Voice control (page 241).
51
Steering WheelE129463CDAB E129464
Page 54 of 296
Downloaded from www.Manualslib.com manuals search engine WINDSCREEN WIPERS
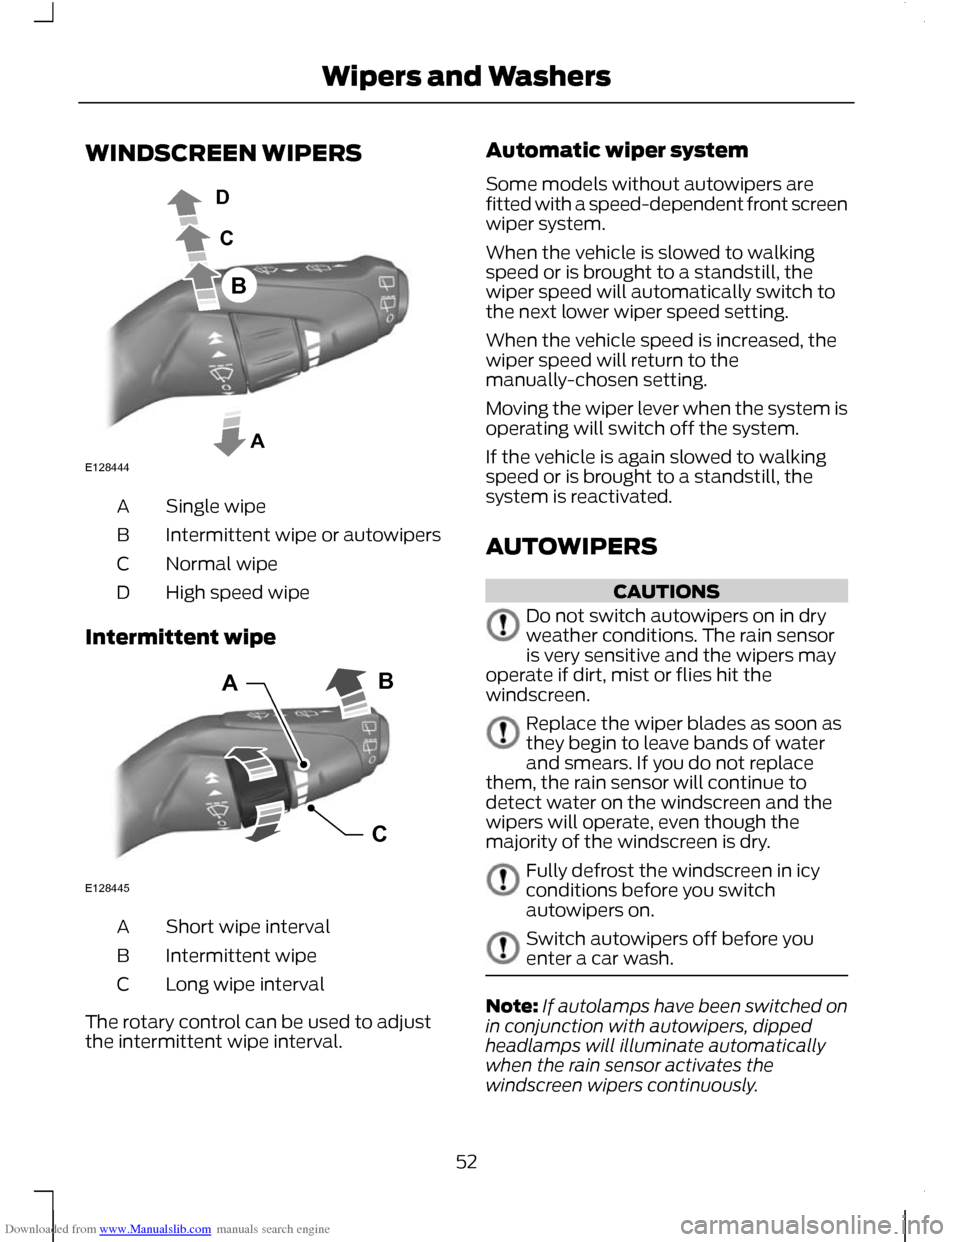
Single wipe
A
Intermittent wipe or autowipers
B
Normal wipe
C
High speed wipe
D
Intermittent wipe Short wipe interval
A
Intermittent wipe
B
Long wipe interval
C
The rotary control can be used to adjust
the intermittent wipe interval. Automatic wiper system
Some models without autowipers are
fitted with a speed-dependent front screen
wiper system.
When the vehicle is slowed to walking
speed or is brought to a standstill, the
wiper speed will automatically switch to
the next lower wiper speed setting.
When the vehicle speed is increased, the
wiper speed will return to the
manually-chosen setting.
Moving the wiper lever when the system is
operating will switch off the system.
If the vehicle is again slowed to walking
speed or is brought to a standstill, the
system is reactivated.
AUTOWIPERS
CAUTIONS
Do not switch autowipers on in dry
weather conditions. The rain sensor
is very sensitive and the wipers may
operate if dirt, mist or flies hit the
windscreen. Replace the wiper blades as soon as
they begin to leave bands of water
and smears. If you do not replace
them, the rain sensor will continue to
detect water on the windscreen and the
wipers will operate, even though the
majority of the windscreen is dry. Fully defrost the windscreen in icy
conditions before you switch
autowipers on.
Switch autowipers off before you
enter a car wash.
Note:
If autolamps have been switched on
in conjunction with autowipers, dipped
headlamps will illuminate automatically
when the rain sensor activates the
windscreen wipers continuously.
52
Wipers and WashersE128444ACDB CABE128445
Page 55 of 296
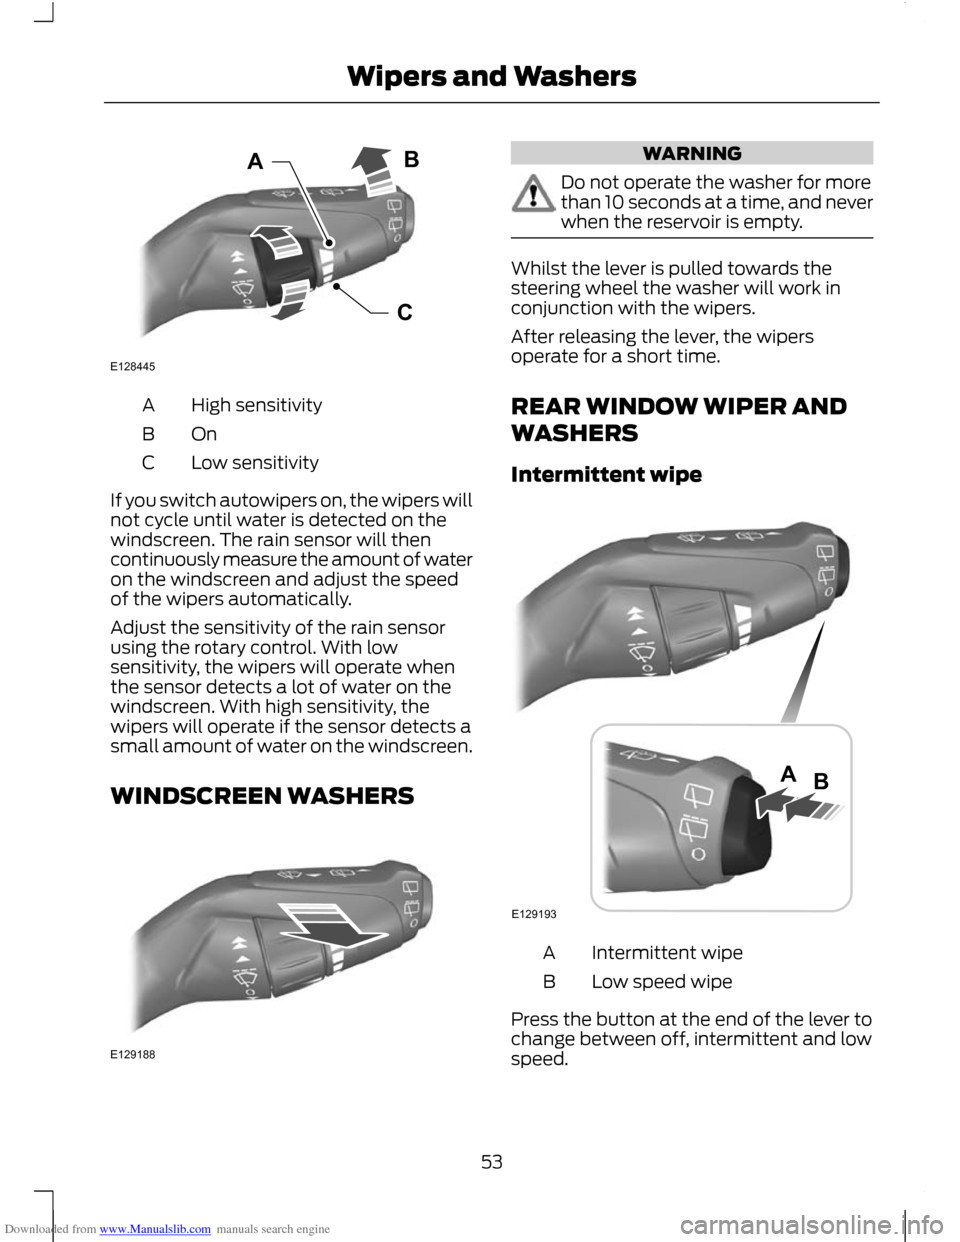
Downloaded from www.Manualslib.com manuals search engine High sensitivity
A
OnB
Low sensitivity
C
If you switch autowipers on, the wipers will
not cycle until water is detected on the
windscreen. The rain sensor will then
continuously measure the amount of water
on the windscreen and adjust the speed
of the wipers automatically.
Adjust the sensitivity of the rain sensor
using the rotary control. With low
sensitivity, the wipers will operate when
the sensor detects a lot of water on the
windscreen. With high sensitivity, the
wipers will operate if the sensor detects a
small amount of water on the windscreen.
WINDSCREEN WASHERS WARNING
Do not operate the washer for more
than 10 seconds at a time, and never
when the reservoir is empty.
Whilst the lever is pulled towards the
steering wheel the washer will work in
conjunction with the wipers.
After releasing the lever, the wipers
operate for a short time.
REAR WINDOW WIPER AND
WASHERS
Intermittent wipe
Intermittent wipe
A
Low speed wipe
B
Press the button at the end of the lever to
change between off, intermittent and low
speed.
53
Wipers and WashersCABE128445 E129188 E129193AB
Page 56 of 296
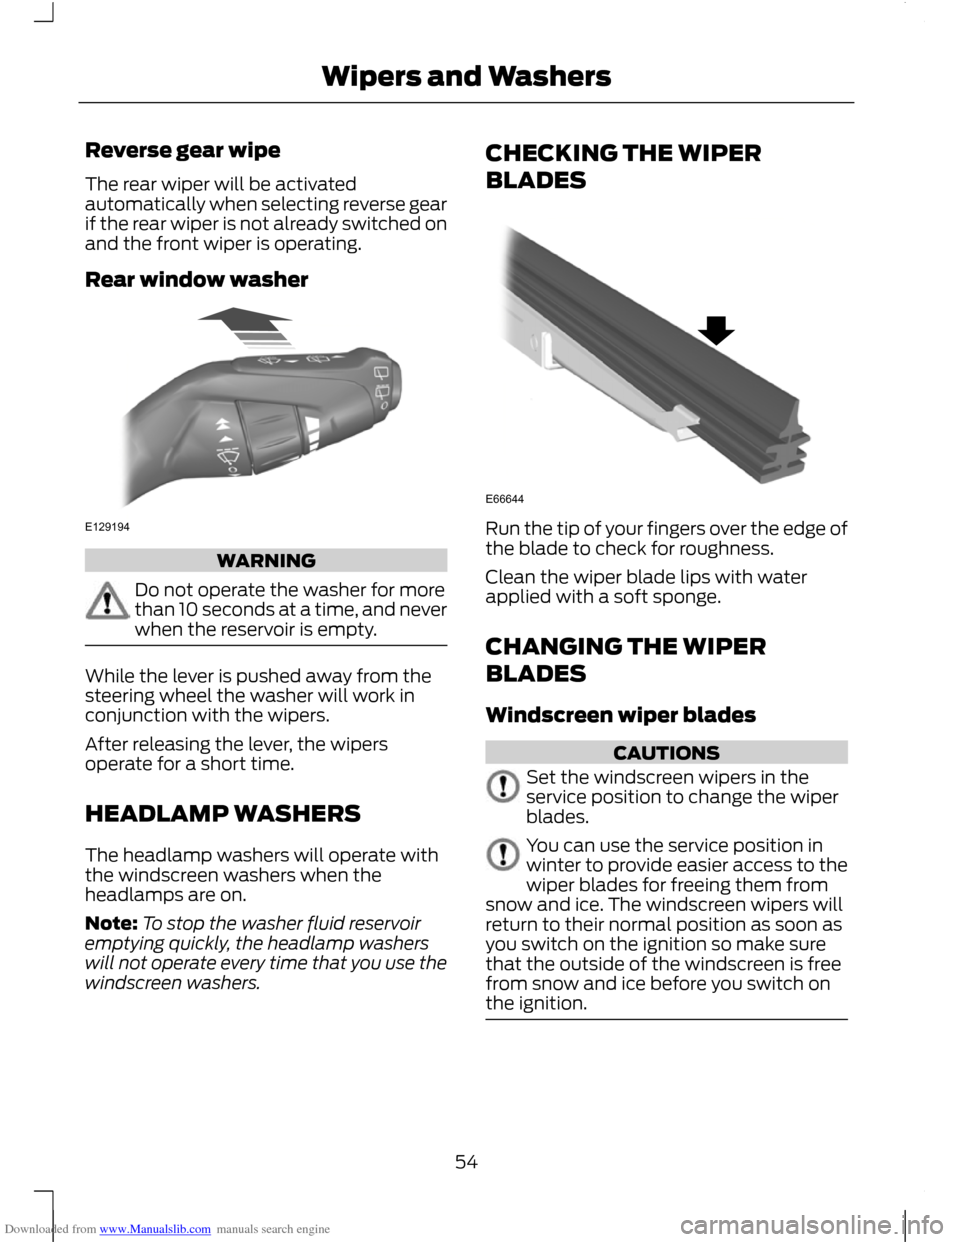
Downloaded from www.Manualslib.com manuals search engine Reverse gear wipe
The rear wiper will be activated
automatically when selecting reverse gear
if the rear wiper is not already switched on
and the front wiper is operating.
Rear window washer
WARNING
Do not operate the washer for more
than 10 seconds at a time, and never
when the reservoir is empty.
While the lever is pushed away from the
steering wheel the washer will work in
conjunction with the wipers.
After releasing the lever, the wipers
operate for a short time.
HEADLAMP WASHERS
The headlamp washers will operate with
the windscreen washers when the
headlamps are on.
Note:
To stop the washer fluid reservoir
emptying quickly, the headlamp washers
will not operate every time that you use the
windscreen washers. CHECKING THE WIPER
BLADES
Run the tip of your fingers over the edge of
the blade to check for roughness.
Clean the wiper blade lips with water
applied with a soft sponge.
CHANGING THE WIPER
BLADES
Windscreen wiper blades
CAUTIONS
Set the windscreen wipers in the
service position to change the wiper
blades.
You can use the service position in
winter to provide easier access to the
wiper blades for freeing them from
snow and ice. The windscreen wipers will
return to their normal position as soon as
you switch on the ignition so make sure
that the outside of the windscreen is free
from snow and ice before you switch on
the ignition. 54
Wipers and WashersE129194 E66644
Page 57 of 296
Downloaded from www.Manualslib.com manuals search engine Note:
The windscreen wiper blades are
different in length. See Technical
Specifications (page 56). If you install
wiper blades of the wrong length, the rain
sensor may not work correctly.
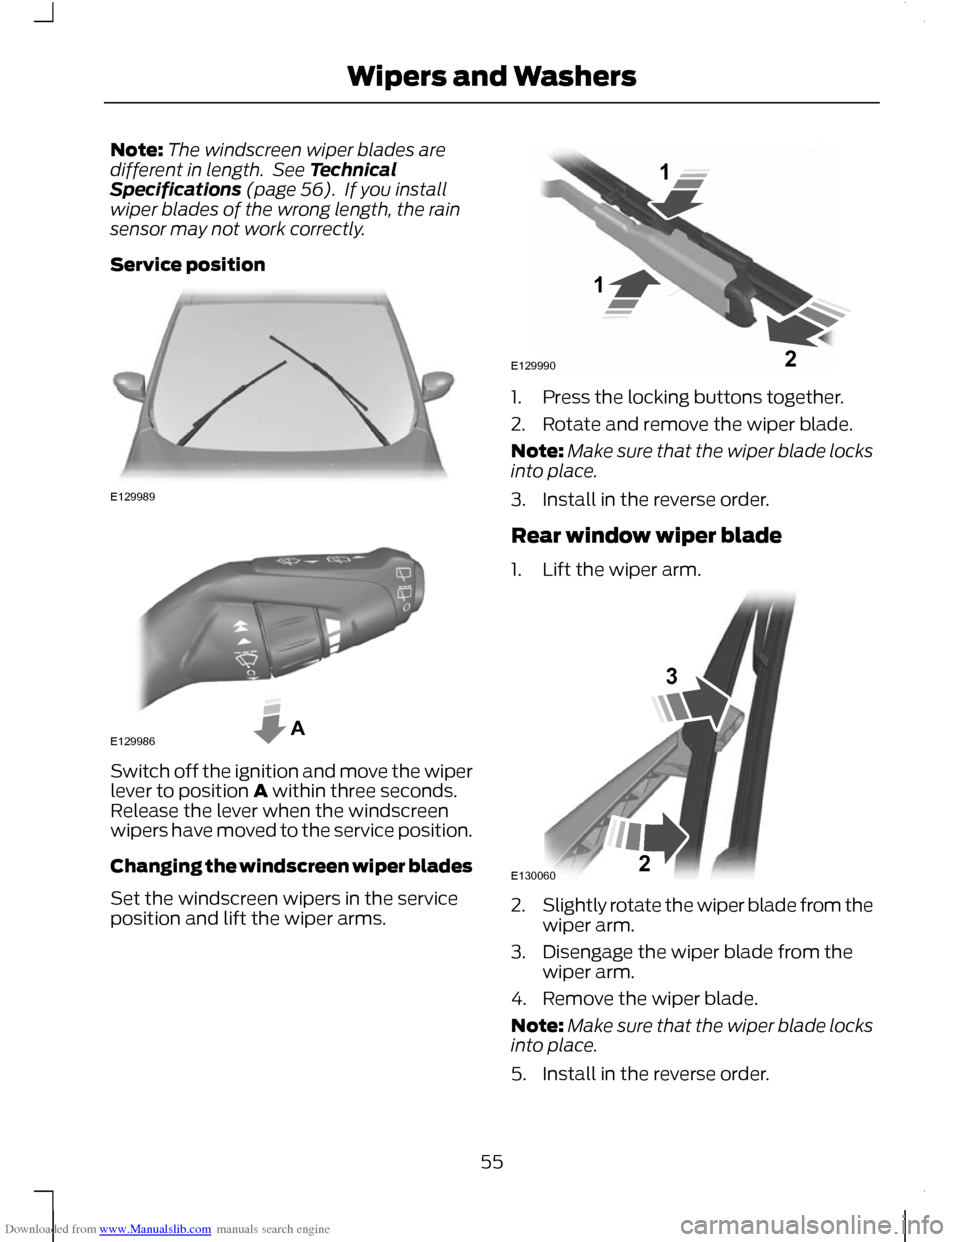
Service position Switch off the ignition and move the wiper
lever to position A within three seconds.
Release the lever when the windscreen
wipers have moved to the service position.
Changing the windscreen wiper blades
Set the windscreen wipers in the service
position and lift the wiper arms. 1. Press the locking buttons together.
2. Rotate and remove the wiper blade.
Note:
Make sure that the wiper blade locks
into place.
3. Install in the reverse order.
Rear window wiper blade
1. Lift the wiper arm. 2.
Slightly rotate the wiper blade from the
wiper arm.
3. Disengage the wiper blade from the wiper arm.
4. Remove the wiper blade.
Note: Make sure that the wiper blade locks
into place.
5. Install in the reverse order.
55
Wipers and WashersE129989 E129986A E129990112 E13006032
Page 58 of 296
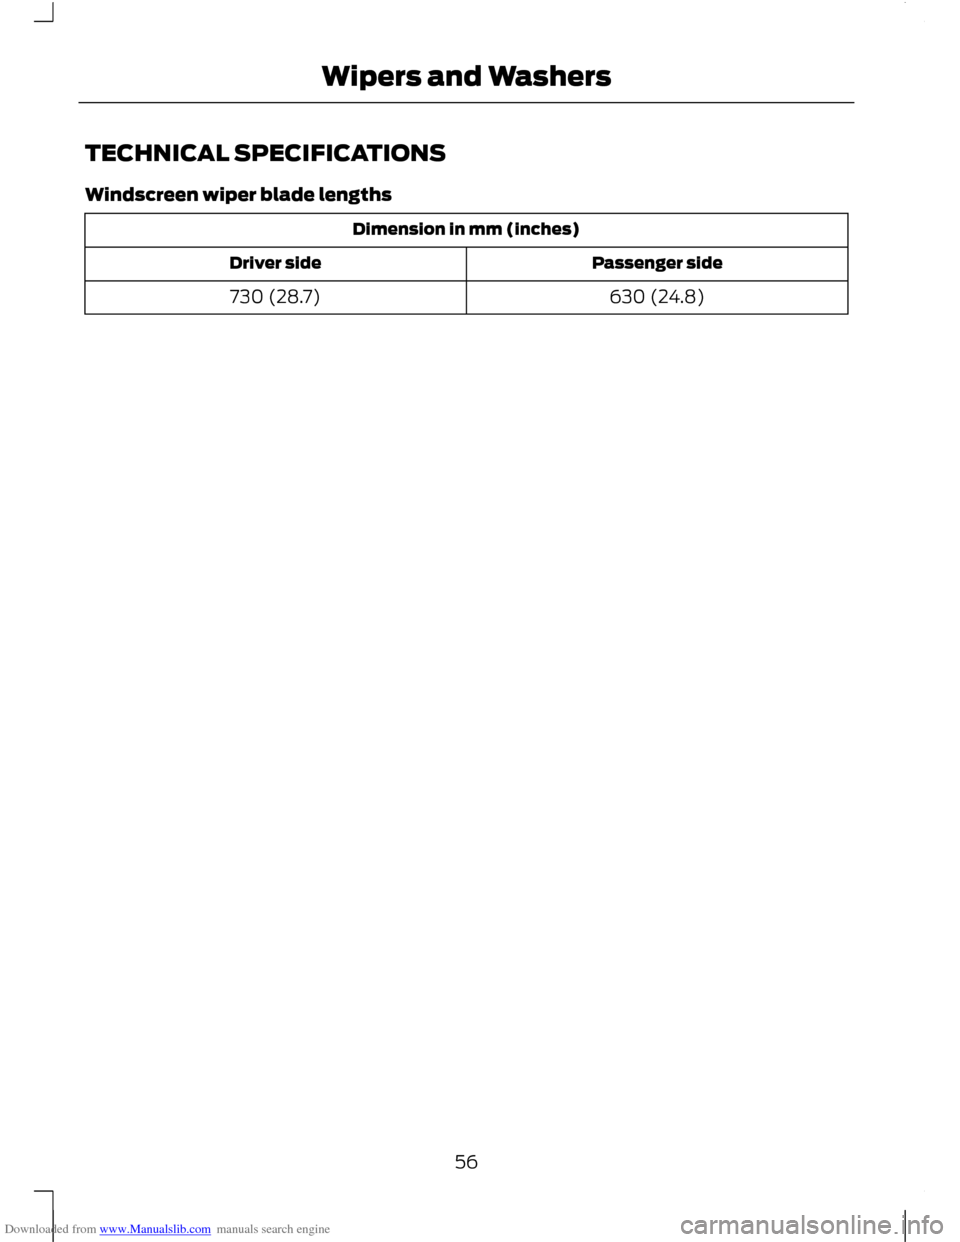
Downloaded from www.Manualslib.com manuals search engine TECHNICAL SPECIFICATIONS
Windscreen wiper blade lengths
Dimension in mm (inches)
Passenger side
Driver side
630 (24.8)
730 (28.7)
56
Wipers and Washers
Page 59 of 296
Downloaded from www.Manualslib.com manuals search engine LIGHTING CONTROL
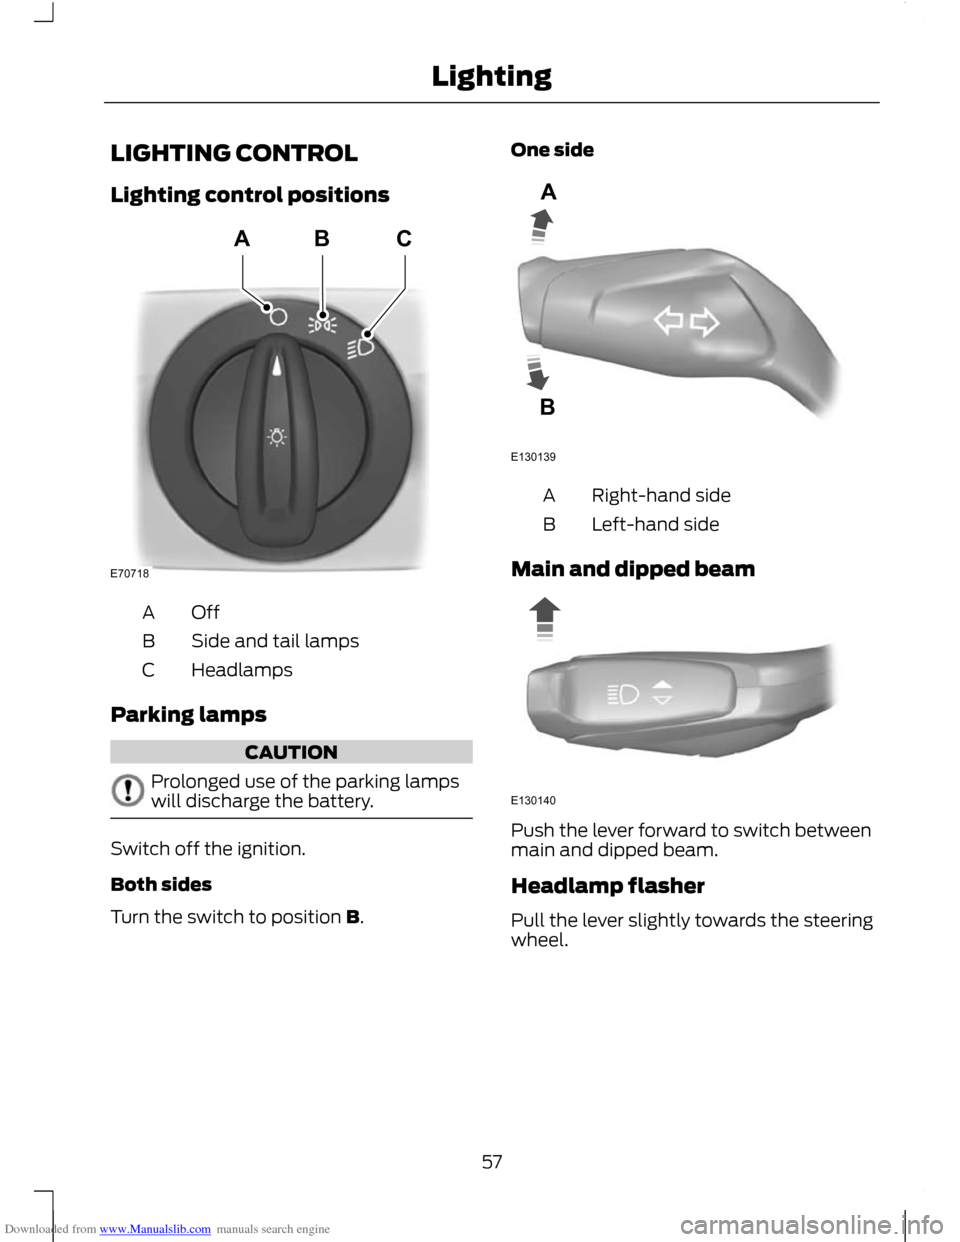
Lighting control positions
OffA
Side and tail lamps
B
Headlamps
C
Parking lamps CAUTION
Prolonged use of the parking lamps
will discharge the battery.
Switch off the ignition.
Both sides
Turn the switch to position B. One side
Right-hand side
A
Left-hand side
B
Main and dipped beam Push the lever forward to switch between
main and dipped beam.
Headlamp flasher
Pull the lever slightly towards the steering
wheel.
57
LightingE70718ABC E130139AB E130140
Page 60 of 296
Downloaded from www.Manualslib.com manuals search engine Home safe lighting
Switch the ignition off and pull the
direction indicator lever towards the
steering wheel to switch the headlamps
on. You will hear a short tone. The
headlamps will go off automatically after
three minutes with any door open, or 30
seconds after the last door has been
closed.
The home safe lights can be cancelled by
either pulling the direction indicator lever
towards the steering wheel again or by
turning the ignition switch ON.
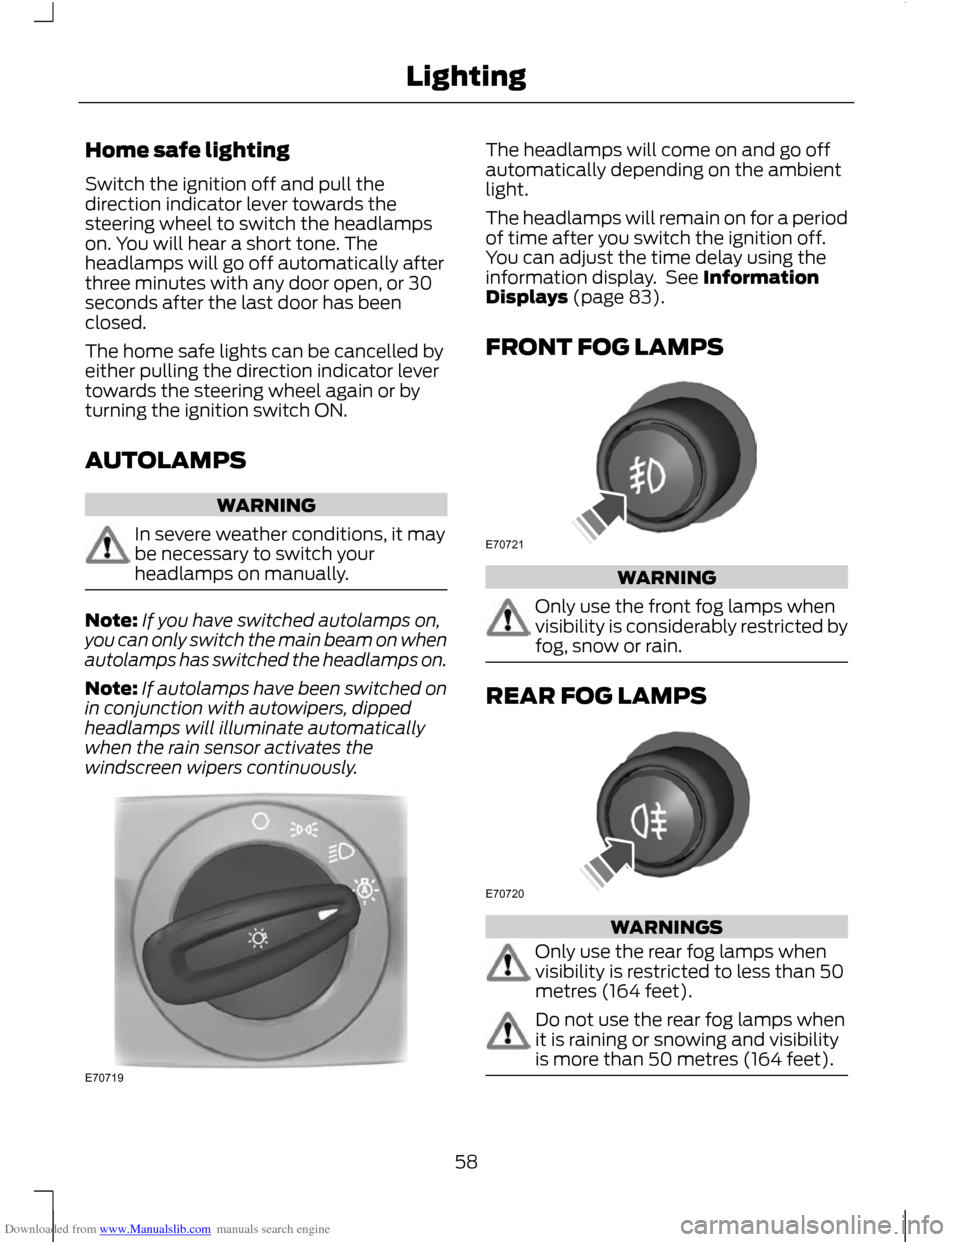
AUTOLAMPS
WARNING
In severe weather conditions, it may
be necessary to switch your
headlamps on manually.
Note:
If you have switched autolamps on,
you can only switch the main beam on when
autolamps has switched the headlamps on.
Note: If autolamps have been switched on
in conjunction with autowipers, dipped
headlamps will illuminate automatically
when the rain sensor activates the
windscreen wipers continuously. The headlamps will come on and go off
automatically depending on the ambient
light.
The headlamps will remain on for a period
of time after you switch the ignition off.
You can adjust the time delay using the
information display. See Information
Displays (page 83).
FRONT FOG LAMPS
WARNING
Only use the front fog lamps when
visibility is considerably restricted by
fog, snow or rain.
REAR FOG LAMPS
WARNINGS
Only use the rear fog lamps when
visibility is restricted to less than 50
metres (164 feet).
Do not use the rear fog lamps when
it is raining or snowing and visibility
is more than 50 metres (164 feet).
58
LightingE70719 E70721 E70720