lock HONDA CIVIC 2002 7.G Workshop Manual
[x] Cancel search | Manufacturer: HONDA, Model Year: 2002, Model line: CIVIC, Model: HONDA CIVIC 2002 7.GPages: 1139, PDF Size: 28.19 MB
Page 704 of 1139
Interior Trim
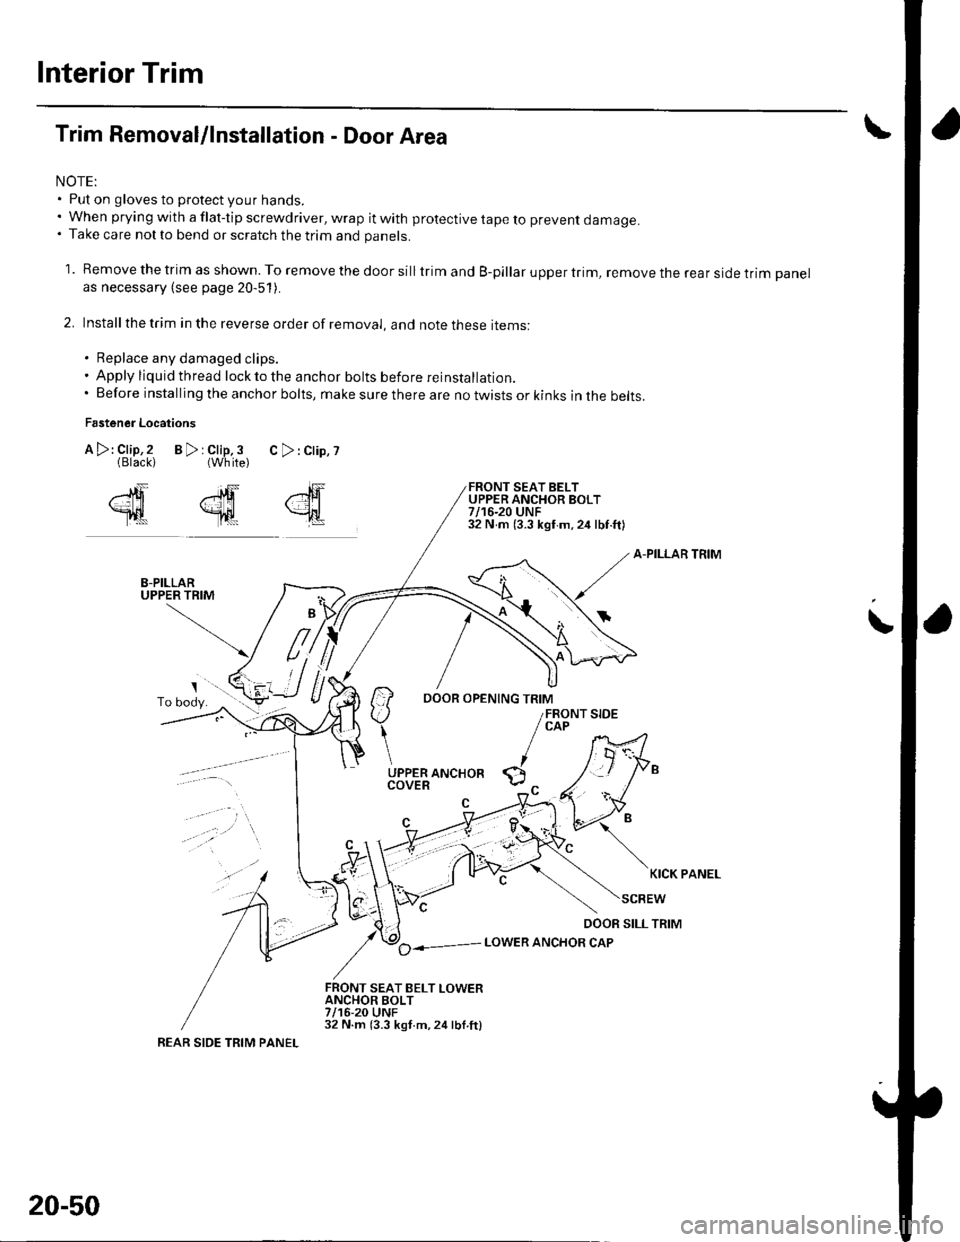
Trim Removal/lnstallation - Door Area
NOTE:. Put on gloves to protect your hands.. When prying with a flat-tip screwdriver, wrap it with protective tape to prevent damage.. Take care not to bend or scratch the trim and panels.
1. Remove the trim as shown. To remove the door silltrim and B-pillar upper trim, remove the rear side trim panelas necessary (see page 20-51).
2. Installthe trim in the reverse order of removal, and note these items:
. Replace any damaged clips.. Apply liquid thread lock to the anchor bolts before reinstallatior,.. Before installing the anchor bolts, make sure there are no twists or kinks in the belts.
Fastener Locations
B>rClip,3 C>:Clip,?{White)
FRONT SEAT BELTUPPER ANCHOR BOLT7/16-20 UNF32 N m (3.3 kgf m,24 lbf.ft)
A-PILLAR TRIM
il-::7
/ ao----- LowER ANcHoR cAP
FRONT SEAT BELT LOWERANCHOR BOLT7/16-20 UNF32 N.m (3.3 kgt.m,24lbl.ftl
,"lF
{
A >: Clip,2(Black)
2ffi
Tl|t
\
KICK PANEL
REAR SIDE TRIM PANEL
20-50
Page 705 of 1139
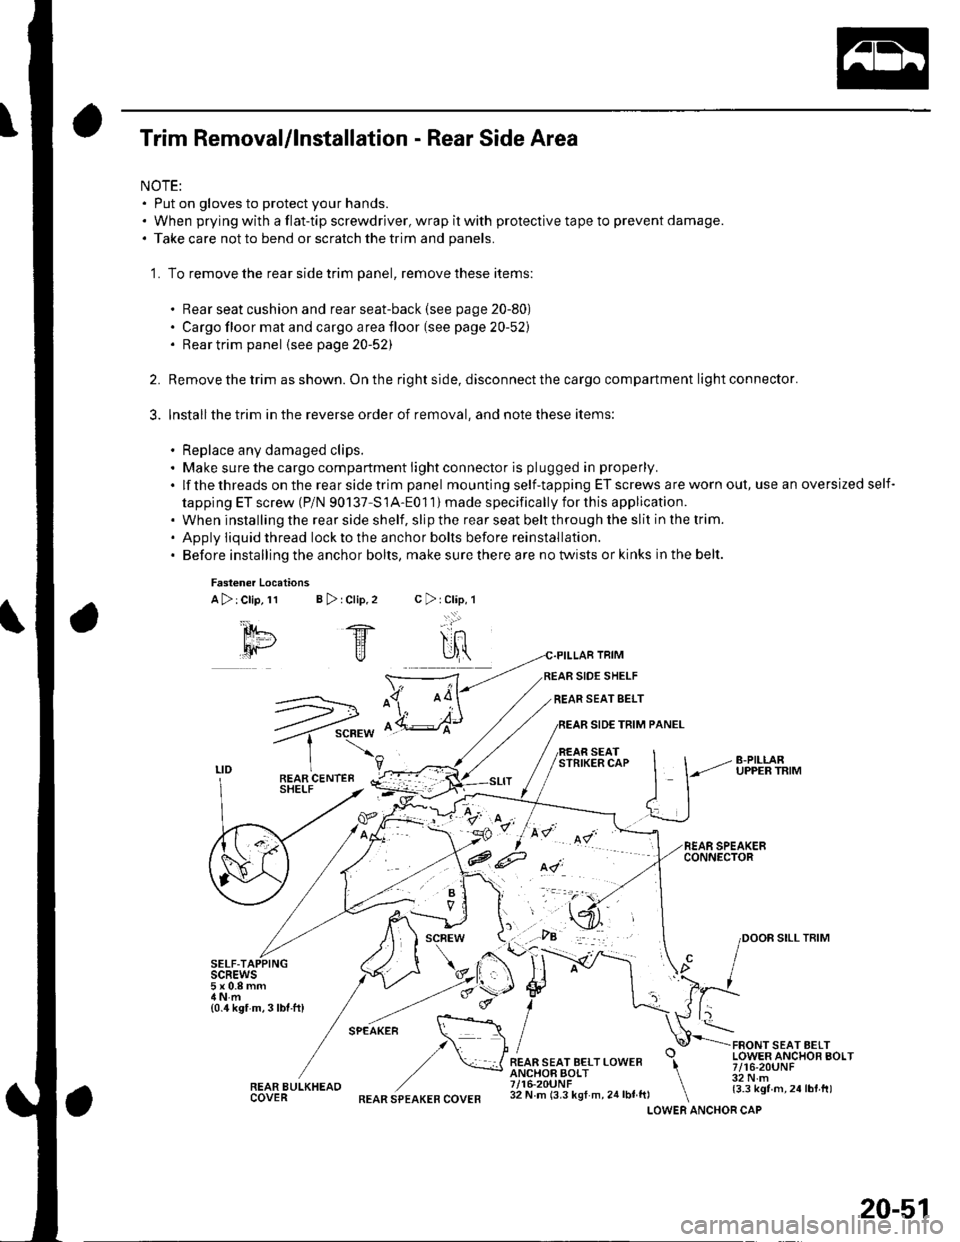
Trim Removal/lnstallation - Rear Side Area
NOTE:. Put on gloves to protect your hands.. When prying with a flat-tip screwdriver, wrap it with protective tape to prevent damage.. Take care not to bend or scratch the trim and panels.
'1. To remove the rear side trim panel, remove these items:
. Rear seat cushion and rear seat-back (see page 20-80). Cargo floor mat and cargo area floor (see page 20-52). Rear trim panel {see page20-52)
Remove the trim as shown. On the right side, disconnect the cargo compartment light connector.
Installthe trim in the reverse order of removal, and note these items:
. Replace any damaged clips.. Make sure the cargo compartment light connector is plugged in properly.
.lfthethreadsontherearsidetrimpanel mounting self-tapping ET screws are worn out, use an oversized self-
tapping ET screw (P/N 90137-S1A-Eo1 1) made specifically for this application.. When installing the rear side shelf, slip the rear seat belt through the slit in the trim.' Apply iiquid thread lockto the anchor bolts before reinstallation.. Before installing the anchor bolts, make sure there are no twists or kinks in the belt.
2.
3.
Fasten€r Locations
A>:Clip,11 B > rClip,2
SELF-TAIscREws5x0.8mm
{0.4 kgf m,3lbf.ft)
REAR BULKHEAOCOVER
TRIM
SIDE SHELF
REAR SEAT SELT
SIDE TRIM PANEL
SEATSTRIKER CAP
FRONT SEAT AELTLOWER ANCHOR BOLT7/16-20UNF32 N.m{3.3 kgf m,24lbt.tt)
c>rClap,l
-..:.:'
SILL TRIM
.F.-*-.n. \::: :\,/ I
,/ \*JREAR SEAT BELT LOWER \ANCHOF BOLT \7/16-20UNF \32 N m (3.3 kgf m, 24 lbf ft, \LOWERREAR SPEAKER COVERANCHOR CAP
20-51
Page 713 of 1139
Dashboard
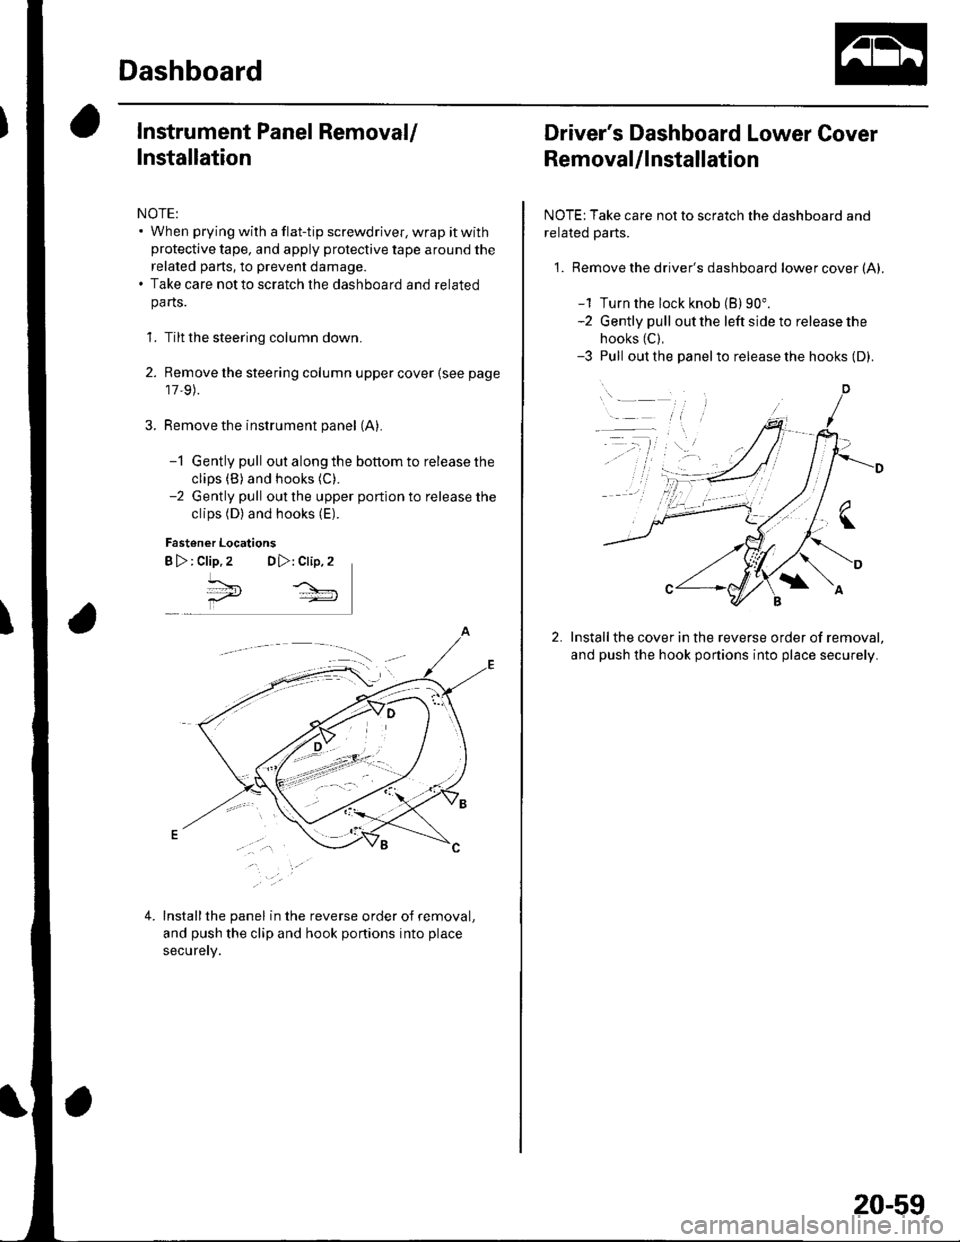
Instrument Panel Removal/
Installation
NOTE:. When prying with a flat-tip screwdriver, wrap it withprotective tape, and apply protective tape around the
related parts, to prevent damage.. Take care not to scratch the dashboard and related
pa rts.
1. Tilt the steering column down.
2. Remove the steering column upper cover {see page
17,9).
Remove the instrument panel (A).
-1 Gently pull out along the bottom to release the
clips (B) and hooks (C).
-2 Gently pull out the upper portion to release the
clips (D) and hooks (E).
Fastener Locations
B >: clip.2 DD,: Clip,2
^*,
4.Installthe panel in the reverse order of removal,
and push the clip and hook portions into place
securery.
Driver's Dashboard Lower Cover
Removal/lnstallation
NOTE: Take care not to scratch the dashboard and
related Parts.
1. Remove the driver's dashboard lower cover (A).
-1 Turn the lock knob (B) 90".-2 Gently pull out the left side to release the
hooks (C),
-3 Pull out the panelto release the hooks (D).
Installthe cover in the reverse order of removal,
and push the hook portions into place securely.
20-59
Page 714 of 1139
Dashboard
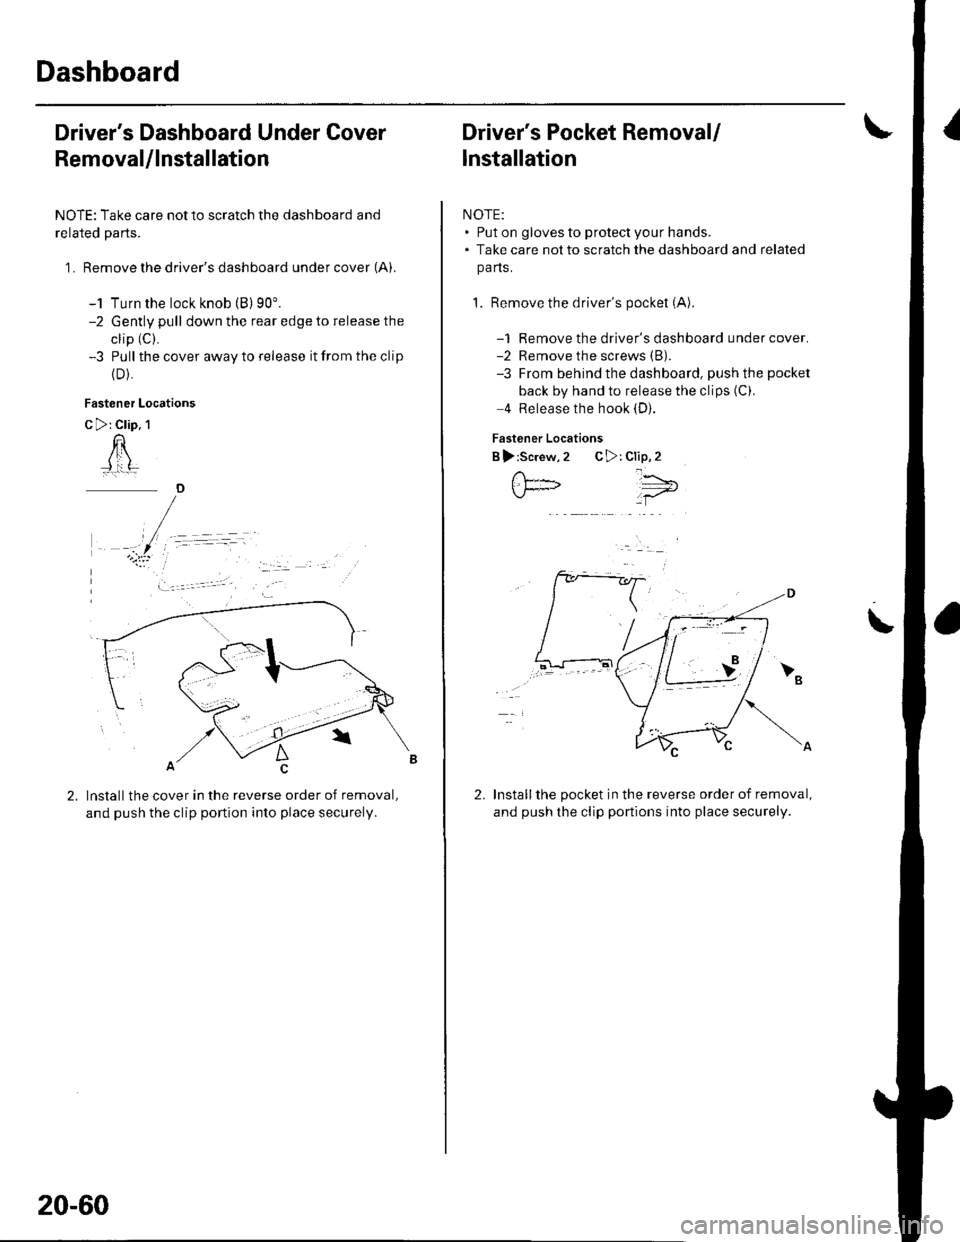
Driver's Dashboard Under Cover
Removal/lnstallation
NOTE: Take care not to scratch the dashboard and
related parts.
1 . Remove the driver's dashboard under cover (A).
-1 Turn the lock knob (B) 90'.-2 Gently pull down the rear edge to release the
clip (C).
-3 Pull the cover away to release it from the clip
{D).
Fastener Locations
C >: Clip. 1
n
Installthe cover in the reverse order of removal,
and push the clip portion into place securely.
)
20-60
Driver's Pocket Removal/
lnstallation
NOTE:. Put on gloves to protect your hands.. Take care not to scratch the dashboard and related
pa ns.
1. Remove the driver's pocket (A)
-1 Remove the driver's dashboard under cover.-2 Remove the screws (B).
-3 From behind the dashboard, push the pocket
back by hand to release the clips (C).
4 Release the hook (D).
Fastener Locations
B ):Screw,2 C>: Clip,2
Installthe pocket in the reverse order of removal,
and push the clip portions into place securely.
','"\5;;t='
\
2.
Page 716 of 1139
Dashboard
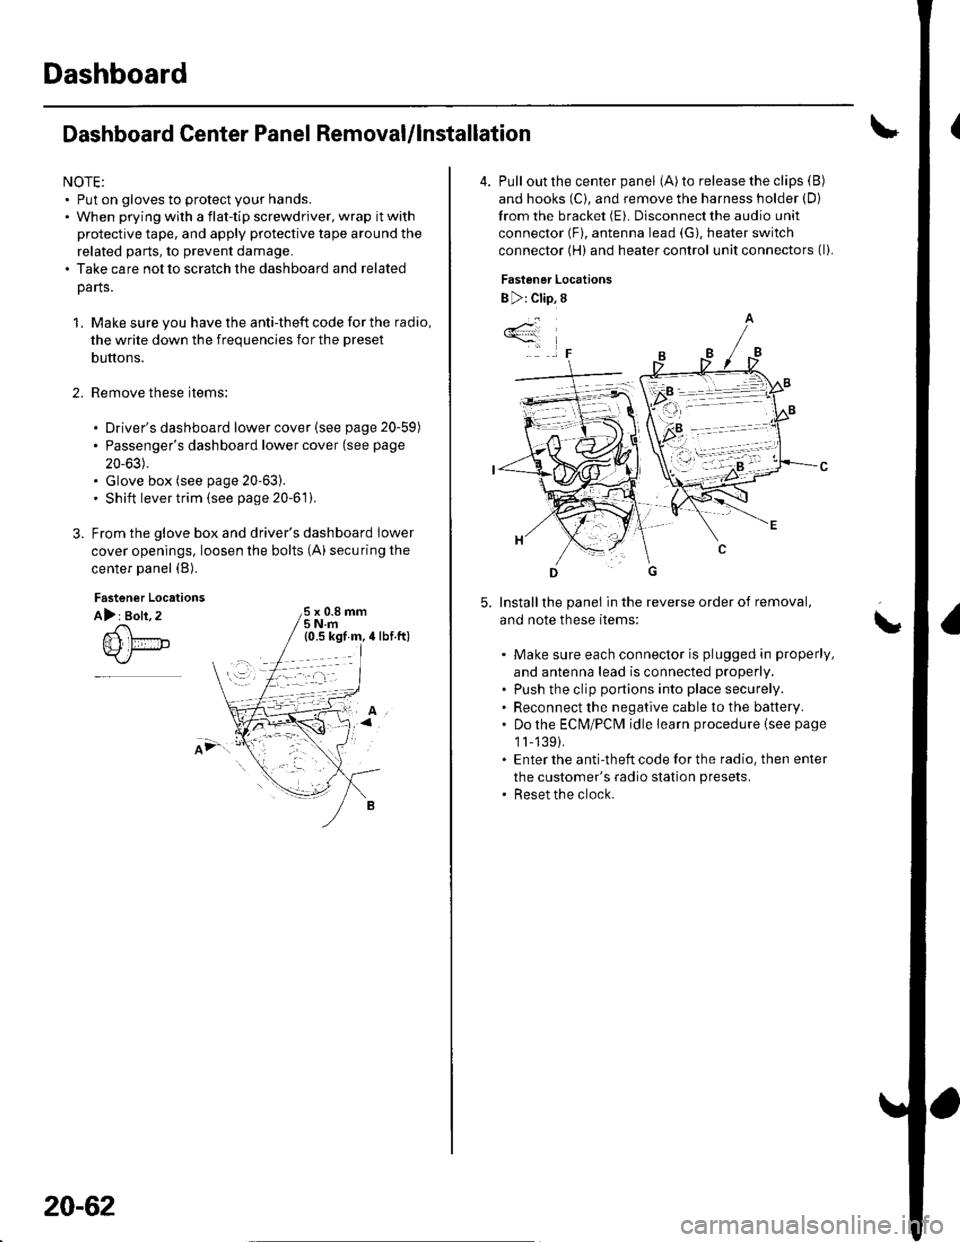
Dashboard Center Panel Removal/lnstallation
NOTE:. Put on gloves to protect your hands.. When prying with a flat-tip screwdriver, wrap it with
protective tape, and apply protective tape around the
related parts, to prevent damage.. Take care not to scratch the dashboard and related
parts.
1. Make sure you have the anti-theft code for the radio,
the write down the frequencies for the preset
buttons.
Remove these items:
. Driver's dashboard lower cover (see page 20-59)
. Passenger's dashboard lower cover (see page
20-63).. Glove box (see page 20-63).. Shift lever trim {see page 20-61).
From the glove box and driver's dashboard Iower
cover openings, loosen the bolts (A) securing the
center panel (B).
2.
Fastener Locations
A): Bolt, 2x 0.8 mm5Nm
;.'
20-62
4. Pull out the center panel (A) to release the clips (B)
and hooks (C), and remove the harness holder (D)
from the bracket (E). Disconnect the audio unit
connector (F), antenna lead (G), heater switch
connector (H) and heater control unit connectors (l).
Fastener Locations
B ): Clip, 8
Installthe panel in the reverse order of removal,
and note these items:
Make sure each connector is plugged in properly,
and antenna lead is connected properly.
Push the clip portions into place securely.
Reconnect the negative cable to the battery.
Do the ECN4/PCt\4 idle learn procedure {see page
1l-139).
Enter the anti-theft code for the radio. then enter
the customer's radio station presets.
Reset the clock.
*4
,F
\
Page 722 of 1139
Dashboard
Dashboard Removal/lnstallation
(cont'd)
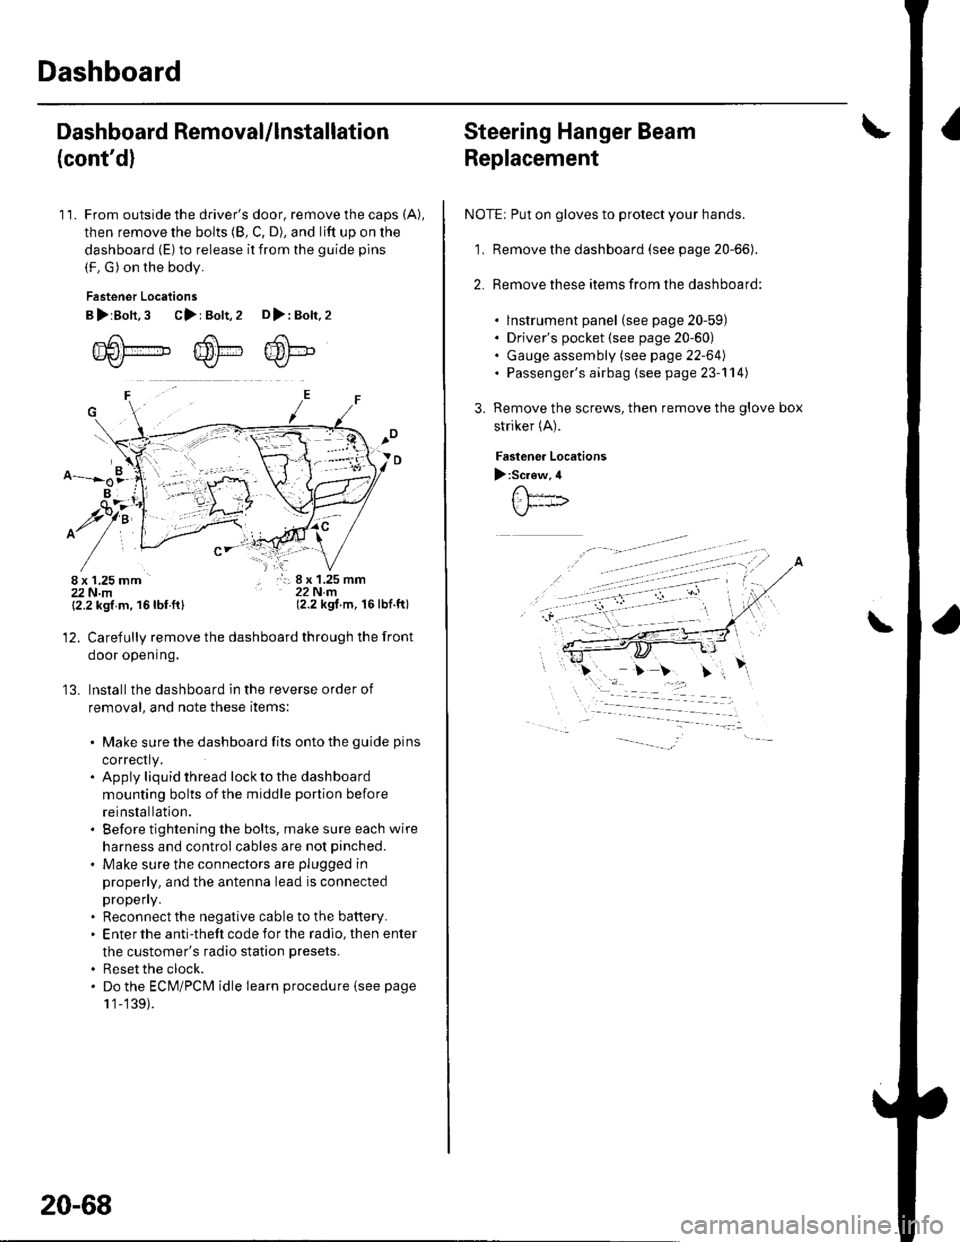
11. From outside the driver's door, remove the caps (A),
then remove the bolts (8, C, D), and lift up on the
dashboard (E) to release it from the guide pins
(F. G) on the body.
Fastener Locations
B>rBolt.3 C>: Bolt,2 D>: Bolt,2
m6[-,,,,",",,-,F6't---'' ffi'!--v{/- Kr* w-
B
$7:
^/761:
/,-,. r:; 8 x 1.25 mm22Nm(2.2 kgf.m, 16lbf.ft)
13.
{2.2 kgf m, 16lbf.ftl
Carefully remove the dashboard through the front
door opening.
lnstall the dashboard in the reverse order of
removal, and note these items:
. Make sure the dashboard fits onto the guide pins
correctly.. Apply liquid thread lock to the dashboard
mounting bolts of the middle portion before
reinstallation.. Before tightening the bolts, make sure each wire
harness and control cables are not pinched.
. Make sure the connectors are plugged in
properly, and the antenna lead is connected
propeny.. Reconnect the negative cable to the battery.. Enter the anti-theft code for the radio, then enter
the customer's radio station presets.
. Reset the clock.. Do the ECM/PCM idle learn procedure isee page
1 '1-139).
20-68
Steering Hanger Beam
Replacement
NOTE: Put on gloves to protect your hands.
1, Remove the dashboard (see page 20-66).
2. Remove these items from the dashboard:
. lnstrument panel (see page 20-59). Driver's pocket (see page 20-60). Gauge assembly (see page 22-64). Passenger's airbag (see page 23-'l 14)
Remove the screws, then remove the glove box
striker (A).
Fastenea Locations
):Screw,4
\
Page 726 of 1139
Seats
Front Seat Removal/lnstallation (cont'dl
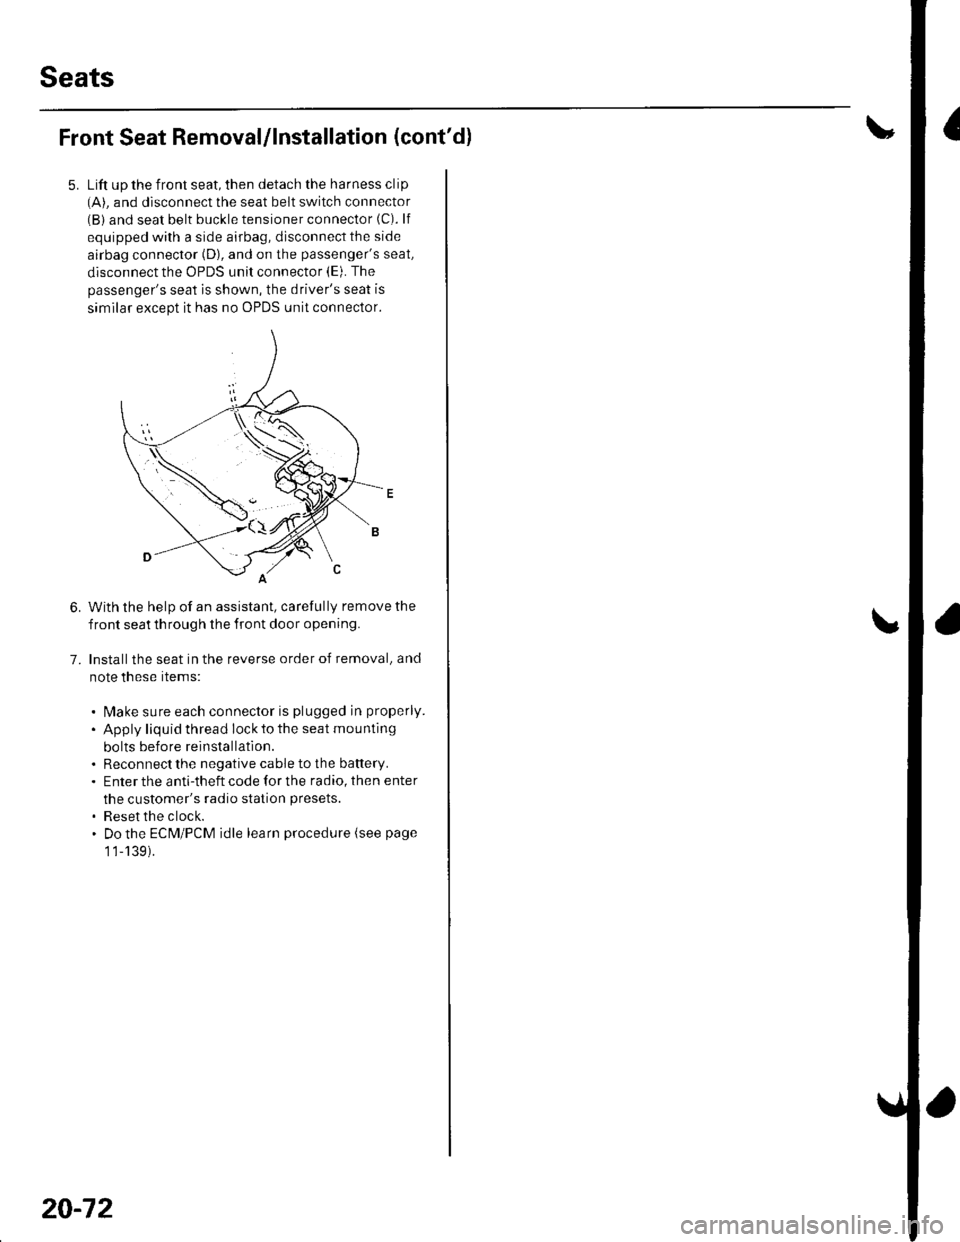
Lift up the front seat, then detach the harness clip(A). and disconnect the seat belt switch connector(B) and seat belt buckle tensioner connector (C). lf
equipped with a side airbag, disconnect the side
airbag connector (D), and on the passenger's seat,
disconnect the OPDS unit connector (E). The
passenger's seat is shown, the driver's seat is
similar except it has no OPDS unit connector.
With the help of an assistant, carefully remove the
front seat th rough the front door opening.
Installthe seat in the reverse order of removal, and
note these rtems:
. l\4ake sure each connector is plugged in properly.
. Apply liquid thread lock to the seat mounting
bolts before reinstallatlon.. Reconnect the negative cable to the battery.. Enter the anti-theft code for the radio, then enter
the customer's radio station presets.
. Reset the clock.. Do the ECM/PCM idle learn procedure (see page
1 1-139).
6.
7.
20-72
Page 734 of 1139
Seats
Rear Seat Removal/lnstallation
NOTE: Take care not to scratch the body or tear the seat covers.
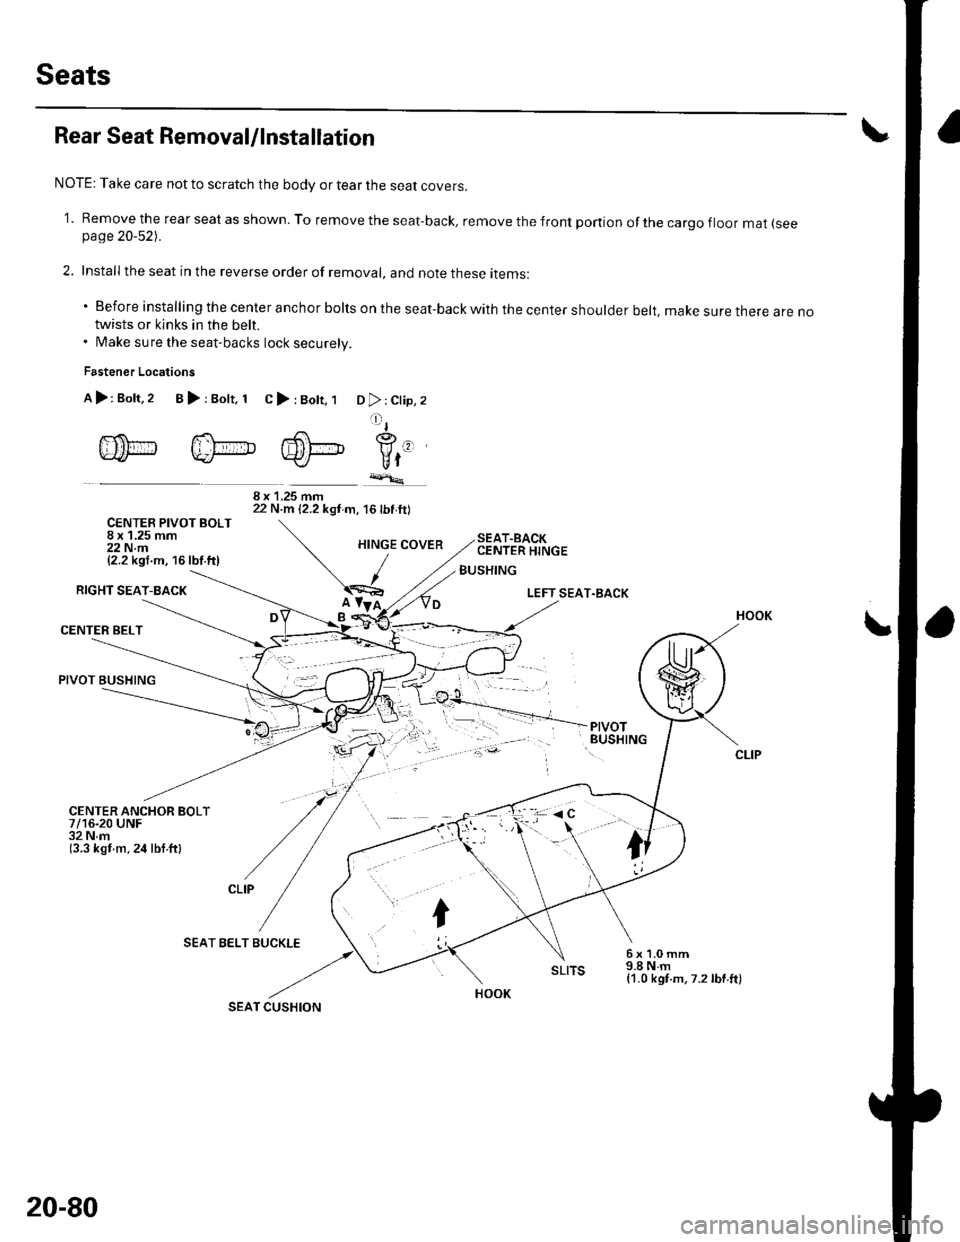
'1. Remove the rear seat as shown. To remove the seat-back, remove the front portion of the cargo floor mar lseepage 20-52).
2. Install the seat in the reverse order of removal, and note these items:
'Beforeinstallingthecenteranchorboltsontheseat-backwiththecentershoulderbelt,makesurethereareno
twists or kinks in the belt.. Make sure the seat-backs lock securelv.
Fastener Locations
A>:Bolt,2 B>rBolt, 1 C>:Bott, 1D >: Clip, 2
lltl
agrf(1
Vt-r_r+*.
\'7
CUSHION
6x1.0mm9.8Nm{1.0 kgf.m,7.2lbf.ft)
/-<.{\.-- F.i\-- K\-|J].Pt-HAP
CENTER PIVOT BOLT8 x 1.25 mm22 N.m{2.2 kgf.m, 16lbf.ftl
RIGHT SEAT-BACK
CENTER BELT
PIVOT BUSHING
CENTER ANCHOR BOLT7/16-20 UNF32Nm(3.3 kgf m.24 lbt ftl
SEAT BELT BUCKLE
8 x 1.25 mm22 N.m 12.2 kgt m, 16lbf.ft)
SEAT.BACKCENTER HINGE
BUSHING
LEFT SEAT.BACK
PIVOTBUSHING
HOOK
20-80
SEAT
Page 735 of 1139
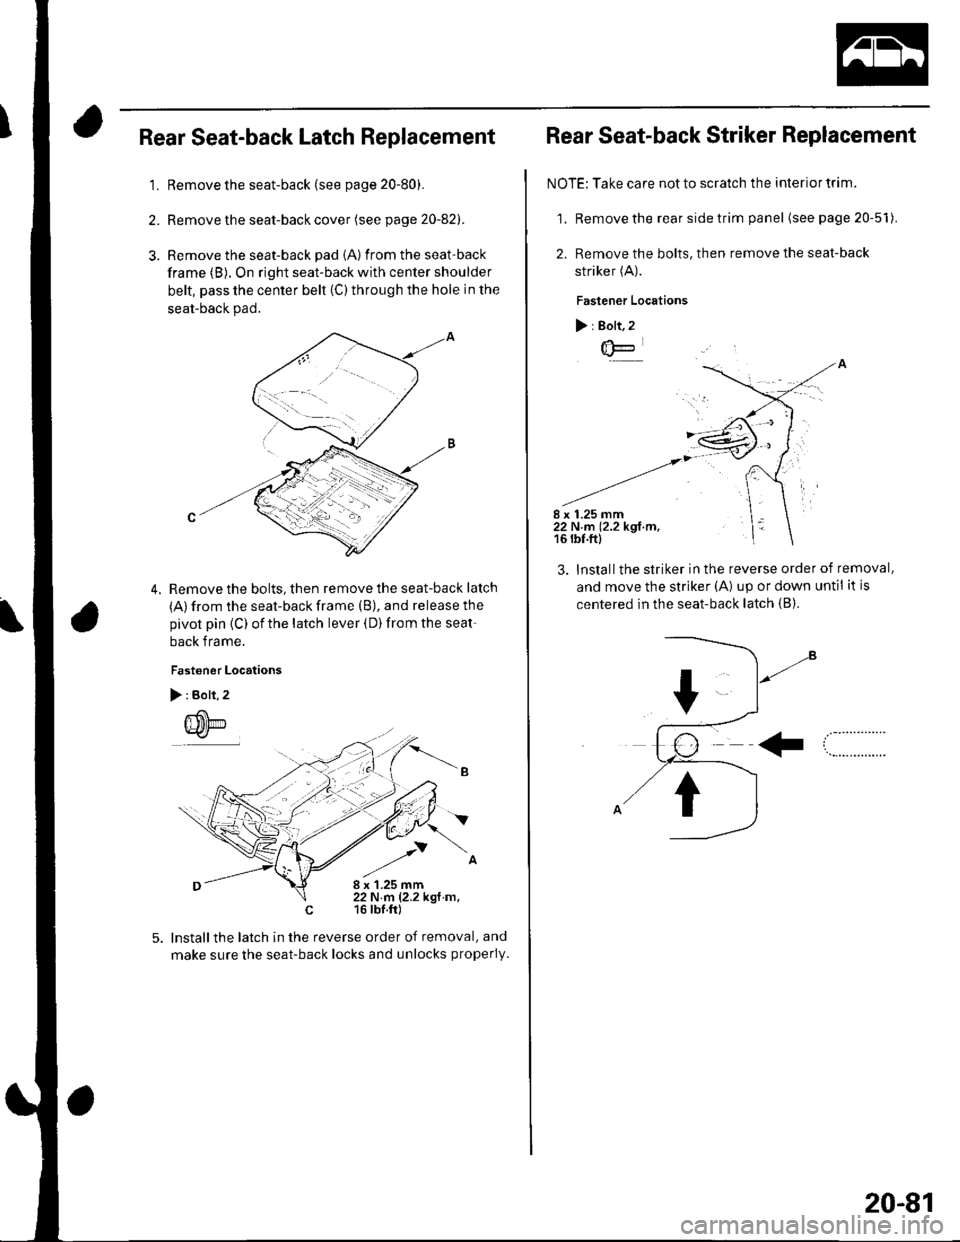
IRear Seat-back Latch Replacement
1.Remove the seat-back (see page 20-80).
Remove the seat-back cover (see page 20-82).
Remove the seat-back pad {A) from the seat-back
frame (B). On right seat-back with center shoulder
belt, pass the center belt (C) through the hole in the
seat-back pad.
Remove the bolts, then remove the seat-back latch
(A) from the seat-back frame (B), and release the
pivot pin {C) of the latch lever (D) from the seat'
back f rame.
Fastener Locations
lnstallthe latch in the reverse order of removal, and
make sure the seat-back locks and unlocks properly.
\
Rear Seat-back Striker Replacement
NOTE: Take care not to scratch the interior trim.
1. Remove the rear side trim panel (see page 20-5'l).
2. Remove the bolts, then remove the seat-back
striker (A).
Fastener Locations
) : Bolt, 2
F
,-;1
8 x 1.25 mm22 N m 12.2 kgl rn,16 tbf.ft)
3. lnstallthe striker in the reverse order of removal,
and move the striker (A) up or down until it is
centered in the seat-back latch {B).
20-81
Page 742 of 1139
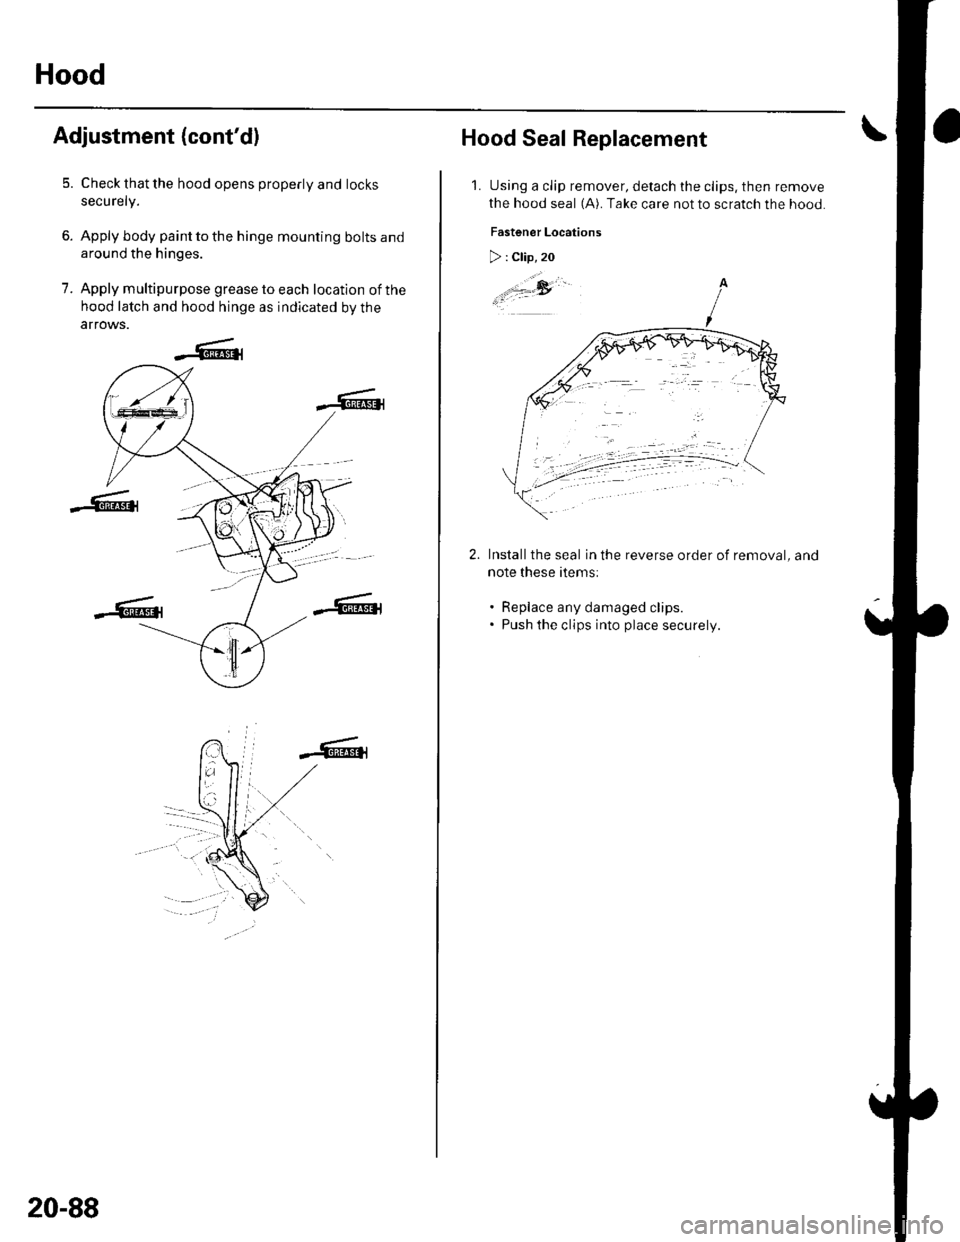
Hood
Adjustment (cont'd)
5. Check that the hood opens properly and locks
securely.
6. Apply body paint to the hinge mounting bolts and
around the hinges.
7. Apply multipurpose grease to each location of the
hood latch and hood hinge as indicated by the
arrows.
.:I
20-88
Hood Seal Replacement
1.Using a clip remover, detach the clips, then remove
the hood seal (A). Take care not to scratch the hood.
Fastener Locations
Installthe seal in the reverse order of removal, and
note these items:
. Replace any damaged clips.. Push the clips into place securely.