lock HONDA CIVIC 2002 7.G Workshop Manual
[x] Cancel search | Manufacturer: HONDA, Model Year: 2002, Model line: CIVIC, Model: HONDA CIVIC 2002 7.GPages: 1139, PDF Size: 28.19 MB
Page 897 of 1139
Gauges
9.
10.
Vehicle Speed Signal Circuit Troubleshooting (cont'dl
Turn the ignition switch OFF.
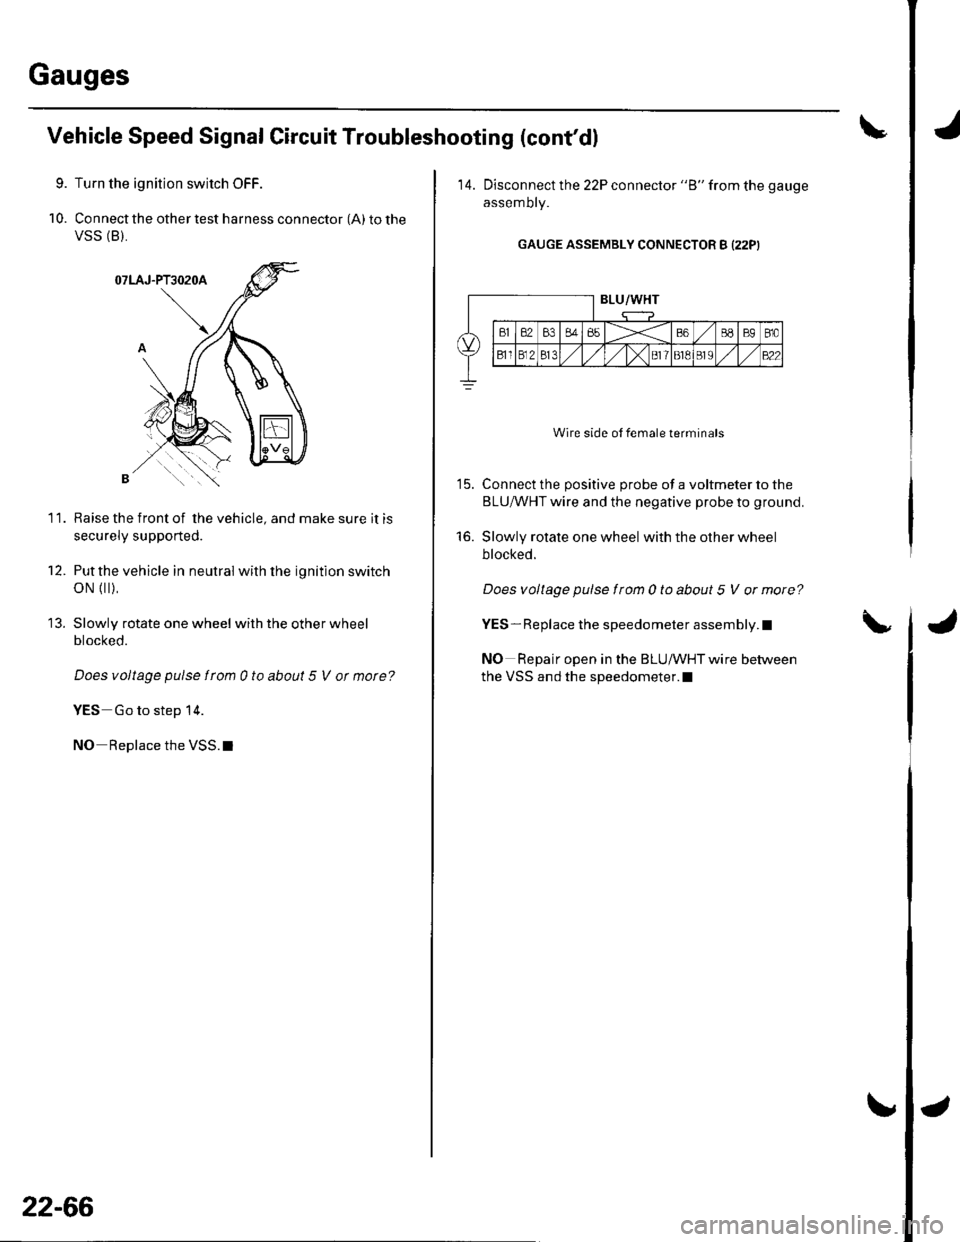
Connect the other test harness connector (A) to the
VSS (B),
11.Raise the front of the vehicle, and make sure it is
securely supported.
Put the vehicle in neutral with the ignition switch
oN {|| ),
Slowly rotate one wheel with the other wheel
blocked.
Does voltage pulse ttom 0 to about 5 V ot morc?
YES Go to step 14.
NO Replace the VSS.I
't2.
t5.
22-66
14. Disconnect the 22P connector "8" from the gauge
assemDry.
GAUGE ASSEMBLY CONNECTOR B (22P)
Wire side ot female terminals
'15. Connect the positive probe of a voltmeter to the
BLU/WHT wire and the negative probe to ground.
'16. Slowly rotate one wheel with the other wheel
blocked.
Does voltage pulse f rom 0 to about 5 V or more?
YES - Replace the speedometer assembly.I
NO Repair open in the BLUMHTwiTe between
the VSS and the speedometer.l
Page 912 of 1139
Bulb Replacement
Headlight:
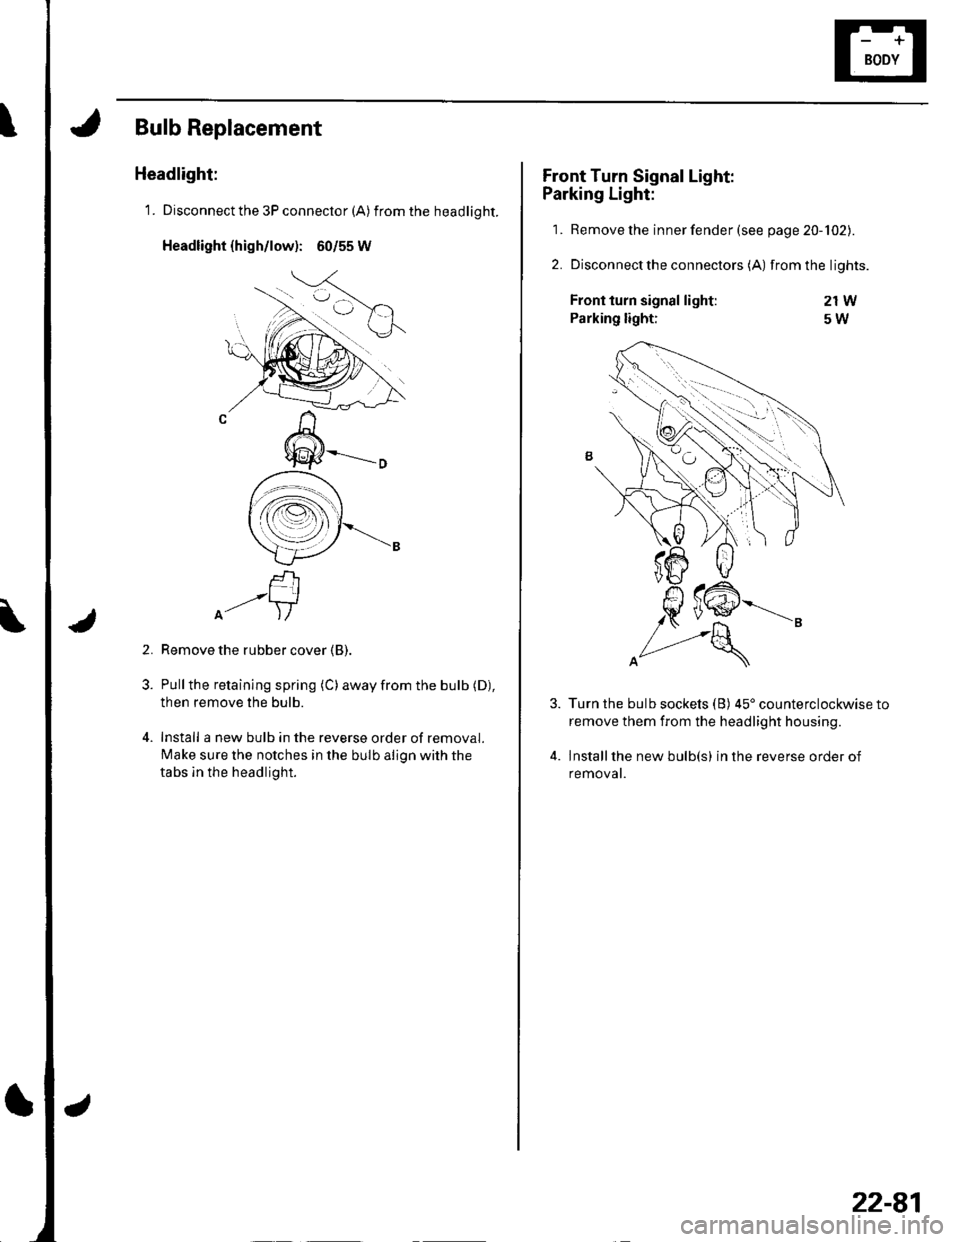
1. Disconnect the 3P connector (A) from the headlight.
Headlight {high/low): 60/55 W
f-rI-'-+lA- )/
Remove the rubber cover (B).
Pull the retaining spring (C) away from the bulb (D),
then remove the bulb.
Install a new bulb in the reverse order of removal.
Make sure the notches in the bulb align with the
tabs ln the headlight.
2.
Front Turn Signal Light:
Parking Light:
1. Remove the inner fender (see page 20-102).
2. Disconnectthe connectors (A) from the lights.
21W
5W
4.
Front turn signal light:
Parking light:
Turn the bulb sockets (B) 45'counterclockwise to
remove them from the headlight housing.
Installthe new bulb(s) in the reverse order of
removat.
22-81
Page 913 of 1139
Exterior Lights
1.
2.
Taillight Replacement
Remove the rear bumper (see page 20-86).
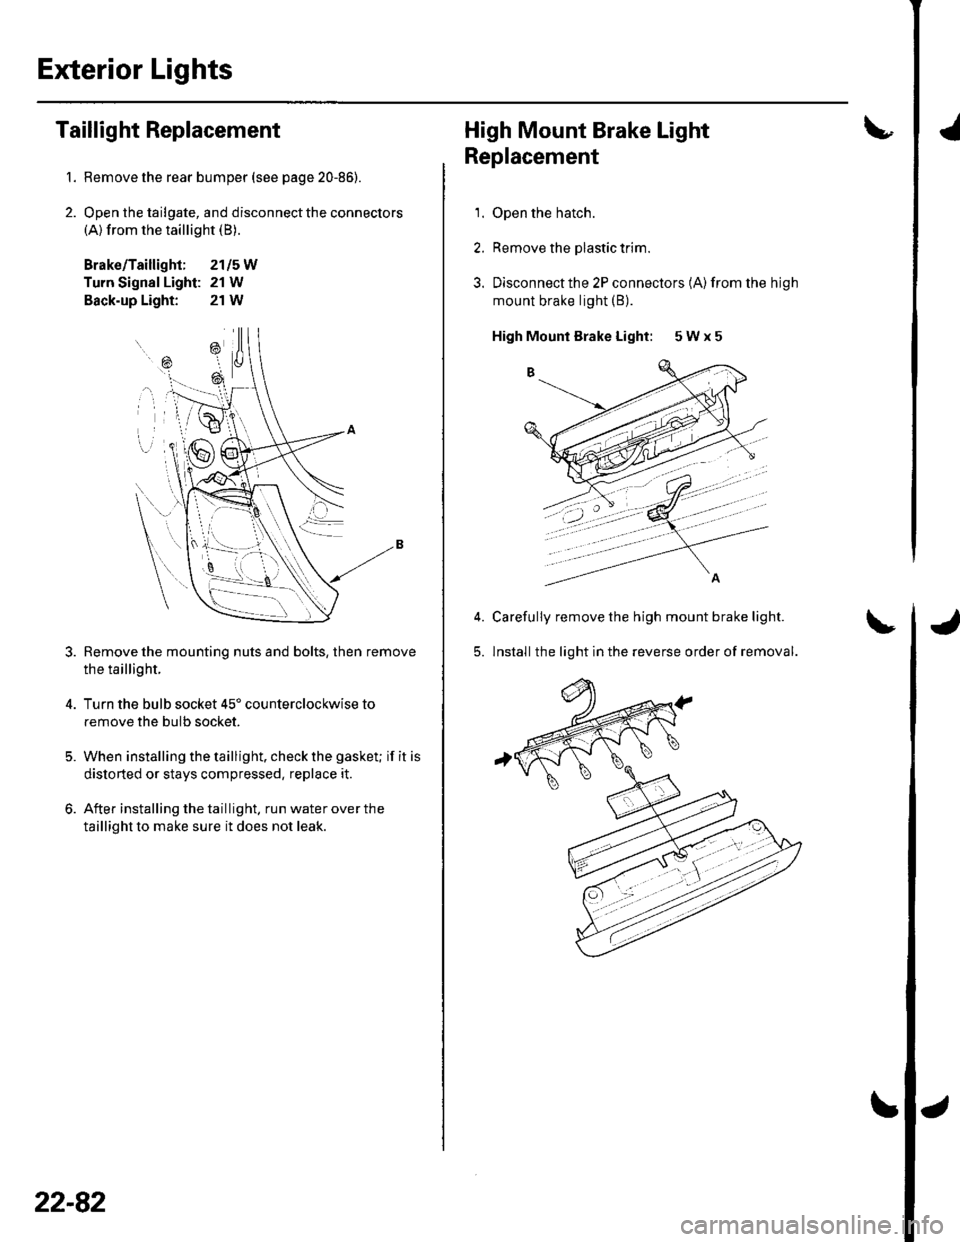
Open the tailgate, and disconnect the connectors(A) from the taillight (B).
Brako/Taillight; 2115W
Turn Signal Light: 21 W
Back-up Light: 21W
Remove the mounting nuts and bolts, then remove
the taillight.
Turn the bulb socket 45' counterclockwise to
remove the bulb socket.
When installing the taillight. check the gasket; if it is
distorted or stays compressed, replace it.
After installing the taillight. run water over the
taillight to make sure it does not leak.
=\
ili--- _ \
rB , \.
---'a t
\
22-82
High Mount Brake Light
Replacement
1. Open the hatch.
2. Remove the plastic trim.
3. Disconnectthe 2P connectors (A)from the high
mount brake light (B).
High Mounl Brake Light: 5 W x 5
Carefully remove the high mount brake light.
lnstall the light in the reverse order of removal.5.
'
Page 914 of 1139
License Plate Light Replacement
1.Remove the hatch lower trim panel (see page 20-
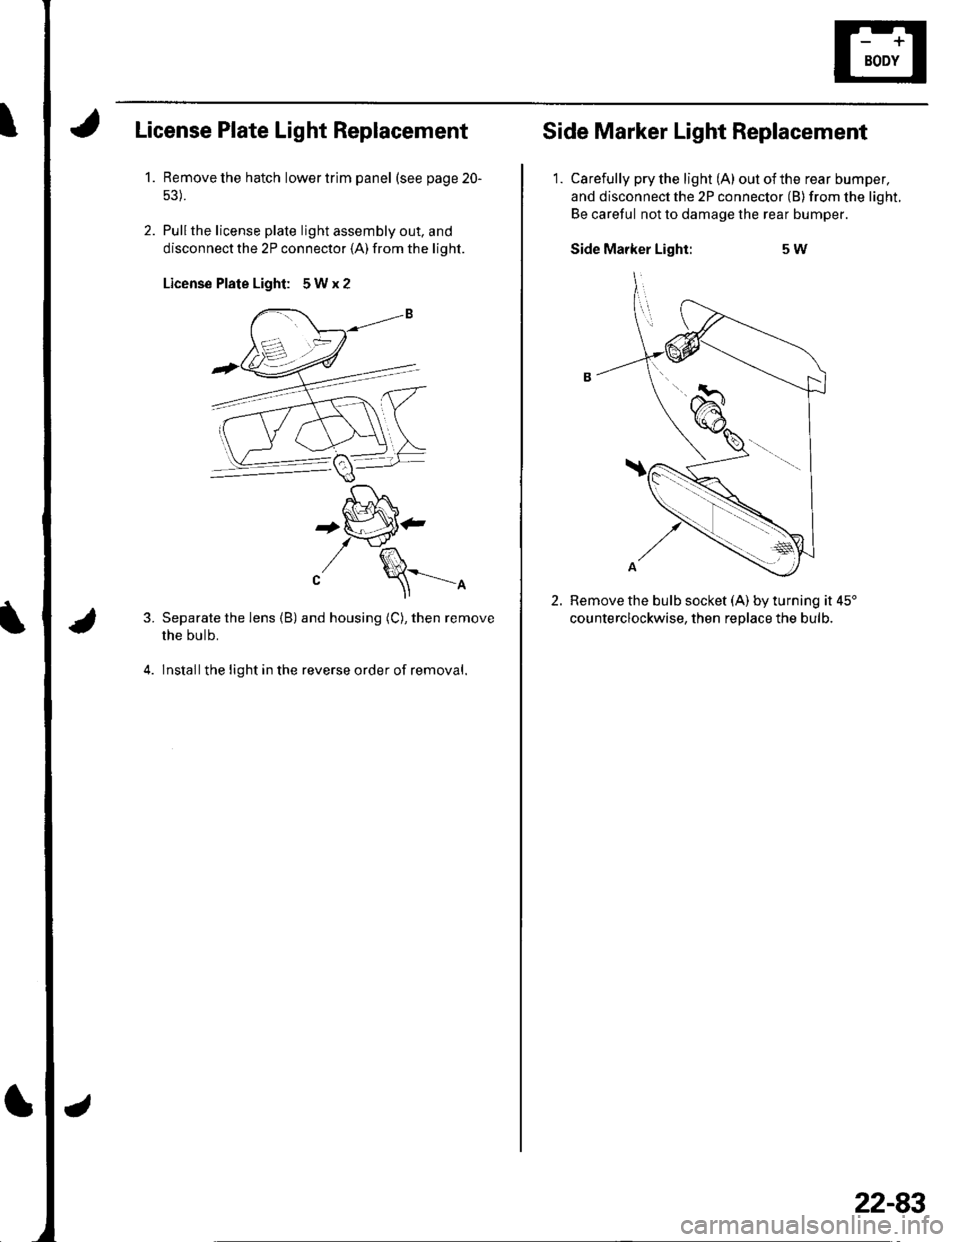
Pullthe license plale light assembly out. and
disconnect the 2P connector (A) from the light.
License Plate Light: 5Wx2
3.
4.
'[-J^,^f , t lo \
+tiP'-t \-J'fl^
"/ \==-^
Separate the lens (B) and housing (C), then remove
the bulb.
lnstallthe light in the reverse order of removal.
Side Marker Light Replacement
1. Carefully pry the light (A) outofthe rear bumper,
and disconnect the 2P connector (B) from the light.
Be careful not to damage the rear bumper.
Side Marker Light:5W
2.Remove the bulb socket (A) by turning it 45'
counterclockwise. then reolace the bulb.
22-83
Page 924 of 1139
I
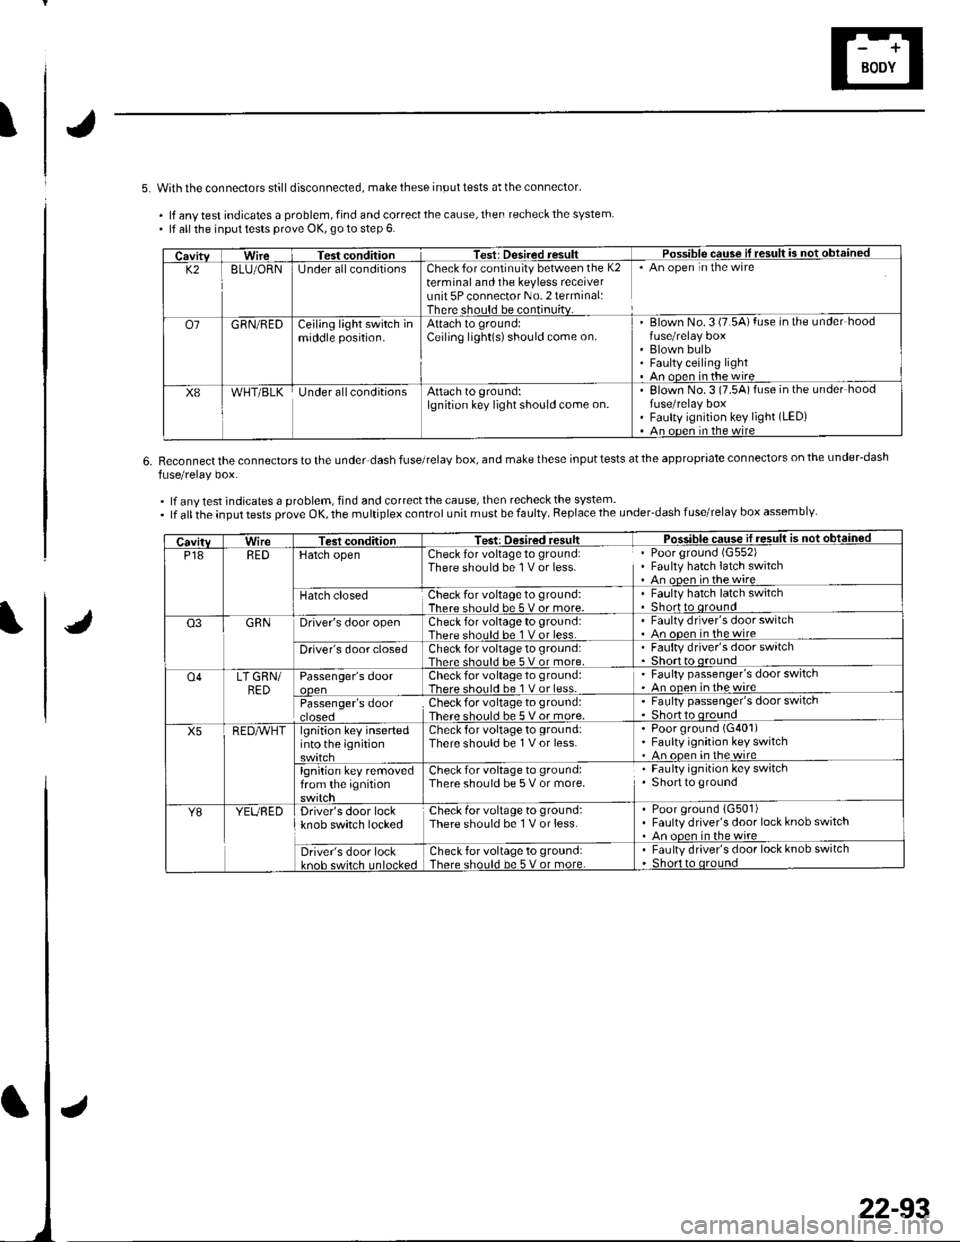
5. With the connectors stilldisconnected, make these input tests at the connector'
. lf anv test indicates a problem, find and correct the cause, then recheck the system. lf all the inpul tests prove OK, go to step 6.
6.Reconnect the connectors to the under dash fuse/relaV box, and make these input tests at the appropriate connectors on the under-dash
fuse/relay box.
.lfanytestindicatesaproblem,findandcorrectthecause,thenrecheckthesystem..lfalltheinputtestsproveOK,themultiplexcontrolunitmustbefaulty.Replacetheunder'dashfuse/relaYboxassemblY
CavitvWireTest conditionTest: Desired resultPossible cquse il result is not obtained
K28LU/ORNlJnder allconditionsCheck for continuity between the K2terminal and the keyless receiverunit 5P connector No. 2 terminal:There should be continuitv.
An open in the wire
o7GRN/REDCejling light switch inmiddle position.Attach to ground:Ceiling light(s)should come on.Blown No. 3 (7.5A) fuse in the under hood
Blown bulbFaulty ceiling lightAn ooen in the wire
X8WHT/BLKUnder allconditionsAttach to ground:lgnition key light should come on.Elown No.3 (7.5A)fuse in the under hoodfuse/relay boxFaulty ignition key light (LED)
An ooen in the wire
CavitvWireTest conditionTest: Desired resultPosq!!!c sq!!ej1!.9!!!!j €d
P18REDHatch openCheck for voltage to ground:There should be 1 V or less.Poor ground (G552)
Fauhy hatch latch switchAn open inthewire
Hatch closedCheck for voltage to ground:There should be 5 v or more.Faulty hatch latch switchShortto oround
Q3GRNDriver's door openCheck for voltage to ground:There should be 1 V or less.Faulty drlver's door switchAn oDen in the wire
Driver's door closedCheck for voltage to ground:Thar. shoul.l he 5 V or more.Faulty driver's door switch
o4LT GRN/BED
RED^vHT
Passenger's doorCheck for voltage to ground:There should be 1 V or less.
' Faulty passenger's door switch' An onen inthewire
Passenger's doorcroseoCheckfor voltage to ground:There should be 5 Vor more.
. Faulty passenger's door switch. Shor o oround
X5lgnition key insertedinto the ignitionCheck for voltage to ground:There should be 1 V or less.Poor ground (G401)
Faulty ignition key switchAn ooen in the wire
lgnition key removedfrom the ignitionCheck for voltage to ground:There should be 5 V or more.Faulty ignition key switchShort to ground
Y8YEUREDDriver's door lockknob switch lockedCheck for voltage to ground:There should be 1 V or less.Poor ground {G501)Faulty driver's door lock knob switchAn ooen in the wire
Driver's door lockkn6h cwirch Inl6cke.lCheck for voltage to ground:There should be 5 V or more.Faulty driver's door lock knob switchShort to oround
22-93
Page 981 of 1139
Keyless/Power Door Lock System
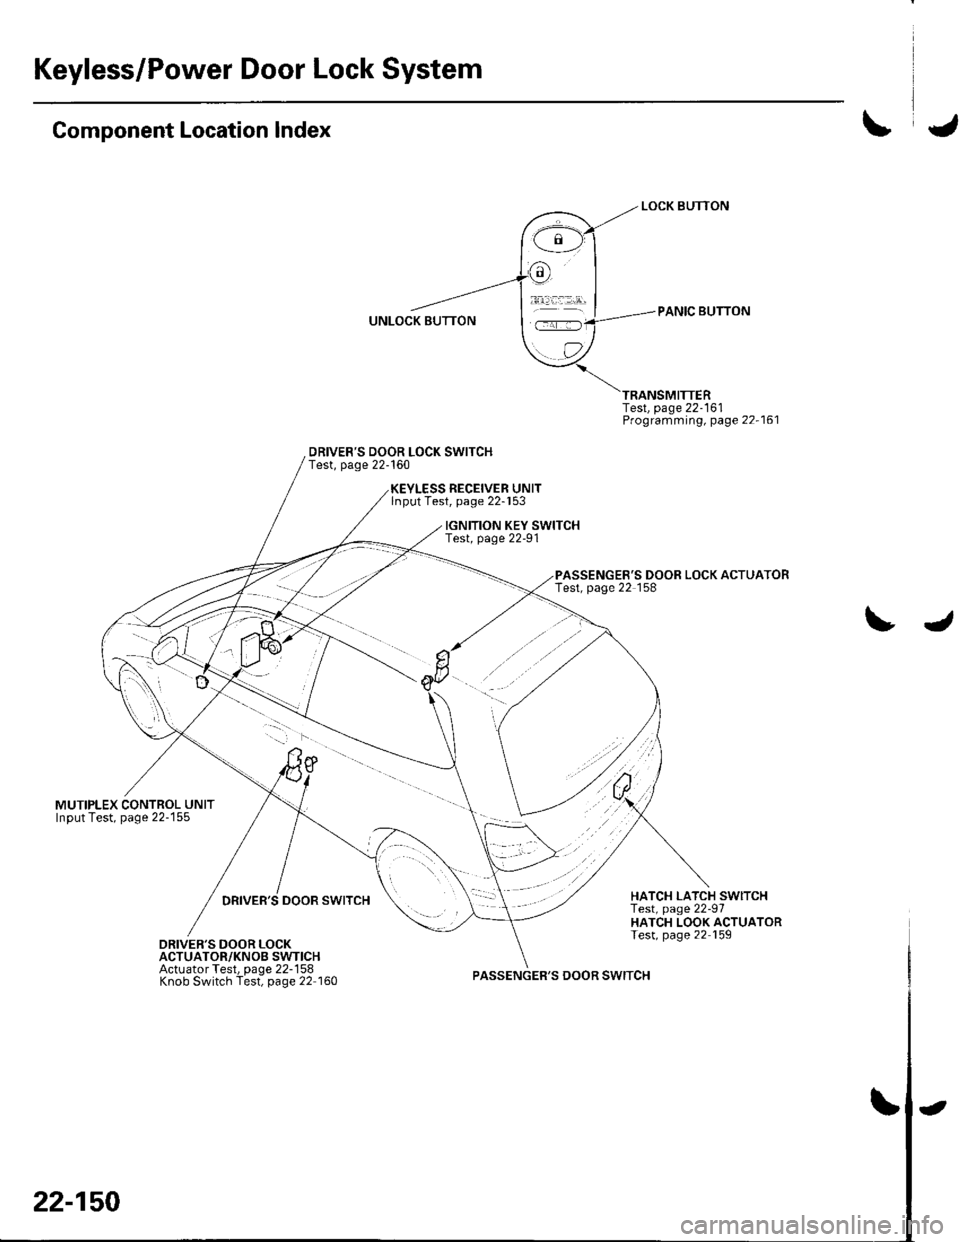
Component Location Index
MUTIPLEX CONTROL UNITInput Test, page 22-155
DRIVER'S DOOR LOCK SWITCHTest, page 22-160
Test, page 22-161Programming, page 22-161
PASSENGER'S DOOR LOCK ACTUATORTest, page 22 158
RECEIVER UNITlnput Test, page 22-153
IGNITION KEY SWITCHTest, page 22-91
DRIVER'S DOOR SWITCHHATCH LATCH SWITCHTest, page 22-97HATCH LOOK ACTUATORTest, page 22 159DRIVER'S DOOR LOCKACTUATOR/KNOB SWTICHActuator Test, page 22-158Knob Switch Test, page 22 160PASSENGER'S DOOR SWITCH
22-150
-
Page 983 of 1139
Keyless/Power Door Lock System
UNDEN HOOD FU8E/BELAY MX
l\b r t15a) FUSE
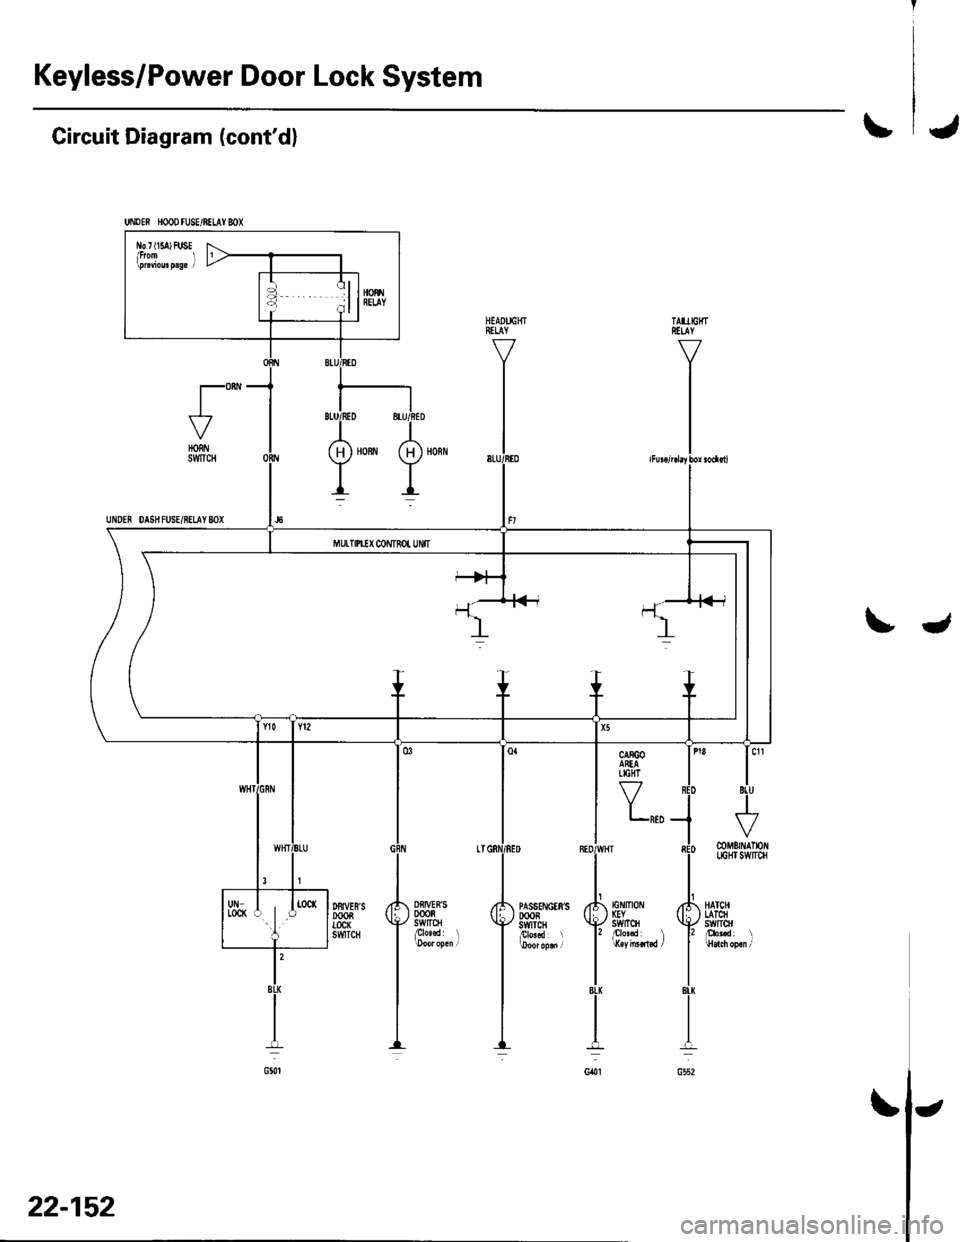
Circuit Diagram (cont'dl\J
t"-HORNSWTCH
UNDEN DAS}I FUSE/8ELAY 8OX
tJ
Y,,,
Df,IVEB'S0008swtrcHplo'.d l
DFIVES'SDOOBTOCK6WTCH
tG tltot IGYstvrTcH
mMErNAlloflLIGHI SWITCH
HATCHLATCHswlrol
22-152
\
Page 985 of 1139
Keyless/Power Door Lock System
Keyless Receiver Unit Input Test (cont'dl
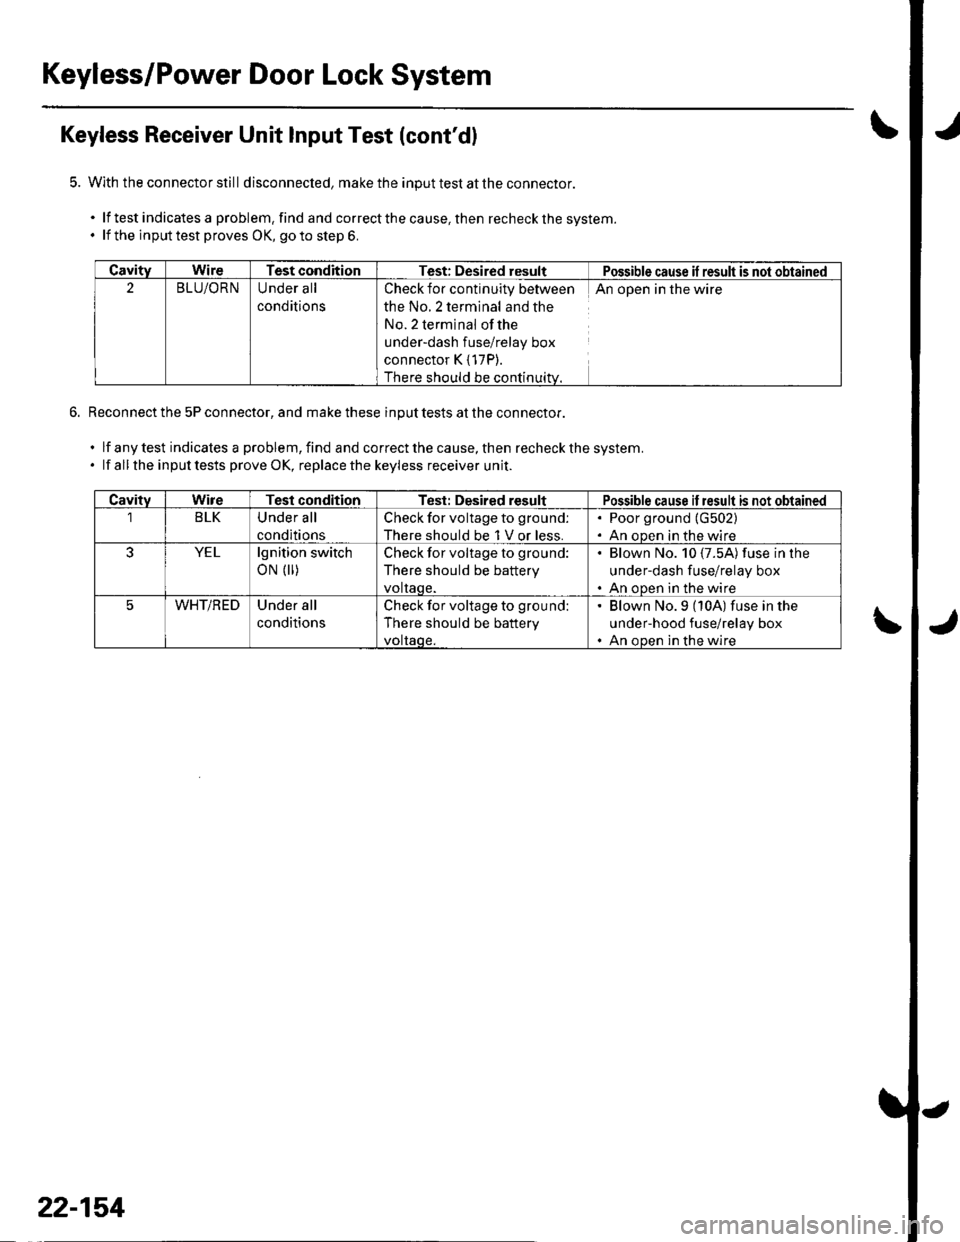
With the connector still disconnecled, make the input test at the connector.
.lftestindicatesaproblem,findandcorrectthecause,thenrecheckthesystem.
. lf the inputtest proves OK, goto step 6.
Reconnect the 5P connector, and make these input tests at the connector.
.lfanytestindicalesaproblem,findandcorrectthecause,thenrecheckthesystem.
. lf all the inputtests prove OK, replacethe keyless receiver unit.
CavityWireTest conditionTest: Desired resultPossible cause il result is not obtained
2BLU/ORNUnder all
conditions
Check for continuity between
the No.2 terminal and the
No. 2 terminal ofthe
under-dash fuse/relay box
connector K { 17P).
There should be continuitv.
An open in the wire
CavitvWireTest conditionTest: Desired resultPossible cause if result is not obtained
1BLKUnder all
conditions
Check for voltage to ground:
There should be 1 V or less.
. Poor ground (G502)
. An oDen in the wire
YELlgnition switch
oN (||)Check for voltage to ground:
There should be battery
voltaqe.
Blown No. 10 {7.5A) fuse in lhe
under-dash fuse/relay box
An ooen in the wire
WHT/REDUnder all
conditions
Check for voltage to ground:
There should be battery
voltaqe.
' Blown No.9 (10A) fuse in the
under-hood fuse/relay box. An ooen in the wire
22-154
Page 987 of 1139
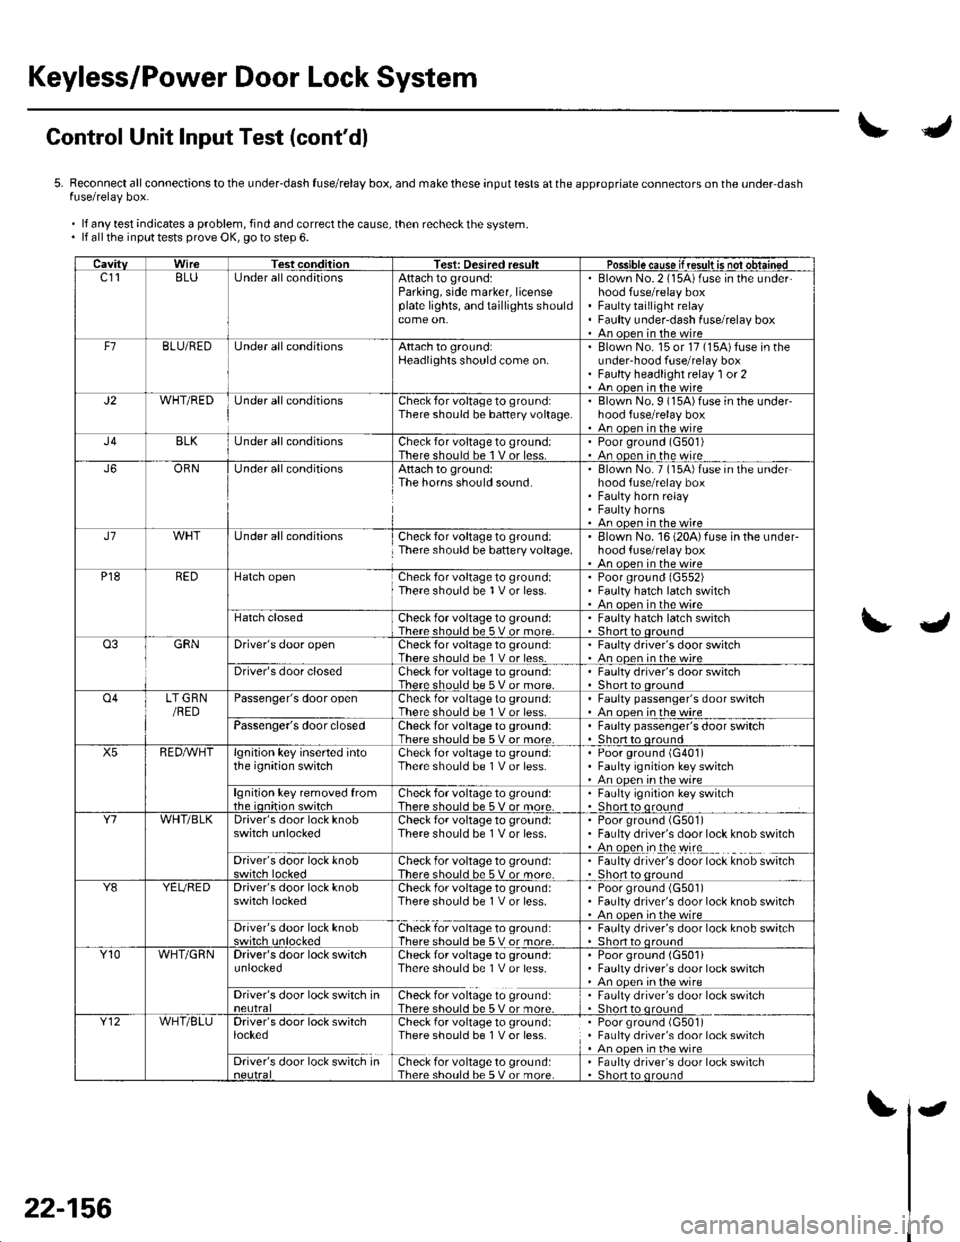
Keyless/Power Door Lock System
Control Unit Input Test (cont'dl
5. Reconnect all connections to the underdash fuse/relay box, and make these input tests at the appropriate connectors on the under-dashfuse/relay box.
'lfanytestindicatesaproblem,findandcorrectthecause,thenrecheckthesystem.. lf all the inputtests prove OK, goto step 6.
CavitvWireTest conditionTest: Desired resultPossible ca use if result is notobtainedc1'l8LUUnder all conditionsAftach to ground:Parking, side marker, licenseplate lights, and tajllights shouldcome on.
Blown No.2 (15A)fuse in the underhood fuse/relay boxFaulty taillight relayFaulty under-dash fuse/relay boxAn onen in rhc wireBLU/BEOUnder all conditionsAttach to ground:Headlights should come on.Blown No. 15 or 17 (15A)fuse in theunderhood fuse/relay boxFaulty headlight relay '1 or 2An ooen in the wireJ2WHT/REDUnder all conditionsCheck for voltage to ground:There should be battery voltage.Blown No.9 (15A)fuse in the under-hood fuse/relay boxAn oncn in thc wircBLKUnder all conditaonsCheck for voltage to ground:Thcre shouln hc 1 V or lpqsPoor ground (G501)An ooen in the wireJ6OBNUnder allconditionsAttach to ground:The horns should sound.Blown No. 7 (15A)fuse in the underhood fuse/relay boxFaulty horn relayFaulty hornsAn 6nen in rhe wireJ7Under all conditionsCheck for voltage to ground:There should be battery voltage.Elown No. 16 (20A)fuse in the underhood fuse/relay boxAn oocn in ihc wi.cP18BEDHatch openCheck for voltage to ground:There should be 1 V or less.Poor ground (G552)Faulty hatch latch switchAn oncn in rhc wirFHatch closedCheck for voltage to groundlThere shoul.l he 5 V or moreFaulty hatch latch switch
GBNDriver's door openCheck for voltage to g.ound:There should be 1 V or less. Faulty driver's door switch. An ooen in the wireDriver's door closedCheck for voltage to ground:There should be 5 V or more.Faulty driver's door switchShort to oroundo4LT GRN/REDPassenger's door openCheck for voltage to ground:There should be 1 V or less.Faulty passenger's door switchAn ooen inthewirePassenger's door closedCheck for voltage to groundlThere should be sVor more
. Faulty passenger's door switch. Short to oroundX5REDAVHTlgnition key inserted intothe ignition swhchCheck for voltage to ground:There should be 1 V or less.Poor ground {G401)Faulty ignition key switchAn ooen inthewirelgnition key removed fromrhe ionition switchCheck for voltage to ground:There should be 5 V or more.Faulty ignition key switchShort to oroundY1WHT/BLKDriver's door lock knobswitch unlockedCheck for voltage to groundlThere should be 1 V or less.Poorground (G50'l)Faulty driver's door lock knob switchAn open in the wireDriver's door lock knobCheck for voltage to groundlIhere should be 5 V or more.Faulty driver's door lock knob switchShort to oroundY8YEUREDDriver's door lock knobswitch lockedCheck for voltage to groundlThere should be 1 V or less.Poorground (G50'l)Faulty driver's door lock knob switchAn oncn inihewireDriver's door lock knobswitch unlockedCheck for voltage to ground:There should be 5Vor more' Faulty driver's door lock knob sw;tch. Shorr to oroundY10WHT/GRNDrtver's door lock switchunlockedCheck for voltage to groundlThere should be 1 V or less.Poorground (G501iFaulty driver's door lock switchAn ooen in the wireDriver's door lock switch inCheck for voltage to ground:Therc shorl.l be 5V or m6rpFaulty driver's door lock switchShort to o rolrndY12WHT/BLUDriver's door lock switchlockedCheck for voltage to ground:There should be 'l V or less.Poor ground (G501)Faulty driver's door lock switchAn oDen in the wireDriver's door lock switch inCheck tor voltage to ground:There should be 5Vor moreFaulty driver's door lock switch
22-156
J
Page 988 of 1139
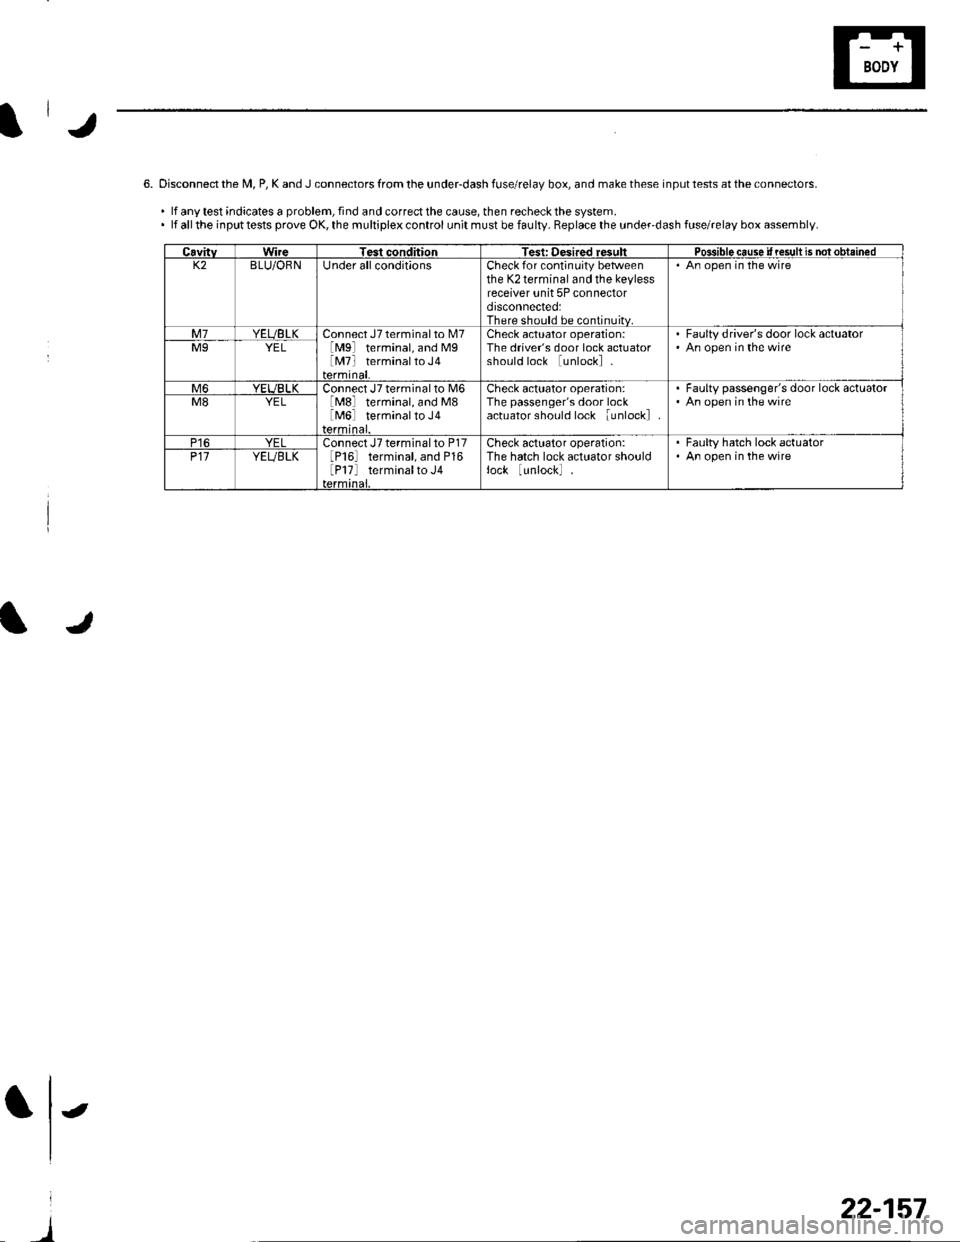
6. Disconnect the M, P, K and J connectors from the underdash fuse/relay box, and make these input tests at the connectors.
.lfanytestindicatesaproblem,findandcorrectthecause,thenrecheckthesystem..lfalltheinputtestsproveOK,themultiplexcontrolunitmustbefaulty.Replacetheunder-dashfuse/relayboxassembly.
CavitvWireTest conditionTest: Desired resultPdsiblo c6use if result is not obtain€dK2BLU/ORNUnder all conditionsCheck for continuity betweenthe K2 terminal and the keylessreceiver unit 5P connectordisconnected:There should be continuitv.
An open in the wire
M7YEUBLKConnect J7 terminal to [,47lMgl terminal, and MglMTl terminalto J4
Check actuator operation:The driver's door lock actuatorshould lock lunlockl
Faulty driver's door lock actuatorAn open in the wireM9YEL
M6YEUBLKConnect J7 terminal to M6lMSl terminal, and M8lM6l terminalto J4
Check actuator operation:The passenger's door lockactuator should lock iunlockl
Faulty passenger's door lock actuatorAn open in the wireM8YEL
P16YELConnect J7 terminal to P17lP16l terminal, and P16lP17l terminalto J4
Check actuator operation:The hatch lock actuator shouldlock lunlockl
. Faulty hatch lock actuator. An open in the wireP17YEUBLK
-
22-157