dashboard HONDA CIVIC 2002 7.G Repair Manual
[x] Cancel search | Manufacturer: HONDA, Model Year: 2002, Model line: CIVIC, Model: HONDA CIVIC 2002 7.GPages: 1139, PDF Size: 28.19 MB
Page 911 of 1139
Exterior Lights
4.
5.
Combination Light Switch Test/Replacement
1. Remove the driver's dashboard lower cover (see page 20-60).
2. Remove the steering column covers (see page 17-9).
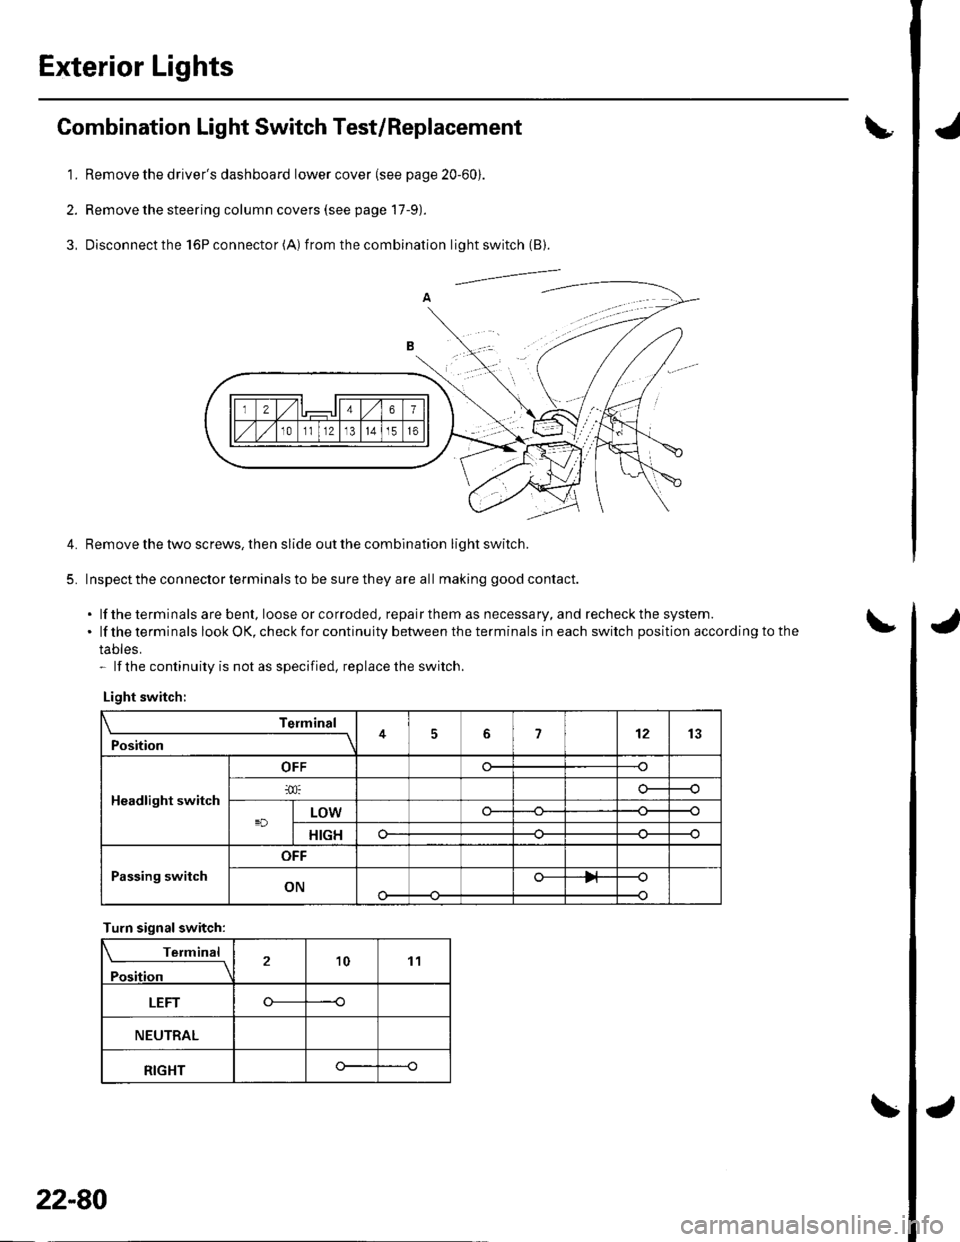
3, Disconnectthe l6Pconnector(A) f rom the combination light switch (B).
Remove the tlvo screws, then slide out the combination light switch.
Inspect the connector terminals to be sure they are all making good contact.
. lf the terminals are bent, loose or co rroded, repa ir them as necessa ry, a nd recheck the system..lftheterminalslookOK,checkforcontinuitybetweentheterminalsineachswitchpositionaccordingtothe
tables.- lf the continuity is not as specified, replace the switch.
Light switch:
Telmint
Position451213
Headlight switch
OFF
LOWo--
HIGHo--
Passing switch
OFF
ONo-
Turn signalswitch:
Terminal
Position21011
LEFT----o
NEUTRAL
RIGHTo--
22-80
Page 923 of 1139
Entry Light Control System
Control Unit Input Test
1. Before testing, trou bleshoot the m u ltiplex control system (see page22-172).
2. Remove the dashboard lower cover.
3. Disconnect the under-dash fuse/relay box connectors.
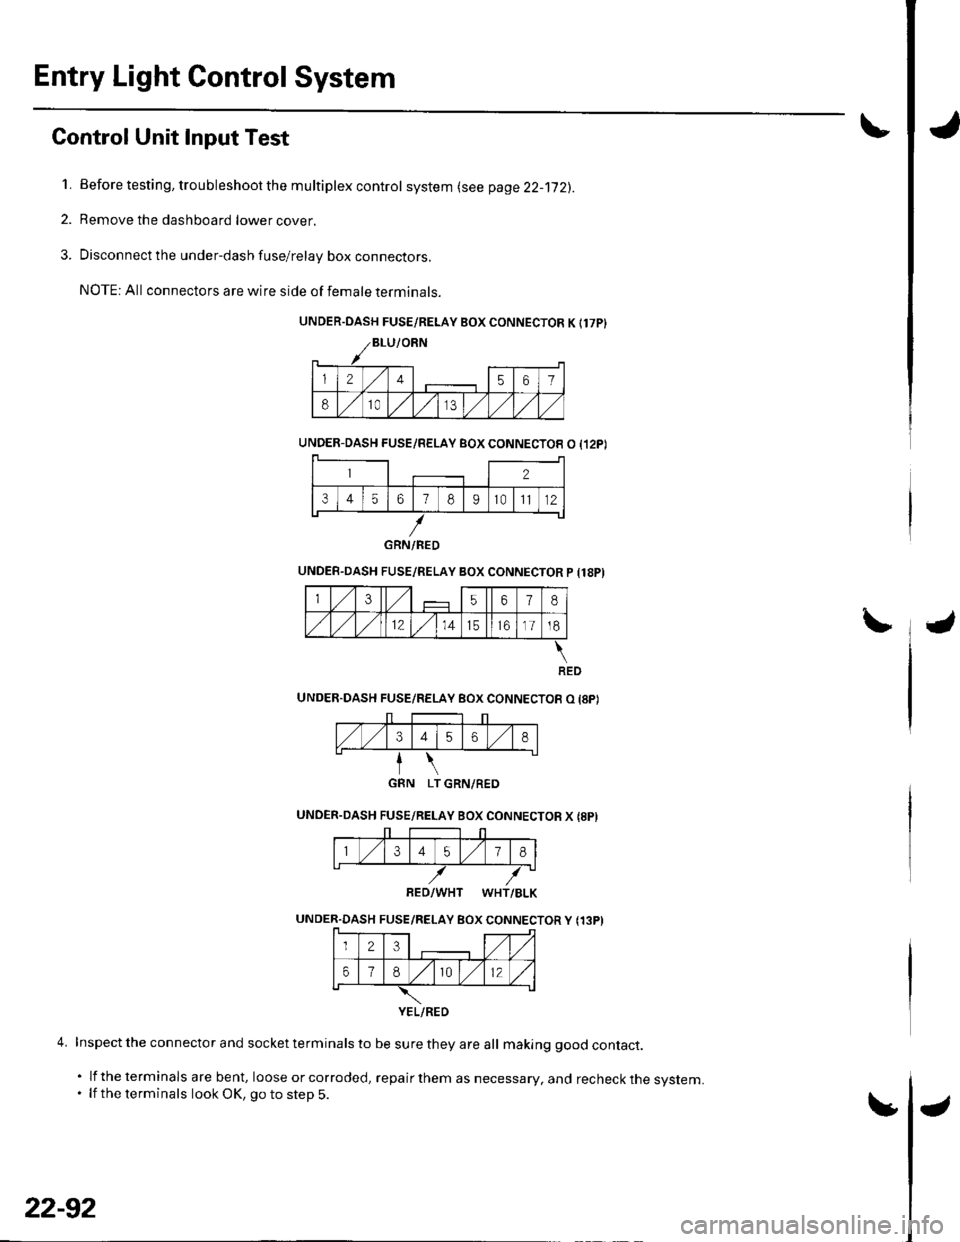
NOTE: All connectors are wire side of female terminals.
UNDER.DASH FUSE/RELAY BOX CONNECTOR K Il7PI
UNDEB-DASIJ FUSE/RELAY BOX CONNECTOR O {,I2PI
UNDEB.DASH FUSE/RELAY BOX CONNECTOR P {18PI
GRN LT GRN/REO
UNOER.DASH FUSE/REI"AY BOX CONNECTOB X I8PI
1,/134578
8ED/WHT WHT/BLK
UNDER.DASH FUSE/RELAY BOX CONNECTOR Y {13PI
Inspect the connector and socket terminals to be sure they are all making good contact.
. lf the terminals are bent, loose orcorroded, repairthem as necessary, and recheck the system.. lf the terminals look OK, go to step 5.
GRN/RED
3456),/18.
YEL/RED
4.
22-92
Page 931 of 1139
Audio System
Audio Unit Removal/lnstallation
NOTE:. Put on gloves to protect your hands.. Take care not to scratch the dashboard and relatedpa rts.
1. Make sure you have the anti-theft code for the radio,
then write down the frequencies for the radio's
preset buttons.
2. Remove the driver's dashboard lower cover (see
page 20-59).
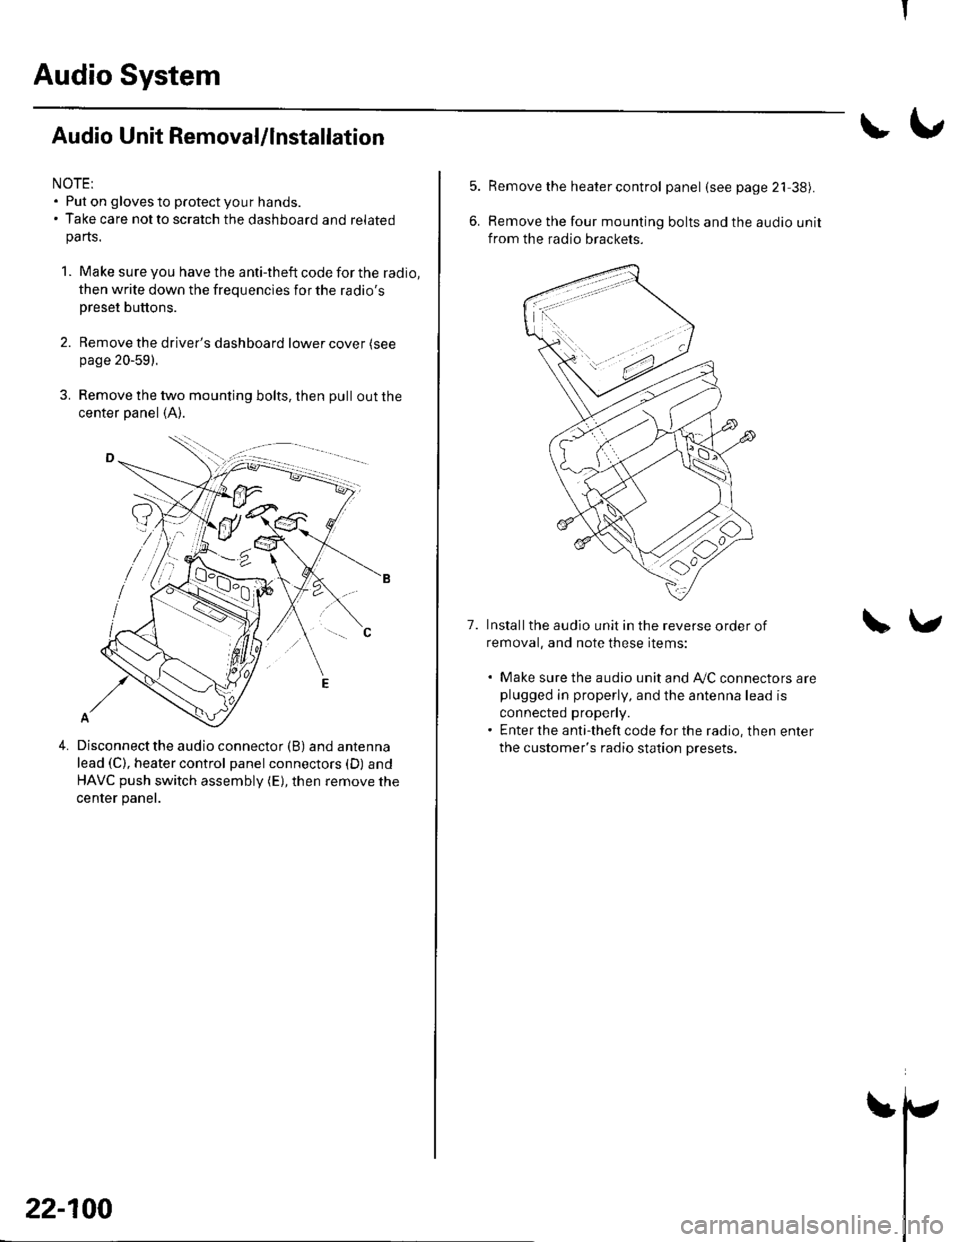
3. Remove the two mounting bolts, then pull out the
center panel (A).
4.Disconnect the audio connector (B) and antenna
lead (C), heater control panel connectors (D) and
HAVC push switch assembly (E), then remove the
center panel.
22-100
!\,
7.
Remove the heater control panel (see page 21 38).
Remove the four mounting bolts and the audio unit
from the radio brackets.
Installthe audio unit in the reverse order of
removal, and note these items:
. Make sure the audio unit and A/C connectors areplugged in properly, and the antenna lead is
connected properly.. Enter the anti-theft code for the radio, then enter
the customer's radio station presets.
\v
I
Page 953 of 1139
Horns
1.
3.
Horn Test/Replacement
Remove the front bumper {see page 20-85).
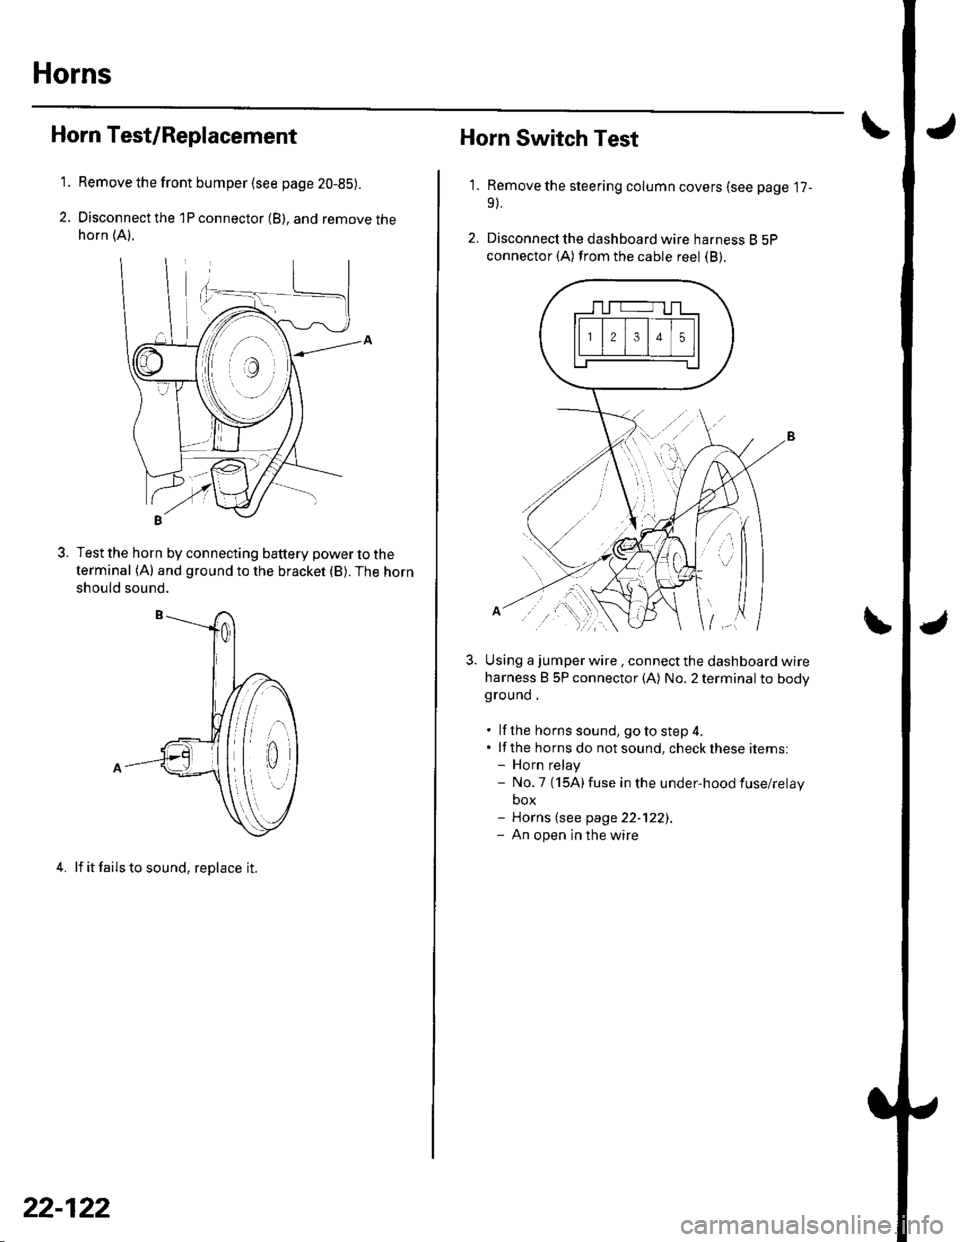
Disconnect the 1P connector (B), and remove thehorn (A).
Test the horn by connecting battery power to the
terminal (A) and ground to the bracket (B). The horn
should sound.
4. lf it fails to sound, replace it.
22-122
1.
Horn Switch Test
Remove the steering column covers (see page '17-
9).
Disconnecl the dashboard wire harness B 5P
connector (A) from the cable reel (B).
Using a jumper wire . connect the dashboard wire
harness B 5P connector (A) No. 2 terminal to bodyground .
. lf the horns sound, goto step 4.. lf the horns do notsound, checkthese items:- Horn relay- No.7 (15A)fuse in the under-hood fuse/relay
box- Horns (see page 22-122).- An open in the wire
| ../......:....,
Page 954 of 1139
I
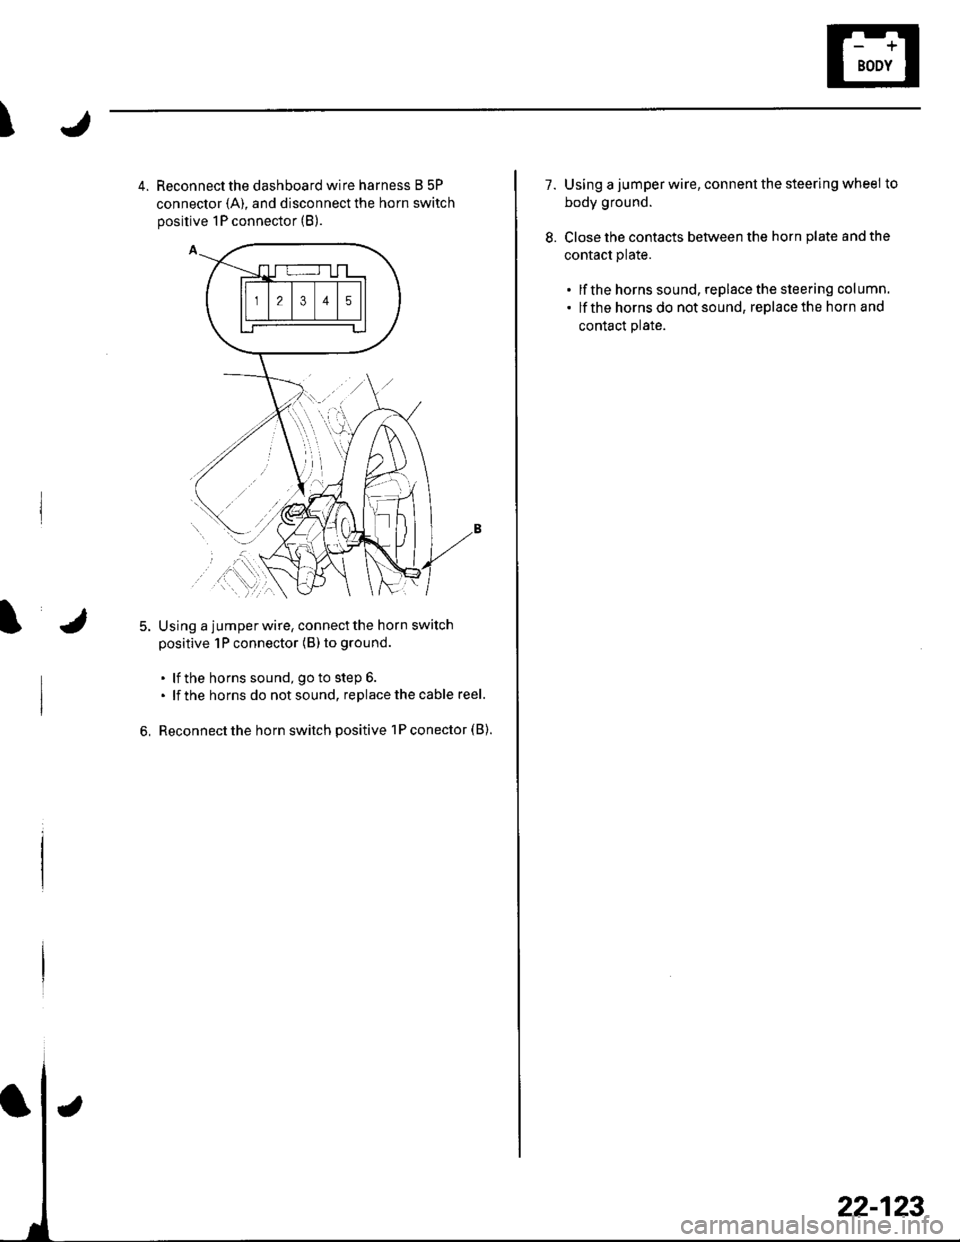
4. Reconnect the dashboard wire harness B 5P
connector {A), and disconnect the horn switch
positive 1P connector (B).
Using a jumperwire, connectthe horn switch
positive 1P connector (B) to ground
. lf the horns sound, go to step 6.. lf the horns do notsound, replacethecable reel.
Reconnect the horn switch positive 1P conector (B).6,
22-123
1.Using a jumper wire, connent the steering wheel to
body ground.
Close the contacts between the horn plate and the
contact plate.
. lf the horns sound, replacethe steering column.. lf the hornsdo notsound, replacethe horn and
contact plate.
8.
Page 971 of 1139
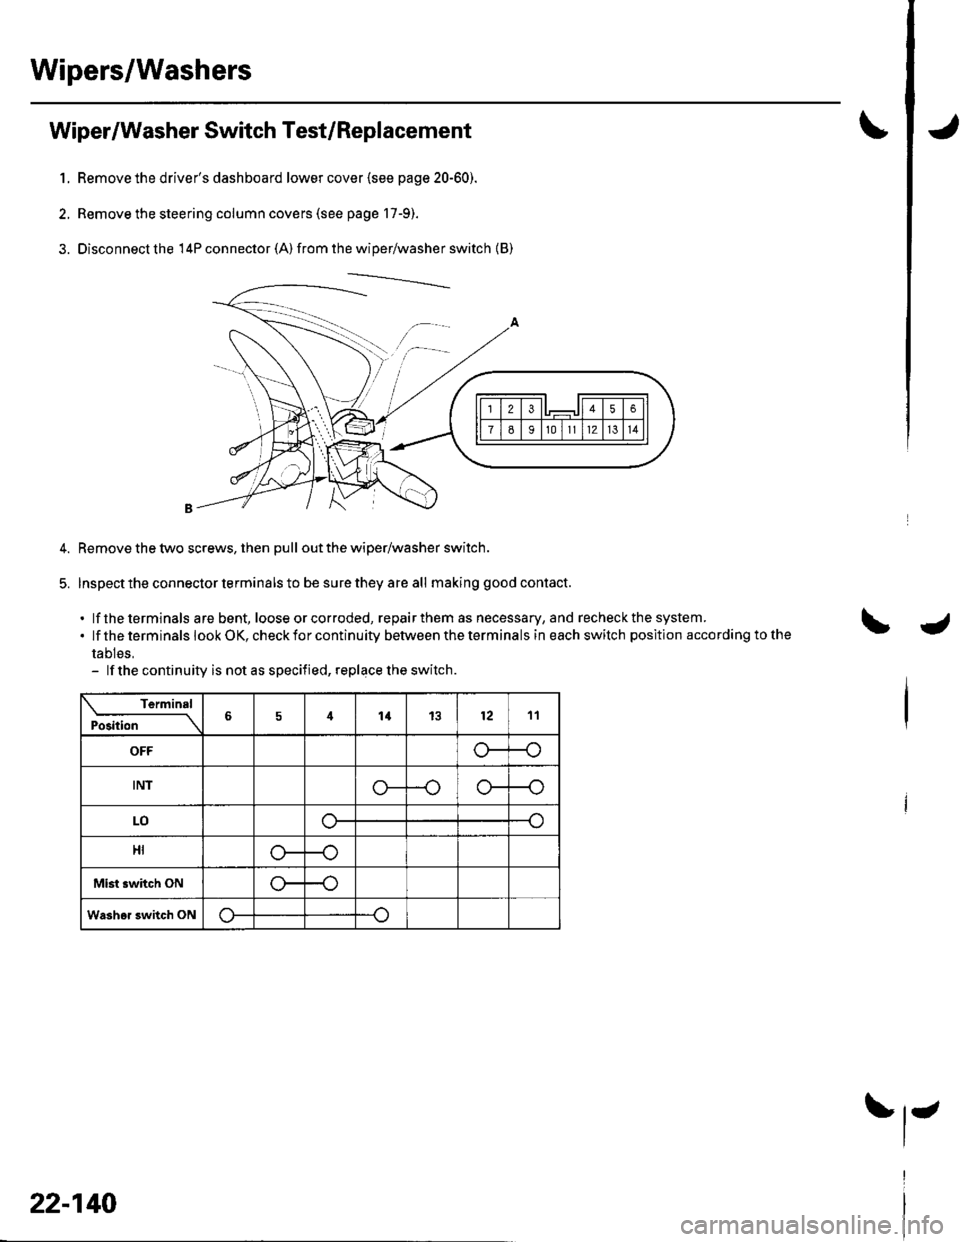
Wipers/Washers
1.
Wiper/Washer Switch Test/Replacement
Remove the driver's dashboard lower cover {see page 20-60).
Remove the steering column covers (see page 17-9).
Disconnecl the 14P connector (A) from the wiper/washer switch {B)
Remove the two screws, then pull out the wiper/washer switch.
Inspect the connector terminals to be sure they are all making good contact.
. lf the terminals are bent, loose or corroded, repairthem as necessary, and recheck the system..lftheterminalslookOK,checkforcontinuitybetweentheterminalsineachswitchpositlonaccordingtothe
tables,- lf the continuity is not as speciiied, replace the switch.
Terminal
Position6414l21211
OFFo--{
tNlo-
LOo-
HI
Mist switch ONr
Washor 3witch ON
22-140
J
Page 972 of 1139
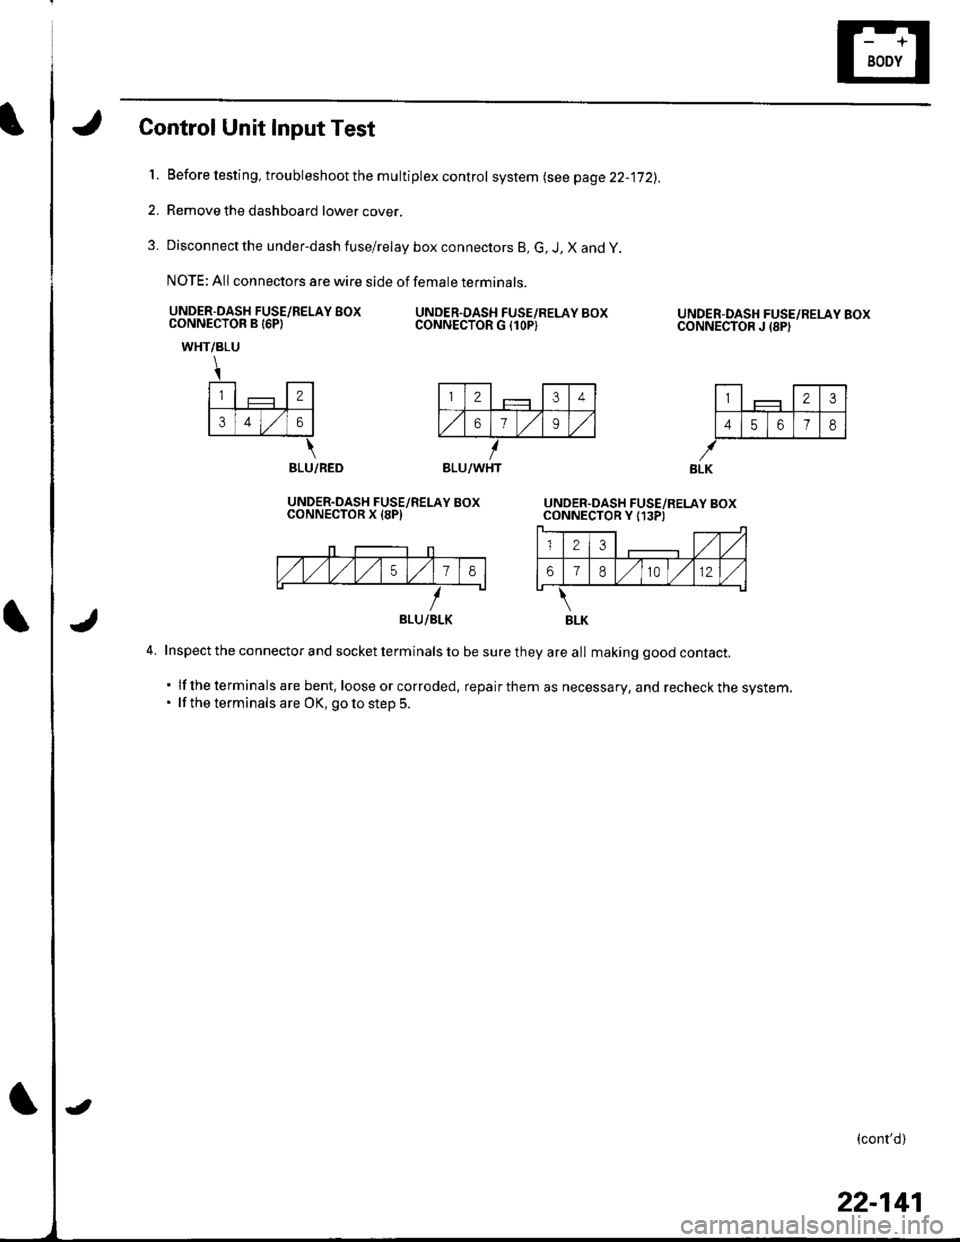
Control Unit Input Test
l.Before testing, troubleshoot the multiplex control system lsee page 22-jj2).
Remove the dashboard lower cover,
Disconnect the under-dash fuse/relay box connectors B, G, J, X and y
NOTE: All connectors are wire side of female terminals.
UNDER-DASH FUSE/RELAY BOXCONNECTOR B I6PIUNDER.DASH FUSE/RELAY BOXCONNECTOR G {1OP)
2.
3.
UNDER-DASH FUSE/RELAY BOXCONNECTOR J {8PI
l-,1 - llTtlF_j-JF-#
141516 7l8l
WHT/BLU
\
l-,1 - l-rl€ll
lslrlzlol
\BLU/RED
UNDER.DASH FUSE/RELAY BOXCONNECTOR X I8PI
4. Inspect the connector and socket terminals to be sure they are all making good contact.
. lf the terminals are bent, loose or corroded, repairthem as necessary, and recheckthe system.. lf the terminals are OK, goto step 5.
(cont'd)
BLU/WHT
BLU/BLK
22-141
Page 984 of 1139
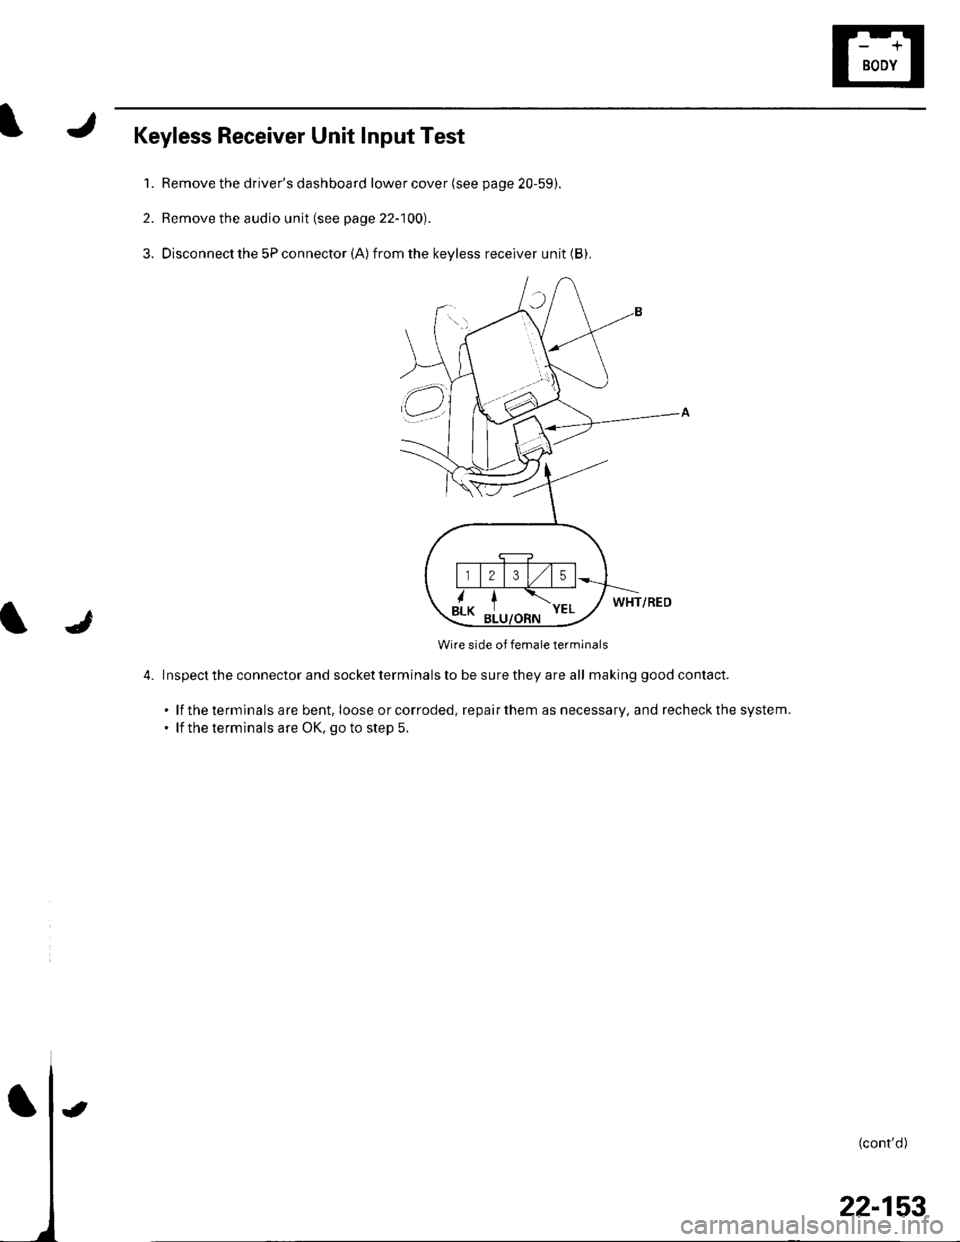
Keyless Receiver Unit Input Test
1. Remove the driver's dashboard lower cover (see page 20-59).
2. Remove the audio unit (see page 22-100).
3. Disconnect the 5P connector (A)from the keyless receiver unit (B).
WHT/RED
Wire side of female terminals
4. Inspecttheconnectorandsocketterminalstobesuretheyareall ma king good contact.
. lf the terminals are bent. Ioose orcorroded, repairthem as necessary, and recheckthe system.. lf the terminals are OK, go to step 5.
l
(cont'd)
t
22-153
Page 986 of 1139
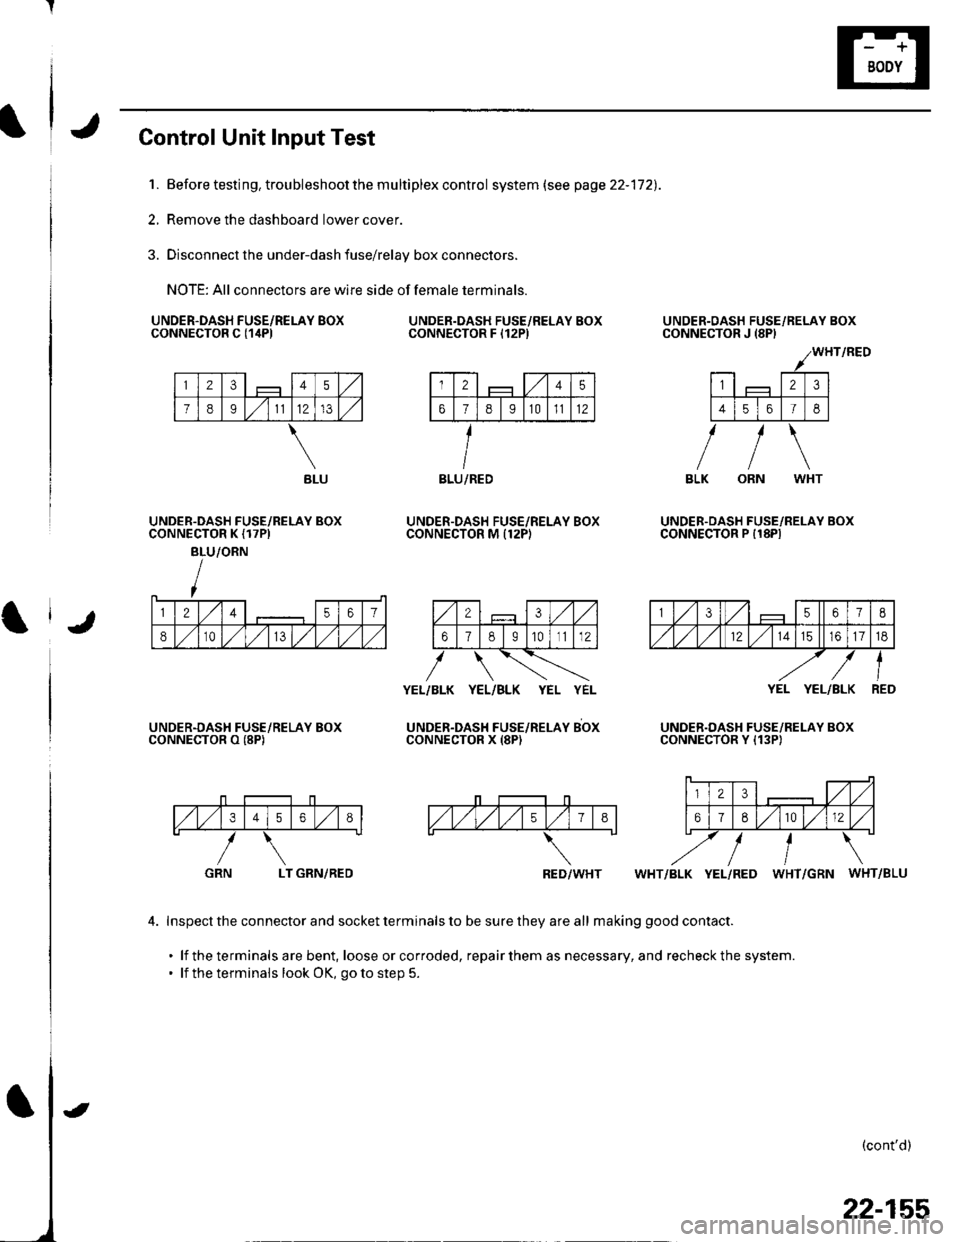
Control Unit Input Test
1. Before testing, trou bleshoot the m u ltiplex contro I system (see page 22-172).
2, Remove the dashboard lower cover.
3. Disconnect the under-dash fuse/relay box connectors.
NOTE: All connectors are wire side of female terminals.
UNDER.DASH FUSE/RELAY BOXCONNECTOR C {1itPlUNDER.DASH FUSE/RELAY BOXCONNECTOR F I12P)
UNDER.DASH FUSE/RELAY BOXCONNECTOR M Il2PI
UNDER-OASH FUSE/RELAY BOXCONNECTOR J {8PI
UNDER.OASH FUSE/RELAY BOXCONNECTOR P I18PIUNDER.DASH FUSE/RELAY BOXCONNECTOR K {17PI
BLU/ORN
UNDER.DASH FUSE/RELAY BOXCONNECTOR O (8P)
YEL/BLK YEL/BLK YEL YEL
UNDER-DAsH FUsE/neLeY sbxCONNECTOR X (8P)
YEL YEL/BLK
UNDER.DASH FUSE/RELAY BOXCONNECTOR Y {13P)
,/1,/34568
LT GRN/REDWHT/BLK YEL/RED WHT/GRN WHT/BLU
4. Inspect the connector and socket terminals to be sure they are all making good contact.
. lf the terminals are bent, loose orcorroded, repairthem as necessary, and recheckthe system.. lf the terminals look OK, go to step 5.
(cont'd)
GRN
BLU/REDBLU
RED/WHT
22-155
Page 996 of 1139
)
I
Troubleshooting
Before troubleshooting the immobilizer system,
troubleshoot any EClvl Diagnostic Trouble Codes (DTCS)
(see page 11-3), and make sure the ECM has no
malfunction.
Note these items before trou bleshooting:
. Due to the action of the immobilizer system, the
engine takes slightly more time to start than on a
vehicle without an immobilizer system.. When the system is normal, and the proper key is
inserted, the indicator light comes on for 2 seconds,
then it will go off.. If the indicatorstartsto blink after 2 seconds, or if the
engine does not start. remove any other immobilizer
keys or large key fobs on the key ring, then repeat the
starting procedure.
lf the engine still does not start, continue with thisprocedure.
1. Turn the ignition switch ON {ll) with proper key.
2. Check to see if the immobilizer indicator light
comes on.
Does the indicator light blink?
YES Disconnect the 7P connector from the
immobilizer control unit-receiver, then go to step 9.
NO Check for these problems, then go to step 3.
. Blown No. 9 (10A)fuse in the under-hood
fuse/relay box.I. An open in the wire between the gauge assembly
and the immobilizer control unit-receiver.l. A faulty immobilizer indicator light,I. An open in the wire between the gauge assembly
and the under-hood fuse/relay box.l
Remove the driver's dashboard lower cover (see
page 20-59).
Remove the steering column lower cover (see page
11-9).
l
-_--t
22-165
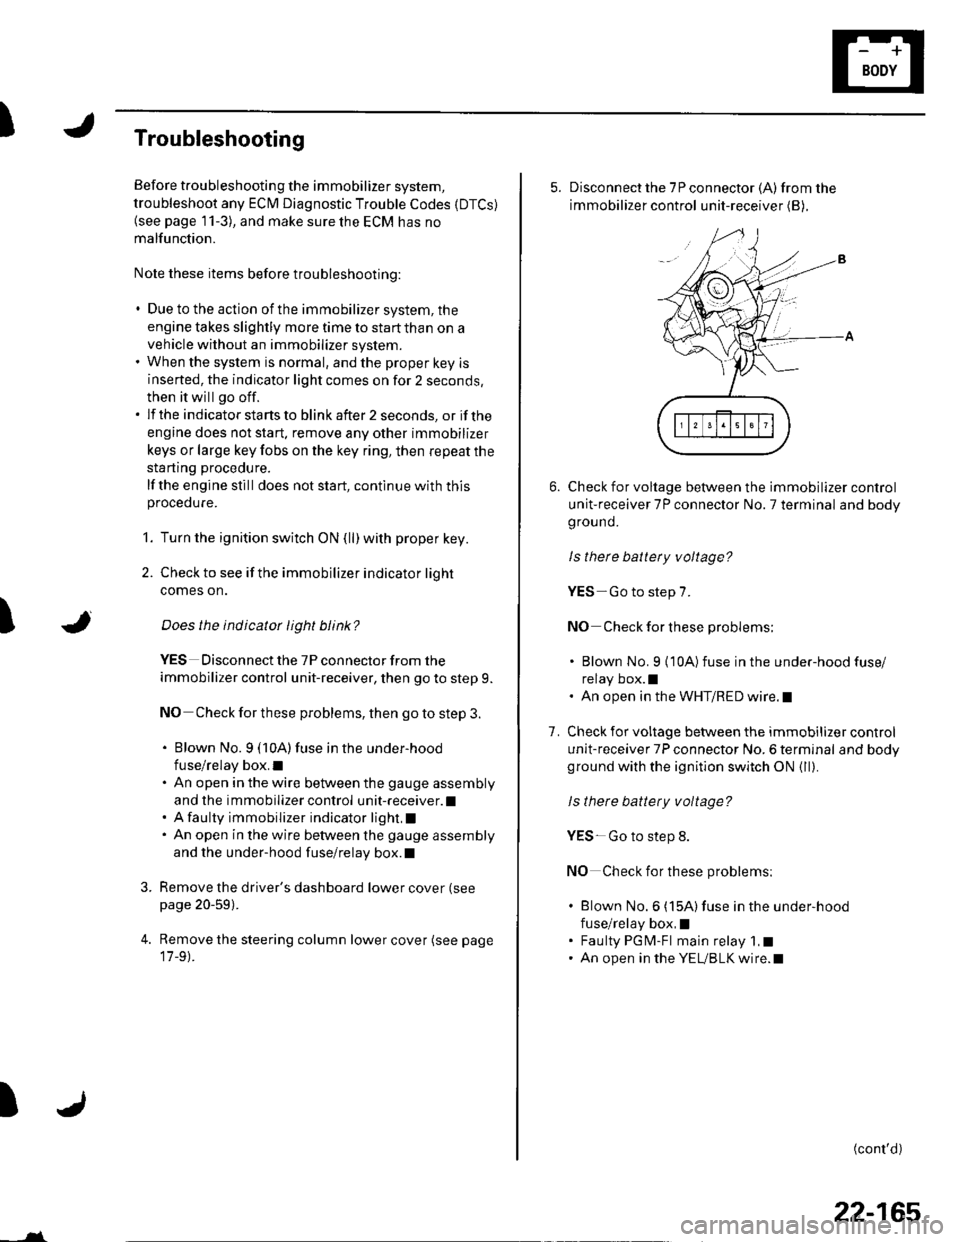
5. Disconnect the 7P connector (A)from the
immobilizer control unit-receiver (B),
Check for voltage between the immobilizer control
unit-receiver 7P connector No. 7 terminal and body
ground.
ls there battery voltage?
YES-Go to step 7.
NO Check for these problems;
. Blown No. 9 {10A)fuse in the under-hood fuse/
relay box.l. An open in the WHT/RED wire.l
Check for voltage between the immobilizer control
unit-receiver 7P connector No. 6 terminal and bodyground with the ignition switch ON {ll).
ls there battery voltage?
YES- Go to step 8.
NO Check for these problems:
. Blown No.6 (15A)fuse in the under-hood
fuse/relay box,I. Faulty PGM-Fl main relay 1,t. An open in the YEUBLK wire.l
1.
(cont'd)