HONDA CIVIC 2003 7.G Workshop Manual
Manufacturer: HONDA, Model Year: 2003, Model line: CIVIC, Model: HONDA CIVIC 2003 7.GPages: 1139, PDF Size: 28.19 MB
Page 441 of 1139
Countershaft Assembly Clearance lnspection
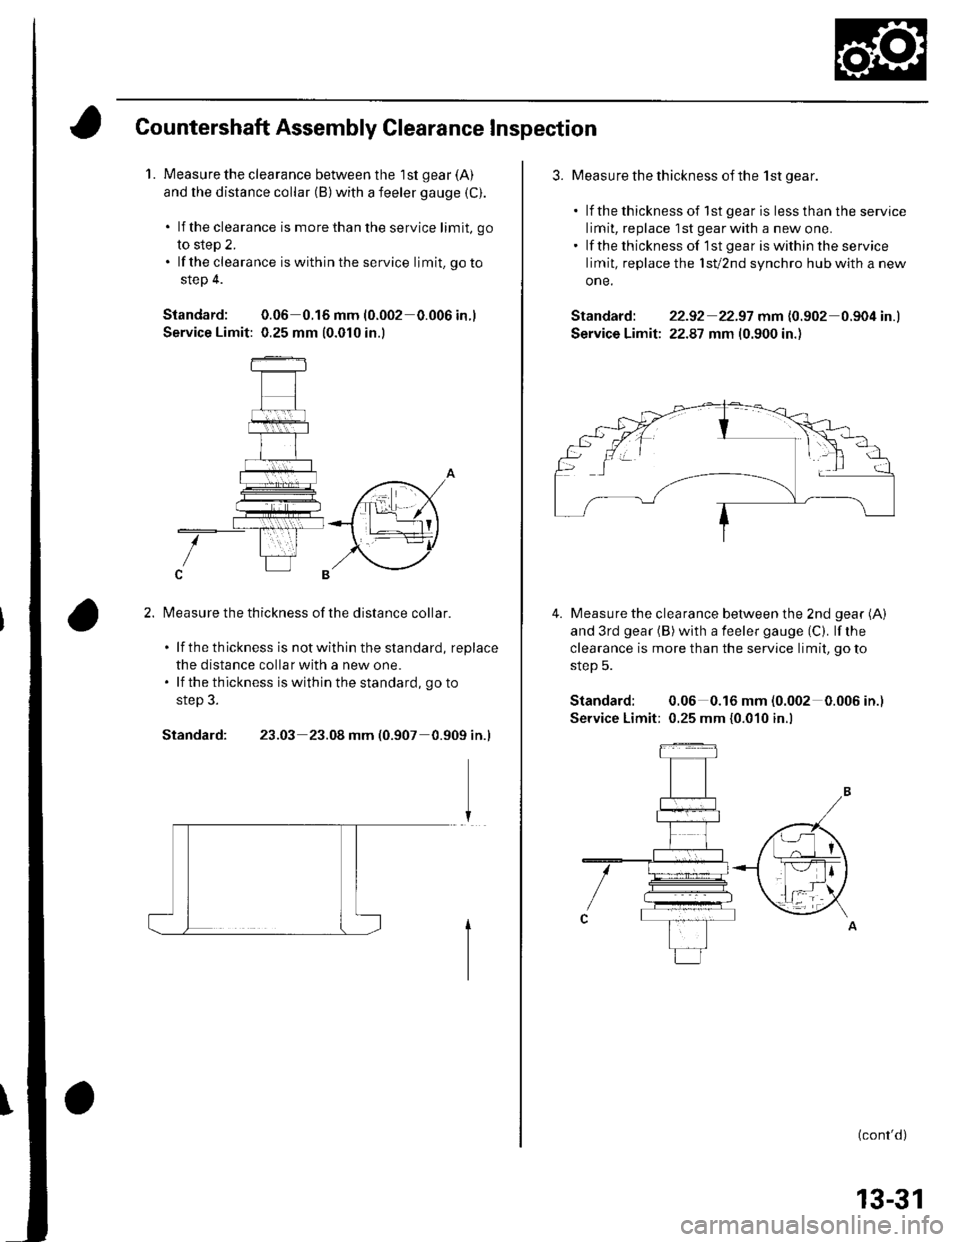
1.Measure the clearance between the 1st gear (A)
and the distance collar (B)with a feeler gauge (C).
. lf the clearance is more than the service limit, go
to step 2.. lf the clearance is within the service limit. go to
step 4.
Standard: 0.06 0.16 mm 10.002 0.006in.l
Service Limit: 0.25 mm (0.010 in.l
2. fvleasure the thickness of the distance collar.
. lf thethickness is notwithin the standard, replace
the distance collar with a new one.' lf the thickness is within the standard, go to
Standard:23.03 23.08 mm (0.907 0.909 in.l
3. Measu re the thickness of the 1st oear.
. lf thethicknessof lst gearis lessthanthe service
limit, replace lstgearwith a newone.. lf the thickness of '1st gear is within the service
limit, replace the lst/2nd synchro hub with a new
one.
Standard: 22-92 22.97 mm 10.902 0.904 in.l
Service Limit; 22.87 mm {0.900 in.)
Measure the clearance between the 2nd gear (A)
and 3rd gear (B) with a feeler gauge (C). lf the
clearance is more than the service limit, go to
steD 5.
Standard: 0.06 0.16 mm (0.002 0.006in.)
Service Limit: 0.25 mm {0.010 in.l
4.
(cont'd)
13-31
Page 442 of 1139
Manual Transmission
Countershaft Assembly Clearance
Inspection (cont'd)
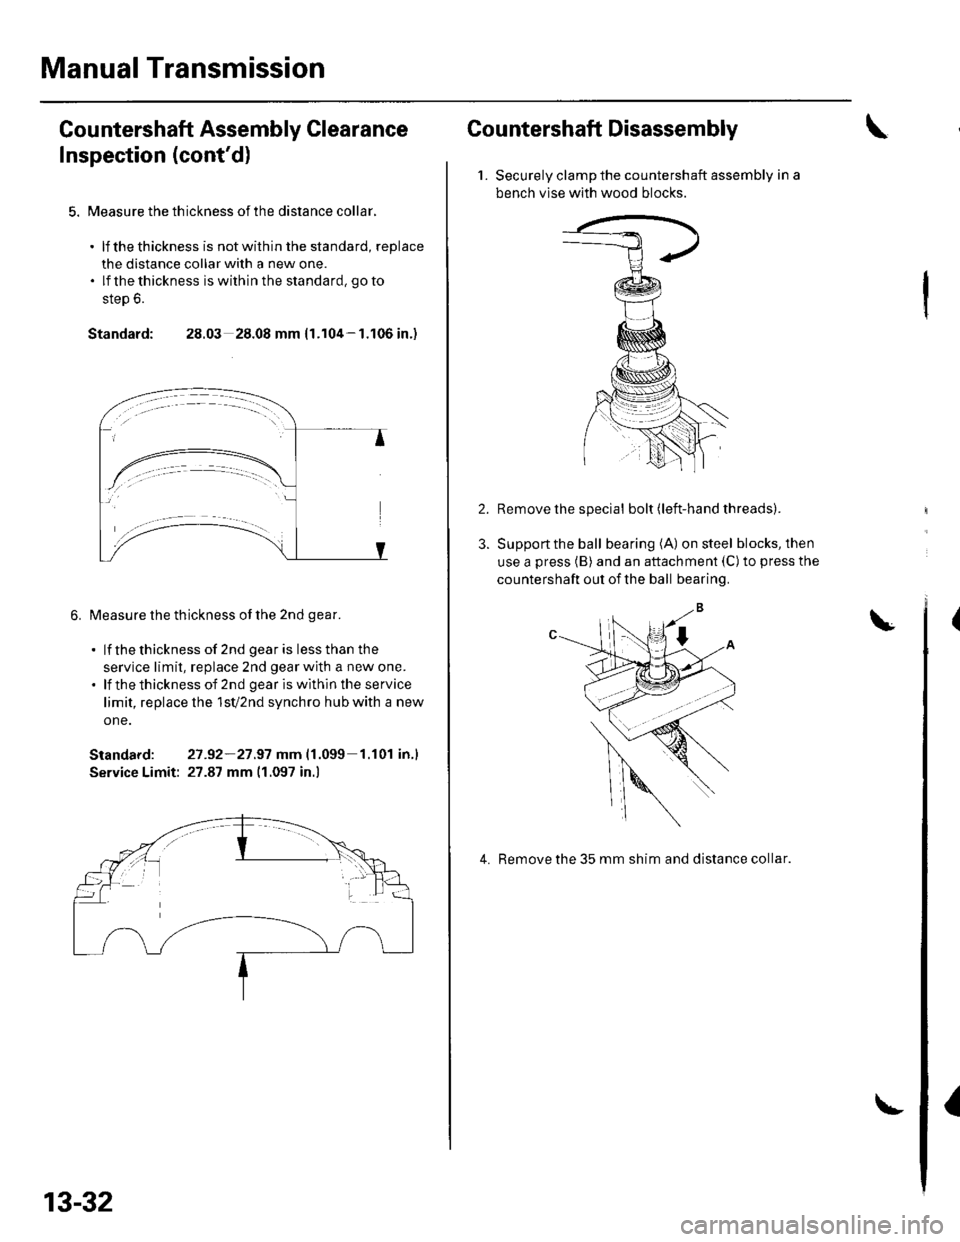
5. Measure the th ickness of the distance collar.
. lf thethickness is notwithin the standard, replace
the distance collar with a new one.. lf thethickness iswithinthe standard, goto
step 6.
Standard: 28.03 28.08 mm {1.104-1.106 in.)
6. Measure the thickness of the 2nd qear.
. lf thethickness of 2nd gearis lessthan the
service limit, replace 2nd gear with a new one.. lf thethicknessof 2nd geariswithintheservice
limit, replace lhe 1sV2nd synchro hub with a new
one.
Standard: 27 -92-21.97 mm|.1.099 1.r01 in.l
Service Limit: 27.87 mm 11.097 in.)
13-32
Countershaft Disassembly
1.Securely clamp the countershaft assembly in a
bench vlse with wood blocks.
Remove the special bolt (left-hand threads).
Support the ball bearing (A) on steel blocks, then
use a press (B) and an attachment (C)to press the
countershaft out of the ball bearing.
4. Remove the 35 mm shim and distance collar.
I
Page 443 of 1139
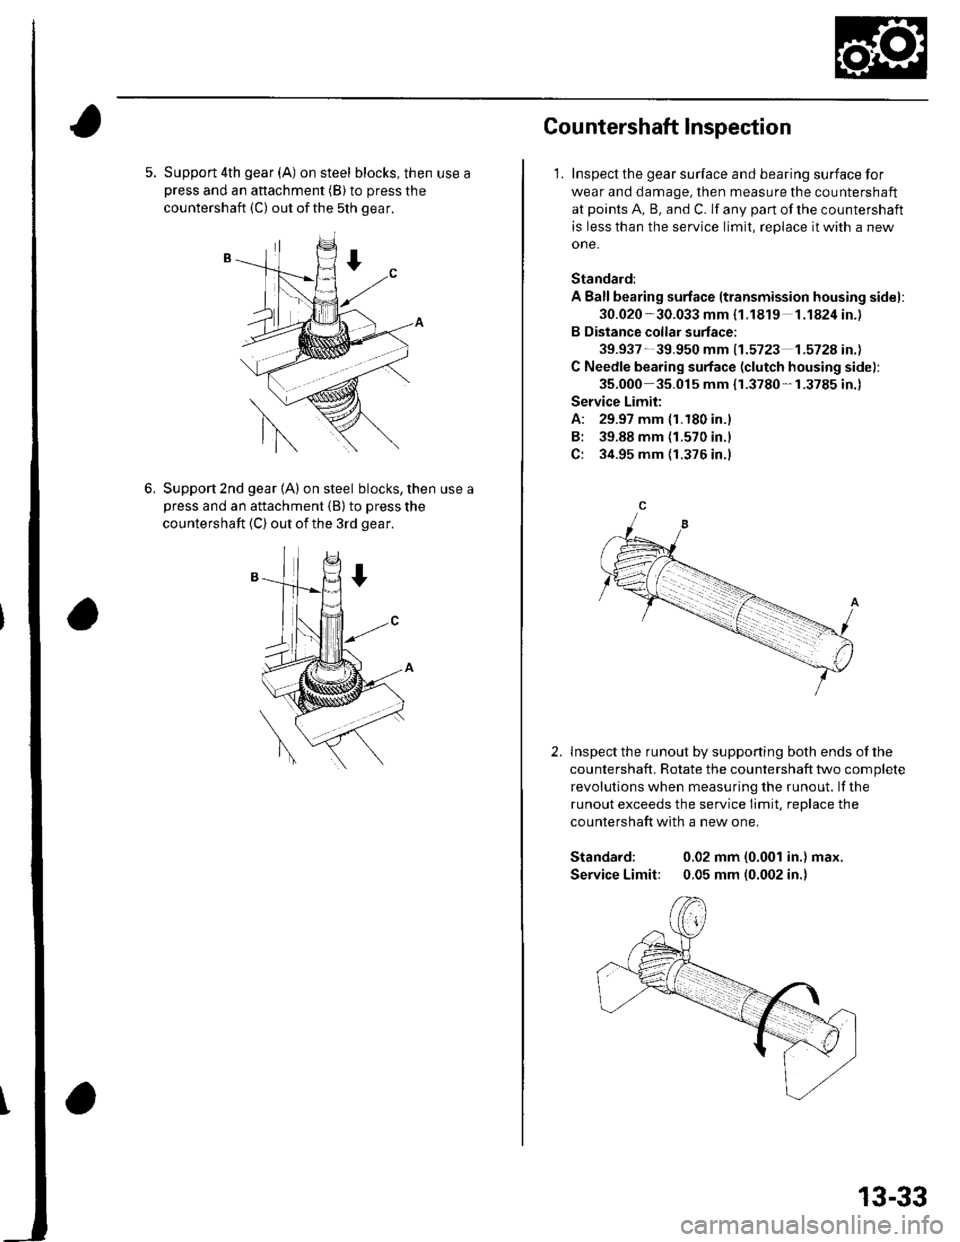
5. Support 4th gear (A) on steel blocks, then use apress and an attachment (B) to press the
countershaft (C) out ofthe 5th gear.
6.Support 2nd gear (A) on steel blocks, then use a
Dress and an attachment {B} to press the
countershaft (C) out of the 3rd gear.
Cou ntershaft lnspection
1. Inspect the gear surface and bearing surface for
wear and damage, then measure the countershaft
at points A, B, and C. lf any part of the countershaft
is less than the service limit, replace it with a new
one.
Standard:
A Ballbearing surface ltransmission housing sidel:
30.020 -30.033 mm {1.1819 1.1824in.)
B Distance collar surface;
39.937- 39.950 mm 11.5723 1.572A in.l
C Needle bearing surface (clutch housing side):
35.000 35.015 mm {r.3780-1.3785 in.)
Service Limit:
A: 29.97 mm {1.180 in.)
B: 39.88 mm {1.570 in.l
C: 34.95 mm {1.376 in.)
lnspect the runout by supporting both ends of lhe
countershaft. Rotate the countershaft two complete
revolutions when measuring the runout. lf the
runout exceeds the service Iimit, replace the
countershaft with a new one.
Standard: 0.02 mm (0.001 in.) max.
Service Limit: 0.05 mm (0.002 in.)
2.
13-33
Page 444 of 1139
Manual Transmission
(
(
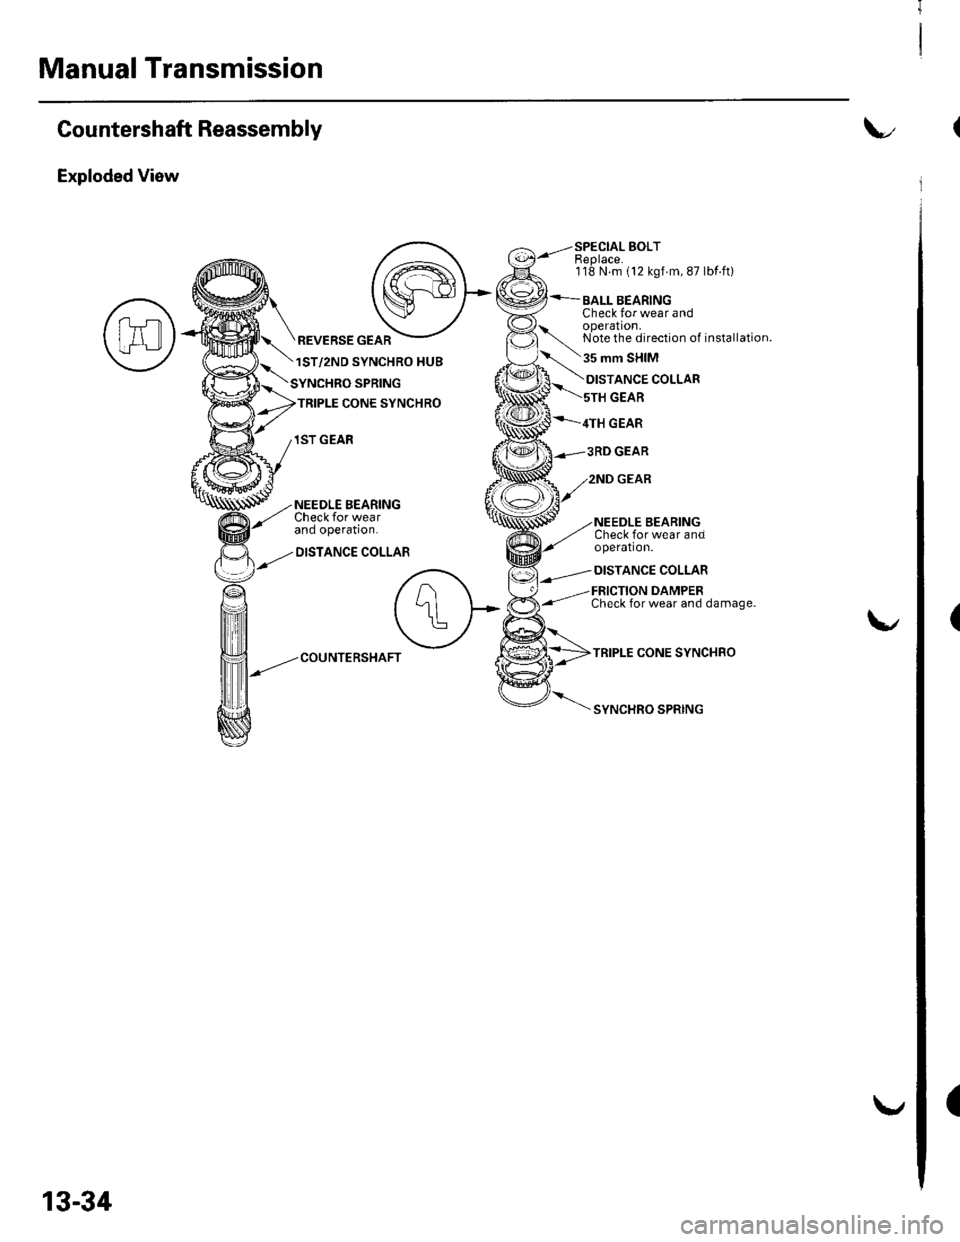
Countershaft Reassembly
Exploded View
SPECIAL BOLTEeplace.118 N.m (12 kgf m, 87 lbf ft)
BALL BEARINGCheck for wear andoperation.Note the direction of installation.
35 mm SHIM
REVERSE GEAR
1ST/2ND SYNCHRO HUB
SPRING
TRIPLE CONE SYNCHRO
1ST GEAR
NEEDLE BEARINGCheck for wearano opera!on.
DISTANCE COLLAR
ANCE COLLAR
GEAR
4TH GEAR
Check for wear andoperation.
DISTANCE COLLAR
FRICTION DAMPERCheck for wear and damage.
TRIPLE CONE SYNCHRO
SYNCHRO SPRING
COUNTERSHAFT
13-34
Page 445 of 1139
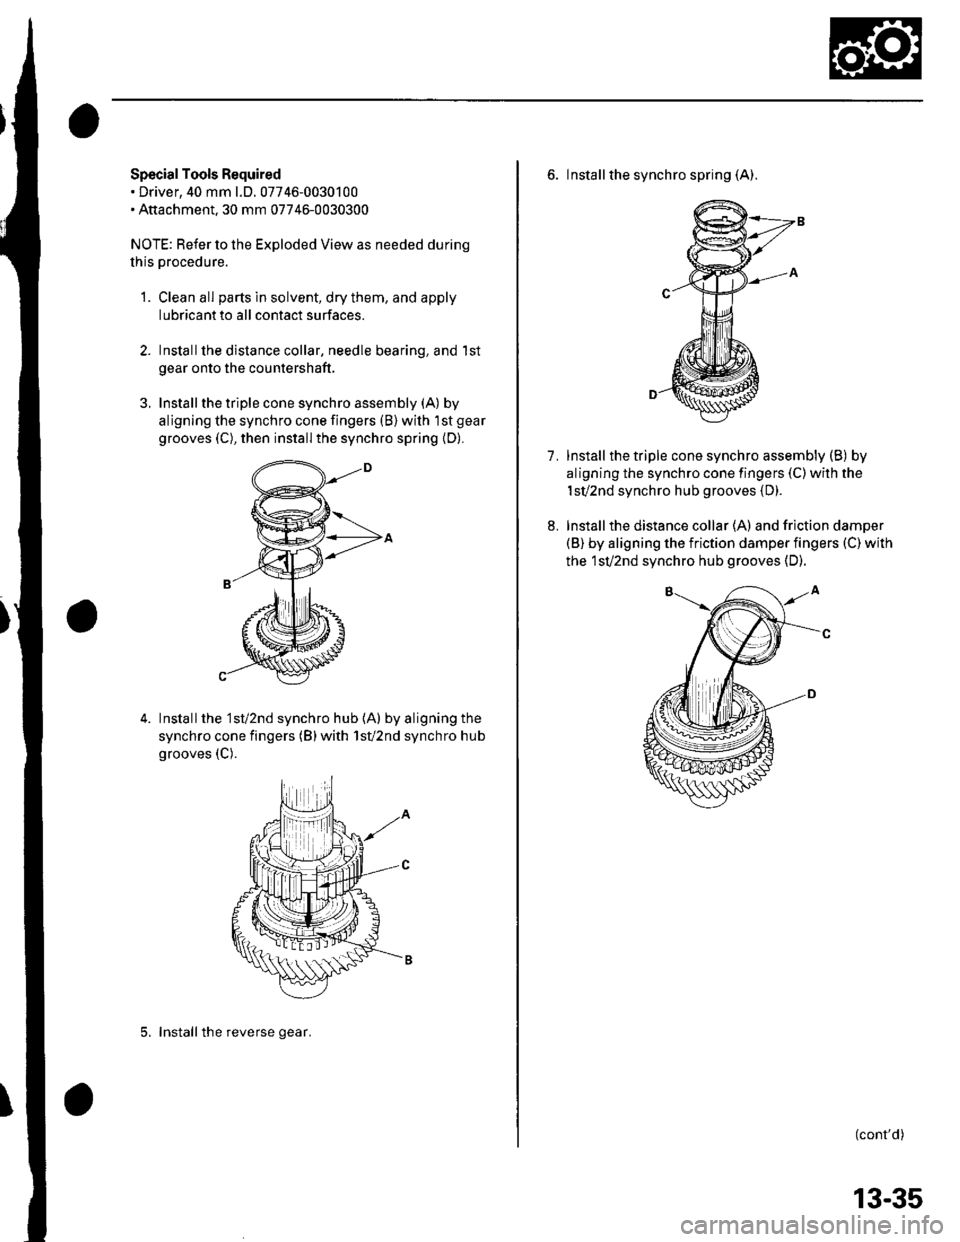
Special Tools Required. Driver, 40 mm l.D.07746-0030100. Aftachment.30 mm 07746-0030300
NOTE: Refer to the Exploded View as needed during
lhis procedure.
1. Clean all parts in solvent, dry them, and apply
lubricantto all contact surfaces.
Installthe dislance collar, needle bearing, and 1st
gear onto the countershaft.
Install the triple cone synchro assembly (A) by
aligning the synchro cone fingers (B) with 'lst gear
grooves (C), then install the synchro spring {D).
3.
Installthe '1st/2nd synchro hub (A) by aligning the
synchro cone fingers (B)with 1sV2nd synchro hub
grooves (C).
5. Installthe reverse gear.
13-35
6. Installthe synchro spring (A).
lnstall the triple cone synchro assembly (B) by
aligning the synchro cone fingers (C) with the
1sv2nd synchro hub grooves (D).
Installthe distance collar (A) and friction damper(B) by aligning the friction damper fingers (C) with
the 1sv2nd synchro hub grooves (D).
1.
8.
(cont'd)
Page 446 of 1139
Manual Transmission
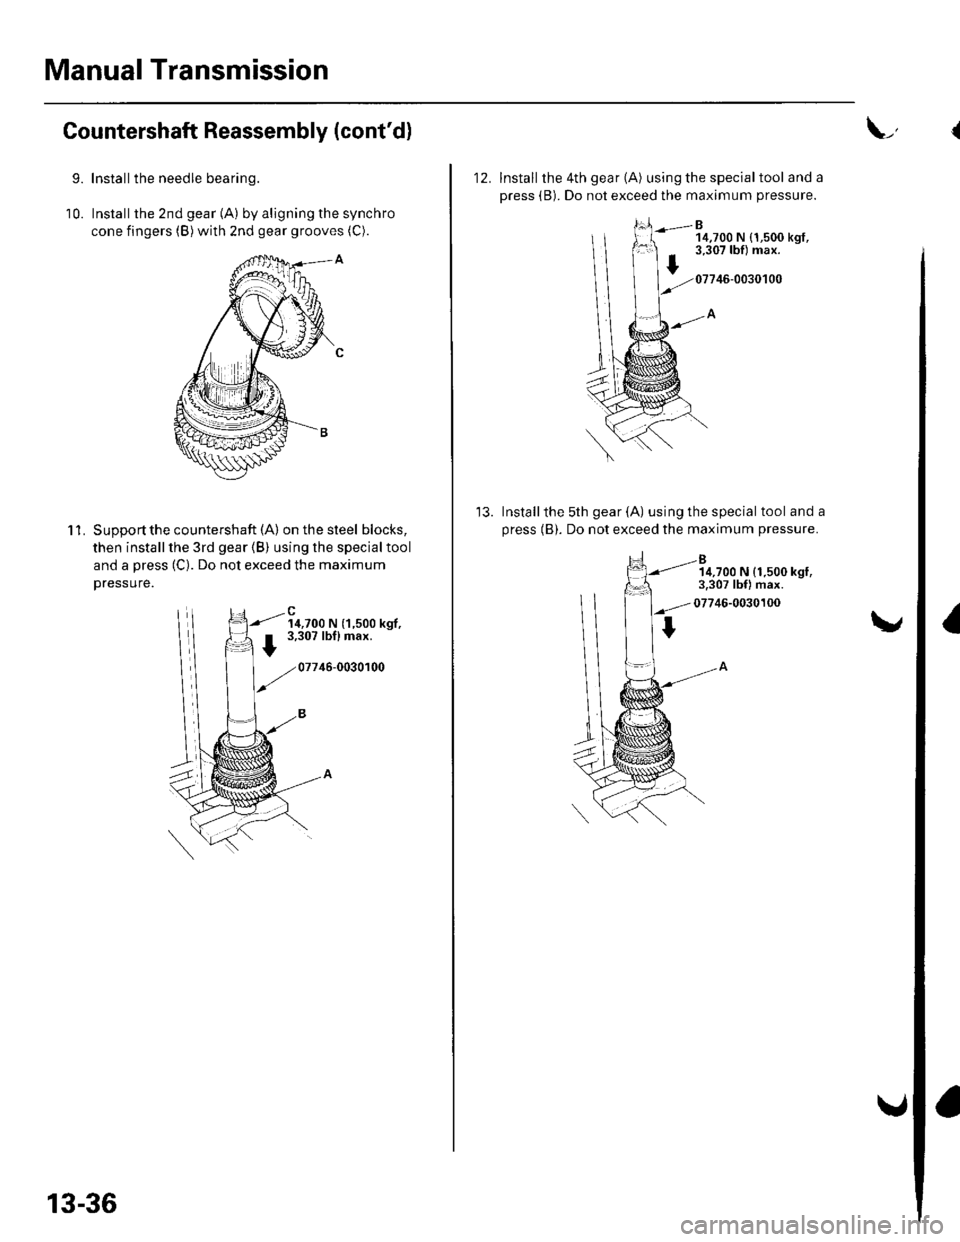
10.
Countershaft Reassembly (cont'dl
9.Install the needle bearing.
Installthe 2nd gear (A) by aligning the synchro
cone fingers (B) with znd gear grooves (C).
'l 1.Supoort the countershaft (A) on the steel blocks,
then install the 3rd gear (B) using the special tool
and a press (C). Do not exceed the maximum
Dressure.
14,700 N (1,500 kgf,3,307 lbflmax.
07746-0030100
13-36
L,
12. Install the 4th gear (A) using the specialtool and a
press (B). Do not exceed the maximum pressure.
B14,700 N {1,500 kgt,3,307 lbf) max.
07746-0030100
Installthe 5th gear (A) using the special tool and a
press (B). Do not exceed the maximum pressure.
14,700 N (1.500 kgl,3.307 lbf) max.
07746-0030100
I
Page 447 of 1139
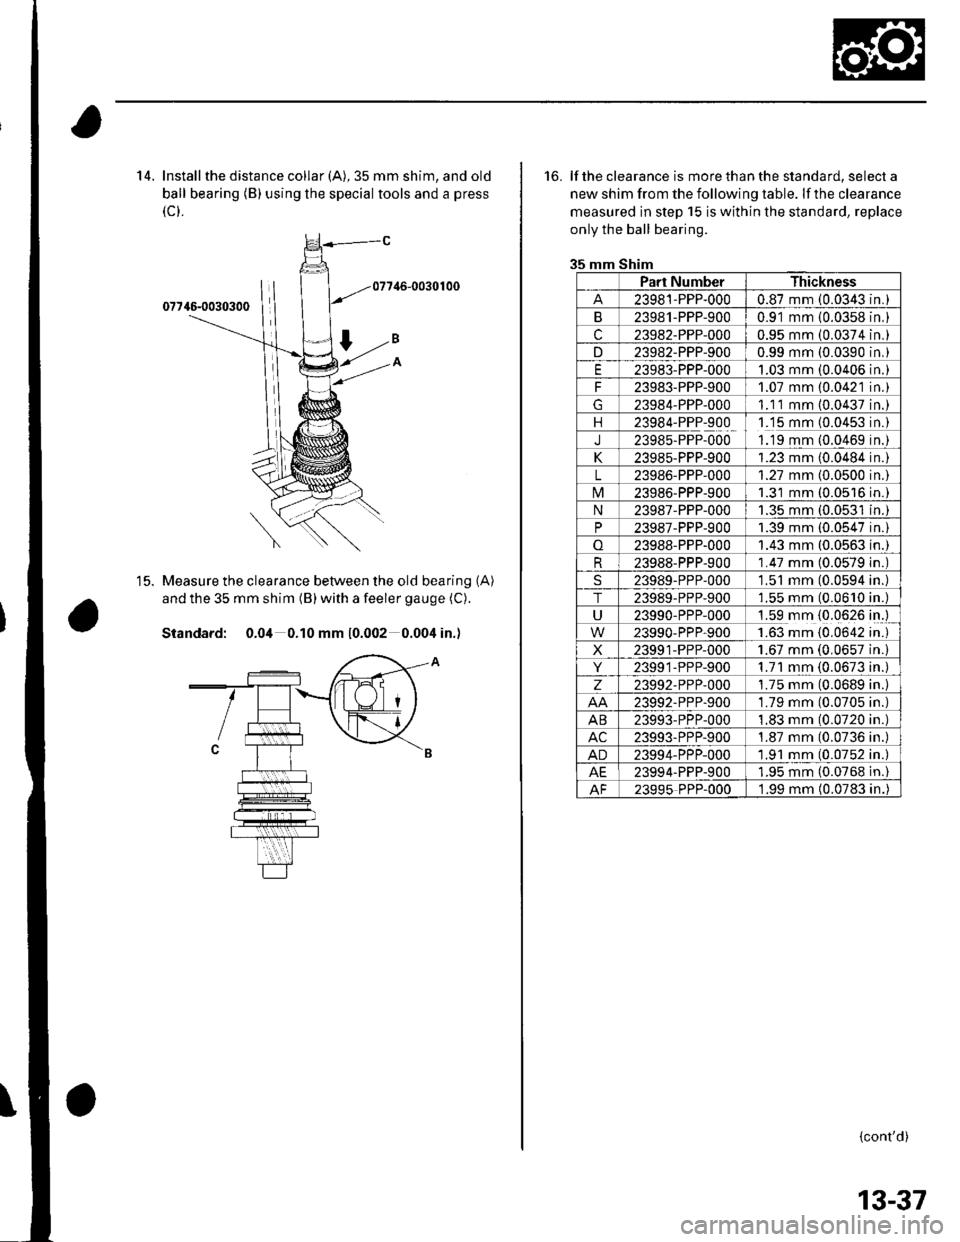
14. Install the distance collar (A), 35 mm shim, and old
ball bearing (B) using the special tools and a press
(c).
Measure the clearance between the old bearing
and the 35 mm shim (B) with a feeler gauge (C).
Standard: 0.04 0.10 mm 10.002 0.004 in.)
(A)t5.
16. lf the clearance is more than the standard, select a
new shim from the following table. lf the clearance
measured in step 15 is within the standard, replace
only the ball bearing.
35 mm Shim
Part NumberThickness
23981-PPP-0000.87 mm (0.0343n.
B23981-PPP-9000.91 mm {0.0358n,
c23982-PPP-0000.95 mm (0.0374n.
D23982-PPP-9000.99 mm (0.0390n,
E23983-PPP-0001.03 mm 10.0406n,
F23983-PPP-9001.07 mm (0.0421n.
23984-PPP-0001.1 1 mm (0.0437n.
1123984-PPP-9001.15 mm (0.0453n.
J23985-PPP-0001.'19 mm (0.0469n.
K23985-PPP-9001.23 mm (0.0484n
L23986-PPP-0001.27 mm (0.0500n.
M23986-PPP-9001.31 mm (0.0516 in.
N23987-PPP-0001.35 mm (0.0531 in.
P23987-PPP-9001.39 mm (0.0547n.
o23988-PPP-0001.43 mm (0.0563 in.
R23988-PPP-9001.47 mm (0.0579 in
23989-PPP-0001.51 mm (0.0594 in
T23989-PPP-9001.55 mm (0.0610 in
U23990-PPP-0001.59 mm {0.0626 in.
1.63 mm {0,0642 in.23990-PPP-900
X23991-PPP-0001.67 mm (0,0657 in
Y23991-PPP-9001.71 mm {0.0673 in
z23992-PPP-0001.75 mm (0.0689 in
23992-PPP-9001.79 mm (0.0705 in
AB23993-PPP-0001.83 mm (0.0720 in
AC23993-PPP-9001.87 mm (0.0736 in
AD23994-PPP-000'1.91 mm (0.0752 in
AE23994'PPP-9001.95 mm (0.0768 in.
AF23995 PPP-0001.99 mm (0.0783 in.
{cont'd)
13-37
Page 448 of 1139
Manual Transmission
Countershaft Reassembly (cont'd)
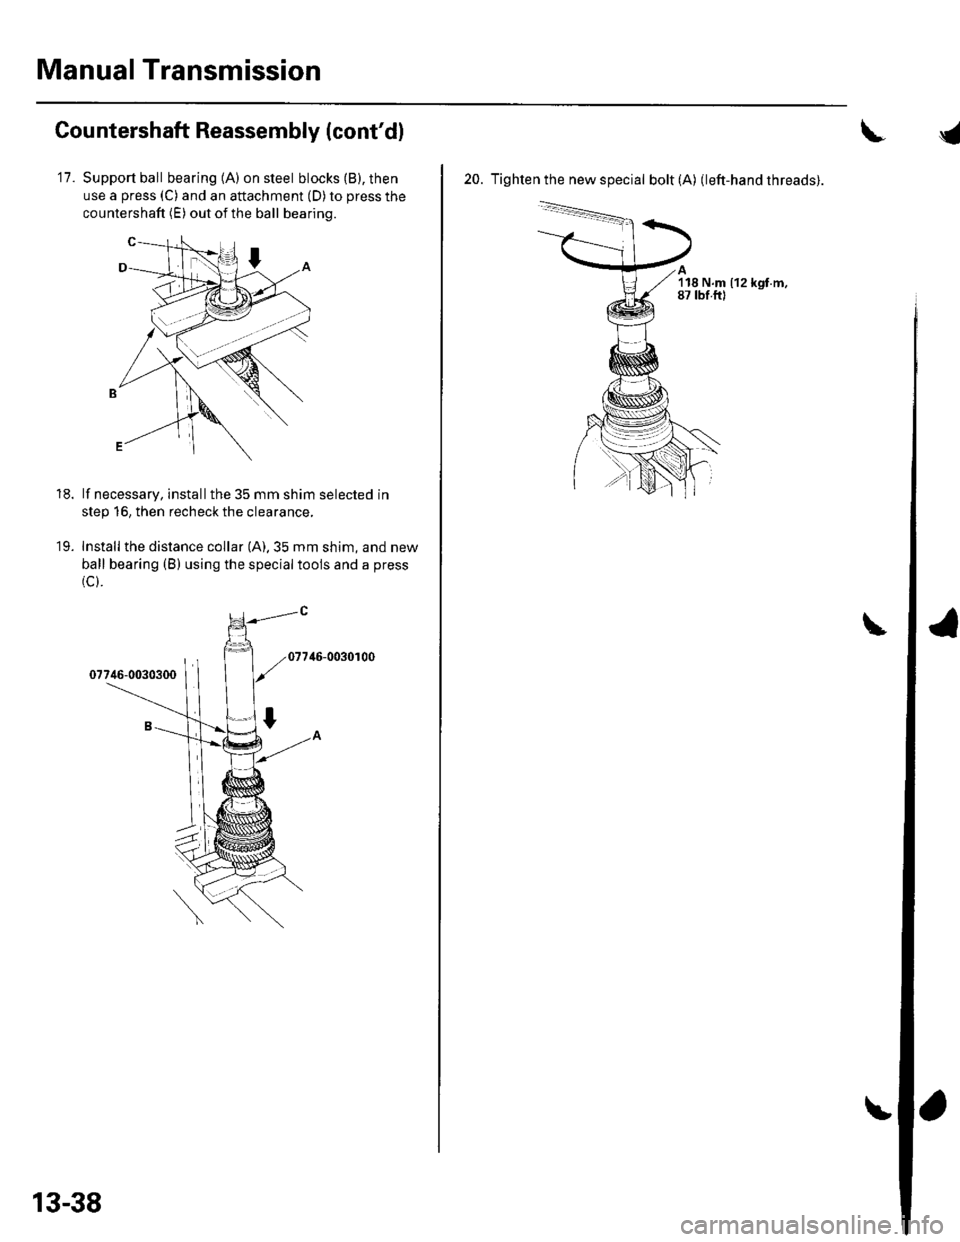
11.Support ball bearing (A) on steel blocks (B), then
use a press (C) and an attachment (D) to press the
countershaft (E) out of the ball bearing.
lf necessary, installthe 35 mm shim selected in
step 16, then recheck the clearance,
Install the distance collar (A).35 mm shim, and new
ball bearing (B) using the specialtools and a press
(c).
46-0030r00
18.
19.
13-38
20. Tighten the new special bolt (A) (left-hand threads).
'l18 N.m (12 kgf.m,87 tbf.ftl
Page 449 of 1139
\
Synchro Sleeve and Hub Inspection
and Reassembly
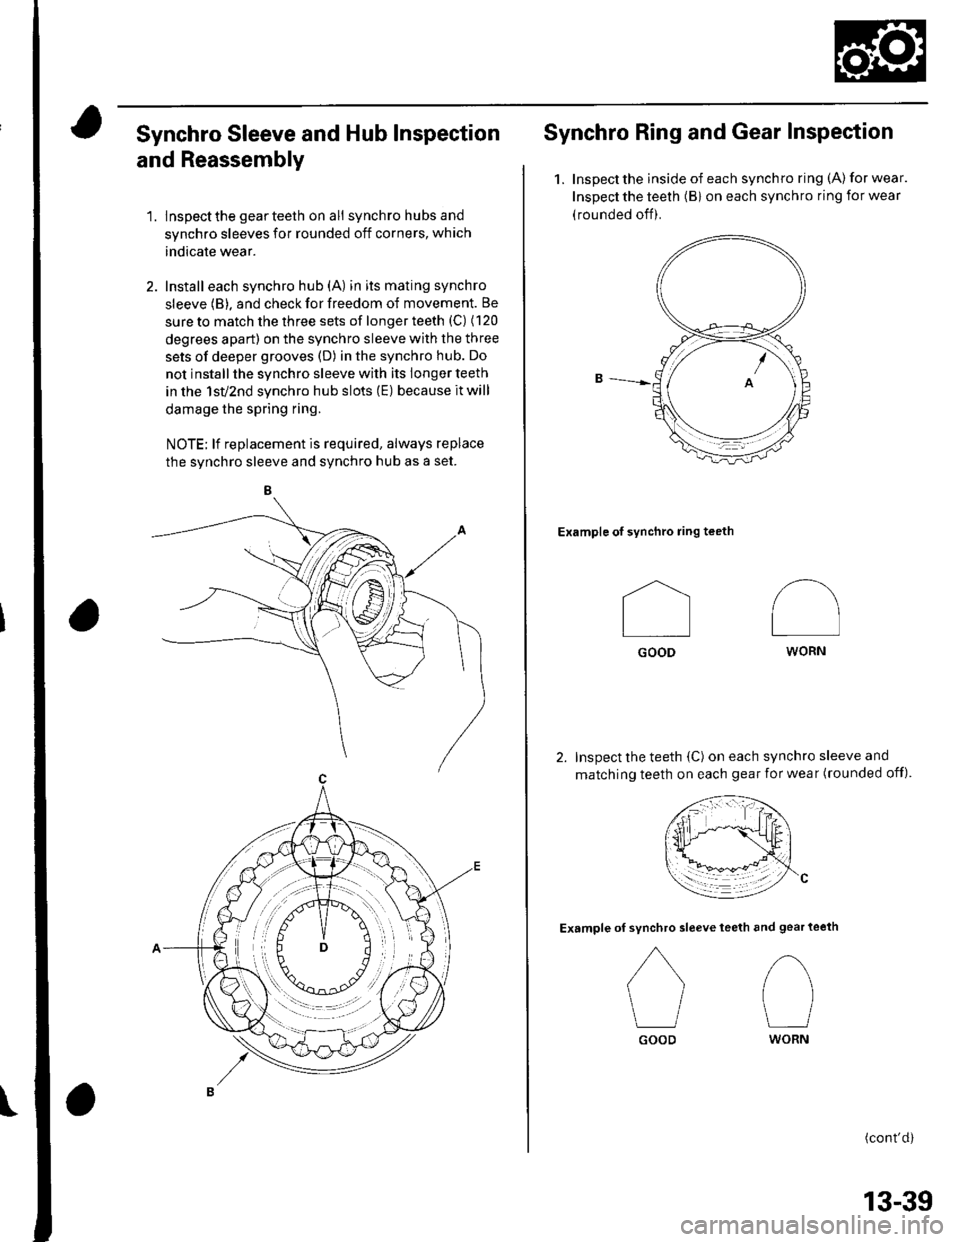
1. lnspectthe gearteeth on ali synchro hubs and
synchro sleeves for rounded off corners, which
indicate wear.
2. Install each synchro hub (A) in its mating synchro
sleeve (B), and check for freedom of movement. Be
sure to match the three sets of longer teeth (C) (120
degrees apart) on the synchro sleeve with the three
sets of deeper grooves (D) in the synchro hub. Do
not install the synchro sleeve with its longer teeth
in the 1sv2nd synchro hub slots (E) because it will
damage the spring ring.
NOTE; lf replacement is required, always replace
the svnchro sleeve and svnchro hub as a set.
Synchro Ring and Gear Inspection
1.Inspect the inside of each synchro ring (A) for wear.
Inspect the teeth (Bi on each synchro ring for wear
(rounded off).
Example of synchro ring teeth
Inspect the teeth (C) on each synchro sleeve and
matching teeth on each gear for wear (rounded off).
Example ofteeth and gear teeth
(cont'd)
I
Il
GOOD
synchro sleeve
GOOD
/\
I
WORN
tl
WORN
13-39
Page 450 of 1139
Manual Transmission
Synchro Ring and Gear Inspection (cont'dl
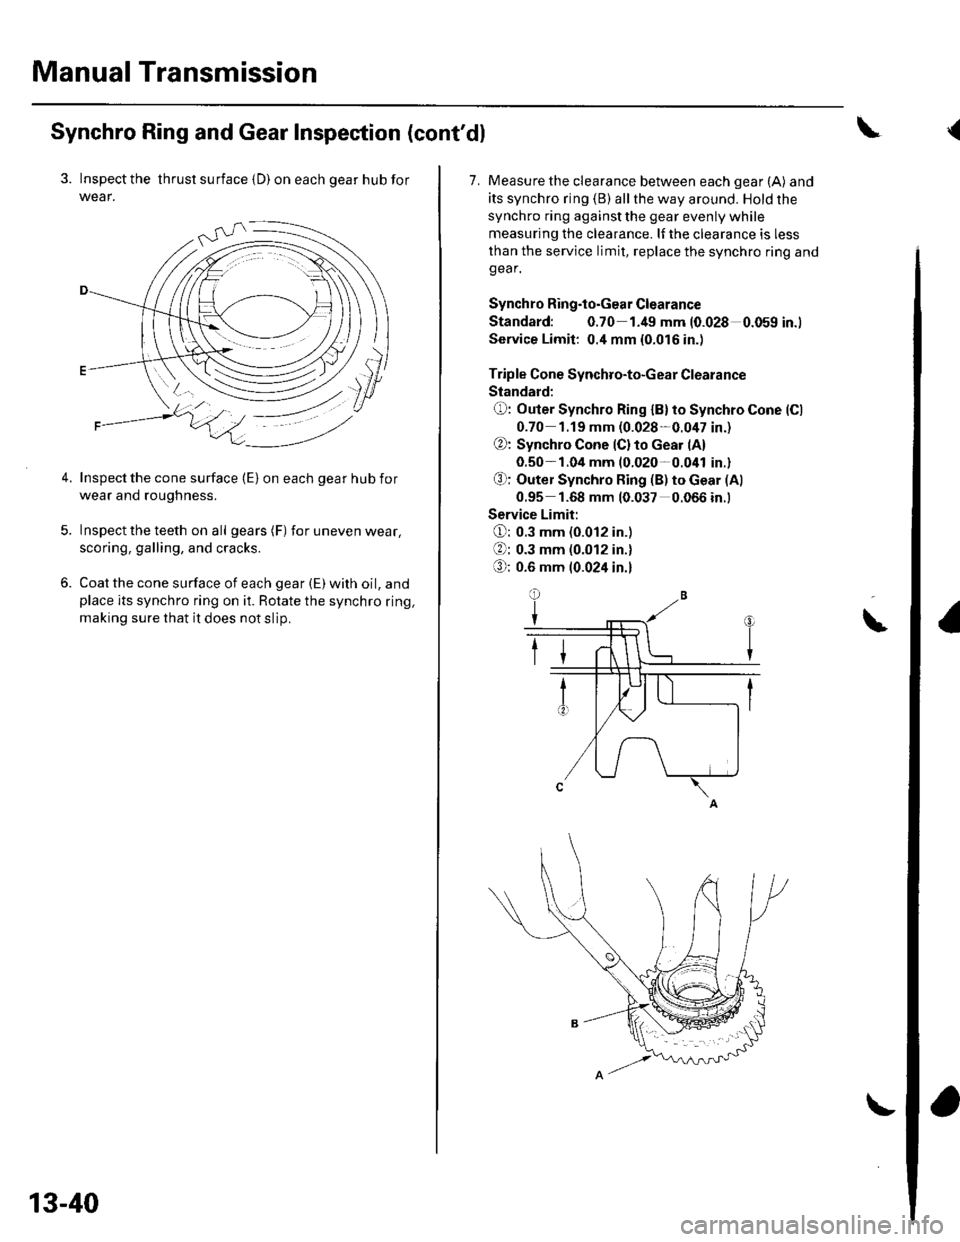
3. Inspect the thrust surface {D) on each gear hub for
wear.
Inspect the cone surface (E) on each gear hub for
wear ano rougnness.
Inspect the teeth on all gears (F) for uneven wear,
scoring, galling, and cracks.
Coat the cone surface of each gear (E) with oil, andplace its synchro ring on it. Rotate the synchro ring,
making sure that it does not slip.
13-40
\
7. Measure the clearance between each gear (A) and
its synchro ring (B) allthe way around. Hold the
synchro ring against the gear evenly while
measuring the clearance. lf the clearance is less
than the service limit, replace the synchro ring andgear.
Synchro Ring.to.Gear Clearance
Standard: 0.70 1.49 mm 10.028 0.059 in.)
Service Limit: 0.4 mm {0.016 in.)
Triple Cone Synchro-to-Gear Clearance
Slandard:
O: Outer Synchro Ring {B}to Synchro Cone (Cl
0-70 1.19 mm (0.028-0.047 in.)
@: Synchro Cone lC) to cear (A)
0.50- 1.04 mm (0.020-0.041 in.)
O: Outer Synchro Ring (B) to Gear (Al
0.95 1.68 mm 10.037 0.066 in.)
Service Limit:
O: 0.3 mm (0.012 in.)
: 0.3 mm (0.012 in.)
O; 0.6 mm 10.024 in.l
\
{